After Effects 3 - Keyframes Interpolation - Using illustrator paths
* Interpolate - To insert between two fixed points
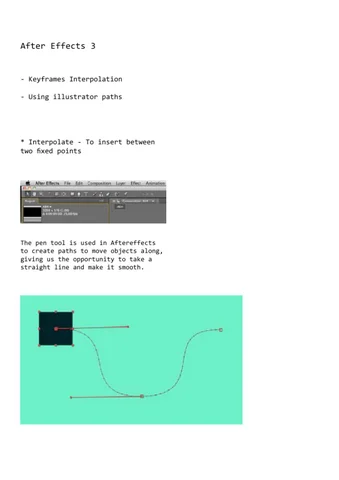
The pen tool is used in Aftereffects to create paths to move objects along, giving us the opportunity to take a straight line and make it smooth.
Keyframe Interpolation
By selecting ‘Animation’ then keyframe interpolation, it gives us the opportunity to select linear with spatial interpolation
Doing this allows us to create straight paths as apposed to bezier curves.
Temporal Interpolation
We can also select to hold keyframe, this keeps the key frame the same, choosing this removes the dots along the paths were the object moves.
This then stops the object moving inbetween anchor points and just makes it jump from one to the next.
Using the Hold Option
We can use the hold option for certain tasks such as making a word flash, and also for things like making the hand of a clock tick.
Moving Keyframes
If we press alt. whilst all the keyframes are selected then move either the first of last keyframe it can push them together making what happens inbetween the first and last keyfrsame happen faster with the same ratio between each one.
Roving across time.
Roving across time, changes the pace of the animation, meaning that instead of staying fixed to its allocated time, it keeps a steady pace equally throughout the animation.tt
These then appear as small circular dots as apposed to diamonds.
Auto Orientation.
Layer - transform - auto orient, this makes the object move around the path with an orientation.
Masks.
to create a shape other than a quare or rectangle, we must use, layer - solid - then make composit size to fill the sceen an after that select the shapes tool and use elipsis and drag the shape over your document.
We also have many ways to work with this mask, with different selections form a normal object.
Mask Path.
Using the mask path tool we can change the shape through time in our animation this, by doing this we create a morphing effect, this could work nicely with my splat for my bounce animation.
Mask Path Reveal.
we are now going to use a mask path rectangle to reveal the word we chose.
Melt.
To paste objects into aftereffects we must first create a solid background comp. size, then paste the object we want in as a mask. ‘M’
is the mask property shortcut.
Dots.
Clouds.
To show only opacity with certain images like polka dots in the shape of a word put the word on top of the dots and to then select switch to modes and select alpha matte.
We are now going to animate a certain PSD file that is much larger than the frame, the reason for this is so we can move it throughout the animation.