

FREE-STANDING GAS FIREPLACES
USER MANUAL (GB)
CARO GAS
NEXO GAS
VIVA L GAS
Q-TEE II GAS
Q-TEE II C GAS
Revision: 1
Dato: 01-01-2025
We reserve the right for any typographical errors.
CONTENTS
INTRODUCTION TO THE USER MANUAL
Gas fireplace models
Instructions for using QR codes
Serial number
GENERAL TECHNICAL INFORMATION
Remote control and range
Receiver and temperatures
Battery replacements
Code generation
Antenna
Power connection
REMOTE CONTROL OPTIONS
Remote control
PUCK
START-UP
Synchronisation of the remote control and receiver
DISPLAY AND FUNCTIONS
Setting Fahrenheit or Celsius
Setting the day and time
USING THE REMOTE CONTROL
How to switch on the fire
How to switch off the fire
Flame height adjustment
Operating modes
Auxiliary function – secondary burner function
Countdown timer for switching off the fire
Setting the child lock
Activation and deactivation of functions
USING THE PUCK (OPTIONAL)
How to switch on the fire
How to switch off the fire
Flame height adjustment
MAINTENANCE
Warranty
Service and maintenance
Cleaning
TROUBLESHOOTING AND ERRORS
Troubleshooting
DISPOSAL
Material
INTRODUCTION TO THE USER MANUAL
Congratulations on the acquisition of your new gas fireplace and on becoming a RAIS customer! You have chosen a gas fireplace where quality, design and function go hand-in-hand.
This user manual is only a basic introduction to the use and maintenance of your fireplace. For further and more detailed information, please refer to the installation manual.
It is important to note that fireplaces can be dangerous if not used correctly. Therefore, we strongly recommend that you read this user manual and the installation manual thoroughly before using your fireplace.
In this manual, we will go over the basic steps for using your fireplace. We will also provide you with some maintenance tips that will help extend the life of your fireplace and ensure that it functions optimally.
Always remember to follow the instructions in the manual when using your fireplace. If you are unsure about anything, please contact a professional for assistance.
Follow us on all of our digital platforms to get the latest tips, knowhow and inspiration.


Thank you for choosing to use our product. We wish you many cosy and safe moments in front of your fireplace!
The user manual covers the following gas fireplace models: – Caro 90, Caro 110, Caro 130 – Nexo 100, Nexo 120, Nexo 140, Nexo 160, Nexo 185 – Viva L 100, Viva L 120, Viva L 140, Viva L 160 – Q-Tee ll, Q-Tee ll C
Please read these instructions carefully so that you get the most out of your new gas fireplace.
INSTRUCTIONS FOR USING QR CODES
You will find QR codes with links to video guides in several places within the user manual.
For using the QR codes, simply open the camera on your phone and point it at the code. You will then get the option to open a link to the video guide.

WARNINGS
Please note the symbols below that indicate potentially dangerous situations.
SYMBOL DESCRIPTION


Visual sign illustrating an important notice or caution.
Visual sign illustrating a potential hazard.
PRODUCTION NUMBER
The production number is the gas fireplace’s identification number and must be used when making any enquiries relating to the fireplace’s warranty.
Find the gas fireplace’s production number on the bottom rear of the fireplace and write it down in the text box:
Production number
Note: See the drawing for the location of the production number.
Date: Dealer:


Example of production number
GENERAL TECHNICAL INFORMATION
Be aware of the following general technical information regarding the remote control and receiver unit.
REMOTE CONTROL AND RANGE
The remote control has a maximum range of 10 metres from the receiver. Placing the remote further from the receiver can interfere with the connection and may cause the need of a reset.
RECEIVER AND TEMPERATURES
The receiver will shut down if the heat exceeds the following temperatures:
• Receiver without internal batteries: 32°F to 176°F (CSA)
• Receiver with internal batteries: 32°F to 131°F (CSA)
• Receiver without internal batteries: 0°C to 80°C (CE, AGA)
• Receiver with internal batteries: 0°C to 55°C (CE, AGA)
BATTERY REPLACEMENTS
It is recommended that you replace the batteries when using the fireplace for the first time in the year.
Old or flat batteries should be removed immediately. If old/flat batteries are left in the device they can overheat, leak and/or explode.
NEVER expose batteries (this includes when they are kept in storage) to direct sunlight, strong heat, fire, humidity or violent impacts. All of these conditions can cause the batteries to overheat, leak and/ or explode.
Batteries must be stored in a location within the recommended temperature range. Temperature range batteries must be stored at 0-55°C (32-131°F).
Avoid using old and new batteries at the same time. Avoid using batteries from different manufacturers at the same time.
Low battery in the remote control is indicated by a battery icon. Frequent beeps from the receiver when the motor operates indicates low batteries in the receiver.
A power adapter connected to the socket can be used instead of batteries.
CODE GENERATION
A code is selected automatically for all Maxitrol electronics from among 65,000 codes available. The receiver must be paired with a handset.
ANTENNA
The antenna must not cross or come into contact with the ignition wire or any other cable. This will render the receiver inoperable.
POWER CONNECTION
The cable for the valve and receiver must be connected before switching on. If this is not connected, the electronic system may be damaged.
REMOTE CONTROL OPTIONS
There are 2 options for operating a RAIS gas fireplace: a remote control (with display) and a PUCK (without display).
REMOTE CONTROL
The remote control with a display is standard. With this remote control, all the functions of the gas fireplace can be used. You get the full experience of your gas fireplace.
Read how to use the remote control on page 10.
PUCK
The PUCK is optional and is ideal in areas where the gas fireplace must be operated by several people in, for example, rental properties, restaurants, receptions, etc.
Read how to use the PUCK control on page 17.


SOFTWARE VERSION


Press the buttons and at the same time. The software version is now displayed.
MODEL NUMBER FOR THE REMOTE CONTROL

Press the buttons and at the same time. The model number of the remote control is now displayed.
START-UP
In this section you can learn how to set up the remote control for the gas fireplace.
The remote control uses 2 x AAA 1.5V batteries. Never use pointed tools to remove the batteries from the receiver and remote control.
The signal range between the remote control and the gas fireplace must not exceed 10 metres.
NOTE!
Once a year you should replace the batteries in the remote to ensure optimal operation. Replace all the batteries at the same time and use only good quality alkaline batteries.

SYNCHRONISATION OF THE REMOTE CONTROL AND RECEIVER
1. Press and hold the receiver’s “reset” button (see the red arrow) until you hear a short ‘beep’ (A) followed by a long ‘beep’ (B).
SYNCHRONISE THE REMOTE CONTROL


2. After the second beep (B), release the reset button on the receiver. You now have 20 seconds to press the “down arrow” button (or minus icon on the PUCK) on the remote control.
3. Hold the button in, until you see the word “conn” on the remote control. Then release the button.
The remote will then count to 8 and 2 short beeps (C) will sound from the receiver.
The receiver and remote control are now synchronised, and the fireplace can be lit.
ATTENTION If a long tone is heard, the synchronization has failed. Therefore, try the synchronization again.


Lines illustrate the duration of the sounds Remote control PUCK

DISPLAY AND FUNCTIONS
Read to learn more about the remote control’s functions.
Program mode
Signal control

SETTING FAHRENHEIT OR CELSIUS

To change between °C or °F, press and hold the buttons and at the same time. Release the buttons once the selection is displayed.
Note: If °F is selected, a 12-hour clock is also automatically selected. If °C is selected, a 24-hour clock is also automatically selected.
or celsius
SETTING THE DEGREES
Scan the QR code to watch a how-to-video


SETTING THE DAY AND TIME


1. Press and hold buttons and at the same time.
2. Press the or button to select a figure that is equivalent with a weekday (e.g., 1= Monday, 2 = Tuesday, 3 = Wednesday, etc.)
3. While it flashes: Press buttons and at the same time. Hour setting flashes.
SETTING THE DAY AND TIME
Scan the QR code to watch a how-to-video

4. Select the hour by pressing or
5. Press buttons and at the same time. Minute setting flashes.

6. Select the minutes by pressing or
7. To confirm, press buttons and at the same time or wait.
USING THE REMOTE CONTROL
HOW TO SWITCH ON THE FIRE
Press and hold the button to switch on the fire.
Be patient: When you switch the fire on/off and use the remote control, you must hold the button for a couple of seconds until the ignition icon is displayed. Then release the button.
The main gas supply starts as soon as the pilot flame ignition is confirmed.
It takes approximately 25-30 seconds for the fireplace to ignite.
The remote control will automatically enter manual mode - after the main burner is lit.
HOW TO SWITCH OFF THE FIRE
HOW TO SWITCH THE FIRE ON
Scan the QR code to watch a how-to-video


Press and hold the button to switch off the fire.
Note: The fire will not be able to be lit again until for 2-3 minutes. If the fire does not go out, press and hold the off button for 12 seconds.

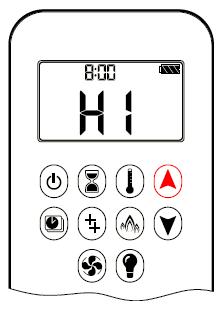
FLAME HEIGHT ADJUSTMENT
1. To activate low heat, double press the button. LO is displayed.
Note: The flame will first switch to high heat before going to low heat.
To get the absoulute minimum heat output, the secondary burners should be turned off before activating low heat.
FLAME HEIGHT ADJUSTMENT
Scan the QR code to watch a how-to-video

2. To activate high heat, double press the button. HI is displayed.

NOTE!
DEW AND CONDENSATION: The fireplace can form dew on the fireplace glass at start-up. When the glass is cold and the appliance is lit, it may cause condensation and fog the glass. This condensation is normal and will disappear within 10-15 minutes as the glass and flue heats up.
Do not turn off the fireplace before all dew on the glass has gone! If the fireplace is turned-off before the dew has gone, the water particles can damage the fireplace. Read more about cleaning the glass under the “Service & Maintenance” section.
WARNING!
If the pilot flame does not light after 3 attempts, wait 3 minutes before trying to light it again.

OPERATING MODE
There are 3 operating settings on the remote control: 1)Thermostat mode, 2) Program mode and 3) Eco mode. Read to learn about all 3 operating modes.
1) Thermostat mode
The room temperature is measured and compared to the set temperature. The flame height adjusts automatically to achieve the desired temperature.
ON:

1. Press the button. is displayed, the pre-set temperature is briefly displayed, and then the room temperature is displayed.
Setting:
1. Press and hold down the button until is displayed and the temperature flashes.
THERMOSTAT MODE
Scan the QR code to watch a how-to-video

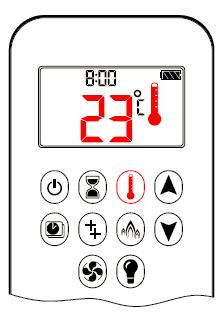
2. Adjust the set temperature by pressing or
3. To confirm, press the button or wait.
OFF:
Press the button until it disappears from the remote screen.
NOTE!
The set temperature for the thermostat mode is the temperature for the operating time in program mode. If the set temperature for the thermostat mode is changed, the temperature for the operating time in the program mode is also changed.
When the program is active, it will try to archive the temperature set in the thermostat program. When the program is out of the programmed time loop (OFF) the fire will try to archive the set Off temperature. If the Off temp is set to “--” the fireplace will go to pilot outside the programmed time.
NOTE!
Standard setting: Operating time (thermostat mode) temperature: 21°C (70°F). Temperature at which fire switches off “--” (only pilot flame lit).
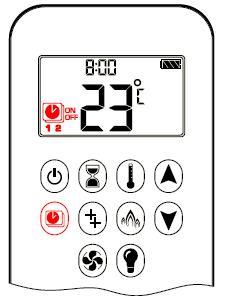
2) Program mode
Program 1 or 2 can both be programmed to operate or stop at specific points in time at a set temperature. Read to learn how the program is activated or deactivated. The following pages show you how to set the program.
ON:
PROGRAM MODE
Scan the QR code to watch a how-to-video


Press the button.
OFF:
Press until it disappears from the screen.
NOTE!
When the gas fireplace is set to Program mode, the fireplace will always be in standby mode (pilot flame lit).
NOTE!
The fireplace has a delay in reaction. The time delay is up to 6 minutes from the last motor turn. The On temperature delay is 0.75°C. The Off temperature delay is 2°C.
SETTING THE TEMPERATURE PROGRAM WITH TIME/DAYS
1. Press and hold until flashes. ON and the set temperature (setting Thermostat mode) are displayed.
2. To continue, press the button or wait. , OFF is displayed, and temperature flashes.
3. Select the temperature by pressing the or button.

4. To confirm, press the button.
NOTE!
The set operating temperature (Thermostat Mode) and the Off temperature are the same for each day.
SETTING THE DAY
1. ALL flash. Press the or button to choose between ALL, SA:SU, 1, 2, 3, 4, 5, 6, 7.
2. To confirm, press the button.
3. Continue either to PROGRAM 2 and set the operating time and time for switching off the fire or stop programming here and PROGRAM 2 remains deactivated.


NOTE!
PROGRAM 1 and 2 use the same operating temperature (Thermostat mode) and temperature for switching off for ALL, SA:SU and Daily Timer (1, 2, 3, 4, 5, 6, 7). When a new operating temperature (Thermostat mode) and temperature for switching off the fire has been set, this becomes the temperature for the new standard setting.
NOTE!
If ALL, SA:SU or Daily Timer is programmed for operating temperature and temperature for switching off the fire for PROGRAM 1 and PROGRAM 2, these become the new standard times.
The batteries must be removed to clear the temperatures, operating times and times for extinguishing the fire for PROGRAM 1 and PROGRAM 2.
3) Eco mode
The flame height alternates between high and low. If the room temperature is lower than the set temperature, the flame height will remain high for longer.
If the room temperature is higher than the set temperature, the flame height will remain low for longer. A cycle lasts for approximately 20 minutes.
The Eco mode can save up to 45% energy and will give the fireplace a more realistic flame behaviour.
ON:
ECO MODE
Scan the QR code to watch a how-to-video


OFF:
Press the button to enter Eco mode. is displayed.
Press the button. Disappears.

AUXILIARY FUNCTION – SECONDARY BURNER FUNCTION
The latching solenoid valve will open automatically after ignition, so that the maximum flow of gas is supplied to both burners assisting with the ignition process.
After pressing the button for the 2nd Burner, the motor will turn 15 seconds in the ON direction until the max. position is reached.
After switching on, burner 1 is lit and burner 2 is in the previous setting.
ON:
HOW TO TURN SECONDARY BURNERS ON/OFF
Scan the QR code to watch a how-to-video


To light a burner, press the button is displayed.
OFF:

To switch off a burner, press the button disappears.
NOTE!
The locked magnetic valve cannot function manually. If the receiver has no more battery power, it will remain in the last operating setting.
COUNTDOWN TIMER FOR SWITCHING OFF THE FIRE
1. Press and hold the button until is displayed and HOUR flashes.
COUNTDOWN TIMER TO SWITCH OFF THE FIRE
Scan the QR code to watch a how-to-video

2. Select the hour by pressing or
3. To confirm press the button. The minutes setting now flashes.
4. Select the minutes by pressing or
5. To confirm, press the button or wait.
Switch OFF the timer:

1. Press the button.
Now and the countdown timer disappear.
NOTE!
Once the countdown time has expired, the fire switches off. The countdown timer only works in Manual, Thermostat and Eco mode. The maximum countdown is 9 hours and 50 minutes.
SETTING THE CHILD LOCK ON:

1. To activate the child lock, press the and buttons at the same time.

If is displayed, the remote control cannot be used apart from the OFF function.
OFF:
1. To deactivate the child lock, press the and buttons at the same time. disappears.
SETTING THE CHILD LOCK
Scan the QR code to watch a how-to-video


ACTIVATION AND DEACTIVATION OF FUNCTIONS
The following functions can be deactivated/activated:
• Child lock
• Program mode
• Thermostat mode (also deactivates Program mode)
• Eco mode
• Light/dimmer (operation)
• Room fan (operation)
• Auxiliary function
• Countdown timer
ACTIVATION OF FUNCTIONS
1. Install batteries. All icons are displayed and they flash.
2. Press and hold down the relevant button and hold for 10 seconds.
3. The function icon continues to flash until activation is completed. Activation is completed when the function icon is displayed.
DEACTIVATE FUNCTIONS
1. Install batteries. All icons are displayed and they flash.
2. While the icons flash, press the relevant function button and hold for 10 seconds.
3. The function icon continues to flash until deactivation is complete. The deactivation is complete when the function icon and 2 horizontal lines are displayed.

USING THE PUCK
The PUCK is a simplified version of a remote control to control your gas fireplace. It works as an alternative to the standard remote.
Read to learn how to switch on, adjust and switch off the fire.
Be patient: When you switch the fire on/off and use the PUCK, you must hold the button for a couple of seconds.
NOTE!
Once the pilot flame is confirmed, the motor will automatically go to maximum flame height.
WARNING!
If the pilot flame does not light after several attempts, switch off the gas supply and contact your RAIS dealer.
HOW TO SWITCH ON THE FIRE
1. Press and hold the button until you hear 2 short ‘beeps’ and the start procedure begins. Release the button.
2. The main gas supply starts as soon as pilot flame ignition is confirmed. A few seconds may pass before the gas in the fireplace ignites.
3. The fireplace will automatically enter high performance mode after the main burner is lit. After 30 seconds the fireplace's performance can be regulated.
HOW TO SWITCH OFF THE FIRE
1. Press and hold the button to switch off the fire.
Note: The fire will not be able to be lit again for 3 minutes.
FLAME HEIGHT ADJUSTMENT
1. Double-click on the “+” button to enter maximum mode fast. 2. Double-click on the “-” button to enter minimum mode fast.
Note: Flame goes to maximum before turning to minimum.


WARRANTY
At RAIS, we stand behind the quality and craftsmanship of our gas fireplaces. We offer a 2-year warranty starting from the date of delivery, in addition to the national warranty requirements applicable in your country.
Warranty Claim Procedure
If you experience issues covered by the warranty, follow these simple steps:
1. Contact Your Authorized RAIS Dealer
Report your case promptly to your dealer, who will initiate the claims process and guide you through the next steps.
2. Provide Necessary Details
To ensure a smooth process, please provide the following:
• Description of the issue
• Serial number of your fireplace
• The original purchase invoice
RAIS will assess the claim and determine whether repair or replacement of parts is needed. All claims are handled professionally and efficiently.
Important Notes
• Warranty Period Duration: Any repairs or replacements under the warranty do not extend the original warranty. The warranty period continues from the original purchase date.
• Alternative Parts: If original parts are unavailable, RAIS will supply alternative parts of equivalent quality to maintain the fireplace's performance.
• Renewed Warranty Period: For replaced parts, warranty coverage follows national/EU legislation regarding renewed warranty periods.
• Non-Transferable Warranty: The warranty applies only to the original purchaser and cannot be transferred if the fireplace is resold.
Return Process
If you need to return a part under warranty, contact your dealer to obtain a case number. The return process will then be managed through your dealer.
Labor Costs
Labor costs for burner repairs are covered if the claim is accepted under the warranty.
Covered Under Warranty
• Malfunctions caused by defective craftsmanship
• Faults due to material defects
• Gas fireplace casing (5-year warranty)
Limited Warranty for Wear Parts (1 year from first use)
• Glass and glass seals
• Skamol side and back panels
• Burner thermocouples
• Decorative logs
Not Covered Under Warranty
• Changes in appearance, color, or patina of stainless steel surfaces
• Thermal expansion noises
Warranty Void if:
• Installation or repairs are not in compliance with local/national laws
• Damage occurs due to external factors (e.g., improper fuels, impacts, lightning, floods, or overheating)
• The fireplace is not installed as per the instructions or is misused
• Unauthorized modifications are made or maintenance is neglected (as outlined in the installation manual)
• Non-original components are used
• Neglect, misuse, or gross negligence causes the fault
Additional Guidelines
• Annual Inspections: Professional annual inspections are recommended to ensure safe operation of the fireplace.
• Warranty Coverage: Only applies to fireplaces purchased through authorized RAIS dealers.
• Replacement Parts: Replacement or renewal of components does not extend the warranty period.
SERVICE AND MAINTENANCE
We recommend a yearly service check of the fireplace to ensure a long and lasting fireplace with a beautiful flame.
SERVICE PROCEDURE
The fireplace must be inspected by an authorised gas installer or other professional in accordance with national law. The inspection must ensure the product’s operation and safety.
RECOMMENDED SERVICE PROCEDURE
Switch off the fireplace and shut off the gas supply. Make sure the fireplace is completely cold before you begin. RAIS cannot be held liable for injuries that result from touching a hot fireplace.
The steps below can be used as a guideline.
1. Protect the floor by laying down a carpet or other covering to prevent damage or dirt.
2. Turn off the gas and power supply to ensure safety during service work.
3. Open the door and carefully remove the ceramic logs and ember layer.
4. Use a vacuum cleaner to thoroughly clean the burner and base grate.
5. Remove the secondary burners and the base grate, and vacuum the entire burner area.
6. Clean the ceramic logs with a soft brush if there are visible soot deposits.
7. Carefully clean the pilot burner with a soft brush and vacuum cleaner. The thermocouple must not be bent or straightened. If it shows signs of wear, replacement is recommended.
8. Check the pilot burner gaskets (green) to ensure they are in good condition. Replace the gaskets during service.
9. Reinstall the base grate correctly.
10. Inspect the venting system and terminal for any blockages that could affect combustion.
11. Place the ember layer and ceramic logs back. Follow the manual for proper placement, as incorrect arrangement can affect efficiency.
12. Check the glass and its gaskets for damage or wear.
13. Clean the glass inside with a glass cleaner to ensure clear visibility of the flames.
14. Close and lock the door properly to ensure a correct seal.
15. Turn on the gas and power supply and check for gas leaks. Inspect the burners and the pilot for proper function.
16. Measure the gas pressure with a manometer to ensure it is within specifications.
17. Light the fireplace and check the pressure settings for proper operation.
18. Test for carbon monoxide (CO) to ensure there are no dangerous emissions in the room.
19. Check the remote control and batteries. Replace the batteries if necessary.
20. Inspect the electrical connections for damage or oxidation.
21. Check the insulation around the burner housing to ensure it is intact and protecting against heat loss.
22. Lubricate any moving parts in the door or control system if necessary to ensure smooth operation.
23. Replace worn parts with original spare parts to ensure optimal performance.
24. Dispose of replaced parts in the appropriate waste containers according to local regulations.
25. Instruct the customer on the safe use and daily maintenance of the fireplace.
NOTE!
The fireplace must be inspected by an authorised gas installer or other professional in accordance with national law.
CLEANING
The fireplace should be cleaned of dust and foreign objects when you use it for the first time in the year, and especially if the fireplace has not been used for a longer period.
You could do this using a soft brush and a vacuum cleaner or by using a damp cloth with a non-abrasive cleaning agent. Never use corrosive or abrasive substances to clean the fireplace. The fireplace must be cold before you clean it.
If the glass has a layer of soot, clean the glass using a glass cleaner. Clean the outside of the fireplace using a dry cloth.
Before using the fireplace for the first time in the year, the flue system and flue gas connection must always be checked for blockages.
Check the outside and inside of the fireplace for any damage and pay particular attention to gaskets. Only original RAIS spare parts may be used.
CLEANING THE CERAMIC LOGS
1. Remove the ceramic logs as described in steps 1-3 in “Recommended Service Guideline” on page 41.
2. Carefully clean the ceramic logs using a soft brush and a vacuum cleaner. Damaged parts may only be replaced by original RAIS specified parts.
3. The scrapped ceramic parts should be disposed of in the correct municipal disposal centres. It is recommended that you use a vacuum cleaner with a HEPA filter system.
4. Put back the embers layer and fit the glass. Ensure that the fireplace functions correctly and is safe to use.
TROUBLESHOOTING
If you, against all expectation, should experience issues with your fireplace, please try the following steps. If the issues persist, please contact your RAIS dealer and state in which step the problem occurred.
The most common problem is a lost connection between the remote control and receiver due to lack of power. Therefore, we recommend changing the batteries in your remote and resetting the connection between the receiver and remote. Please follow the guide on page 8.
Does the remote control light up when you press the buttons?
Are the remote control and receiver connected? (Can you see the motor valve move on the GV60 Combination Valve when you press the arrow up or down on the remote control?).
Can you hear a metallic, hollow sound (the magnetic valve opening), when turning the gas fireplace on? Can you hear/see a spark? (You can hear a ticking sound when a spark is generated?).
Is the pilot flame on?
Is the pilot flame burning for more than 30 seconds, before it turns off?
Are the main and secondary burners burning for more than 30 seconds before it turns off? (Is there a flame by the ceramic logs?)
Are there flames for more than 2 minutes after the main and secondary burners are turned on?
NO
Please check that the batteries are working and mounted correctly.
Please check the batteries and the power supply. Try connecting the receiver and remote control again.
Is the gas fireplace working after burning for 2 or more minutes?
The magnetic valve can get stuck. Try the starting sequence again.
Check that the ignition cable between the receiver and burner electrode is connected.
Please check the gas supply and that the pipes have been vented. Check that the button on the GV60 Combination Valve is set to ON.
1st thermocouple might not function correctly. Check the thermocouple with an ohmmeter. = 4-6 mV drop.
Check that the button on the GV60 Combination Valve is set to ON.
2nd thermocouple is interrupted. Check that the 2nd thermo is not covered in any way and that the flame is touching the thermo sensor. Check the wire to the 2nd thermocouple.
Check the flame by the 2 thermocouples. Check that the logs and embers layer are placed according to the installation manual.
Check the gas supply. LPG: The bottle can freeze which causes the gas supply to decrease.
ERROR CODES ON THE REMOTE CONTROL
ERROR CODE
F04
F06
SYMPTOM
• No pilot within 30 sec.
• Note: After 3 failed ignition sequences F06 is displayed.
• 3 failed ignition sequences within 5 minutes
• Fire is not responding, no pilot flame
POSSIBLE CAUSE
• No gas supply
• Air in pilot supply line
• No spark
• Reversed polarity in 1st thermocouple wiring
• No gas supply
• Air in pilot supply line
• No spark
• Reversed polarity in 1st thermocouple wiring
• Incorrect pilot orifice if the valve has been converted from LPG to NG or vice versa.
F09
F40
F46
• Fire is not responding
• No electric control of the fire
• Battery icon flashes on the handset display
• Fire is not responding
• Intermittent response
• No electronic control of the fire
• The down arrow button was not pressed during pairing.
• The receiver and handset are not synced
• Low battery in the handset
• No or bad connection between the receiver and handset
• No power to the receiver
• Low communication range (Main adapter faulty, handset not communicating with the receiver)

ERROR CODES ON THE APP
ERROR CODE MESSAGE
F02
F02
Contact Service
F03 F03
Contact Service
F04
F04
Ignition Sequence malfunction
Wait 1 minute
Retry ignition
F06 F06
Contact Service
F10
F10
Contact Service
F12
F12
Contact Service
F13 F13
Contact Service
F14 F14
Contact Service
F15 F15
Contact Service
F16 F16
Contact Service
F17 F17 Contact Service
F19 F19 Contact Service
F26 F26 Contact Service
F28 F28 On-Demand Pilot
F31 F31 Contact Service
F41 F41 Check WiFi
F43 F43 No receiver connected Contact Service
F44 F44 Contact Service
• 5 sec. beep from the receiver
• Fire is not responding, no ignition
• 5 sec. beep from the receiver
• Ignition process is interrupted
• Fire is not responding, no ignition
• No pilot flame within 30 sec.
• NOTE: After 3 failed ignition sequences F06 is displayed
• 3 failed ignition sequences within 5 minutes
• Fire is not responding, no pilot flame
• Pilot light lit
• Main burner fails to ignite and pilot light shuts off
• Ignition is blocked for 2 minutes
• Motor turns to pilot position
• Fan at level 4 for 10 minutes
• Motor turns to pilot position
• 5 sec. beep from the receiver
• Fire is not responding, no ignition
• 5 sec. beep from the receiver
• Fire is not responding, no ignition
• No temperature shown in the app
• No ignition (fire is not responding)
• Pilot drops when motor opens main gas
• Microswitch not making contact with the cam on the motor knob
• Motor wiring incorrect
• Reversed polarity or faulty microswitch
• Bent motor knob
• Thermocouple wiring incorrect or interrupted
• ON/OFF switch in ”O” (OFF) position
• No gas supply
• Air in pilot supply line
• No spark
• Reversed polarity in thermocouple wiring
• Incorrect pilot orifice if valve has been converted from LPG to NG or vice versa
• No gas supply
• Air in pilot supply line
• No spark
• Reversed polarity in thermocouple wiring
• Incorrect pilot orifice if the valve has been converted from LPG to NG or vice versa
• 2nd thermocouple is out of position
• 2nd thermocouple wiring incorrect
• Gas logs out of position
• Gas ports for burner are blocked
• Receiver temperature exceeds 60°C
• Receiver powered by batteries
• Blocked flue, no air circulation in firebox
• Heat shield incorrectly installed
• Receiver temperature exceeds 80°C
• Receiver software doesn’t support on 2nd thermocouple
• Wrong receiver
• 2nd thermocouple is not connected
• 2nd thermocouple wiring
• Handset out of range for more than 1.5 h
• Electrical interference
• Inlet voltage exceeds 7.25 V
• Malfunction of the main adapter
• Insufficient thermo-voltage
• Thermocouple malfunction
• Low inlet gas pressure
• Improper thermocouple flame impingement
• Carbon build-up on the thermocouple
• Valve malfunction
• Resistance in thermocurrent circuit
• It is not possible to increase flame height after ignition
• Fan at level 4 for 10 minutes (T>60°C)
• Pilot shuts off after a predefined time
• Fire is not responding
• No electronic control of the fire
• Fire is not responding
• No electronic control of the fire
• Fire is not responding
• No electronic control of the fire
• No temperature shown in the app
• ”N.a.” (not applicable) displayed in the app
• Receiver temperature exceeds 60°C
• Pilot shuts off after no motor movement for a predetermined time
• Receiver malfunction
• No power to WiFi module or router
• No WiFi connection between WiFi module and router, and/or smart device
• No communication between the receiver and WiFi module
• Handset not within range
• Low battery in the handset
ERROR SOUND DIAGRAM
Confirmation ignition start (EU)
Ignition sequence (US)
Failure:
Micro switch defect, ON/OFF
Switch open, Wiring not completed, Learn function failed, no 2nd Thermocouple connected to 2nd Thermocouple version (Receiver: yellow lable), Ignition failed because 2nd Thermocouple has not cooled down
Low Battery (during the motor turns)
Reset (also new Batteries or Power ON)
Learning function
DISPOSAL GUIDE
When your gas fireplace is no longer in use, it’s important to consider the environment and dispose of it in the most responsible manner.
Material sorting
To properly sort materials from the gas fireplace, always adhere to national laws and regulations regarding material disposal.
Here’s an overview of the materials:


Dør pakning Türdichtung Door gasket Scellement de porte


Messing Messing Brass Laiton


Dør pakning Türdichtung Door gasket Scellement de porte


Keramiske Logs keramische Scheite Ceramic Logs bûches en céramique


Elektronik dele Elektronikteile Electronics parts Pièces électroniques


Elektronik dele Elektronikteile Electronics parts Pièces électroniques


ASSOCIATED MANUALS AND VIDEO GUIDES
On this page you will find references to other manuals and video guides for our gas fireplaces. Scan the associated QR code to see the manuals and video guides. The manuals are available in other languages on RAIS’s website.
APP AND WIFI MODULE

EXODRAFT

BALANCED FLUE PIPE SPARE PARTS LIST

VIDEO GUIDES


