8 minute read
Interpreting the meter reading


The information given by the light meter after taking a reading is referred to as the‘meterindicated exposure’ (MIE). This is a guide to exposure only. The light meter should not be perceived as having any intelligence or creative sensibilities. The light meter cannot distinguish between tones or subjects of interest or disinterest to the photographer. It is up to the photographer to decide on the most appropriate exposure to achieve the result required. A photographer with a different idea and outcome may choose to vary the exposure. It is the photographer’s ability to interpret and vary the meter-indicated exposure to suit the mood and communication of the image that separates their creative abilities from others. If light or dark tones dominate, the indicated exposure will be greatly influenced by these dominant tones. Using the MIE will expose these dominant dark or light tones as mid-tones. Minority light and mid-tones will be overexposed or underexposed. If you consider interest and visual impact within a photograph is created by the use of lighting and subject contrast (amongst many other things) the chances of all the elements within the frame being mid-tones are remote. The information, mood and communication of the final image can be altered through adjusting exposure from MIE.
Average tones
Advertisement
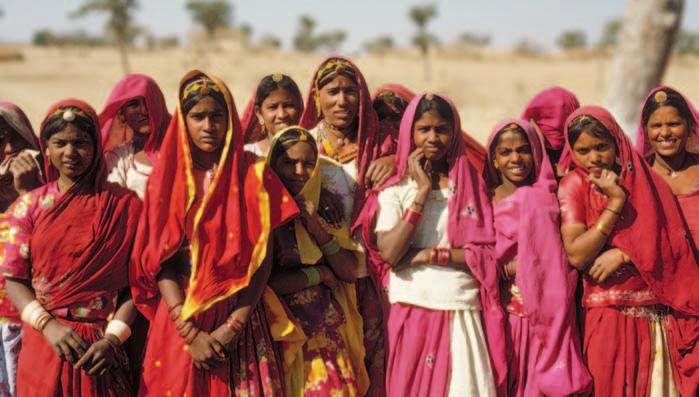
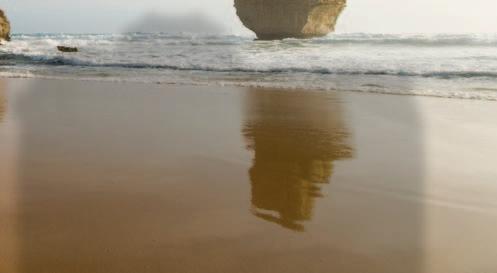
Indian market (average tones) MIE
A subject of average reflectance (mid-tone) is placed with equal dark and light tones. All three tones are lit equally by the same diffuse light source. A reflected reading of the mid-tones will give correct exposure. An exposure using the reflected reading of the dark tone will render it gray and overexpose the mid and light tones. An exposure using the reflected reading of the light tone will render it gray and underexpose the mid and dark tones. An incident reading will give ‘correct’ exposure regardless of which tone it is held in front of because it measures the light falling on the subject, not the light reflected from it. The intensity of the light source is constant but the reflected light from the three tones varies (see page 40, Hand-held light meters).
If dark tones dominate the framed image the MIE will result in the dark tones being recorded as mid-tones. Mid-tones will be recorded as light tones and any light tones may be overexposed. If light tones dominate the framed image the meter-indicated exposure will result in the light tones being recorded as mid-tones. Mid-tones will be recorded as dark tones and dark tones may be underexposed. If the mid-tones present in amongst these dominant dark or light tones are to be recorded accurately the exposure must be either reduced (for dominant dark tones) or increased (for dominant light tones) from the MIE.
The amount the exposure needs to be reduced or increased is dictated by the level of dominance of these dark or light tones (see the chapter ‘Contrast and Compensation > Exposure compensation’).
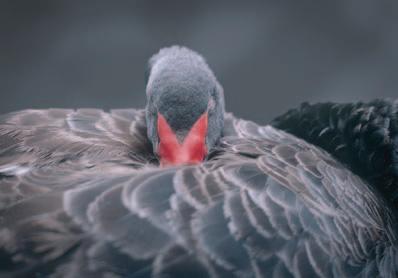
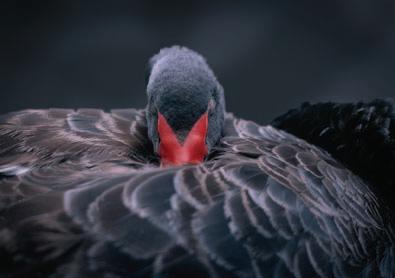
Black swan (dominant dark tones) MIE Decreased exposure

White wall (dominant light tones) MIE Increased exposure

Activity 6
Photograph a subject requiring adjusted exposure from that indicated by the light meter. State how the dominant tones would have affected the light meter reading and how the image would have looked if you had not adjusted the exposure.
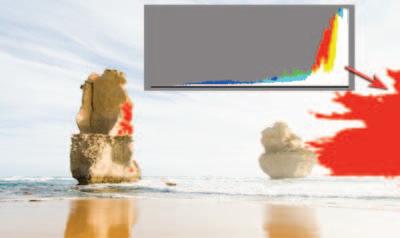
When taking a picture with a digital camera it is sometimes possible to check the exposure during the capture stage to ensure that the full tonal range of the image has been recorded. Th e most accurate indication of the exposure does not come from the image on the LCD screen but the histogram (all DSLR cameras and the better fi xed-lens compact cameras are able to display these histograms). Some fi xed-lens cameras can even display the histogram before the image has been captured. Th is ‘live preview’ is also available on a few DSLR cameras that have a second sensor designed to feed this live view to the LCD screen prior to capture.


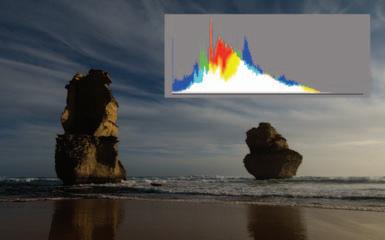
Th e levels of brightness in the histogram are displayed as a simple graph. Th e horizontal axis displays the brightness values from left (darkest) to right (lightest). Th e vertical axis of the graph shows how much of the image is found at any particular brightness level. If the subject contrast is too high or the exposure is either too high or too low then tonality will be ‘clipped’ (shadow or highlight detail will be lost).Most digital camera sensors can only record a limited range of information when compared to the range of tones human vision is capable of seeing detail in. Th e tones that are out of the range of the image sensor of the digital camera record as black or white with no detail. We should attempt to adjust the exposure or reduce the contrast of the subject matter to ensure maximum information is recorded. Note > When using the JPEG fi le format you should attempt to modify the brightness, contrast and color balance at the capture stage to obtain the best possible histogram before editing begins in the software.

The photographer can either increase or decrease exposure to ensure a full range of tones is recorded during the capture stage. Photoshop will not be able to replace information in the shadows or highlights that is missing due to inappropriate exposure or excessive subject contrast. The information should extend all the way from the left to the right side of the histogram if the subject contrast and the exposure are appropriate.
Overexposure and underexposure
If the exposure is too high a tall peak will be seen to rise on the right side of the histogram (level 255). If the digital file is underexposed the peaks are crowded on the left-hand side of the histogram and there is little or no peaks on the right-hand side of the histogram. Some cameras can be programed to blink in the areas that are overexposed. Solution: Adjust the exposure in the camera using either the exposure compensation controls or the manual controls. If exposure is too low due to bright backlights in the image you can try moving the camera to exclude the bright light source, locking the exposure by half-pressing the shutter release and then reframing.


Lowering contrast
If the contrast is too high tall peaks may be evident at either end of the histogram. Solution: Decrease the subject contrast by either repositioning the subject matter or by lowering the contrast of the lighting. The light source can be diffused or additional lighting can be provided in the form of fill flash or reflectors. In the image above the camera’s tiny built-in flash unit has been used to increase the exposure in the shadows. This allows the overall exposure to be lowered, which in turn prevents the sky behind the children from becoming overexposed.
The final histogram should show that pixels have been allocated to most, if not all, of the 256 levels. If the histogram indicates large gaps between the ends of the histogram and the sliders (indicating either a low-contrast scan or low-contrast subject photographed in flat lighting) the relationship between the subject contrast and light quality could be reconsidered.
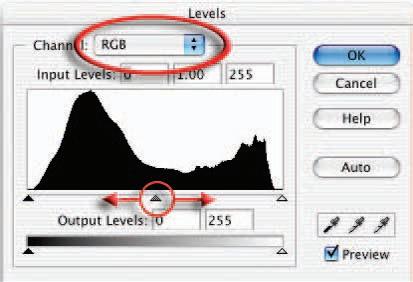
Small gaps at either end of the histogram can, however, be corrected by dragging the sliders to the start of the tonal information. Holding down the Alt/Option key when dragging these sliders will indicate what, if any, information is being clipped. Note how the sliders have been moved beyond the short thin horizontal line at either end of the histogram. These low levels of pixel data are often not representative of the broader areas of shadows and highlights within the image and can usually be clipped (moved to 0 or 255). Moving the ‘Gamma’ slider can modify the brightness of the mid-tones. If you select a Red, Green or Blue channel (from the Channel pull-down menu) prior to moving the Gamma slider you can remove a color cast present in the image. For those unfamiliar with color correction the adjustment feature ‘Variations’ (Image > Adjustments > Variations) in Photoshop gives a quick and easy solution to the problem. After correcting the tonal range using the sliders click ‘OK’ in the top right-hand corner of the Levels dialog box.
Note > Variations is not available for Photoshop users working in 16 Bits/Channel mode.


Color
Neutral tones in the image should appear desaturated on the monitor. If a color cast is present try to remove it at the time of capture or scanning if possible. Solution: Control color casts by using either the white balance on the camera (digital) or by using an 80A or 80B color conversion filter when using tungsten light with daylight film. Use the available color controls on the scanning device to correct the color cast and/or saturation.