13 minute read
Raw format exposure considerations


One of the big topics of conversation since the release of Photoshop CS has been the subject of ‘Raw’ fi les and ‘digital negatives’. Th is section of the chapter guides you through the advantages of choosing the Raw format and the steps you need to take to process a Raw fi le from your camera in order to optimize its exposure.
All digital cameras capture in Raw but only digital SLRs and the medium- to high-end ‘Prosumer’ cameras off er the user the option of saving the images in this Raw format. Selecting the Raw format in the camera instead of JPEG or TIFF stops the camera from processing the color data collected from the sensor. Digital cameras typically process the data collected by the sensor by applying the white balance, sharpening and contrast settings set by the user in the camera’s menus. Th e camera then compresses the bit depth of the color data from 12 to 8 bits per channel before saving the fi le as a JPEG or TIFF fi le. Selecting the Raw format prevents this image processing taking place. Th e Raw data is what the sensor ‘saw’ before the camera processes the image, and many photographers have started to refer to this fi le as the ‘digital negative’. Th e term ‘digital negative’ is also used by Adobe for their archival format (.dng) for Raw fi les.
Advertisement
Th e sceptical among us would now start to juggle with the concept of paying for a ‘state-of-theart’ camera to collect and process the data from the image sensor, only to stop the high-tech image processor from completing its ‘raison d’être’. If you have to process the data some time to create a digital image why not do it in the camera? Th e idea of delaying certain decisions until they can be handled in the image-editing software is appealing to many photographers, but the real reason for choosing to shoot in Camera Raw is QUALITY.

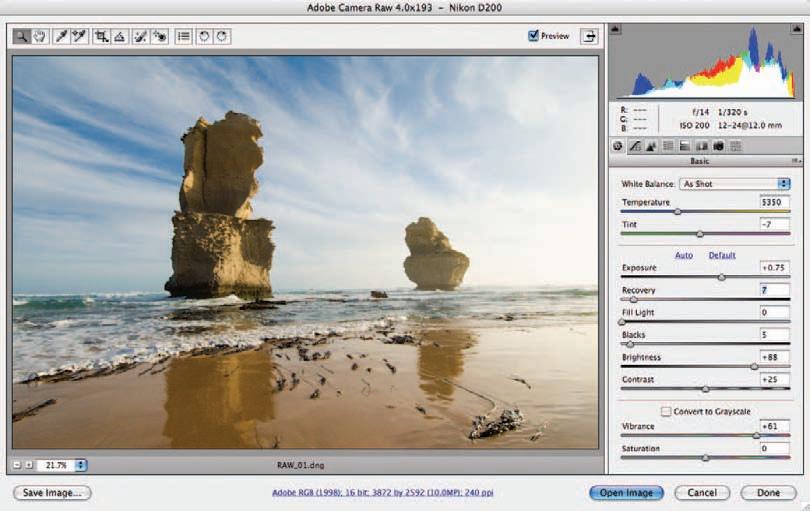
Th e unprocessed Raw data can be converted into a usable image fi le format by Adobe Camera Raw (ACR). Variables such as bit depth, white balance, exposure, brightness, contrast, saturation, sharpness, noise reduction and even the crop can all be assigned as part of the conversion process. Performing these image-editing tasks on the full high-bit Raw data (rather than making these changes after the fi le has been processed by the camera) enables the user to achieve a higher quality end-result.
Double-clicking a Raw fi le, or selecting ‘Open in Camera Raw’ in Bridge, opens the Adobe Camera Raw (ACR) dialog box, where the user can prepare and optimize the fi le for fi nal processing in the main Photoshop editing interface. If the user selects 16 Bits/Channel in the Workfl ow Options, the 12 bits per channel data from the image sensor is rounded up - each channel is now capable of supporting 32,769 levels* instead of the 256 levels we are used to working with in the 8 bits per channel option. Choosing the 16 Bits/Channel option enables even more manipulation in the main Photoshop editing space without the risk of degrading the image quality. When the fi le is opened into the image-editing work-space of your Photoshop software, the Raw fi le closes. Any changes you make to the appearance of the image in the ACR dialog box will be applied to the image that is opened in Photoshop’s main editing space but won’t alter the original image data of the Raw fi le. Th e adjustments you make in the ACR dialog box are saved as XMP metadata in the DNG fi le as an XMP sidecar fi le or in the computer’s Camera Raw database or cache.
*Note > Photoshop’s 16-bit editing is 15-bit + 1 (15-bit processing gave the Photoshop engineers a midpoint). In Photoshop CS2 we had the option to set the Info palette to 16-bit values to confi rm this but this option was removed for Photoshop CS3.
Most digital imaging sensors capture images using 12 bits of memory dedicated to each of the three RGB color channels, resulting in 4096 tones between black and white. Most of the imaging sensors in digital cameras record a subject brightness range of approximately five to eight stops (five to eight f-stops between the brightest highlights with detail and the deepest shadow tones with detail).
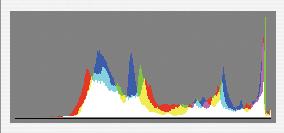
One would think that with all of this extra data the problem of banding or image posterization due to insufficient levels of data (a common problem with 8-bit image editing) would be consigned to history. Although this is the case with mid-tones and highlights, shadows can still be subject to this problem. The reason for this is that the distribution of levels assigned to recording the range of tones in the image is far from equitable. The brightest tones of the image (the highlights) use the lion’s share of the 4096 levels available while the shadows are comparatively starved of information.

Distribution of levels

An example of posterization or banding
Shadow management
CCD and CMOS chips are, however, linear devices. This linear process means that when the amount of light is halved, the electrical stimulation to each photoreceptor on the sensor is also halved. Each f-stop reduction in light intensity halves the amount of light that falls onto the receptors compared to the previous f-stop. Fewer levels are allocated by this linear process to recording the darker tones. Shadows are ‘level starved’ in comparison to the highlights that have a wealth of information dedicated to the brighter end of the tonal spectrum. So rather than an equal amount of tonal values distributed evenly across the dynamic range, we actually have the effect as shown above. The deepest shadows rendered within the scene often have fewer than 128 allocated levels, and when these tones are manipulated in post-production Photoshop editing there is still the possibility of banding or posterization.
Accessing a broader dynamic range
The histogram displayed on the back of a digital camera may not accurately reflect the precise range of tones that is being captured when the photographer elects to shoot in the Camera Raw format. Most cameras provide information that is geared to the photographer capturing in the JPEG or TIFF format only. A photographer may therefore underestimate the dynamic range that is capable of being recorded by their camera. Instead of capturing a dynamic range of approximately five stops the Raw format may be capable of capturing images with a dynamic range that exceeds 7 or 8 stops when using a DSLR camera. The precise dynamic range will vary with the type of sensor being used as the smaller sensors fitted to the prosumer digicams do not enjoy the same dynamic range as the APS and full-frame sensors fitted to the DSLR cameras.
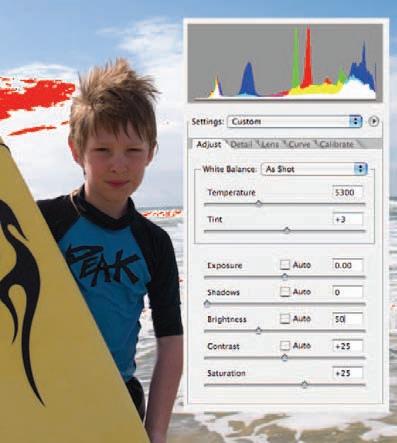
In the example above the highlights of the distant clouds were flashing when the image was reviewed in the camera (a common option on many digital cameras for indicating when overexposure has occurred). The histogram associated with the file clearly indicated that the highlights were being clipped. When the file was opened in Camera Raw the Exposure slider was moved to a value of −0.50 and usable detail (level 245) was returned to this area of the image. The Brightness slider was raised to compensate for the negative Exposure value. If the exposure had been lowered in camera the dark top that the boy is wearing would have required rescuing instead of the highlights. Most photographers find that it is preferable to rescue the highlights rather than the shadows although due care must be taken not to allow the highlights to become completely overexposed. Taking two spot meter readings will enable the experienced photographer to ascertain the subject brightness range and assess whether this is compatible with the dynamic range of the sensor they are using.
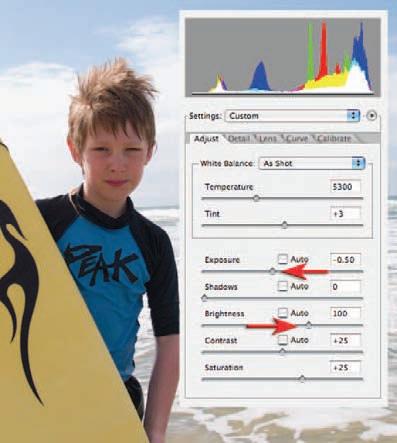
Lowering exposure in ACR
For those digital photographers interested in the dark side, an old SLR loaded with a fine-grain black and white film is a hard act to follow. The liquid smooth transitions and black velvet-like quality of dark low-key prints of yesteryear are something that digital capture is hard pressed to match. The sad reality of digital capture is that underexposure in low light produces an abundance of noise and banding (steps rather than smooth transitions of tone). The answer, however, is surprisingly simple for those who have access to a DSLR and have selected the Raw format from the Quality menu settings in their camera. Simply be generous with your exposure to the point of clipping or overexposing your highlights and only attempt to lower the exposure of the shadows in Adobe Camera Raw.
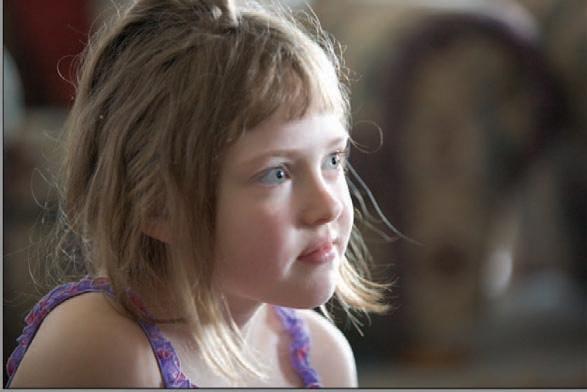
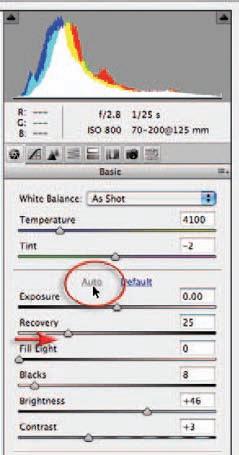
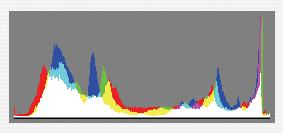
1.The first step is the most difficult to master for those who are used to using Auto or Program camera exposure modes. Although the final outcome may require deep shadow tones, the aim in digital low-key camera exposure is to first get the shadow tones away from the left-hand wall of the histogram by increasing and NOT decreasing the exposure. It is vitally important, however, not to increase the exposure so far that you lose or clip highlight detail. The original exposure of the image used in this project reveals that the shadow tones (visible as the highest peaks in the histogram) have had a generous exposure in-camera so that noise and banding have been avoided (the tones have moved well to the right in the histogram). The highlights, however, look as though they have become clipped or overexposed. The feedback from the histogram on the camera’s LCD would have confirmed the clipping at the time of exposure (the tall peak on the extreme right-hand side of the histogram) and if you had your camera set to warn you of overexposure, the highlights would have been merrily flashing at you to ridicule you of your sad attempts to expose this image. The typical DSLR camera is, however, a pessimist when it comes to clipped highlights and ignorant of what is possible in Adobe Camera Raw. Adobe Camera Raw can recover at least one stop of extra highlight information when the Exposure slider is dragged to the left (so long as the photographer has used a DSLR camera that has a broader dynamic range than your typical fixed-lens compact digicam).

Adobe Camera Raw rescues the highlights - sometimes automatically
When the Auto checkbox in the Exposure slider is checked, Adobe Camera Raw often attempts to rescue overexposed highlights automatically. With a little knowledge and some attention to the camera’s histogram during the capture stage, you can master the art of pushing your highlights to the edge. So if your model is not in a hurry (mine is watching a half-hour TV show) you can take an initial exposure on Auto and then check your camera for overexposure. Increase the exposure using the exposure compensation dial on the camera until you see the fl ashing highlights. When the fl ashing highlights start to appear you can still add around one extra stop to the exposure before the highlights can no longer be recovered in Adobe Camera Raw. Th e popular term for this peculiar behavior is called ‘exposing right’.
PERFORMANCE TIP
If the highlights are merrily fl ashing and the shadows are still banked up against the lefthand wall of the histogram, the solution is to increase the amount of fi ll light, i.e. reduce the diff erence in brightness between the main light source and the fi ll light (see Lighting on Location > Fill fl ash).
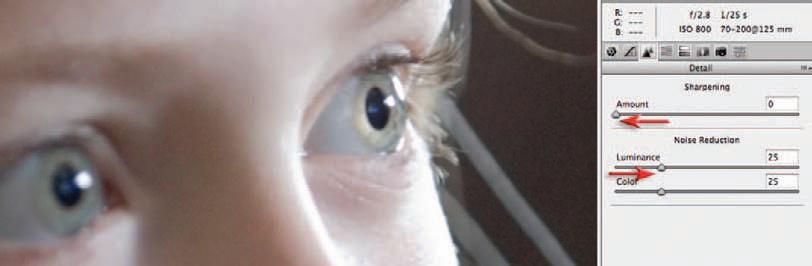
2.Before we massage the tones to create our low-key image we must first check that our tones are smooth and free from color and luminance noise. Zoom in to 100% magnification for an accurate preview and look for any problems in the smooth dark-toned areas. Setting both the Luminance Smoothing and Color Noise Reduction sliders to 25 (found in the Detail tab) removes the noise in this image. I would also recommend that the Sharpness slider be set to 0 at this point. Rather than committing to global sharpening using the Adobe Camera Raw dialog box, selective sharpening in the main Photoshop editing space may help to keep the tones as smooth as possible.
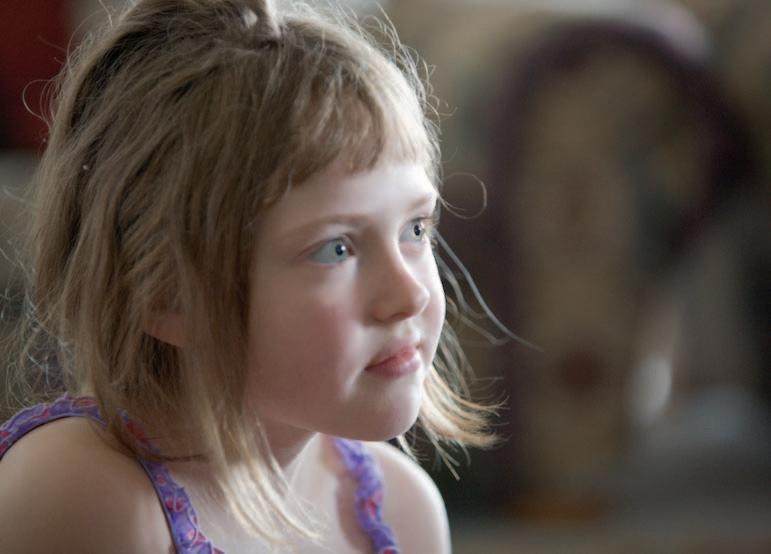
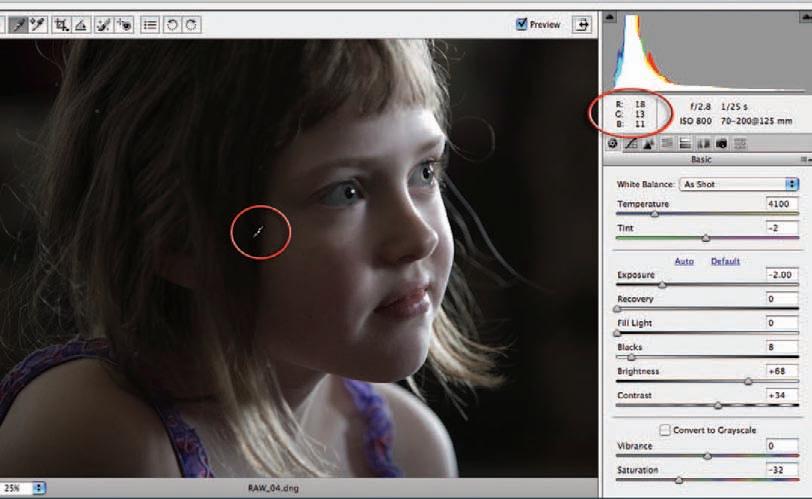
3.Create the low-key look by moving the Exposure and/or the Brightness sliders to the left in the Basic tab. You can continue to drop these sliders until the highlights start to move away from the right-hand wall of the histogram. Select the ‘White Balance Tool’ and move your mouse cursor over the deeper shadows - this will give you an idea of the RGB values you are likely to get when this image is opened into the editing space. Once you approach an average of 15 to 20 in all three channels the low-key look should have been achieved.
Expose right and adjust left
As we have seen in the previous example the inequitable distribution of levels has given rise to the idea of ‘exposing right’. This work practice encourages the user seeking maximum quality to increase the camera exposure of the shadows (without clipping the highlights) so that more levels are afforded to the shadow tones. This approach to making the shadows ‘information rich’ involves increasing the amount of fill light (actual light rather than the ACR’s fill light) or lighting with less contrast in a studio environment. If the Camera Raw file is then opened in the Camera Raw dialog box the shadow values can then be reassigned their darker values to expand the contrast before opening it as a 16 Bits/Channel file. When the resulting shadow tones are edited and printed, the risk of visible banding in the shadow tones is greatly reduced.
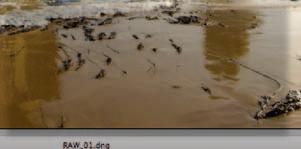
This approach is not possible when working with a subject with a fixed subject brightness range, e.g. a landscape, but in these instances there is often the option of bracketing the exposure and merging the highlights of one digital file with the shadows of a second. The example above shows the use of a layer mask to hide the darker shadows in order to access the bit-rich shadows of the underlying layer and regain the full tonal range of the scene. See Photoshop CS3: Essential Skills or Photoshop Elements 6 Maximum Performance for detailed post-production editing techniques.
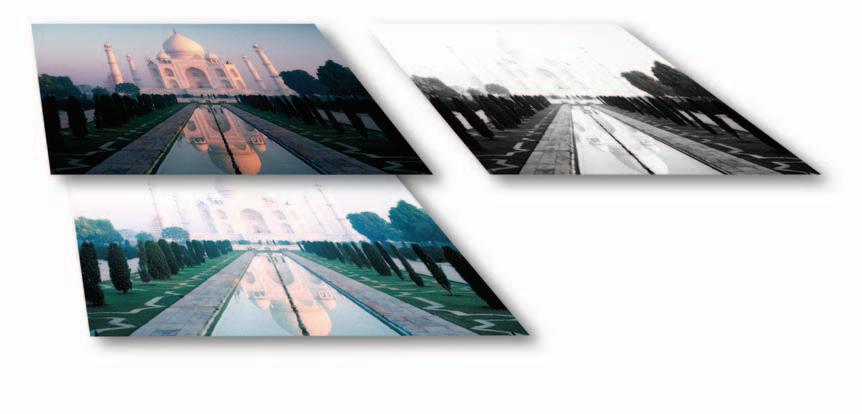
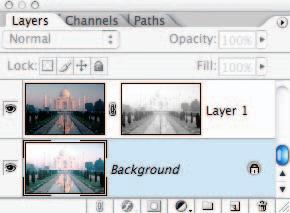
Separate exposures can be combined in Adobe Photoshop

Daniel Tückmantel
Paul Allister
contrast and compensation


James Newman

essential skills
~ Gain knowledge and understanding about contrast and exposure compensation and its relationship to the correct exposure. ~ Understand the relationship between lighting contrast, lighting ratios, subject contrast and subject brightness range. ~ Create images demonstrating an understanding of contrast and exposure compensation. ~ Document the progress and development of these skills.