5 minute read
A black and white digital workfl ow


A black and white digital workflow
It is possible to create high quality black and white images using a digital workflow as well as the more traditional analog film and photographic paper route. Just as the Zone System is about tonal control and manipulation we can exercise the same degree of precise control over digital tones or levels destined to be printed via an inkjet printer. This control can be exercised during the capture, post-production editing and printing stages of the digital process.
Advertisement
Capturing in RGB
It is important to capture the images destined for black and white as color images in the digital camera you are using. Do not be tempted to select any black and white option that may exist in your camera’s preferences. It is advisable to capture your images using the Raw file format to access the higher bit depth and higher dynamic range that the Raw file format offers. Make sure you have read the section ‘Raw format exposure considerations’ in the chapter ‘Exposure and Light Meters’ (pages 51 to 58). To achieve rich shadow tones it will be important not to underexpose the shadow tones during the capture stage of the process.
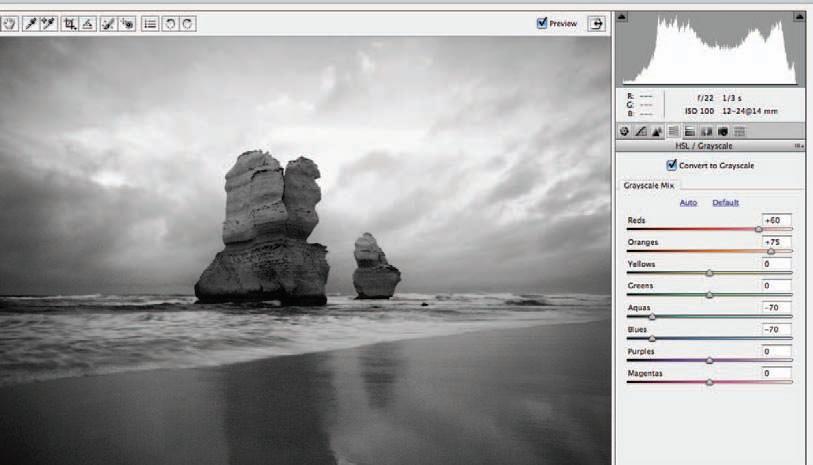
Converting to grayscale in the editing software
The best place to convert a digital image from color to black and white (grayscale) is in Adobe Camera Raw or Photoshop Lightroom. Use the sliders in the HSL/Grayscale tab to fine-tune the conversion process. Dragging the red slider to the right will lighten the red colors in the image whilst dragging the blue slider to the left will darken the blue tones. You can then lower the exposure and increase the overall contrast using the tone curve controls to increase the drama further if required. For users of Photoshop Elements it is recommended that you open the image as a 16 Bits/Channel file from Adobe Camera Raw and then make use of the ‘Convert to Black and White’ adjustment feature to achieve maximum quality.
Black and white printing using an inkjet printer
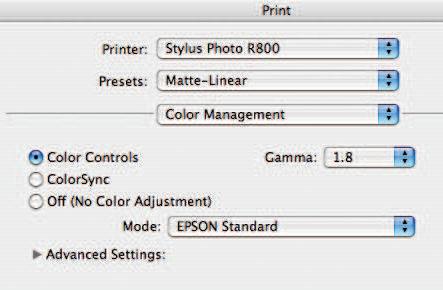
If you hope to create neutral black and white prints from a color inkjet printer it is important to either profile your printer or consider purchasing a printer that utilizes a gray ink cartridge in addition to the black ink cartridge that is part of the overall ink set. Budget 8 x10 inch (A4) printers usually struggle to print black and white images without a color cast in both the shadow and the highlight tones. The ‘canned’ profiles that come shipped with these printers rarely produce acceptable results. Attempting to print black and white images using the ‘black’ option in the printer driver can result in unsightly ink dots in the highlights of the print and the image does not match the luminance values of the calibrated on-screen display in your editing software.
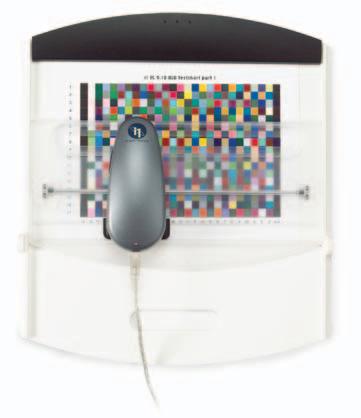
A calibration device such as the Gretag Macbeth Eye-One Pro from X-Rite is capable of creating a custom profile for your unique printer/ink paper combination. Alternatively you can contact a profile service provider who can create a profile for you using the same hardware. This involves measuring a target print from your printer to create a unique profile for the color characteristics of your printer setup. Normally these profiles are created using no color management as the untagged target file moves through the editing software and the printer driver software. The file is opened in the editing software without converting to the working space (‘Leave as is’), ‘No Color Management’ or ‘Same as Source’ is then selected in the ‘Print’ dialog box and the color management is switched off in the printer driver. To create a more efficient profile for a budget printer it is recommended that the color management is left on in the printer driver (the rest of the workflow remains the same). It is important to select a standard color setting in the Color Controls of the printer driver with a Gamma of 1.8, if available. This last step will ensure the shadow tones print with rich detail instead of printing too dark (as is the case with standard profiles created for these budget printers).
Note > The larger 13 x 19 inch (A3) printers using the higher quality inksets (such as the Epson 2400 using UltraChrome K3 inks) have better ‘off-the-shelf’ performance for printing black and white prints with better shadow detail.

Target tones
With an accurate printer profile optimized for your printer you should be able to target the three most important tones in the Zone System. This is Level 110 which should print approximately the same tone as a photographers’ gray card, the darkest shadow tone that is not black (Zone II) and the brightest tone that is not paper white (Zone VIII). Print a step wedge with tones of a known value so that you can accurately assess the performance of your printer, when working with a particular paper and ink combination. Once these values have been targeted in the print you can then accurately target these tones when working with images in your image-editing software (see the texts Photoshop: Essential Skills or Adobe Photoshop Elements Maximum Performance for more information on these post-production skills).
Wil Gleeson
studio lighting


Rodrick Bond

essential skills
~ Develop knowledge and understanding of the use of artifi cial light sources, camera and associated equipment in a studio environment. ~ Develop an awareness of the effect of artifi cial light in the creation and control of lighting ratios, shadows, contrast and exposure. ~ Observe the importance of lighting in the production of photographic images. ~ Produce photographs demonstrating a practical knowledge of the use of light. ~ Compile information relevant to the technique and production of each image.