9 minute read
SoM Laser cutter screen printing


TUTORIAL
Screen printing with lasers
Prepare screen printing frames with a laser cutter and print your own posters and clothes
Dr Andrew Lewis
Dr Andrew Lewis is a specialist fabricator and maker, and is the owner of the Andrew Lewis Workshop.
YOU’LL NEED
Wood for frame
approx. 2 cm × 1 cm × 100 cm
Steel woven wire mesh filter screen
between 60 and 200 mesh
Fibre pencil Acrylic spray paint Screen printing ink
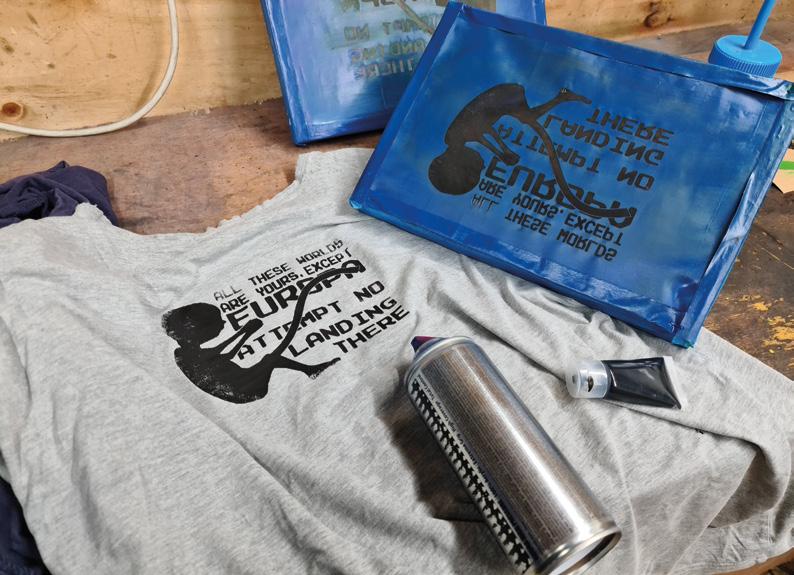
Right Some fabric inks will set with the addition of a catalyst, while others require heat to get them to become colourfast. If you don’t set the ink properly, it will wash out of the garment. It’s also worth pre-washing the garment before you print to prevent colour bleeding from the fabric into the ink
Screen printing is a favourite for
custom clothing and art prints, because the printing process can be fast, repeatable, and easy to
automate. A screen print is essentially a very advanced stencil that uses fabric mesh to hold ink-resistant masks in place. Creating a printing screen usually involves applying a special photosensitive emulsion to fabric mesh stretched over a frame, and then developing the screen with a design in a similar way to making a photographic paper print. It’s not a difficult process, but it does require special equipment. You can also make simple screens by applying pre-cut vinyl directly to the mesh, but the vinyl can’t be cut into very intricate patterns. In this article, you’ll see how you can use your laser cutter to shortcut the process, and get printing with the minimum of fuss.
If you’re going to get into screen printing, then you’re going to need a screen. Making a screen is easy and, if you’ve ever stretched a canvas, you’ll be familiar with the technique. Begin by cutting some
FORGE

wood to make a square about the size of an A4+ sheet of paper (250mm × 337mm). You don’t have to make a fantastic job of the jointing, as long as the pieces hold together and are flat, with the sides at right angles. Staples, glue, and brad nails should be fine for holding the frame together.
On a normal screen printing frame, the mesh will be made of nylon, silk, or some other fabric. To work with the laser, you’ll need something more resilient than textiles. Take a piece of stainless steel mesh large enough to stretch around the frame, and staple it to one side, pulling the mesh tight as you go. The tension of the mesh on the frame is important to get good prints, so keep the mesh as tight as you can. Work your way around the frame, stapling the mesh in place and drawing the tension. Once you’ve fixed the mesh in place, go around with some extra staples to make doubly sure. You can use some masking tape to tidy up the edges of the frame and protect your fingers from any sharp strands of mesh.
You don’t need photosensitive emulsion for the lasering process: you’ll be using acrylic spray paint. Apply a few thick coats of acrylic spray to both sides of the mesh. The paint needs to totally seal the mesh. You can check this by holding the screen up to a bright light and making sure you don’t see any pinpricks of
PICK YOUR INK
There’s a huge variety of screen printing inks available, and you’ll have to experiment to some extent if you want to get the best results from your screen. If the ink is too thick, you’ll probably find that you can’t push it across the screen properly. If the ink is too thin, it will go through the screen and seep underneath the edge of the mask, ruining your prints. If you’re using a waterbased ink, you can thicken it by leaving it with the lid off to evaporate some of the water. You could also add a thickening agent if you need to.
Left When you’re making the frame, the important side is the one that will have the mesh stretched over it. Keep that edge as square and flat as possible. A combination of glued butt joints and staples should be enough to hold the frame in shape
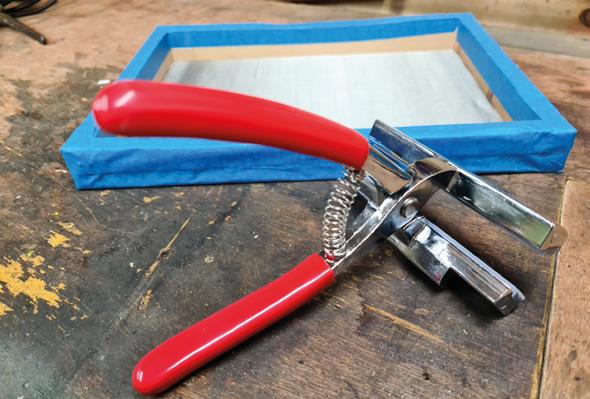
Below If you have access to some canvas pliers, stretching the mesh on the frame should be considerably easier. Canvas or upholstery pliers have a wide jaw and a raised section on the back to increase leverage when pulling canvas tight
TUTORIAL

above the surface that you want to print on
”
Above Stainless steel filter mesh is relatively inexpensive and rugged enough to stand up to bombardment from lasers and squeegees. Staple the mesh onto the frame as though you’re stretching a canvas
Right A bright light is very useful for checking your mesh is etched properly. You can see a flaw at the foot of this etching, where excess heat from the laser has damaged the mesh. This screen won’t survive many prints before the mesh around the foot disintegrates completely. It’s best to start again and etch a new frame with a lower power and more passes if this happens
QUICK TIP
Some printing inks contain latex and other harmful chemicals. Be careful and check the MSDS data, especially if you have an allergy. light shining through the acrylic. Two or three coats of paint should be enough to seal the screen completely.
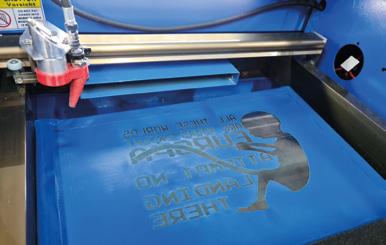
Once the mesh has dried for a couple of hours, you can load the frame into the laser cutter and etch your design into it. It’s best to position the frame with the mesh side closest to the laser, leaving a void below. Detail is critical, so don’t forget to adjust the height of the frame to match the focal point of the laser. It might be tempting to etch the design in a single pass, but applying too much concentrated power on small details can generate enough heat to damage the steel mesh. Make four or five laser passes with a lower power (10–15 percent of full power at 200mm/s, depending on the laser) to get the best result. It should be obvious when the mesh is completely etched, as you’ll be able to see through the etched sections. Hold the screen up to a bright light to double-check you’ve got a good,
even etch. Give the screen a quick wipe with some water and a soft sponge to get rid of any residues from the etching process, and let it dry.
You’re ready to screen-print, so grab some ink, a squeegee, and something to print on. Proper screen printing jigs hold the frame slightly above the surface that you want to print on. That’s one of the reasons that tensioning your frame is important. You need to be able to push the screen down onto the surface and

have it spring back up again behind the squeegee as it moves along. You don’t have a fancy frame, but you do have the next best thing, which is a few 2p coins. You can stack or tape coins to the corners of your frame to keep it slightly raised from the print surface. It might look a bit odd, but it will work.
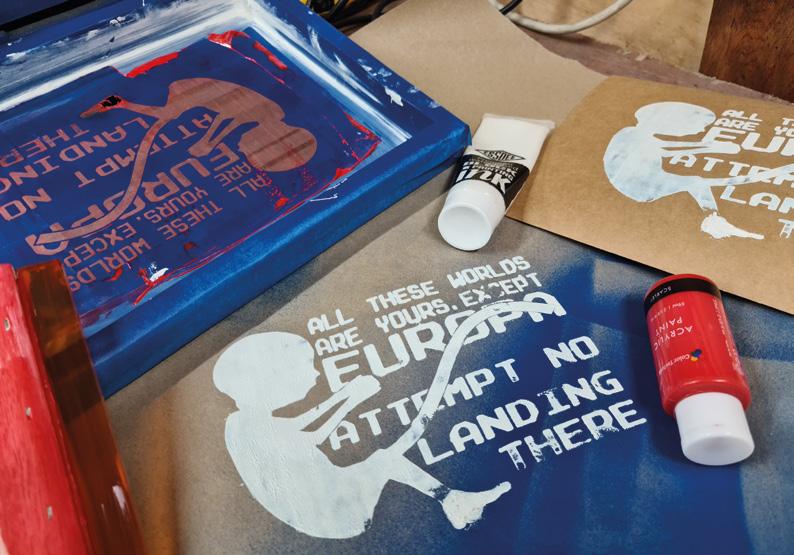
Take your frame and place it on the object you want to print. Put some ink at one end of your screen, and use your squeegee to pull the ink across the frame without pushing down. This is called flooding or a flood pass, and the idea is to spread the ink across the screen, to improve print quality and to prevent waterbased inks from drying in the mesh of the screen and blocking it between prints.
Now, draw the squeegee across the screen again, this time pushing down gently onto the print surface as you pull the squeegee along. If you feel more comfortable, you can push the squeegee rather than pull it. Remove the frame, let the design dry, and repeat as necessary. You’ll probably need to make a few practice runs before you figure out all of the variables. The thickness of the ink, the amount of pressure you apply, distance between the frame and the print surface, the fineness of the screen mesh, the material you’re printing to, and even the temperature of the room make a difference to the final result.
If you’re really struggling with the squeegee and find that you can’t get a good image, then chances are that the problem is with your ink or with the screen itself. If the screen is blocked by dried ink, or hasn’t been fully etched, you won’t be able to get a good result. If the viscosity of the ink is wrong, you’ll have trouble controlling the flow of ink onto the print surface. If you’ve been fiddling around for a long time and your frustration levels are rising, try using the screen as a simple stencil, and test it by dabbing ordinary acrylic paint through the screen with a sponge or stiff brush. If you still don’t get an image from that, then try using a frame with a coarser mesh, or thinning the ink.
NO WASTE
You can reuse your frames by cleaning the acrylic off with acetone or another solvent and then respraying the mesh again, ready to etch on the laser. If you accidentally leave some ink to dry on the frame, you should be able to clean it with water and a white or green abrasive pad. The acrylic paint is more resilient than you might expect, and will withstand a fair amount of abuse before it gets damaged. The finer the mesh you use, the more detail you can reproduce – but too fine a mesh will make it very hard to force the ink through the screen.


