9 minute read
Tutorial Retro gaming


TUTORIAL
Use a retro DB9 joystick with Raspberry Pi 400
MAKER K.G. Orphanides
K.G. makes, writes about, and helps to preserve unusual gaming software and hardware.
@KGOrphanides
Get the classic ZX Spectrum experience with Raspberry Pi 400 and a GPIO joystick
Raspberry Pi 400 is, with its integrated keyboard and tweaked performance, a
modern home micro. This month, we pay tribute to one of the computers that helped inspire its look by emulating Sinclair’s ZX Spectrum, complete with the latest games and retro joysticks connected via GPIO. These use the D-sub connector popularly called DB9, also known as DE-9.
01 Install the Free Unix Spectrum Emulator
Also available in the RetroPie emulation distro we’ve used in previous tutorials, the FUSE ZX Spectrum emulator can be found in Raspberry Pi OS’s standard repositories, so installation is a bare minimum of fuss. Open a Terminal window and type: fuse-sdl
Press F2 to open FUSE’s file browser, navigate to AbbayeDesMorts.tzx.zip, and press ENTER. The game should load and run automatically. For full-screen mode, press F1, go to Options, and select ‘Full screen’. Take note of the Filter option in the same menu, which lets you choose the emulator’s upscaling method: ‘TV 3x’ gives you some pleasing scan lines and the correct aspect ratio.
Warning! Copyright
Many (but not all) Spectrum games can be legally downloaded. See our Legal ROMS page for more information. magpi.cc/legalroms
You’ll Need
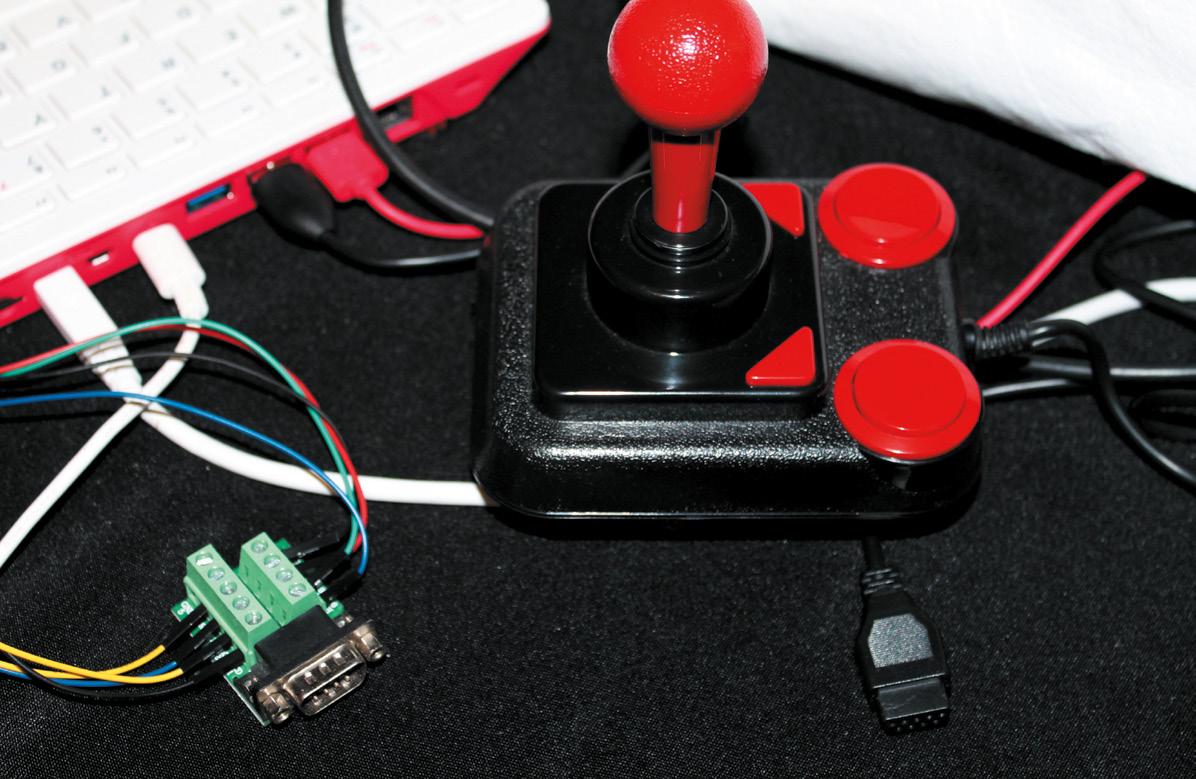
> DB9 joystick
> DB9 breakout board magpi.cc/
db9breakout
> 10–20 male-tofemale jumper cables magpi.cc/
mfjumpers
> DB9 GPIO driver source magpi.cc/
db9gpiogit
sudo apt install fuse-emulator* spectrumroms opense-basic libspectrum8
This will install FUSE, its GTK and SDL front ends, and both open-source system ROMs and the original Spectrum system ROMs. Permission has been granted for free modification and distribution of the latter (magpi.cc/SpecROMs).
While the open-source ROM can only handle a limited selection of files, that spectrum-roms package will allow you to play a wide array of games, including the latest generation of technically spectacular releases for the platform.
02 Test FUSE Next, we’ll make sure FUSE is working with the ZX Spectrum port of Locomalito’s open-source classic, L’Abbaye Des Morts. In a Terminal, type:
wget https://spectrumcomputing.co.uk/zxdb/ sinclair/entries/0030109/AbbayeDesMorts.tzx.zip 03 Wire up your joystick port Standard DB9 connectors split the nine pins of your cable into nine screw-down terminals. We found it most convenient to use male-to-female jumper cables for this, clamping the male tips into our DB9 breakout connector.
For a classic single-button joystick like the Competition Pro Retro we used, pin 1 is up, pin 2 is down, pin 3 is left, pin 4 is right, and pin 6 is fire. Pin 8 connects to ground – we recommend using a green cable for it. Some joysticks may require you to connect port 7 to a 3.3V power connector on the GPIO, but the Competition Pro does not.
See the ‘DB9 pins’ box (overleaf) for an at-aglance DB9 connection table.
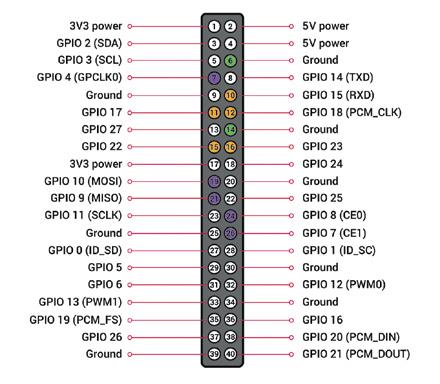
04 Wire up Raspberry Pi Wiring up the DB9 port to Raspberry Pi’s GPIO is a fairly simple process, although you’ll have to do some careful pin counting. On Raspberry Pi 400, pin 1 is at the top right of the horizontally
DB9 breakout boards are silk-screened with pin numbers, making it easy to connect your jumper leads Any classic or modern reproduction 9-pin (DB9) joystick will work for this – you can even use a Sega Mega Drive pad in a pinch
oriented GPIO port and pin 40 is at the bottom left. Remember that GPIO numbers don’t correspond with pin position numbers.
For a reminder of where everything is, open a Terminal and type: pinout.
Our diagram (Figure 1, overleaf) shows where the female jumpers connected to your DB9 port need to go on Raspberry Pi. For a single one-button joystick, up goes to GPIO 4, down to GPIO 7, left to GPIO 8, right to GPIO 9, and fire to GPIO 10.
05 Build the DB9 joystick driver Let’s build the driver. Enter this in a Terminal window:
sudo apt install dkms raspberrypi-kernelheaders git clone https://github.com/marqs85/db9_ gpio_rpi.git cd db9_gpio_rpi sudo cp -r db9_gpio_rpi-1.2 /usr/src/db9_ gpio_rpi-1.2/ sudo dkms add db9_gpio_rpi/1.2 sudo dkms build db9_gpio_rpi/1.2 sudo dkms mkdeb db9_gpio_rpi/1.2 --sourceonly sudo modprobe --first-time db9_gpio_rpi map=1,1 #!/bin/bash # fix for db9_gpio_rpi driver issue https://github.com/marqs85/ db9_gpio_rpi/issues/8 # RPi 4 and 400 need this tweak to speak to db9_gpio_rpi gpio connected controllers as some inputs need explicit pullup # ensure that you’re applying the pullups to the correct pins - this is for a standard deployment of the driver # # Use: # chmod pullup.sh +x # add /path/to/pullup.sh to /etc/rc.local to load on boot
# Joyport /dev/input/js0 raspi-gpio set 4 ip pu raspi-gpio set 7 ip pu raspi-gpio set 8 ip pu raspi-gpio set 9 ip pu raspi-gpio set 10 ip pu raspi-gpio set 11 ip pu raspi-gpio set 14 ip pu # Joyport /dev/input/js1 - if we connect a second joystick raspi-gpio set 15 ip pu raspi-gpio set 17 ip pu raspi-gpio set 18 ip pu raspi-gpio set 22 ip pu raspi-gpio set 23 ip pu raspi-gpio set 24 ip pu raspi-gpio set 25 ip pu
pullup.sh
> Language: Bash
DOWNLOAD THE FULL CODE:
magpi.cc/pullupfix
001. 002.
003.
004.
005. 006. 007. 008. 009. 010. 011. 012. 013. 014. 015. 016. 017. 018. 019. 020. 021. 022. 023. 024. 025.
TUTORIAL
THE MAGPI DB9 pins
For a one-button joystick – including multi-button sticks with only single-button functionality – connect these pins on your DB9 breakout board.
DB9 pin Joystick function
1
UP
2
DOWN
This tutorial is from in The MagPi, the official Raspberry Pi magazine. Each issue includes a huge variety of projects, tutorials, tips and tricks to help you get the most out of your Raspberry Pi. Find out more at
magpi.cc 3
4
5
6
7
8
9
LEFT
RIGHT
FIRE
GROUND
That map option defines what kind of joystick you’re using, with each number classifying a different type of joystick As we’re using a one-button joystick, map=1,0 would do it, but 1,1 means we can connect a second stick of the same type to a second port.
Top Tip
GPIO reference
If you’re flummoxed by GPIO pin numbering, see the official docs at magpi.cc/gpio.
06 Test your joystick Building and loading the driver won’t quite get us to a functional joystick, as the driver isn’t fully compatible with Raspberry Pi OS’s recent use of raspi-gpio instead of gpio. However, this is a great time to test your joystick to make sure that it’s wired up correctly.
sudo apt install jstest-gtk jstest-gtk
You should see your joystick in the peripherals list. When you click into it, if you’re using a Competition Pro Retro or similar joystick, you’re likely to find that the fire button is jammed on and that the horizontal x axis is stuck at the left.
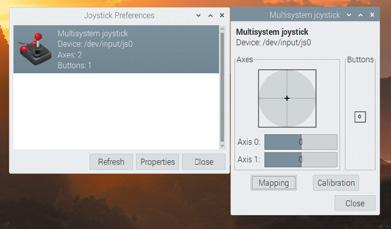
The jstest-gui program allows you to test your joystick and also indicates whether it’s working as it’s supposed to
07 Pull-ups are good for you This is because your GPIO needs to be set up to handle the joystick’s pull-up switches. On a standard DB9 GPIO configuration, the script you’ll find at magpi.cc/pullupfix will do this for you. Create it using your preferred text editor and save it somewhere handy. We’ve put ours in /home/pi/pullup.sh. Test it by running:
sh /home/pi/pullup.sh jstest-gtk
If the joystick is now aligned properly and the button isn’t stuck on, you’re in business.
chmod +x /home/pi/pullup.sh
Finally, let’s load those pull-up settings on boot.
sudo mousepad /etc/rc.local
Above the exit line, enter the following:
/home/pi/pullup.sh
You can also place the pull-up code directly in rc.local if you wish.
08 Load on boot Once you’re satisfied that your joysticks work, you’ll want to load the driver module on boot.
sudo mousepad /etc/modules
…and add:
db9_gpio_rpi
After saving and exiting the file, enter:
sudo mousepad /etc/modprobe.d/db9.conf
options db9_gpio_rpi map=1,1
If you’re using a different joystick and configuration, you’ll need an appropriate map, and possibly some extra GPIO connections, which you can find at magpi.cc/db9gpio.
Reboot Raspberry Pi and use jstest-gtk to ensure that everything is working as it should. You can now use the driver as a generic controller input device.
09 FUSED joysticks FUSE doesn’t enable joystick support by default, so we’ll have to set that up. Run fuse-sdk, then press F1 for the menu. Go to Options > Peripherals > General. Press SPACE to enable Kempston joystick support, then press ENTER.
Press F1, then Navigate to Options > Peripherals > Joysticks and make sure both Joystick 1 and Joystick 2 are set to Kempston. If not, press ENTER, press ENTER again to open the Joystick type options, navigate to Kempston on the list, and press ENTER again.
Note that some games may default to using Joystick 2, so you’ll want to configure both, even if you only have a single stick connected.
When you’re happy with your settings, open the Options menu and select Save.
10 Game configuration Although many Spectrum games support joysticks, you’ll often have to enable support for these. L’Abbaye des Morts enables joystick support by default, but its menus provide a good example of what to look for.
Load the game and then press C on the keyboard to access the control configuration. Pressing 1 here enables and disables Kempston joystick support. In other titles, you may need to explicitly choose to use your joystick to control the game if you want it to work.
11 Get game The Spectrum’s been a long-time homebrew favourite, with software continuing to come out for years past its original availability. There’s been a resurgence in popularity of the platform with the release of a number of successors, most recently the ZX Spectrum Next.
As ever, the indie-friendly itch.io digital distribution platform is one of the best places
Figure 1
FORGE
to find both free and commercial releases for the Spectrum, and we’ve put together a list at magpi.cc/zxspectrumgames.
Figure 1 GPIO connection points for two singlebutton joysticks, corresponding to the ‘GPIO connections’ table (below). Joystick 1 is purple, joystick 2 is orange. Use your choice of ground pins for each controller: ground pins 6 and 14 are marked in green here
12 Boot to black Finally, let’s start FUSE on boot for that authentic Spectrum ambience. In /home/pi/.config/autostart create a text file called fuse.desktop. If the directory doesn’t exist, create it. Add the following lines to your new file:
[Desktop Entry] Type=Application Name=FUSE Exec=/usr/bin/fuse-sdl --full-screen
You can exit FUSE at any point to return to Raspberry Pi OS’s familiar desktop.
Top Tip
Get in touch
Is retro gaming your hobby? Drop KG a message on Twitter
@KGOrphanides
if you have any early-2000s physical Linux game releases.
GPIO connections
GPIO connection table for two one-button joysticks. The db9_gpio_rpi driver uses these pins by default for single-button joysticks. You will also need a ground connection for each.
BUTTON Joystick 1 GPIO PIN Joystick 2 GPIO PIN
UP
DOWN
LEFT
GPIO 4
GPIO 7
GPIO 8 GPIO 15
GPIO 17
GPIO 18
RIGHT
FIRE
GPIO 9
GPIO 10 GPIO 22
GPIO 23


