19 minute read
STRUCTURAL FORENSICS
investigating structures and their components Some lessons are not learned until after events occur. This was the case with the San Francisco-Oakland Bay Bridge (SFOBB) or Bay Bridge. This bridge, which carries more than 240,000 vehicles per day along Interstate 80, connects the peninsula of San Francisco with the city of Oakland and eastern side of the San Francisco Bay. Initial reports suggested hot-dip galvanizing embrittled the bolts causing a failure. After more research, it was determined the embrittlement was not from the galvanizing but was a much more complex issue.
History of the Bay Bridge
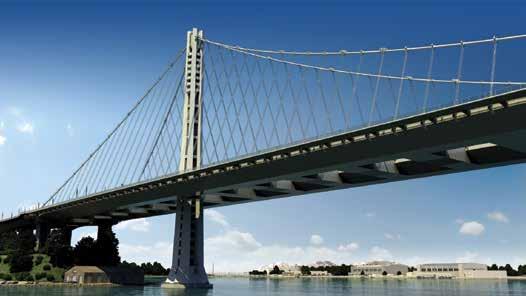
In 1989, the series of bridges that make up the Bay Bridge were severely damaged during the infamous Loma Prieta Earthquake that rocked the city and surrounding areas. The most substantial damage occurred when the upper east section of the bridge collapsed onto the lower deck during the height of the heaviest traffic commute, causing heavy damage to travLessons Learned from the Bay Bridge Bolt Failure eling vehicles and killing and injuring many. After this earthquake, the western section of the bridge underwent a complete seismic retrofit in 2004, where the bridge was modified By Thomas Langill, Ph.D. to become more resistant to seismic activity and other ground motion. In 2013, the eastern section of the bridge was completely replaced with a new self-anchored suspension bridge (SAS) and opened in September of that year (Figure 1). This allowed the bridge’s cables to be completely attached to the ends of its deck, rather than into the ground, allowing for more flexibility during seismic activity. However, one of the issues with an SAS bridge is the potential for an amplification of stresses during Dr. Thomas Langill has been a seismic event where the SAS cables are hit with with the American Galvanizers an increase of pressure to hold up the bridge. Association for 22 years as its Technical Director. He is Chairman of three ASTM Subcommittees, including the subcommittee that maintains the standards for the hotdip galvanizing process, A05.13, G01.04 on atmospheric corrosion, and G01.14 on corrosion of construction materials. Dr. Langill is also Secretary of the ASTM Main Committee A05 on MetallicCoated Iron and Steel Products. Bridge designers and constructors are always concerned with preserving their bridges for as long as possible. To combat the amplification of stresses and to offset the potential of harmonic amplification of the bridge deck, the designers installed shear keys in the new design of the eastern bridge span. Shear keys are blocks of concrete supported by large diameter bolts that are made from ASTM A354 Grade BD material in diameters from two to four inches and have been hot-dip galvanized. The shear keys dampen the seismic energy transmitted to the bridge deck and help prevent damage during an earthquake. They are not intended to support the bridge deck itself but merely play a role in the suppression of forces during a seismic event. Each bolt within the shear key is heat-treated to meet the minimum specification of mechanical properties, and hot-dip galvanized to provide corrosion protection. These bolts were used throughout the Bay Bridge design, not just in the new shear key installation. These anchor rods, A354BD, are specified to have an ultimate tensile strength (Fu) of a minimum of 140,000 psi for bolts with diameters above 2.5 inches and a hardness range of a minimum of 31 HRC and a maximum of 39 HRC. Figures 2a and 2b show the placement of the anchor rods used for the shear keys when the bolts were first put into place in the Pier E2 location. The anchor rods were installed into the shear keys in November 2008, and grouting of the rods began in January 2013. However, these anchor rods were not tensioned until March 2013 because they could not be installed until the superstructure of the bridge was put in place. Because of this, the very bottoms of the anchor rods were purposely damaged to hold the nuts until they could be properly tensioned. The top of the steel pipe sleeve assemblies holding the shear key rods were exposed to the environment
(a)
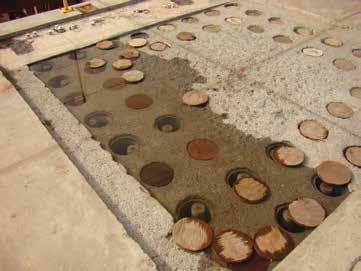
Figure 2 (a and b). Placement of the anchor rods used for the shear keys when the bolts were first put into place in the Pier E2 location. (b)
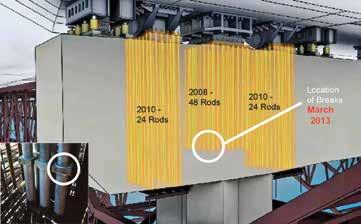
during the period before the superstructure of the bridge was installed. This left little clearance between the top of the rods and the bottom of the bridge.
Beginning Signs of Trouble
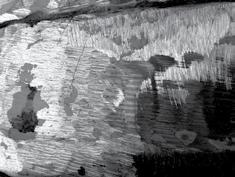
Once the superstructure of the bridge was erected in 2013, and the load transfer was completed, the anchor rods were pre-tensioned to 70% of their minimum specified ultimate tensile strength (Fu). After the first two weeks of tension, 32 of the 96 anchor rods had fractured, all occurring at or near the threaded engagements towards the bottom of the rods. Once the pre-tension level was reduced to 40% Fu, failure of the rods ceased. This resulted in the decision to abandon all 96 of the rods. An alternative anchoring system was successfully designed and installed. Although these anchor rods were no longer in service, their failure raised major concerns about the long-term performance of the remaining A354BD rods throughout the bridge. The fracturing (Figure 3) resulted in three investigations focused on metallurgical testing and failure analysis on two of the fractured rods from the shear keys. It was determined the failure of the rods was a result of hydrogen embrittlement. As a result, the California Department of Transportation undertook a second testing program to further examine the cause of failure and to evaluate the remaining A354BD rods throughout the bridge.
Shear Key Rod Failure Investigation
This investigation, which began shortly after the tensioning of the shear key rods, included performing metallurgical testing and failure analysis on the rods. It was conducted by three investigators: Salim Brahimi, President of IBECA Technologies and Chairman of the ASTM F16 Committee on Fasteners; Rosme Aguilar, Branch Chief of Cal Trans Structural Metals Testing Branch; and Conrad Christensen, Principal and Founder of Christensen Materials Engineering. The design of the bridge created a very low clearance between the rods and the superstructure of the bridge. For testing to continue, the rods had to be removed in small sections by pulling them up as far as possible and sawing them off. This process was very extensive, so only a few rods ultimately were removed for the study. The first batch of A354BD rods, those installed in the shear keys, were not tested through the Magnetic Particle Inspection (MPI) because they were installed before the requirement for MPI testing was added to the contract. The MPI looks for small cracks in the rods. All of the A354BD rods were cleaned by dry blasting to SSPC No. 10 Near-White Blast Cleaning before being dipped into the molten zinc bath, to avoid acid cleaning. By skipping the acid solution, the rods avoided the generation of hydrogen. The rods were galvanized within four hours of blast cleaning to ASTM A123 standards. The bolt threads on the rods can be rolled or cut, and heat treatments must include quenching in oil. The investigation continued with a visual inspection of two failed rods and showed the presence of Denso paste, which is part of the Denso Tape System on the rods that provide extra corrosion protection. The threads and fractured surfaces had remnants of this paste as well as the grout used during installation. This visual inspection revealed that the surface was brittle, and that cracks had developed, grown, and spread throughout the rods progressively. This process exceeded the rod’s structural capacity, ultimately resulting in the final failure. After the visual inspection was complete, the investigation moved forward by using a scanning electron microscopy (SEM) examination of the surfaces across the rod diameter. The results showed intergranular fracture morphology near the threaded roots. As the crack progressed, the morphology became more mixed, causing a sudden fast fracture when the crack reached a critical size, meaning the rod could no longer carry the applied load. The mechanical property testing results were within proper specification values for hardness, ultimate tensile strength, chemical analysis, and microstructural analysis of the hot-dip galvanized coating. However, after conducting analysis with the Charpy V-notch tests, it was found that the test result values (13-18) were below expectations (25-35), meaning the material had failed to reach expected toughness and could be susceptible to embrittlement. The Charpy V-notch test is an impact test that determines the amount of energy that can be absorbed by the material during a fracture. The conclusion of this study stated that the cause of this failure was hydrogen embrittlement combined with the applied load exceeding the susceptibility of the rod material. The steel rods complied with the proper specification, A354BD, but the microstructure
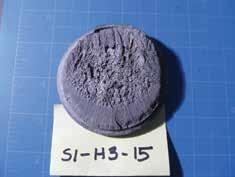
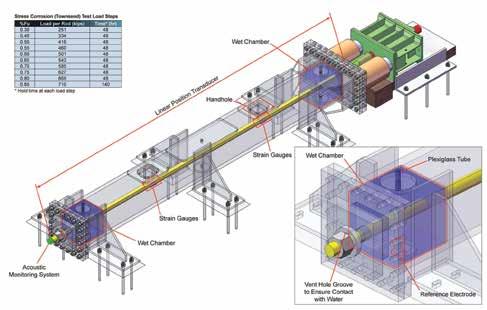
Figure 4. Townsend test schematic.
was not uniform. The microstructure inhomogeneity resulted in low toughness and marginal ductility, causing the rods to be susceptible to hydrogen embrittlement.
Evaluation of the Selected Fractured Rods
After the results of the initial analysis on the A354BD rods had shown signs of hydrogen embrittlement, the various parties responsible for the bridge design were concerned about the potential of hydrogen embrittlement in other A354BD rods throughout the rest of the bridge. Therefore, another study was initiated to test rods throughout the bridge. A variety of rods of different sizes, tension levels, and locations were selected for detailed laboratory testing to determine chemical composition, hardness, and susceptibility to hydrogen embrittlement. All mechanical property tests showed that material properties were generally uniform and within specification requirements. Another Charpy impact toughness test was conducted which showed toughness levels of the majority of the rods within the normal ranges for the material. Only the tests on the samples of the 2008 rods showed lower toughness values. After these tests resulted in normal readings, the Townsend Test for Stress Corrosion Cracking (SCC) was performed on the fulldiameter rods obtained from the various groups of previously selected rods. In this test, the tensile load was increased very slowly (in steps) until a threshold load level was established for the onset of cracking due to hydrogen embrittlement (Figure 4). This slow increase was essential because of the required time it takes for diffusion in detecting the effects of hydrogen. To properly detect the threshold load for hydrogen entering the steel from the environment due to corrosion (environmental hydrogen), the rods were loaded up to 1.8 million pounds while immersed in saltwater containing 3.5% sodium chloride. The results of this test concluded: • The 2008 rods failed because of hydrogen embrittlement at the same load (0.70 Fu) that led to failure on the bridge with similar fracture characteristic. (This confirms the
Townsend Test duplicates the actual performance of the rods.) • The fracture surface on the rods showed where the initiation of the crack occurred. As the cracks progressed, the fractures changed from intergranular to cleavage and finally to ductile fractures that took place on the opposite end of the initial cracks. (These fractures were evident in all the 2008 bolts examined.) • After testing the remaining rods, it was determined that all had threshold loads greater than their design loads, indicating they were not susceptible to hydrogen embrittlement. The next step was to determine if hydrogen was already present in the steel and if it could have contributed to the low threshold of the fractured rods. The Townsend test was repeated in air, without exposure to salt water, to make the determination. This test showed a complete absence of hydrogen embrittlement and resulted in the following: • Failure of the 2008 rods in the wet
Townsend Test occurred as a result of environmentally induced hydrogen embrittlement.
• The 2008 rods would not have failed if they were protected from saltwater Following the Townsend Test, the Raymond test was conducted on two types of small specimens cut from full-size rods. This test is a slow, rising step-load laboratory bend that allows for an examination to determine the susceptibility to hydrogen embrittlement. The results were consistent with the Townsend Test and again proved the failure was a result of hydrogen embrittlement based on their exposed environment, not internal hydrogen. The main results of the study were as follows: the 2008 rods failed by hydrogen embrittlement at the same load (0.70 Fu) that resulted in failure on the bridge. The outcome provided independent confirmation of the result obtained with full diameter rods.
Summary
In conclusion, there was no indication that the galvanizing process contributed in any way to the failure of the rods from 2008. The low hydrogen embrittlement threshold of the failed rods was likely due to fabrication methods and thermal treatment of the rods. The results of this study indicate the Bay Bridge rods installed in 2008 failed because of environmentally induced hydrogen embrittlement caused by tensioning above their threshold while simultaneously immersed in water. This created the perfect environment to introduce hydrogen into the steel. There was no evidence that hydrogen was present in the steel before installation or tensioning, nor that internal hydrogen contributed to the A354BD rod failures. The Townsend Tests performed on the A354BD rods confirmed that, without the presence of water, the rods would not have failed. All of the remaining rods on the bridge were tested and proved to have hydrogen embrittlement thresholds higher than their pre-tensioned stress levels and were concluded as safe. The remaining rods were designed to have supplemental corrosion protection measures that include dehumidification, paint systems, or grout. All of these measures will prevent corrosion and the possibility of hydrogen embrittlement as long as the galvanized coating remains intact. Additionally, the development of specific maintenance procedures for the corrosion protection system can provide assurance to the bridge owners and will be specified in the Self-Anchoring Suspension (SAS) Maintenance Manual.▪ The online version of this article contains references. Please visit www.STRUCTUREmag.org.
Structural DeSign
design issues for structural engineers T he previous two STRUCTURE magazine articles (General Principles of Fatigue and Fracture, Part 1, August 2016 and AISC and Damage Tolerance Approaches, Part 2, November 2016), reviewed the fundamental principles of cracking and how to design for fatigue and fracture. This article presents three case studies that illustrate how an engineer can use this guidance to address project challenges. The intent of this article is to move from the theoretical to the practical, and demonstrate that there is a realistic place for the more developed methodologies of fatigue and fracture mitigation.
Northridge Earthquake
The 1994 Northridge earthquake had a tremendous impact on the American Institute of Steel Construction’s (AISC) steel code over the past 20 years. After the magnitude 6.7 (Mw) earthquake, inspectors discovered 1,300 fractured moment frame connections in 72 buildings. Naturally, this made Fracture Case Studies many people uncomfortable. To address the fracture issues, the SAC Steel Project (www.sacsteel.org) studied Part 3 material behavior, connection geometry, and construction practices to figure out what happened By Paul W. McMullin, S.E., Ph.D. and why it happened. Results of the project are widely published and infused throughout current AISC Seismic provisions. One of the questions that came up during the studies was the effect of the welding backup bar. Field erectors preferred leaving them in place because they take time and money to remove. However, they create an inherent notch in the joint. This section uses fracture mechanics to study the impact that leaving the backing bar in Paul McMullin is a Founding place has on joint behavior, and what happens Partner at Ingenium Design when it is fully fillet welded to the beam flange. in Salt Lake City. He is an In the first condition, the backing bar is tack Adjunct Professor and the welded to the column flange and fused to the beam lead editor of the Architect’s as the weld is deposited, illustrated in Figure 1. Guidebooks to Structures series. Paul can be reached at Paulm@ingeniumdesign.us.
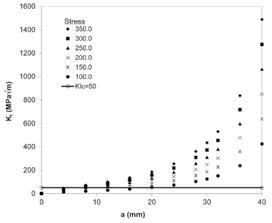
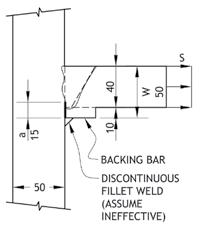
Figure 1. Beam to column flange weld in PreNorthridge moment connection.
Note how the backing bar and any lack of fusion at the weld root creates a crack. Using fracture mechanics, one can plot the stress intensity KI as a function of crack depth and far-field stress, shown in Figure 2. Using a fracture toughness of 50 MPa (m)1/2 – a middle ground value – most of the stress intensities are greater for stresses in the yield range (250 MPa to 350 MPa). Even with twice the toughness, it still seems like a poor choice to leave the backing bar in place. What happens when a continuous fillet weld is placed along the bar? Won’t that take care of the problem? There now exists an eccentric crack condition. Looking at Figure 3, notice that about half of the stress intensity values are higher than the assumed toughness. There may be an argument to allow this condition. However, considering the possibility of lower toughness, the certainty of constraint near the web intersection, and the potential for the crack to grow due to low-cycle fatigue, it also seems imprudent to leave the backing bar in place. In the end, a joint where the backing bar is removed, with the weld root gouged out and rewelded, can perform orders of magnitude better than one that has a crack-like lack of fusion in it from the backing bar. This conclusion is born out not only by the analysis but also by a rational view of the problem.
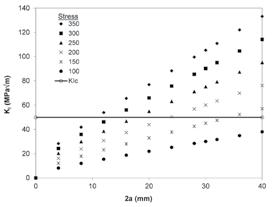
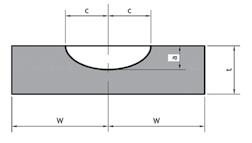
Figure 4. Assumed crack geometry in the tank wall.
Ammonia Tank
The question to answer, on a sizeable ammonia tank, is what stress corrosion cracks need to be repaired and which ones can be left alone. When steel is in contact with ammonia with very low oxygen content, cracks do not grow. However, cracks do grow in tanks when the ammonia is contaminated with air. The tank in question had been out of service for some time and had a number of stress corrosion cracks. The owner wanted to recommission the tank, and hence the project. Utilizing API RP 579 Fitness for Service, the engineers on the project created crack ratio charts that let field crews know which cracks needed repair. Cracks under a certain size for a given aspect ratio, though detected, could remain in place. The effort began by mining Charpy toughness data from material test reports. Using the master curve approach, the engineer correlated Charpy values to fracture toughness K1 values. The correlations are a function of thickness and Charpy energy values. This provided one side of the equation – the other being the stress intensity factor. Utilizing this data, the engineer developed stress intensity solutions based on the basic crack geometry shown in Figure 4. These are from solutions in API 579. Selecting a crack length 2c, a crack depth a is calculated. Doing this for numerous crack lengths, the curves in Figure 5 and Figure 6 are generated. Where the crack depth is greater than the tank wall thickness (Figure 5), a leak-beforebreak condition exists. This approach is good because the tank will leak before rupturing. However, for lower toughness material, like in the weld or heat affected zone, a breakbefore-leak condition existed (Figure 6 ). This is of more concern, given the lack of warning before catastrophic failure. This analysis tells two things. In the base metal, long, shallow cracks need to be repaired, as a break-before-leak condition exists for aspect ratios (a/2c) less than 0.5. In the weld base metal, all cracks of a given size need to be repaired. The engineer can decide what crack size, for a given aspect
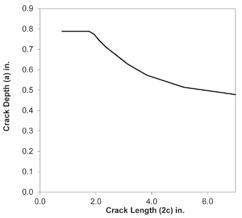
Figure 5. Critical crack size, a leak-before-break condition in the tank wall. Figure 6. Critical crack size, a break-before-leak condition in the weld.
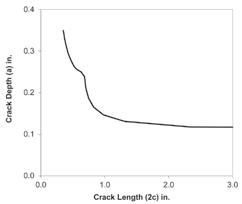
ratio, needs to be repaired by choosing an acceptable safety factor. Finally, perhaps a third lesson: Not every crack is a problem and needs to be repaired.
Bridge Crane
The bridge crane in Figure 7 was one of the dozens in the area that were decommissioned over the years. It was about 100 years old and had experienced somewhere between 5 to 10 million fatigue cycles. The owner wanted to know if the structure was safe before investing in a major electrical upgrade. The study looked at the member forces, AISC fatigue requirements, and non-destructive testing of the eyebars. The force analysis did not identify any problems. The model results matched the Maxwell diagram in the original drawings. The fatigue analysis indicated stresses in most members below the threshold values in AISC of 4.5 ksi. A few members towards the middle of the truss had stresses near 10 ksi. They had failed at one point, causing the truss to lose over a foot of camber. Up to this point, nothing was of major concern. However, enter non-destructive testing (NDT). Before any NDT testing occurred, ironworkers stripped the paint of some key joints and discovered cracks, visible to the naked eye, shown in Figure 8. The phased array ultrasonic and magnetic particle testing found cracks inside and at the surface of a substantial number of joints. The cracks ranged in size from 1/8 to 2½ inches long and 1/64 to 1/32 inches wide. After lengthy discussions and a second engineering opinion, the owner elected to retire the truss – creating a serious operational challenge to the site. Given the size and extent of the cracks and difficulty in repairing eyebars, it was truly the only rational decision. A key lesson to learn from the bridge crane is the importance of thorough inspection. The stress and fatigue analyses showed the bridge crane was in good shape. However, reality showed a very different picture, one that eventually saved lives. In the end, the principles of damage tolerance can be applied to traditional civil engineering structures in a way that provides clarity to the cracks they may contain. These are rooted in fracture toughness testing, stress intensity factor solutions, fatigue testing, life correlations, and non-destructive testing. These case studies show the approach in utilizing some of these tools and the insight gained through their application. Greater application of these tools to civil engineering structures would lead to increased safety of the structures for which engineers are responsible.▪
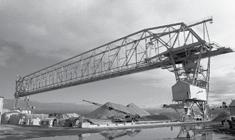
Figure 7. Bridge crane with eyebar bottom chord and diagonal members.
