
2 minute read
Adjusting the Component/Group View


Adjusting the Component/Group View
The way users view a component or group instance can be adjusted in SketchUp. By adjusting the view settings of the components and groups, you will gain a better understanding of what it means to be working within a component or group instance.
Advertisement
To help demonstrate this point, next to the previously made Cube components, create another component: using the Circle tool, draw a 10´-diameter circle on the ground. Next, using Push/Pull, add a 10´ volume to the circle, creating a cylinder.
Select the entire cylinder, right-click and select Make Component. Name the component Cylinder (Fig. 3-9). Make two copies of the cylinder component and place them near the cubes (Fig. 3-10).
Next, select one of the Cube components, right-click, and select Edit Component—or just double-click on the component. Either method will place the view context into the component instance.
Fig. 3-9: Create a Cylinder component adjacent to the cubes. Make the cylinder 10´ in diameter and 10´ tall.

Fig. 3-10: Make two copies of the Cylinder component and place them near the Cube components.
As previously stated, the dashed line appears around the Cube component that is being edited. This indicates which version of the component is being worked on (Fig. 3-11).
All the other Cube components are screened back, but they are more vivid or clear than the Cylinder components. When a component instance is entered, similar components won’t have as much contrast as the rest of the model, indicating which components are the same (Fig. 3-11).
Component instance ‘Rest of model’
Similar component
Similar component
‘Rest of model’
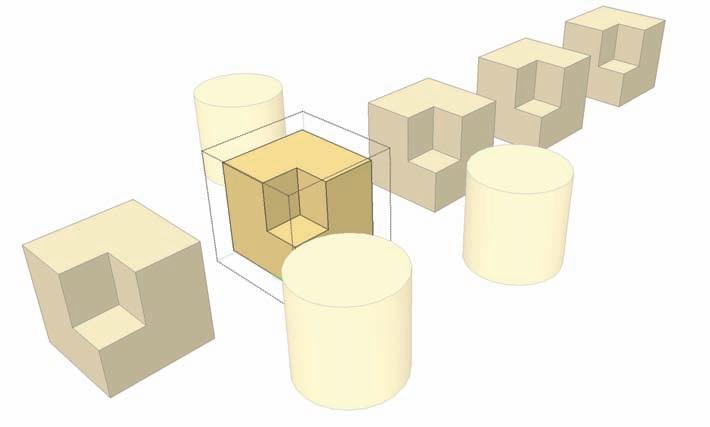
Fig. 3-11: The model view changes in a component instance. Similar components are slightly faded, while the rest of the model (in this case, the cylinders) becomes almost invisible.
The Cylinder components (or rest of the model) have more contrast to distinguish between the specific component instances and the rest of the model geometry. If there were any other unrelated model faces and edges, they would be just as faded (Fig. 3-11).
You can adjust these view settings. Go to the Window menu and select Model Info. From the Model Info menu box, select Components. The settings found under this tab allow you to adjust the contrast of similar components (or the rest of the model) when you are working within a component instance (Fig 3-12).
You can adjust the slider under Fade Similar to decrease or increase how vivid the similar components will appear when you are in that specific component instance (Fig. 3-13). The Fade Rest of Model slider works similarly: adjusting it will make the rest of the model less or more vivid when you enter a component instance (Fig. 3-14).
Next to each slider is a check box that says Hide. When this box is checked, all similar components or the rest of the model will be hidden when you enter a component instance.
Fig. 3-12: The Model Info Components tab is used to adjust the way a model appears when its components are edited.


