3 minute read
Component Tools


Use the Component menu (Window > Components) to navigate to the desired compo33 nent folder and select the component.
The selected component will appear in the model and on the new layer. When a component is copied, it will stay on the same layer.
Advertisement
Component Tools
There are many tools that affect the placement, copies, rotation, and scale of components. The following list is a quick overview of some tools:
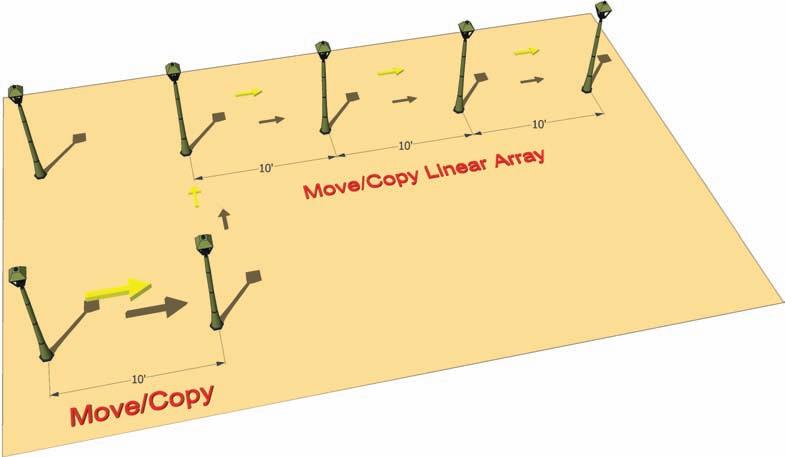
Move/Copy Like many of SketchUp’s tools, Move/Copy has multiple functions.
Ctrl+Alt+click and drag to create a copy of the selected component/geometry. Entering a value (distance) in the VCB will locate the copied component the specified distance away from the original.
Move/Copy array – Linear Move/Copy has the ability to create multiple copies in a row.
Example: To copy a component 10´ in any direction, enter 4X in the VCB. Three copies will be generated along the same axis of movement, each 10´ apart (Fig. 6-25).
Fig. 6-25: A Move/Copy linear array.
You can change the distance and value in this example as needed. Move/Copy will always create a set number of copies (the value entered -1) equidistant from each other. Move/Copy array – Division Copy and place a component 40´ from the original. Enter 5/ (divide symbol). Four copies will be created, equally spaced between the two components (Fig. 6-26). As with Array – Linear, the distance and value can be changed as needed.

Fig. 6-26: The Move/Copy Array – Division.
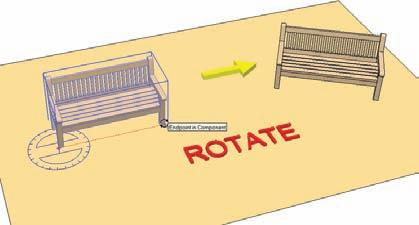
Move/Copy–rotate The Move/Copy command doubles as a Rotate-On-Axis tool. Select Move/Copy and hover the cursor over the selected component. Little red Xs will appear around the side of the component the tool is hovering over. Selecting one of the Xs will cause a small rotate protractor to appear, allowing the object to be rotated on an axis (Fig. 6-27). Learn how to quickly locate the crosshairs on various sides and play with how the Move/ Copy Rotate functions. rotate tool The Rotate tool (View> Toolbars > Modification menu) allows you to select two points of rotation for a selected component: the center axis and the angle of rotation. The Rotate tool can array objects using the same commands as Move/Copy Linear and Division Array (Fig. 6-28). Scale tool The Scale tool (View > Toolbars > Modification menu) allows a component to be enlarged, reduced, or distorted in size and shape.

Fig. 6-27: The Move/Copy crosshairs and rotation. Fig. 6-28: The Rotate tool.
Example: Select a component and activate the Scale tool. A series of green square handles will appear around the component. Grab a handle and move it in and out to adjust the size and dimension of the component (Fig. 6-29). Components can be scaled to retain proportion by using only one of the four corner handles. You can scale them to a specific value by entering the value after a green handle has been selected. You can also use Scale to create an exact mirror image of a component by selecting one of the handles and entering the value -1. You should practice scaling components using the various handles and seeing how they affect the size, shape and proportions of a component. Also, the scale tool can be used on flat surfaces. path Copy (Copy along path) This is a custom Ruby Script available for free download at www.smustard.com. It allows components and groups to be copied along arcs and other nonlinear lines. Follow the instructions in Chapter 5 to install the Ruby. From the Plug-in menu, select Copy Along Path. There will be two options: Copy to Path Nodes and Copy to Spacing. For now, select Copy to Spacing. Enter a value and press Enter. Next, select an arc and then the component. The component will be copied along the arc at the specified interval (Fig. 6-30).
Fig. 6-29: The Scale tool
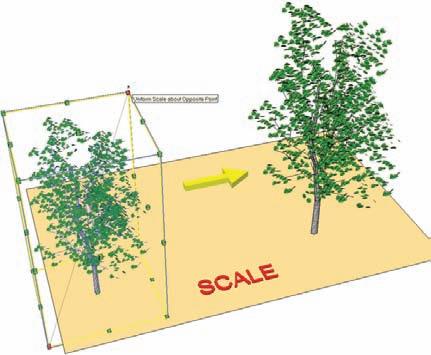

Fig. 6-30: The Copy Along Path Ruby Script can array components along arcs.


