
2 minute read
Adding the Custom Components


27. Add color to the massing. Paint the entire massing beige (Materials > Marker > Beige). Do not alter or apply color to the Courthouse Glass Dome component.
Adding the Custom Components
Advertisement
Now it’s time to add the windows and doors.
When you convert the geometry representing the windows and doors into a compoøø nent, make sure you use the appropriate method and steps as outlined in Chapter 9 (pages 126–128).
28. On the building massing face, draft the Window 1 component outline as indicated. 29. Push/Pull the window surfaces inward 2˝. Add a transparent color.

Window 1 complete
30. On building massing face, draft Window 2. Draft the basic outline and offset the face inward 1´. Make sure to draft a 2˝ mullion for the window.
31. On the Push/Pulled face, draft the window frame as indicated. Push/Pull the window surfaces inward 2 ˝. Add color.
32. Push/Pull the window surfaces 2˝ inward. Add color.
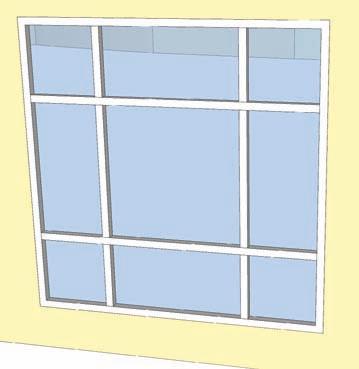
33. To make Window 3, copy and paste Window 2. Make the copy unique (right-click and select Make Unique). In the component instance, draw two edges as indicated in the graphic. Make sure they subdivide the faces.


Window 2 complete Window 3

34. Select the top two edges of the window frame of Window 3. Move them directly vertical 2´ to create the slanted window panel. 35. To make the door, locate and construct the door component on the building face as indicated. Draft it on the face created in step 26.
36. Draft the Main Entry Door component in three stages. Use the dimensions provided in the graphics for the general and detailed component outline. First, draft the general outline for the door.


Window 3

37. Add mullions and further divisions to the Main Entry Door component started in the previous step.
38. Add edges on the two center faces of the Main Entry Door component. This will define the door handles on the component.


39. To further define the Main Entry Door, add and adjust volumes: Push/Pull the window faces inward 3˝. Apply Material > Markers > Yellow to the door frames. Push/Pull the top door face 2´ outward. Apply a transparent color to the window surfaces.
40. Select and Move the bottom edge of the top frame inward 1´ to create an angled doorframe panel, as shown in the diagram.
41. Copy and arrange the three Main Entry Door components on the extruded faces of the building mass that were created in steps 24, 25, and 26. Scale the components to fit.


