
8 minute read
Chapter 7 SketchUp Collections


Whenusing SketchUp, people frequently miss the opportunity to fully organize and even use collections. That is a big mistake. Collections are notoriously messy. Whether you’re working with a collection of components, styles, or textures, it is easy to be lazy and not keep the collections clean and organized—but now there is no excuse for laziness. This section will show you all of the rules and resources you need to build extensive, high-resolution, organized collections. Adhering to these standards will ensure that you always have the files you need right when you need them.
M AT eri A l c ollec T ion
Advertisement
You may have noticed that almost every amateur SketchUp model has the same shingles, bricks, and grass. Avoid using the materials that are preloaded in SketchUp. These materials are easily recognizable and will make your models look elementary. Diligently search for texture images to find ones that best represent the materials you have chosen for your design. This section contains several strategies for finding, creating, and organizing your professional material collection.
The Materials Browser
Before you begin in earnest, take a moment to explore the Materials browser. Launch it by activating the Paint Bucket tool, or by clicking on the Window drop-down menu and choosing Materials. The Materials browser has two separate tabs: Select and Edit (Figure 7.1). The Select tab displays preloaded collections, favorite collections, and the materials in your model. This is where you find materials to apply to surfaces within your model. The Edit tab is where you can change the many properties of a material already added to your model (Figure 7.2). Use the Edit tab to change the color, scale, texture image, and opacity of the active material.
TIP The Material Browser is very different on the Mac, but the underlying concepts are the same. This book does not contain Mac screenshots, but it is not hard to apply the directions from Windows to Mac.

creating a Material
Texture images are relatively small, optimized images that can repeat infinitely without seams, and they are essential for creating professional-quality SketchUp materials. Professional-quality materials are essential for creating convincing 3D models that accurately represent your design.
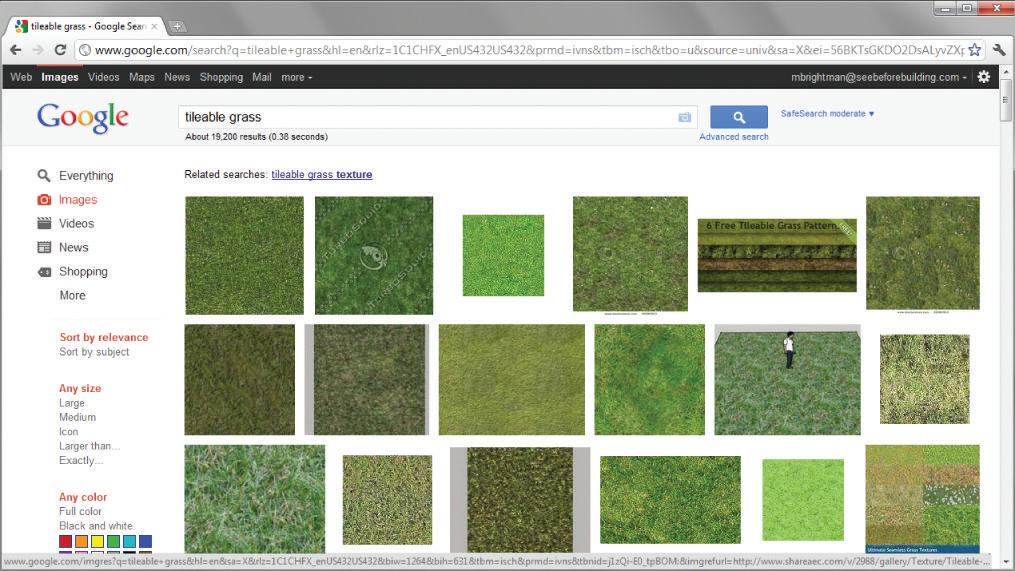
An enormous number of texture images are available online for free. To begin collecting textures, perform a Google image search for “tileable grass.” You can sort the results from a Google image search by many filters, most importantly size. For this exercise, click Medium to view images that are at a high enough resolution to look great, yet still maintain a reasonable file size. When searching for images, you can find the most valuable images by adding the words “tileable,” “texture,” or “material” to the query (Figure 7.3).
Click on an image thumbnail to navigate to the site that hosts the image. From there, you can right-click on the image and choose Save Image As. Save the image to your TEMP folder. Raw texture images should be saved in the TEMP folder because you won’t need the original image once it is imported into a SketchUp material. Now, add the texture image to a new material in SketchUp. To do that, follow these steps: a new material.
1. In the Materials browser, click the Create Material button to add a new material (see Figure 7.4). When you create a new material, the Create Material dialog opens and creates a copy of the active material.
2. Name the material Grass 01.
3. Click on the folder icon to add a texture image. Navigate to your TEMP folder and select the Grass Texture material. Click the Open button.

4. Click OK to finish creating the material.
Once a texture is created, it resides in the current model only. You will need to add the new material to a collection to access it while working on other models. To do that, follow these steps:
1. Click on the In Model Collection (house icon) to see the materials that are in your model.
2. Right-click the Grass 01 material thumbnail and choose Save As.
3. Navigate to the RESOURCES/MATERIALS folder and save the material in the appropriate material folder. If you set your default folders as described in Chapter 6, “The Professional’s SketchUp Environment,” you will be taken there immediately. Other excellent free and commercial sources for textures are available. Try searching Google for “free textures” and see what you can find. When you use an image search and find an image you like, the site hosting it will usually have other collections and textures available. Click on the Website for this image link to view more offerings from the site hosting the image. Access more materials in SketchUp by clicking on the Details menu and choosing Get More to see a SketchUp blog post about sources for free texture images. Lastly, FormFonts.com has an extensive library of texture images available at a very reasonable price. Regardless of where you get your textures, just be sure that you keep them organized.
Adding the collection to favorites
Now that you have added a material to your collection, you need to add that collection to your favorites within the Materials browser. This will give you access to the collection every time you open SketchUp.
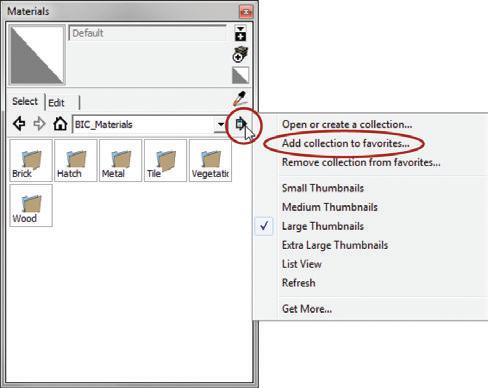
1. In the Materials browser, click the Details menu and choose Add Collection to Favorites (Figure 7.5).
2. Navigate to the RESOURCES/MATERIALS folder and select OK.
3. Click the Material Collections dropdown menu and select the MATERIALS folder. The new Materials collection will be at the bottom of the list. Once a collection is added to your favorites, you can always access the collection from the Collections dropdown menu in the Materials browser.
Figure 7.5 To manage material collections and favorites, use the Details menu in the Materials browser.
TIP Manage your collection from the secondary pane or from a file browser such as Windows explorer. Under the Bic _Materials folder, add logical subfolders such as hard Surfaces, Textiles, Metals, roofing, Stone, Tile, glass, Water, Wood, cladding, and ground cover.
c o MP onen T c ollec T ion S
Components have several useful applications, one being prebuilt SketchUp models of common objects that will save you an immense amount of time. Everyone can use objects such as lamps, plants, cars, and furniture, but no one wants to build these complex objects from scratch every time they are needed. Fortunately, component collections allow you to save and organize all of these objects for easy access and reuse.
The components Browser
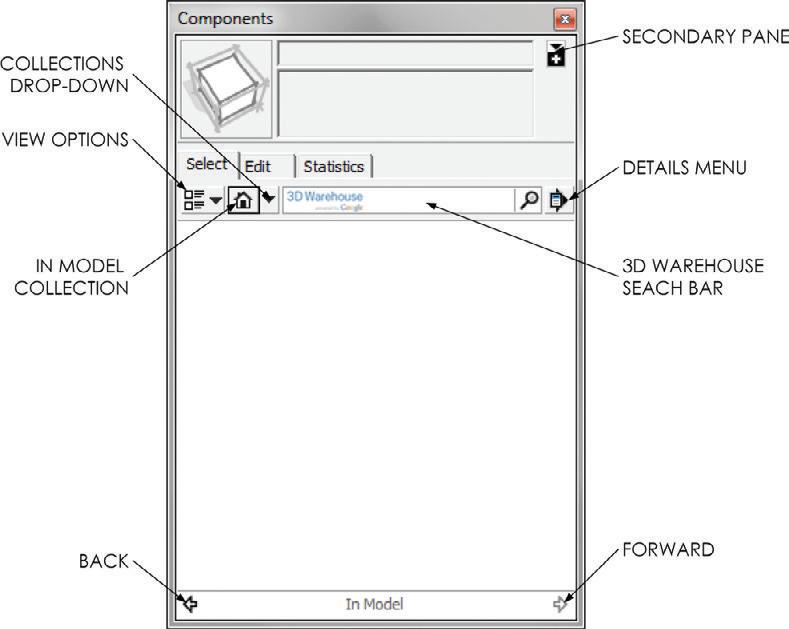
The Components browser is where you can view component collections, access the 3D Warehouse, and see which components are in your model. To access the Components browser, click on the Window drop-down menu and choose Components (Figure 7.6).
Chapter 7: SketchUp Collections
Finding Components
Hundreds of thousands, if not millions, of components are immediately available for free within the Trimble 3D Warehouse. This is a huge repository of user-created, user-submitted, and user-rated models. Buyer beware, though. You get what you pay for, and when you pay nothing you should not expect much. Many of the models on the 3D Warehouse need to be optimized, correctly scaled, or even completed. This is not to say that it is not a good place to look. Just keep in mind that most of the models in the 3D Warehouse are not plugand-play; they will require some work to make them useable.
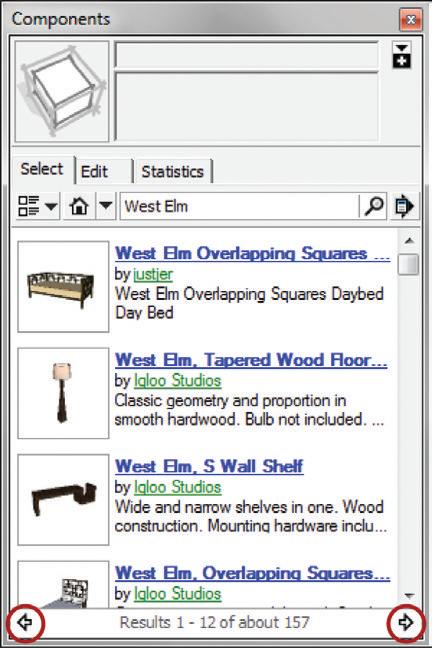
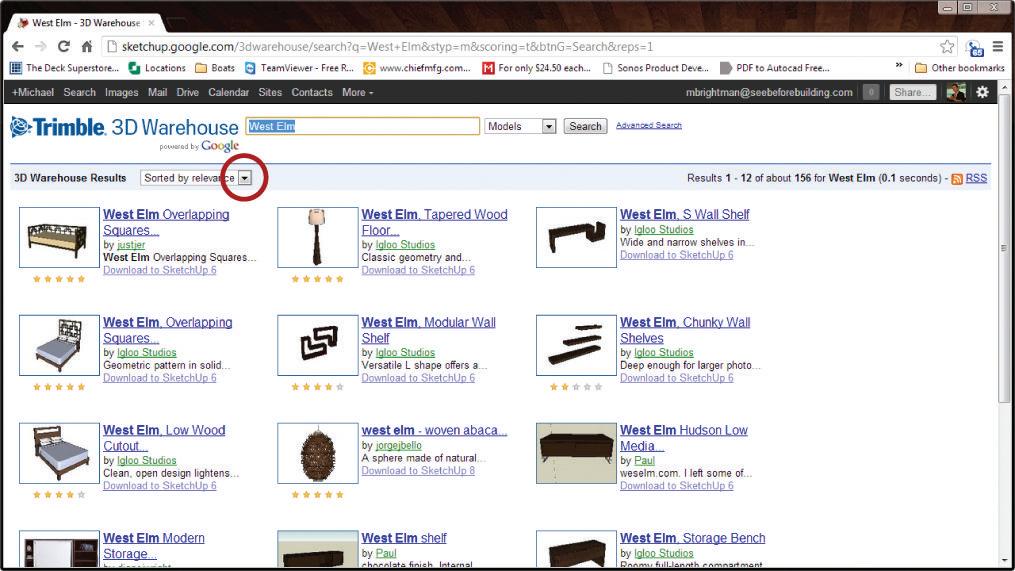
To search the 3D Warehouse, enter your query directly into the search box in the Components browser. You can search for object titles, such as chair, table, car, and people. You can also search for brand names, such as West Elm, Pella, and Mercedes; brand searches typically return more favorable results. Once your search is complete, use the arrows at the bottom left and right to navigate through the search results (Figure 7.7).
At this point, you can click on a model thumbnail in the Components browser and then click again in your model to place the component. The selected component will be copied into your model.
Searching within the Components browser is a quick way to grab models from a minimalist interface. You can also access the 3D Warehouse through the Web, which provides significantly more model information and search options. Click the Details menu and select View in Trimble 3D Warehouse. This will launch the web version of the Trimble 3D Warehouse, which will be larger and easier to view; but most important, it will be sortable by ratings and popularity to help you filter the best models to the top. You can access search results in the 3D Warehouse web interface from the Details menu or by clicking on the component name in the search results (Figure 7.8).
Click the Download Model button to save a component to your ACTIVE PROJECTS/ RESOURCES/COMPONENTS collection.
A better solution for building a component collection is to pay for the models. FormFonts.com offers an extensive collection of excellent professionally built, commercially available models. All of the models at FormFonts.com are properly scaled, textured, and optimized, making them easy to use “right out of the box.” For professionals, paying for models is worth the small monetary investment to have perfect models in seconds.
Adding a collection to favorites
Once you have created a collection, you will want to access it every time you open SketchUp. To do that, follow these steps:
1. Click the Details menu and choose Open or Create a Local Collection.
2. Navigate to your RESOURCES folder, select the COMPONENTS folder, and then click OK.
3. Click the context arrow again and choose Add to Favorites. The COMPONENTS collection will be available every time you open SketchUp under the Component Collections drop-down menu.
TIP Manage your collection from a file browser such as Windows explorer. Add logical subfolders to the components folder—for example, landscape, furniture, entourage, Doors, Windows, etc. you might even consider organizing your components by project.
S T yle S c ollec T ion
Currently, styles are not as widely available as materials and components are; this is probably because the preloaded libraries are more than enough to get you started.
creating a Style
Use the Mix tab in the Styles browser to combine your favorite styles into new creations. To do that, follow these steps:
1. In the Styles browser, click on the Mix tab. This automatically launches the secondary pane.

2. In the secondary pane, choose your favorite collection.
3. Drag a style to one of the properties in the Mix tab. The current style will inherit the specified properties from the style that you dragged up.
4. Click the Style icon to update and save the changes made to the current style. The watermark will disappear upon updating.
Adding a Style to a collection
Not every style needs to be a part of the default template, so you will need a style collection to hold additional useful styles. Any style that you create should be saved in your Styles collection. To save a style, follow these steps:
1. Click the In Model Collection (house icon) to see which styles are in your model; you will see the styles that you created in Chapter 5, “The Professional’s SketchUp Template.” them.
2. Right-click on a style and choose Save As.
3. Navigate to your RESOURCES/STYLES folder, select it, and click Save. If you set your default folders as described in Chapter 6, you will be taken there immediately.
Adding a collection to favorites
So that this collection is always available when you need it, click on the Details menu and select Add Collection to Favorites. Navigate to and select the RESOURCES/STYLES folder and choose OK. The collection will be available every time you open SketchUp under the Style Collections drop-down menu (Figure 7.11).
TIP in addition to any new styles you create, add all of the styles from the default template to your Styles collection.

c h APT er Poin TS
☑ Collections are most valuable when they are kept current and organized. Organize material and component collections in a way that works for you. Consider organizing your collections by types, project, client, or even design style—for example, modern or traditional.
☑ All browsers have a secondary pane and a drag-and-drop interface that makes managing collections easier. You can also manage collections from a file browser.
☑ When you use a collection to add materials, components, and styles to your current model, you are creating a copy of the original from the collection and placing that copy in the model. When you edit the materials, components, or styles, you are editing only the copy in the model, not the original in the collection.


