

Thermal
Monocular Camera
User's Manual
Foreword
General
This manual introduces the functions and operations of Thermal Monocular Camera (hereinafter referred to as "the Camera"). Read carefully before using the device, and keep the manual safe for future reference.
Safety Instructions
The following signal words might appear in the manual.
Signal Words


Revision History
Meaning
Indicates a high potential hazard which, if not avoided, will result in death or serious injury.
Indicates a medium or low potential hazard which, if not avoided, could result in slight or moderate injury.
Indicates a potential risk which, if not avoided, could result in property damage, data loss, reductions in performance, or unpredictable results.
Electrostatic Sensitive Devices. Indicates a device that is sensitive to electrostatic discharge. Indicates dangerous high voltage.
Take care to avoid coming into contact with electricity.
Indicates a laser radiation hazard.
Take care to avoid exposure to a laser beam.
Provides methods to help you solve a problem or save time.
Provides additional information as a supplement to the text.
Privacy Protection Notice
As the device user or data controller, you might collect the personal data of others such as their face, fingerprints, and license plate number. You need to be in compliance with your local privacy protection laws and regulations to protect the legitimate rights and interests of other people by implementing measures which include but are not limited: Providing clear and visible identification to inform people of the existence of the surveillance area and provide required contact information.
About the Manual
● The manual is for reference only. Slight differences might be found between the manual and the product.
● We are not liable for losses incurred due to operating the product in ways that are not in
compliance with the manual.
● The manual will be updated according to the latest laws and regulations of related jurisdictions. For detailed information, see the paper user’s manual, use our CD-ROM, scan the QR code or visit our official website. The manual is for reference only. Slight differences might be found between the electronic version and the paper version.
● All designs and software are subject to change without prior written notice. Product updates might result in some differences appearing between the actual product and the manual. Please contact customer service for the latest program and supplementary documentation.
● There might be errors in the print or deviations in the description of the functions, operations and technical data. If there is any doubt or dispute, we reserve the right of final explanation.
● Upgrade the reader software or try other mainstream reader software if the manual (in PDF format) cannot be opened.
● All trademarks, registered trademarks and company names in the manual are properties of their respective owners.
● Please visit our website, contact the supplier or customer service if any problems occur while using the device.
● If there is any uncertainty or controversy, we reserve the right of final explanation.
Important Safeguards and Warnings
This section introduces content covering the proper handling of the device, hazard prevention, and prevention of property damage. Read carefully before using the device, and comply with the guidelines when using it.
Transportation Requirements

● Transport the Camera within the allowed humidity and temperature conditions.
● Do not fall, squeeze, violently vibrate or immerse the device in liquid when transporting. Gently pick and place the Camera when moving, prevent the internal equipment becoming damaged or cable connection becoming loose.
● Do not transport the Camera without package. Use the factory default package or material of equal quality to pack the Camera when transporting it, otherwise the Camera can become easily damaged.
Storage Requirements
● Store the Camera within the allowed humidity and temperature conditions.
● Do not place the device in a humid, dusty or extremely hot or cold site that has strong electromagnetic radiation or unstable illumination.
● Do not squeeze, violently vibrate or immerse the device in liquid.
● Do not mechanically vibrate or crash when storing.
● Store the Camera in a ventilated place that has no strong electromagnetic radiation.
● For long-term storage of the battery, make sure that it is fully charged every half year to ensure the battery quality. Otherwise, damage may occur.
Operation Requirements

● Prevent liquid from flowing into the Camera to avoid damage to the internal components.
● Do not stuff foreign materials into the Camera to prevent a short circuit which could result in the Camera being damaged or people becoming injured.
● Do not expose the device to high electromagnetic radiation or dusty environments.
● Do not aim the lens at the sun or any other bright light.
● Improper use or replacement of the battery may result in explosion hazard.
● Do not charge other battery types with the supplied charger. Confirm there is no flammable material within 2 m of the charger during charging.
● Make sure that the plug is properly connected to the power socket.
● Do not connect multiple devices to one power adapter, to avoid over-heating or fire hazards caused by overload.
● If smoke, odor, or noise arises from the device, immediately turn off the power, unplug the power cable, and contact the service center.

● Do not dismantle the Camera. The internal components can only be repaired by a qualified professional. Dismantling it without professional assistance might cause water seeping in or might result in the Camera producing poor quality images.
● Operating temperature: –20 °C to +50 °C (–4 °F to +122 °F), and the operating humidity shall be 95% or less.
Maintenance and Repair Requirements
● Prevent liquid from flowing into the Camera to avoid damage to the internal components. In case the liquid enters the Camera, immediately stop using the Camera, cut off the power, and disconnect all the cables, and then contact your local customer service center.
● Use the accessories regulated by the manufacturer. The Camera should be maintained by qualified professionals.
● Make sure to cut off the power before cleaning the Camera, to prevent electric shock.
If the Camera malfunctions, contact your local customer service center. Do not dismantle the Camera.
● Clean the Camera body with a piece of soft dry cloth. For any dirt that is hard to remove, pick up a piece of clean and soft cloth, dip it into a little neutral detergent and gently wipe the dust away. After that, wipe away all the remaining liquid on the Camera with another dry cloth. Never use volatile solvents such as alcohol, benzene and thinner, or cleaners that are strong and abrasive. Otherwise, the Camera’s surface coating will be damaged and its working performance will be encumbered.
● Save the factory package of the Camera. When the Camera malfunctions, pack the Camera with the factory package and send to the dealer.
1 Product Introduction
1.1 Overview
The thermal monocular camera captures sharp thermal imaging at a fast frame rate for smooth, impeccable vision on running targets and from moving vehicles. Designed to increase situational awareness at any time of day, the camera can detect humans, animals, and objects in complete darkness, haze, or through glaring light, equipping law enforcement professionals, hunters, and outdoor enthusiasts with reliable thermal imaging in tough conditions. It is widely used in outdoor scenarios for hunting, rescue, animal observation, and more.
1.2 Functions
● Colorization
Different colorization modes display different effects.
● Digital zoom
Supports 1×, 2×, 4× and 8×digital zoom. The number might different depending on devices.
● Range measurement
Marks the top and bottom of the target, and the screen automatically displays the distance of the target from the camera.
● Hot point tracking
Detects and marks the highest and lowest temperature point.
● Network
Supports network connection through the Wi-Fi. You can add the Camera through mobile app to realize functions, such as capturing, recording and parameter configuration.
● Storage
Built-in storage (32 GB EMMC), supports recording and capturing.
● Automatic suspend and shutdown
Supports setting time of automatic suspend and shutdown.
2 Structure
2.1 Packing List
2-1 Packing list
2.2 Device Description
Figure 2-1 Button description

Table 2-2 Button description
1 Power button
Capture button
Mode button
Zoom button
● Press and hold to start or shut down the Camera.
● Press to enable or disable the suspend mode.
● Press and hold to record videos.
● Press to capture images.
● Press and hold to enter the main menu.
● Press to select the pseudo color.
● Press and hold to manually adjust the shutter.
● Press for digital zoom.
Figure 2-2 Port description
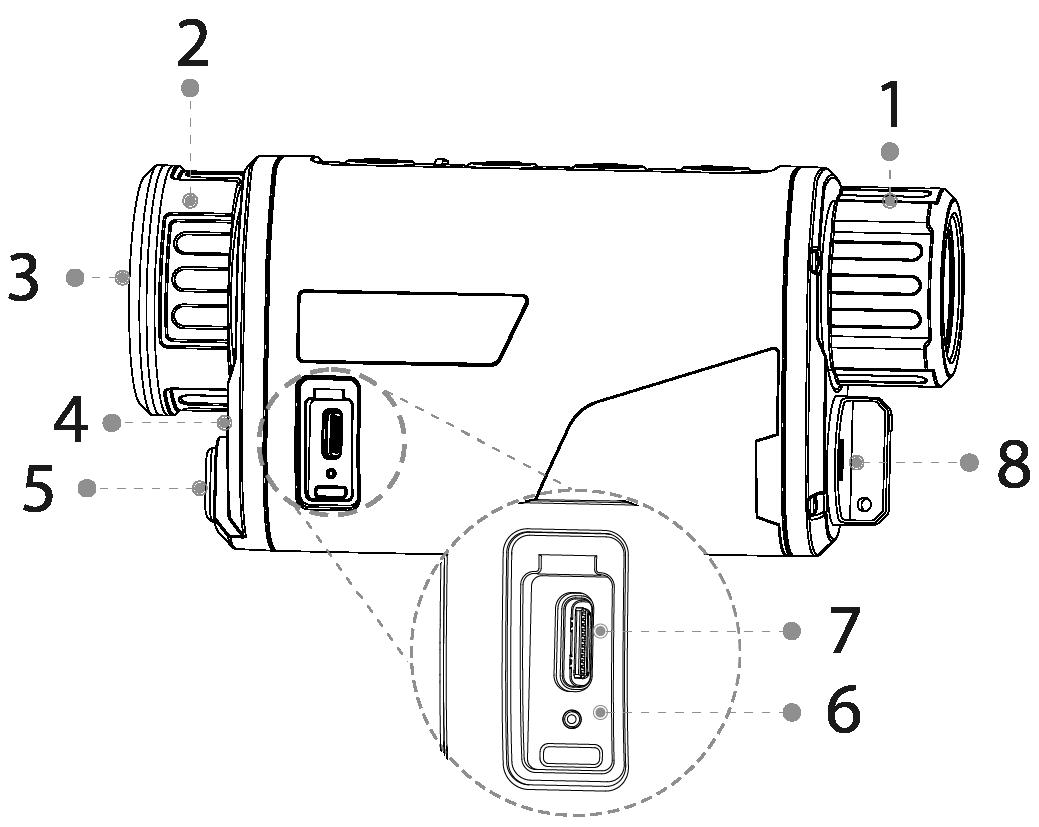
2-3 Port description
1 Diopter adjustment knob Adjust the diopter according to your eyesight.
2 Adjustable lens Manually rotate the lens to adjust the focus for a clear image.
3 Protective cover Dust prevention. Close the cover when not using the Camera.
4 MIC Collects sound.
5 Tripod nut For tripod installation.
● Red and green lights flashing alternately: charging error.
6 Charging indicator
7 Type-C port
● Red light on: charging.
● Green light on: fully charged.
● Off: not connected to data cable to charge.
● Connects to CVBS display.
● Connects to a data cable for charging.
8 Battery compartment The place for holding the battery.
Table
3 Basic Operation
3.1 Starting and Shutdown
3.1.1 Manual Starting and Shutdown


Press and hold to start or shut down the Camera; press to suspend or weak up the Camera.
After starting the Camera, remove the protective cover of the lens.
● When the Camera is shut down, press and hold to start it.
● When the Camera is on, press and hold to shut down it.
● When the Camera is on, press to suspend the Camera.
● When the Camera is in suspend mode, press to weak up it.
3.1.2 Auto Shutdown

Step 1 Press and hold to go to the main menu.


Step 2 Press or to select .
Step 3 Press to go to the System Settings configuration screen.
Step 4 Press or to select Auto Shutdown.
Step 5 Press , and then press or to set the auto shutdown time.
● Off: Disable the auto shutdown.
● 5 Mins,10 Mins, 30 Mins, 60 Mins: If there is no operation in the configured time, the Camera will automatically shut down.
Step 6 Press to save the configuration.
After finishing the auto shutdown settings, the Camera will suspend first, and then shut down.
3.2 Configuring the Camera
3.2.1
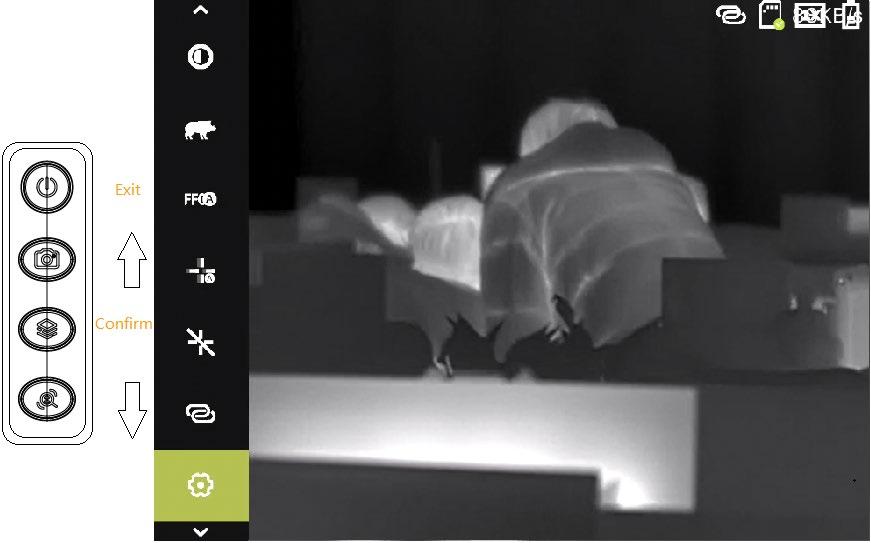
Menu Description
When the Camera is on, press and hold to enter the main menu. Function of all buttons are as follows.
● Press to move upward the cursor.
● Press to move downward the cursor.
● Press to confirm.
● Press to exit.
3.2.2 Image Adjustment
3.2.2.1
Adjusting Diopter
To get a clear image, rotating the diopter adjustment knob to fit your eyesight.
For the first-time use, adjust the diopter before configuring the functions.
Step 1 Aim the lens at the target, and then make your eyes close to the eyeshade.
Step 2 Adjust clockwise or counterclockwise the knob according to your eyesight.
3-2 Adjust diopter

3.2.2.2
Adjusting Focus
Rotate the lens to get a clear view.
Step 1 Aim the thermal lens to the target.
Step 2 Adjust clockwise or counterclockwise the lens until the view is clear.
During the adjustment, do not touch the lens to avoid smudging it; otherwise it may affect the image quality.
Figure
3.2.2.3 Setting Colorization
Select the colorization, which adds color to the thermal image and uses color to indicate the temperature.
Step 1 On the main menu, press or to select Colorization
Step 2 Press to go to the Colorization configuration screen.
Step 3 Press or to select the colorization.
● White Hot: The objects with high temperature are white. The higher the temperature, the brighter the color.
● Alarm: The objects with high temperature are red. The objects can stand out.
● Iron Red: The objects with high temperature are red. The higher the temperature, the brighter the color.
● Black Hot: The objects with high temperature are black. The higher the temperature, the darker the color.
● Sepia: The objects with high temperature are brown. The higher the temperature, the darker the color.
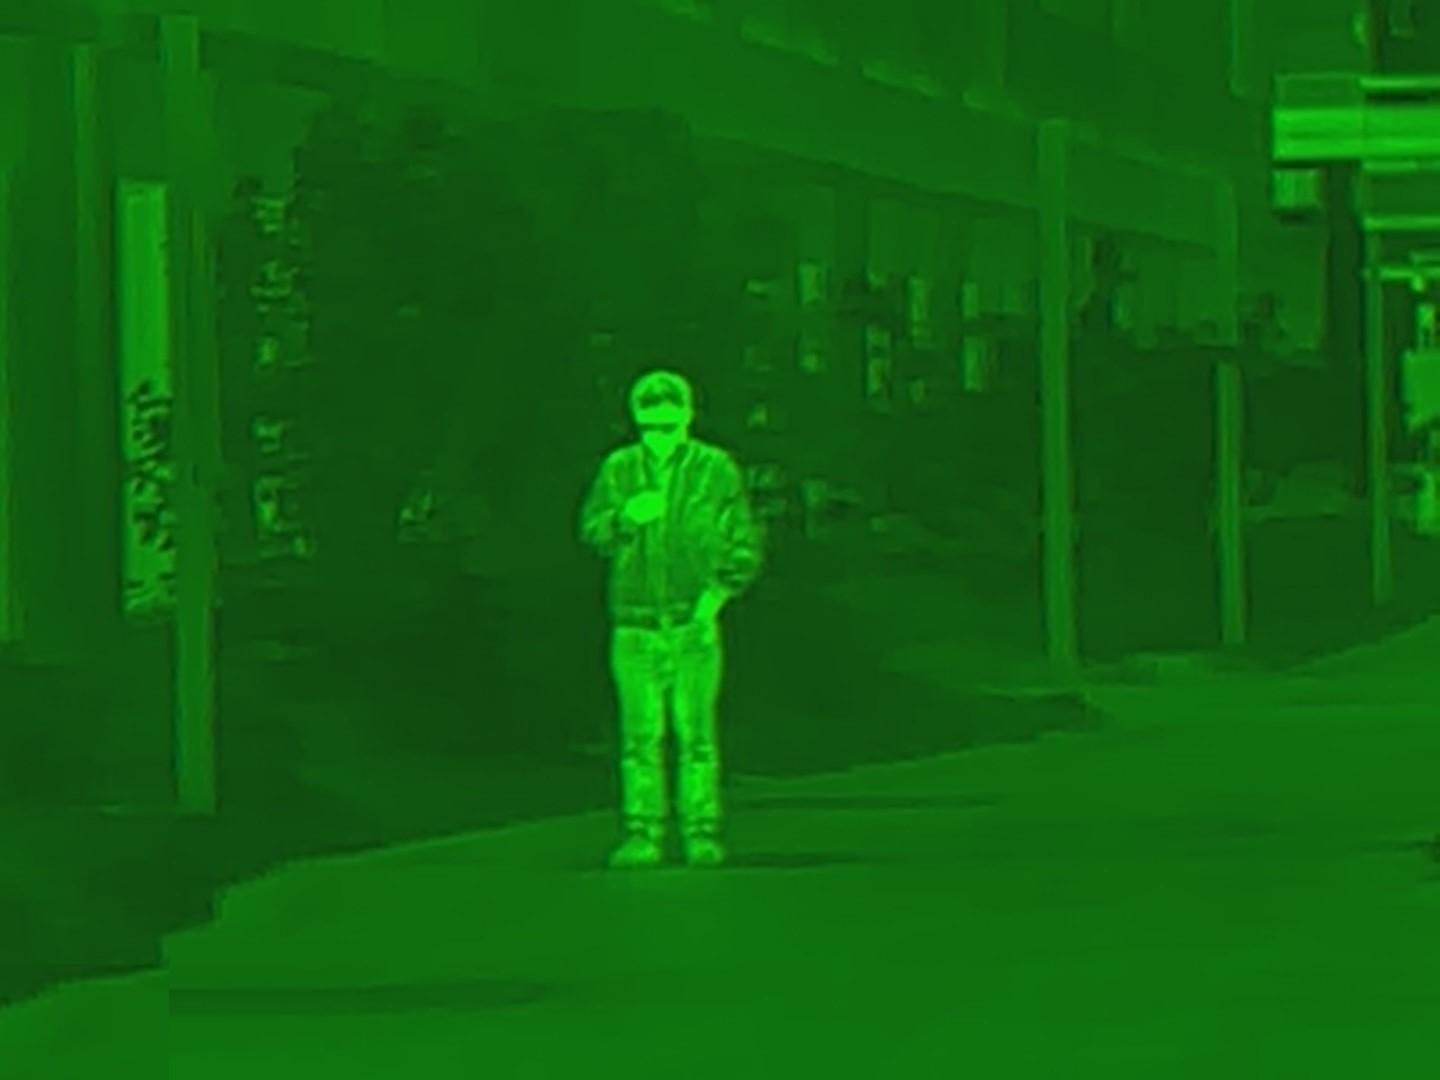
● Green Hot: The objects with high temperature are green. The higher the temperature, the darker the color.
Step 4 Press to save the configuration.
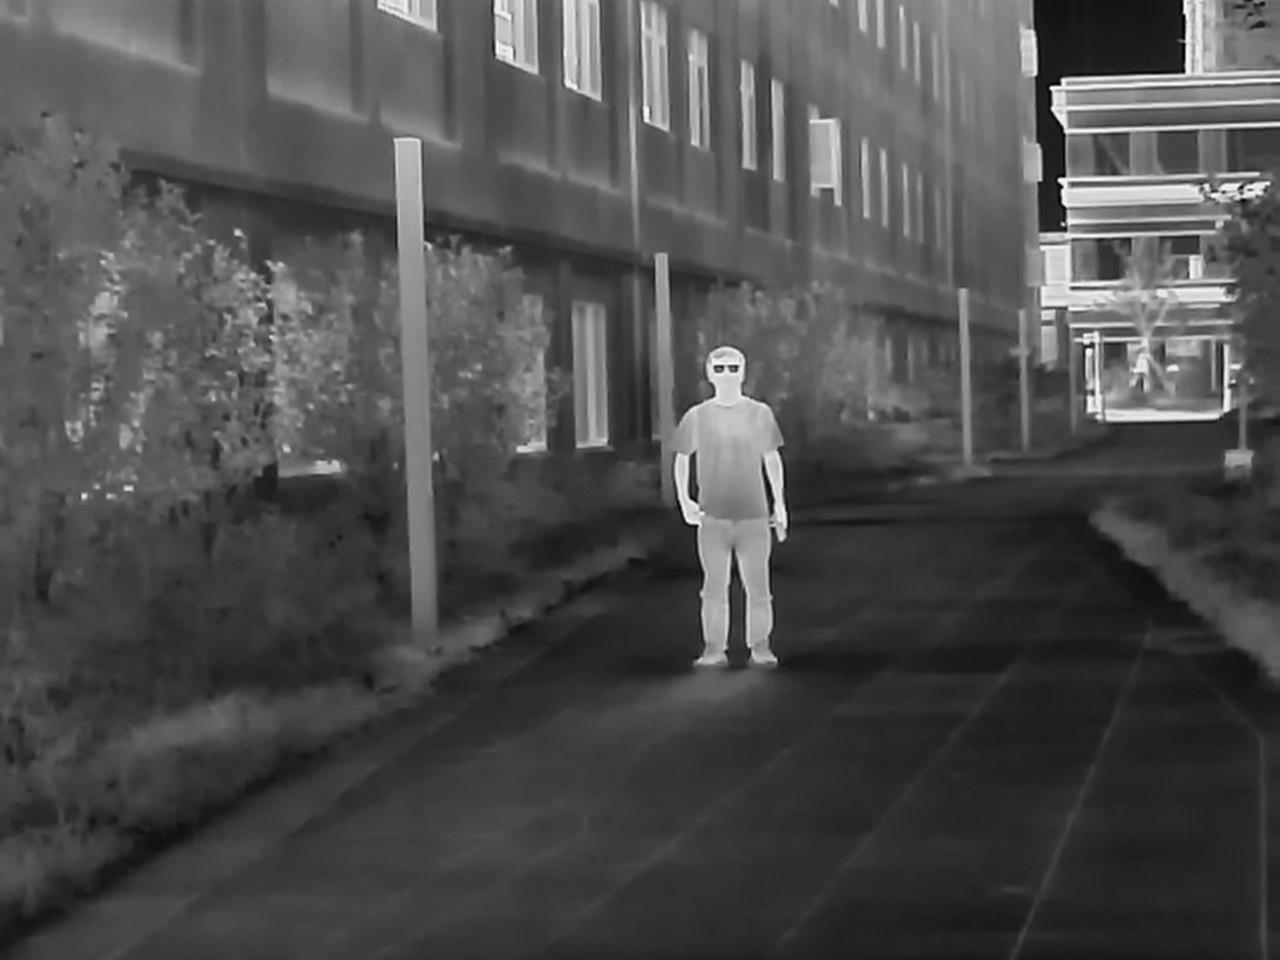
Figure 3-3 White hot
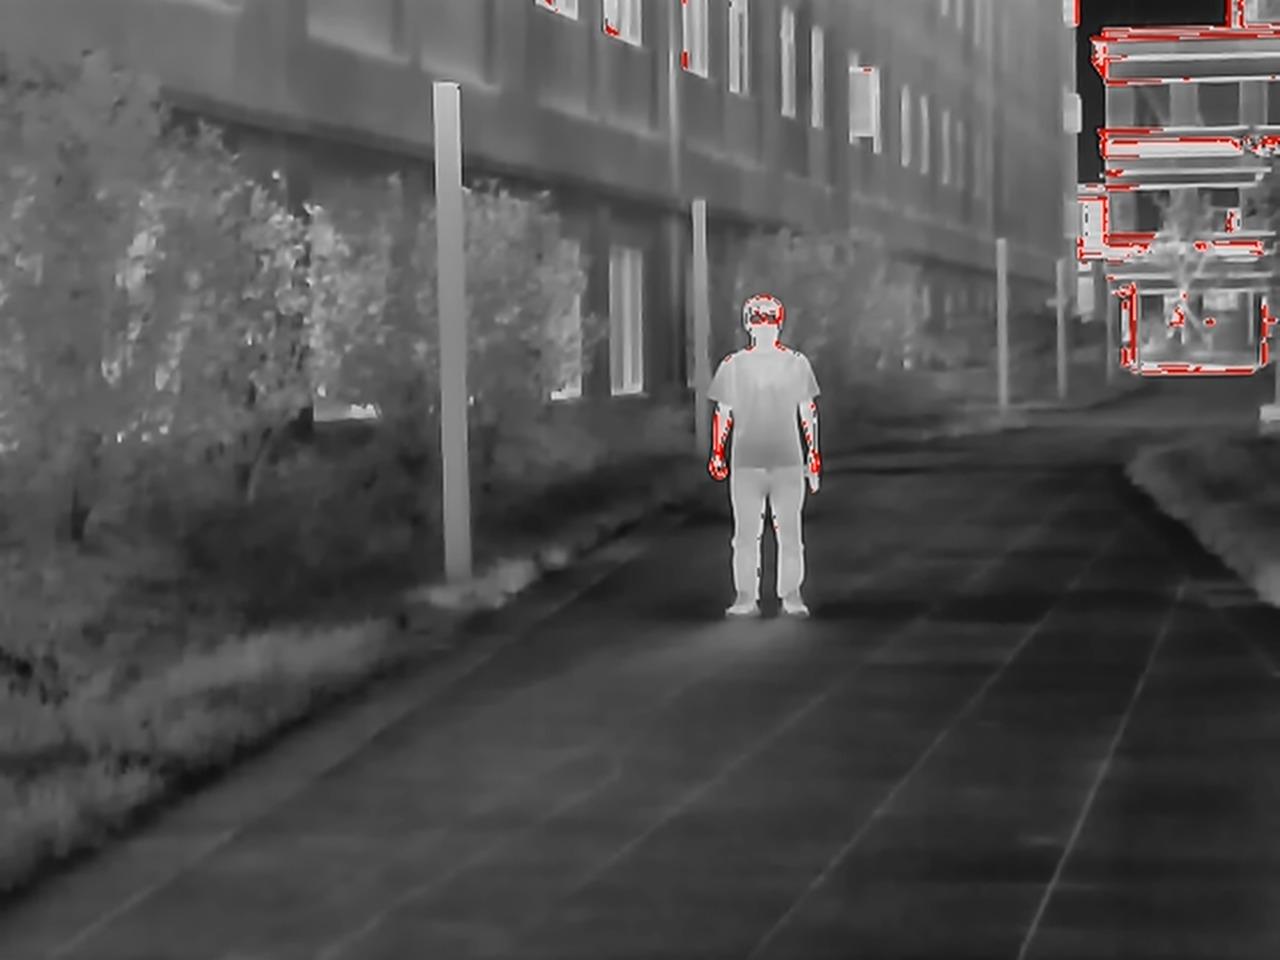


Figure 3-4 Alarm
Figure 3-5 Iron red
Figure 3-6 Black hot

3.2.2.4 Setting Digital Zoom
Digital zoom helps to zoom in the image.
On the viewing screen, press to do digital zoom, and the image changes.
3.2.2.5 Setting Status Bar Display

Step 1 On the main menu, press or to select .
Step 2 Press to go to the Status Bar configuration screen.
Step 3 Press to select On to display the status bar; select Off to hide the status bar.
Figure
Figure 3-8 Green hot
● Manual: On the live screen, press to manually calibrate the image as needed
3.2.4 Setting Ranging Mode
After setting the ranging mode, the Camera can measure the range towards targets.
To guarantee the measurement accuracy, keep your hand steady when measuring the range.

Step 1 On the main menu, press or to select .
Step 2 Press to go to the Ranging Mode configuration screen.
Step 3 Press to select the ranging mode.
You can select from Wild Boar, Deer, Rabbit, Wolf and Customize.
Step 4 Press to save the configuration.
Two green lines are displayed on the screen.
Step 5 Press or to move the green lines to the top and bottom of the target to get the distance between the target and the Camera.
Figure 3-9 Ranging Mode

3.2.5 Setting Scene Mode
Step 1 On the main menu, press or to select

Step 2 Press to go to the Scene Mode configuration screen.
Step 3 Press to select the scene mode from Standard and Forest.
● Standard: Used for daily observation.
● Forest: Stands out the targets with high temperature, which makes it easier to find out the targets.
Step 4 Press to save the configuration.
3.2.6 Setting Logo Display

Step 1 On the main menu, press or to select .
Step 2 Press to go to the Logo configuration screen.
Step 3 Press to enable or disable logo display.
Step 4 Press to save the configuration.
After enabling logo display, the logo will be display when the camera is starting.
3.2.7 Setting Burning Warning

Step 1 On the main menu, press or to select .
Step 2 Press to go to the Burning Warning configuration screen.
Step 3 Press to enable or disable the burning warning function.
Step 4 Press to save the configuration.
3.2.8 Setting Hot Point
Tracks the points with the highest and lowest temperature in real time.
Step 1 On the main menu, press or to select

Step 2 Press to go to the Hot Point configuration screen.
Step 3 Press to enable or disable Hot Point
Step 4 Press to save the configuration.
After enabling Hot Point, the hot and cold point icons will automatically locate at the points with the highest and lowest temperature in the image.
3.2.9 Setting Wi- Fi Connection
After enabling Wi-Fi connection, you can connect your phone to the hotspot of the Camera, and then access the Camera with the app.
The frequency bands and modes and the nominal limits of transmitted power (radiated and/or conducted) applicable to this radio device are the following:
Wi-Fi 2.4 GHz (2.4 GHz to 2.4835 GHz) 20 dBm
Some cameras will automatically disable the Wi-Fi function when the battery level is lower than 15%.
Step 1 Scan the QR code with your smart phone to install the app.

Step 2 On the main menu, press or to select

Step 3 Press to go to the WiFi configuration screen.
Step 4 Enable the Wi-Fi function.
● Hotspot: Use the Camera as the hotspot, and connect your phone to the hotspot of the Camera.
1. Press to select Hotspot, and then press
2. Enable the Wi-Fi of your smart phone, and then connect to the hotspot of the Camera.
◇ Wi-Fi name: Model number + serial number.
◇ Wi-Fi password: The last 8 digits of the serial number.
You can find the serial number on the Camera and the label of the packing box.
3. Log in to the app. The password is the last 8 digits of the serial number. Add devices according to the prompt.
● Wi-Fi: Use your phone as the hotspot, and connect Camera to the hotspot of your phone.
1. Press to select WiFi, and then press . The Wi-fi mane and password are displayed on the screen.
2. Chang the Wi-Fi name and password of your phone as the screen shows.

3. Select , and then press . The Camera automatically connects to the hotspot of your phone.
4. Log in to the app. The password is the last 8 digits of the serial number. Add devices according to the prompt.
● Off: Disable the Wi-Fi function.
3.2.10 Setting DPC
After enabling DPC (Defective Pixels Correction), you can correct the defective pixels in the image.
Step 1 On the main menu, press or to select

Step 2 Press to go to the DPC configuration screen.
Step 3 Press to set DPC.
● Auto: The Camera automatically corrects the defective pixels in the image.
1. Select Auto.
2. Press to start the auto correction.
3. Follow the screen instructions to close the lens cover.
4. Press to save the configurations.
● Manual: You need to correct the defective pixels manually.
1. Press to select X-axis and Y-axis.
2. Press and hold or to calibrate the defective pixels.
3. Press and hold to save the configuration.
The center of the cursor is the position of the defective pixel.
● Restore: The DPC configuration is restored to the primary state.
3.2.11 System Settings
Step 1 On the main menu, press or to select
Step 2 Press to go to the System Settings configuration screen.
Step 3 Press or to select the parameter to be configured.
Step 4 Press to go to the configuration screen.
Parameter
MIC
Auto Standby
USB Mode
Table 3-2 System settings
Description
Press or to enable or disable MIC.
Press to select the auto standby time.
● Off: Disable auto standby.
● 1 Min, 3 Min, 5 Min, 10 Min: If there is no operation in the configured time, the Camera will automatically suspend.
Press to select the USB mode.
● Mass: The Camera can be used as a storage device.
● UVC: Connect the Camera to a computer to view live images through the Client.
● Off: Charge the Camera.
Language Press or to select the language.
Unit Set
Storage
Version
Restore Default
Press or to select the unit from metre and feet.
Press or to set the storage mode.
● FullDiskStop: Stop recording when the disk is full.
● FullDiskCover: Cyclically overwrite the earliest video when the disk is full.
View the device information such as serial number and version number.
Restore the device to default configuration.
This operation will restore the camera to default configuration. Please be careful.
3.3 Video and Snapshot
You can manually record videos and capture images when the Camera is installed with an SD card.
3.3.1 Recording Videos
On the viewing interface, press and hold for 3 seconds to start recording a video. The OSD flashes red on the screen and the recording time is display. Press and hold again for 3 seconds to stop the recording. When the recording stops, the recording time will display normally.
3.3.2 Capturing Images
On the viewing page, press to capture images. The screen will display an icon when the capturing succeeds.
3.3.3 Exporting File
Exports the recorded and captured files.
Step 1 Connect the Camera to the computer through USB data cable. The driver will automatically be installed for first-time connection.
● Connect the cables before starting the Camera. Do not hot swap the USB port of the Camera.
● Select UVC on the USB Mode configuration screen after connecting the Camera to the computer.
Step 2 On the computer desktop, double-click My Computer, and then open the Camera disk at a mobile storage device.
Step 3 Select the files to export and copy them to the computer. The specific computer client is required for playing the exported files.
Step 4 Disconnect the USB data cable with the computer. After connecting the Camera to the computer, images can be displayed on the Camera, but the functions of recording and capturing will not be available.
3.4 Charging
The start bar will display battery information after the Camera starts. When the battery is low, charge the Camera timely to make sure the normal function.
● When charging the Camera, the temperature is required at 0 °C to 45 °C (32 °F to 113 °F). Otherwise the charging function will be automatically disabled.
● Charge the Camera with the Type-C data cable that comes with the delivery.
Step 1 Open the sealing cover of the Type-C port when charging.
Step 2 Connect the Type-C cable to the Type-C port to charge the Camera.
The charging indicator states:
● Red and green lights flashing alternately: charging error.
● Red light on: charging.
● Green light on: fully charged.
● Off: not connected to data cable to charge.
4 System Update
4.1 Upgrading Manually
Step 1 On the main menu, press or to select .
Step 2 Press to go to the System Settings configuration screen.
Step 4 Select Mass
Step 3 Press or to select USB Mode, and then press .
Step 5 Connect the Camera and your computer, and then copy the upgrading file to the Camera.
Step 6 Disconnect the Camera and your computer, and then restart the Camera.
4.2 Upgrading through App
When the app detects new program for upgrading, it will prompt a notification. Tap Upgrade to upgrade the system.
Appendix 1 Compliance Notice
The thermal series products might be subject to export controls in various countries or regions, including without limitation, the United States, European Union, United Kingdom and/or other member countries of the Wassenaar Arrangement. Please consult your professional legal or compliance expert or local government authorities for any necessary export license requirements if you intend to transfer, export, re-export the thermal series products between different countries.