7 minute read
3.5 Lamitina. How to Photograph a Trillion Stars
3.5 Lamitina. How to Photograph a Trillion Stars 29
3.5 How to Photograph a Trillion Stars
Advertisement
By Luke Lamitina ’22
Background
Many people have seen the awe inspiring photographs taken over the years by telescopes such as the Hubble Space Telescope [3]. These canvases of ethereal structures that span over such vast distances have inspired generations and sparked social movements [6]. Astrophotography has a long and significant history spanning all the way back to 1839 when Louis Jacques Mandé Daguerre attempted to take the first long exposure of the moon. Due to technical problems with his telescope and tracking, his image ended up coming out fuzzy and distorted. Nevertheless, he had started the ball rolling on astrophotography, and it would only be a year before a man named John William Draper took the first successful photograph of the moon [1]. Although Daguerre wasn’t successful in his first attempt, he invented a new method called the Daguerreotype Process which allowed for much crisper images—not only revolutionizing the field of astrophotography, but photography as a whole [5]. Since John William Draper’s first picture of the moon, leaps in technology and innovation have allowed us to photograph some of the faintest objects in the cosmos. For example, in 1994 Robert Williams, the director of the Space Telescope Science Institute in Baltimore, Maryland, decided to use his director’s discretionary time on the Hubble Space Telescope in a way that seemed preposterous to many scientists at the time. His idea was to point the telescope at a place in the sky where there were thought to be no galaxies, or nebulae—somewhere in the sky that was believed to have nothing in it. After 10 days of exposure time, the Hubble returned what is now known as the Hubble Deep Field image [2]. This one picture had effects that completely revolutionized astrophysics as a whole. As an avid astronomer who partakes in exoplanetary research, a friend and I recently embarked on a new project: photographing a trillion stars. To do this, we photographed the galaxy known as M31, commonly referred to as the Andromeda Galaxy. At a distance of 2.5 million light years from Earth, Andromeda is the closest galaxy to the Milky Way. In 4.5 billion years, the two galaxies are predicted to collide and merge into a new galaxy deemed Milkdromeda [4]. Prior to this collision, my exoplanetary research partner and I set out to photograph Andromeda using the Allegheny Observatory. In this article I will overview our process and show the final result.
Materials and Methods
There are three major considerations when conducting astrophotography. The first is the weather. It is very difficult to take good pictures of space if it is cloudy, even if the cloud level is low. The ideal conditions are a completely clear, cold winter night. On cold winter nights, the molecules in the air do not hold as much moisture as they do in the summer, leaving us with clearer images.
Secondly, we must choose a target that is bright enough for our specific telescope to actually see. The system for giving objects in space a value that correlates with their apparent brightness is called visual magnitude. There are different scales that use different comparison stars as a reference, but the one that we used uses the star Vega as a reference. Objects dimmer than Vega are given a Vmag that is positive and objects brighter than Vega are given a Vmag value that is negative.
Another important consideration is the size and distance of the object we are photographing. Depending on the camera one is using, some objects are either too small or too large to photograph. This can be due to the object’s physical size or its distance from the earth.
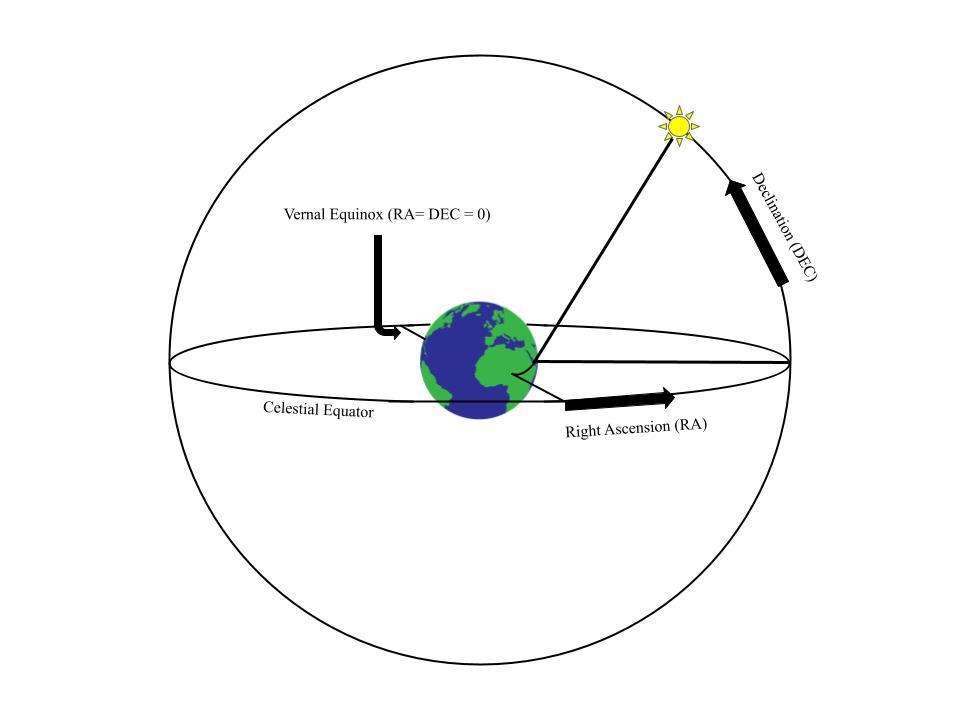
Figure 1: Locating an object with RA and DEC
Lastly, it is important to choose a target with a good right ascension (RA) and declination (DEC). RA and DEC is a coordinate system for the sky, similar to our coordinate system on the earth—they give a way of knowing where a star, galaxy, or nebula is located in the sky (see figure 1). In order to choose a good RA and DEC, multiple factors must be taken into account. The most important of these factors is how much atmosphere the light from our target must pass through before it reaches our detectors. One thing you must know is that as light passes through any type of medium such as air, small variations in temperature, pressure, etc. cause the light to scatter. If
30
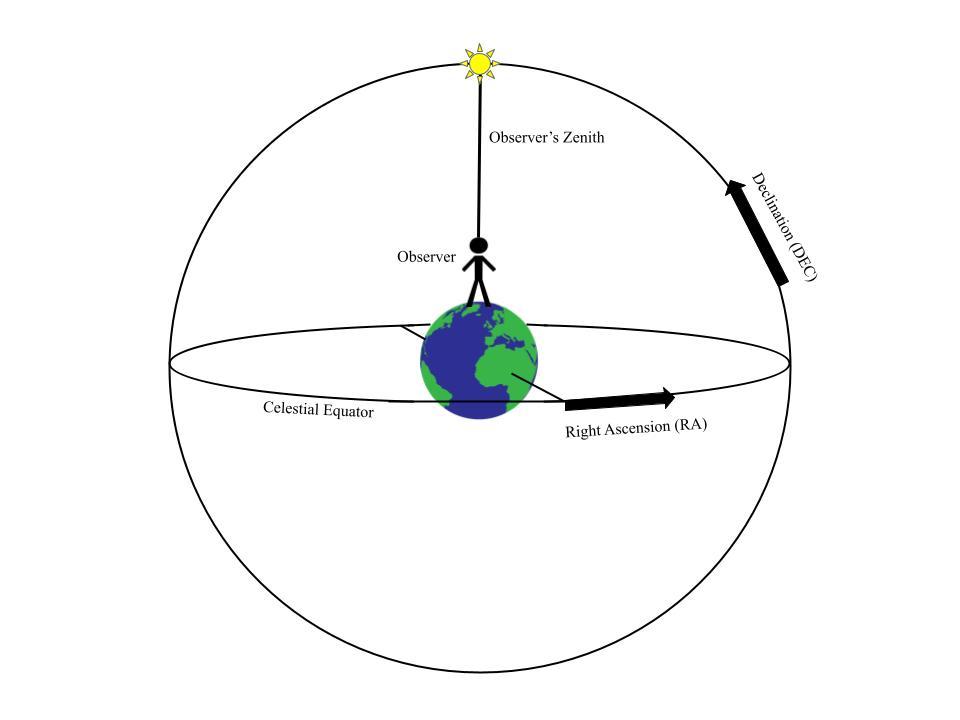
we are taking long exposures of the Andromeda Galaxy, this scattering effect, caused by Earth’s atmosphere, will give us a less crisp image. Therefore, we want the light to travel through as little atmosphere as possible. For example, a star located near an observer’s horizon would not be a good target because it would have to travel through much more air mass than a star located directly above the observer. When an object is at the spot in the sky where its light travels through as little atmosphere as possible, we say that the object is at zenith (see figure 2).

Figure 2: Object at Observer’s Zenith
Once we have chosen our target and checked the conditions, we are ready to observe. For the observations that my partner and I did, we needed a pretty powerful camera. Luckily, we had some time over winter break to use the Allegheny Observatory’s Keeler 16-inch telescope. Interestingly, we didn’t even use the telescope to take the exposures; for that we used a DSLR camera mounted on top of the telescope specifically designed for this kind of project. Before we took any exposures, we needed to complete three main steps: 1) Focus the telescope, 2) Calibrate the Telescope at Andromeda, and 3) Set up tracking so that Andromeda didn’t shift out of our telescope’s view as the earth rotated.
Focusing the telescope is fairly easy. Imagine you are taking a picture with your phone and the screen is blurry when you first go to take it. You then tap the screen or point it at an object, and the thing that you are photographing comes into focus. It’s the same idea for astrophotography just with some more technical processes that differ based on the telescope you are using. Most observatories will actually have a telescope guide, which is a set of instructions for how to carry out certain steps using that specific telescope and accompanying software. Once we have the telescope focused, we can now actually point it at Andromeda.
This second step can sometimes be the most frustrating. When we put our coordinates into the telescope, it almost never points perfectly where we want it to. There is almost always a degree of error. In other words, the Chapter 3. Life Science
telescope thinks that it is pointed at Andromeda when it is actually pointing to a patch of sky close to Andromeda. To correct this, we must take a quick exposure and compare the stars we see to the stars near Andromeda. You can use any kind of sky map, but for our case we used a program called Starry Night. Once we figure out where we are actually pointing, we just keep moving the telescope and taking quick exposures (roughly 5 Seconds) until we are in the right spot. Lastly, we set the telescope to tracking so that we can take exposures without our galaxy shifting out of frame as the night goes on. Once everything is set up, we can take our exposures. Depending on the stability of the telescope you are using and the natural noise of the camera, these exposures should be anywhere from 1-30 minutes. In our case, we started by taking one or two five-minute exposures before moving on to ten-minute exposures when our data looked good. Then it just becomes a waiting game. The goal is to get as much exposure time as possible. For our image, we didn’t really feel like staying up until 6 am, so we took about two and a half hours of total exposure time. Finally, we were left with 15-20 raw frames that we then used in our post processing to render our final image.
Post Processing and Results
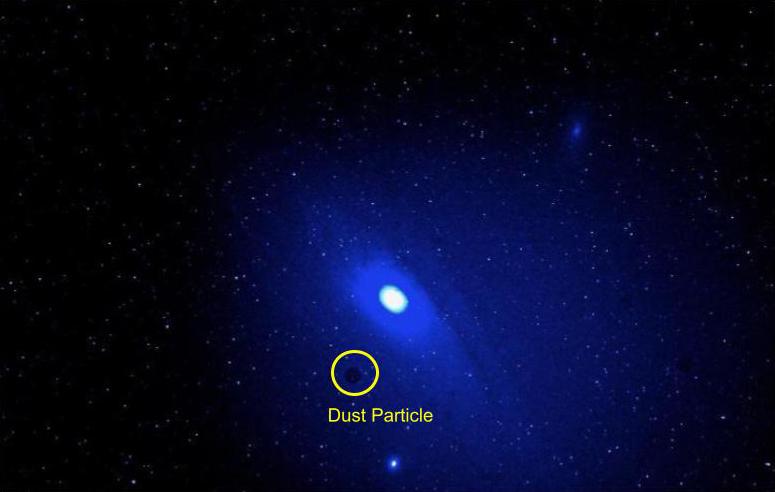
The first two steps in post processing are generating a master flat and a master bias. It is very common to have dust particles on the lens of our camera. By generating a master flat, we are given a frame that is only dust particles (see figure 3). This way, we can apply it to our Andromeda image and subtract everything in our master flat from our image, effectively removing any spots. A master bias is a little more complicated, but just as relevant. Any kind of electronics gives off heat to run. When taking long exposures this inherent heat from running our camera can affect the whole frame. This is what we call a camera’s ‘noise.’ It is similar to black and white static on an old TV screen. To remove this, all we do is take a zero-second exposure to see the noise of the camera. By having nothing in our frames, we are left with just the noise that the camera gives off. Now we are able to take our two master frames and subtract them from our original exposures of Andromeda.


