3 minute read
TUTORIAL - How to: integrate


How to: Integrate CitrusHR expenses to Xero
Recording expenses accurately and on-time is often a major hassle for staff...
Signing off incomplete
expense claims can be a nightmare for managers, and the whole process, when handled manually, can cause all sorts of friction in the office.
It’s much more common for bigger companies to have dedicated apps or systems to manage expenses for them.
But that’s often not practical for smaller companies. CitrusHR combines advice from qualified consultants with HR software that includes a holiday and absence planner, employee database,
@citrusHR
David Lester, Founder, citrusHR
He started a software company aged 22, and grew it successfully before selling. He then started startups.co.uk, the UK’s leading small business website, which he recently sold to focus on citrusHR. David qualified as a Chartered Accountant with Ernst & Young.
time-tracking, payroll reporting, expenses management and much more!
CitrusHR’s built in expenses system minimises hassle for everyone involved, and sends the expenses data straight into Xero…
Step 1: Link to citrusHR to Xero
With just two minute’s set-up time, you can have all your expenses data syncing seamlessly from citrusHR to Xero.
To get started, from your Dashboard select the Settings tab and choose Data Sharing and Synchronisation.
Once inside, select Xero from the dropdown menu and click save change. In this menu you can map your charge codes to Xero’s account codes or map your expense clients to your Xero clients. Click connect to Xero.
You will be redirected to Xero and
You can choose which of your originations to connect to if you have more than one. Lastly clicking allow access will direct you back to prompted to login to your account.
CitrusHR.
Step 2: Choose your expense settings in CitrusHR
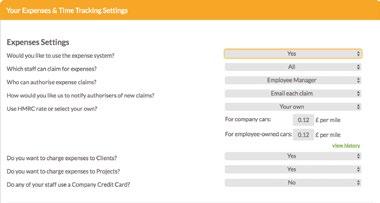
Go back to Settings and this time choose Time Tracking, Expense Settings and Codes. Once inside expense settings you can choose which staff can claim and authorise expenses, and also whether expenses should be charged to clients or projects. You can also setup whether to use HMRC or your own rates for mileage claims.
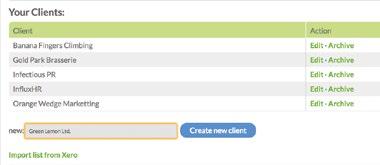
This step is a huge time saver. Now you are connected to Xero, you can import all of your clients from Xero to CitrusHR. Once you have done this you can easily allocate an expense to an existing client from the citrusHR app. You can also can create new, edit and archive expense clients.
Step 4 – Map charge codes to Xero account codes
Now it’s time to map CitrusHR charge codes to Xero account codes.
Link the Xero account codes with your charge codes using the dropdown menus and save your changes when you’re done.
That’s the set-up done, and now you’re ready to submit an expense claim to Xero.
Step 5 – Submit your first expense claim
Go to your dashboard. In the actions tab, create a new expense claim. When you want to submit more than one claim use the new multiple expense claims form.
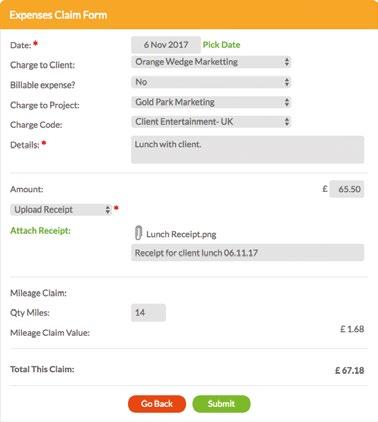
Complete the claim form selecting from your list of charge codes, projects and clients. Upload relevant receipts and record your mileage. Submit your claim when you’re ready.
Your completed expenses claim looks like this in CitrusHR and when you log in to your Xero account, your claims will be stored as draft bills ready for you to action at your leisure.