This academic year has been a year for me to constantly surpass myself Under the guidance of excellent tutors, I have worked really hard to not only reach or transcend the standards of various different presentations and submissions, but also smartly adjust my learning mode and generally extract my design style. Although there are many moments of suffering and pain, this process of growth is very precious
Design is the most comprehensive module It requires me to gather all the stuff I know to design something for some people. In the process of completing the design, I began to learn to develop my various senses to observe and feel the world, and to respond effectively to those phenomena. I began to learn to truly step out of my personal perspective, think about problems from different perspectives, and find ways to meet the needs of others.
‘Site’ project taught me to observe and response ‘Memory Spots’ project taught me to transform emotions to architectural reality ‘Framework’ project taught me to think flexibly and learn to cooperate with others ‘Urban Observatory’ project taught me multifaceted thinking and application.
There are countless excellent and suitable answers for the design of a building I often encourage myself to discover and utilize the things I appreciate, becoming my style I have also gone from being a person who was unwilling and afraid to listen to others' opinions, to a person who, although occasionally a bit nervous, is more open-minded What remains unchanged is that I am still a person who loves persistence. I always admire my exceptional endurance at work.
Apart from design modules, I also learned a lot from technology , history and representation modules Speaking of technology ,until now, I still feel that things related to structure often make me feel confused, but I gradually began to find a sense through the practice of high-intensity homework For the history module, I could say I love it the most because every time I contact readings or images of the past, I can happily travel back in time, stay in the virtual world in my mind and temporarily forget how much homework I need to catch up with, haha ! As for representation, I would say it is an extremely important module because all our design thoughts need to be transformed from what is in our mind to paper , physical models or digital views Without representation, you can’t record the things you feel and express yourself to let people understand you
Resit of portfolio is a good chance to reflect. I see it as a platform of experimentation, as a small staircase for crossing the bigger ones ,and as a time to lay a solid foundation before I can really contribute to society through design. I want to thank all of you for helping me towards success
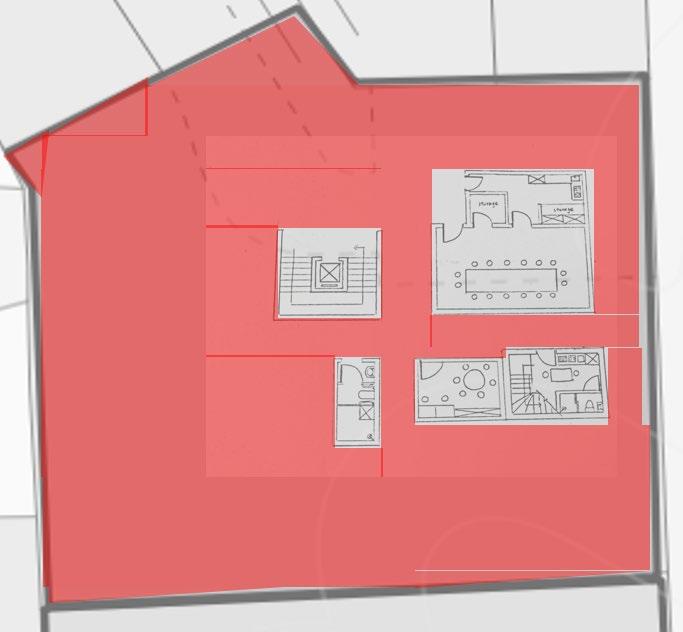
Showcase
Showcase
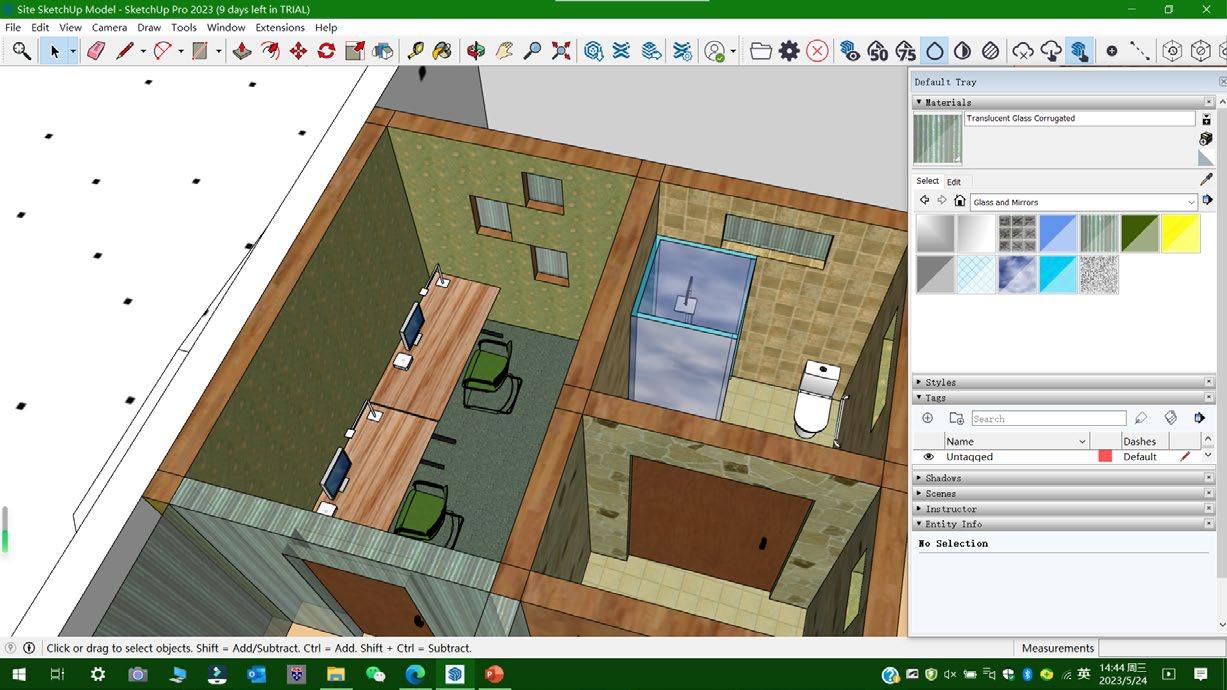
Urban Observatory SketchUP Model (May 2023)
CAD Drawing for US Consulate in Luanda (May 2023)
Technology Section Drawing (Feb 2023)
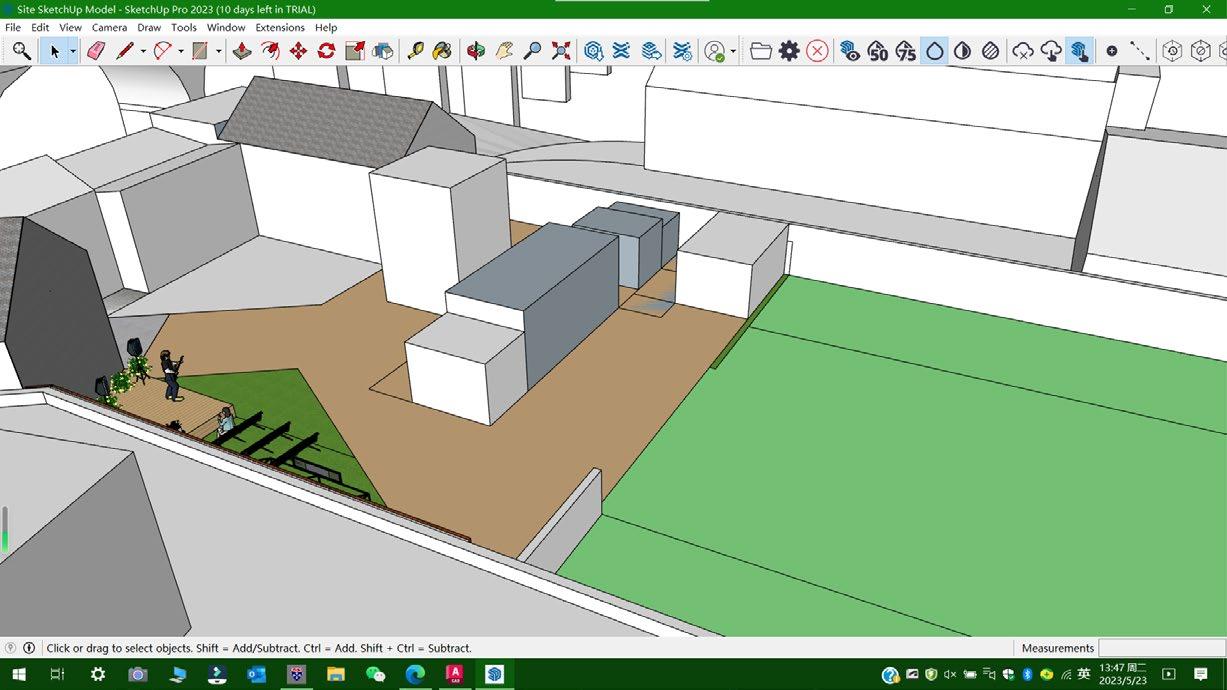
Space Model for Project ‘Site
’(Dec 2022)
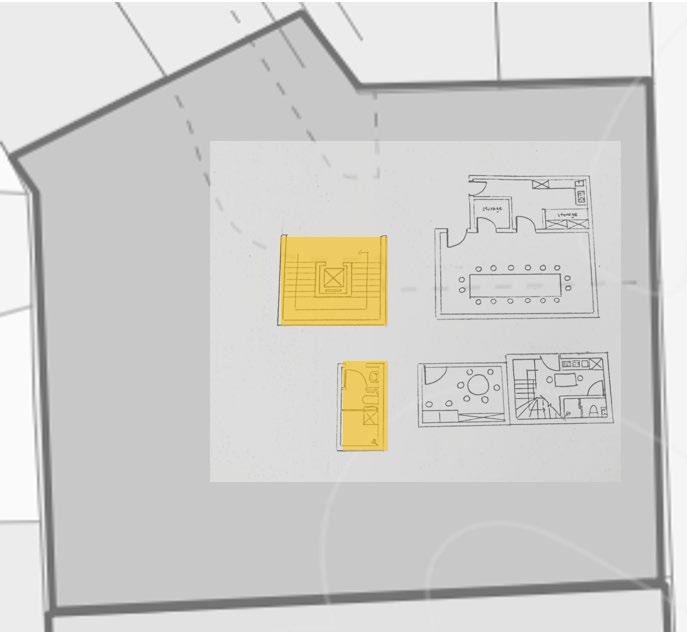
Showcase
Memory Spot Final Physical Model (Nov 2022)
Showcase
Human Figure Charcoal Sketch (Jan 2023) City Walk Charcoal Sketch (Sept 2022)
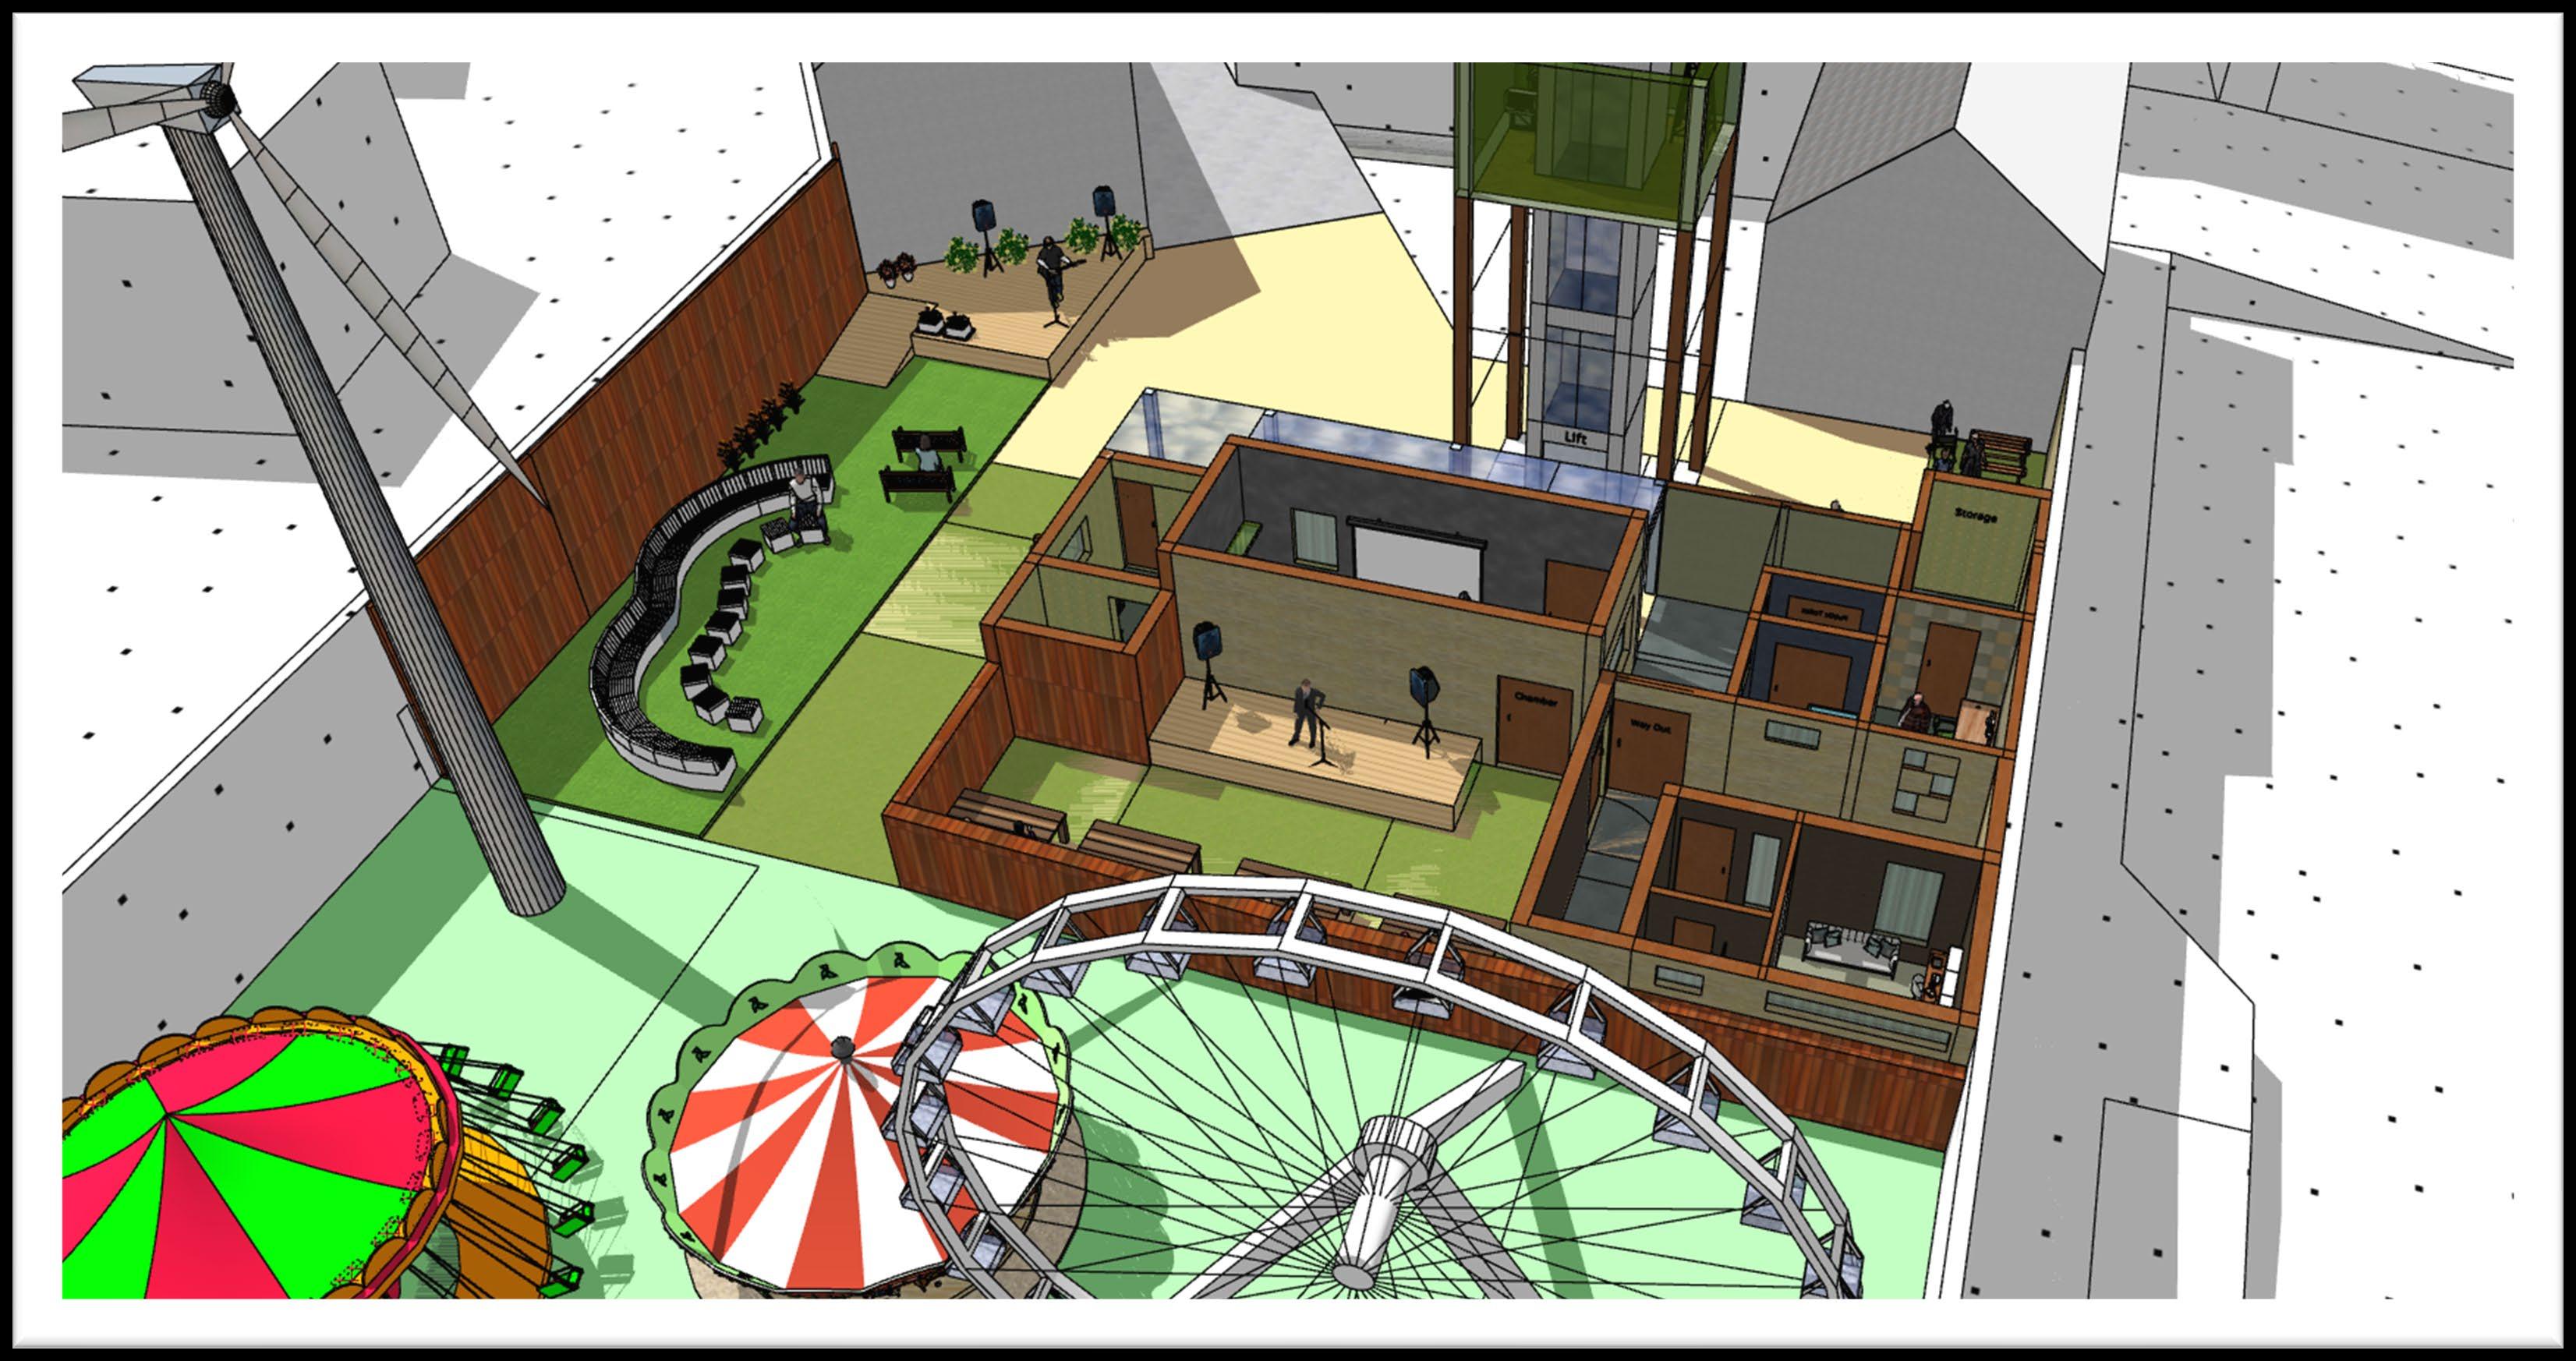
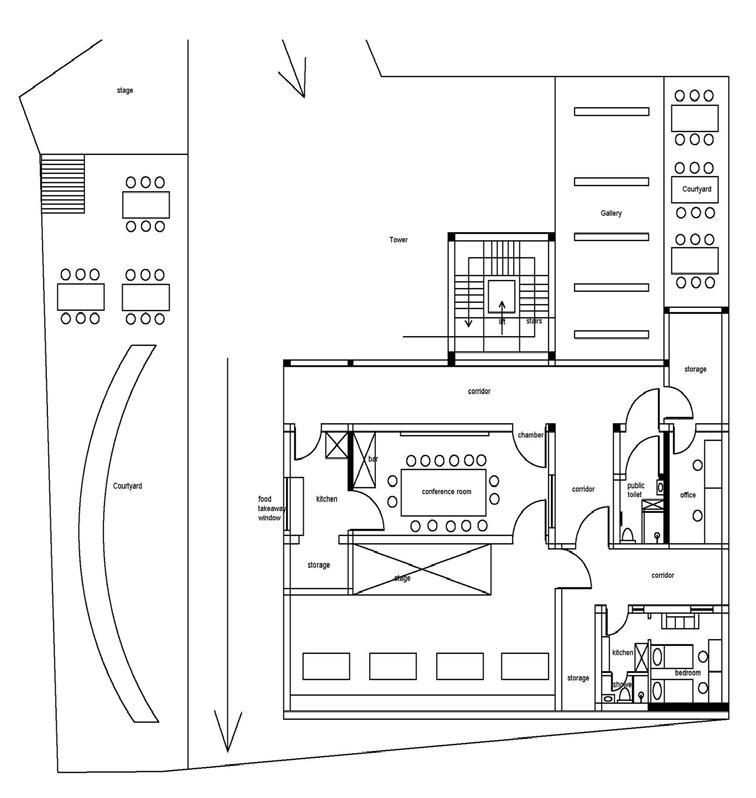
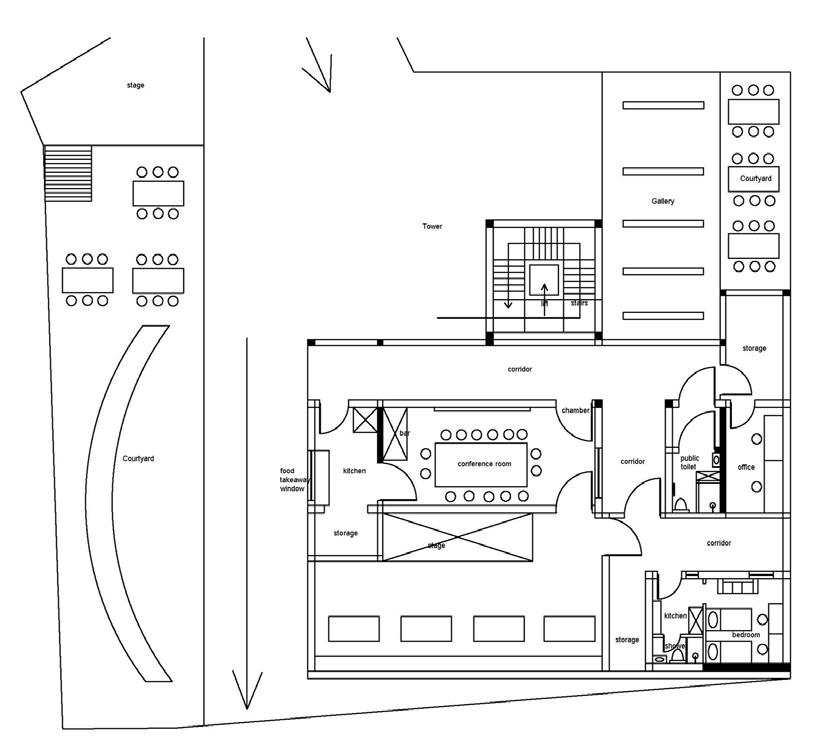
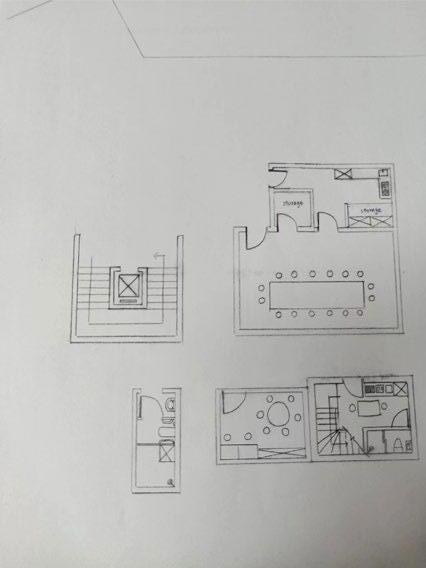
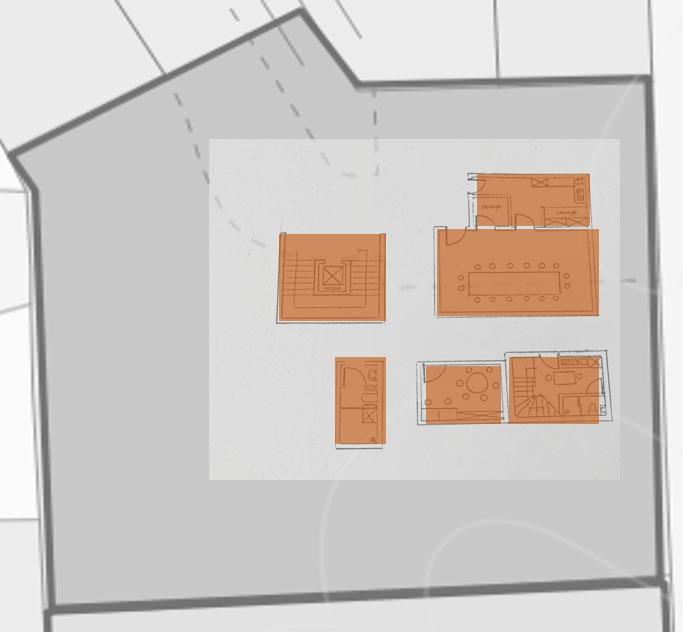
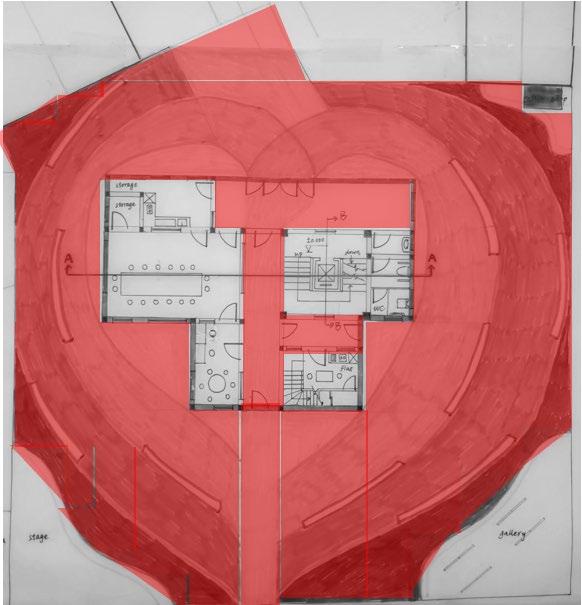
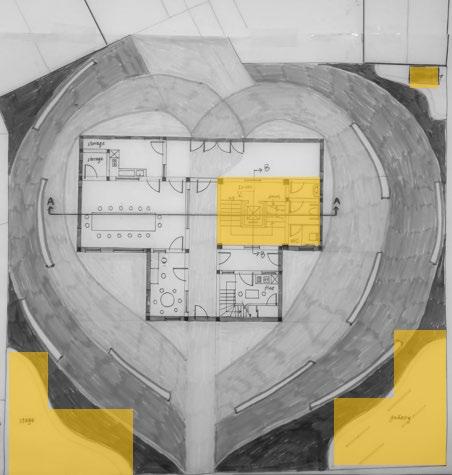
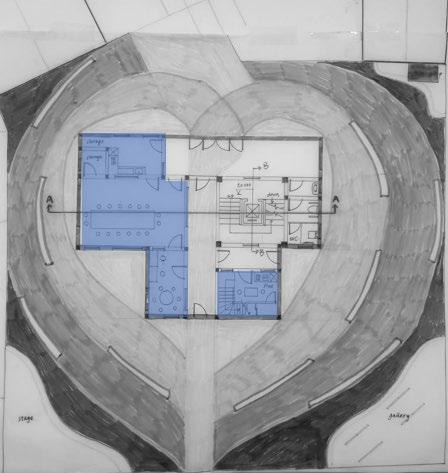
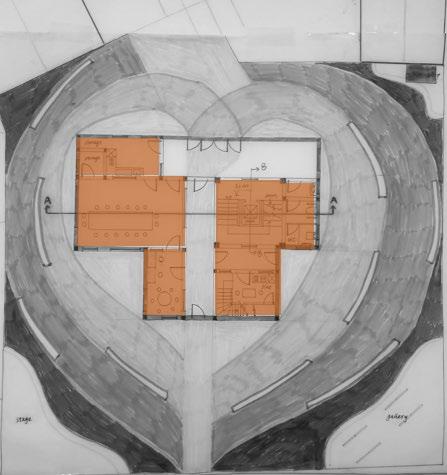
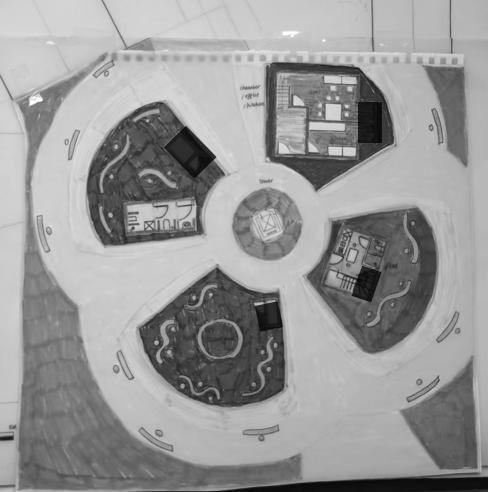
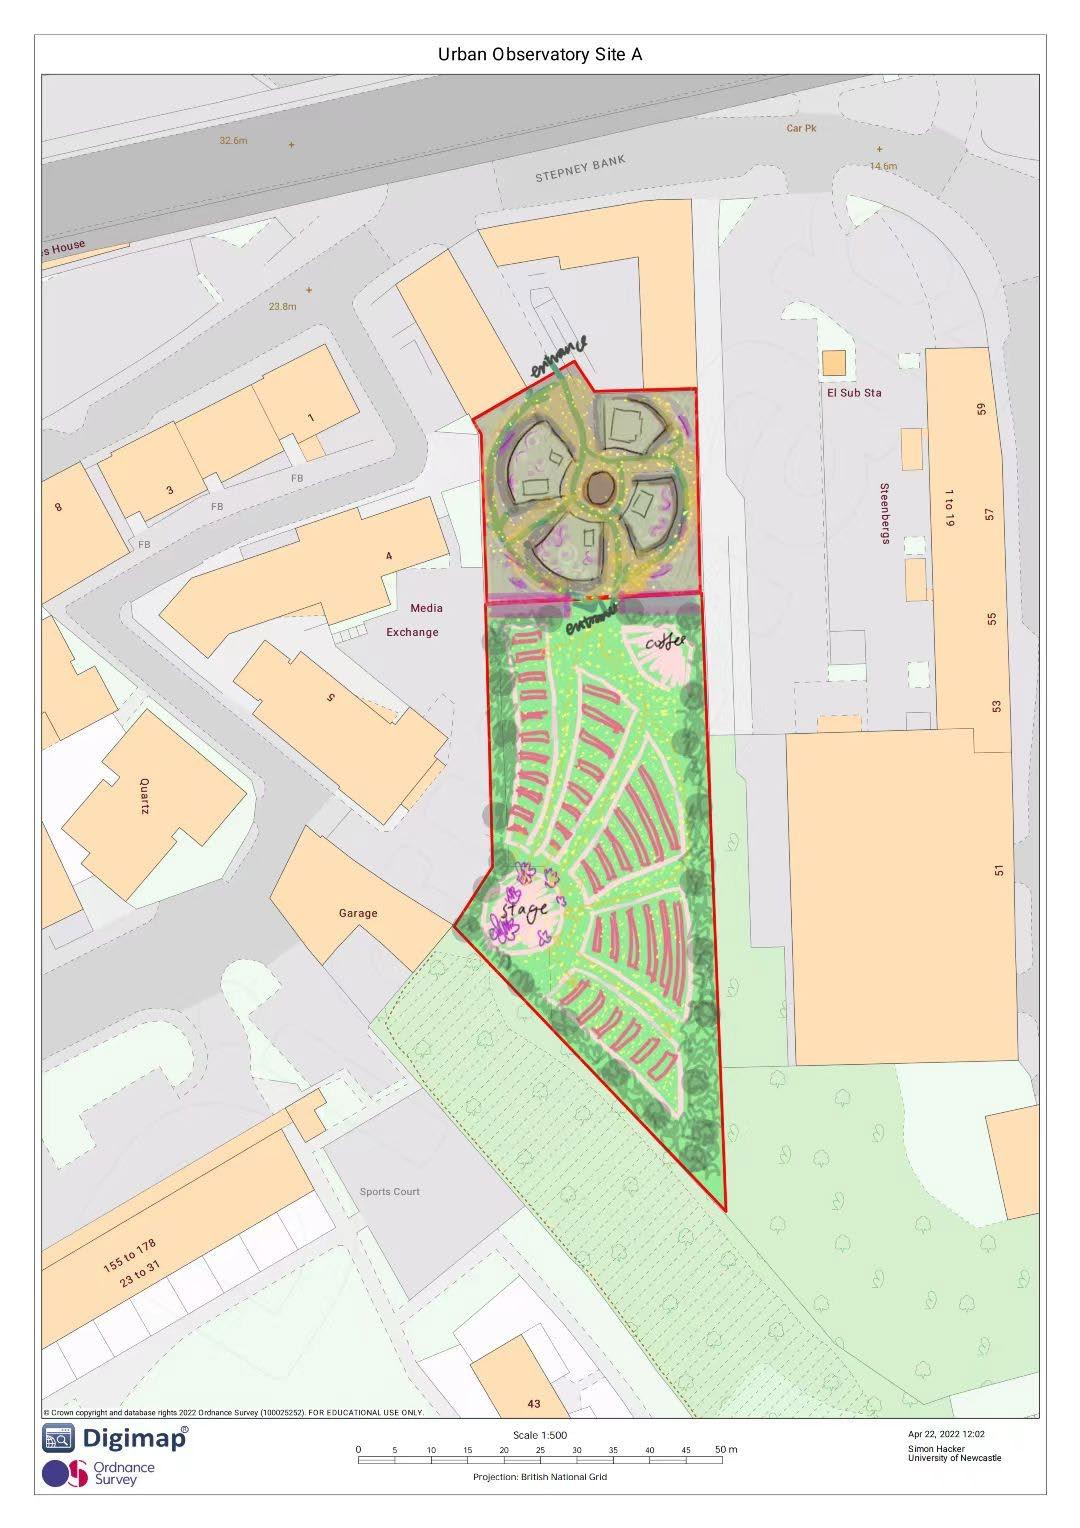
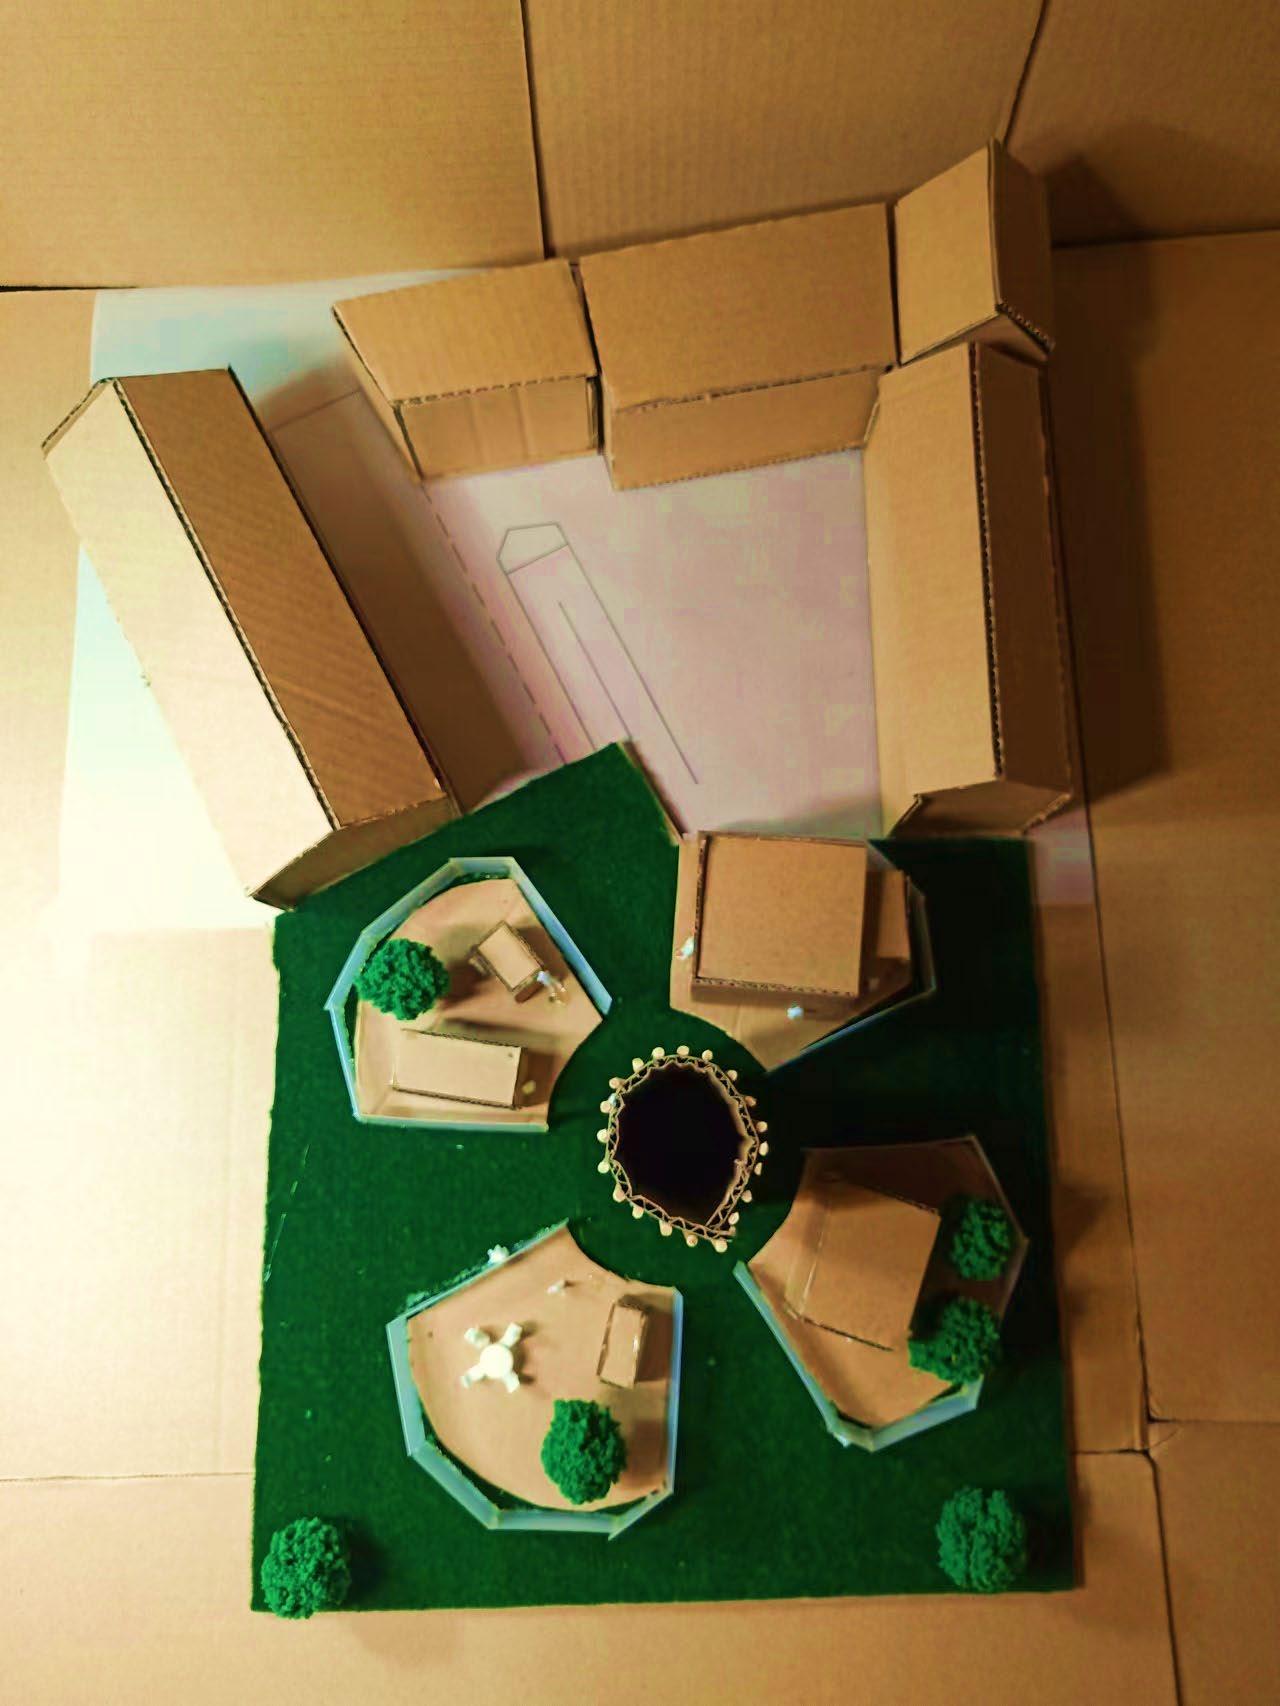
Urban Observatory
1.4 Urban Observatory
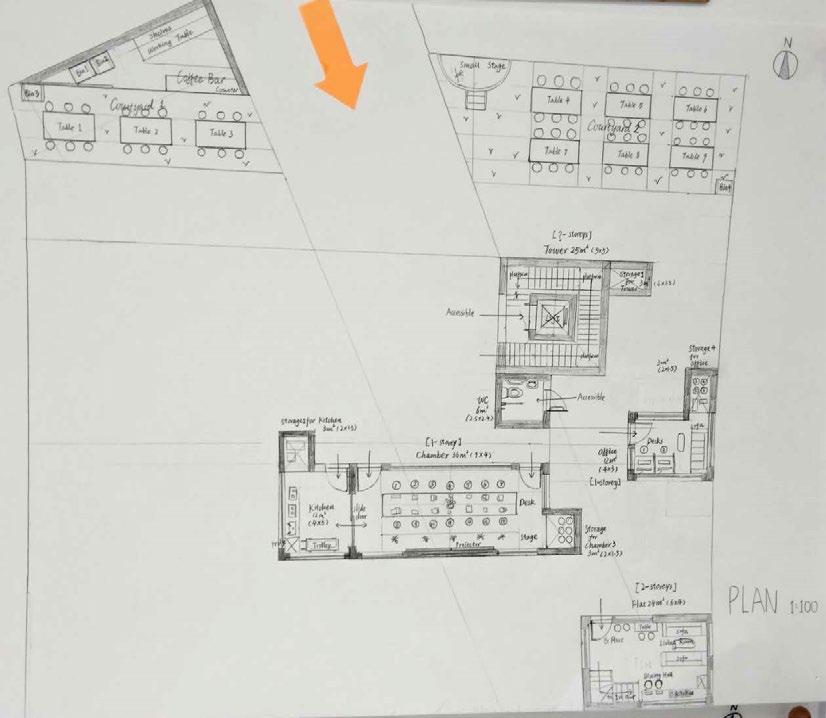
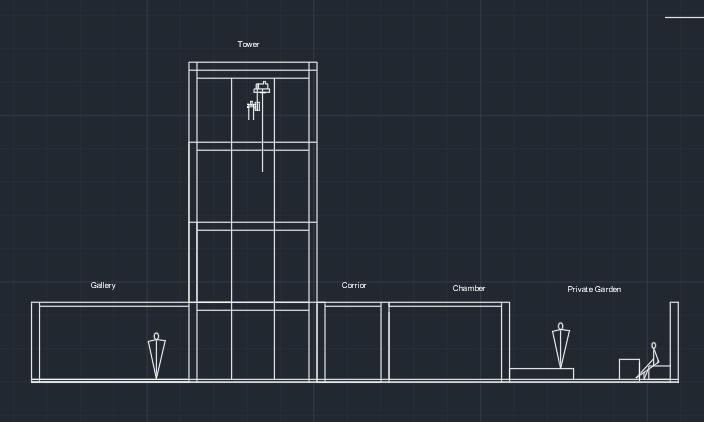
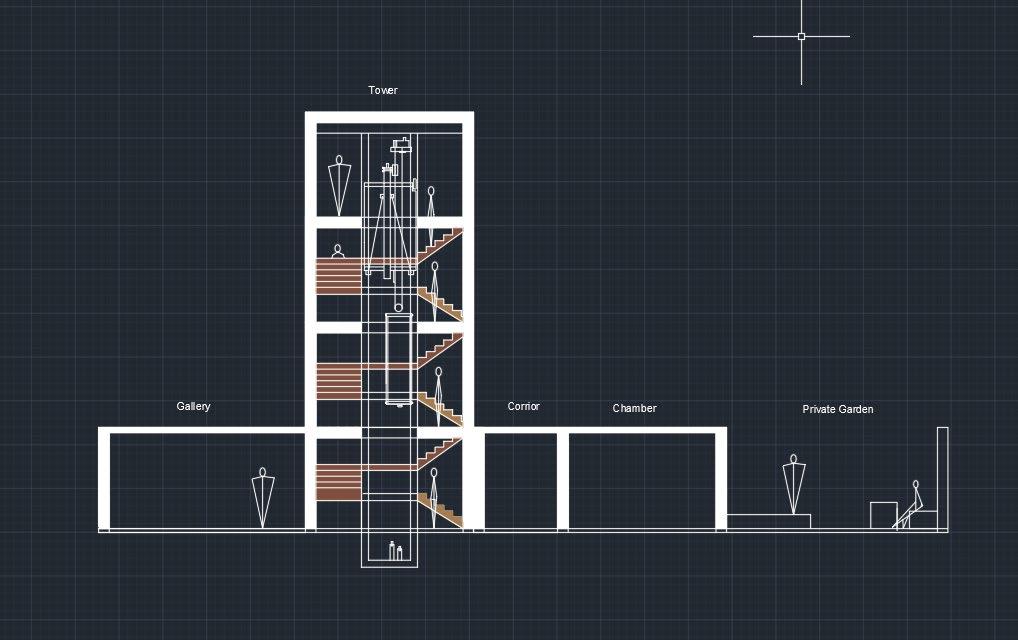
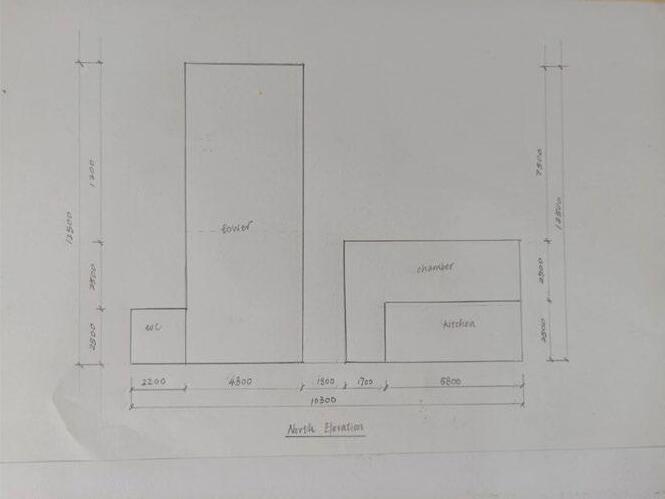
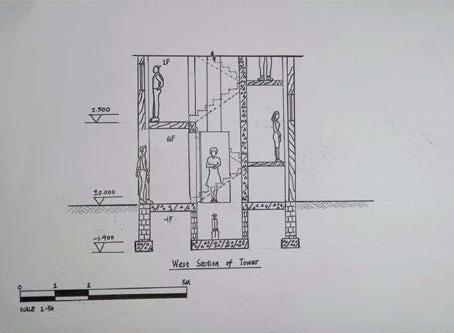
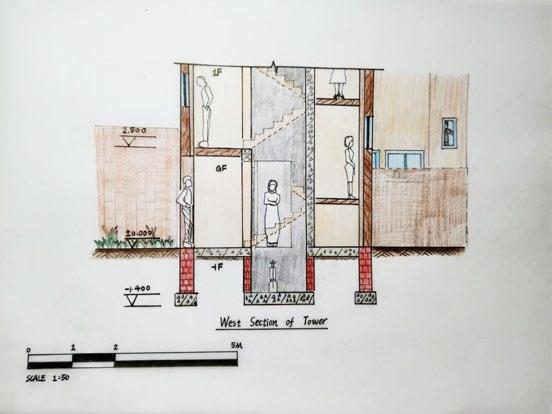
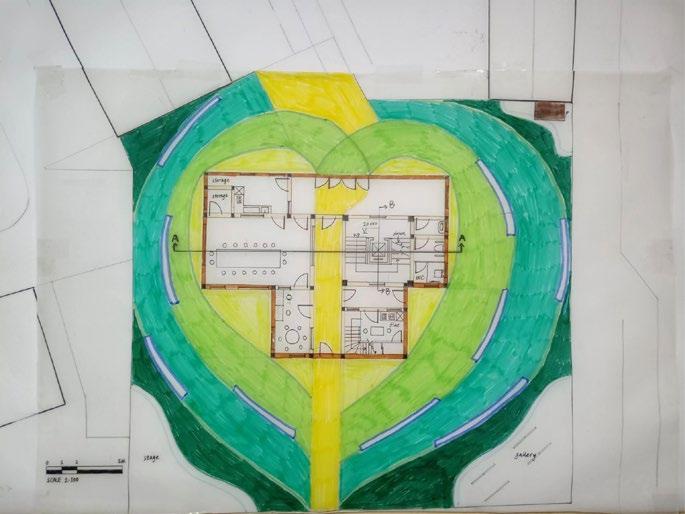
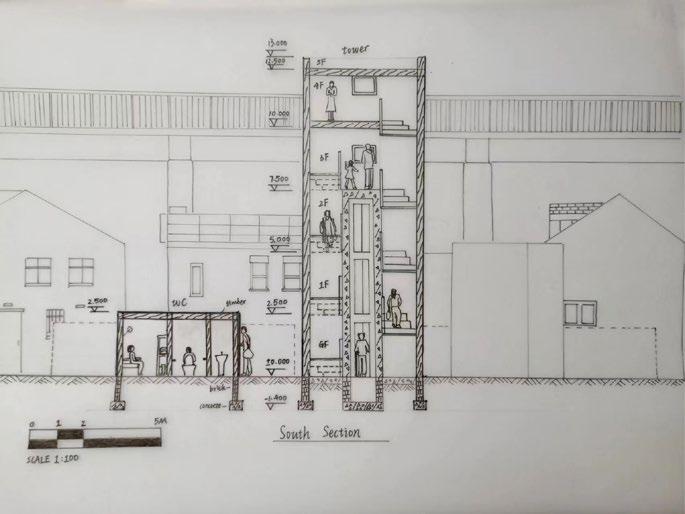
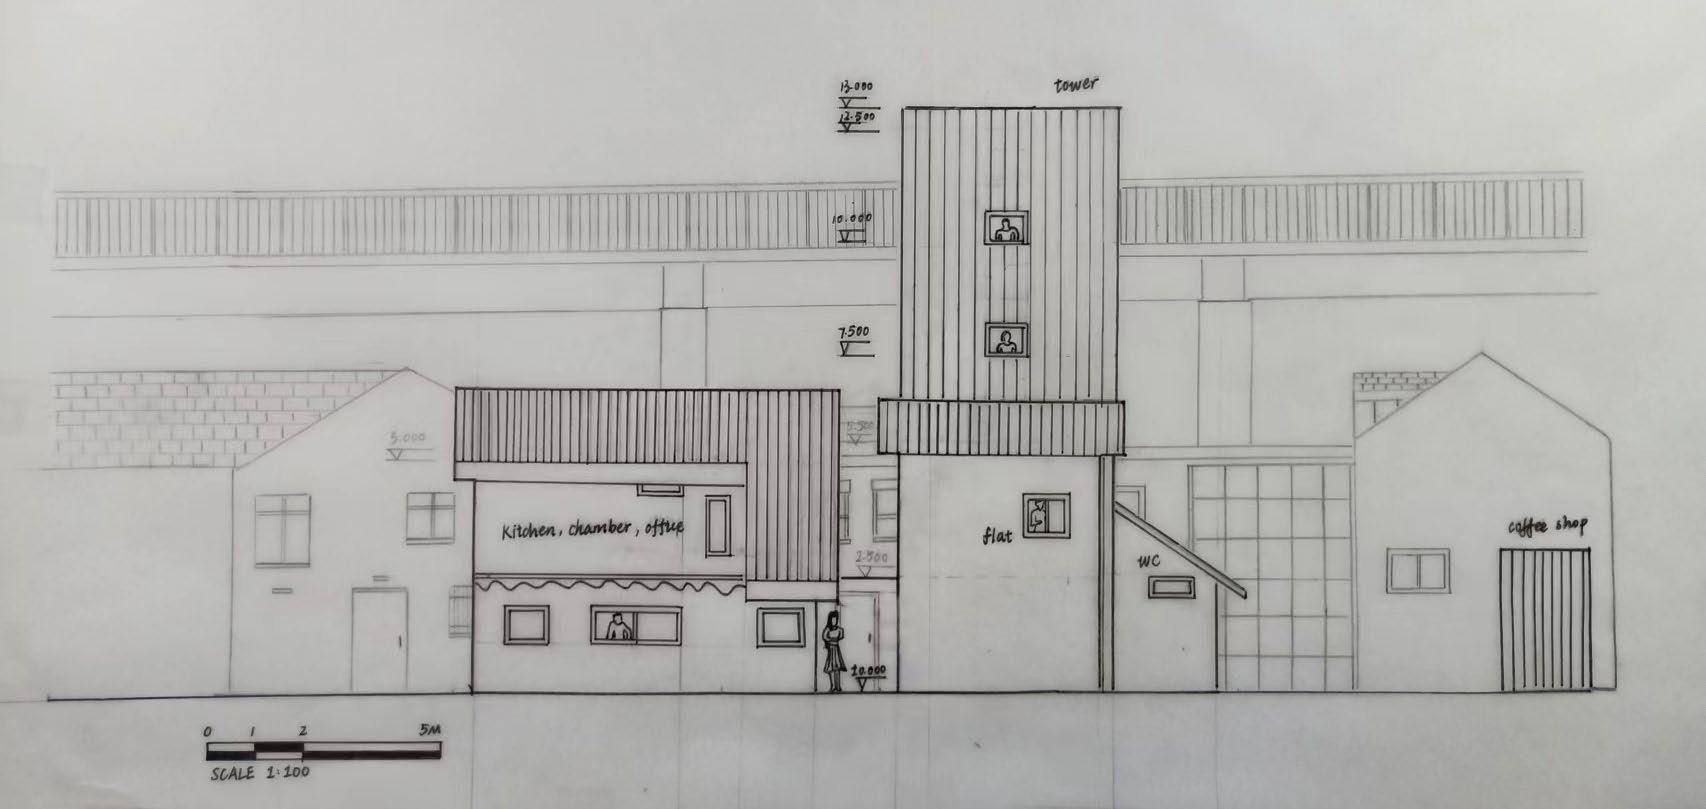
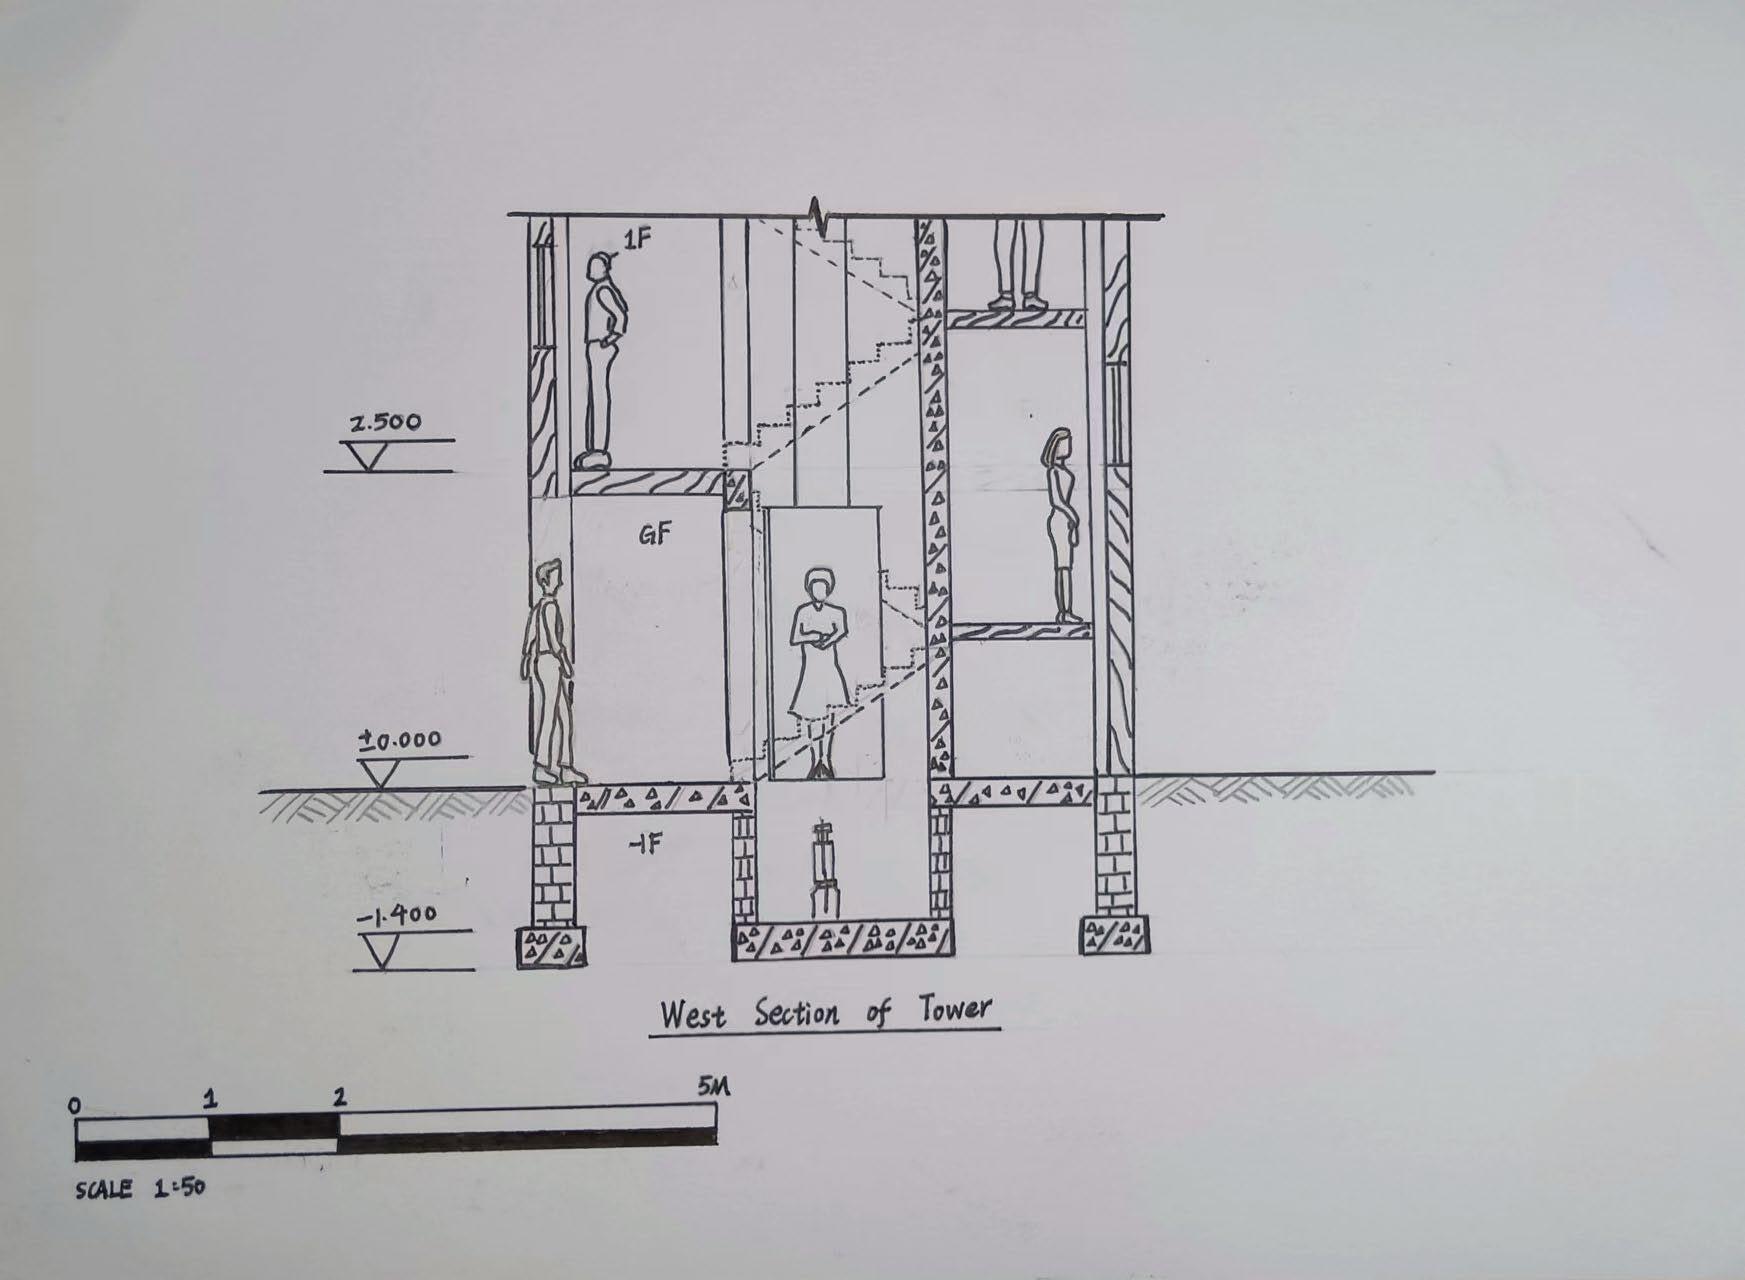
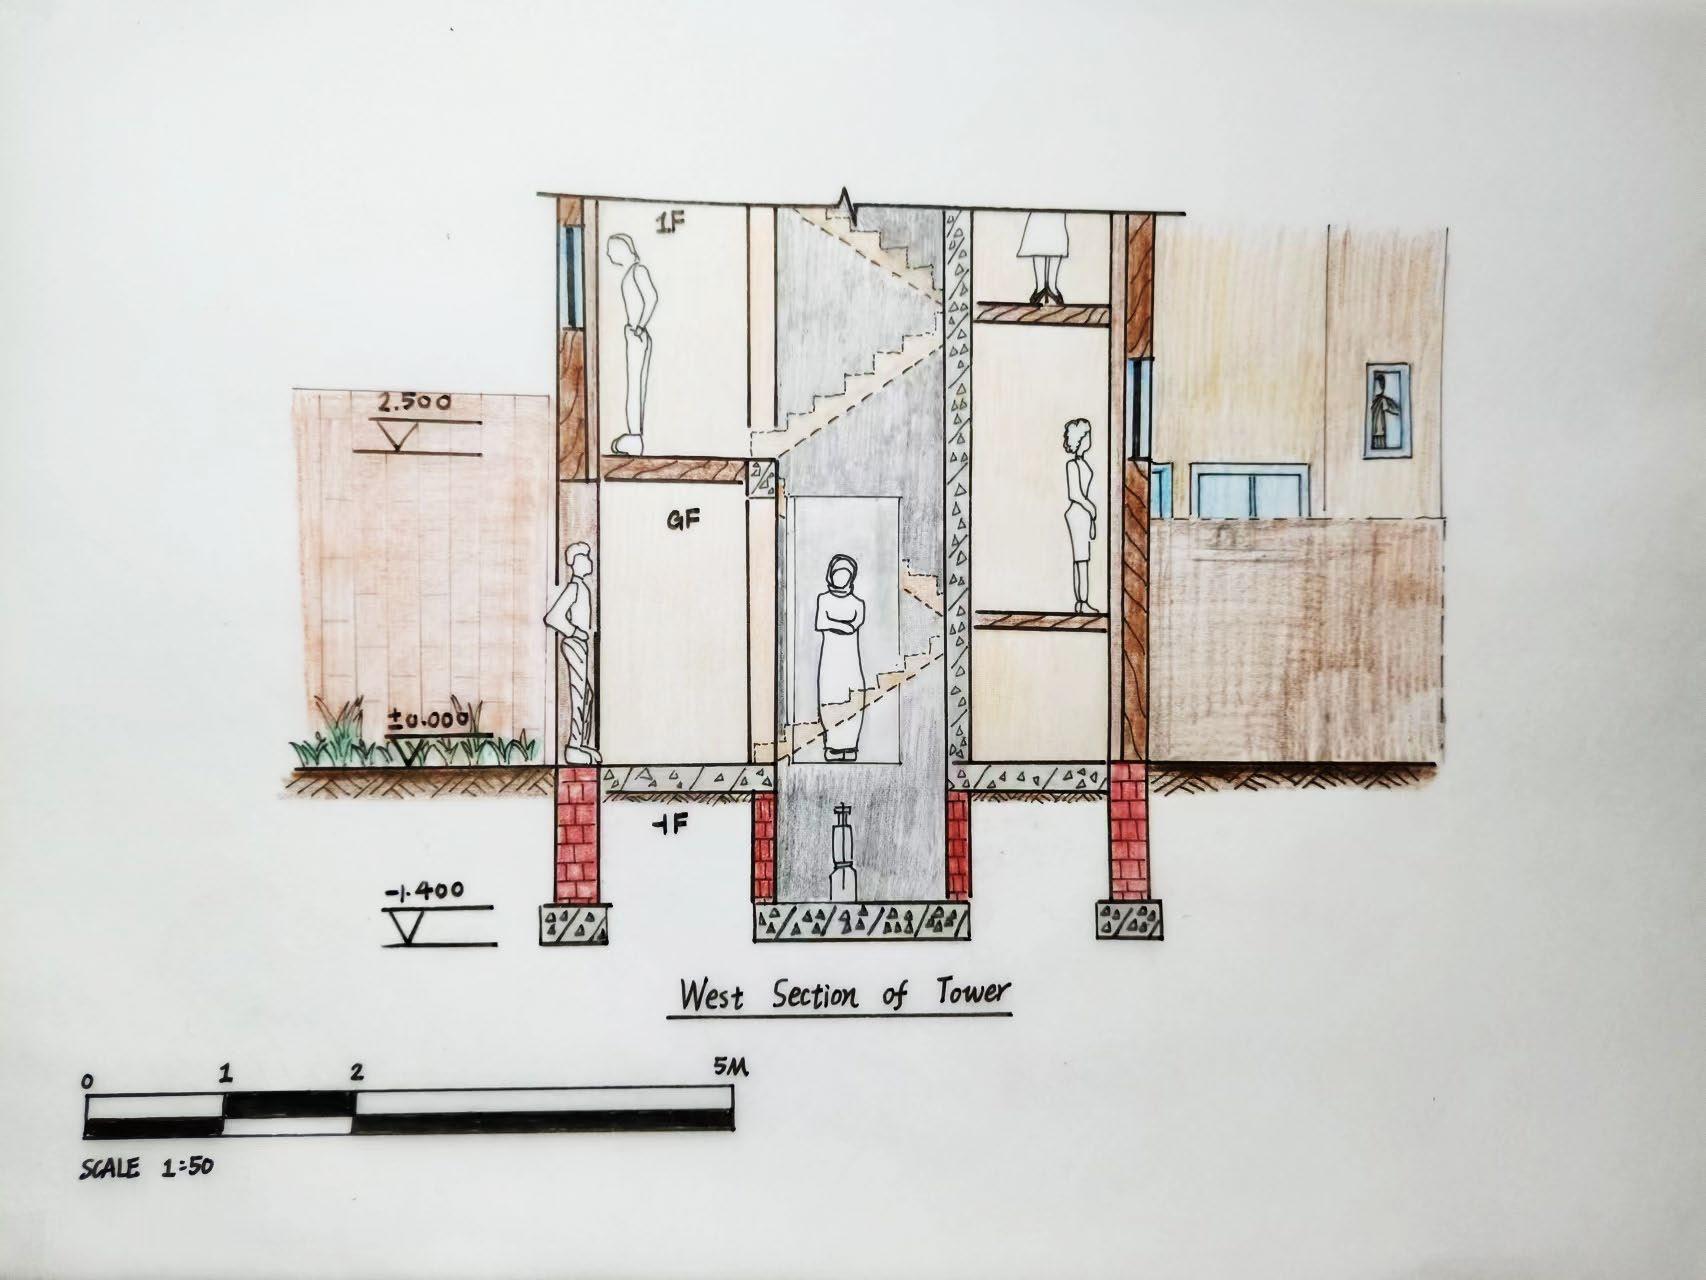
1:100 Final Design Section A-A (West Section) in context
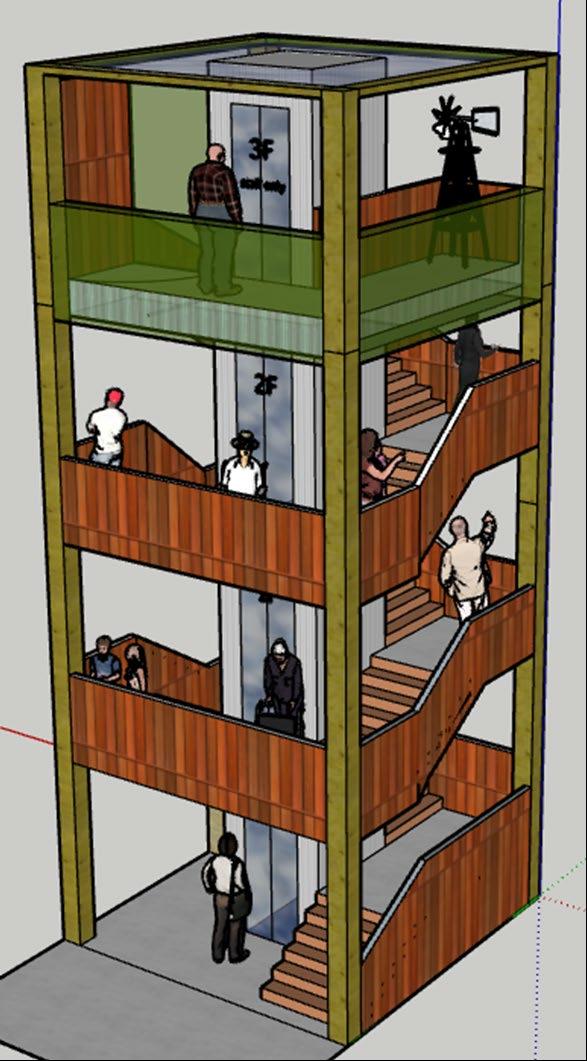
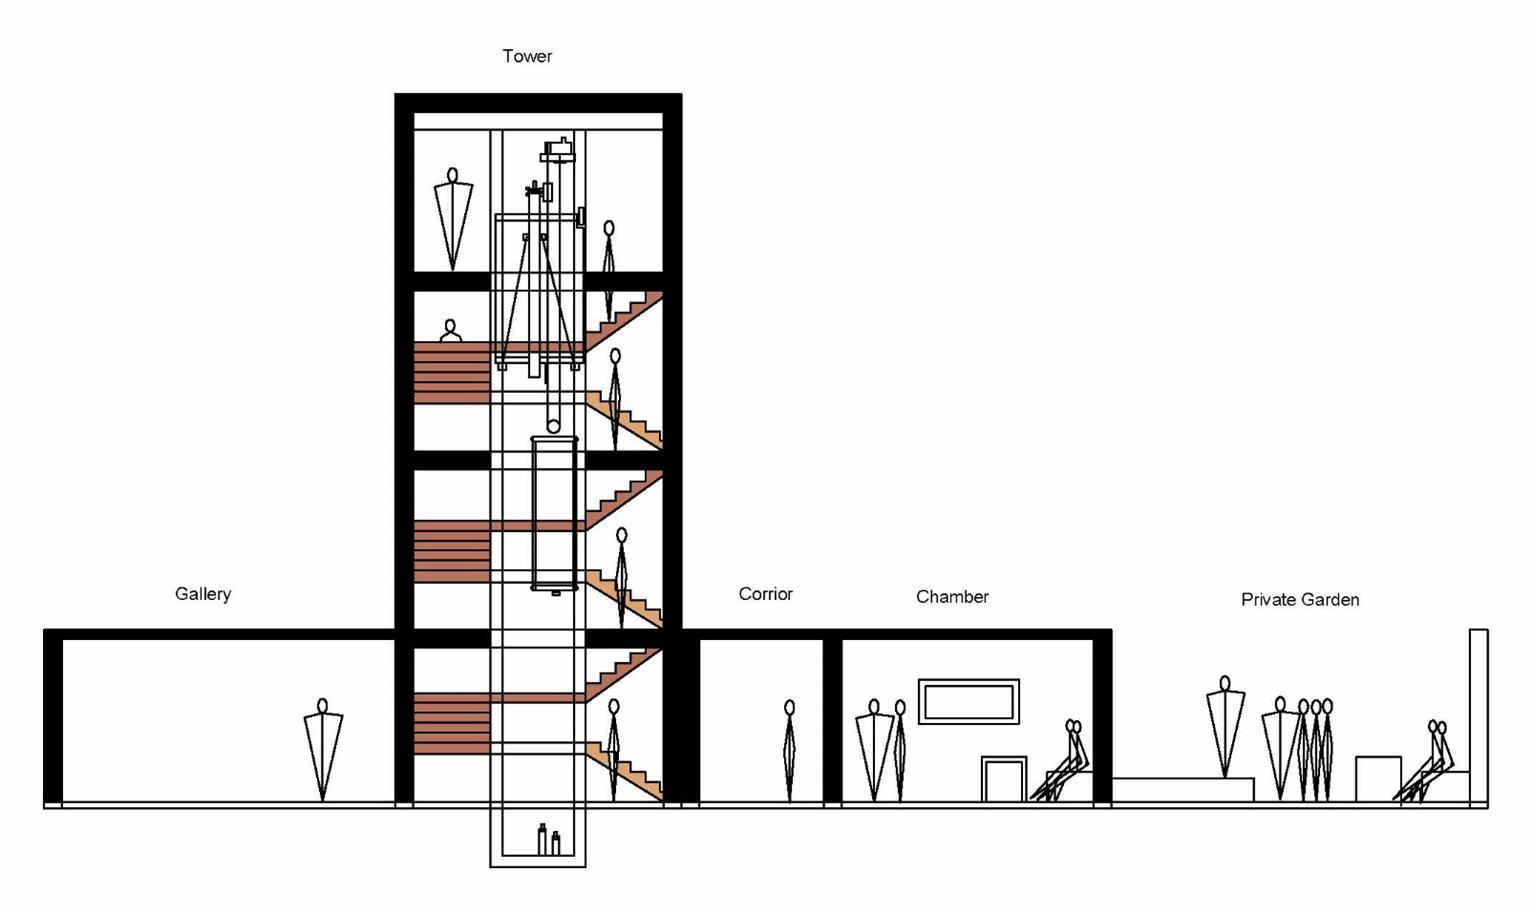
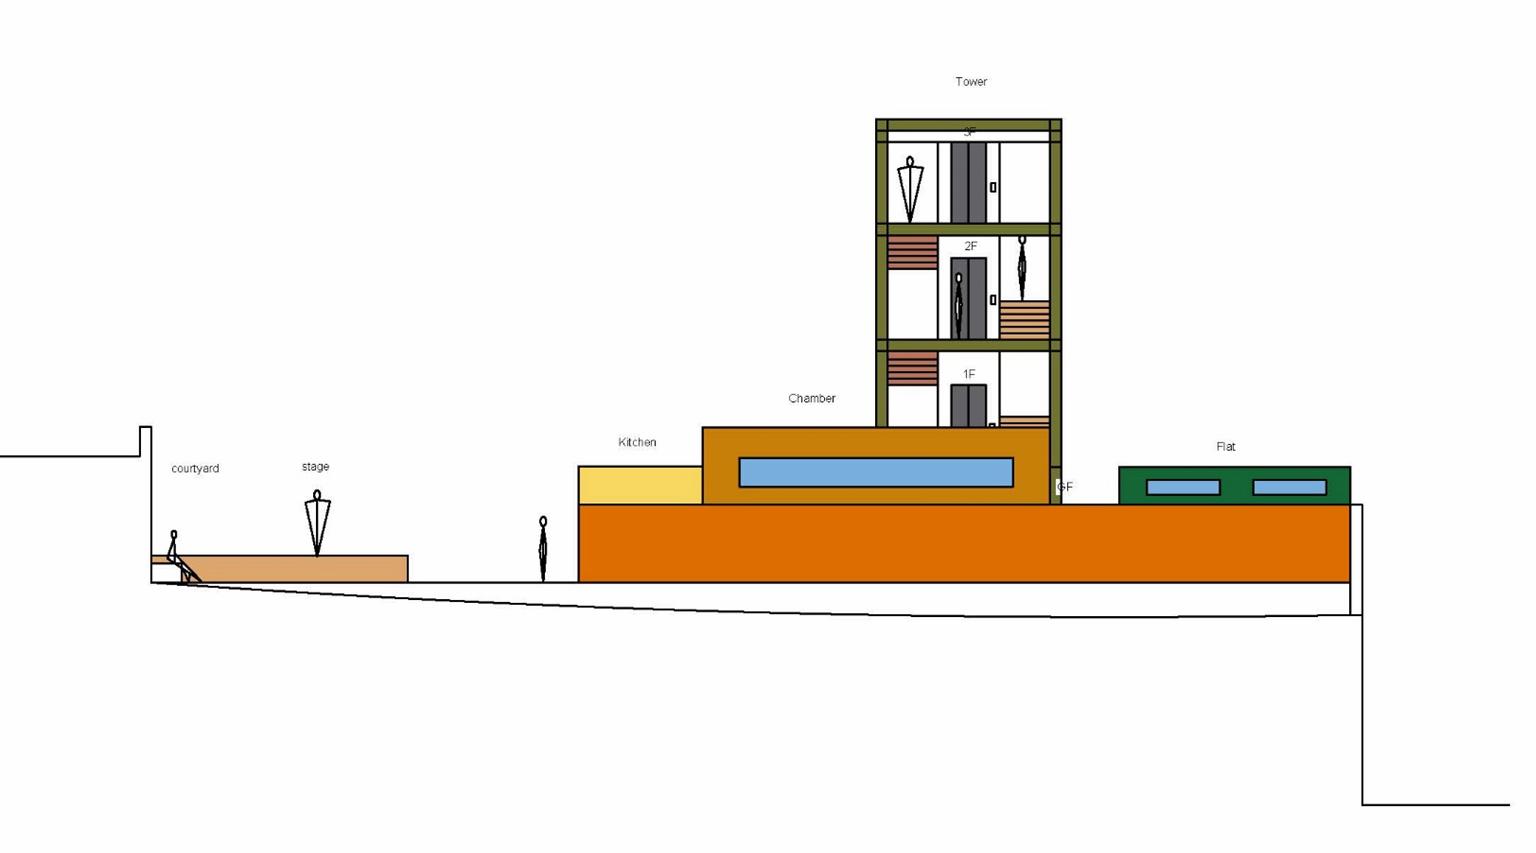
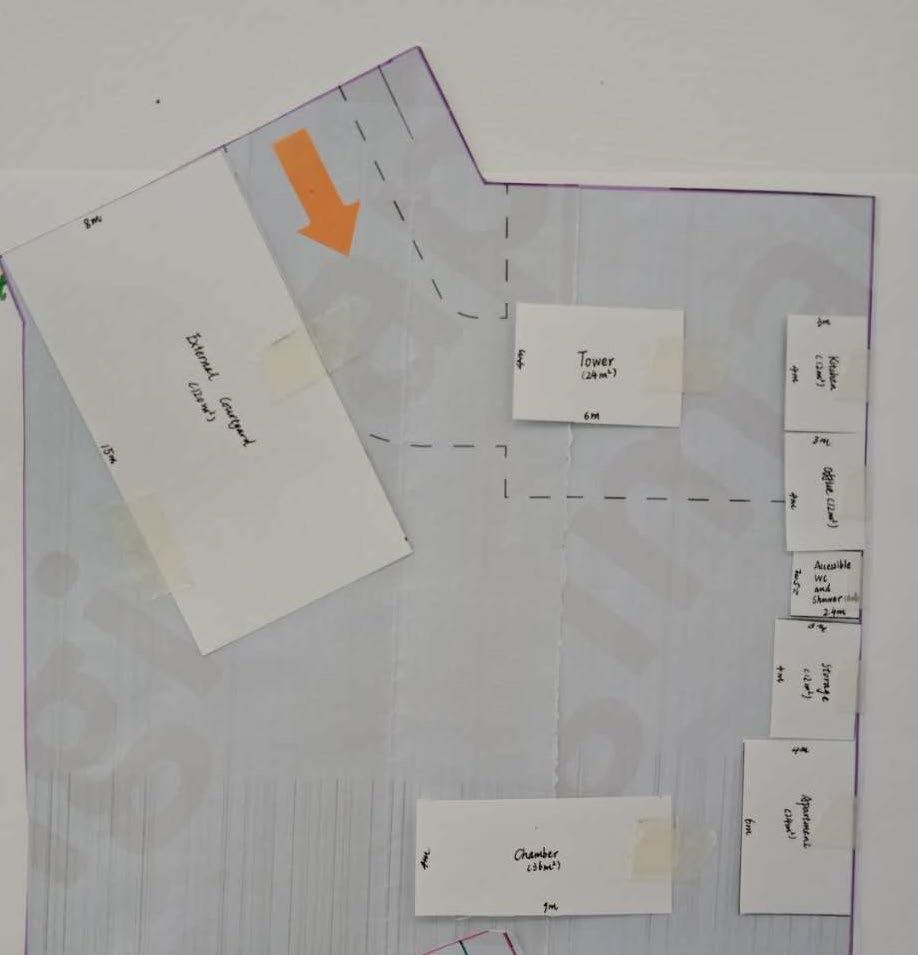
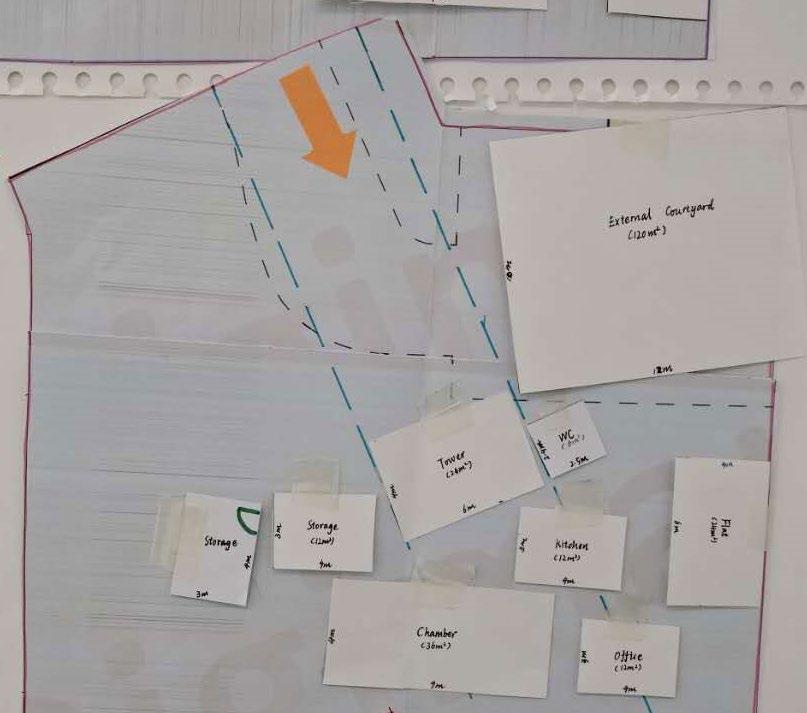
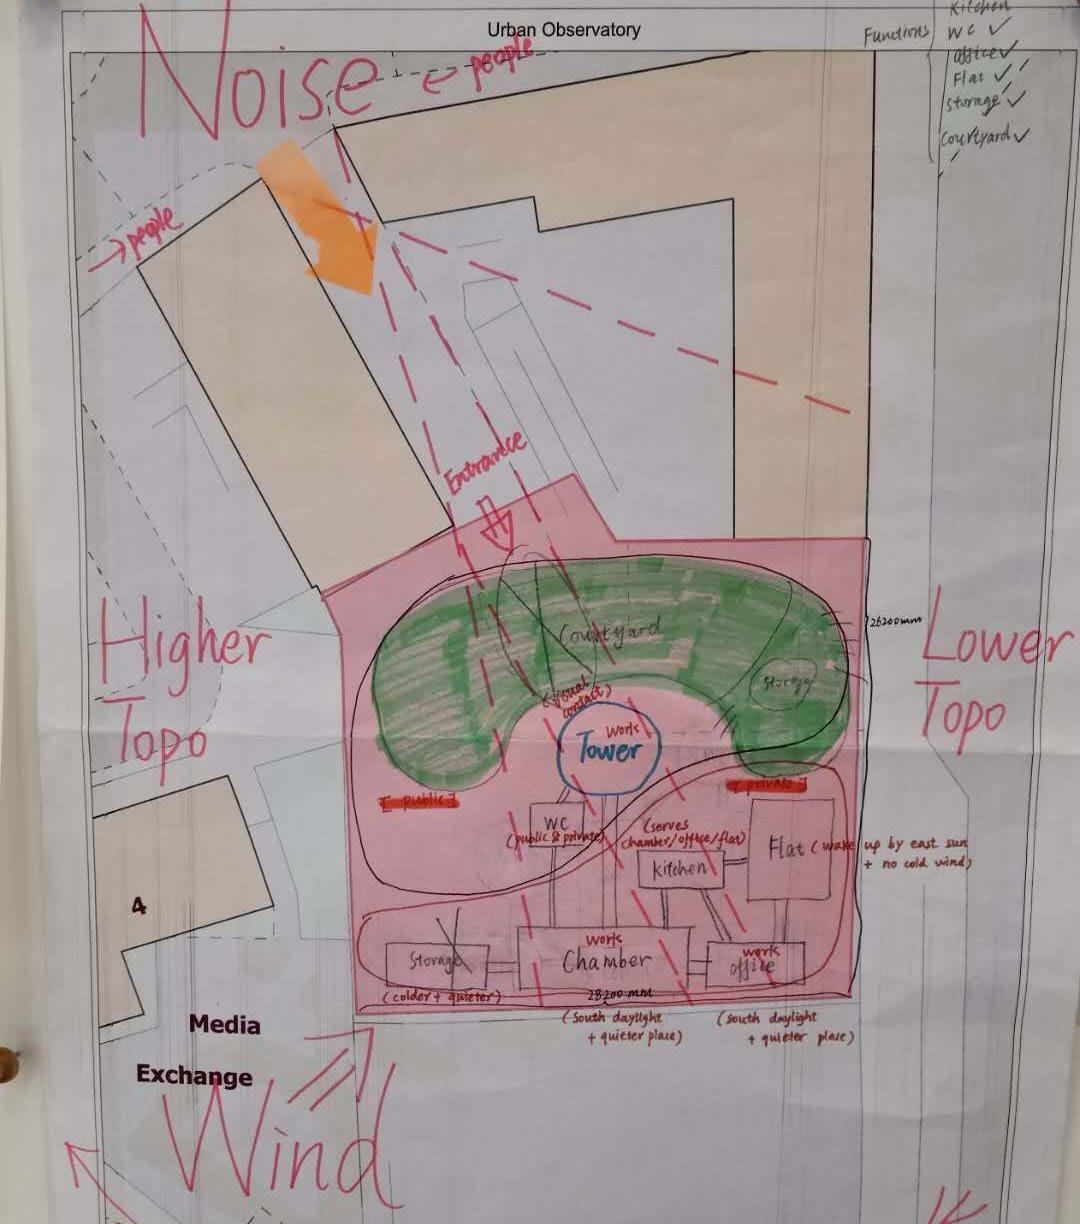
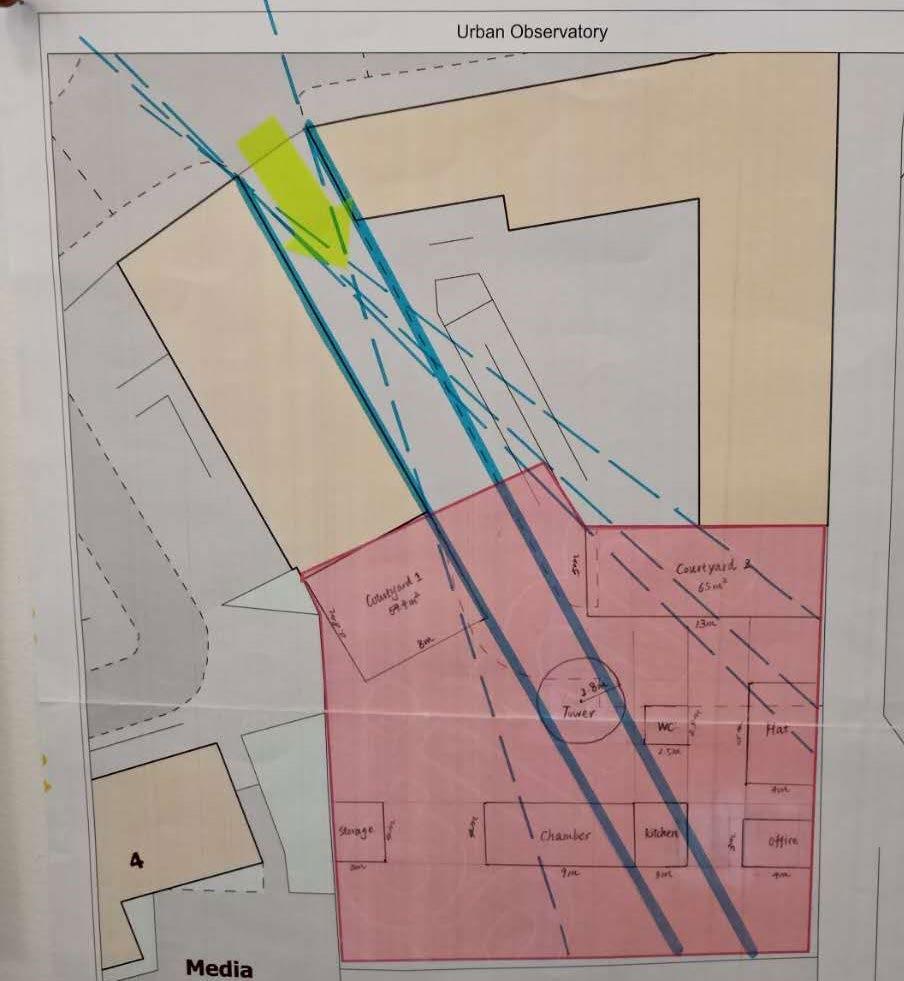
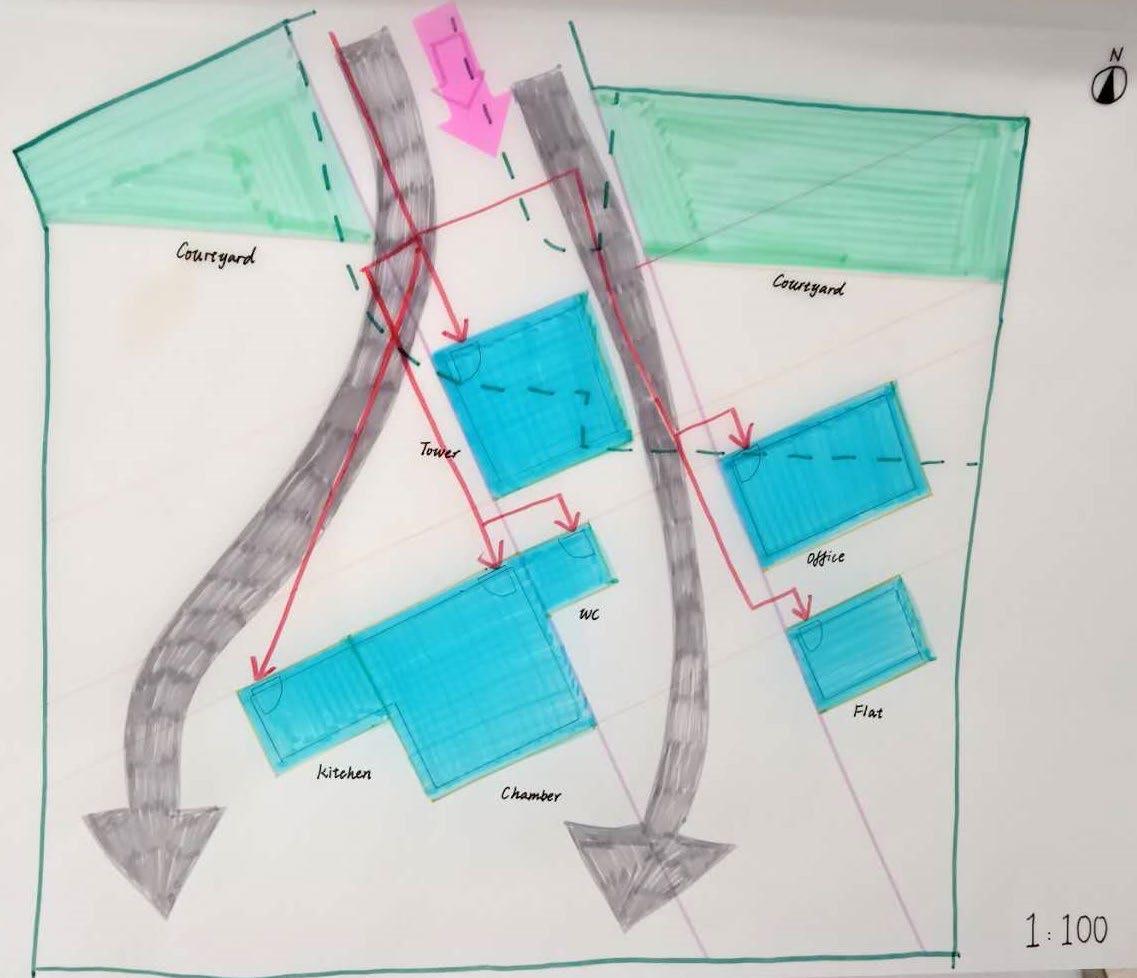
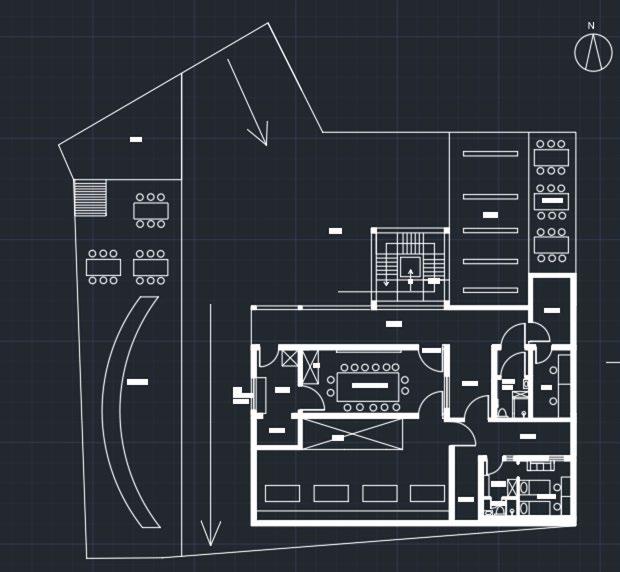
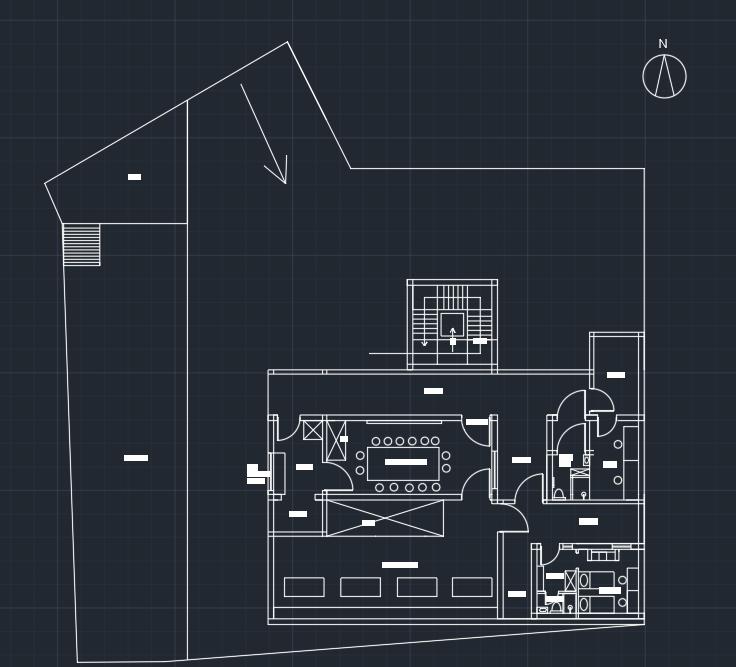
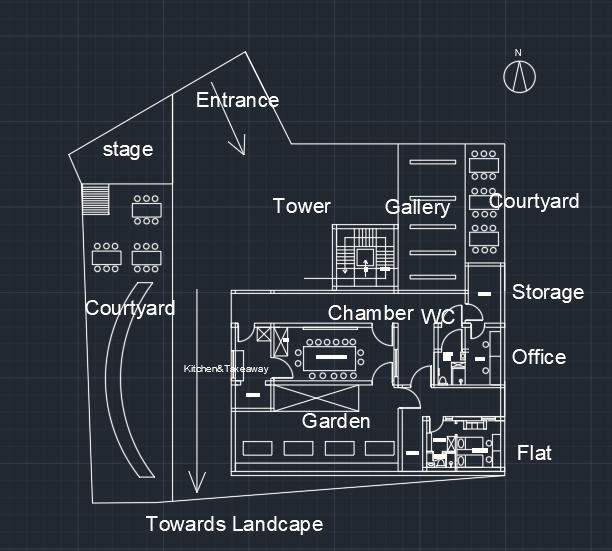
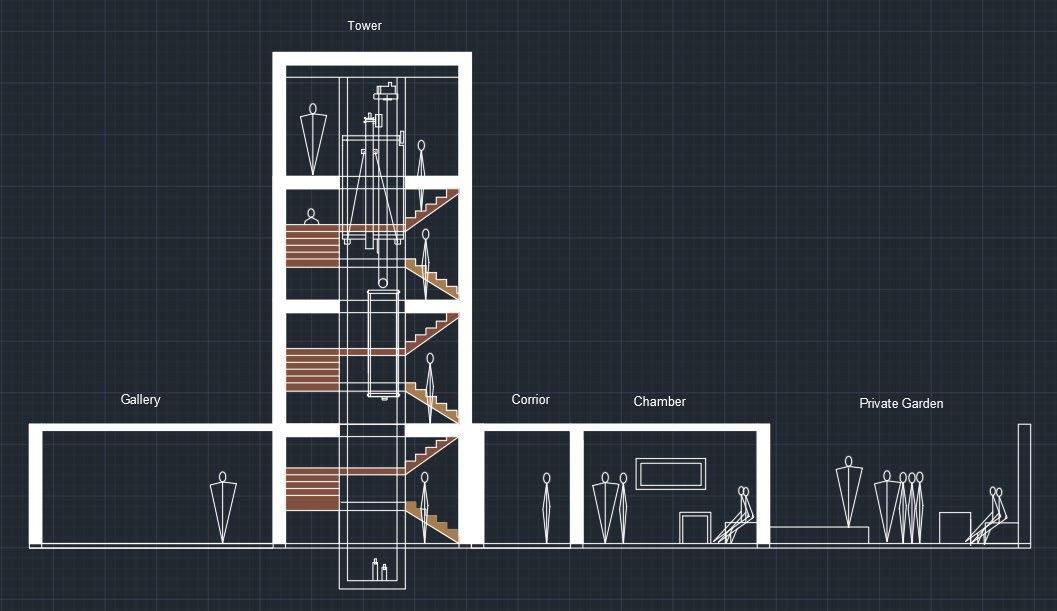
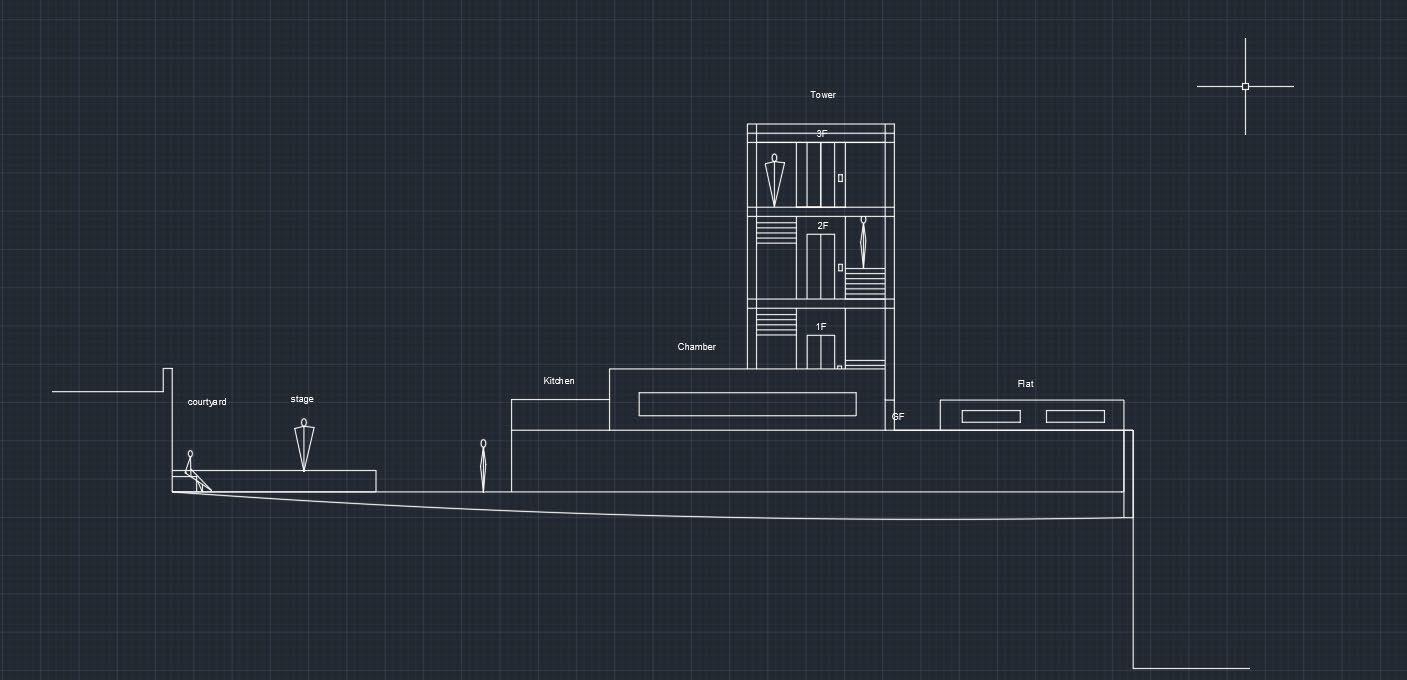
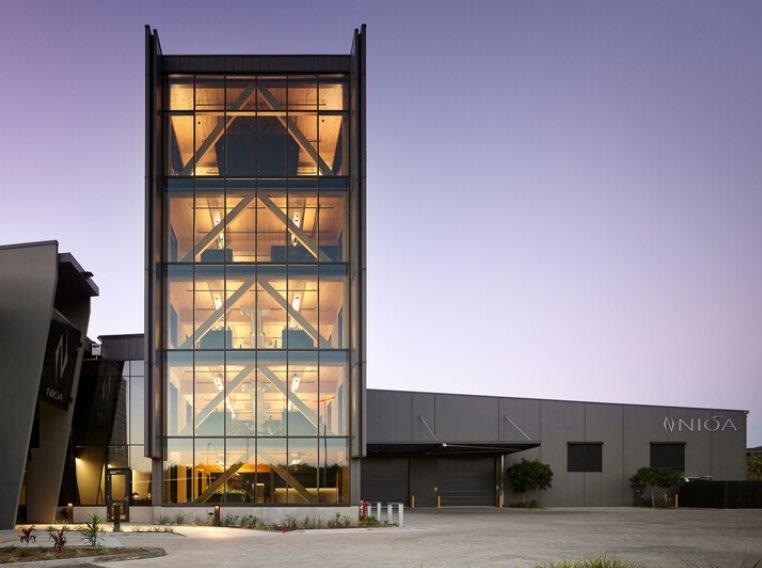
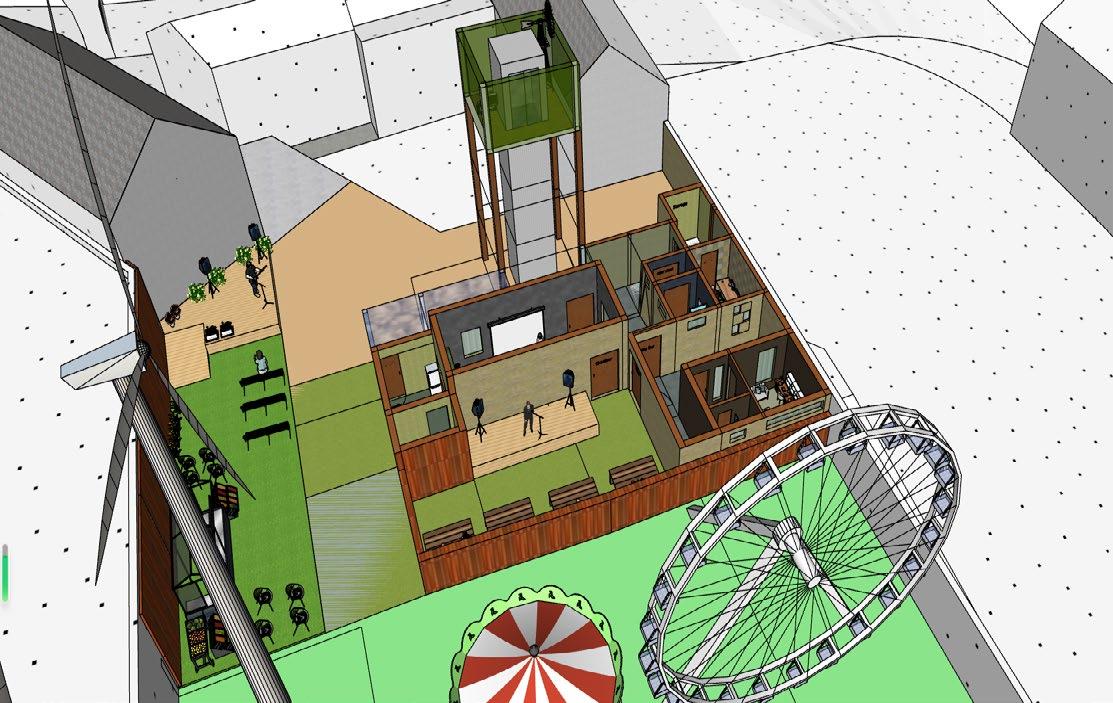
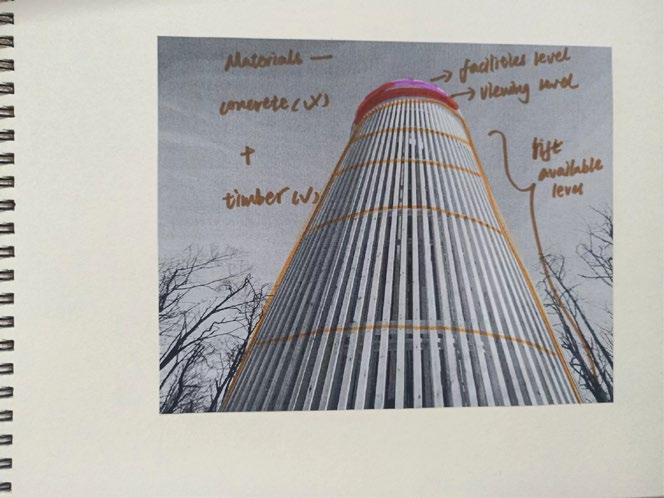
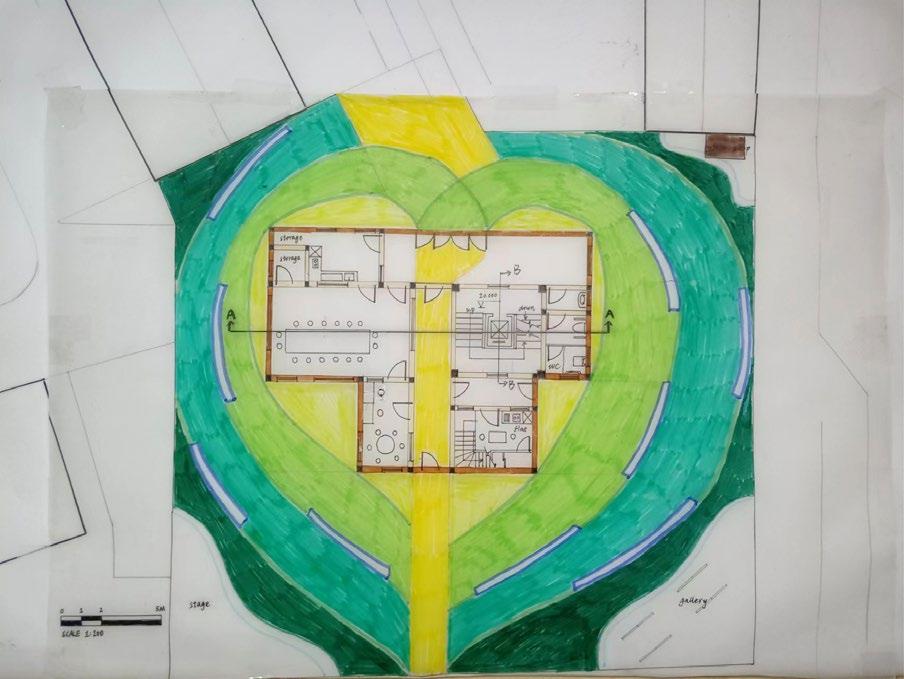
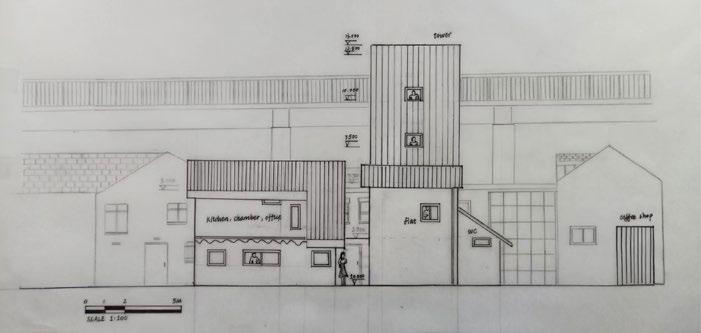
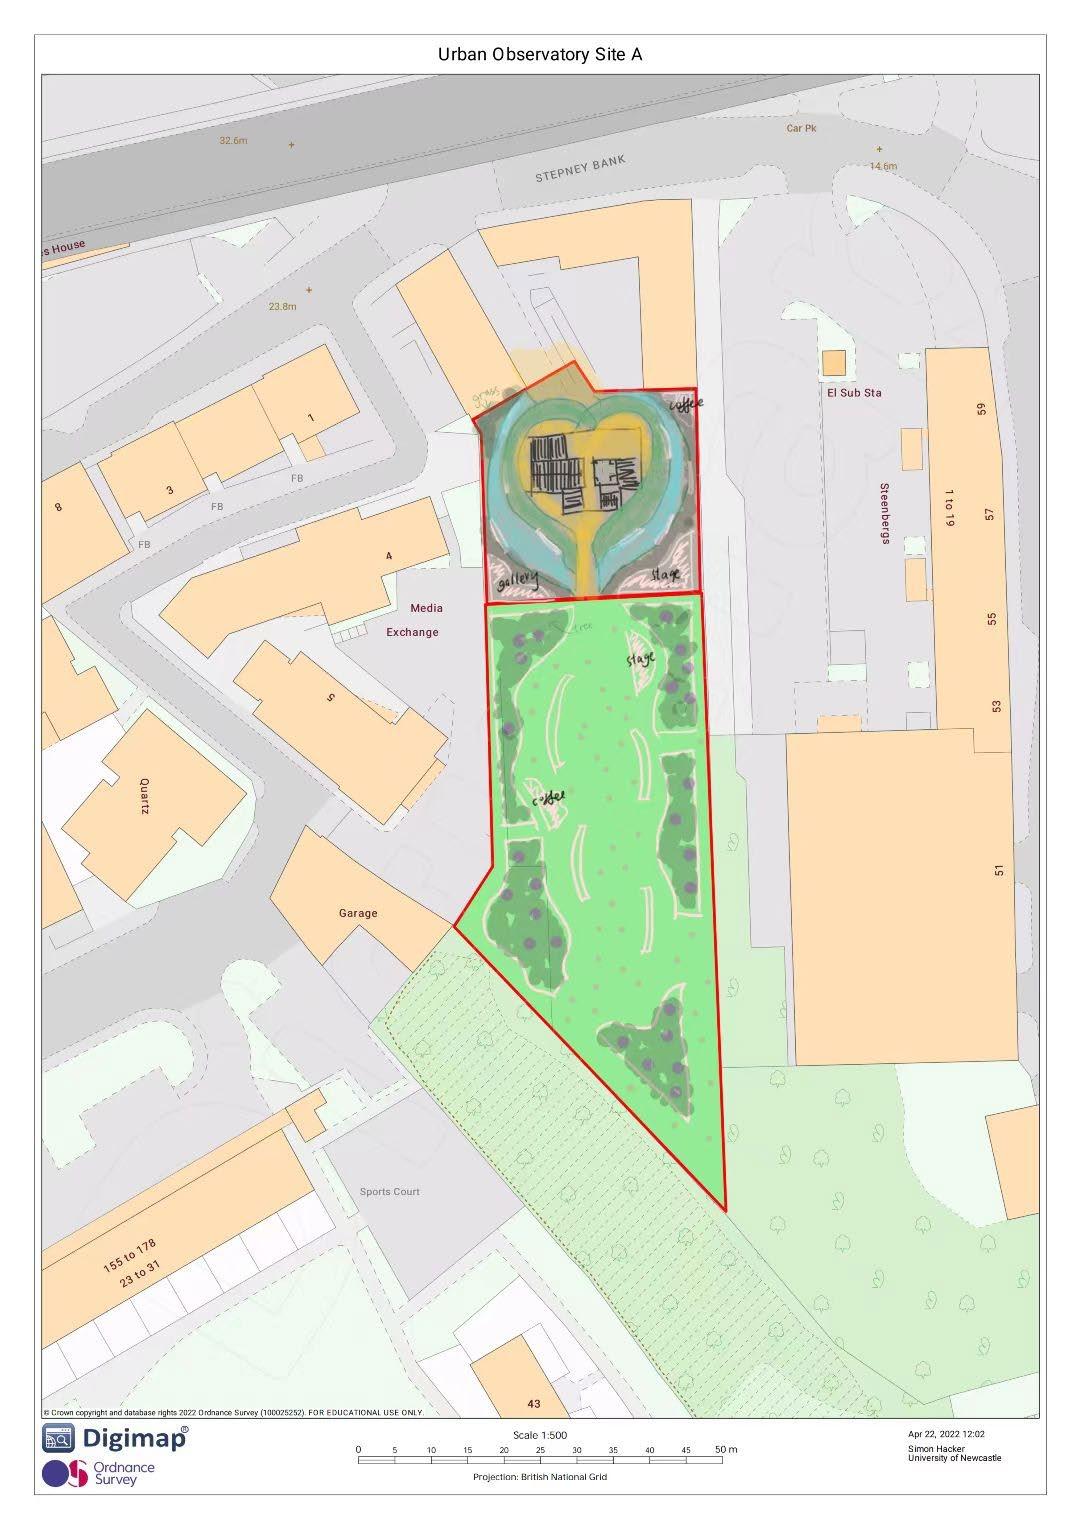
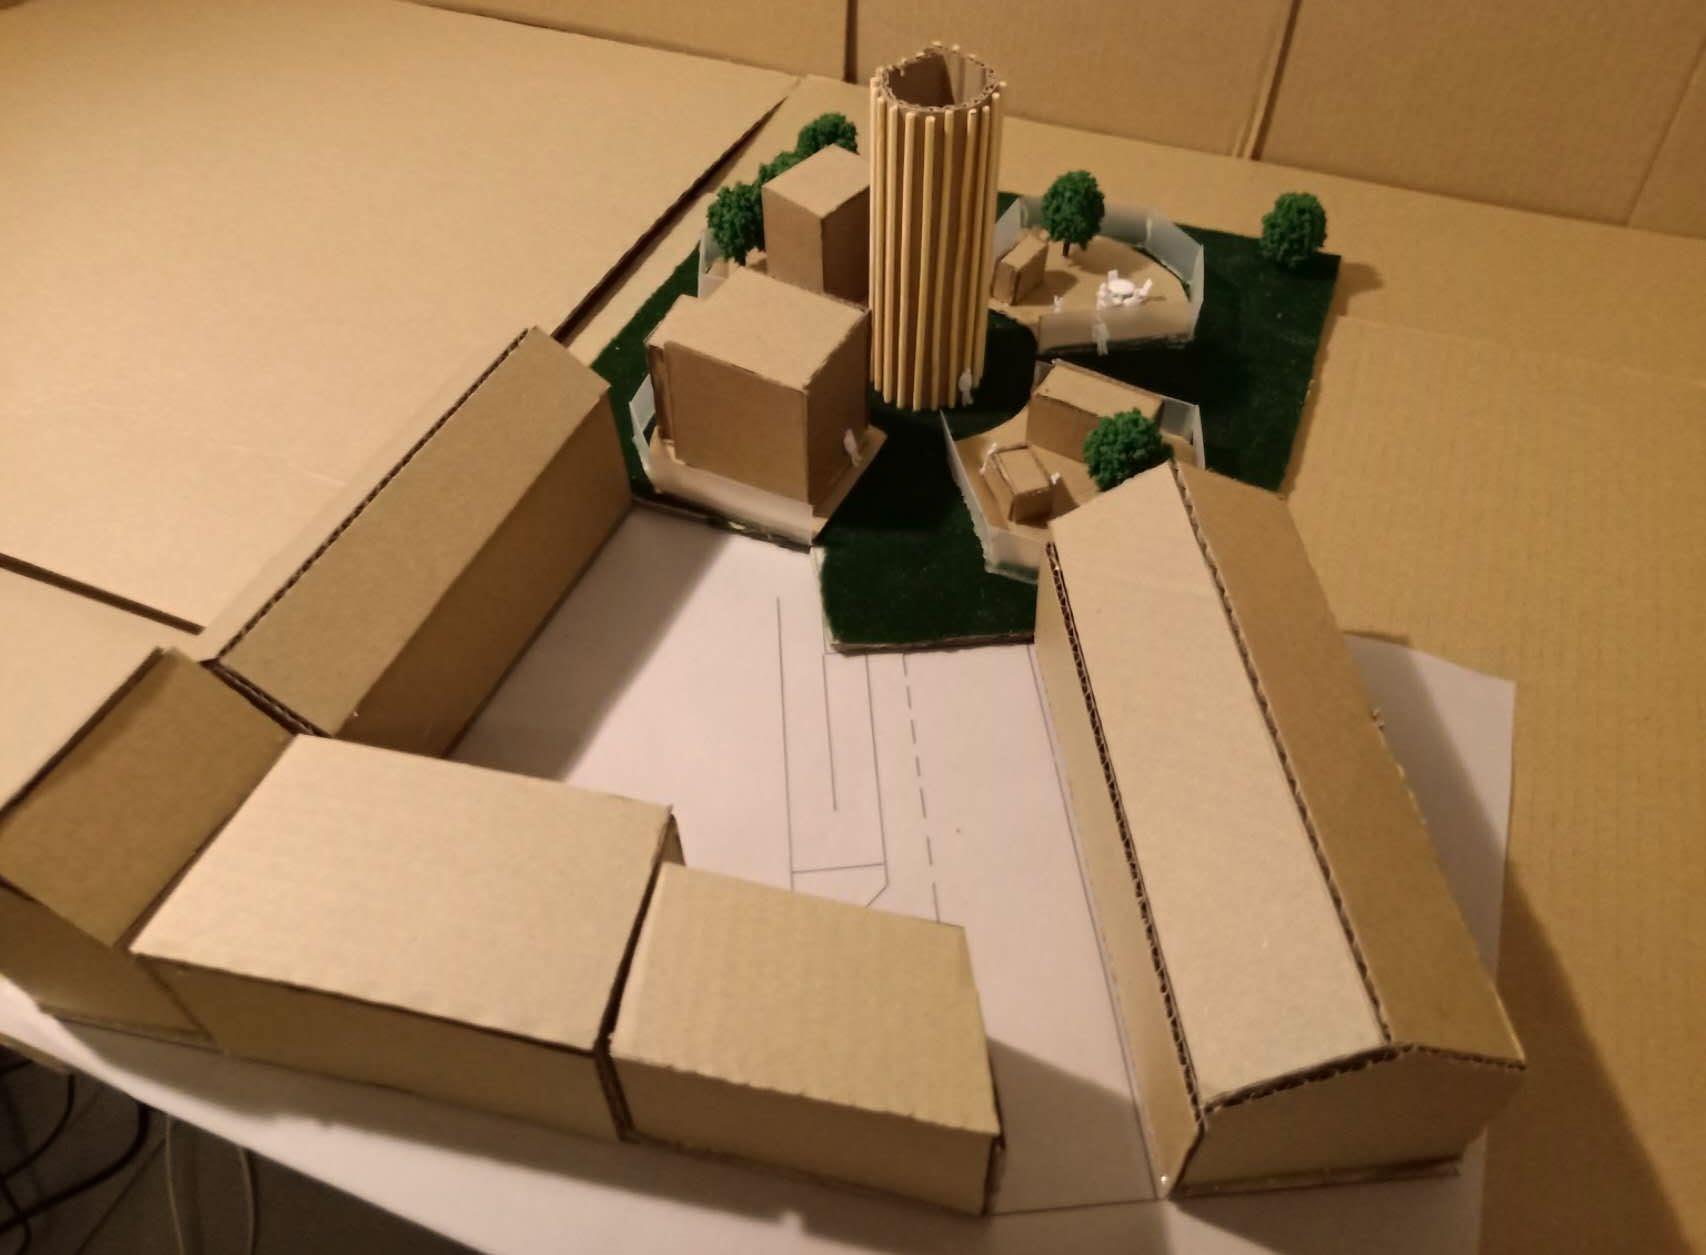
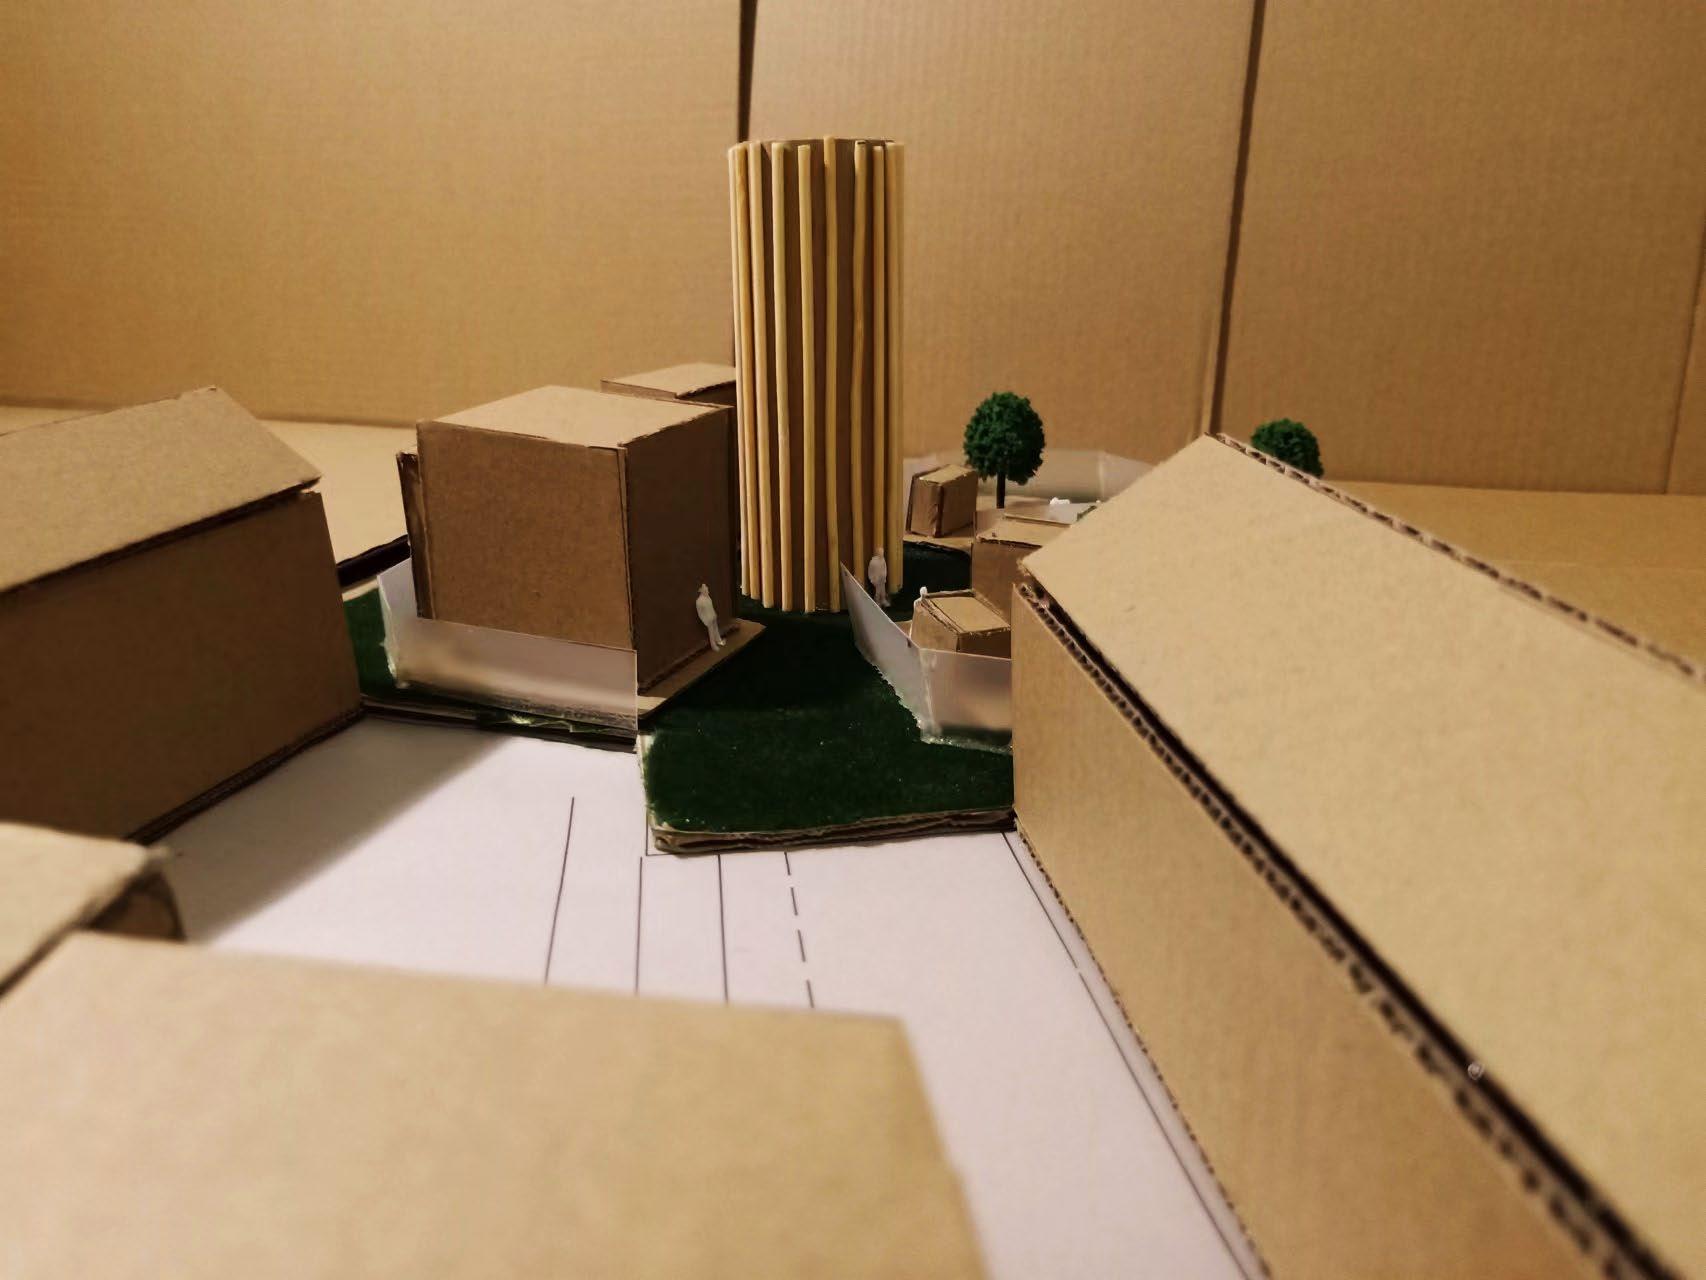
I chose ‘wind’ as the topic of urban observatory according to the strong wind on the day I visited the site in Ouseburn in late February Newcastle is a windy city so it would be fantastic if there are devices distributed in different corners of the city to collect data about wind, like wind speed, wind strength and wind direction, and then they are received by a tall tower specially designed for it
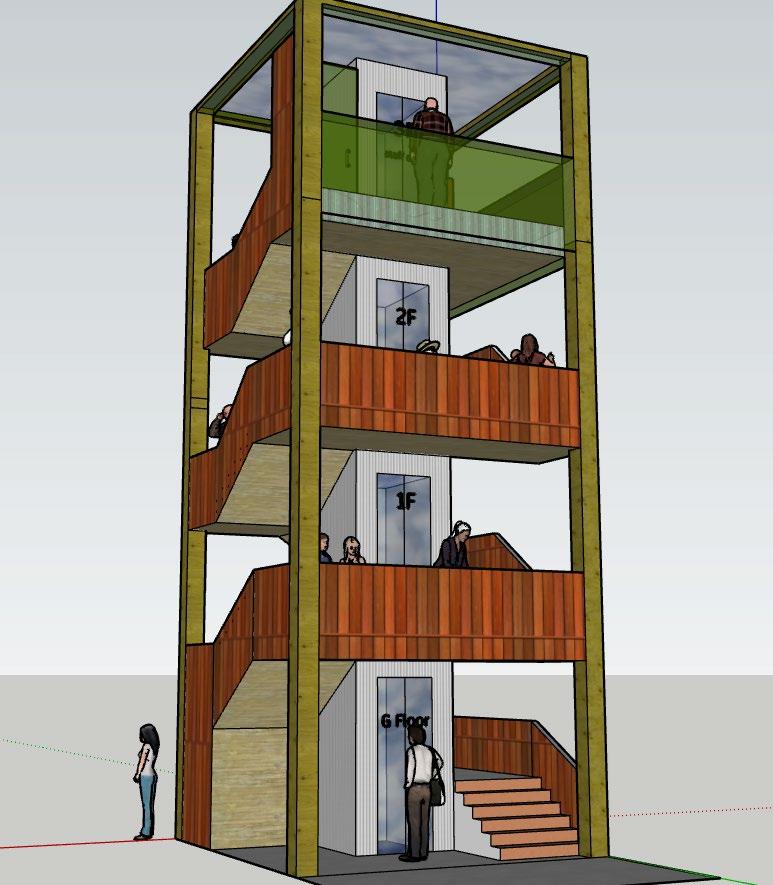
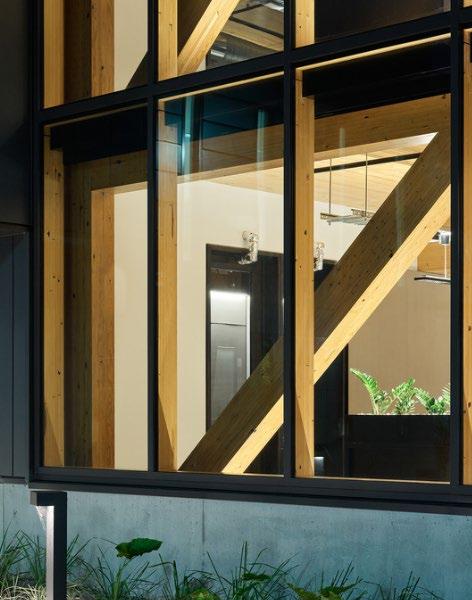
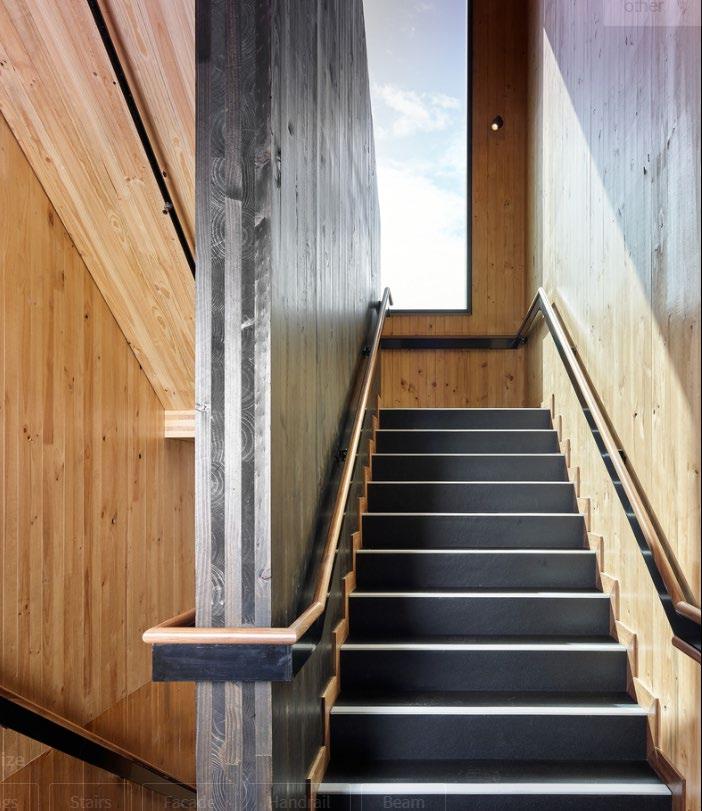
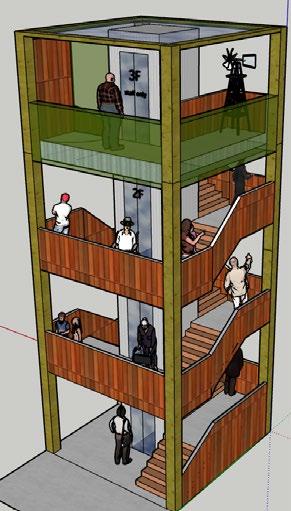
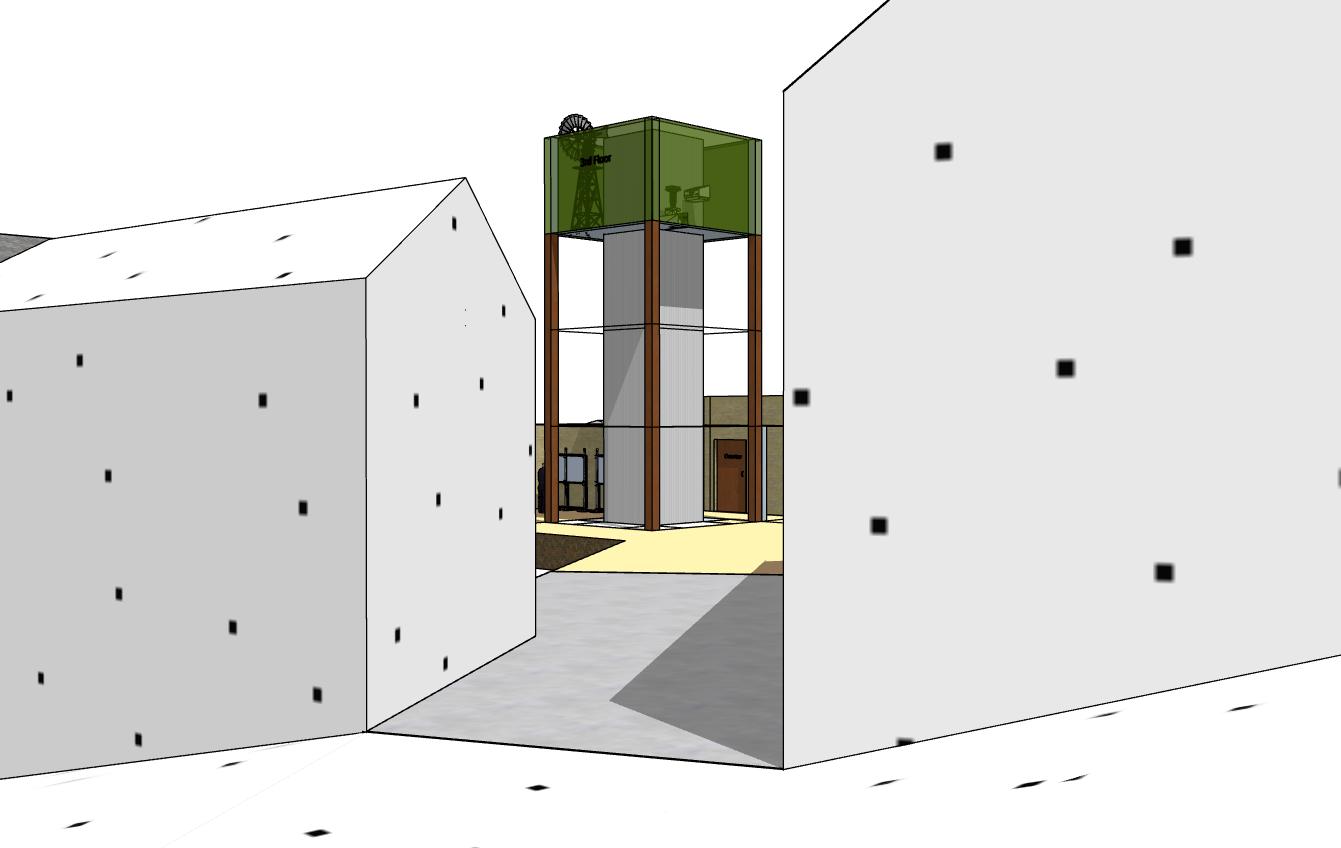
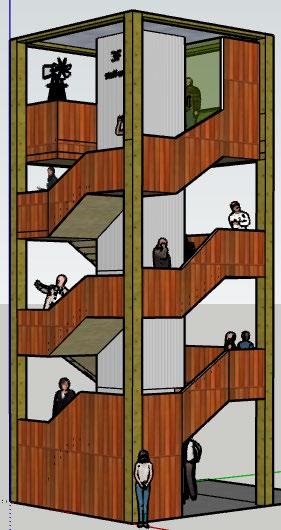
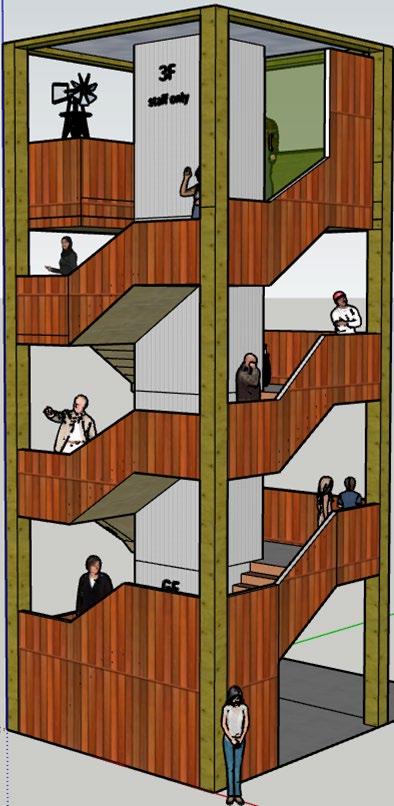
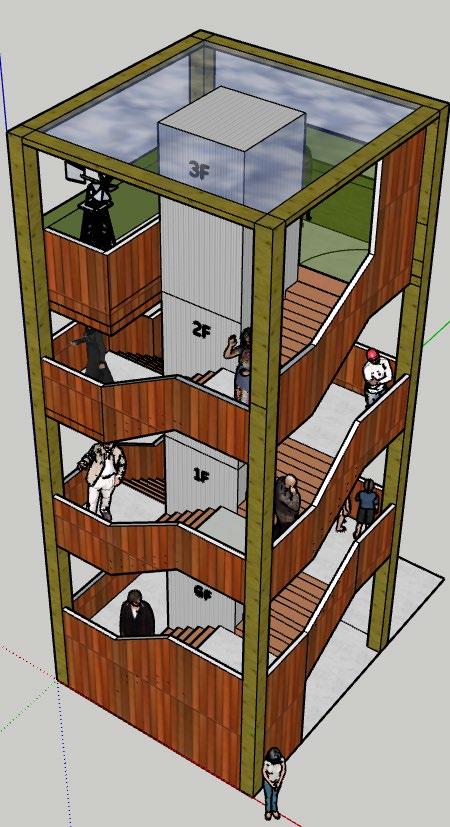
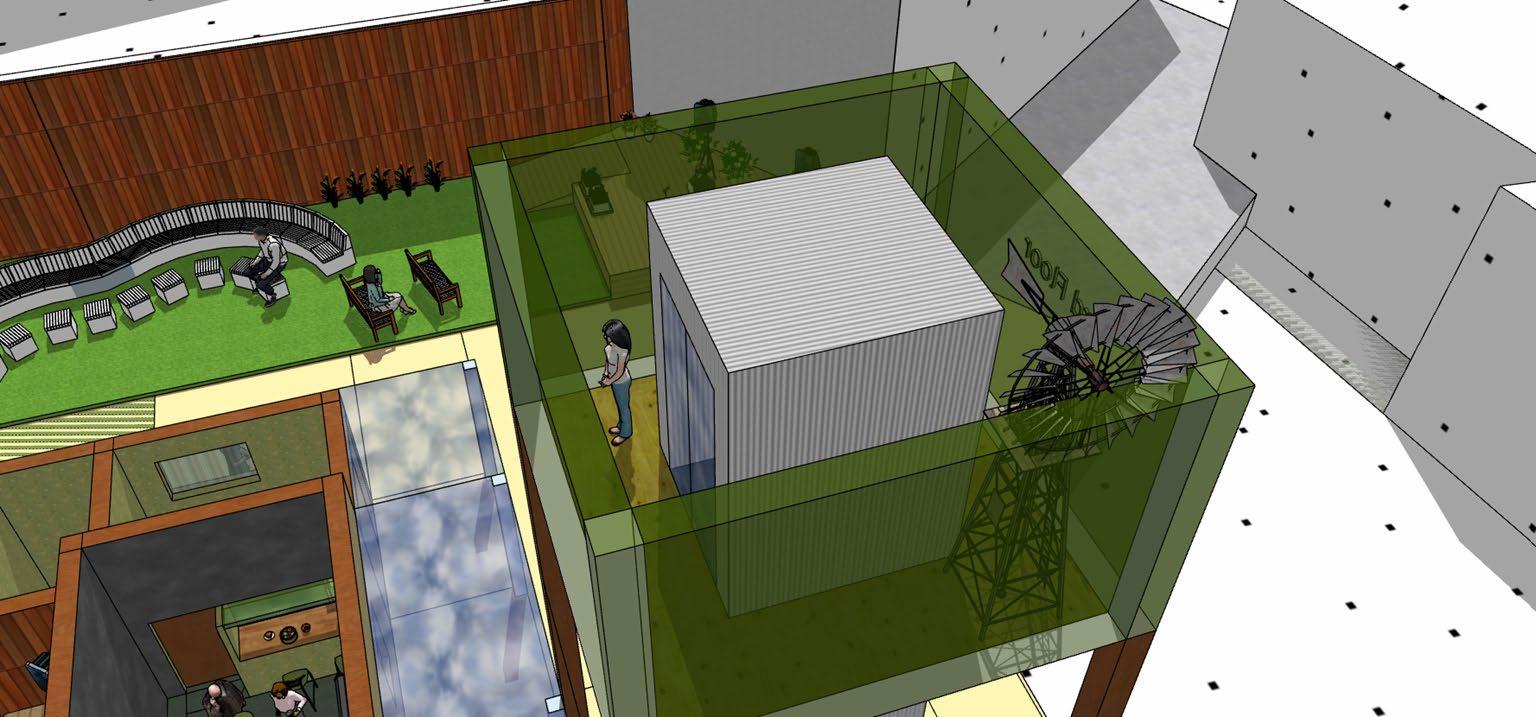
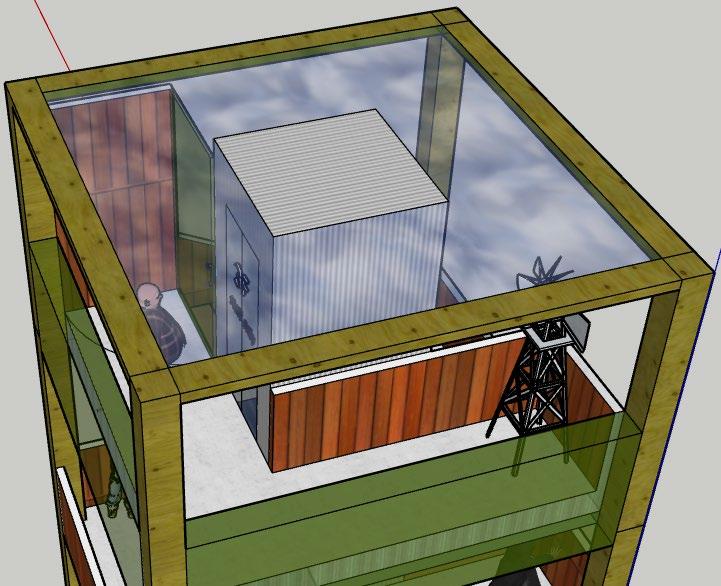
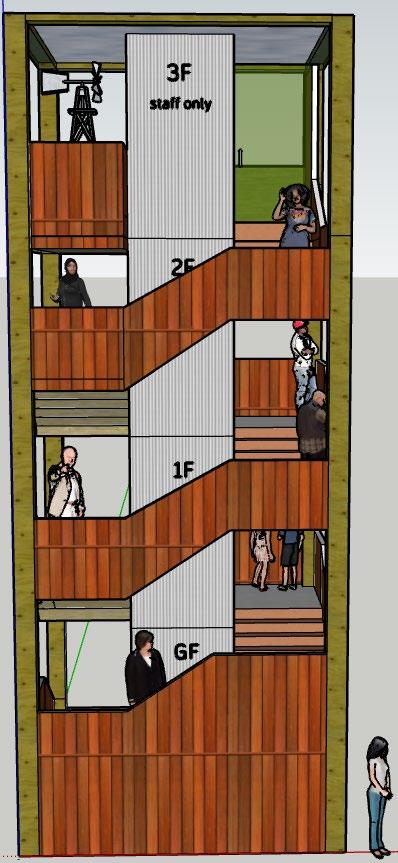
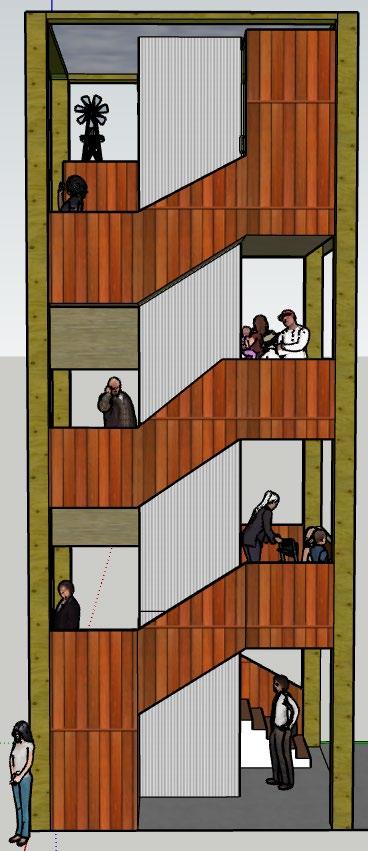
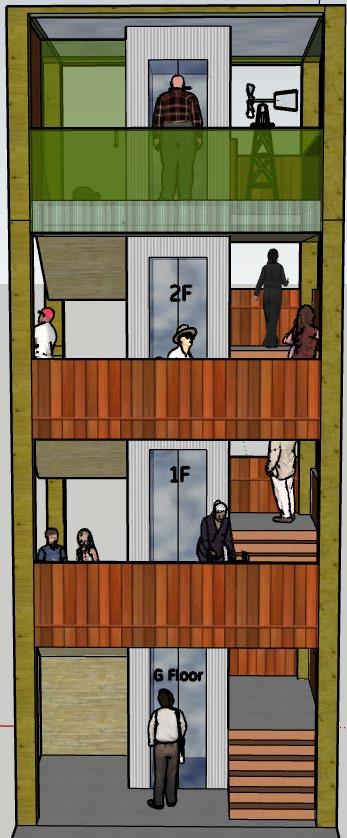
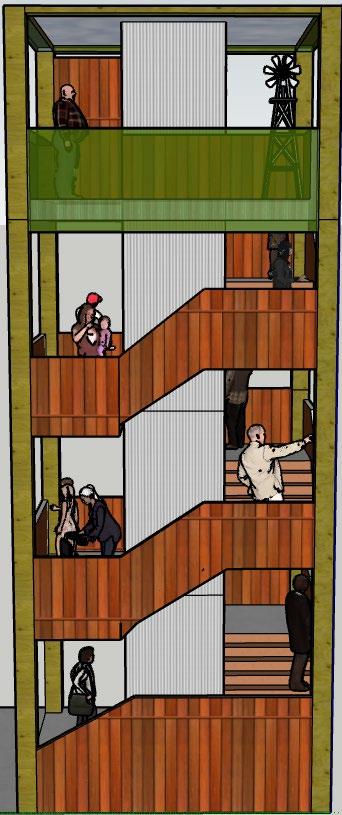
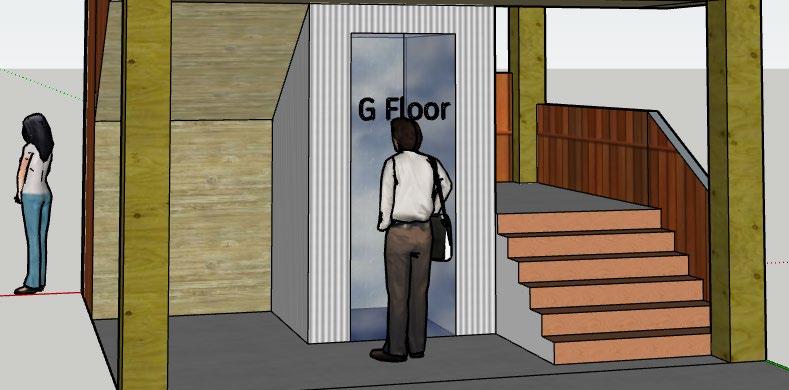
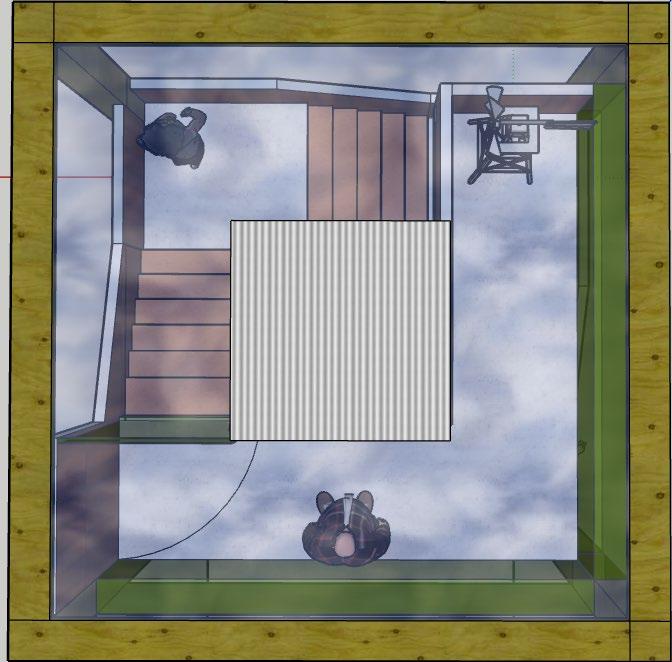
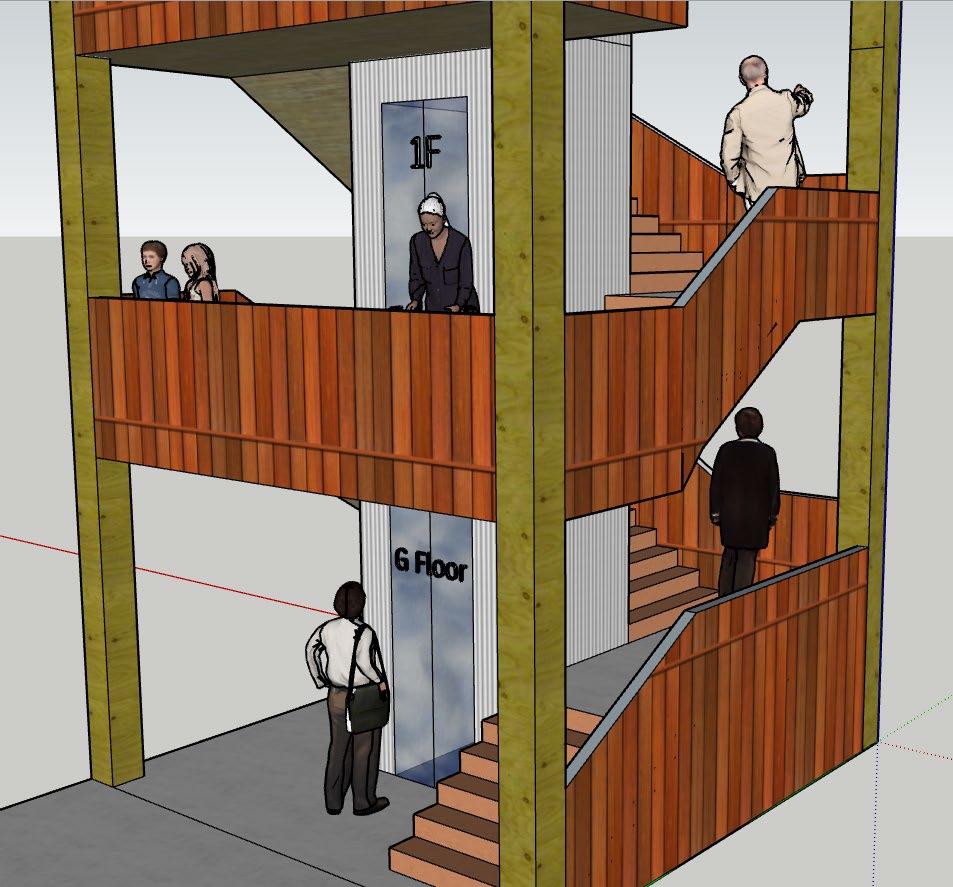
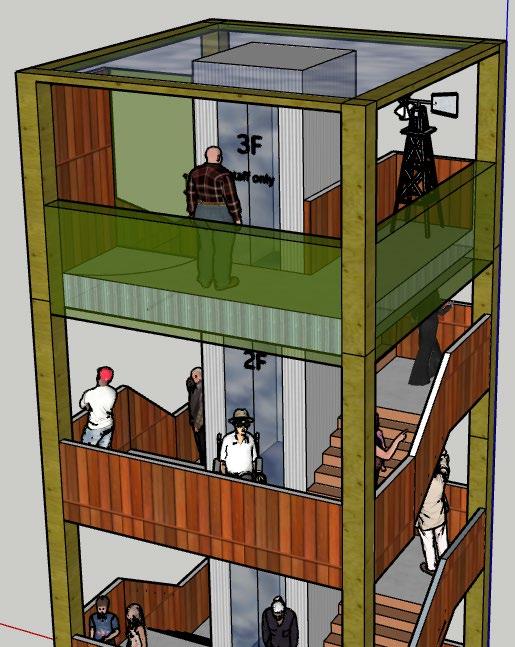
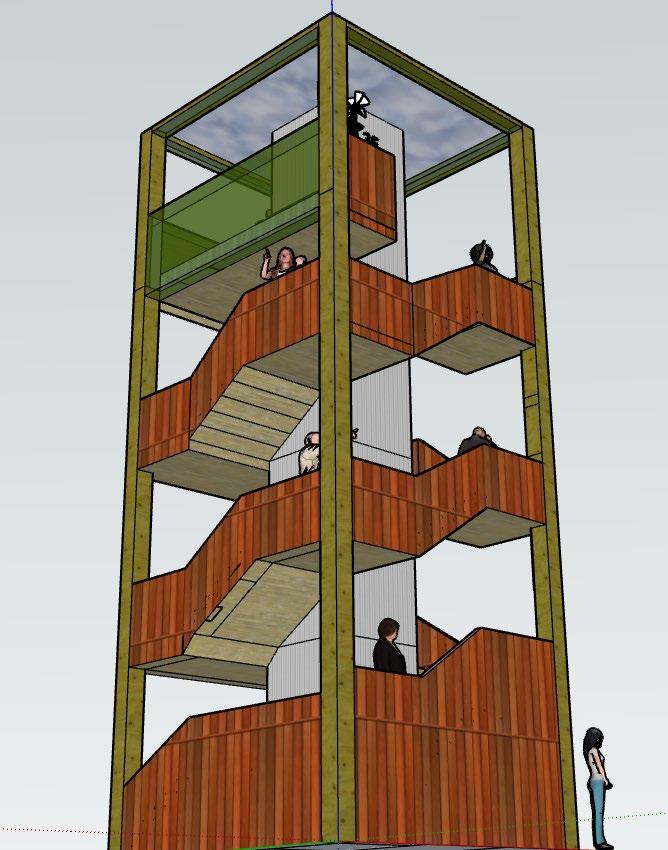
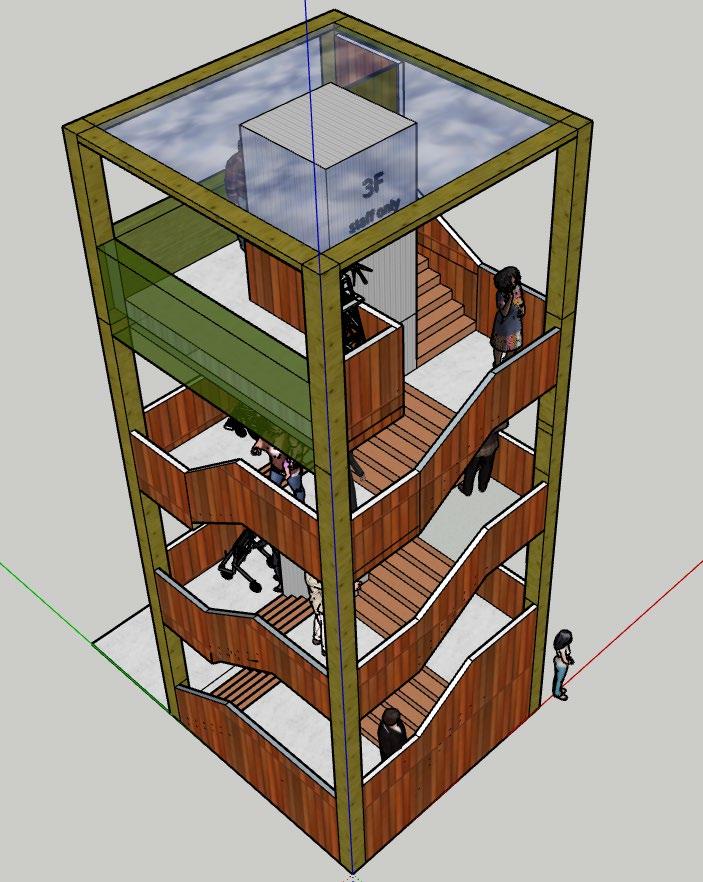
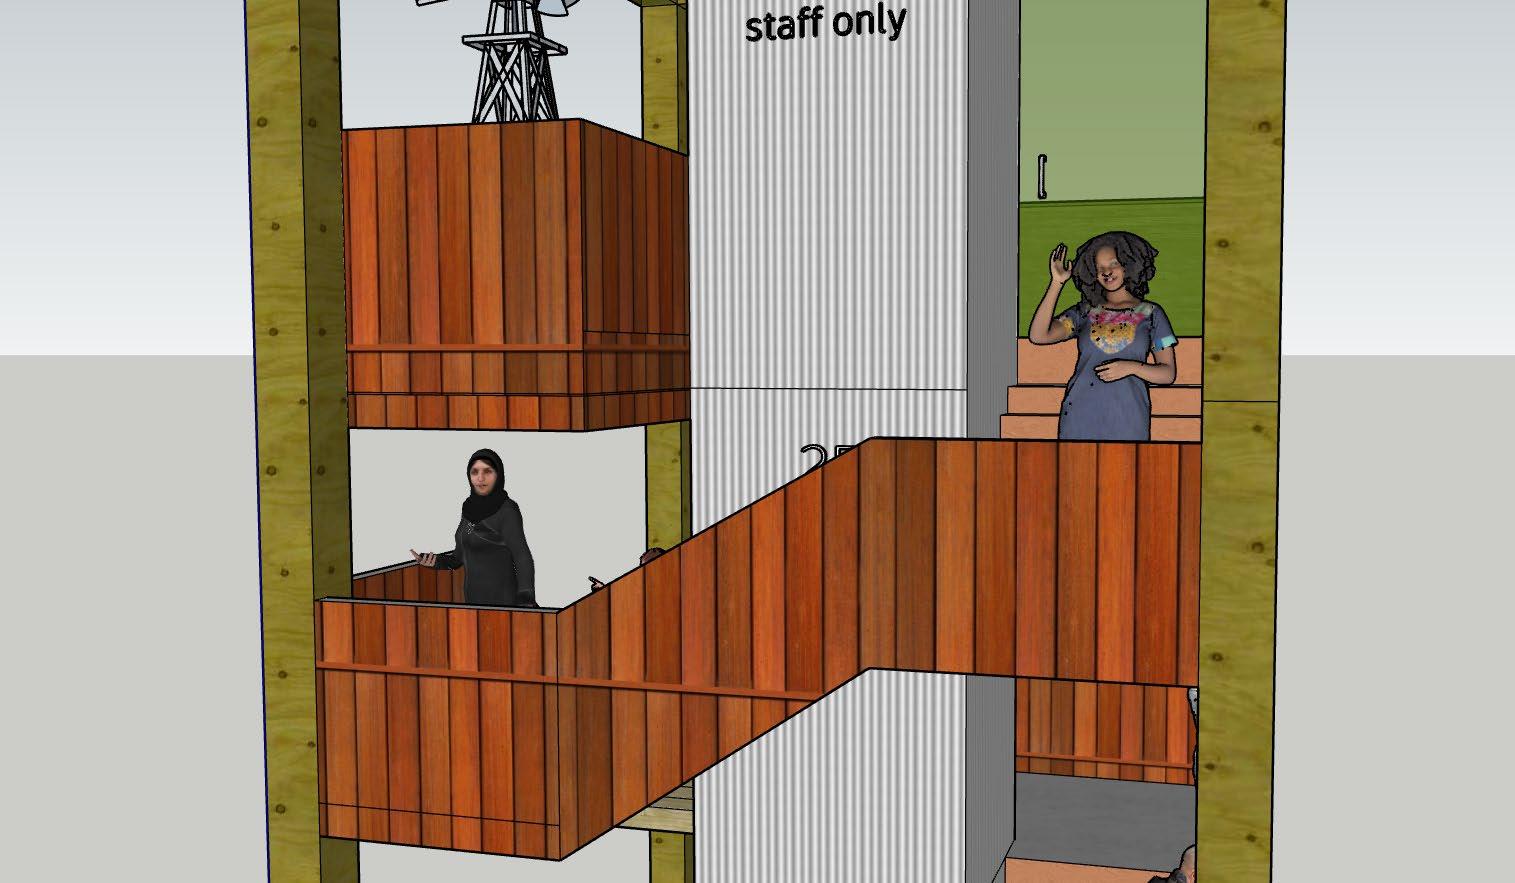
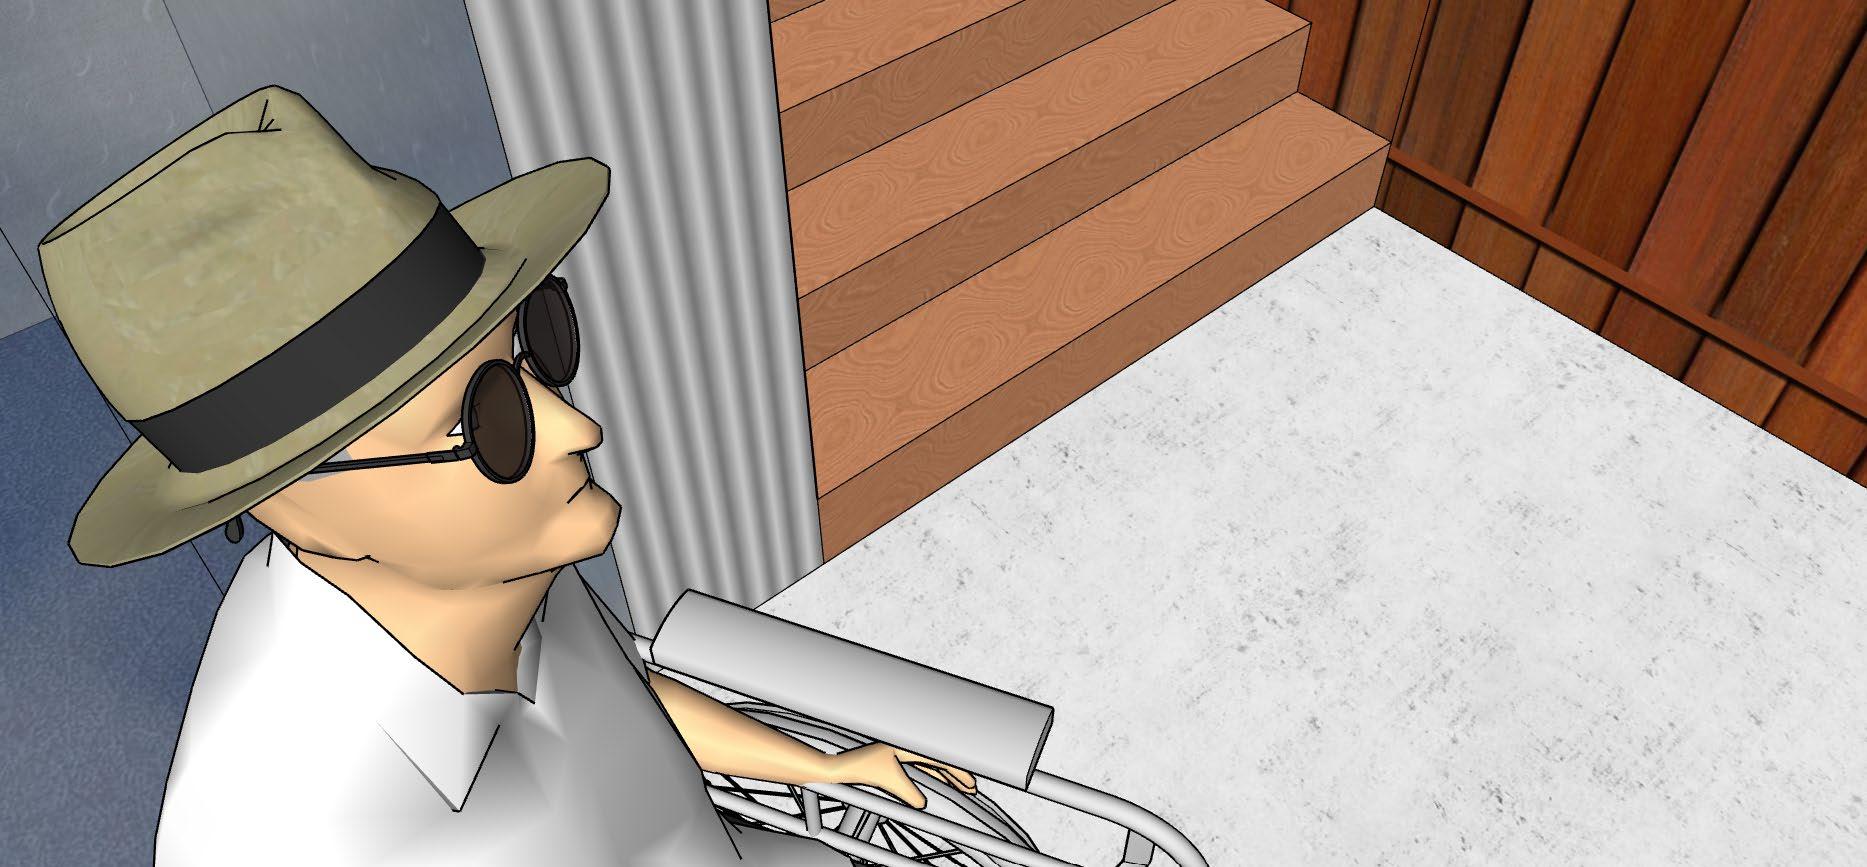
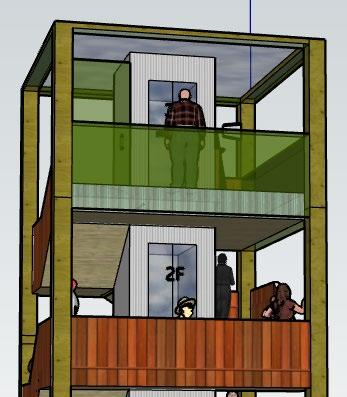
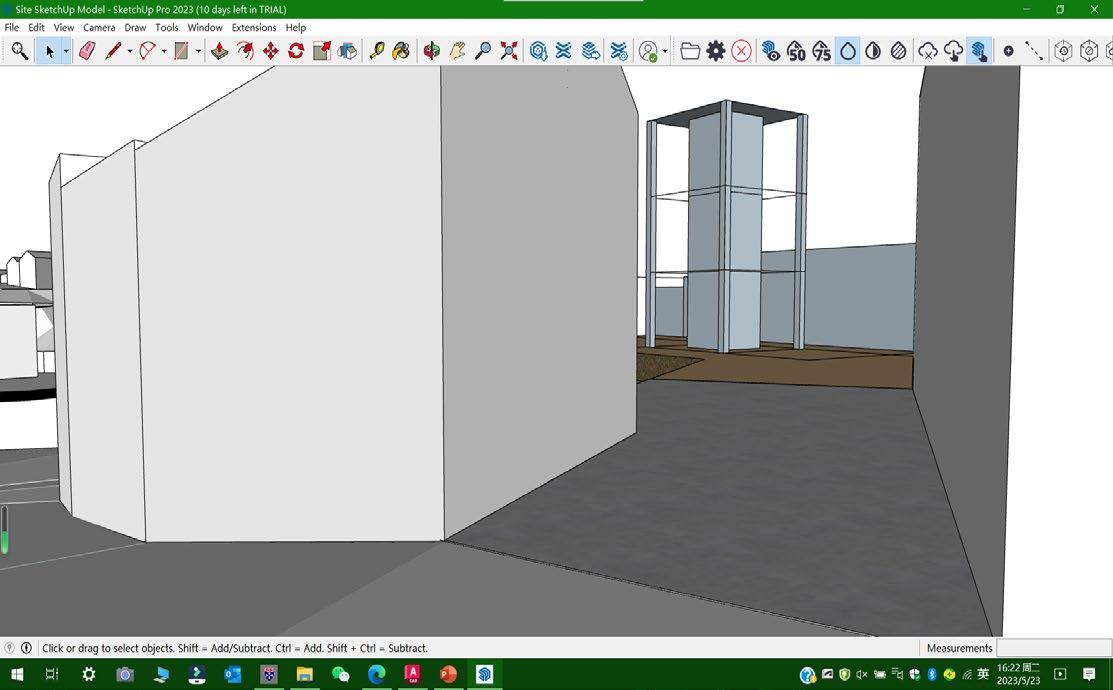
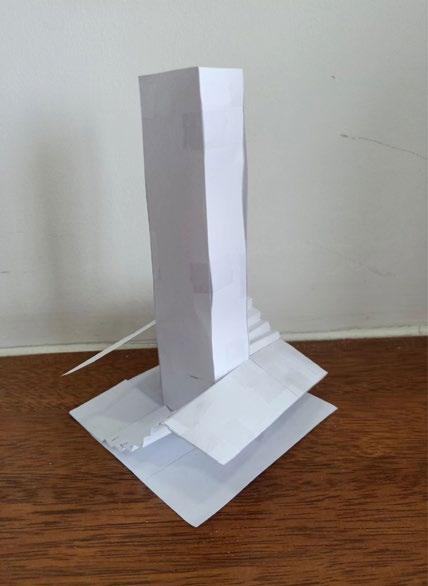
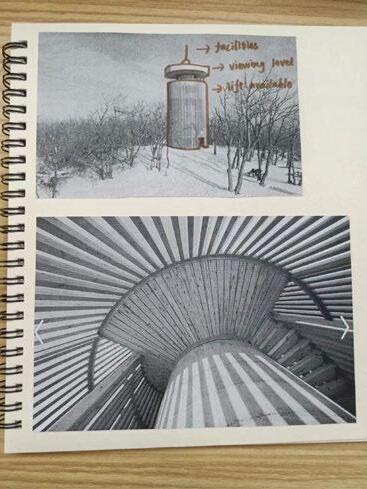
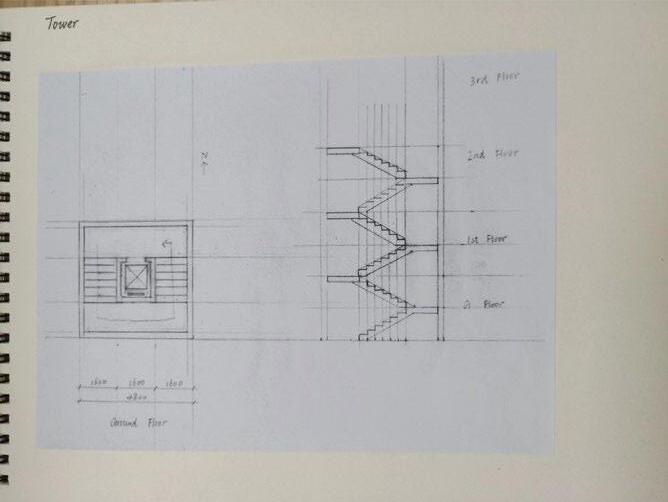
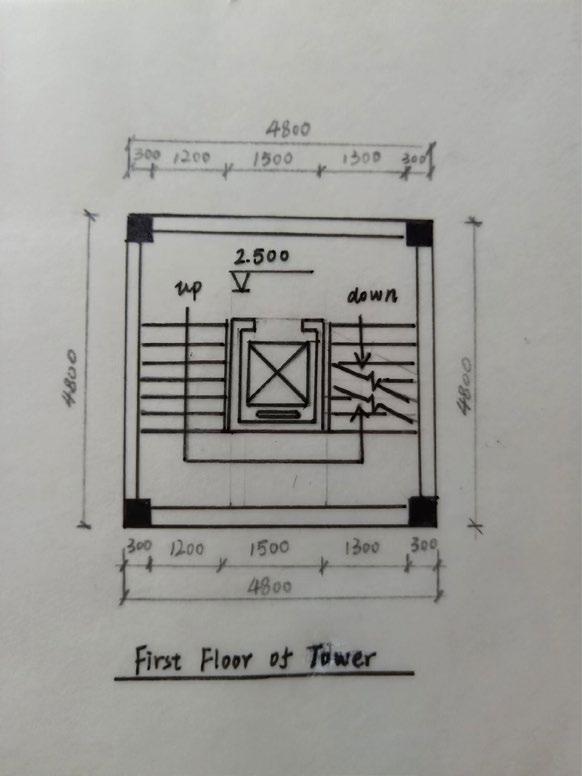
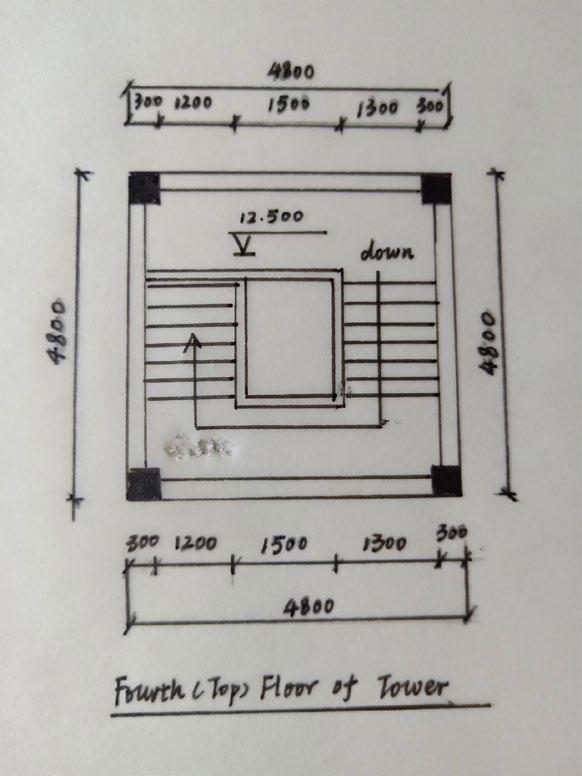
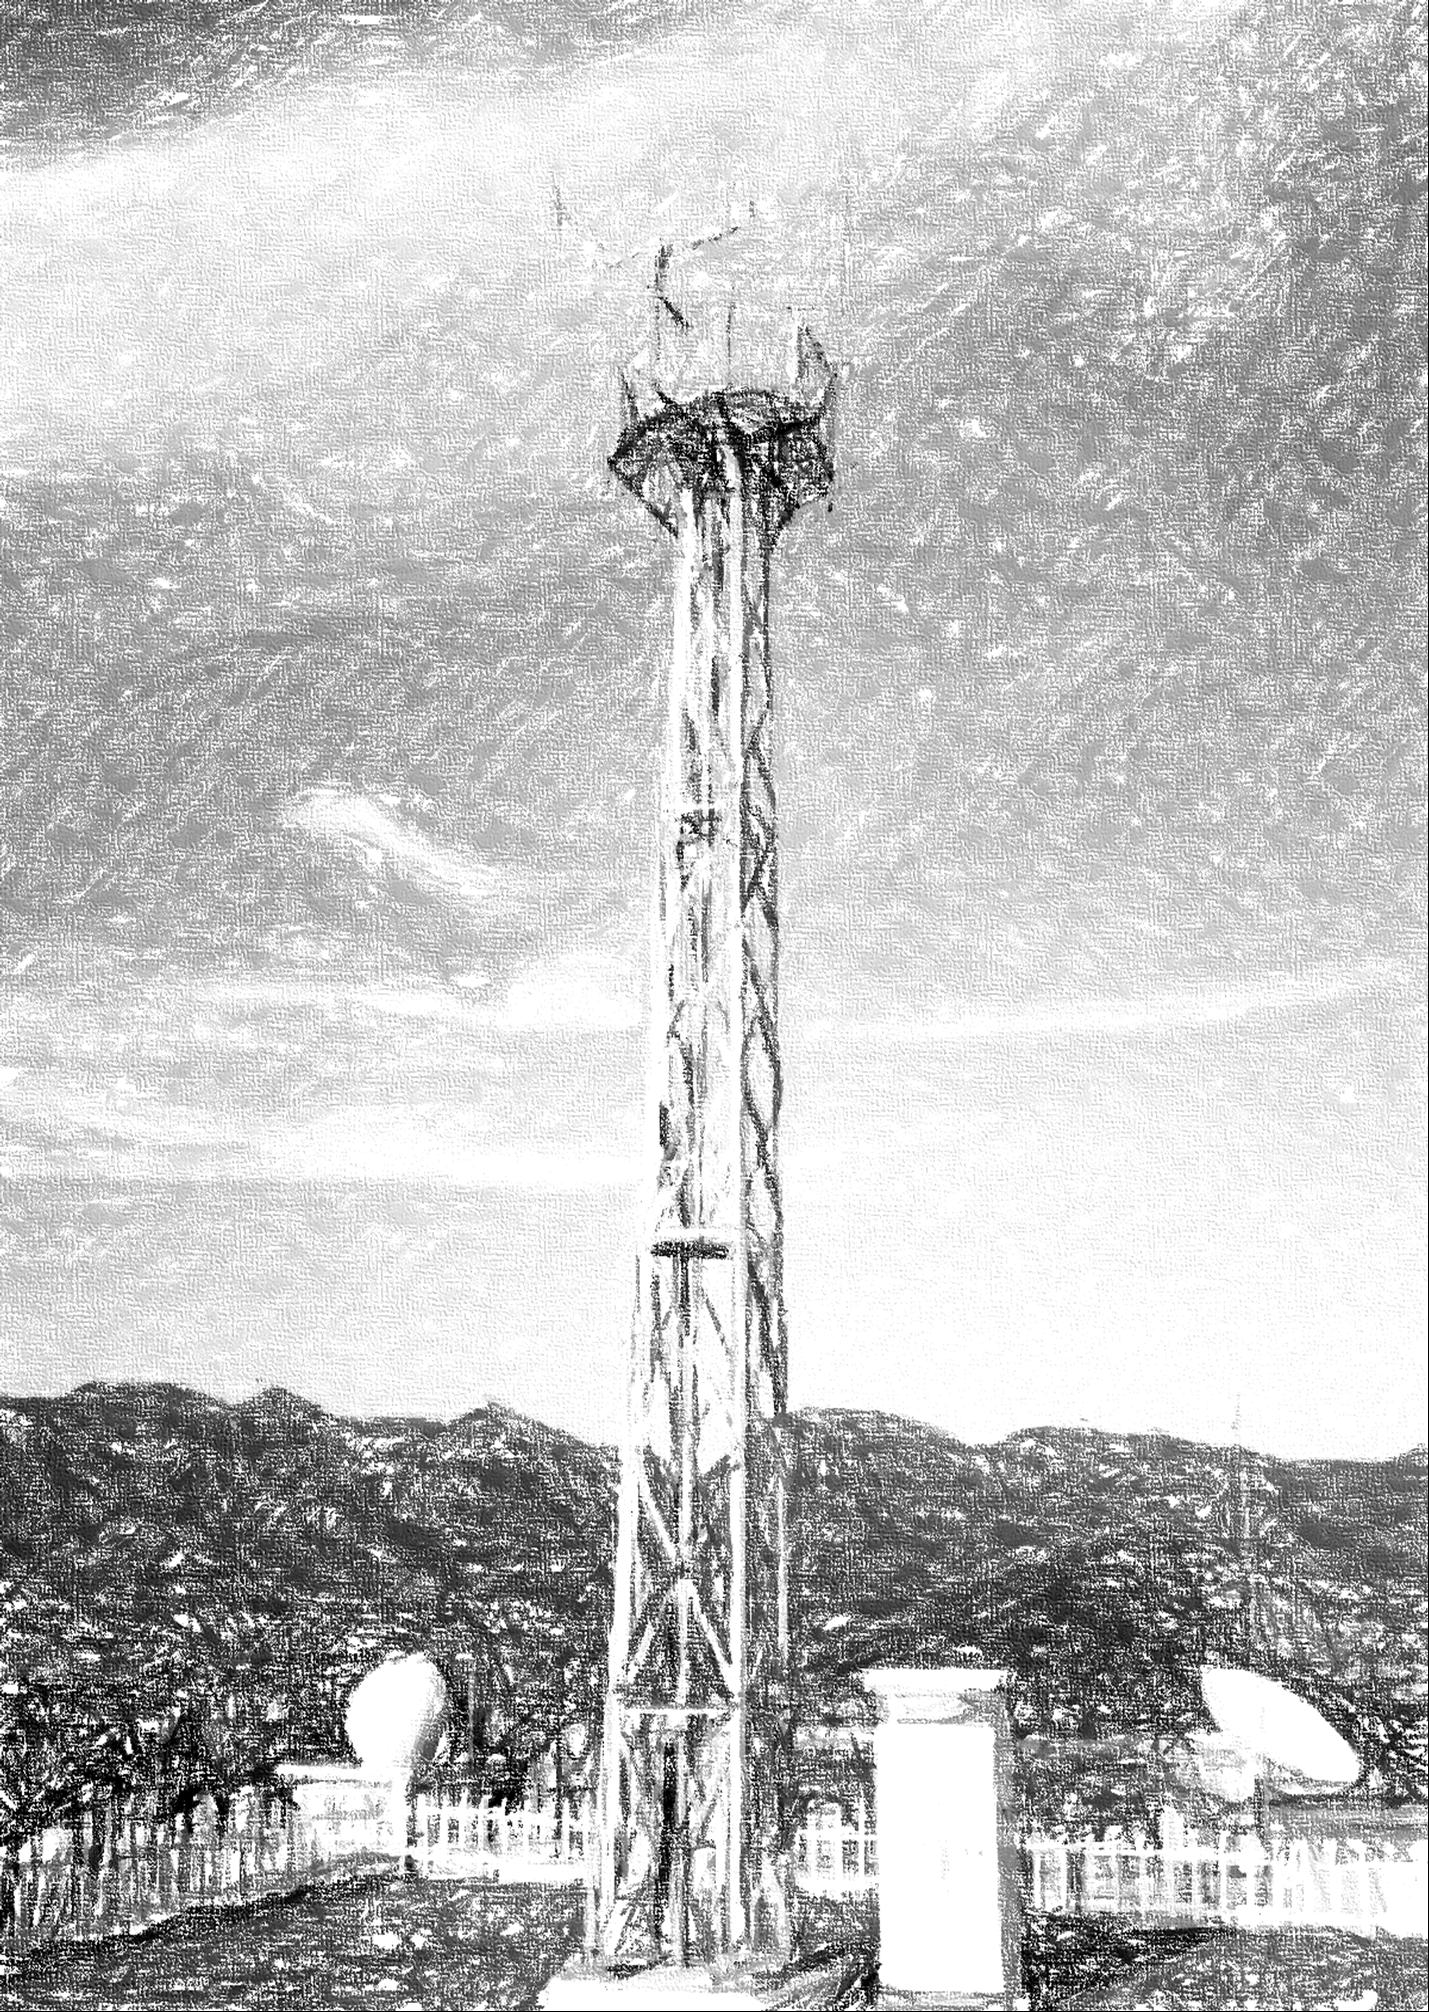
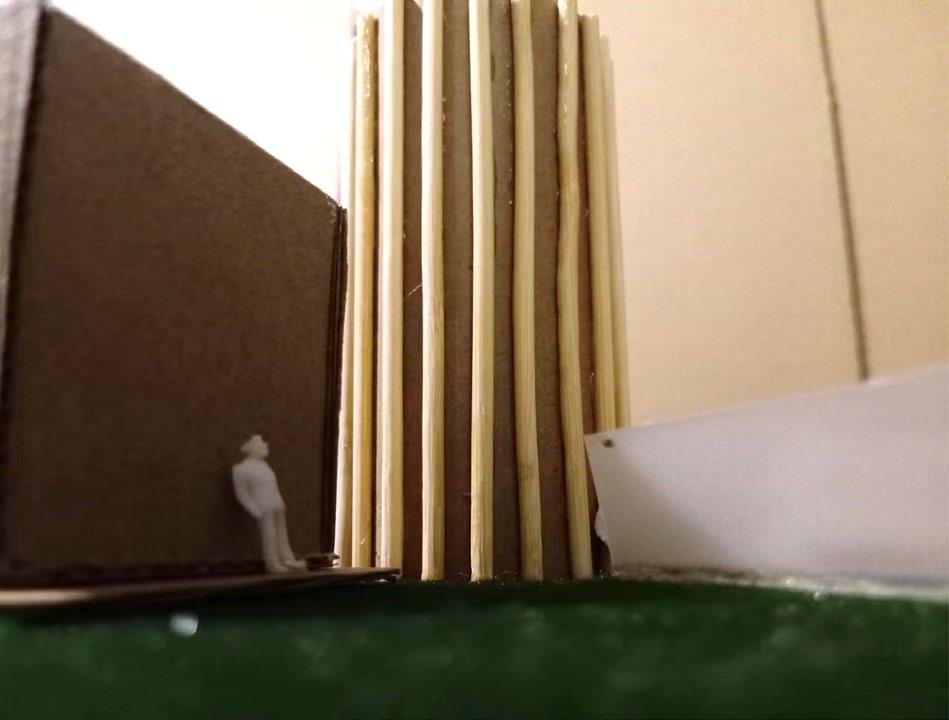
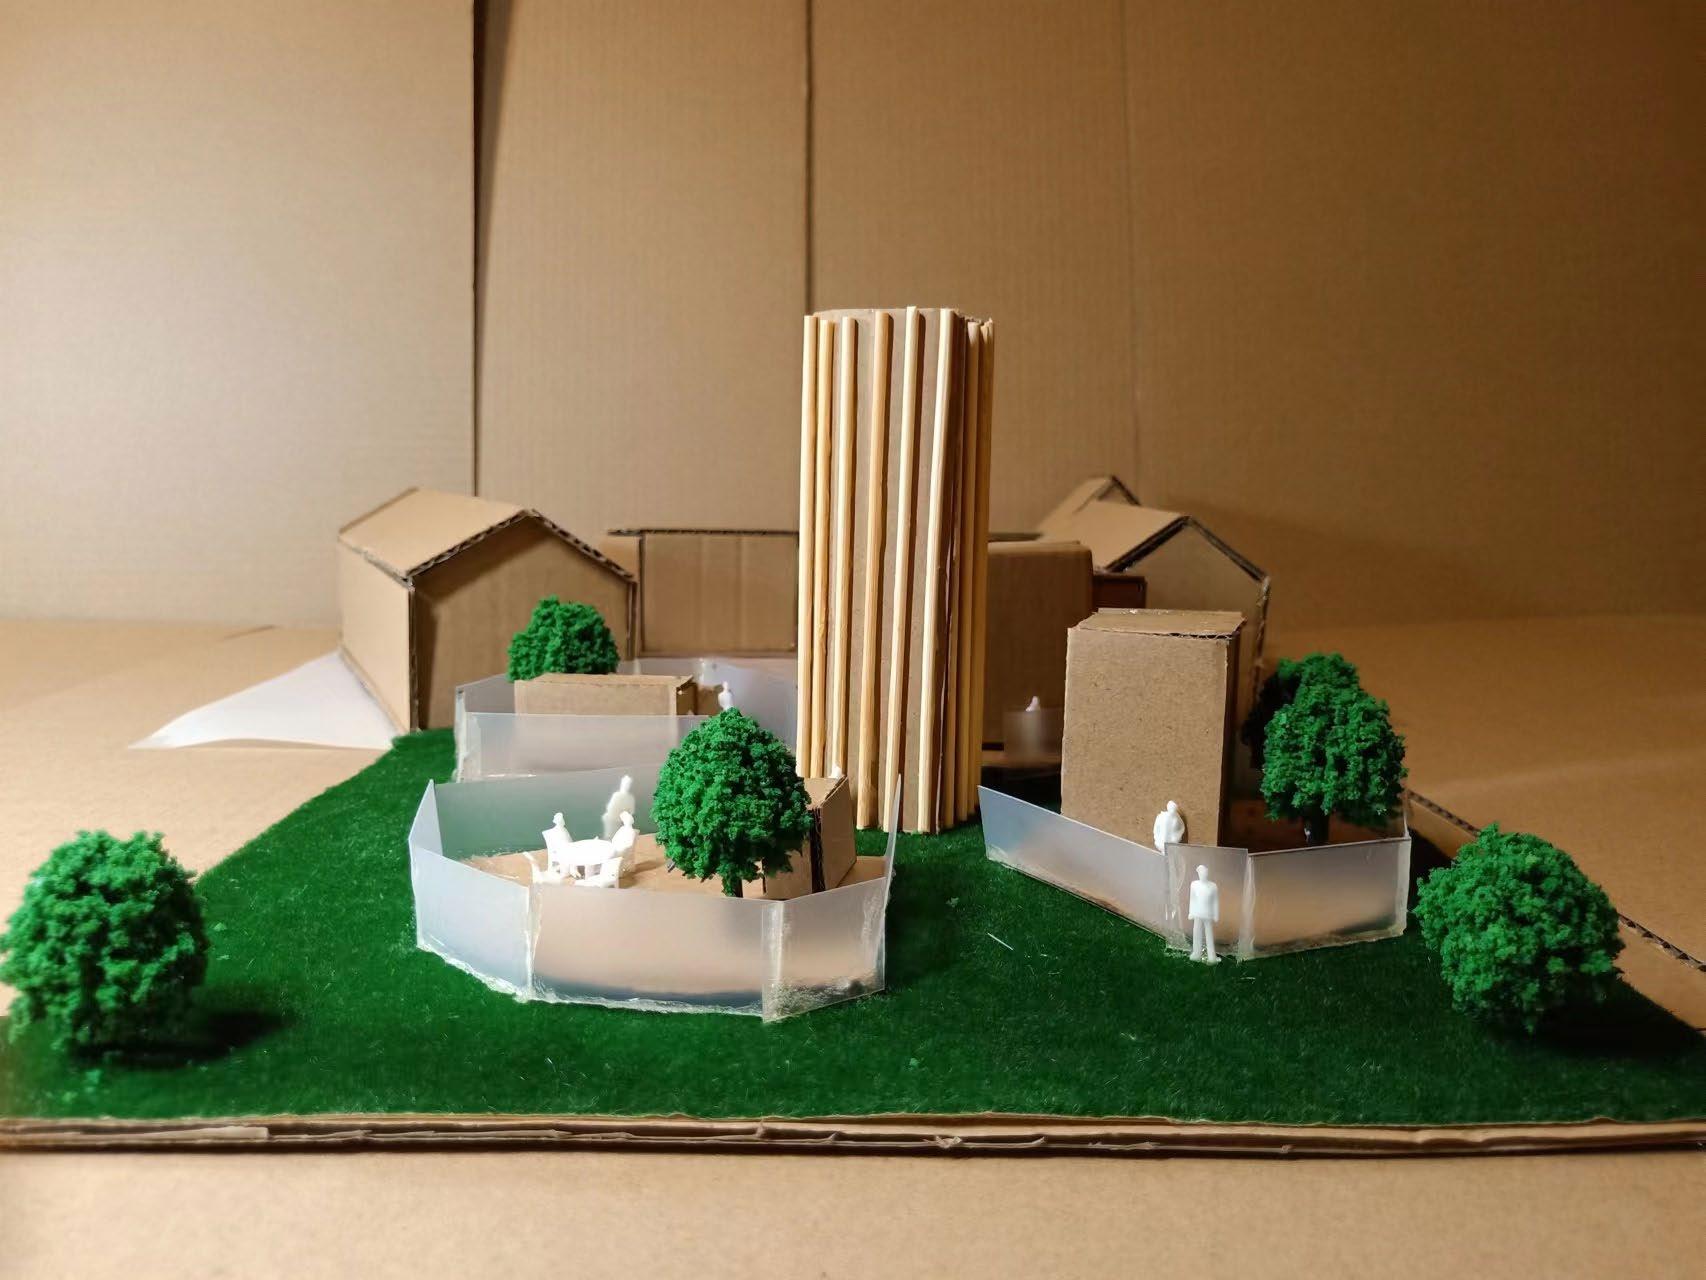
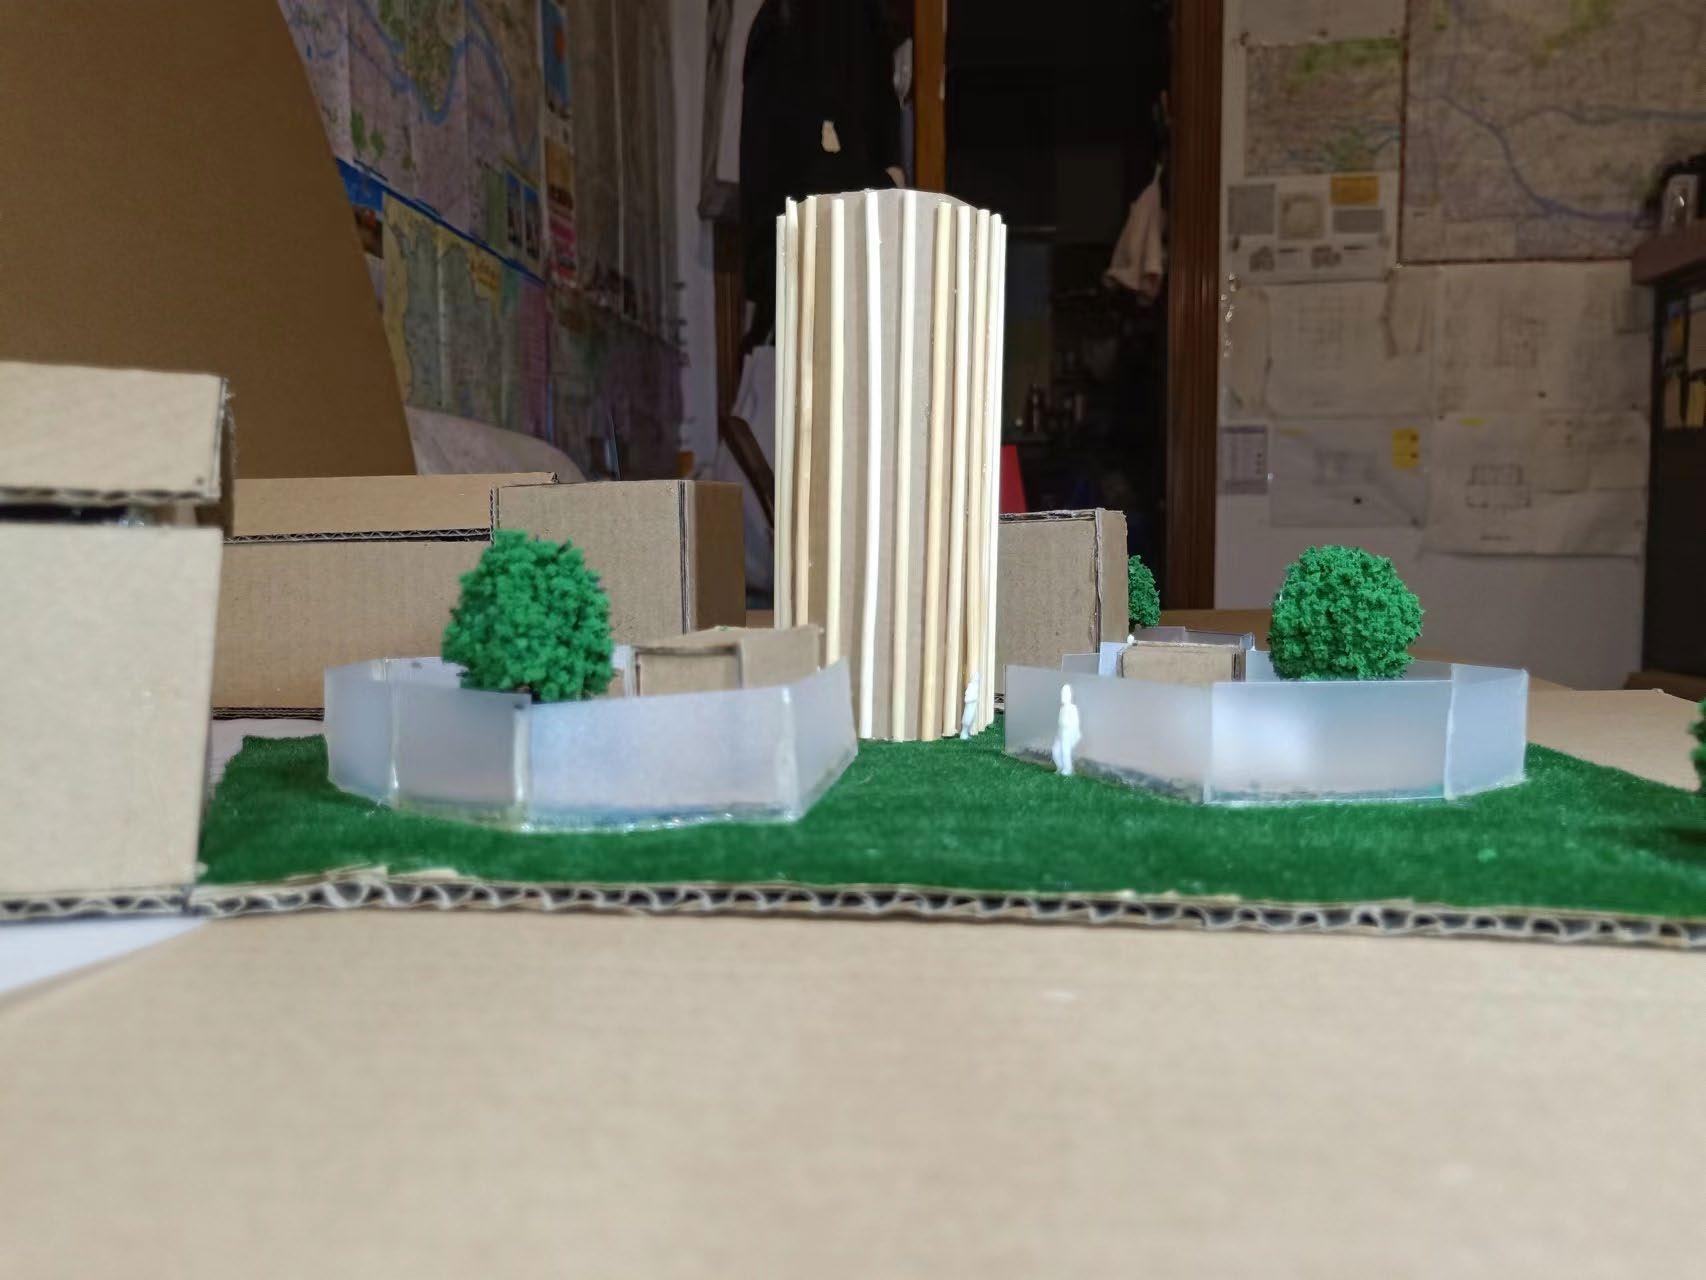
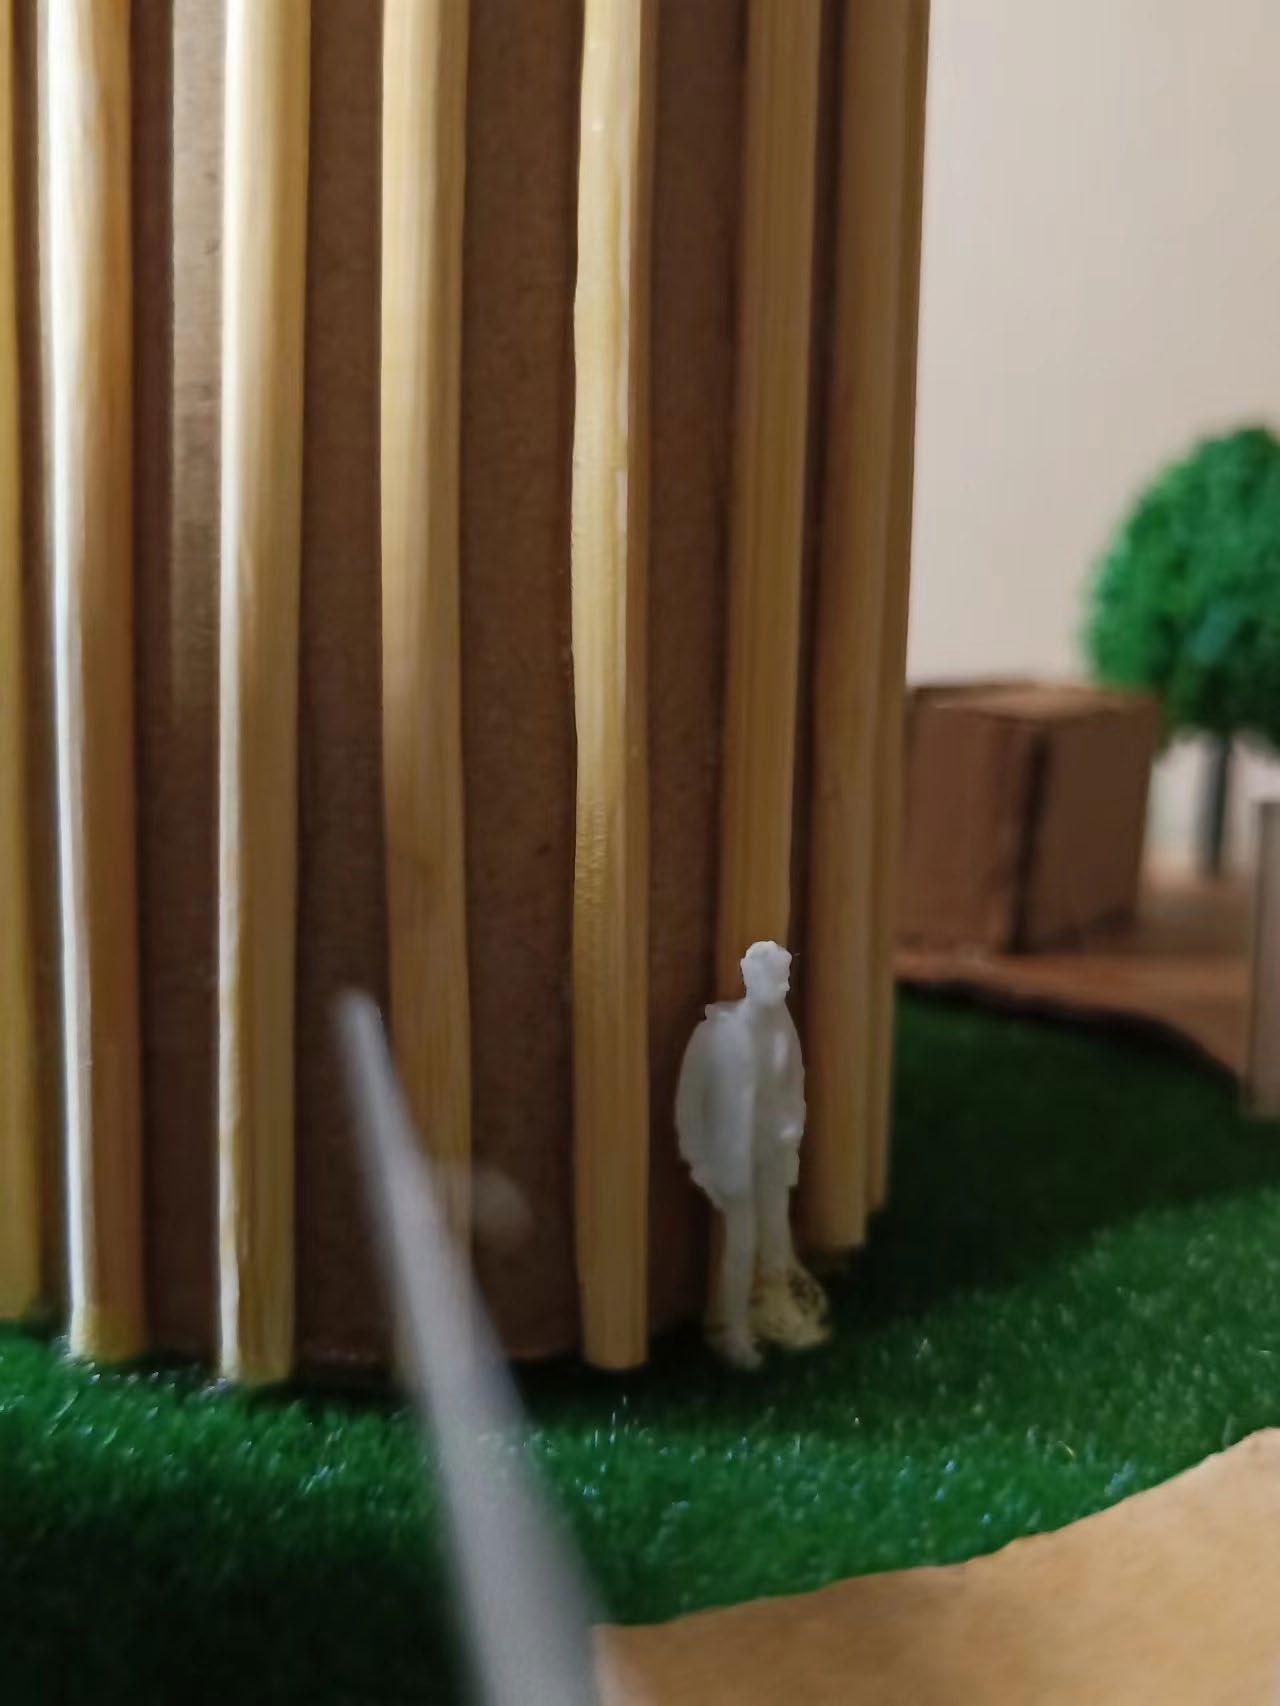
A 12m high tower is placed in the middle of the site to allow people to see at a glance from the narrow entrance with limited vision It is mainly made by timber structure, with some glass guardrails, concrete slabs and stainless-steel lift
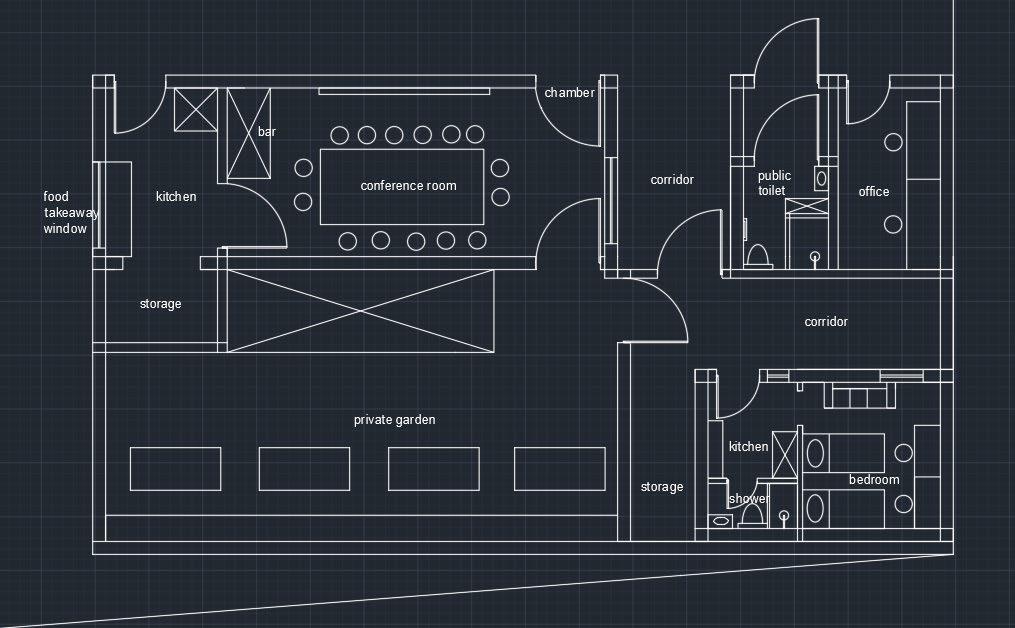
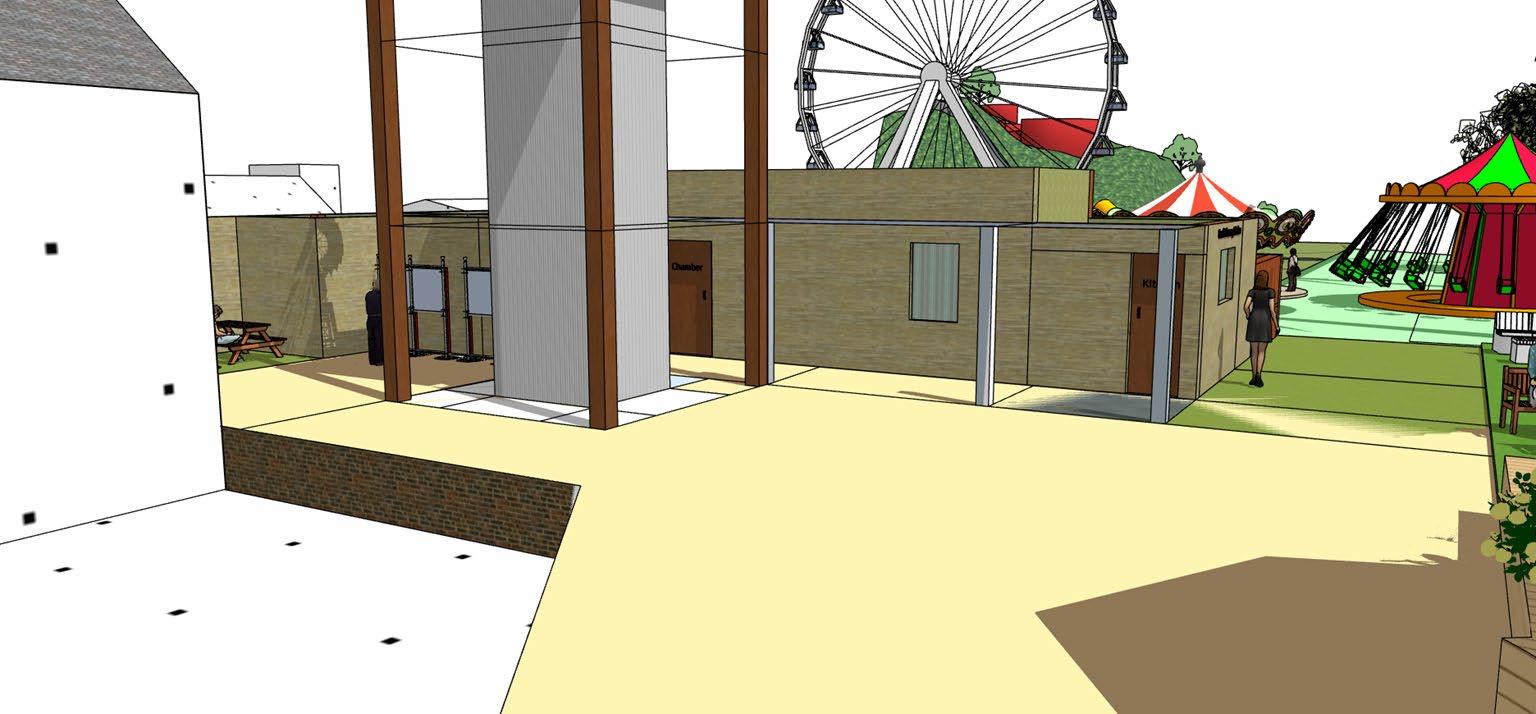
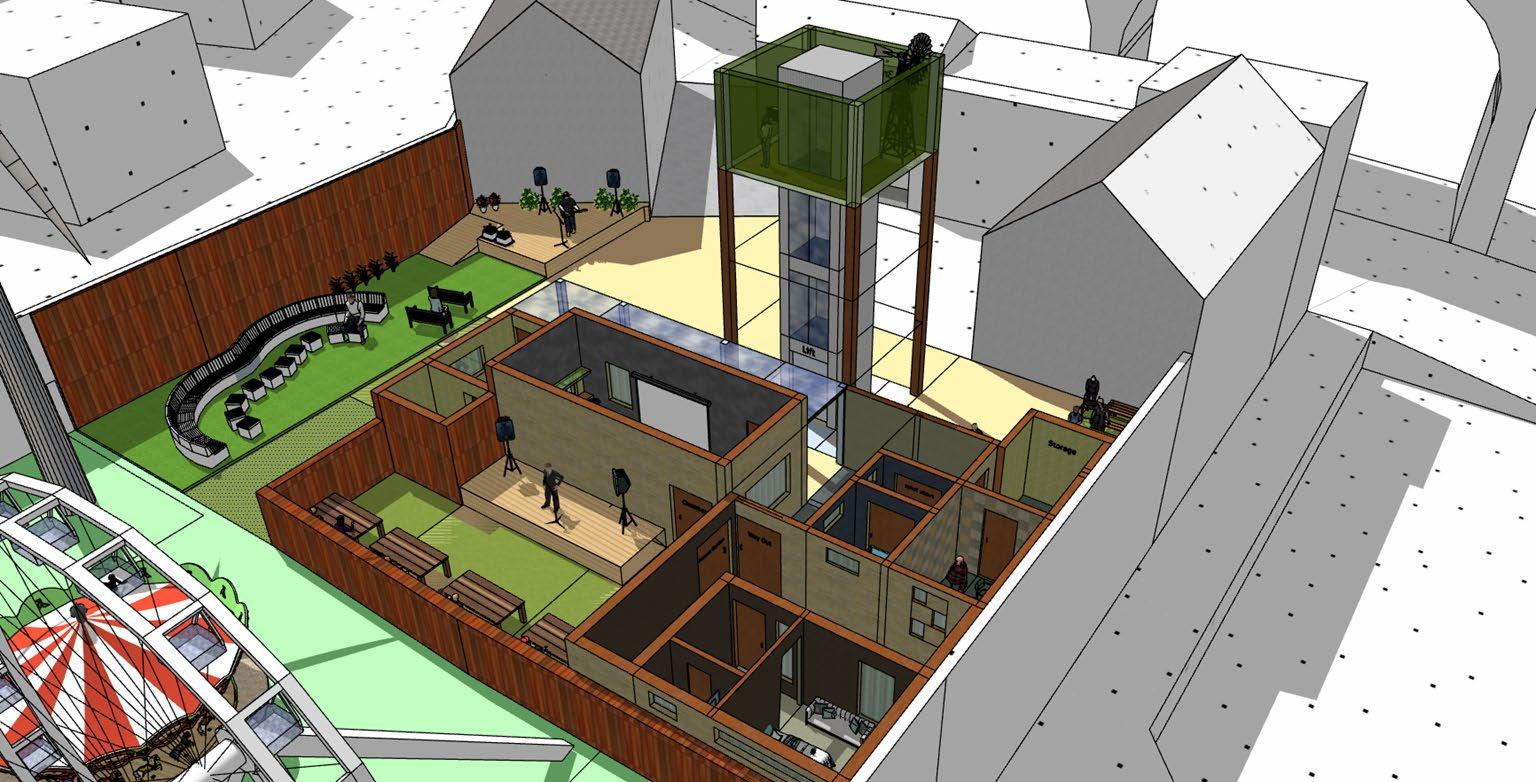
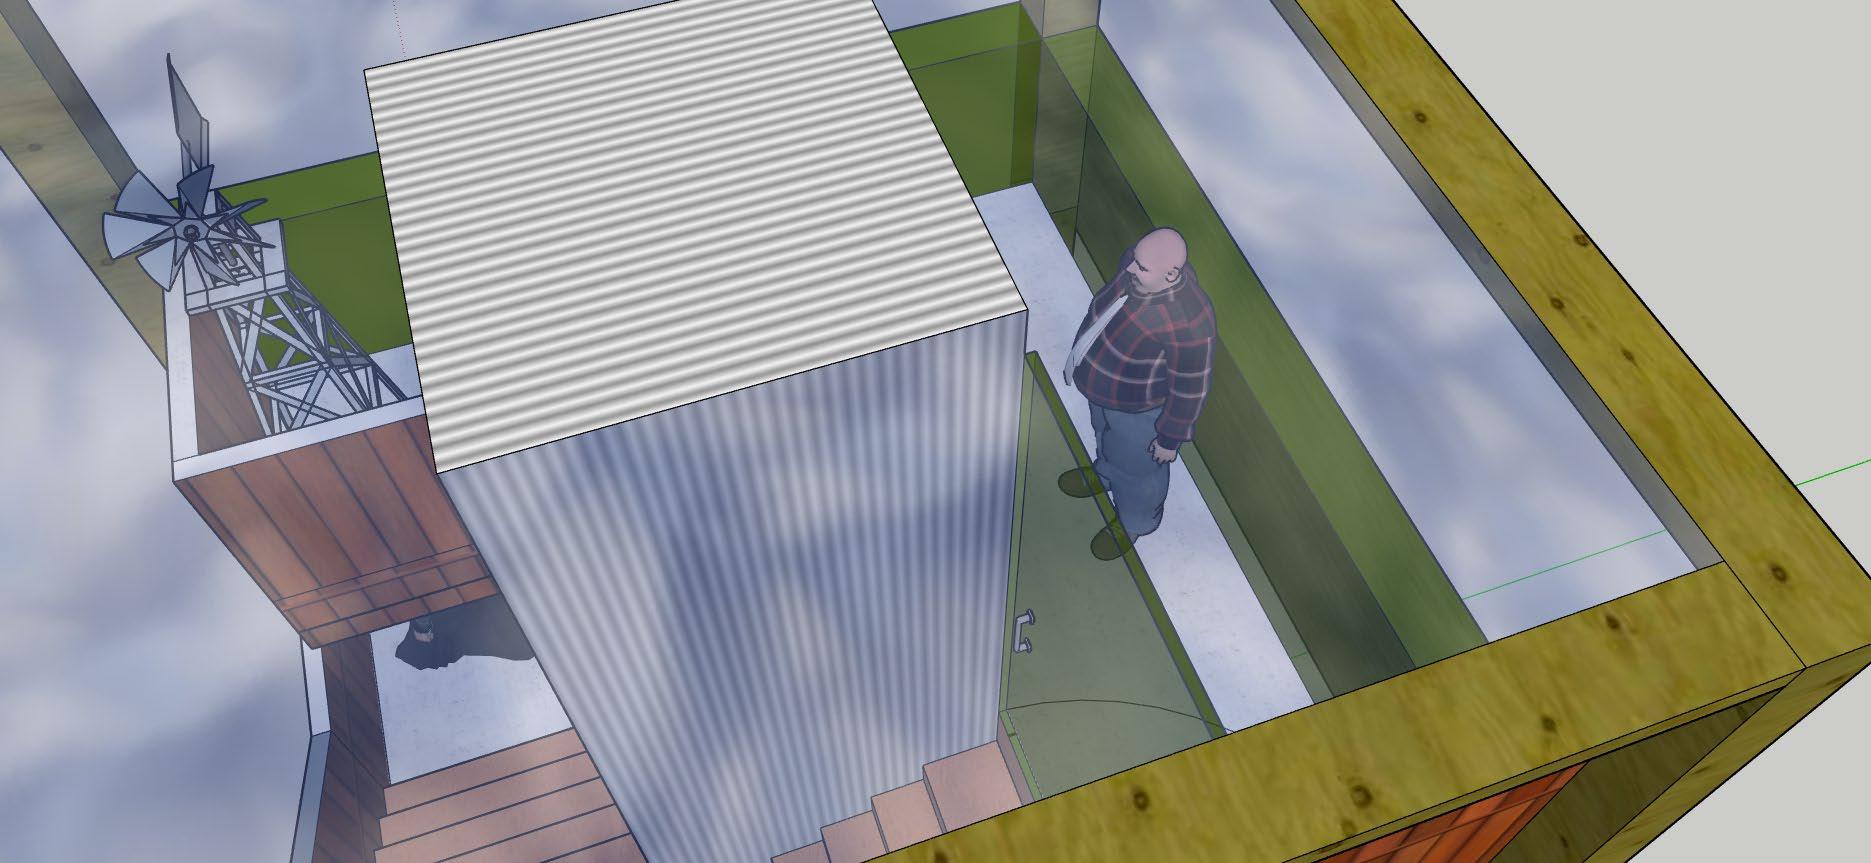
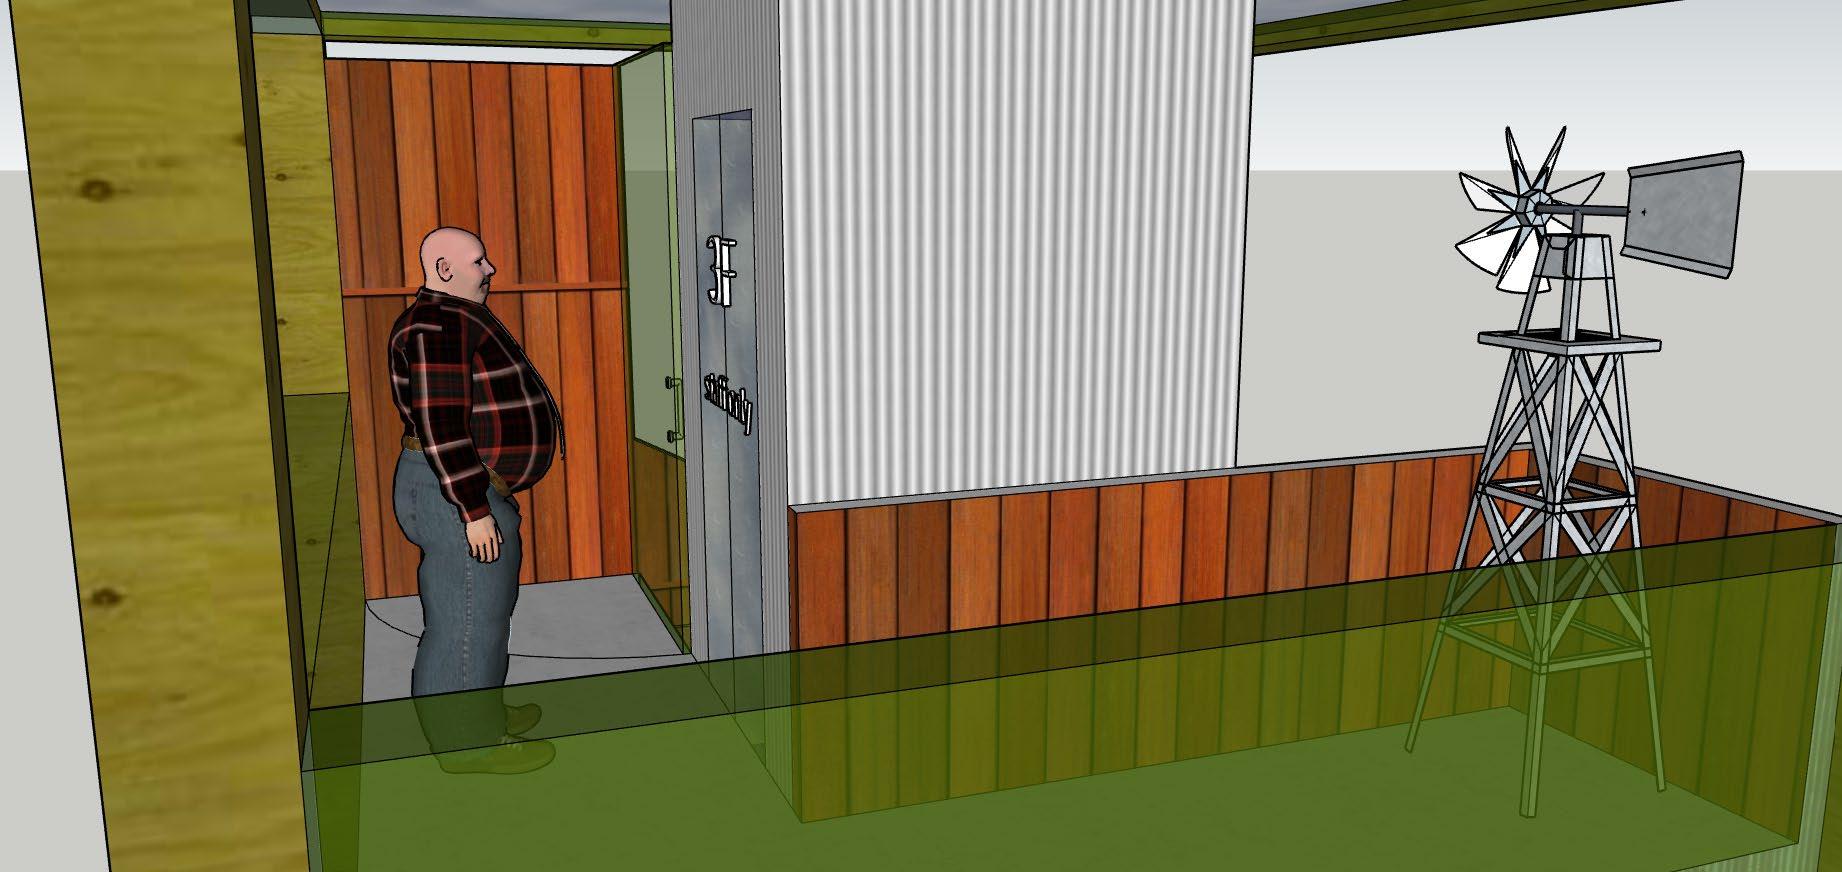
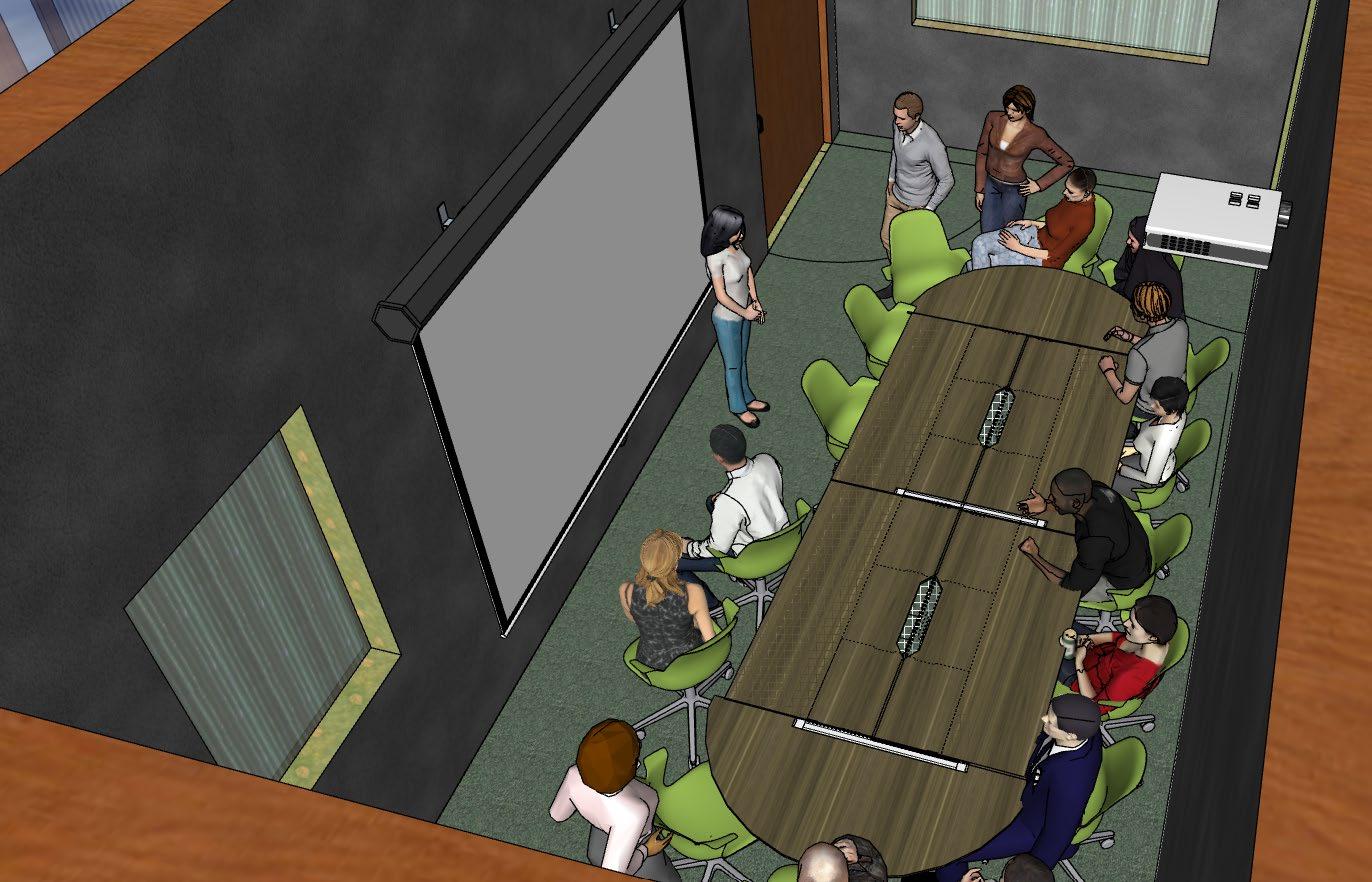
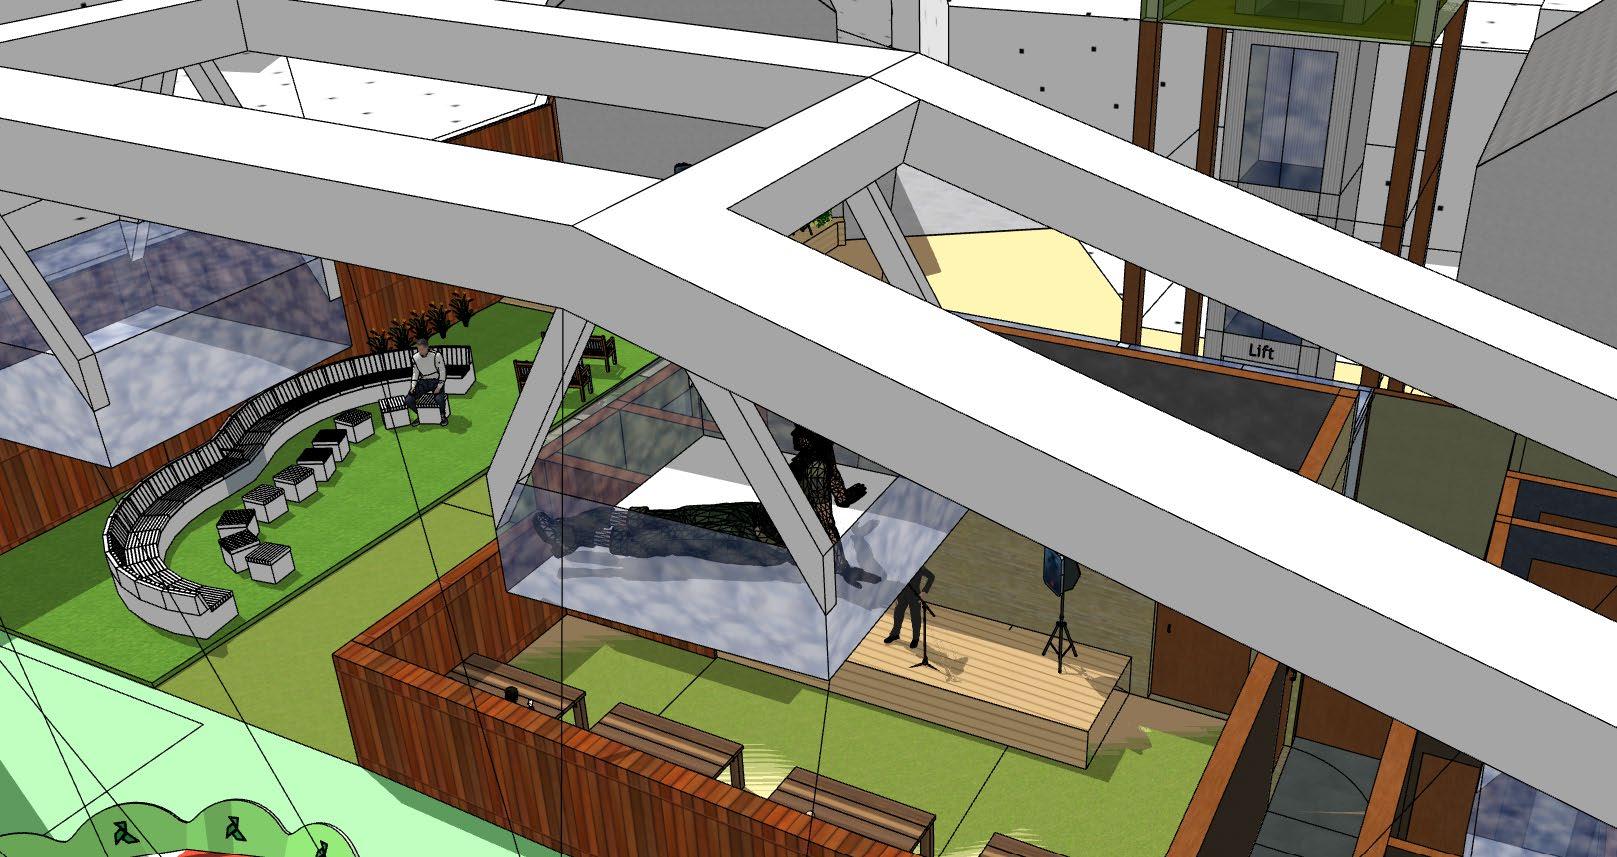
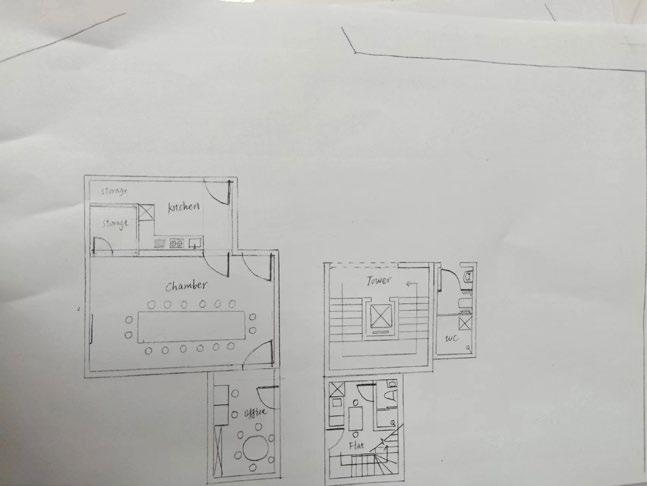
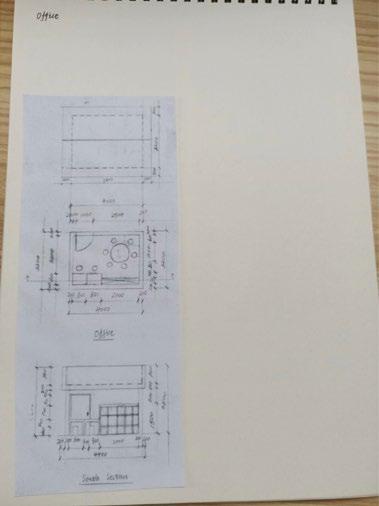
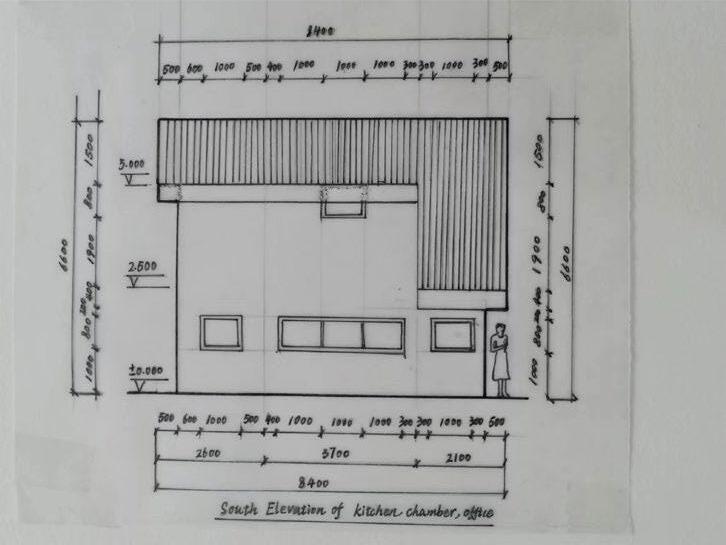
On third (top) floor there will be facilities for staffs to collect data and go down to the 9m wide ,4m high chamber just to the south of the ground floor of this tower to discuss with their colleagues.
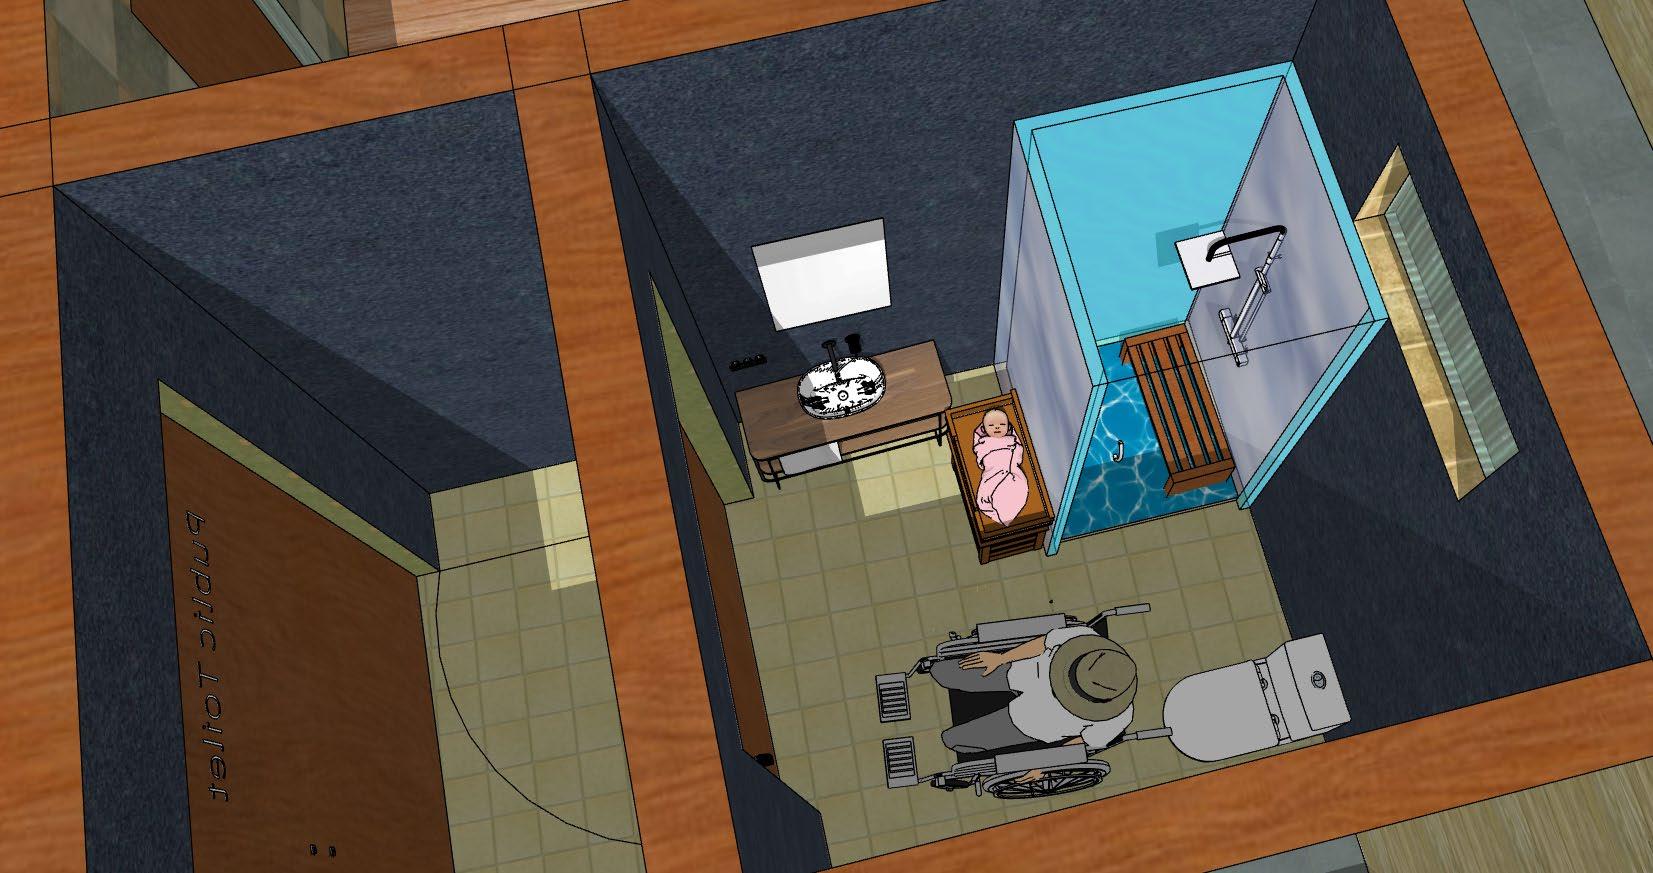
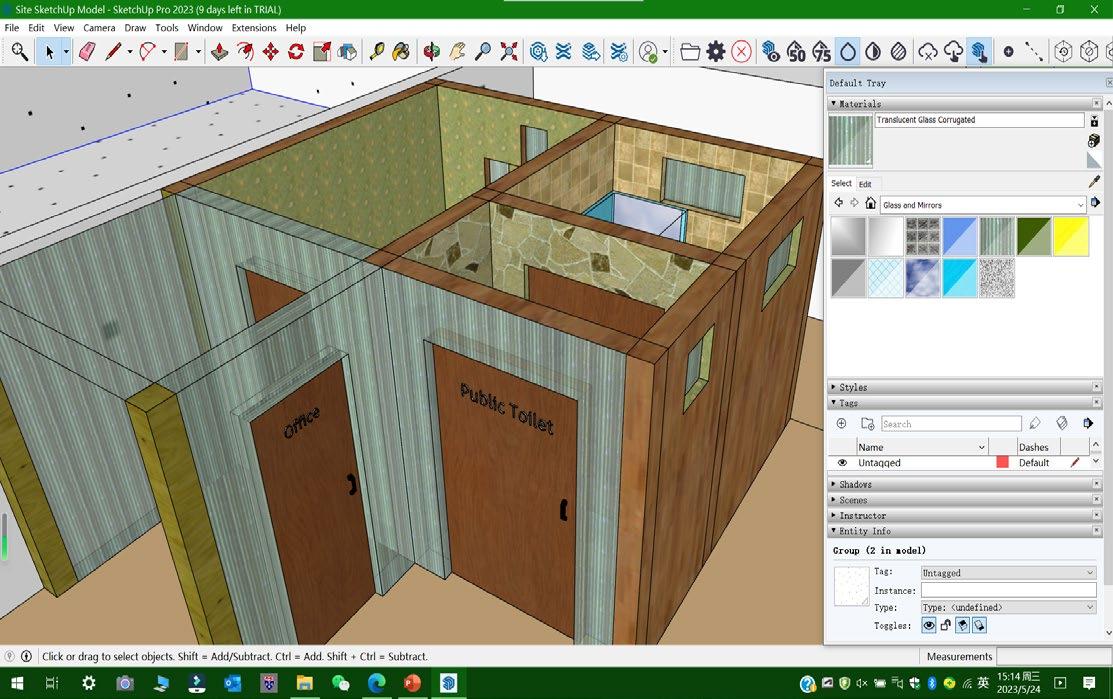
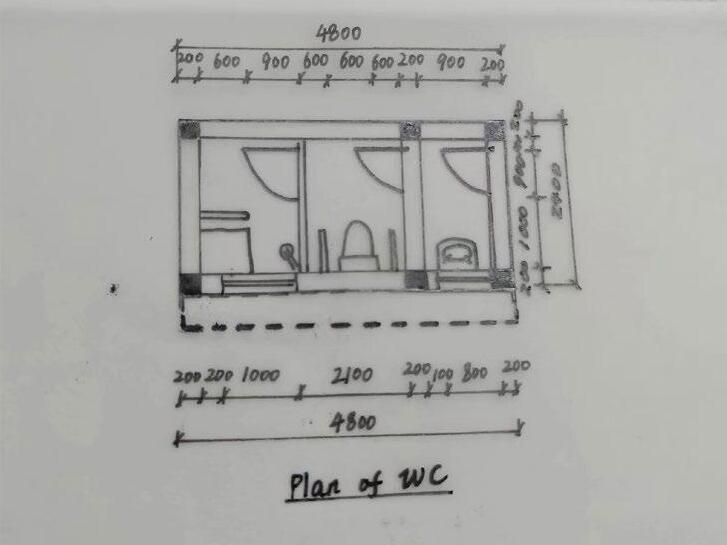
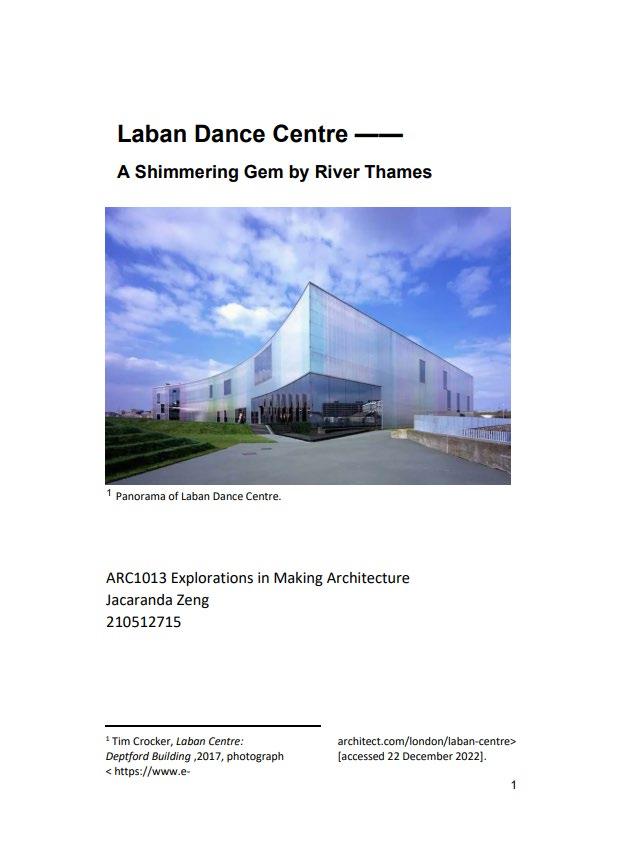
After that, some reports or interesting diagrams will be displayed at the gallery, which is located to the east of the tower, so that public will have a chance to know about useful knowledge about wind. The council members could have access to a 12㎡ office near the wheelchair-accessible public toilet, which are both located across a corridor with glass shelter.
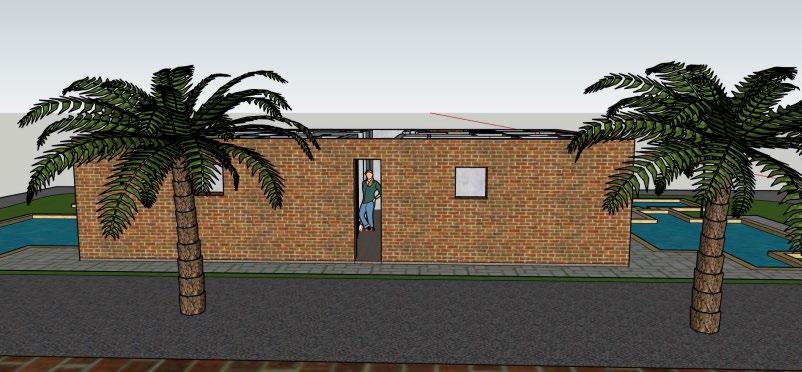
1.4 Urban Observatory
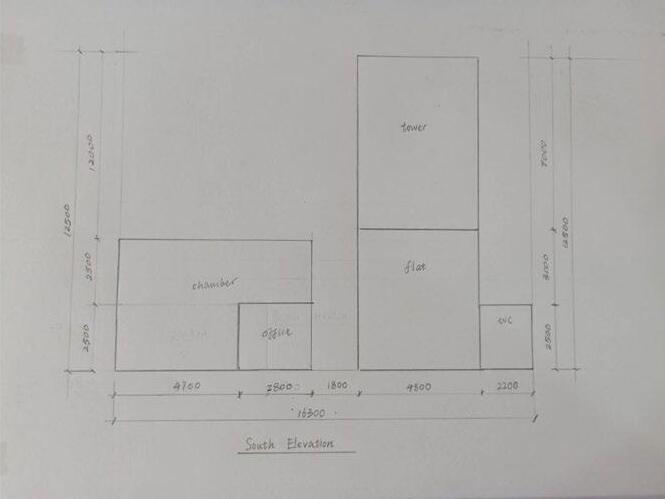
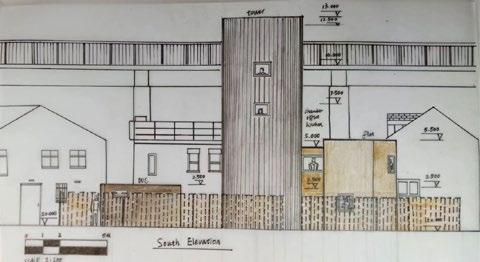
1:100 Final Design South Elevation in context
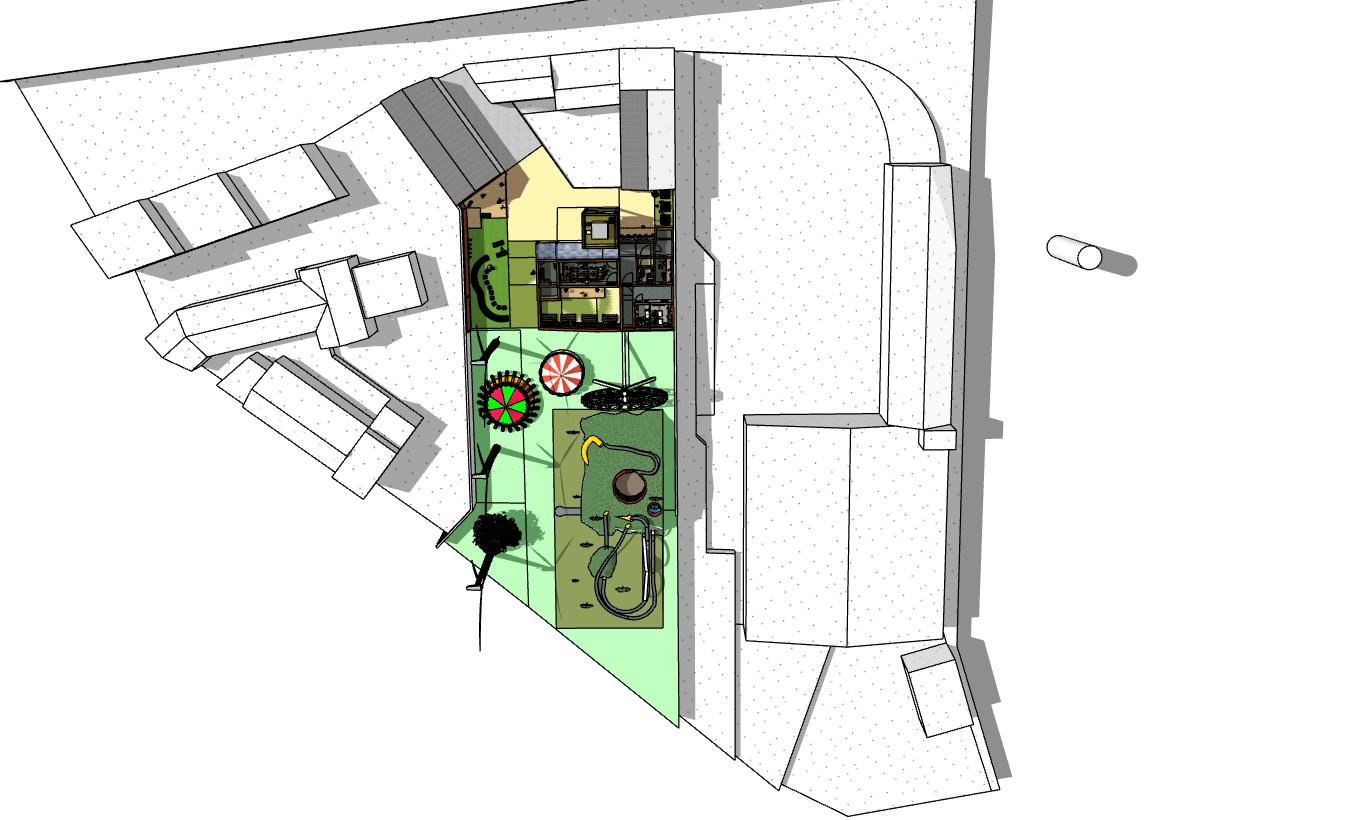
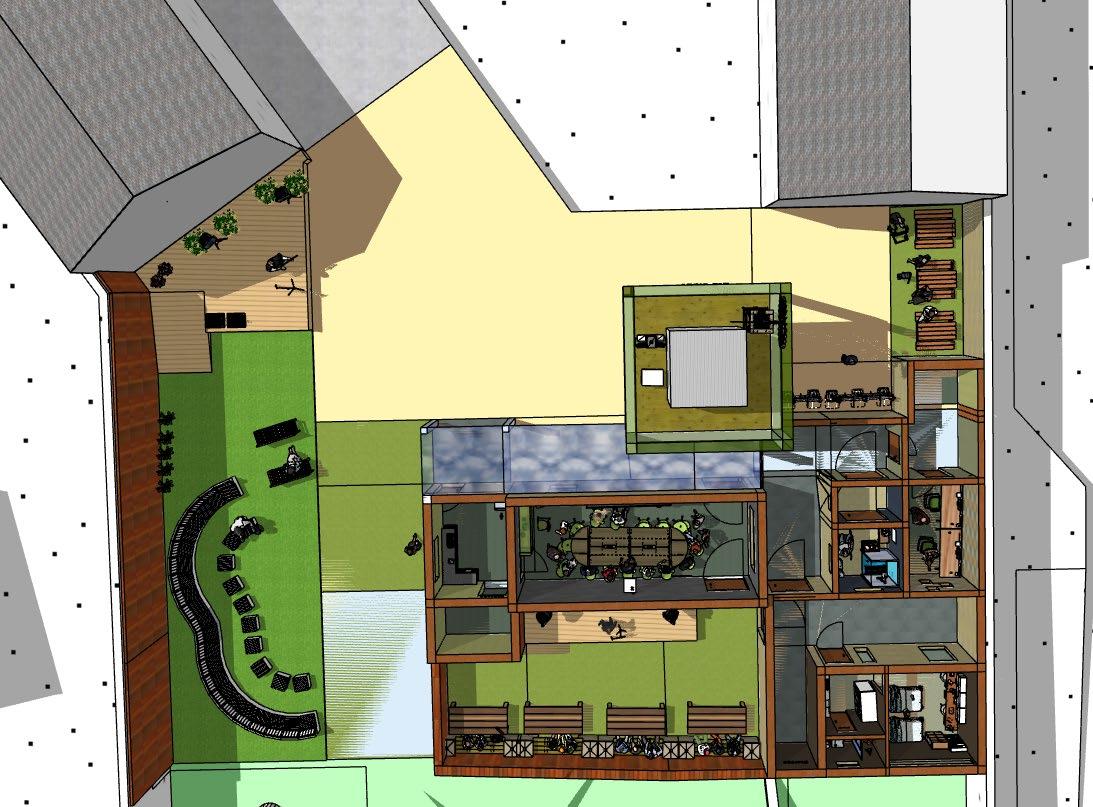
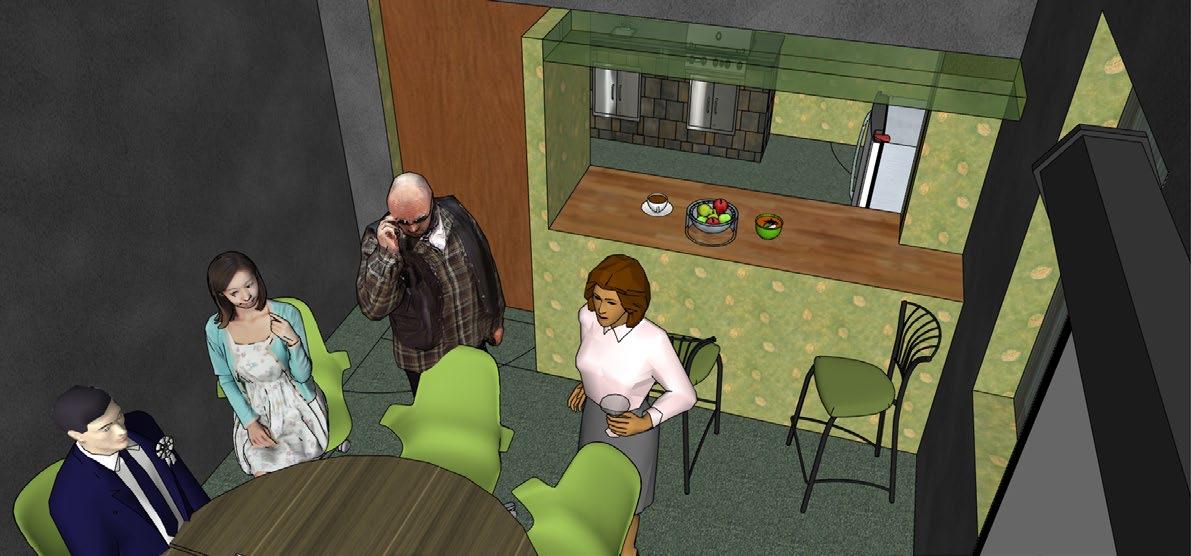
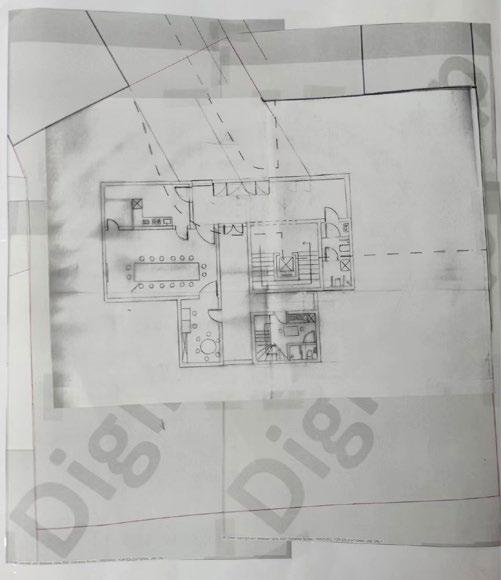
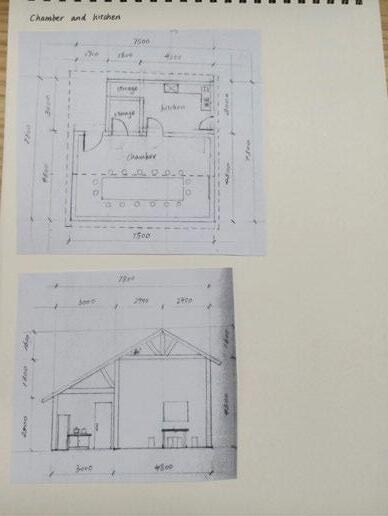
When staffs are tired they could have a cup of tea from the bar located just inside the chamber and the bar is a connection with the public kitchen, which could serve chamber for food and drinks and serve the public at the courtyard for food takeaway Staffs could also relax themselves at the public garden just at the back of the chamber or go to the two-people flat to have a good sleep
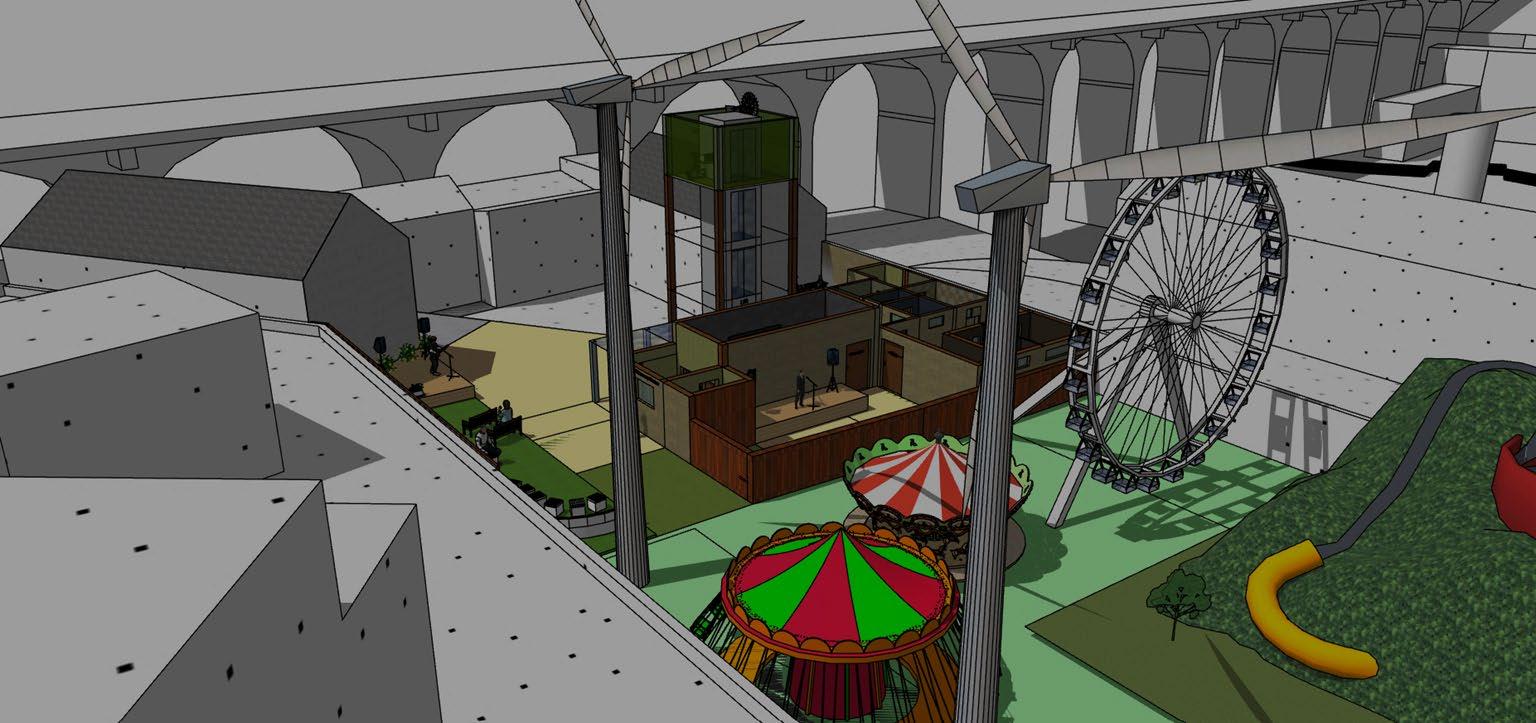
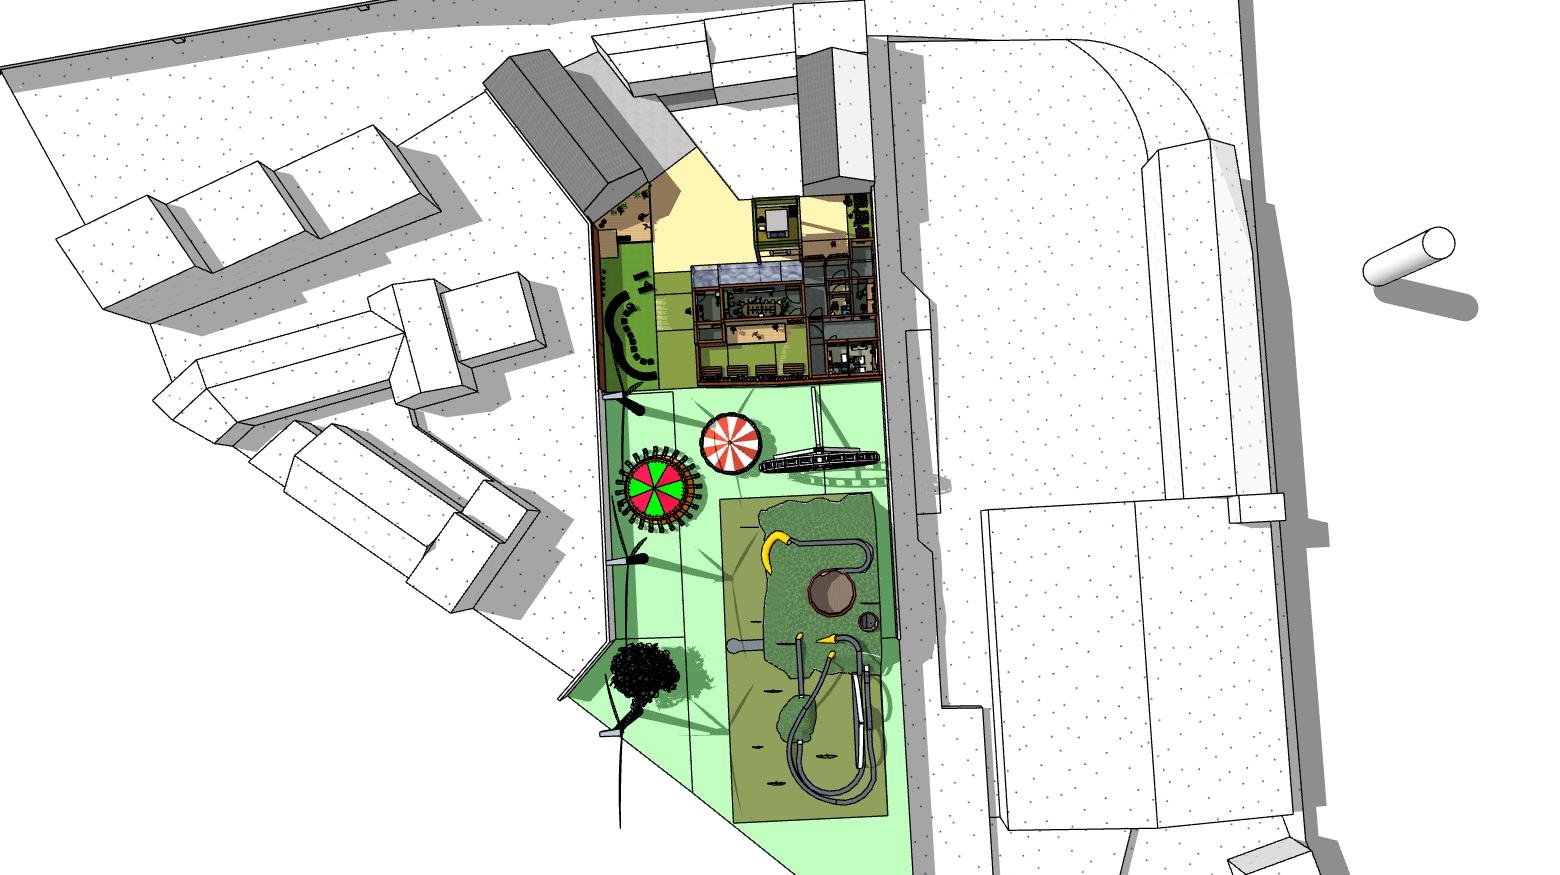
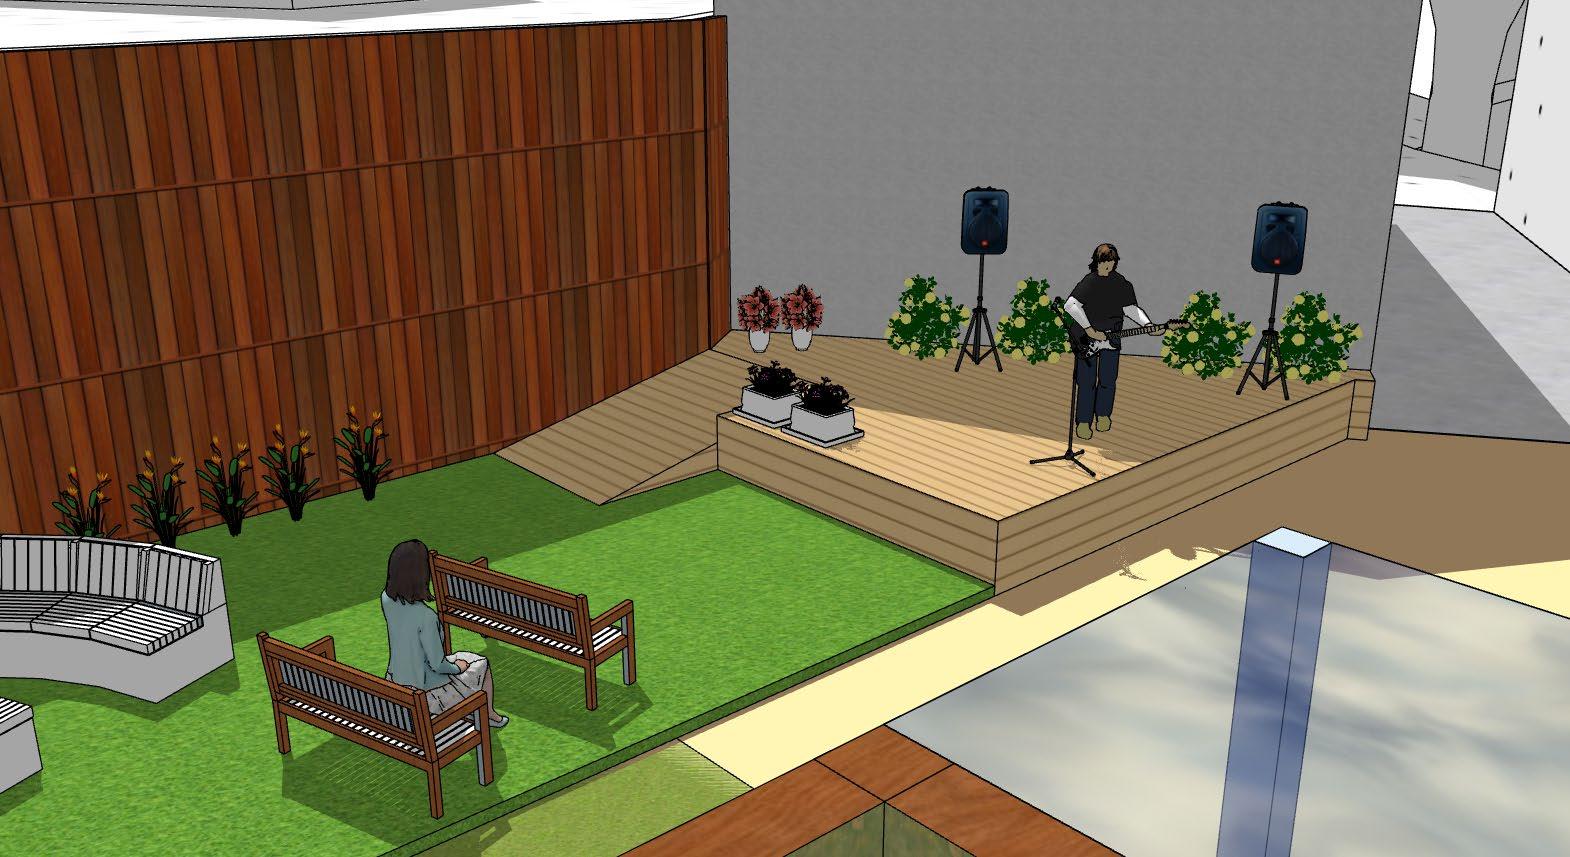
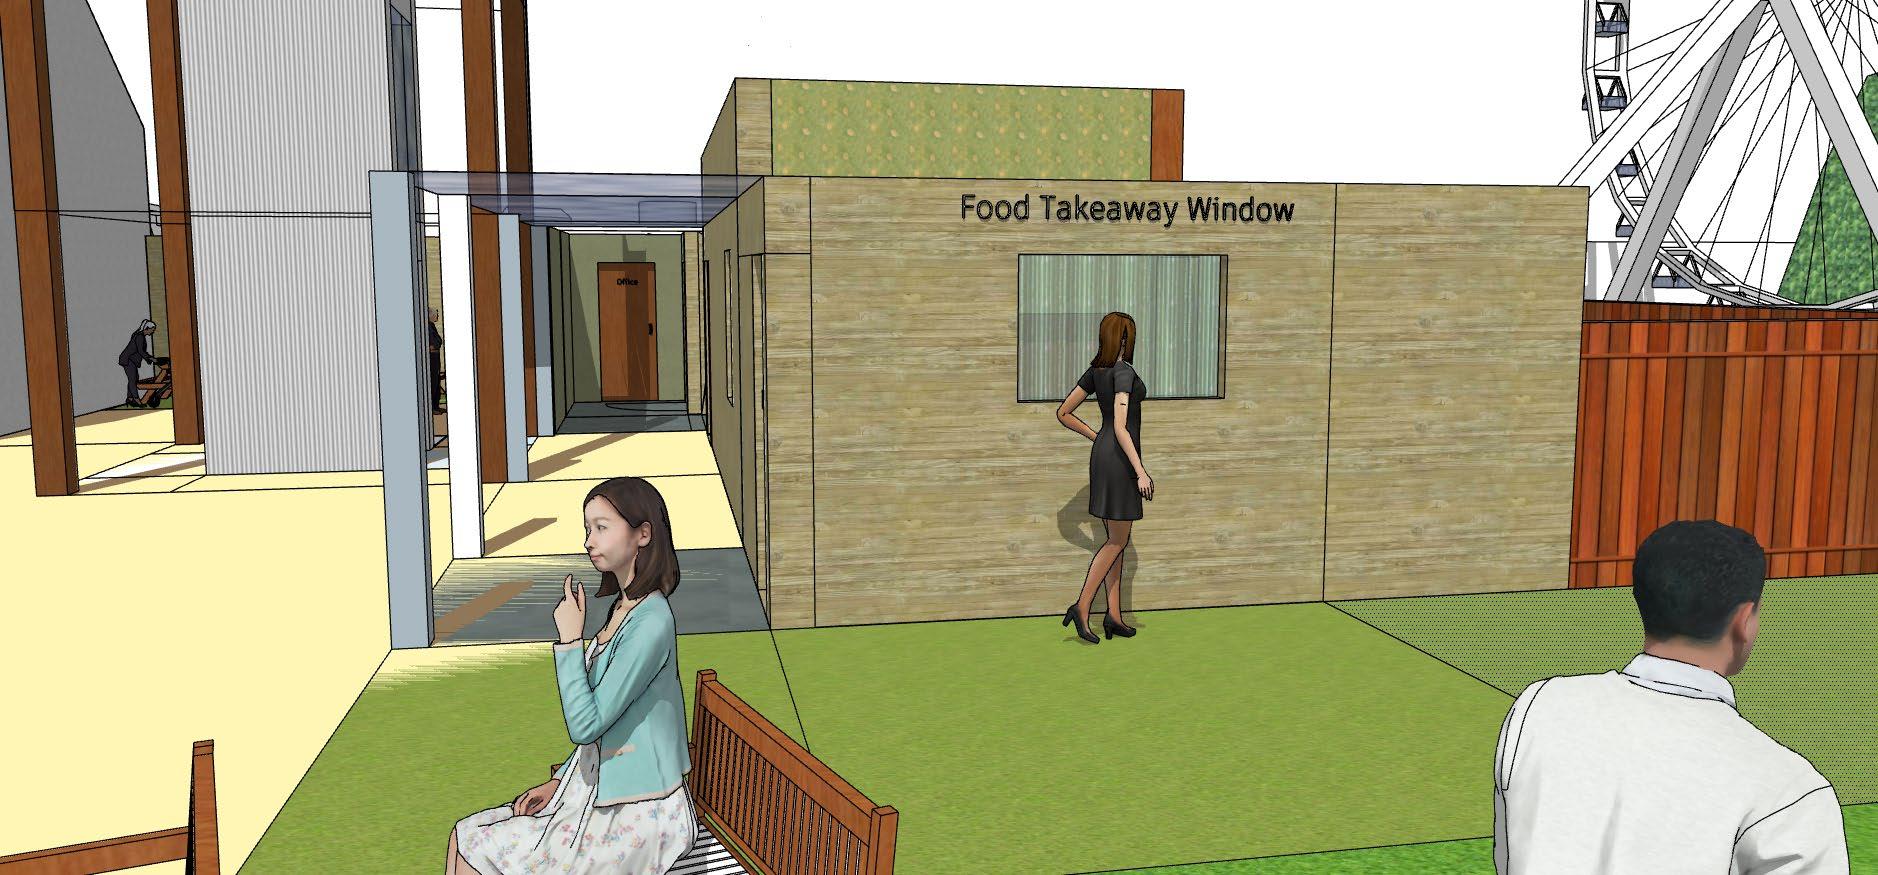
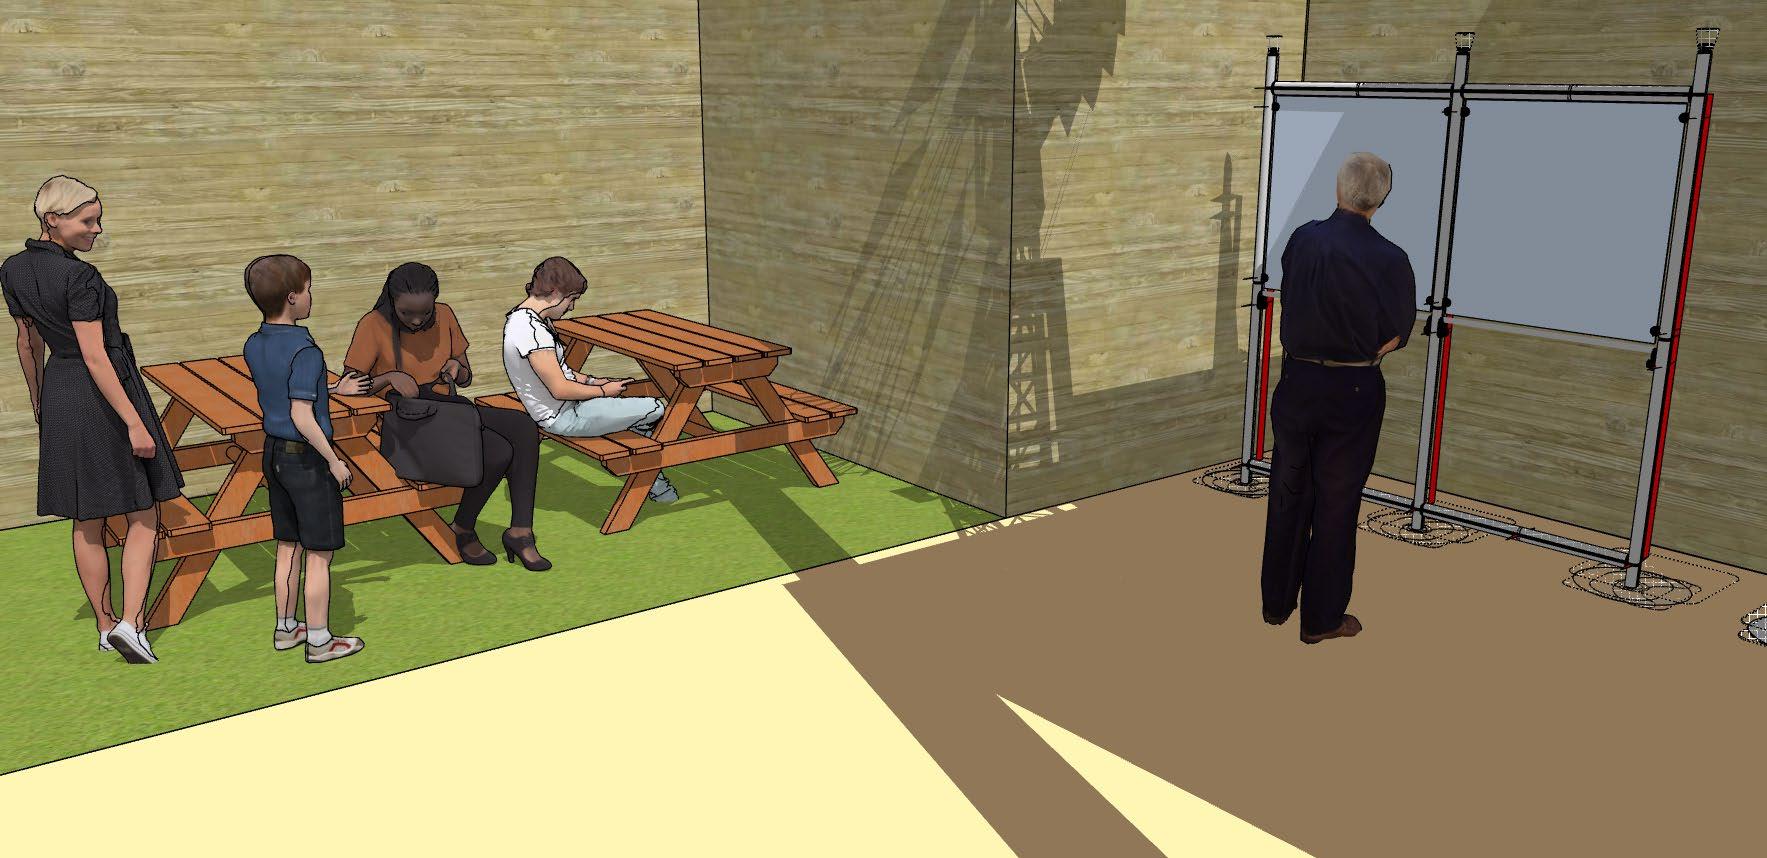
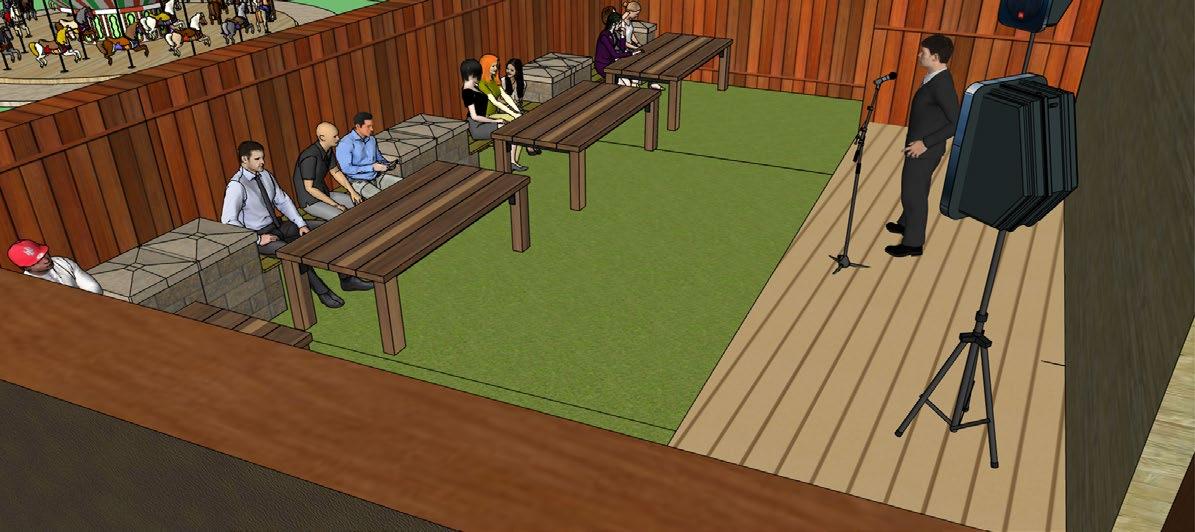
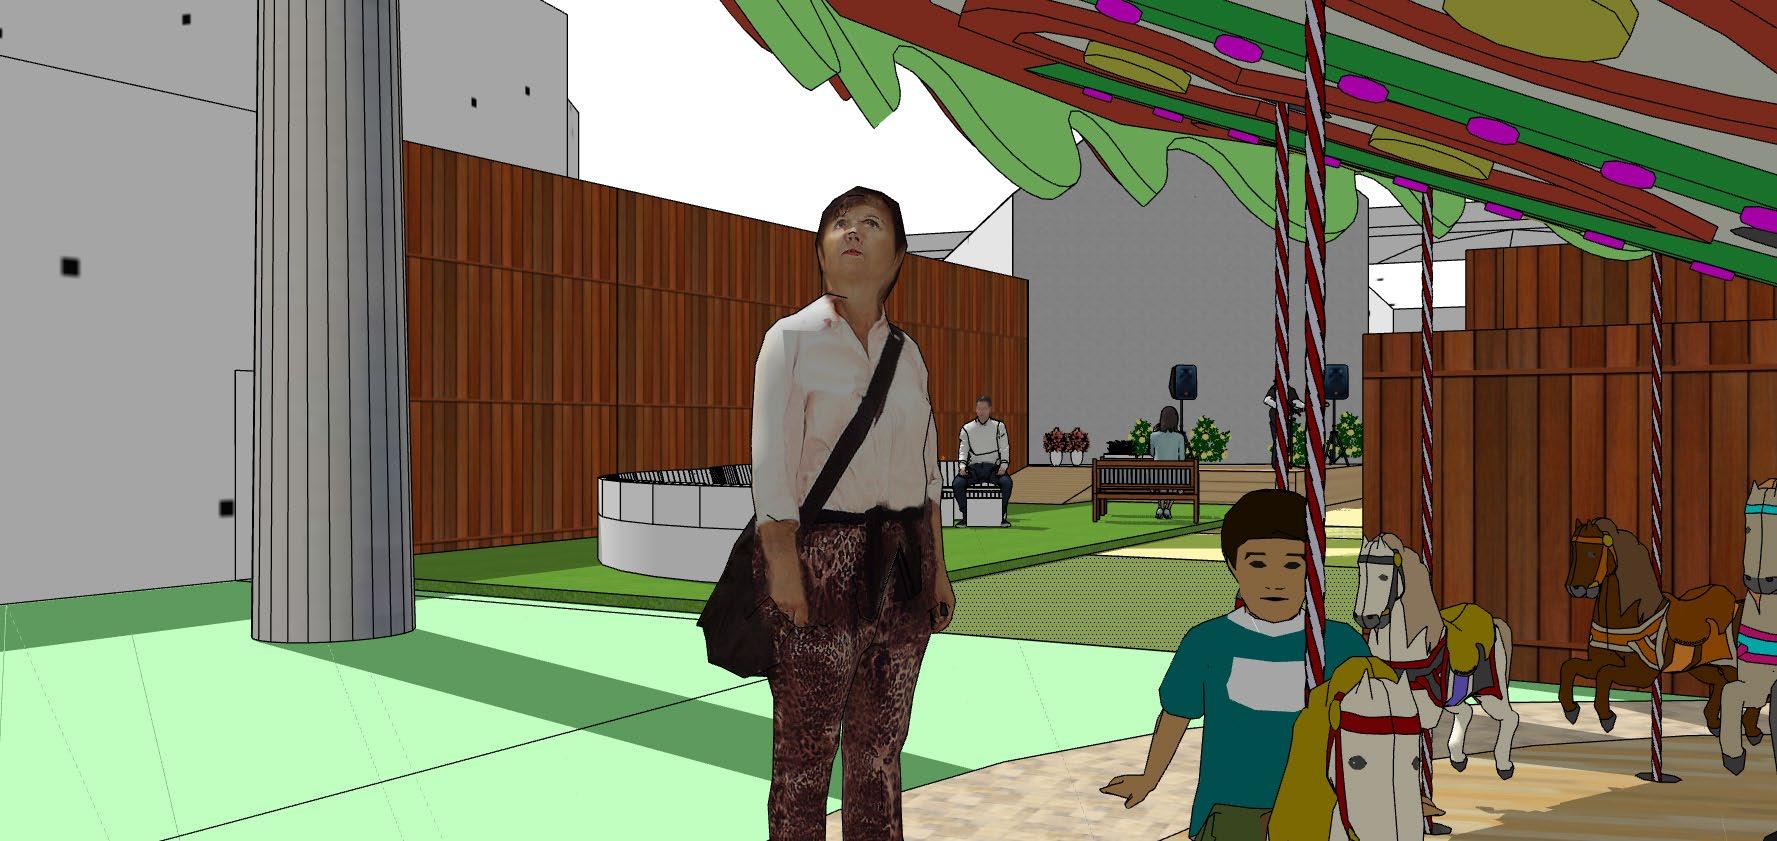
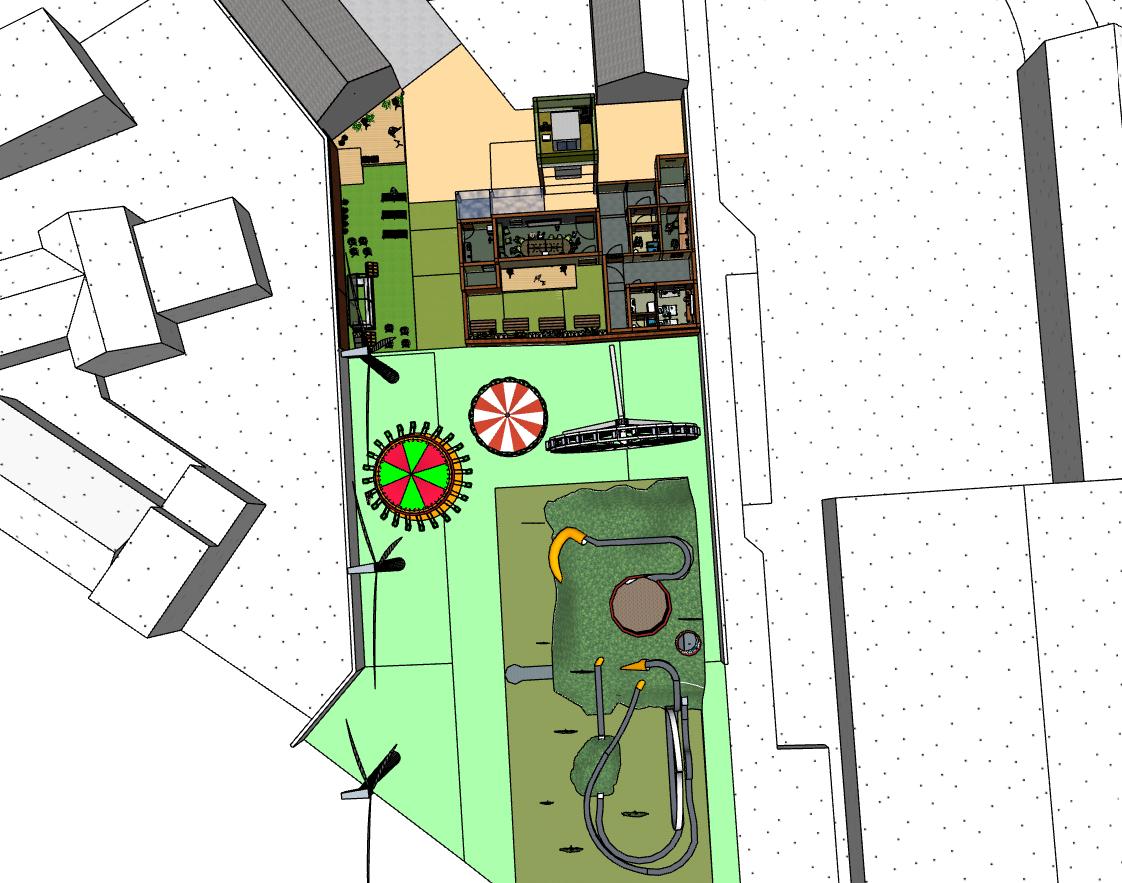
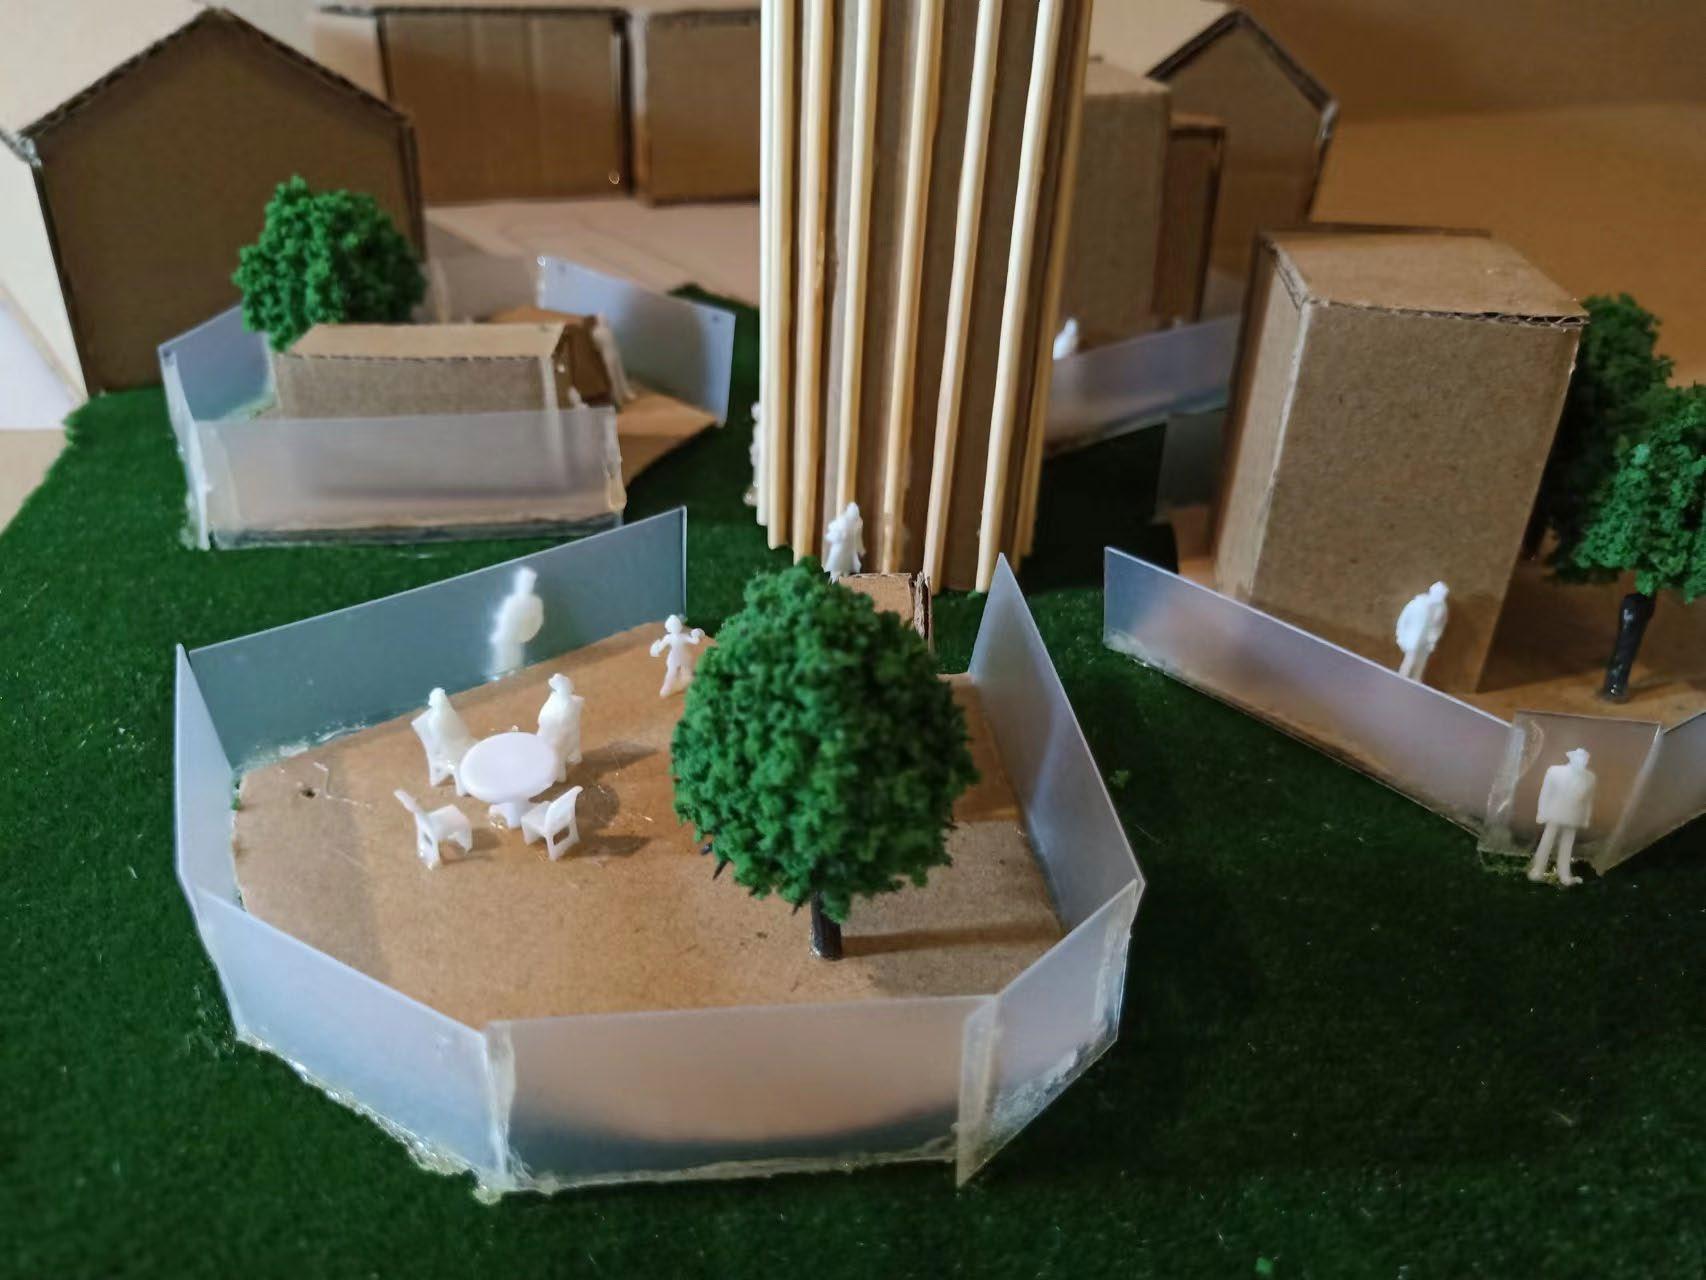
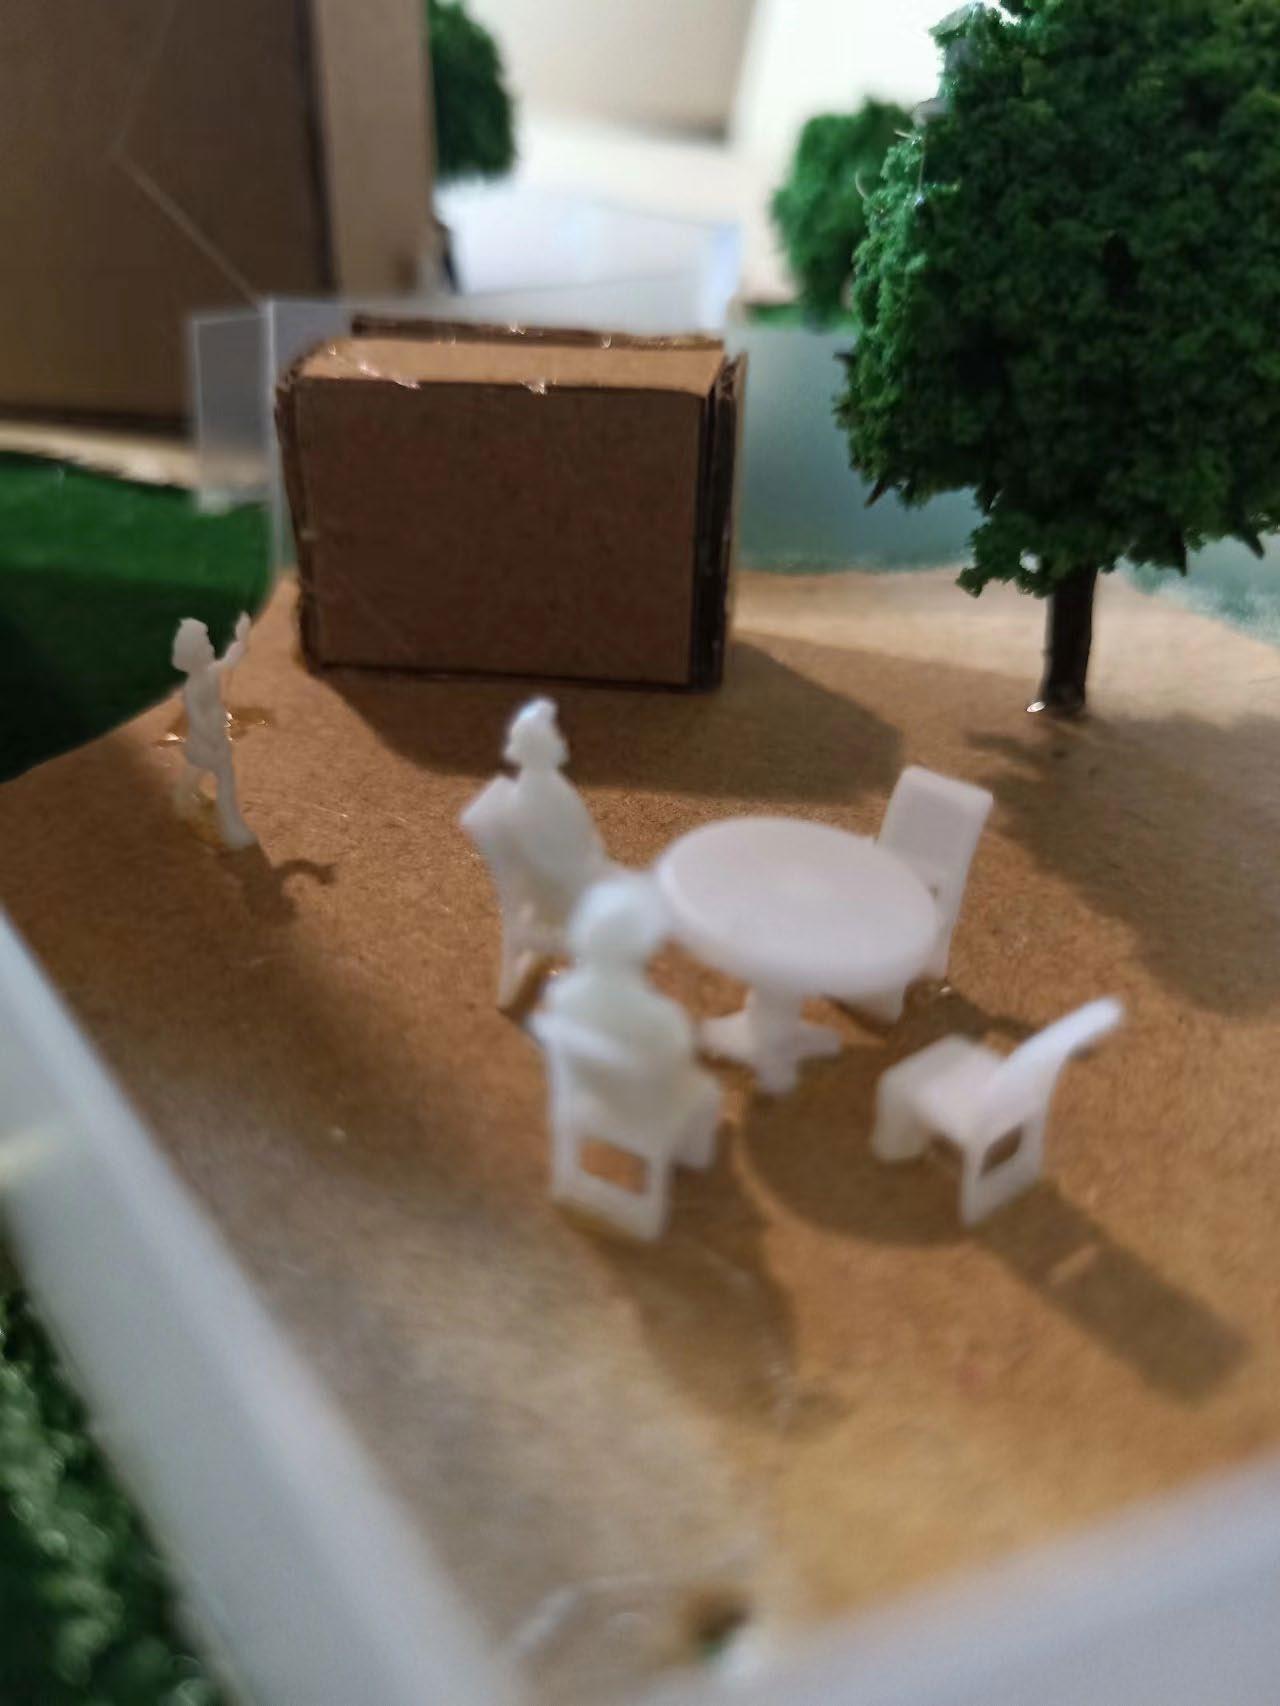
Our lovely visitors could enjoy some music from the stage just on the right-hand side after they come into the site. Before they visit the tower they could have a look at the gallery about wind data. Courtyard with a long timber bench and chairs is designed to encourage friendly conversations and interactions Food takeaway window is a convenient stop for starving people to grab some food or drinks. The convenient circulation route guides people to the landscape, which is a wind-powered amusement park called ‘Windy Party’ with exciting entertainment facilities carousel , swivel flying chairs, Ferris wheel and rollercoaster, for people to enjoy the wind.
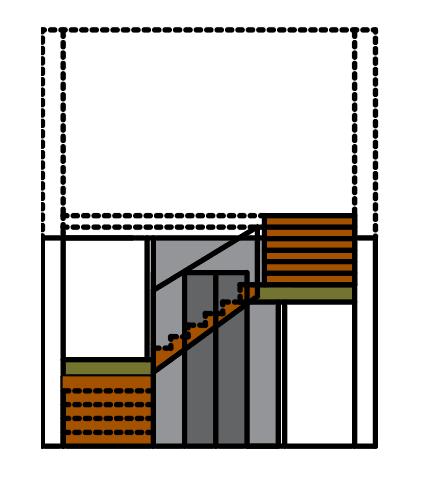
1:50 Detail Drawing Process
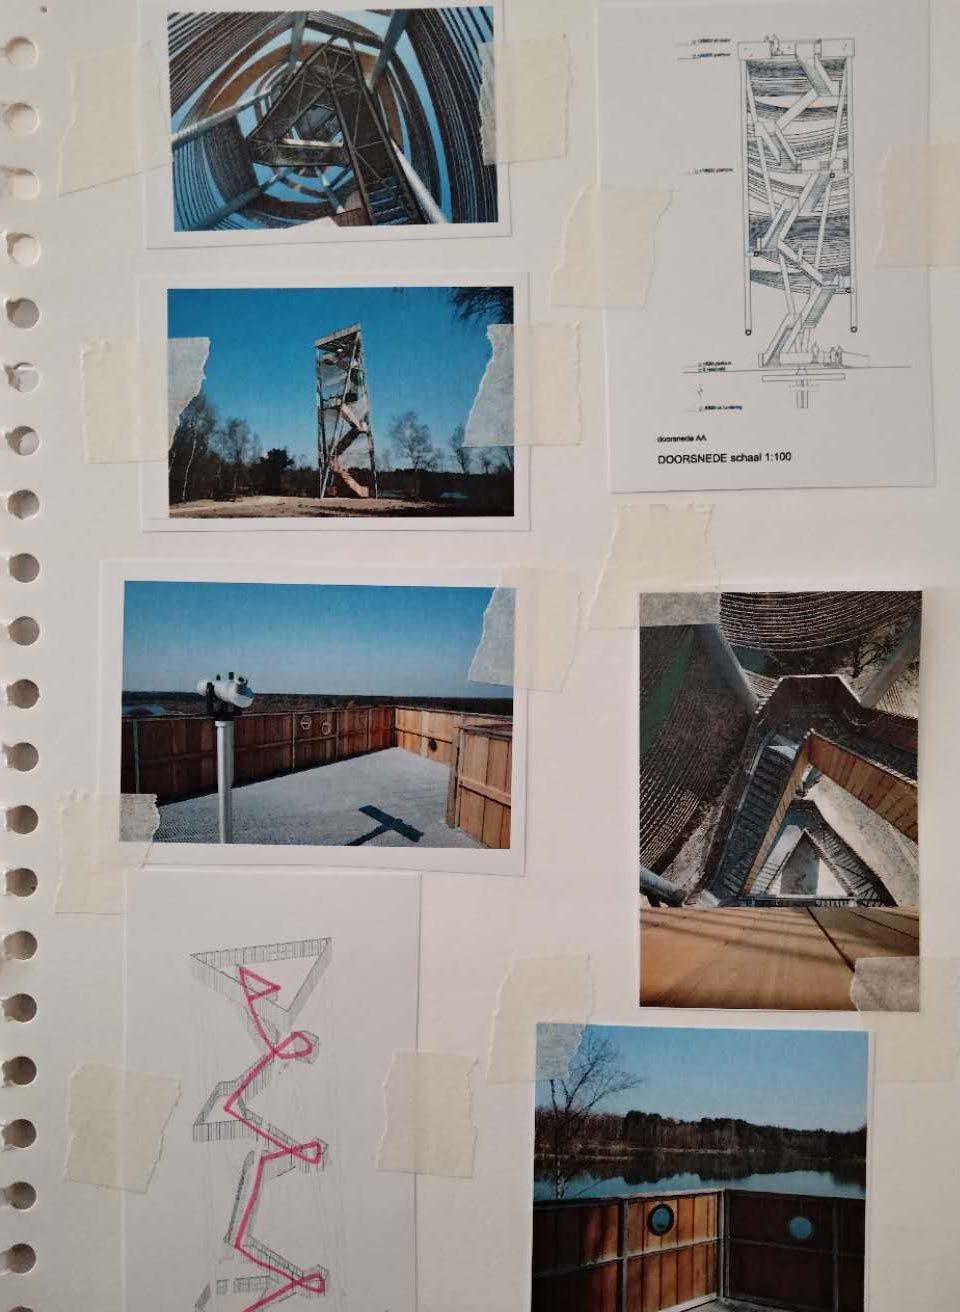
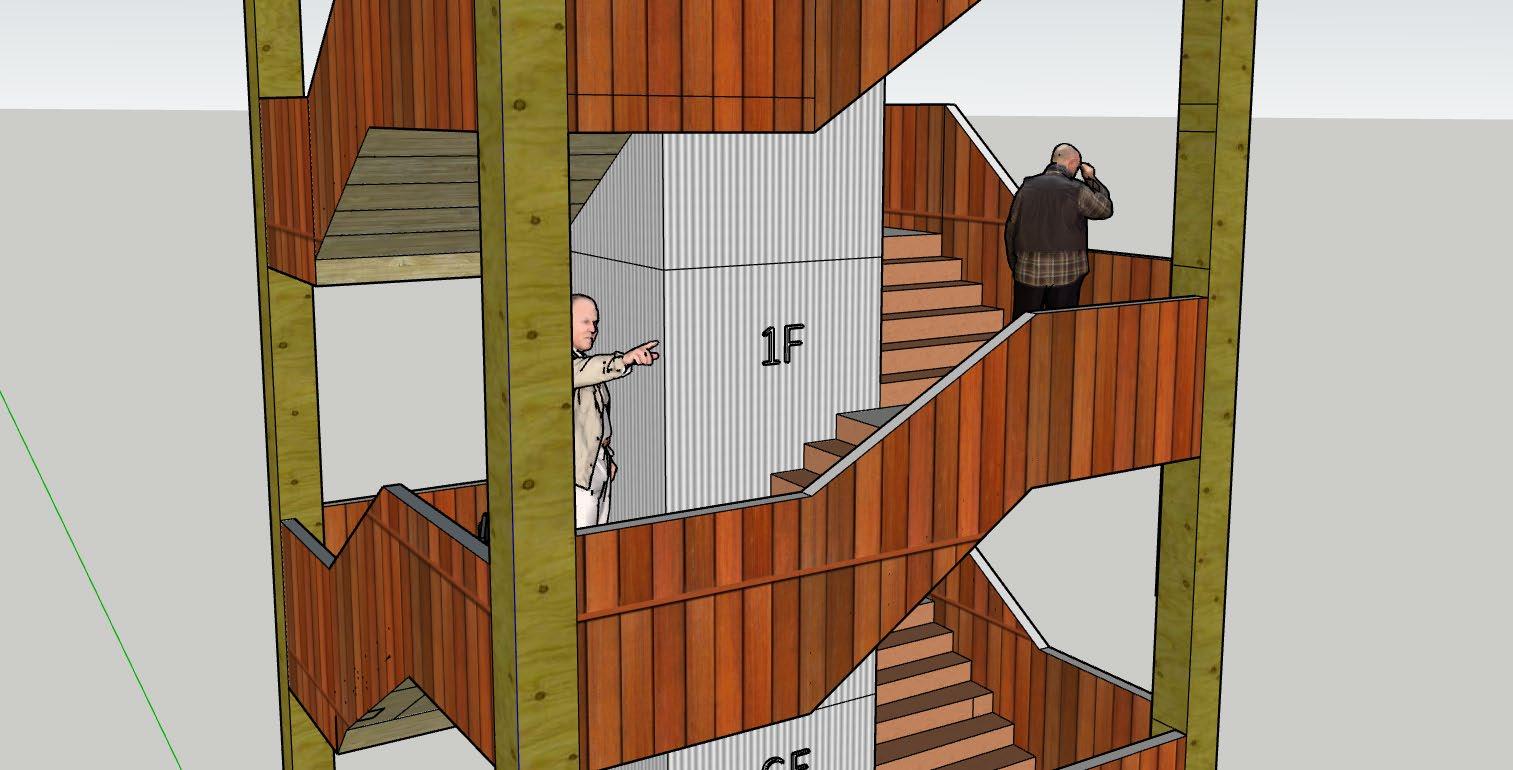
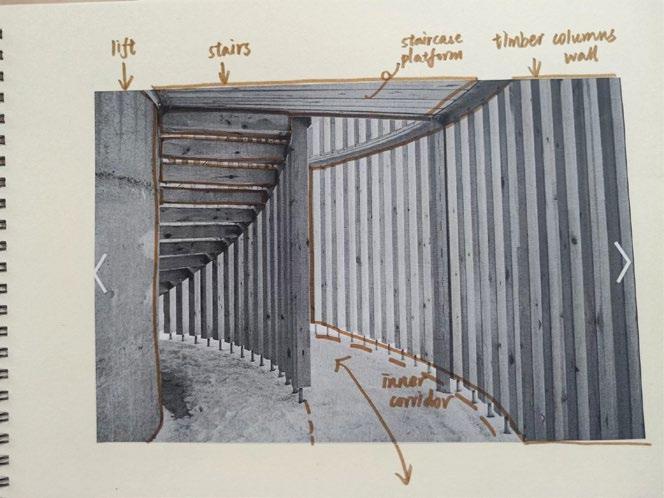
Staircase is an essential design for the tower Figuring out the relationships among columns/guardrails/lifts/slab s/human has been a difficulty but finally I found out my way to express my design thoughts through these pictures.
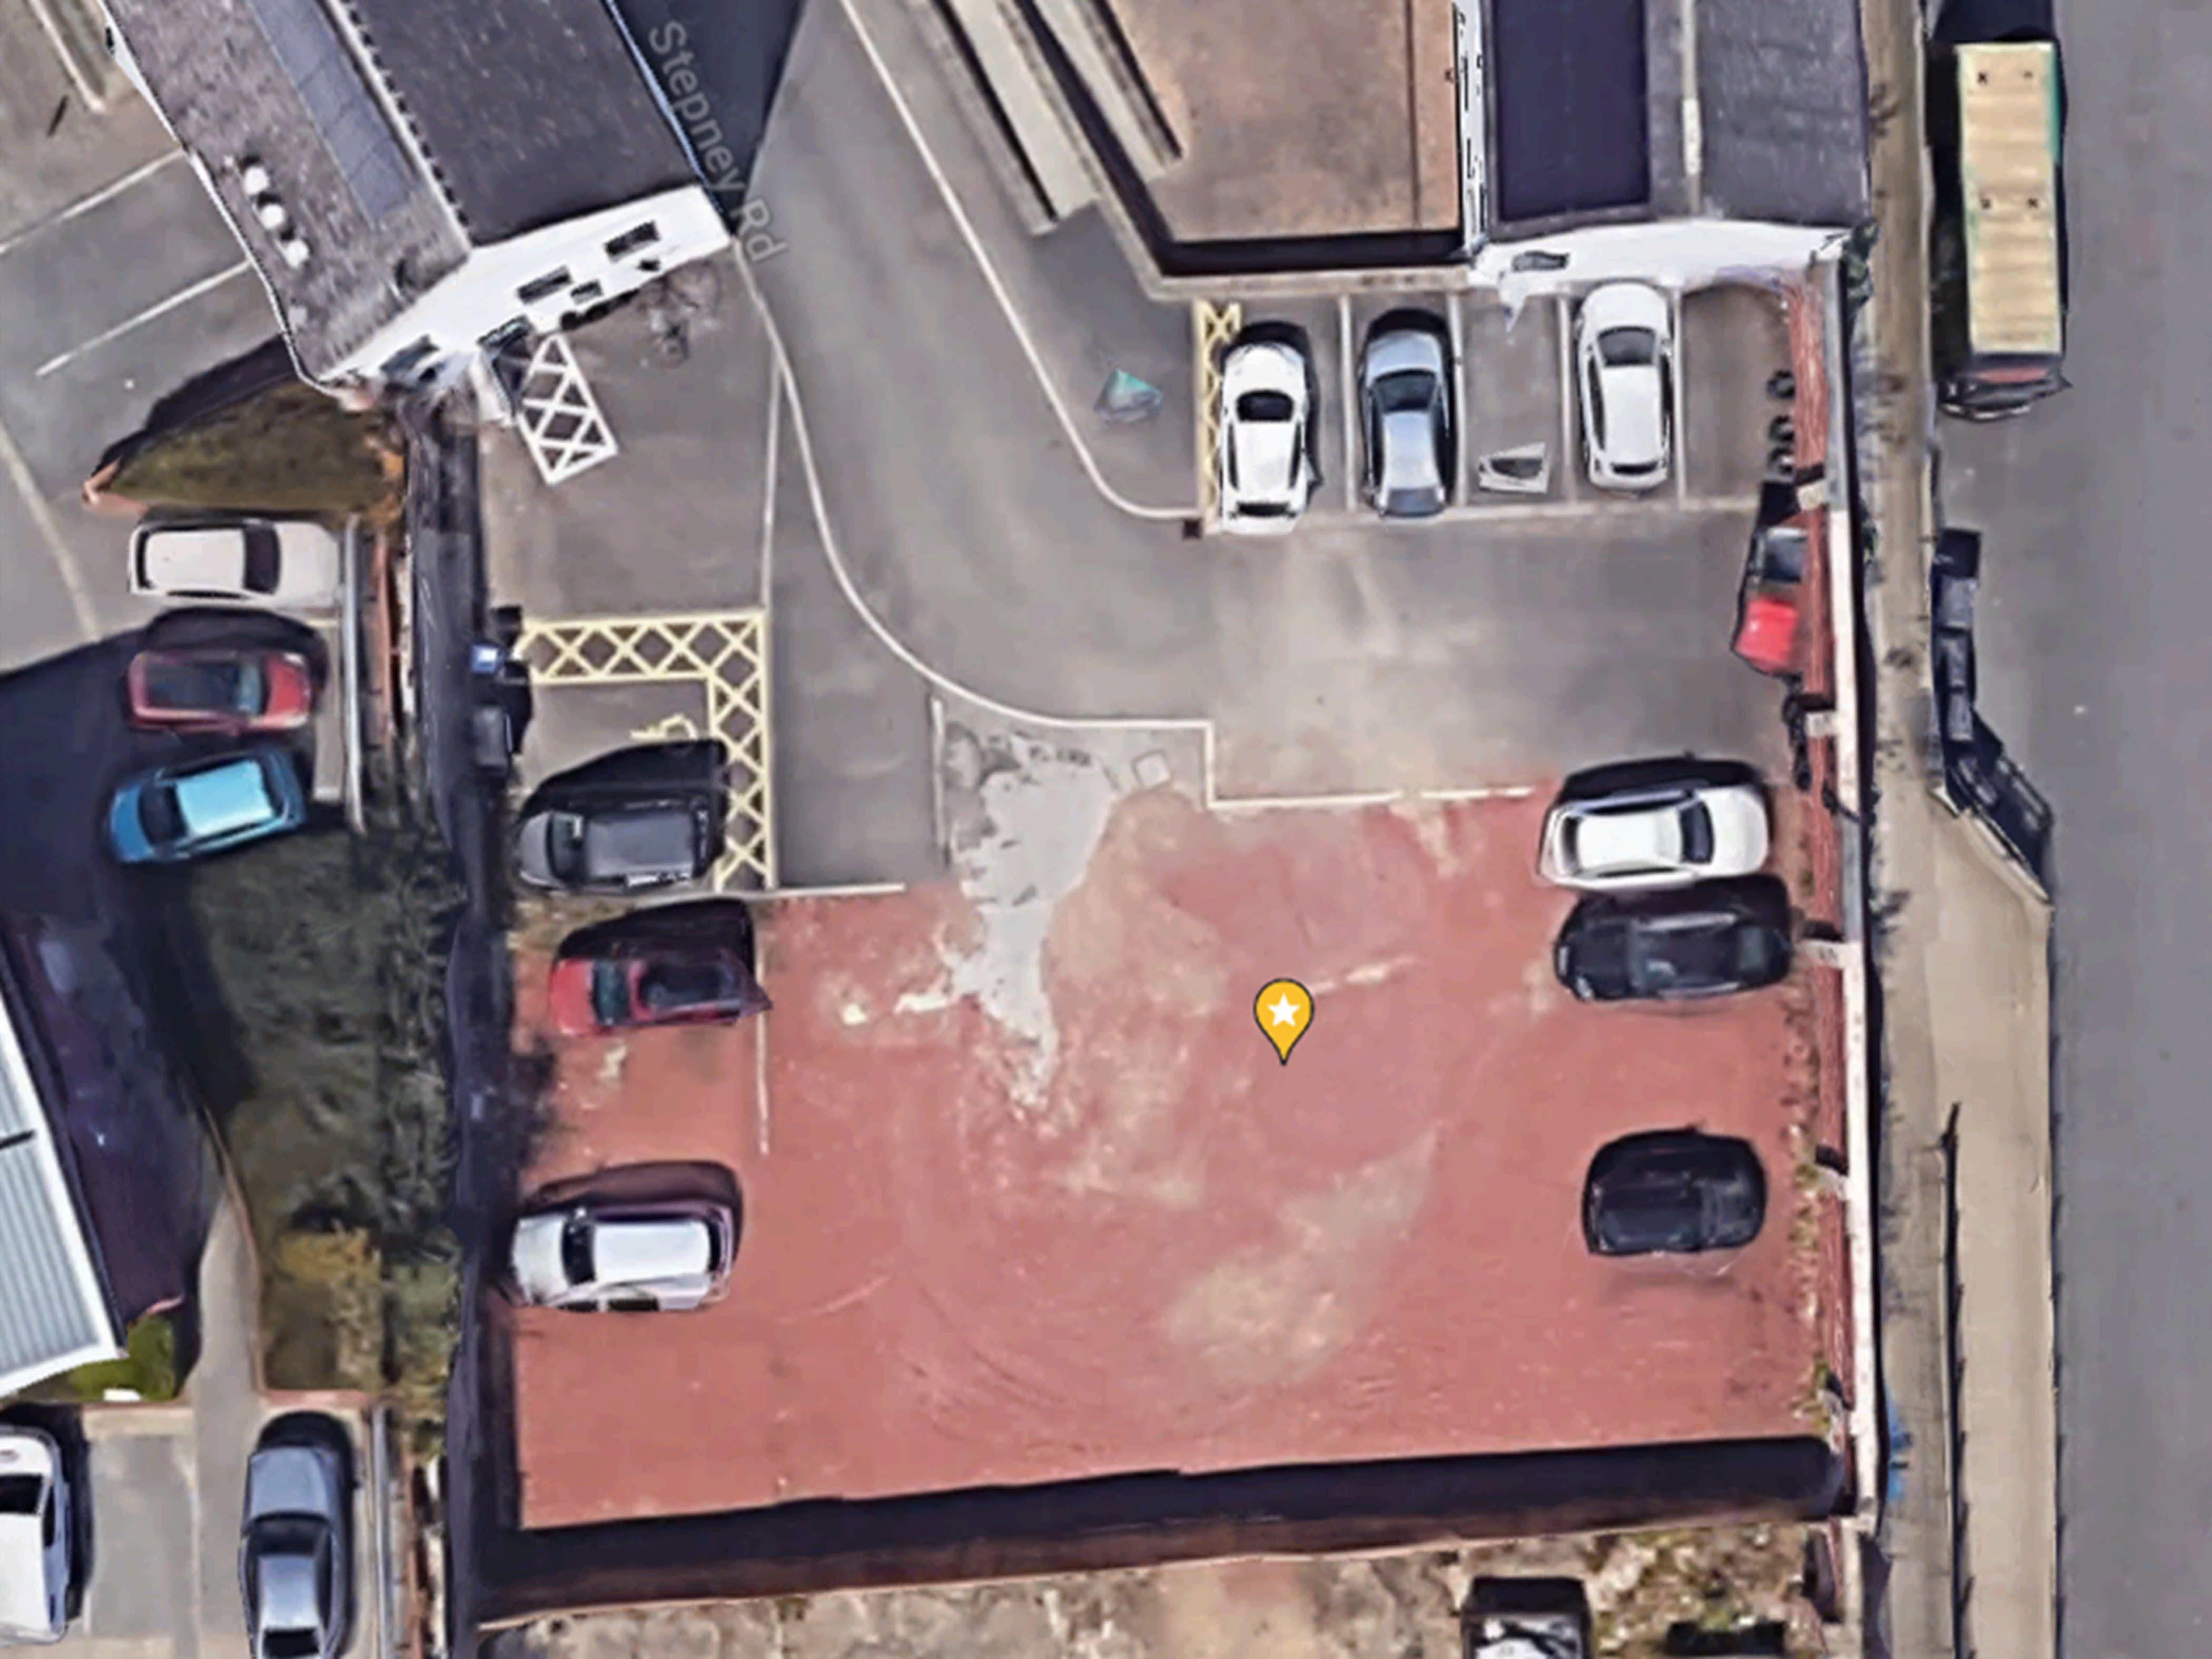
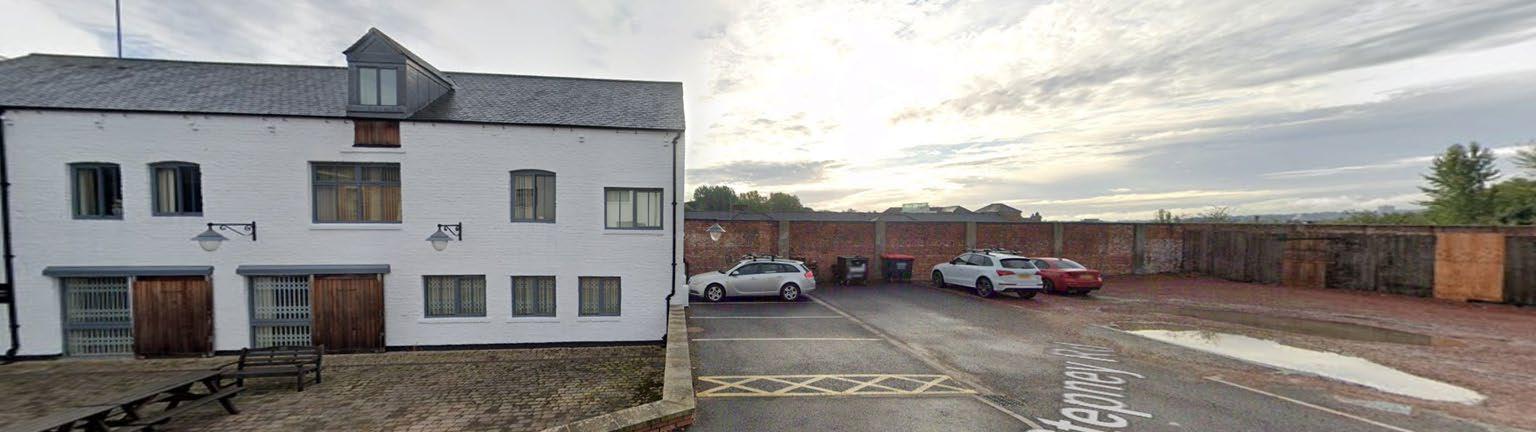
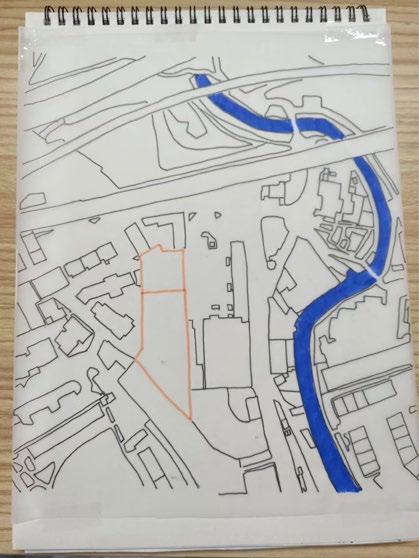
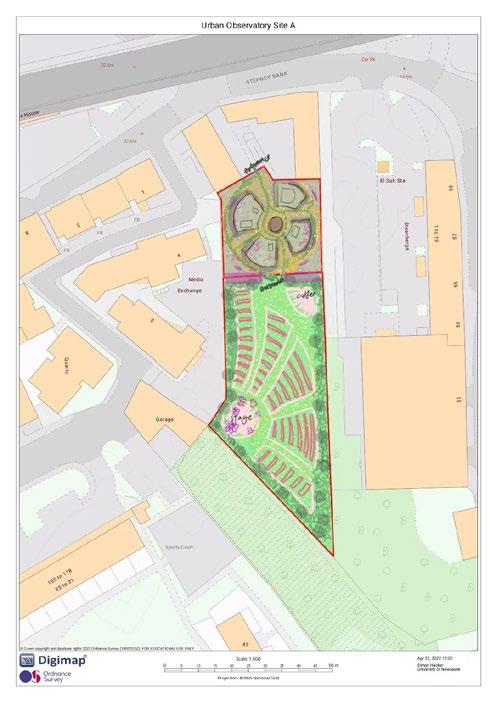
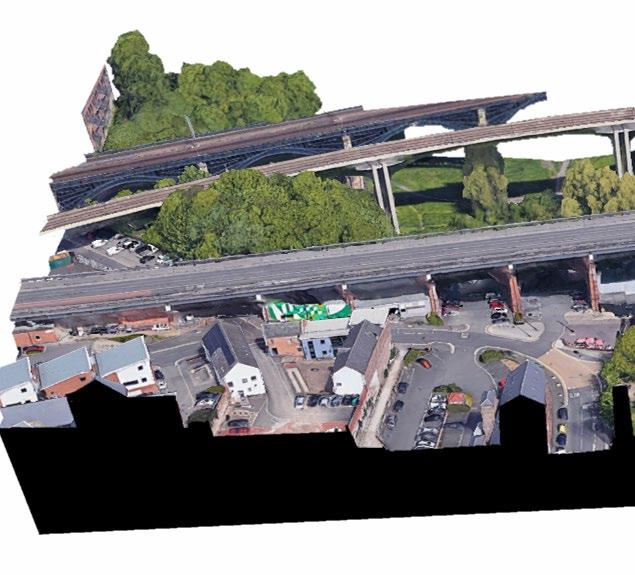
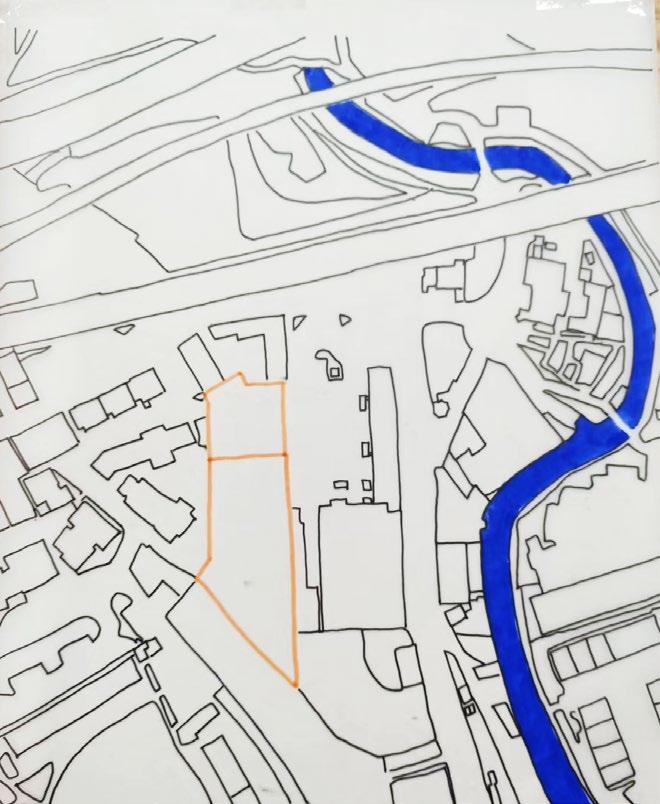
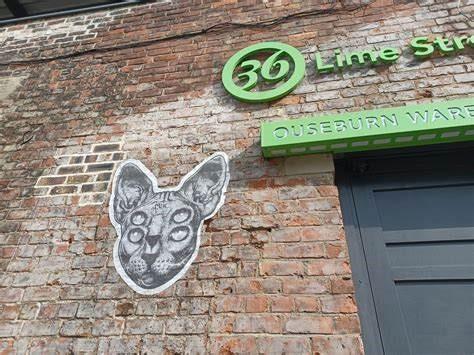
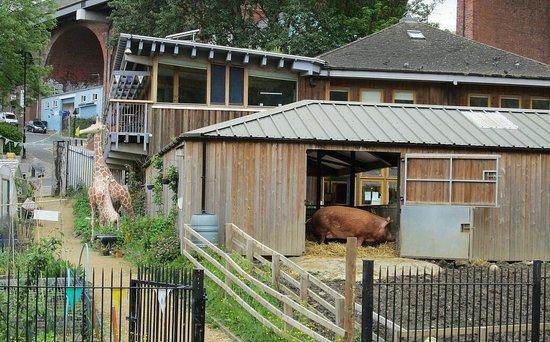
Ouseburn is a quiet and art-squeaky spot just east of Newcastle city centre Compared to another remote site with a certain slope, I chose this site , where the terrain is lower but has a higher flow of people, to do my design Pieces of rubble, broken wooden panels, old red bricks, and rough concrete floors aroused my desire for design even more. The site is currently used as a car park and the venue for Ouseburn spring market, which opened my eyes to more possibilities for this land.
Sun at Noon North View of Site
Bird View of Site
Sketch: Bird View Sketch: North View
1.4 Urban Observatory
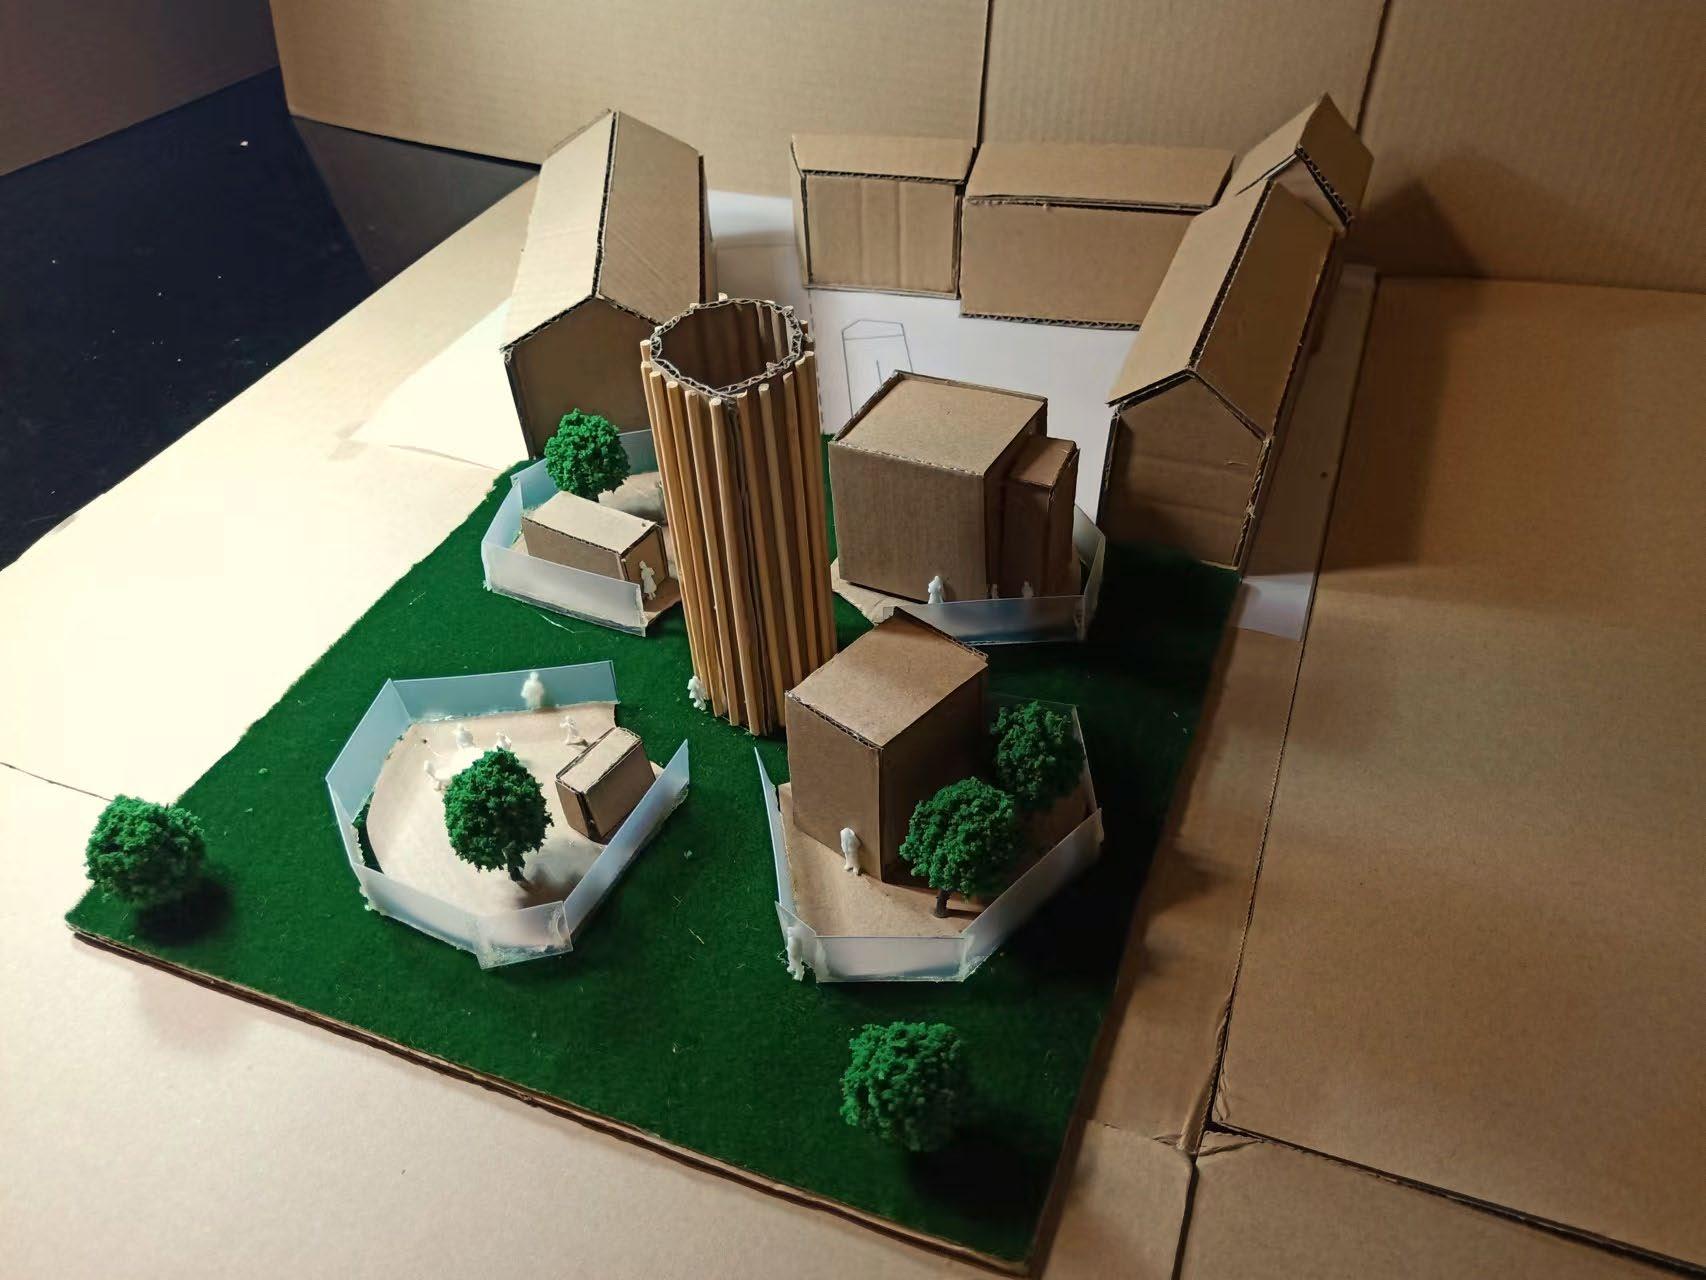
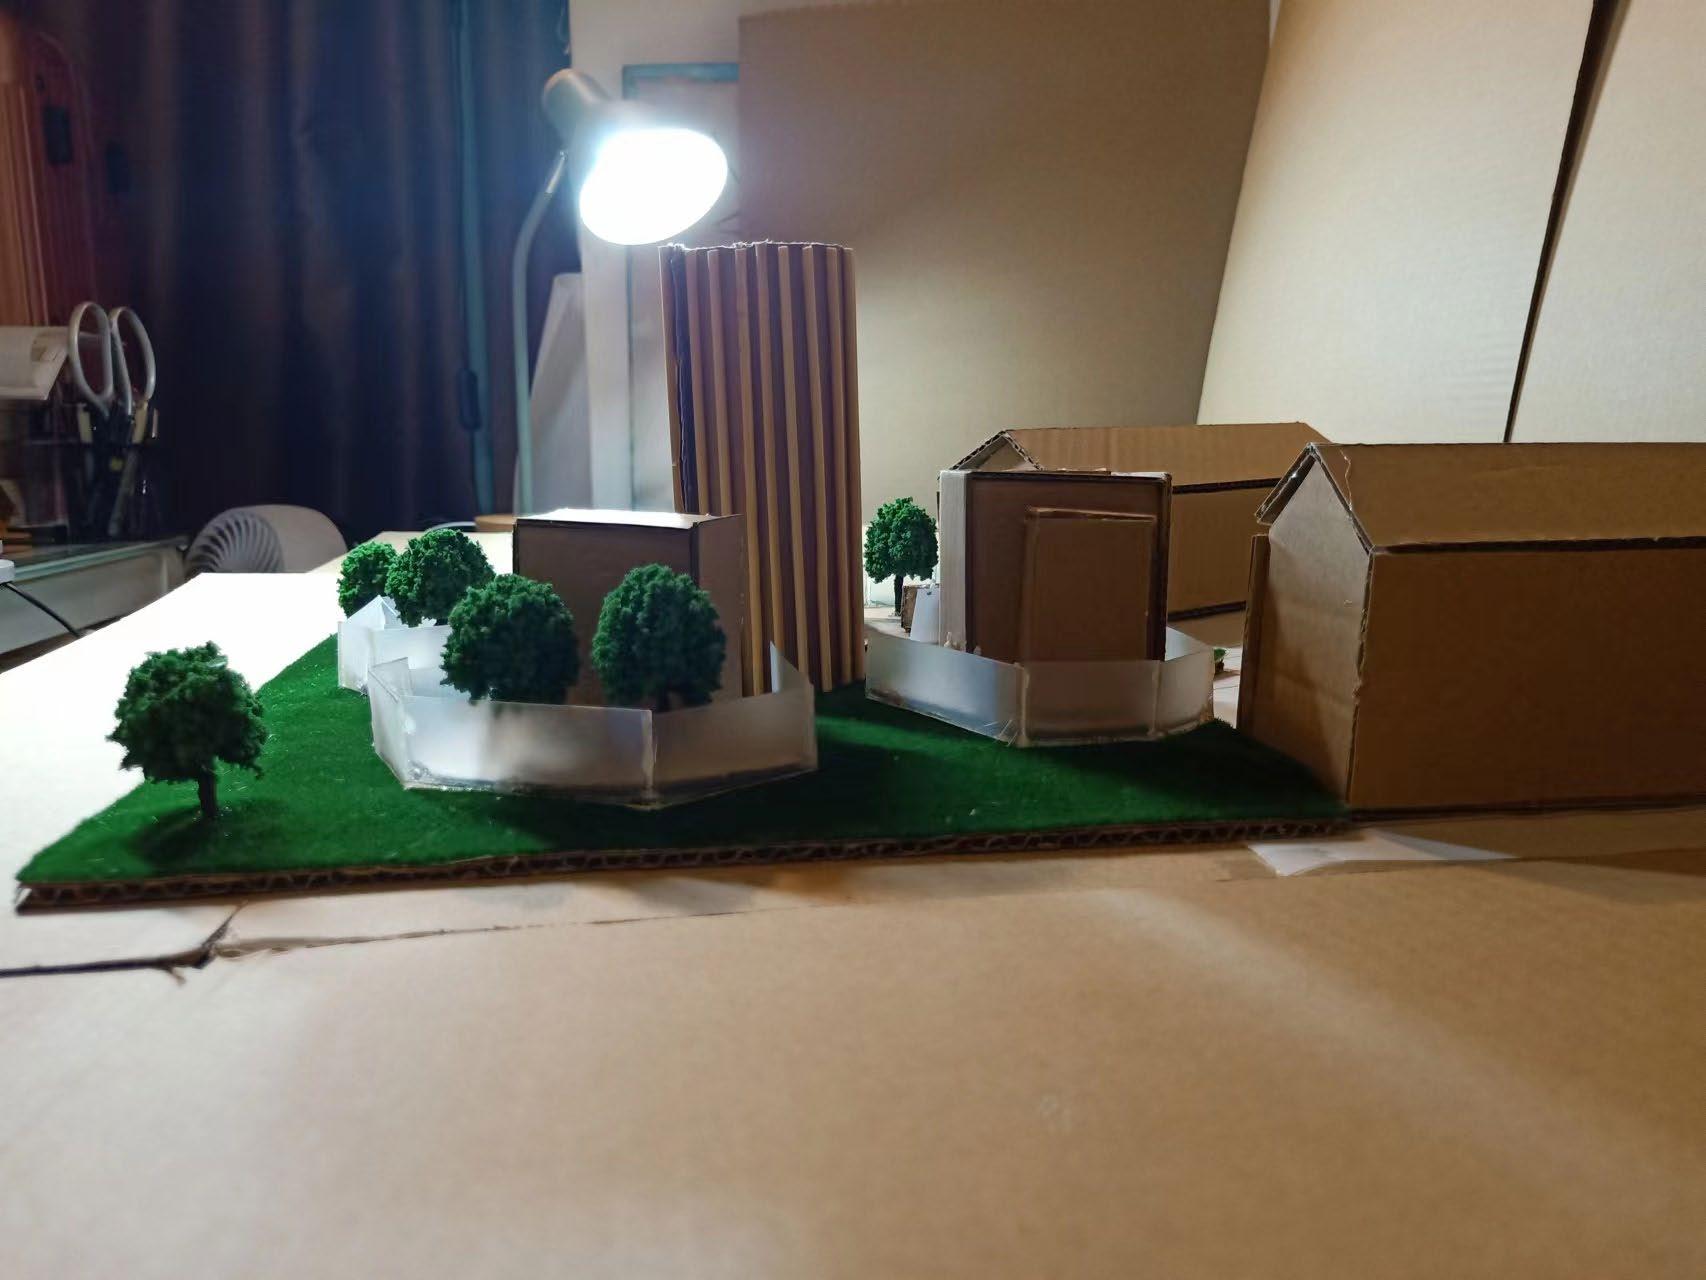
Group Site Models
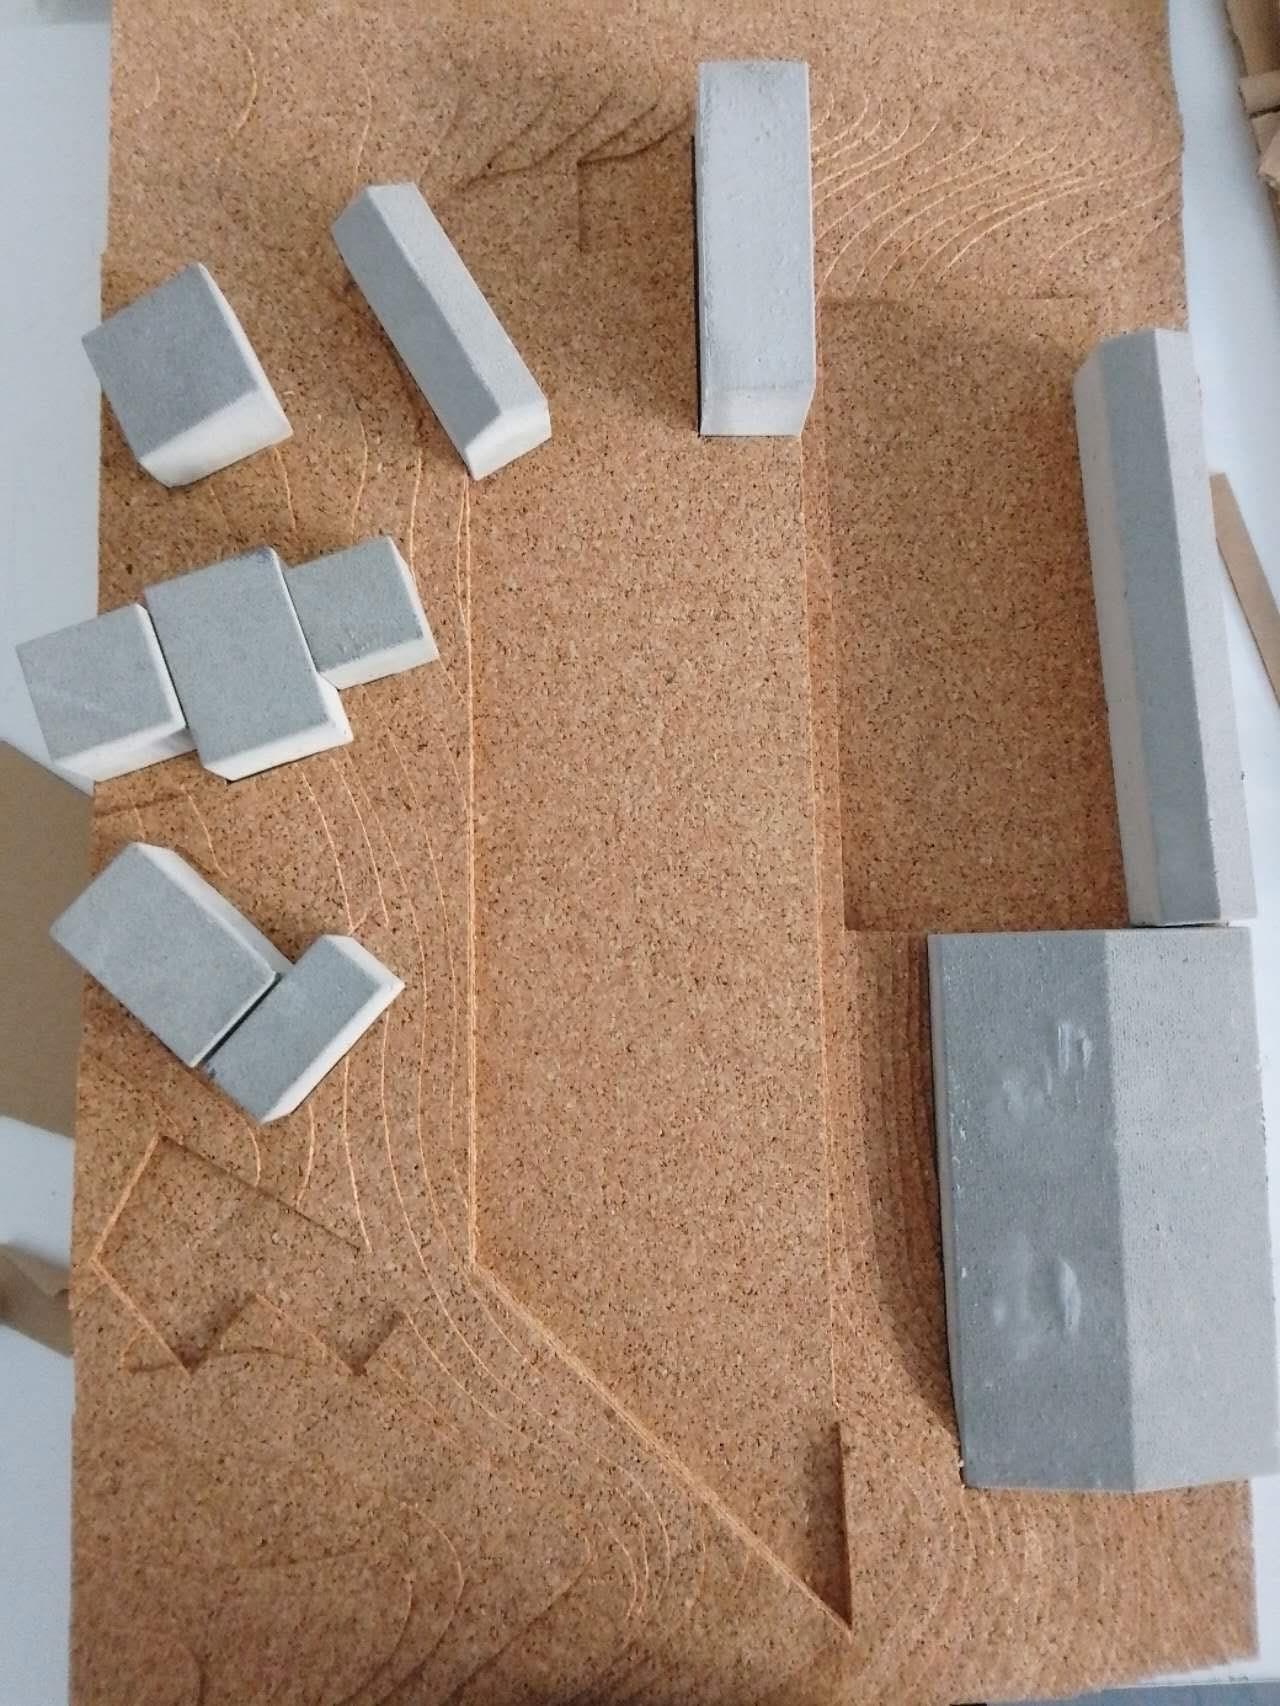
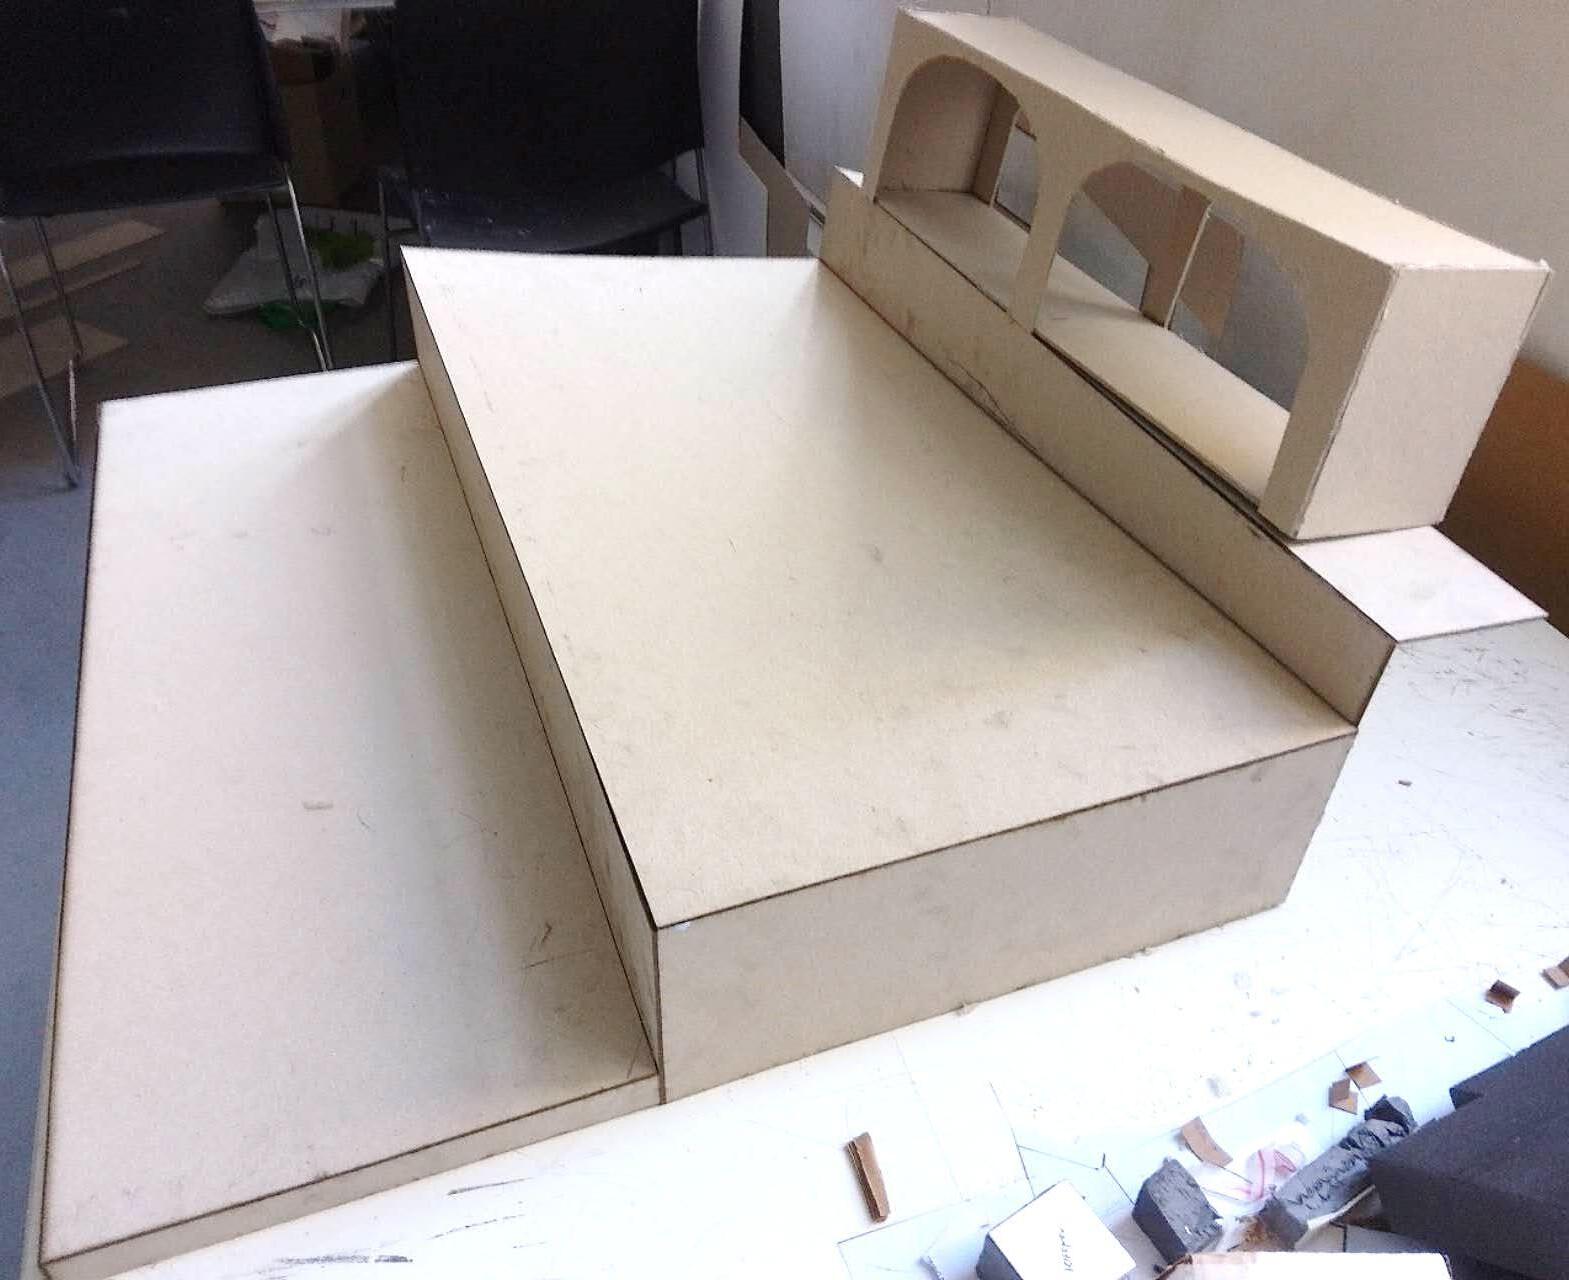
We used cork and foam to make the 1:200 model in order to show the rich textures of the site, and used wooden board to make the 1:100 one because it is solid and not easy to deform.
1:200 Site Model
1:100 Site Model
1.4 Urban Observatory
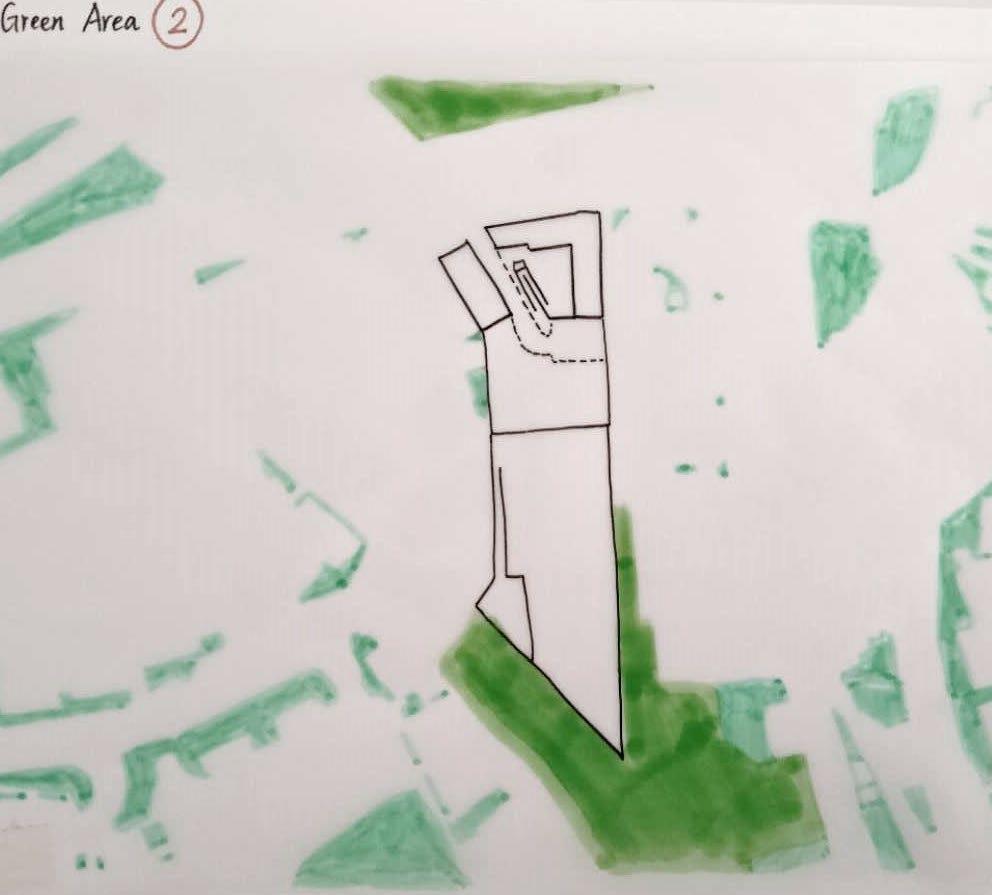
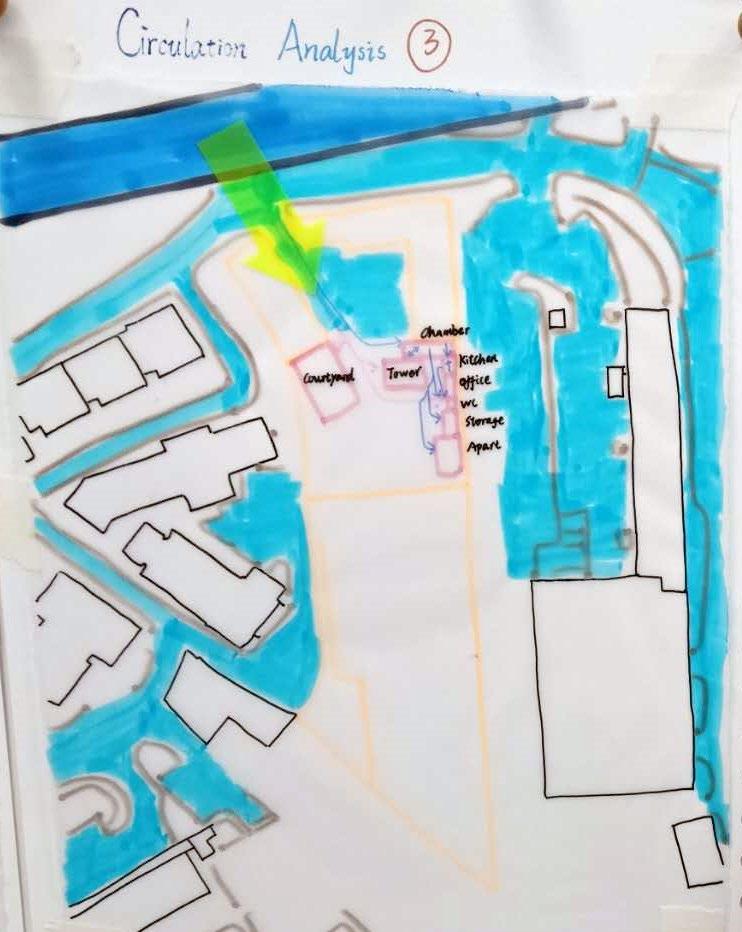
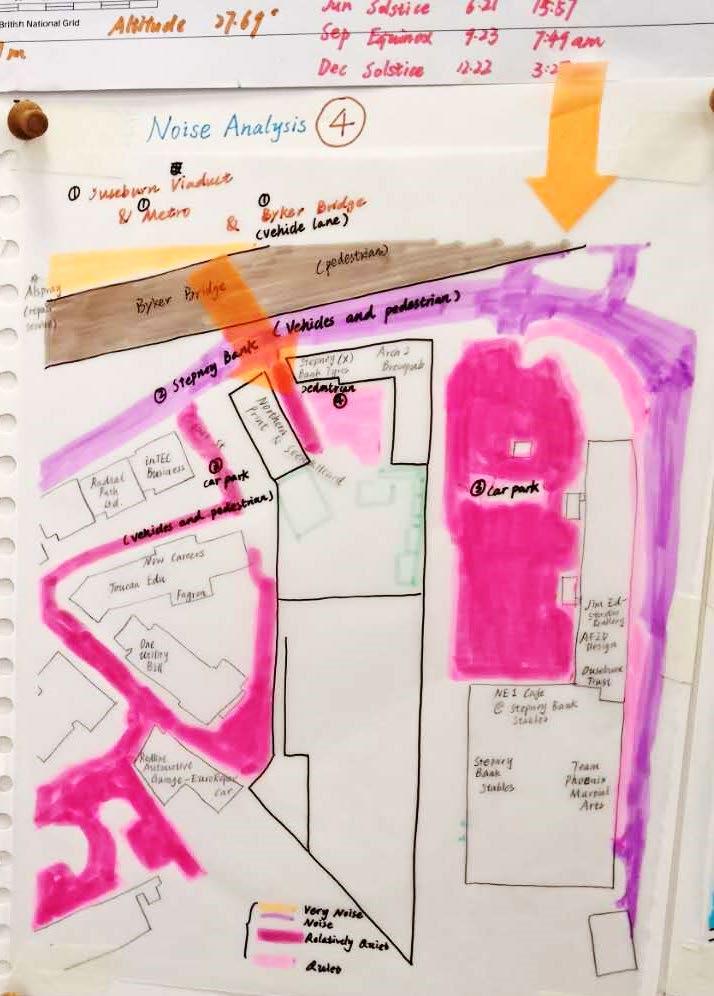
Site Analysis Manual Diagrams
These are my original diagrams showing different aspects on site. Sun, rain, wind ,topography, vegetation, existing buildings, circulation, sound....Before I got lose into them, I need to find out what I want to design so that I could make effective use of my observations.
Site Analysis Summative Picture
According to my site visit, wind on site was extremely strong, which piqued my interest in design something about wind. Wind affects the layout of buildings of different functions, but it could be made good use of Machines for collecting wind data, wind power equipment on site, tower and amusement facilities for enjoying the wind could be good ideas
Path
Strongest Southwestern Wind
1.4 Urban Observatory
Design Process
From March to May, I have been testing various kinds of layout of my buildings to find out a relatively suitable choice for the site. Trying to cover all different aspects from site analysis made my mind messy, but I did found a balance among all the possibilities.
1st Layout 2nd Layout
3rd Layout 4th Layout
5th Layout
6th Layout
7th Layout Final Layout
1.4 Urban Observatory
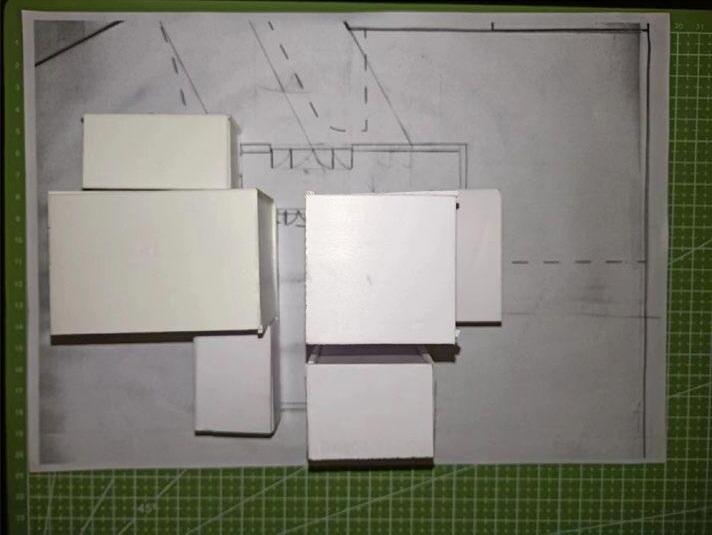
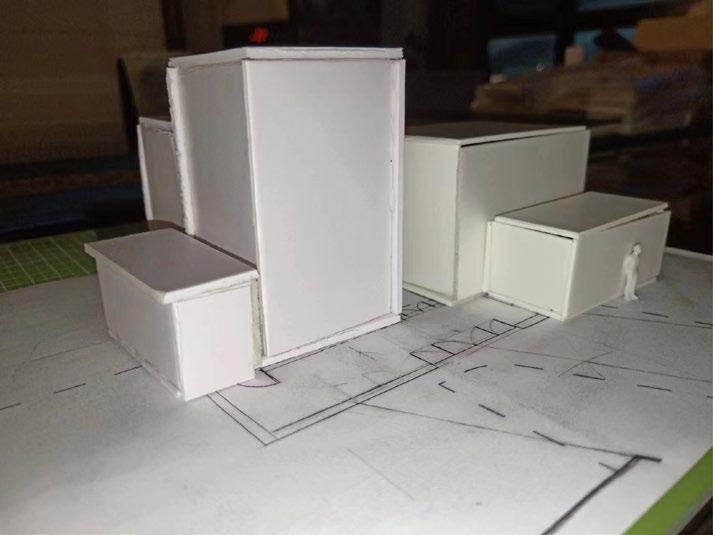
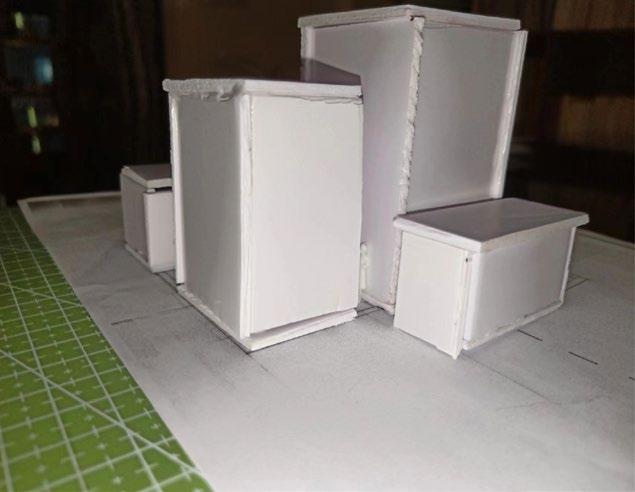
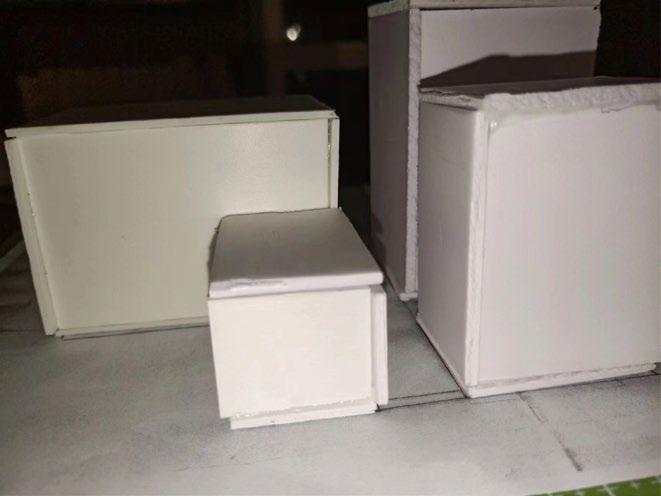
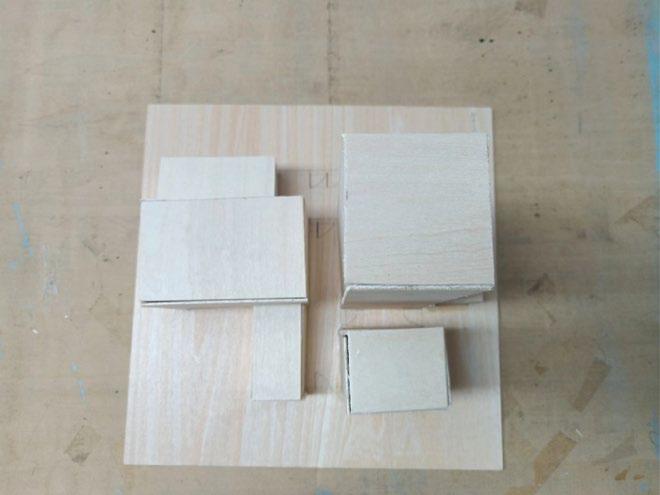
Physical Modelling Process
3rd Physical Model
Speaking of physical models, materiality was the first thing to be considered. Responding the brief, I would like to use timber as main material, then add some glass and concrete to visually enhance my buildings My 3rd model shows my expectation of my buildings It is quite conceptual, which means I know that this model is still some way from my final work but it is a hope for me
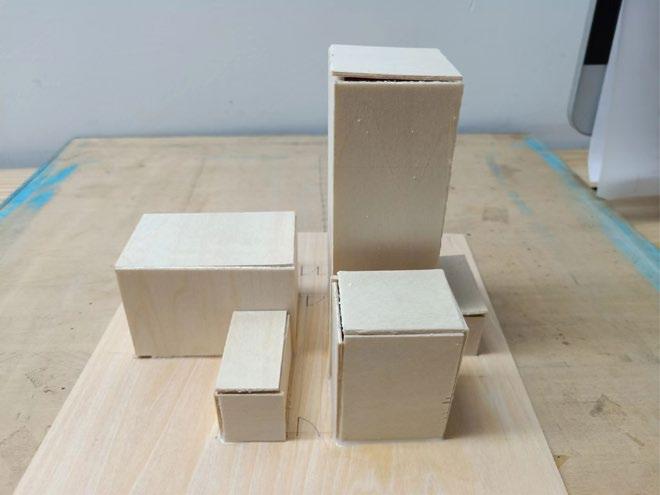
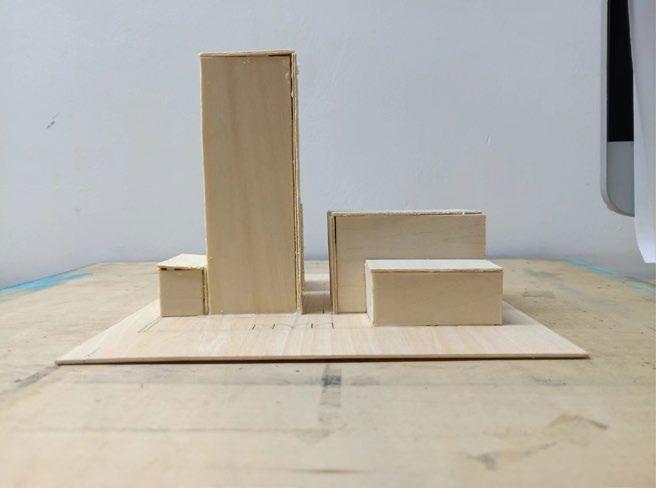
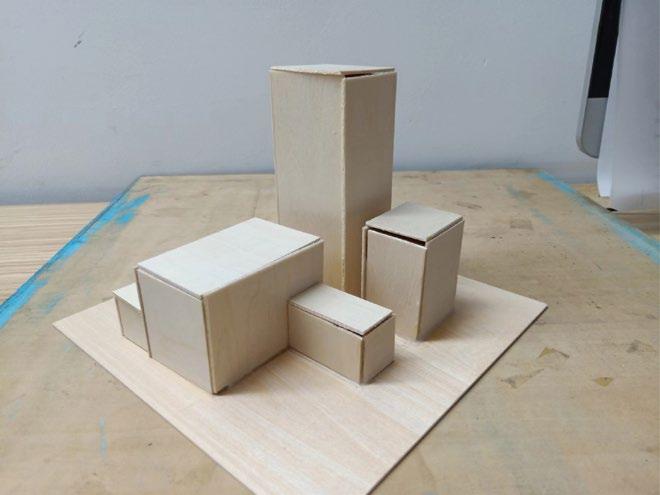
Volumes were easier to be tested in 3d Playing with boxes randomly was a big joy and I have been playing it for hundreds of times Here are two fixed models after the struggle
1st Physical Model
2nd Physical Model
1.4 Urban Observatory
Design Review before final submission
Review Space (Apr 2023)
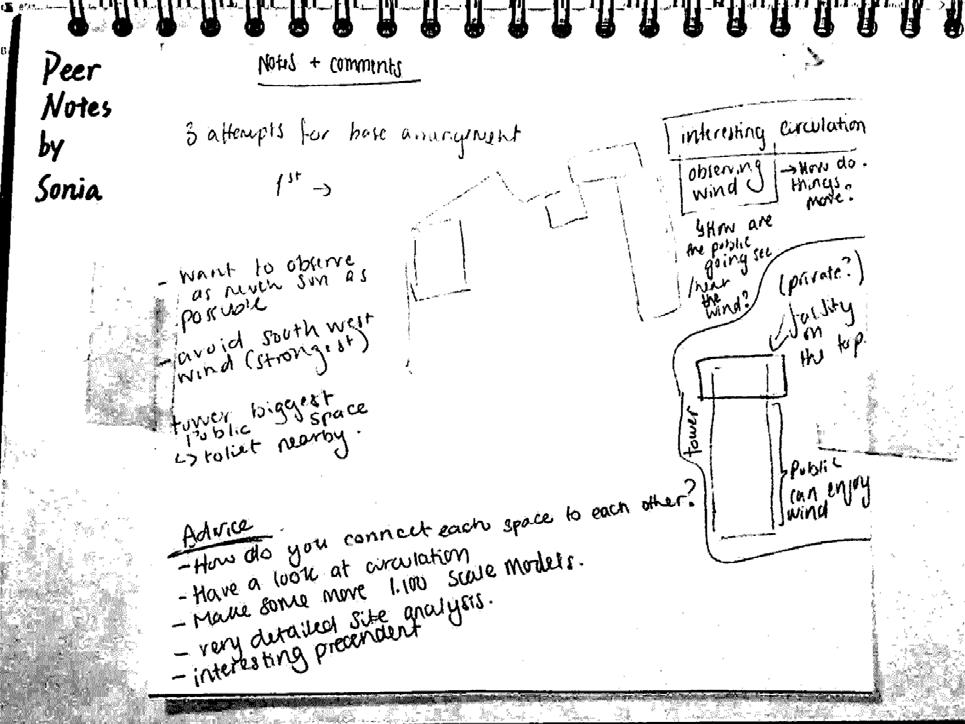
Feedback from my tutor Chloe, my groupmates Sonia and Weichen
This was the review before my final design It sums up all my work for this project and it was so rewarding My tutor and groupmates kindly gave me feedbacks and it helped me to refine my design I realized no steps were taken in vain Every step counts!
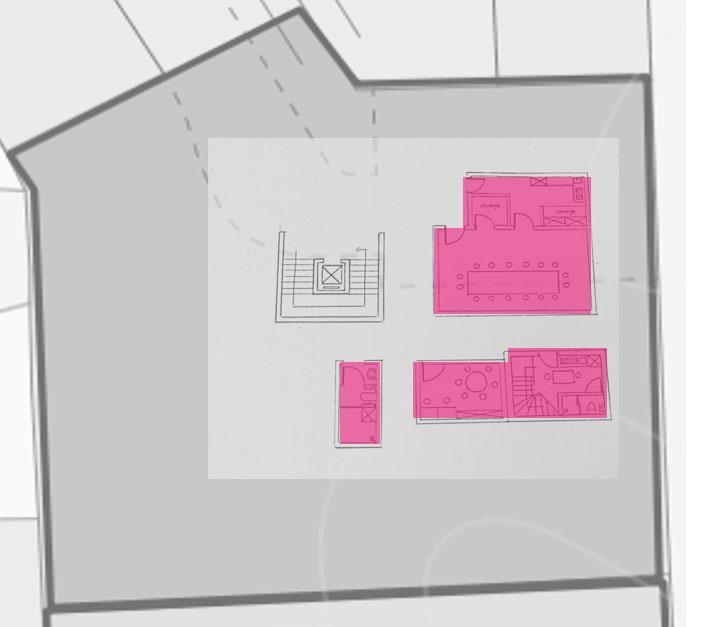
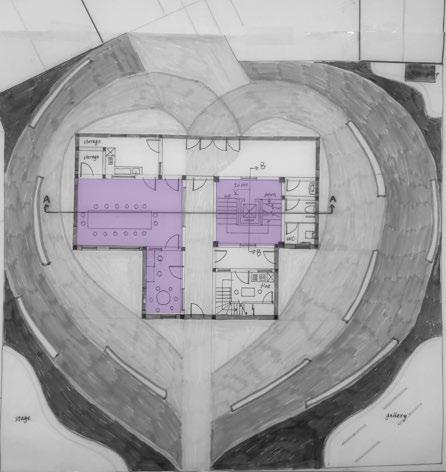
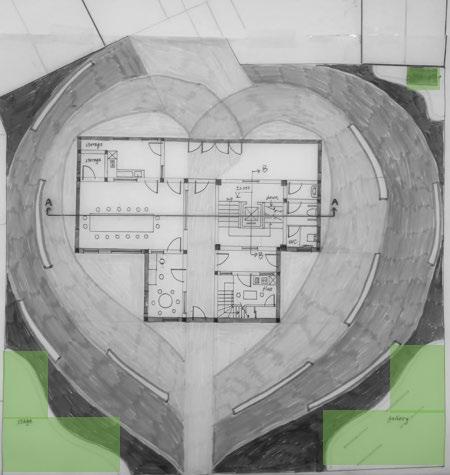
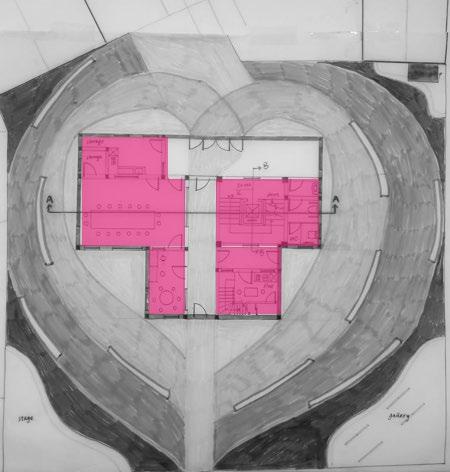
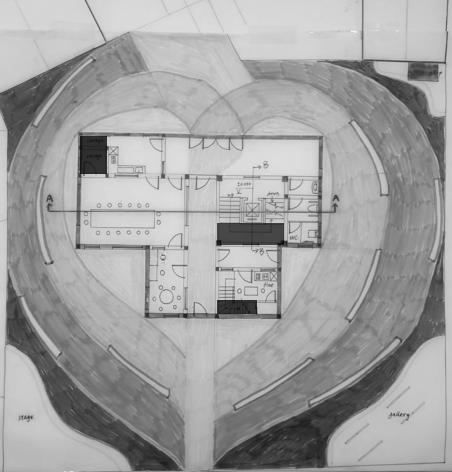
Final Design 1:100 Plan
1.4 Urban Observatory
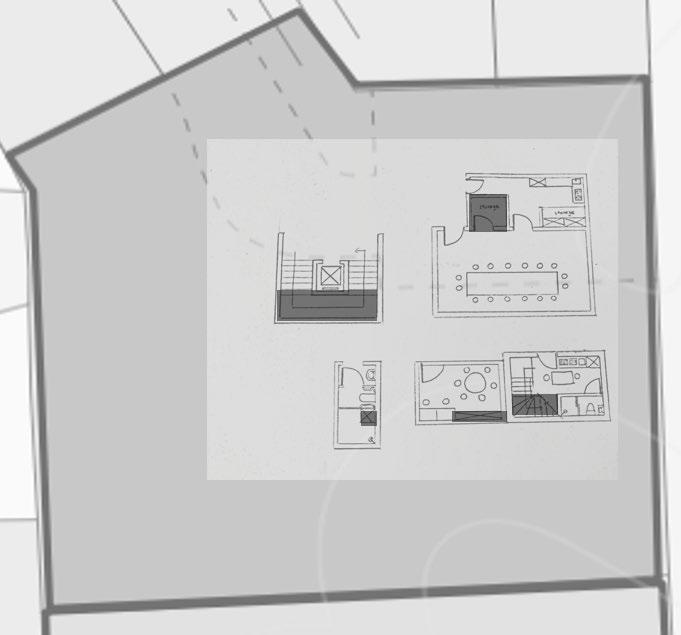
Final
Plan Process
Thanks to our digital representation courses, I ,a pure artisanal person, started to try to quickly produce nice drawings using computer softwares. I absolutely love CAD for generate my design thoughts. The drawings are perfect for digital submissions.
1.Start with the right corner Flat
2.Then the office
3.Then the public toilet
6.Then the courtyard and tower
4.Then the chamber 7.Done!
1.4 Urban Observatory
Final Section Process
This cut cut the tower and chamber and it is the view from the main path for the public
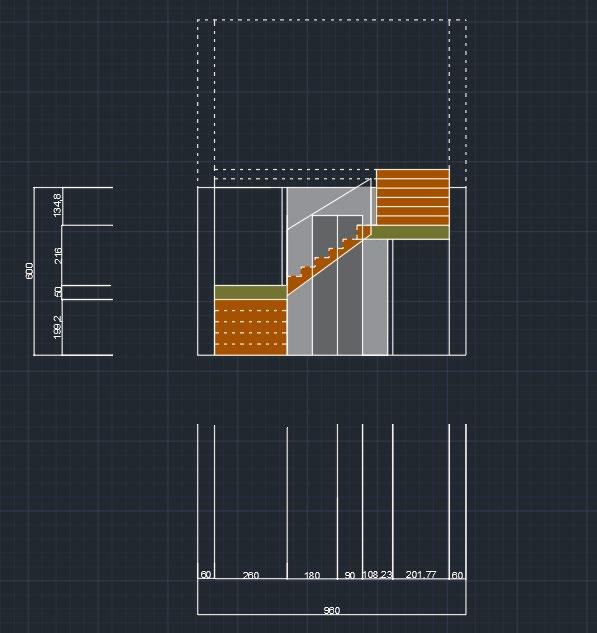
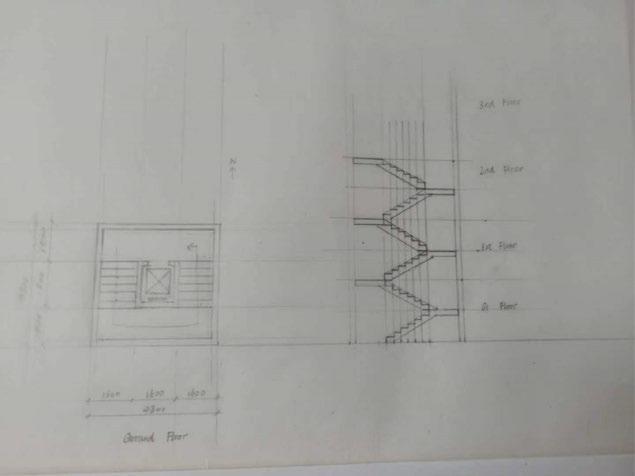
I used to think the stairs of the tower are the most difficult part of my design, but when I actually drew it on the computer, I found it so interesting I loved to imagine a person following my stairways and spinning around the lift in the centre The ‘1300mm long ,250mm deep and 166cm high ‘staircases suited my tower so well
1. Draw all the things at the cut according to the plan
2.Refine the tower-the most important part of section
1.4 Urban Observatory
Final Elevation Process
South elevation is a view from the landscape. It shows a general scene of the site. I used different colour patterns to differ different buildings of various functions. Elevation is something that the public would feel before entering the building so a spectacular tower and outstanding chamber would be feasts for their eyes.
South elevation without colours
A colourful south section!
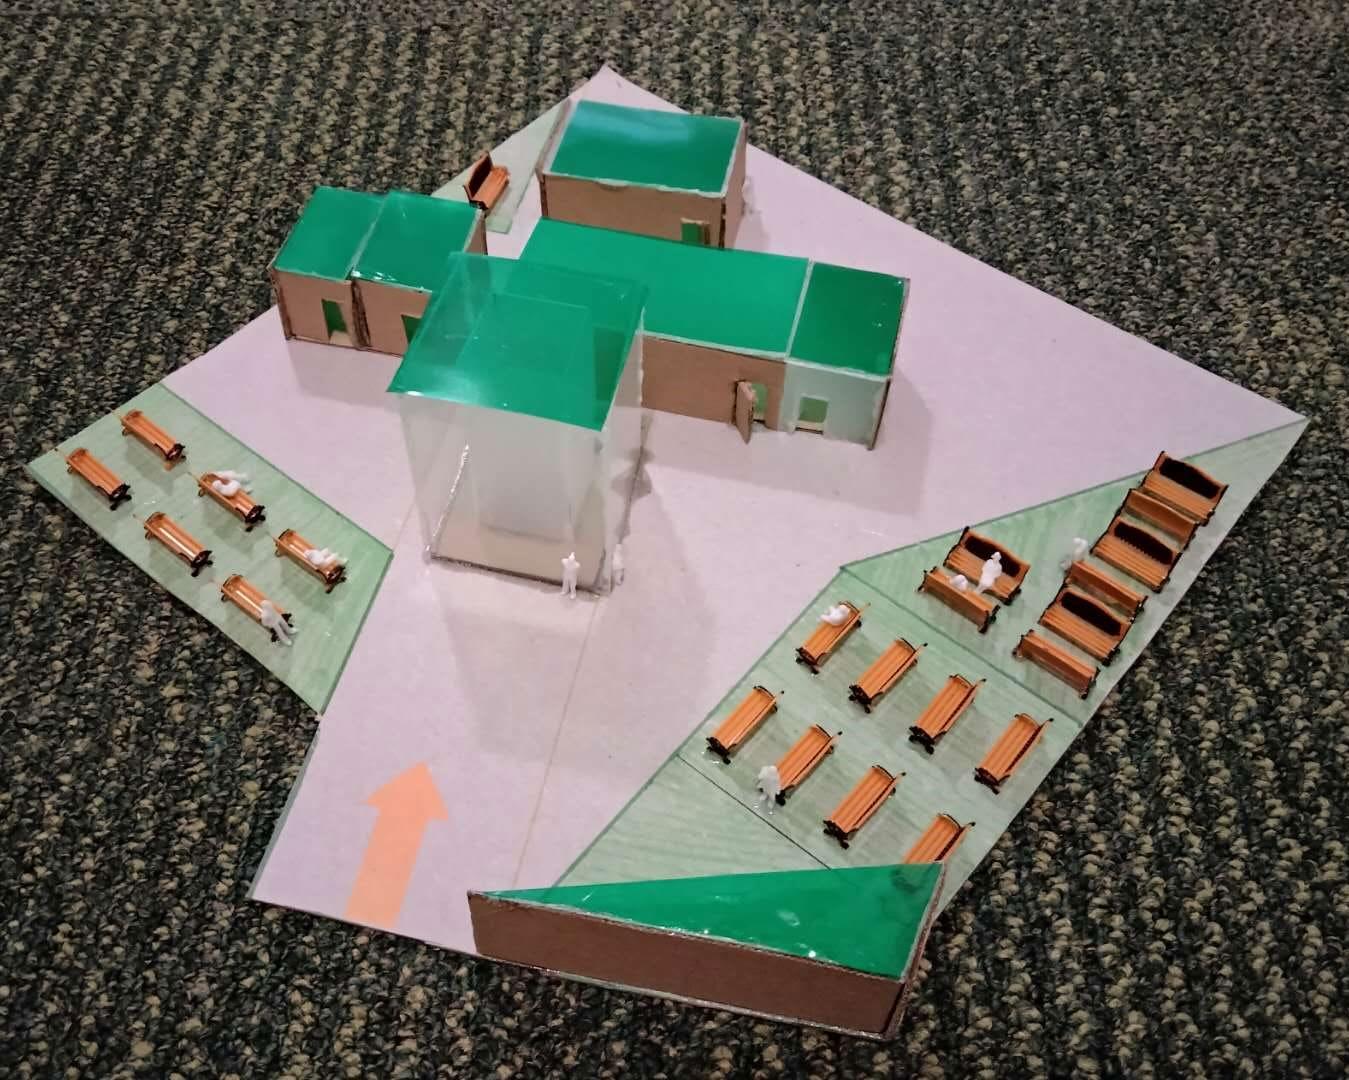
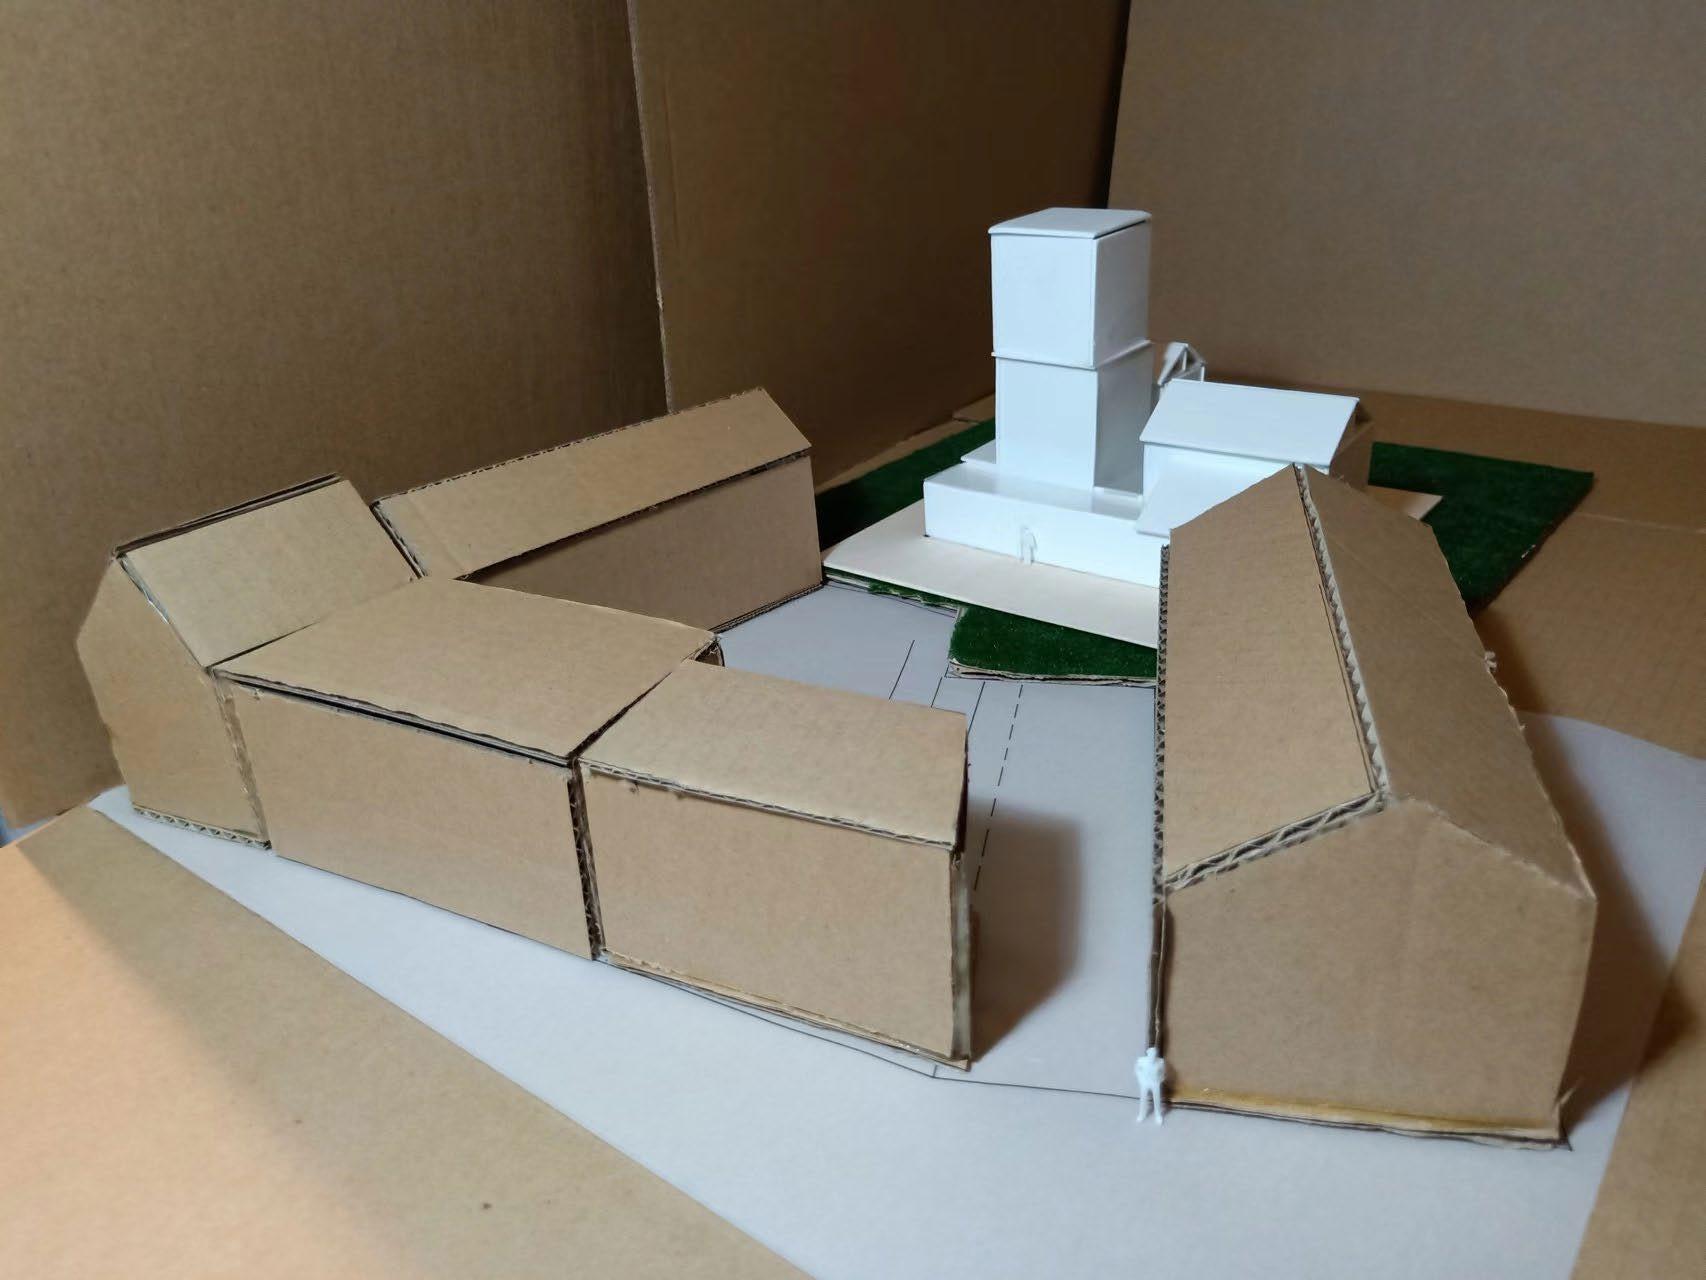
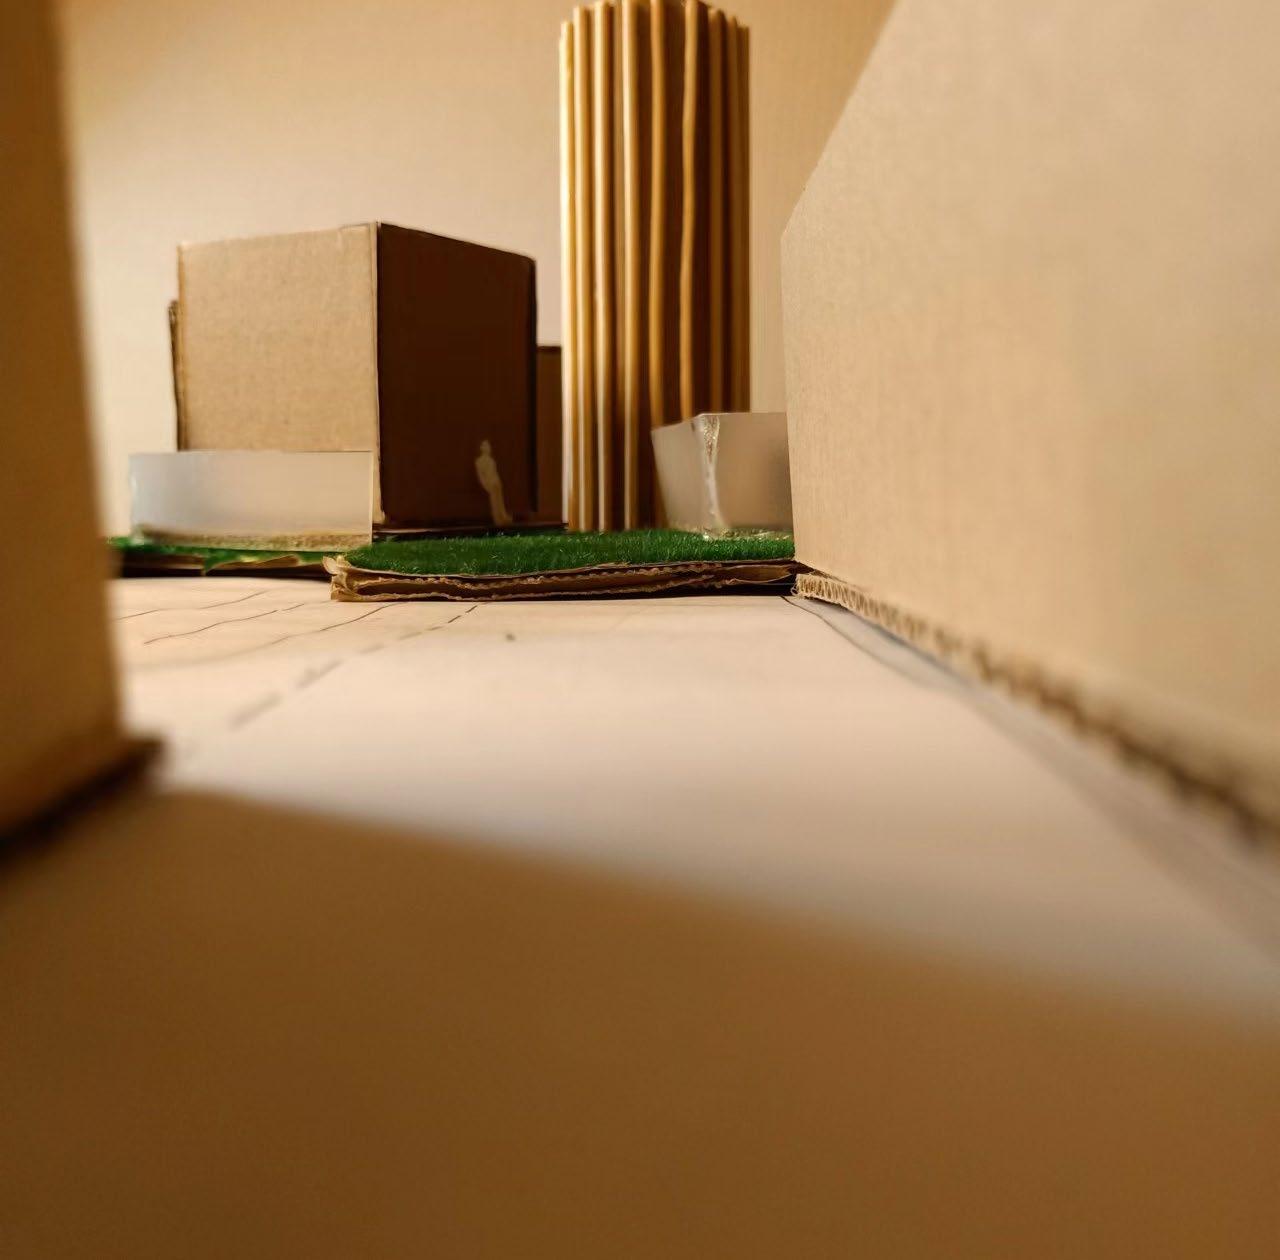
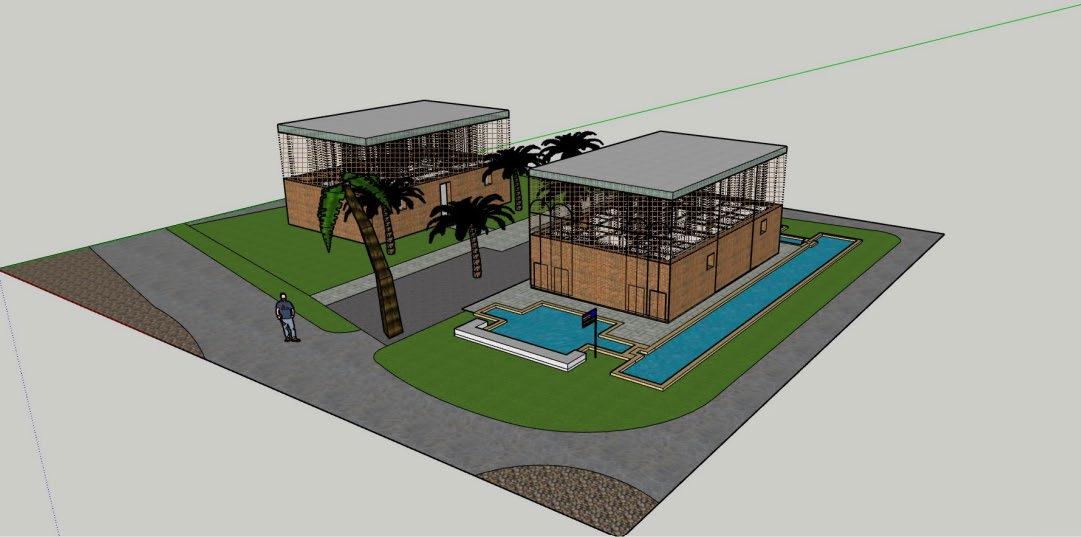
Final Model of Buildings and Landscape
Welcome to my giant sketchup model my biggest project of the year!
1.4 Urban Observatory
Building Models
N
Entrance
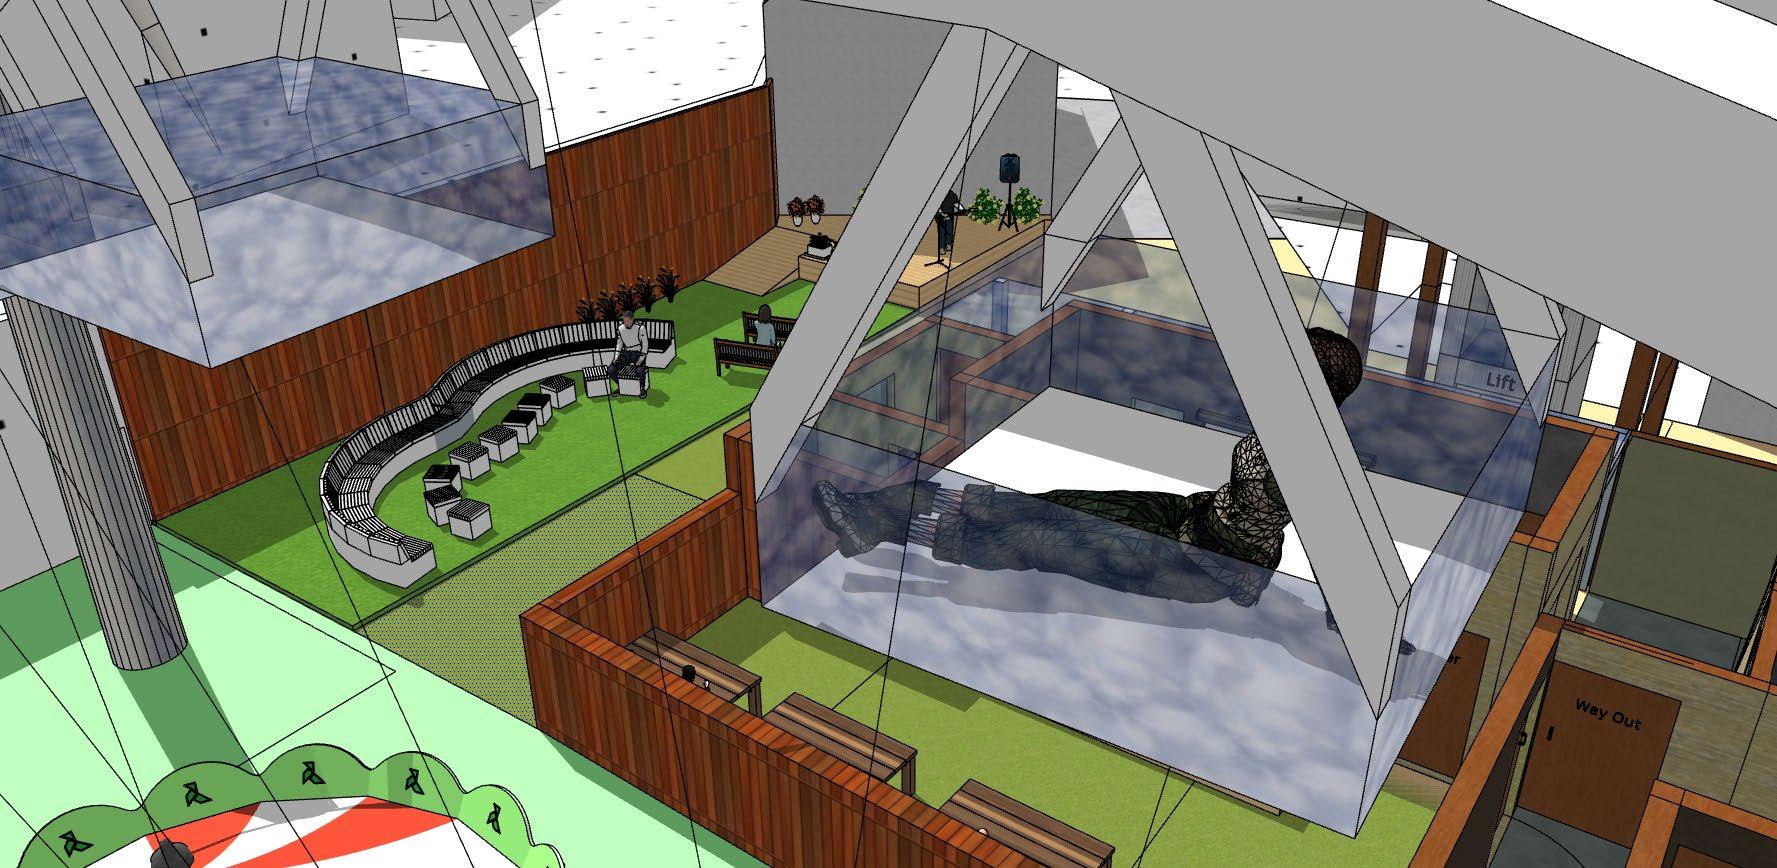
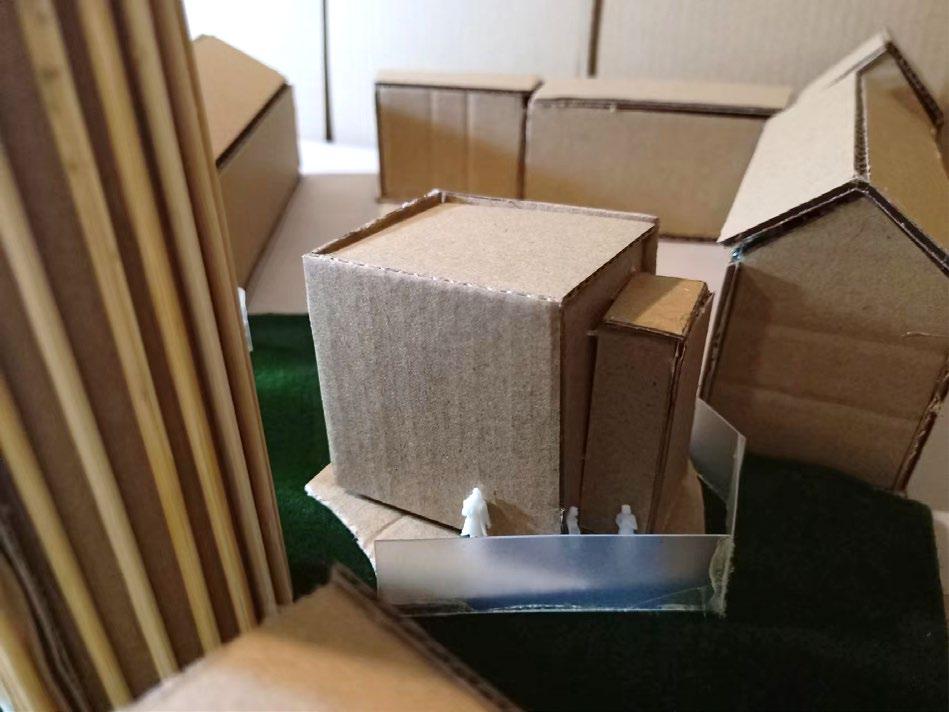
As a visitor, when you come into the site, you will be amazed by the 12m high elegant and modern tower. Before you rush to the lift or stairs, you could enjoy some music from the stage, watch a gallery of wind data of Newcastle, or have a coffee served from the takeaway window connected to the public kitchen.
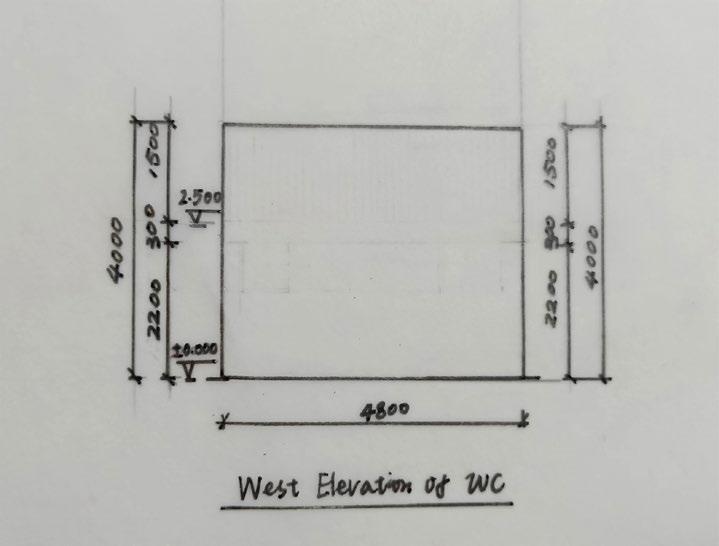
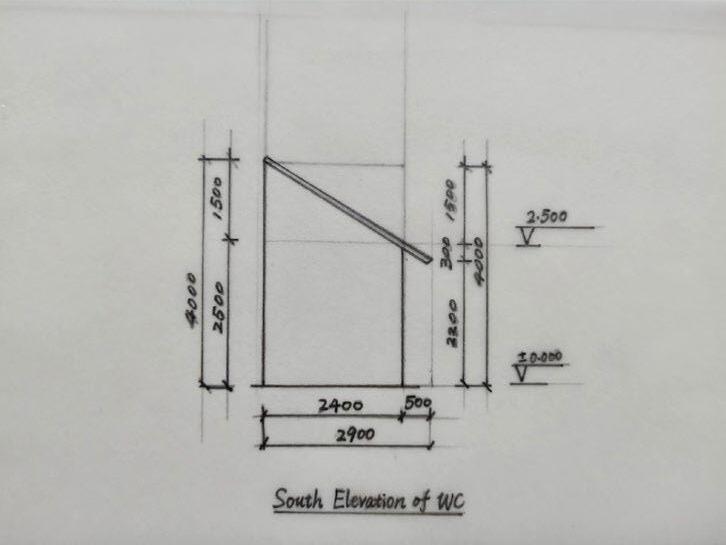
The WC is just near the tower and it is wheelchair accessible. When you go onto the tower you could feel the wind and enjoy the scenery. The ‘Windy Party’ amusement park at the landscape is just waiting for you to explore. When you use the ferris wheel, you have a different feeling about the same site.
Landscape Model
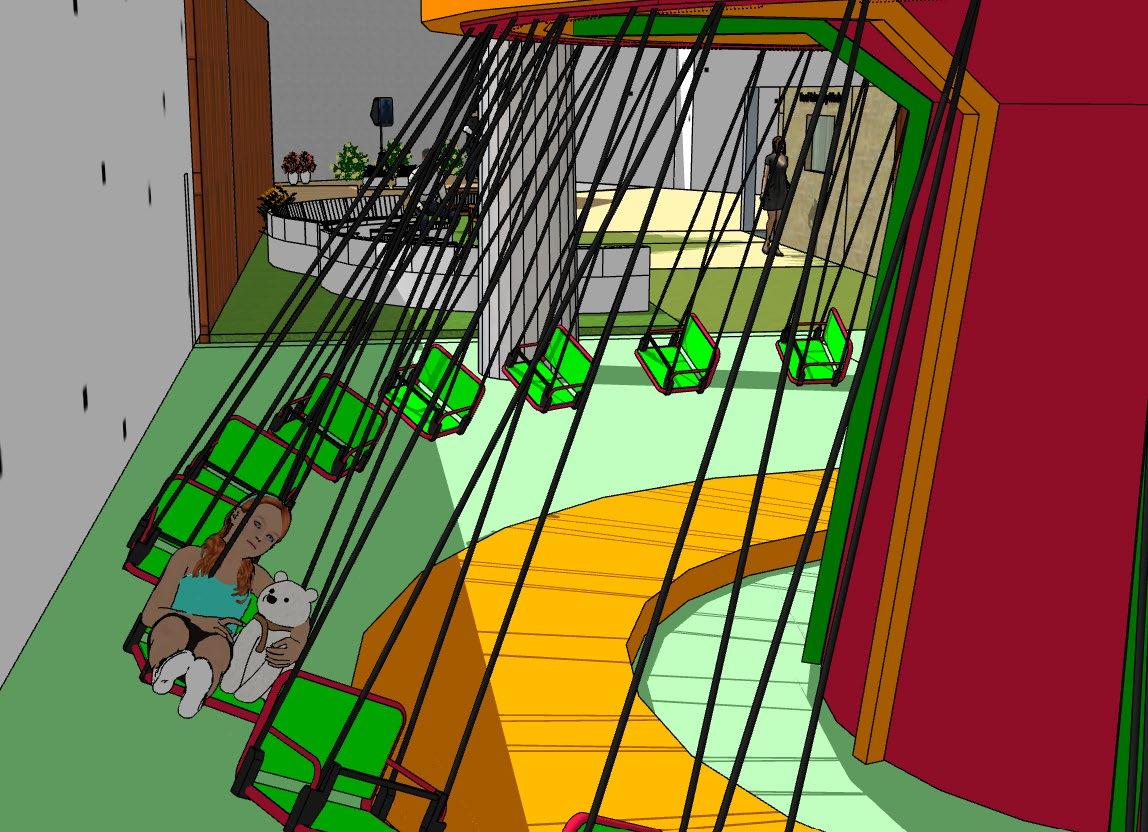
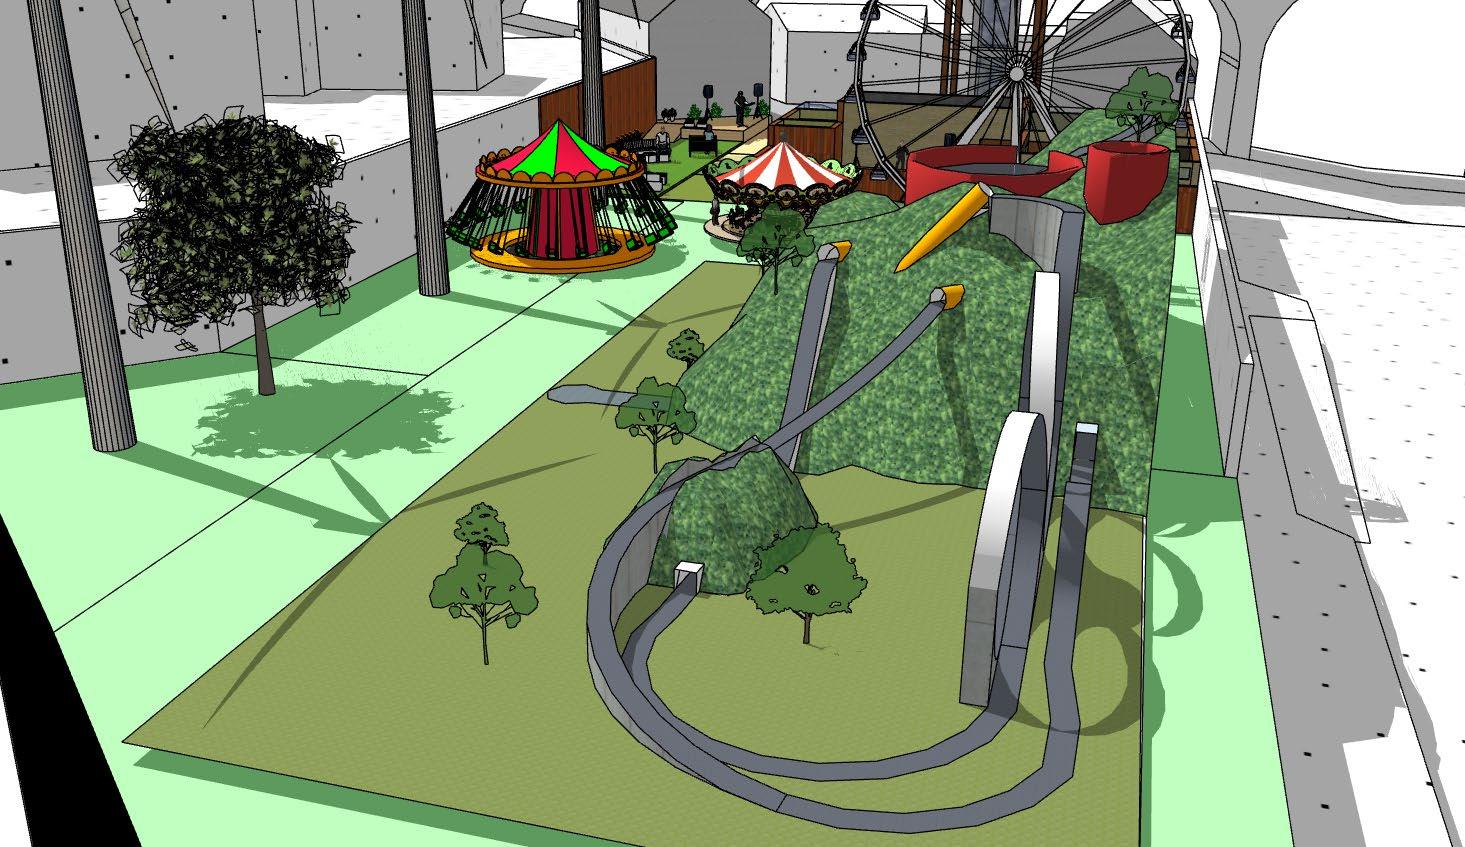
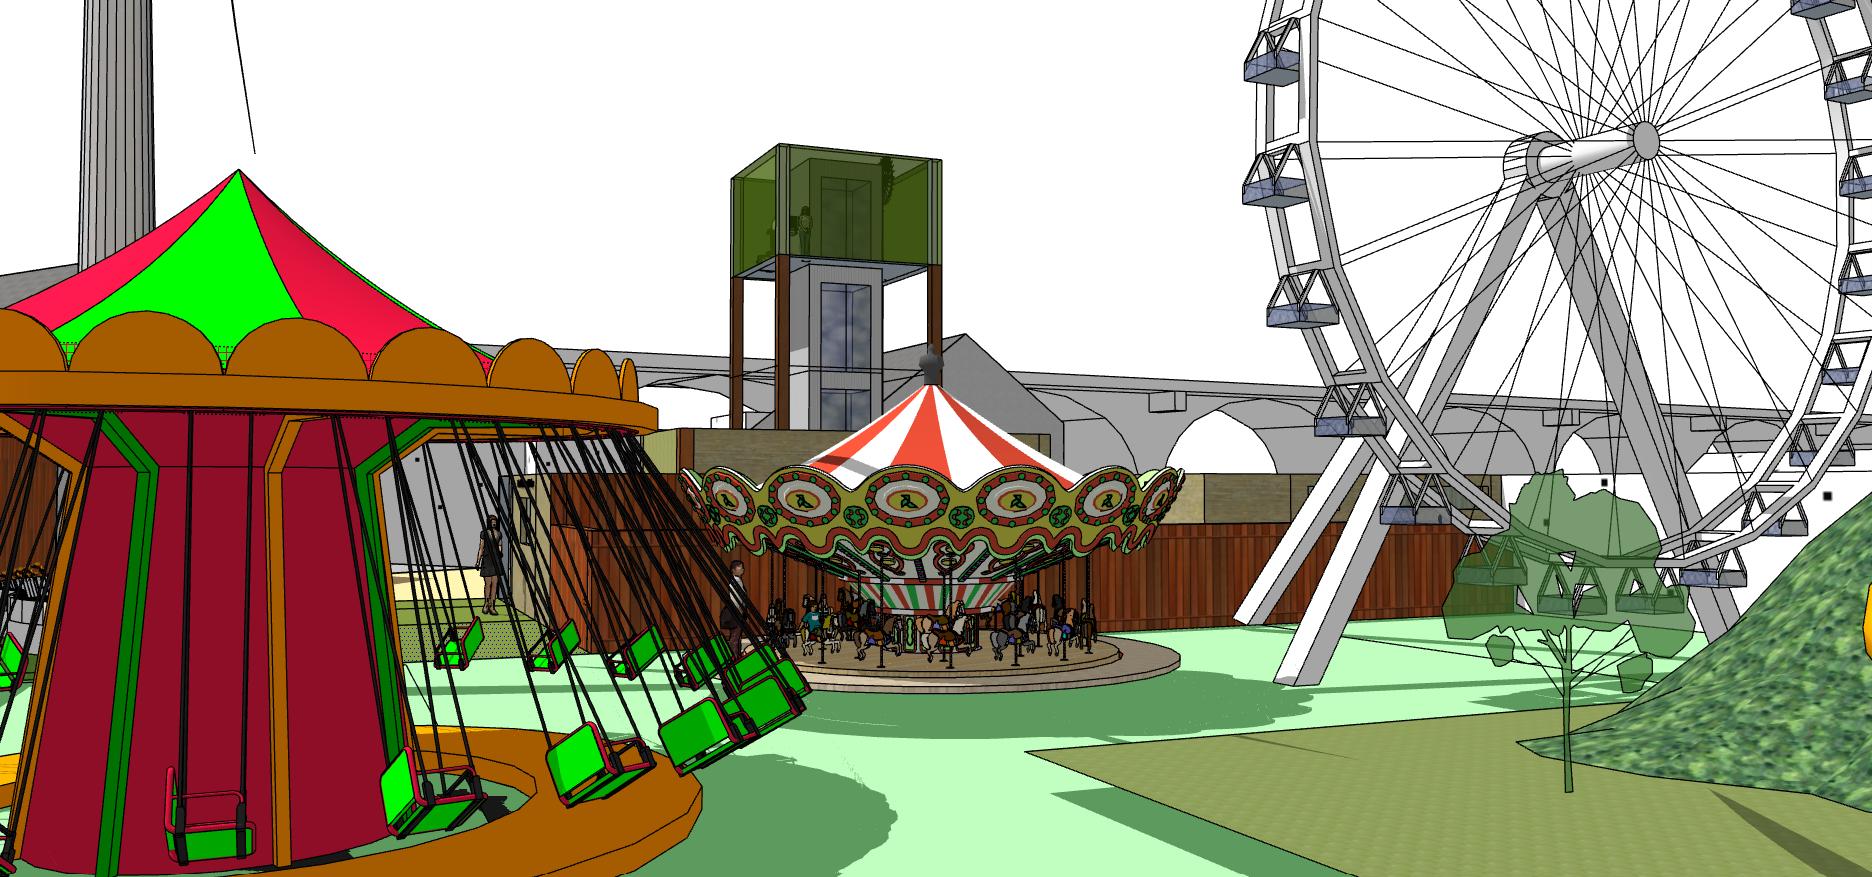
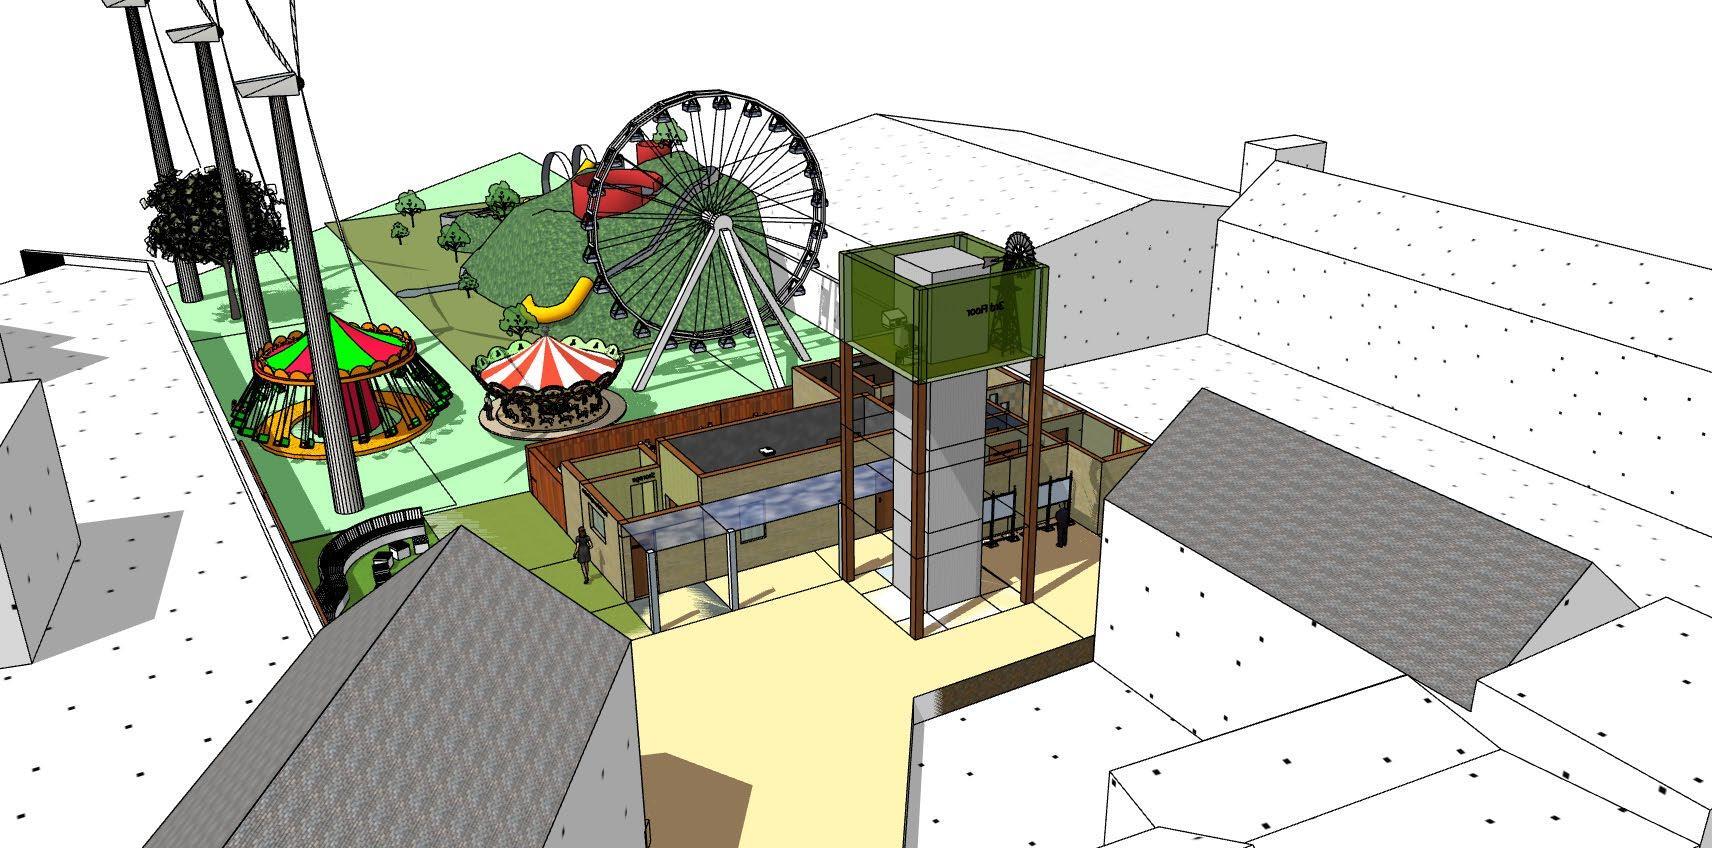
Amusement Park named ‘WINDYPARTY’:
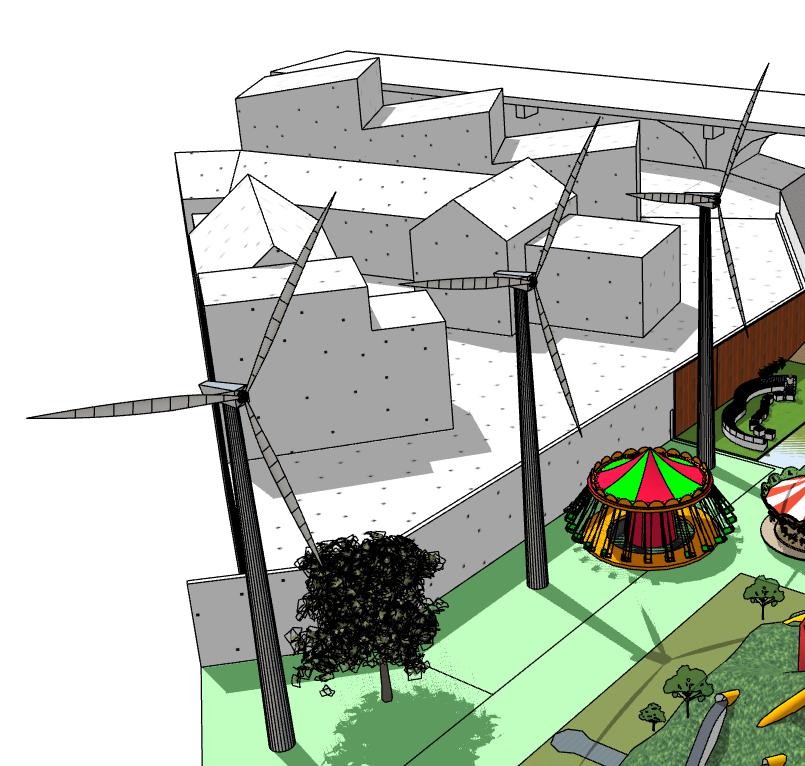
Carousel
Swivel Flying Chair
Ferris Wheel
Rollercoaster
1.4 Urban Observatory
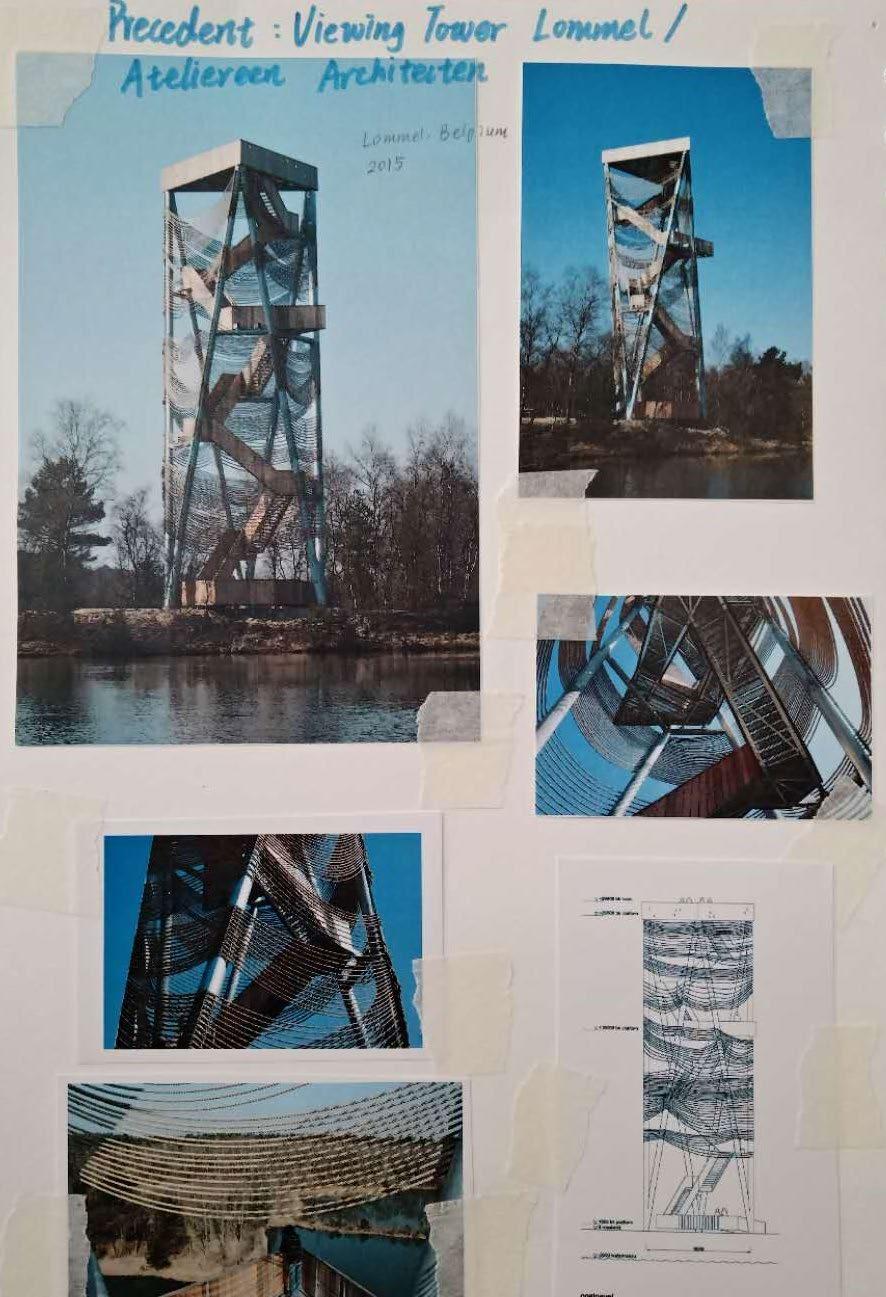
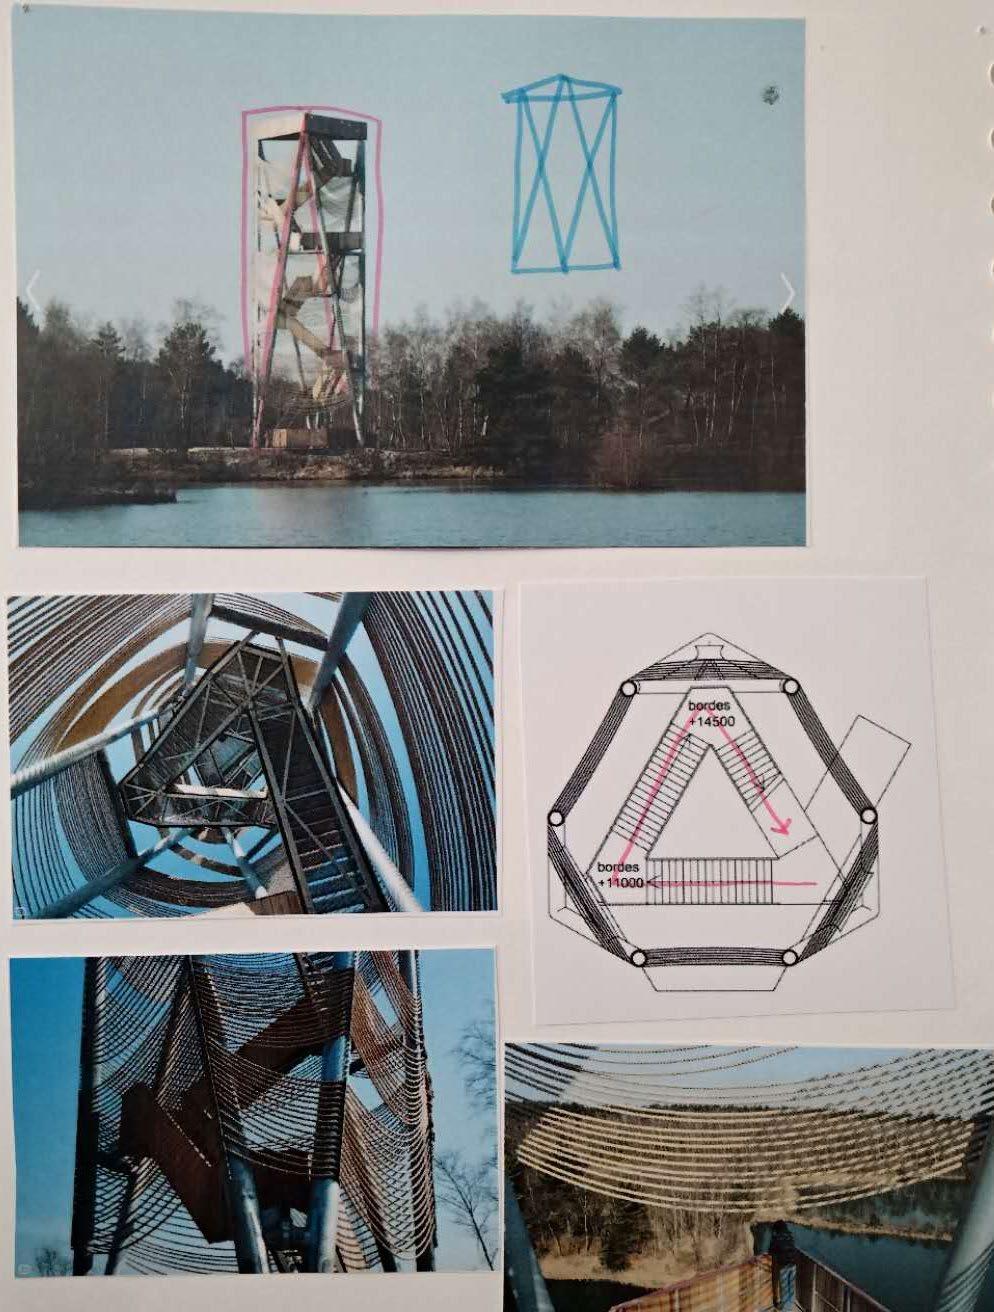
Design Precedents
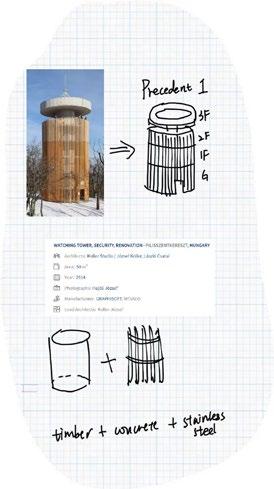
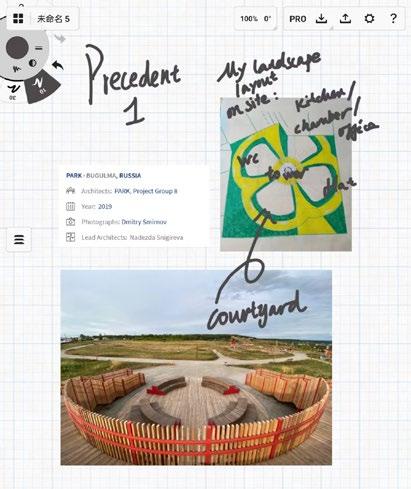
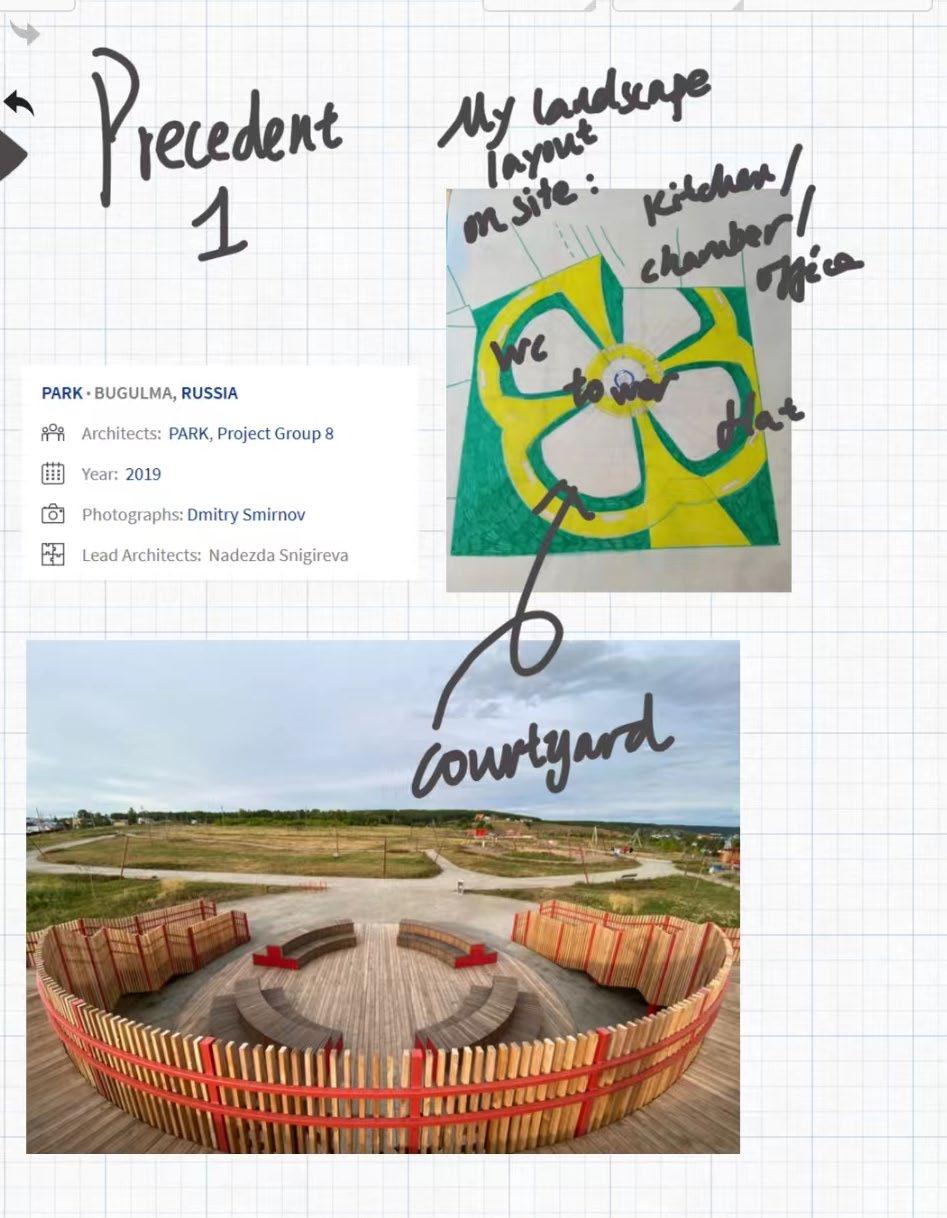
Precedent 1
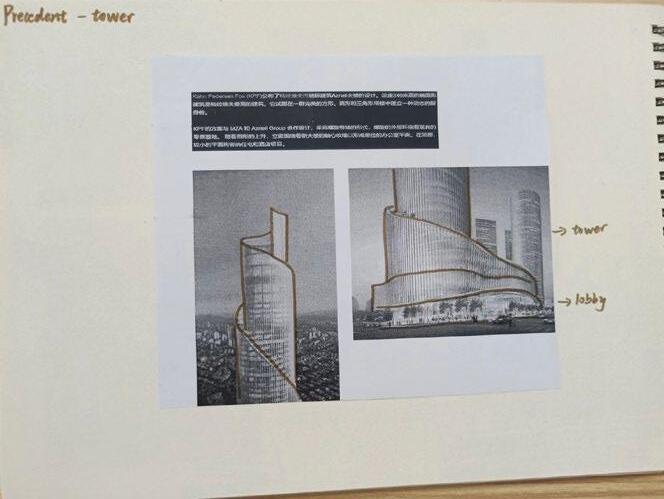
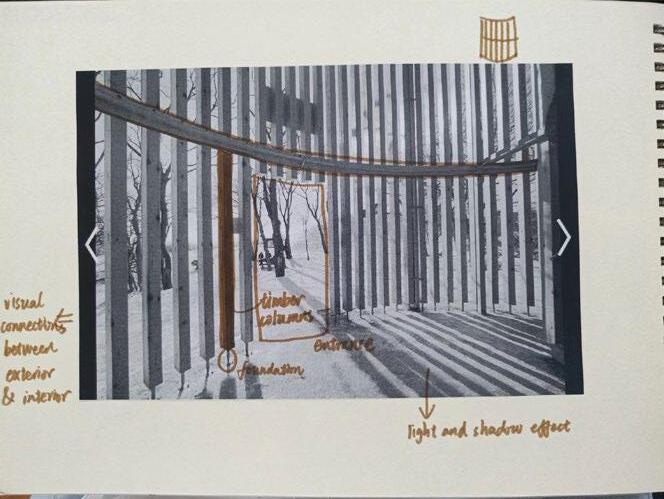
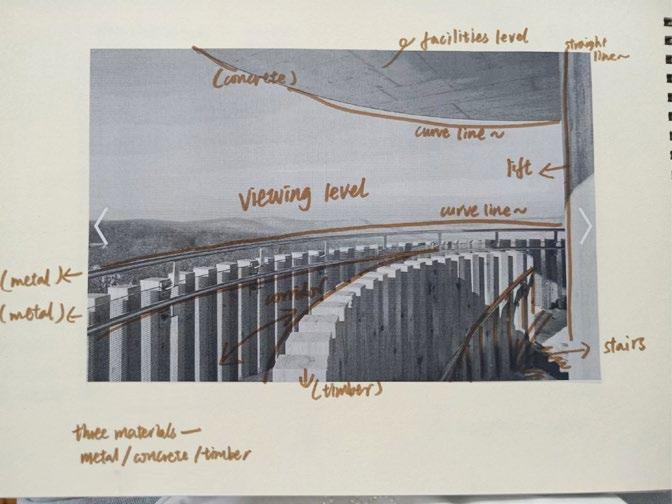
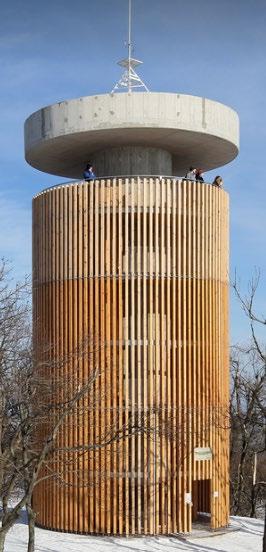
Initially I was attracted by the cool appearance of this viewing tower Its dynamic shape of structure and string made me think of wind It is mainly made of steel so I was worried about whether transforming its material into timber would make it ugly But it is a nice reference
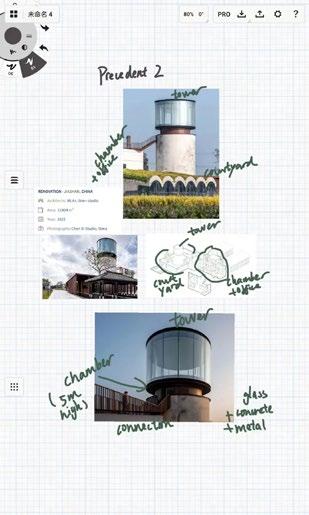
My final sketchup tower model looks more like this precedent rather than the first one. The excellent combination of timber, glass, concrete and steel gave me inspiration. Although the shape is a relatively simple cube, it is very neat and posh.
The circulation from the entrance is really convenient. After entering the site, you go straight to the tower ,turn left to use stairs/lift ,turn right to enter chamber.
Site Entrance View
Bird View of Site
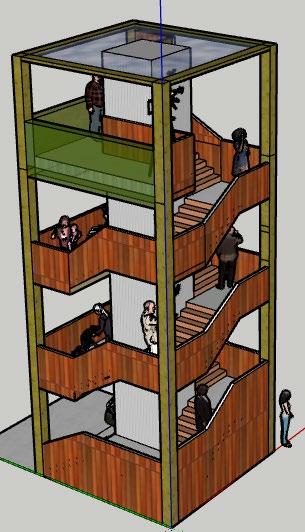
Tower Top Floor View
1.4 Urban Observatory
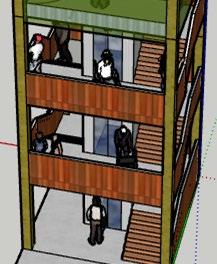
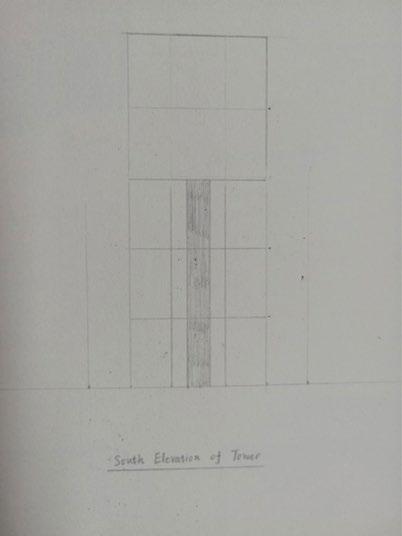
Tower Elevations
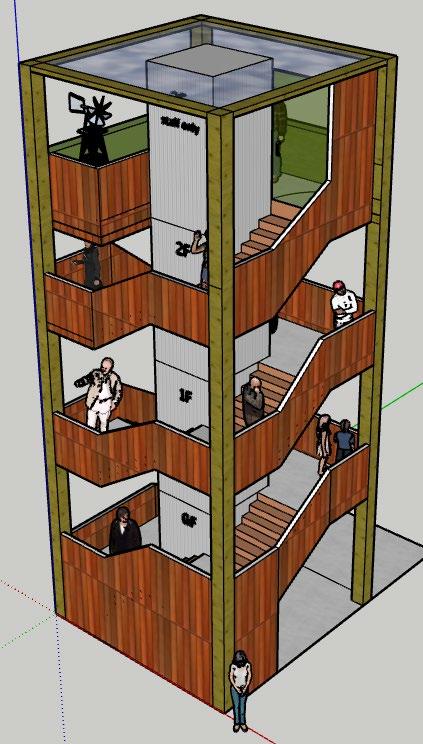
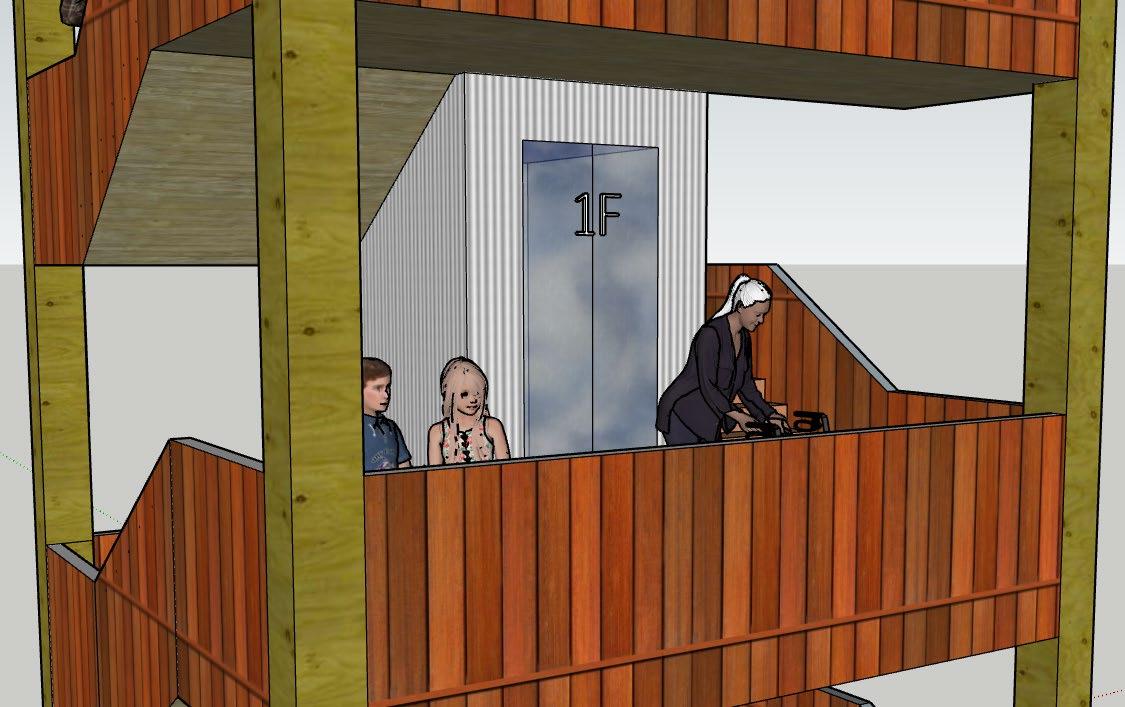
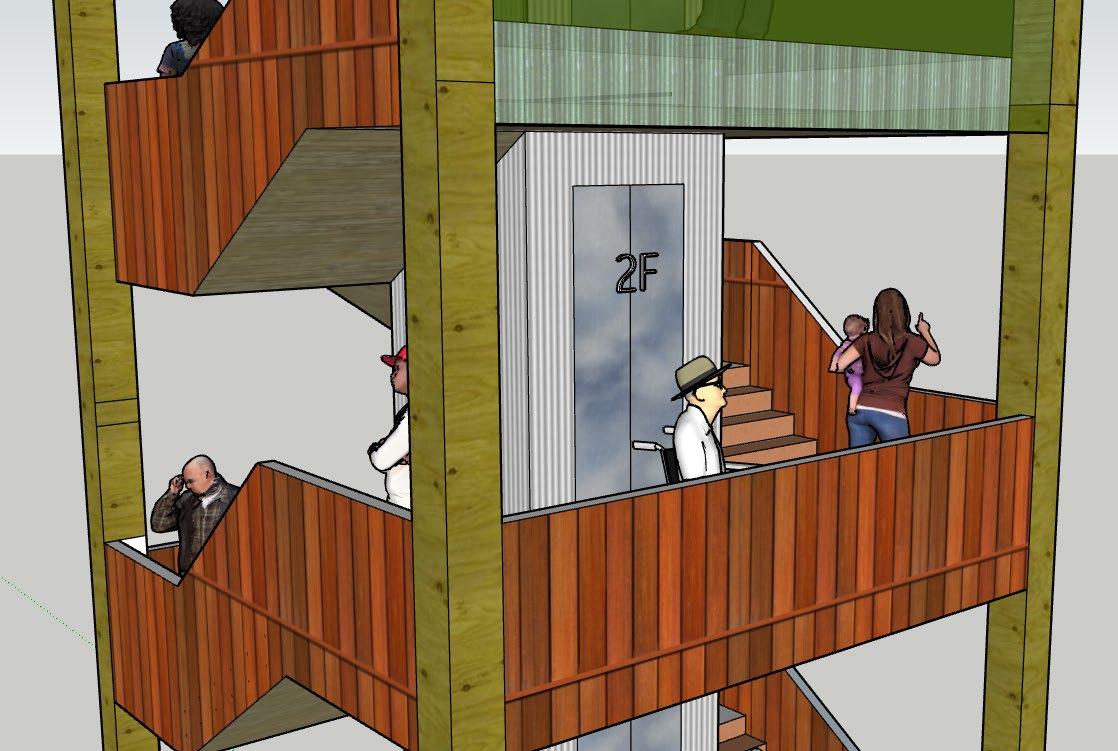
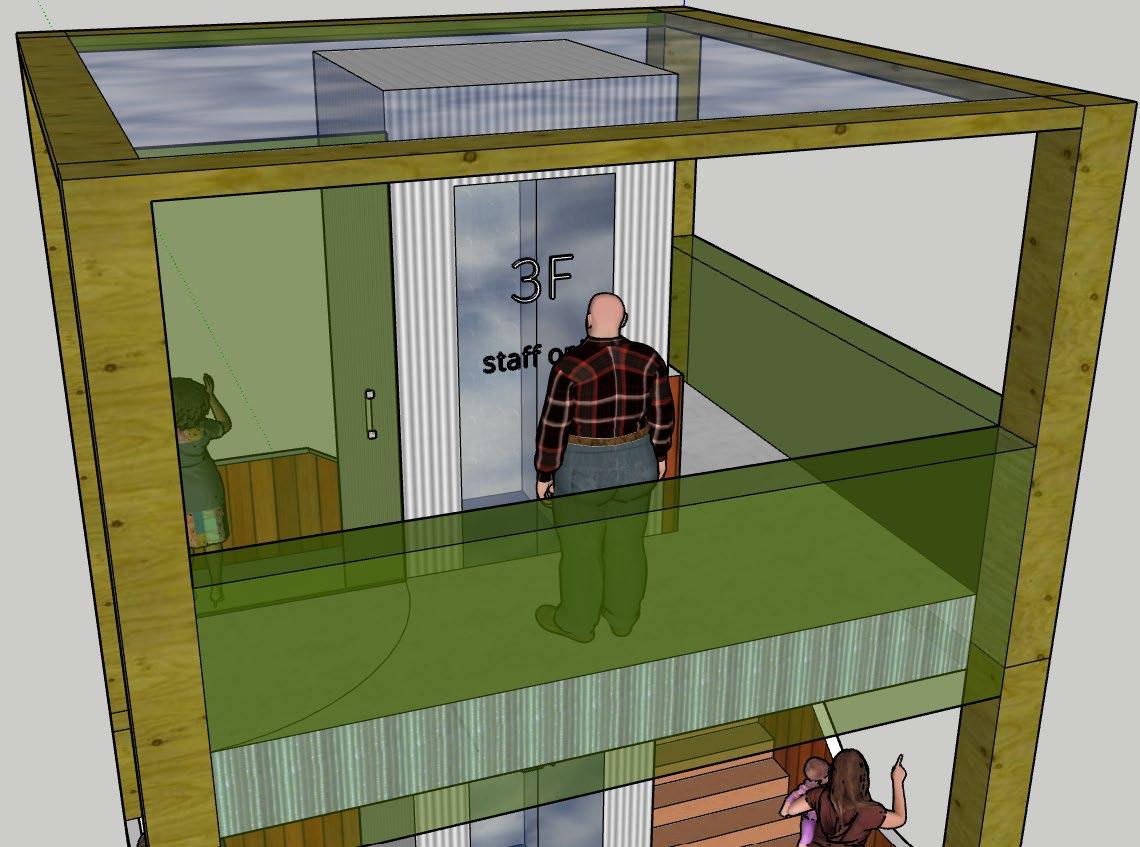
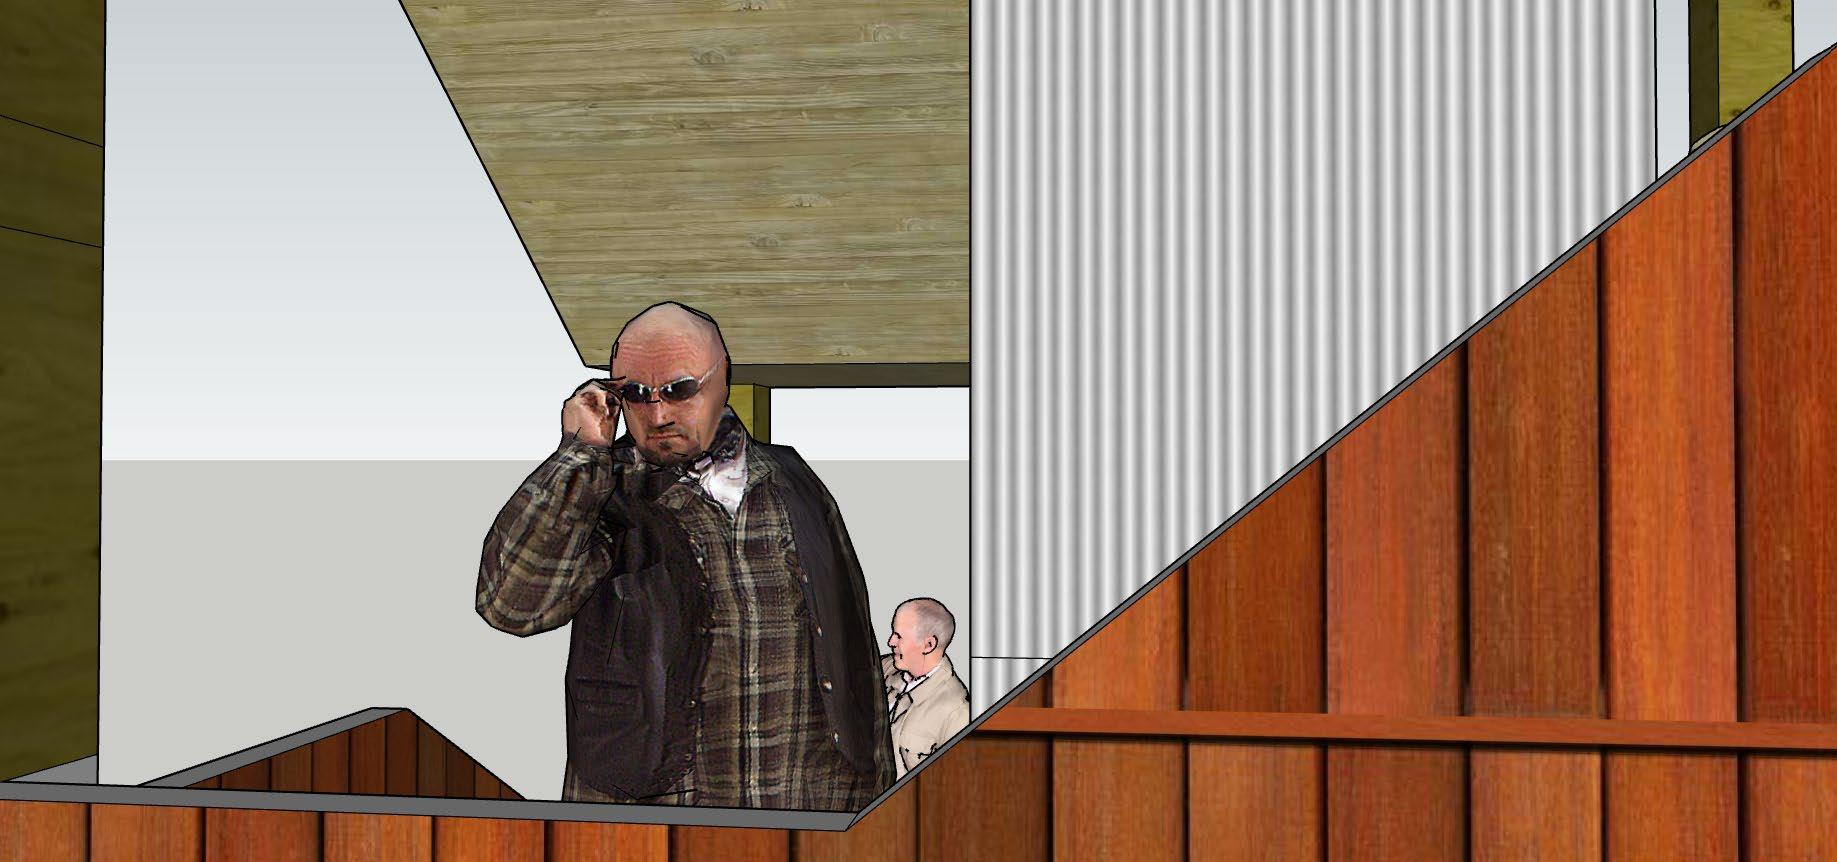
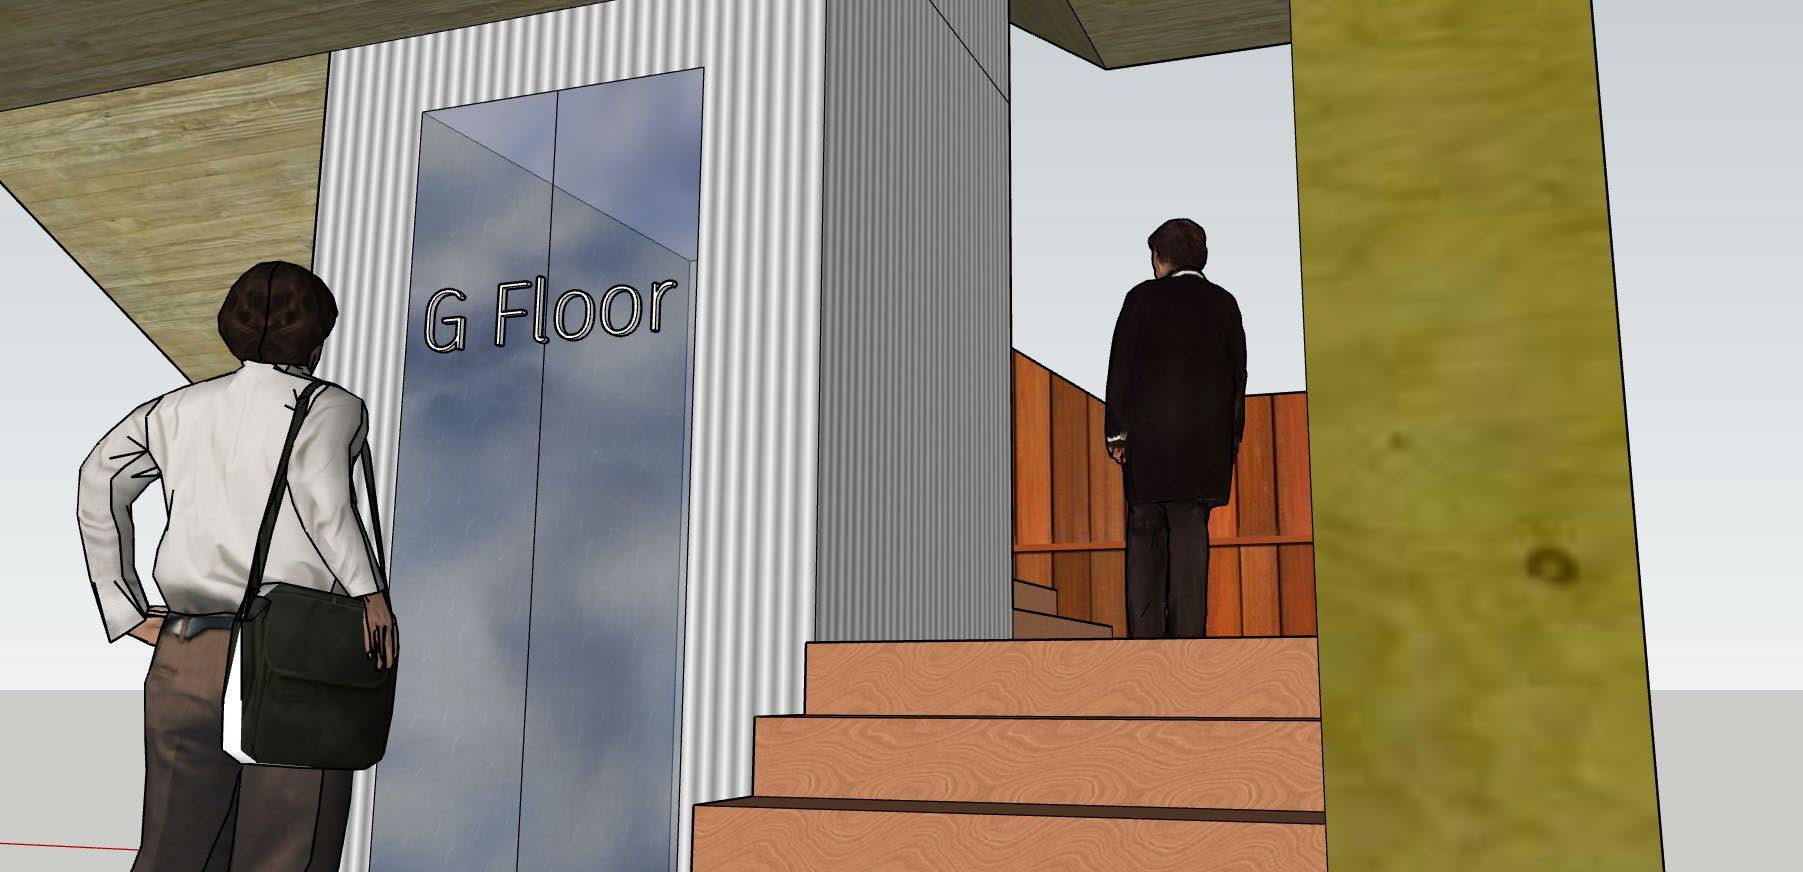
The most important urban observatory building is this tower It can be accessed by both the public and staffs. There are four floors, each 3m high, totally 12m high. Everyone including wheelchair users can have access to ground floor/first floor/second floor Wheelchair users could enjoy all all angles of scenery except for the parts which are blocked by the lifts. Only staffs can go to third floor because there are facilities for collecting wind data A locked glass door will be the protection for third floor
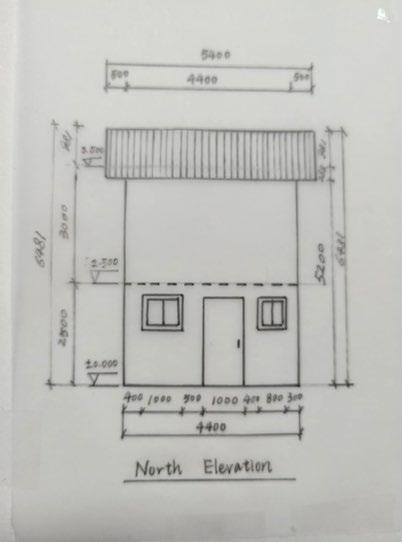
North Elevation
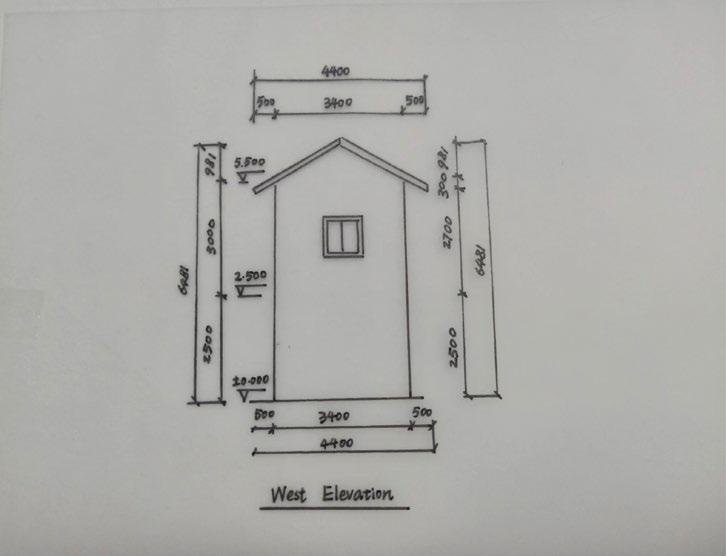
West Elevation
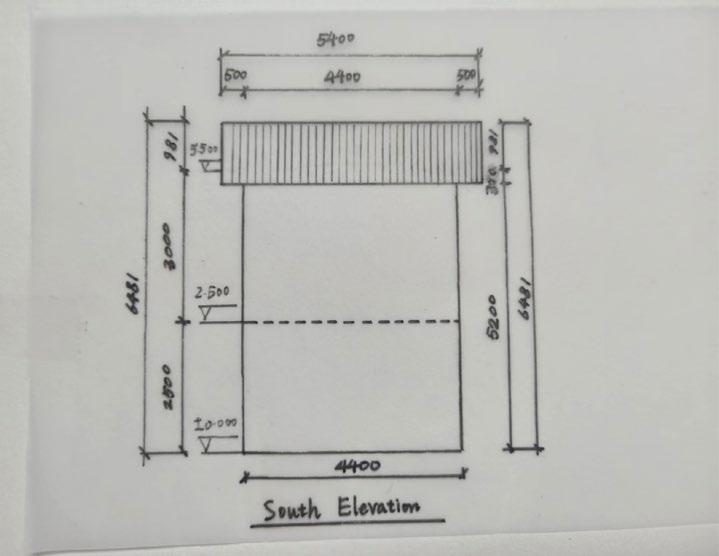
South Elevation
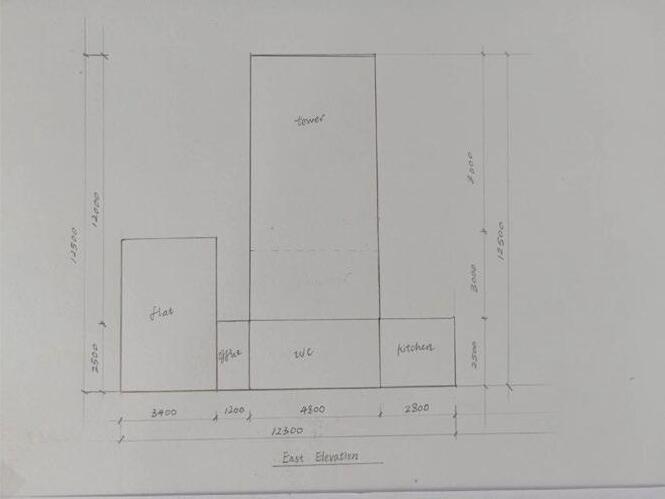
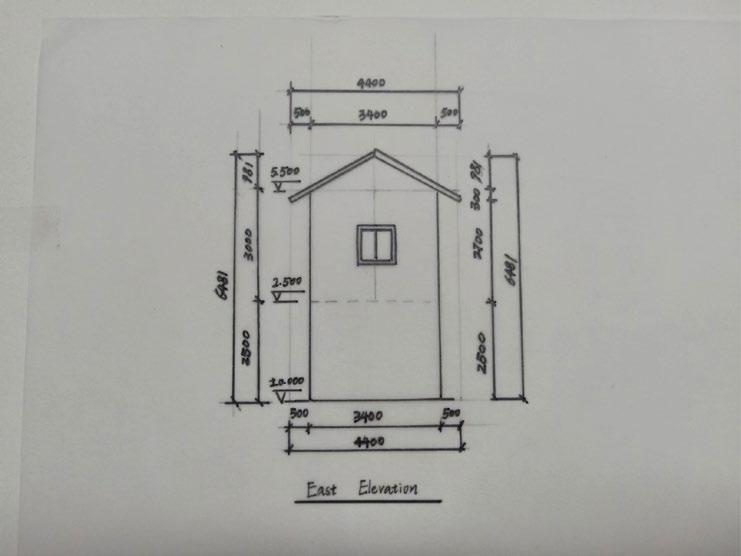
East Elevation
1.4 Urban Observatory
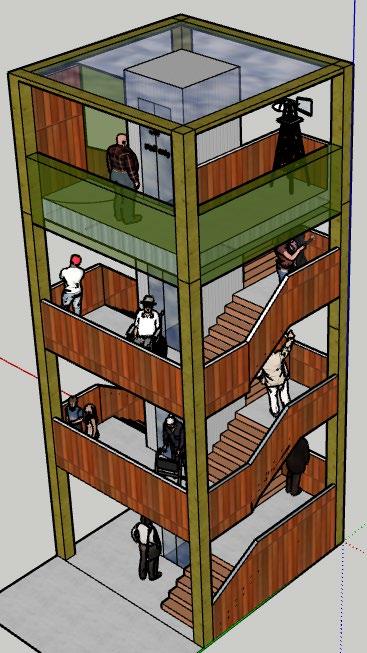
Tower Overall Views
From the site entrance view, people directly see the whole body of tower in its northwest view.
People sitting in the courtyard can see west view of tower.
People coming from landscape (amusement park) can see southwest view of tower.
People come out from the chamber /public toilet/flat can see southeast view of tower.
People watching the gallery can see northeast view of the tower.
Northwest View
View
View
View
1.4 Urban Observatory
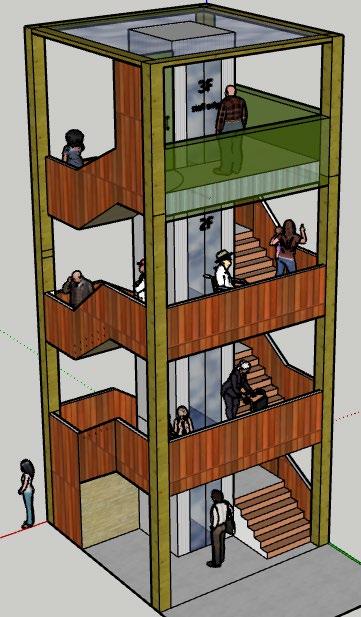
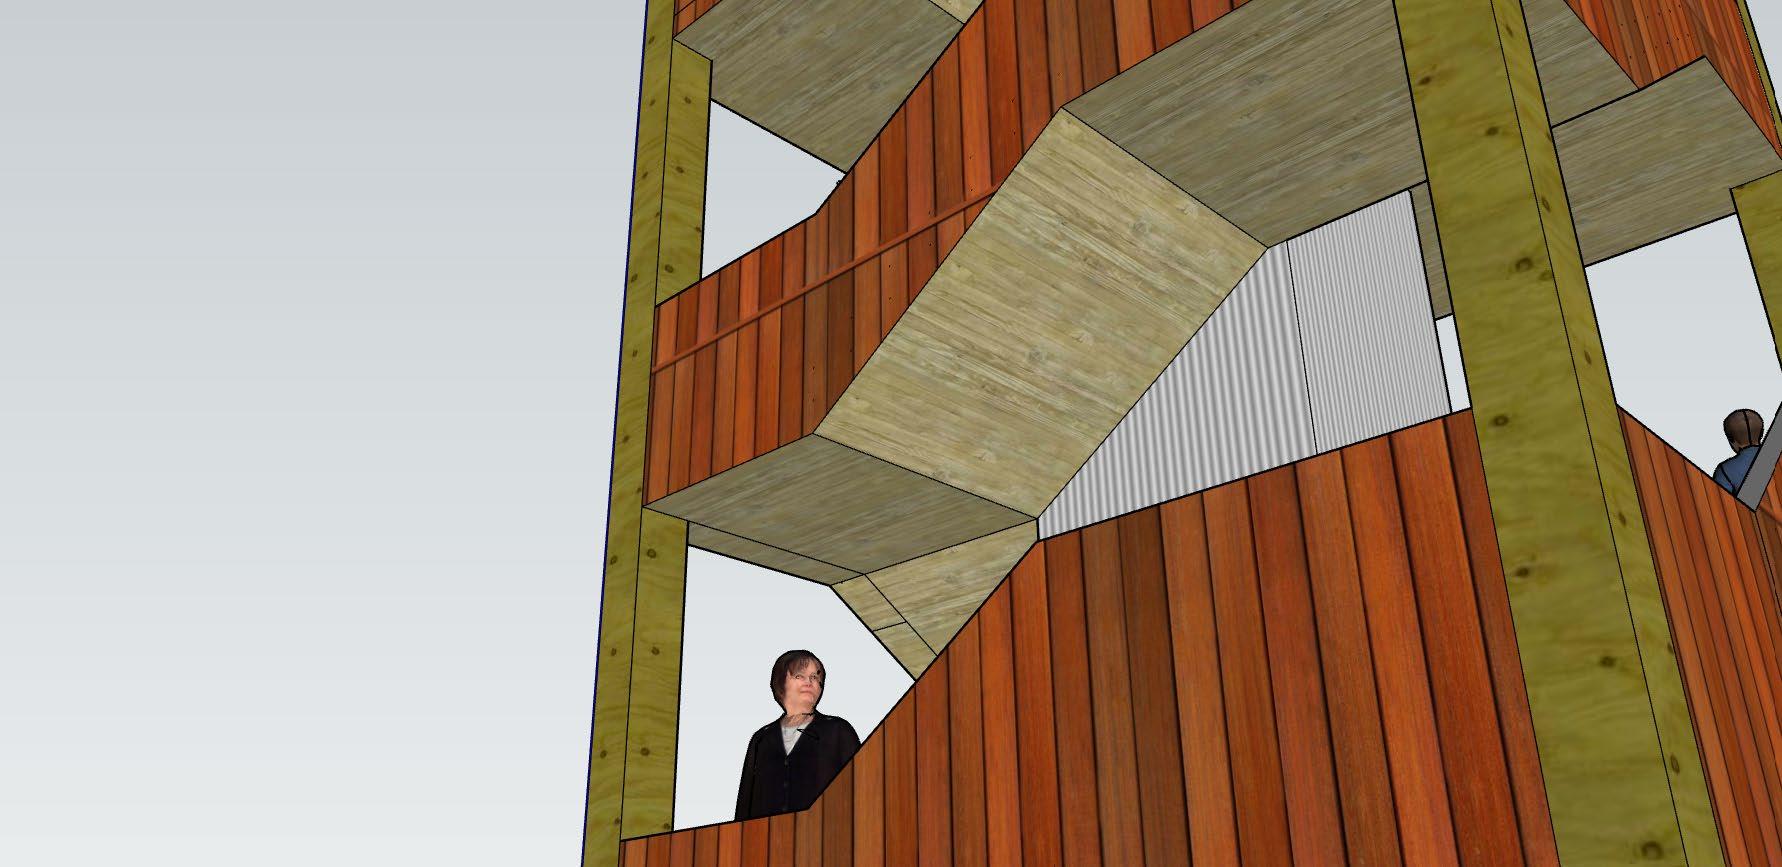
Tower Each Floor Close-up
Tower Entrance View
Tower Upper View from its entrance side
1.4 Urban Observatory
Tower Close-up
Tower as an essential carrier for urban observatory is the most worthwhile building to design. Satisfying elevations really affect visitors’ experience.
Top View
Bottom View
Third Floor Atmospheric Picture
1.4 Urban Observatory
Third Floor Atmospheric Picture
Second Floor Atmospheric Picture
Second Floor Atmospheric Picture
1.4 Urban Observatory
First Floor Atmospheric Picture
1.4 Urban Observatory
First Floor Atmospheric Picture
Ground Floor Atmospheric Picture
Ground Floor Atmospheric Picture
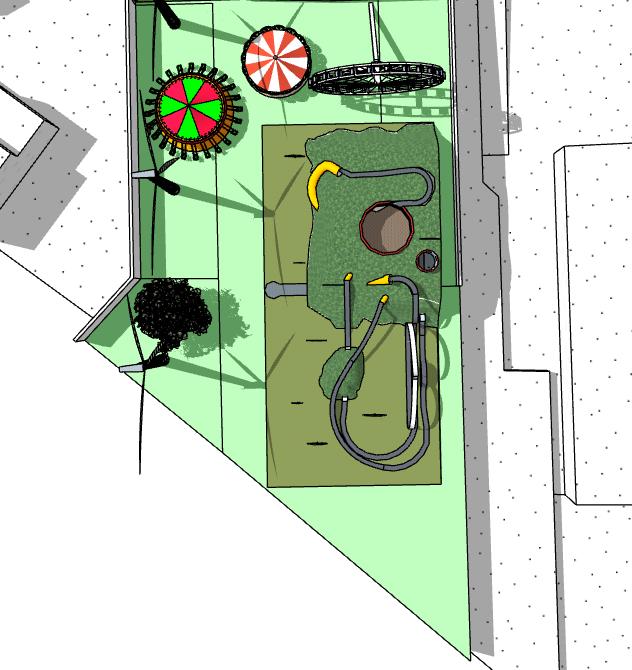
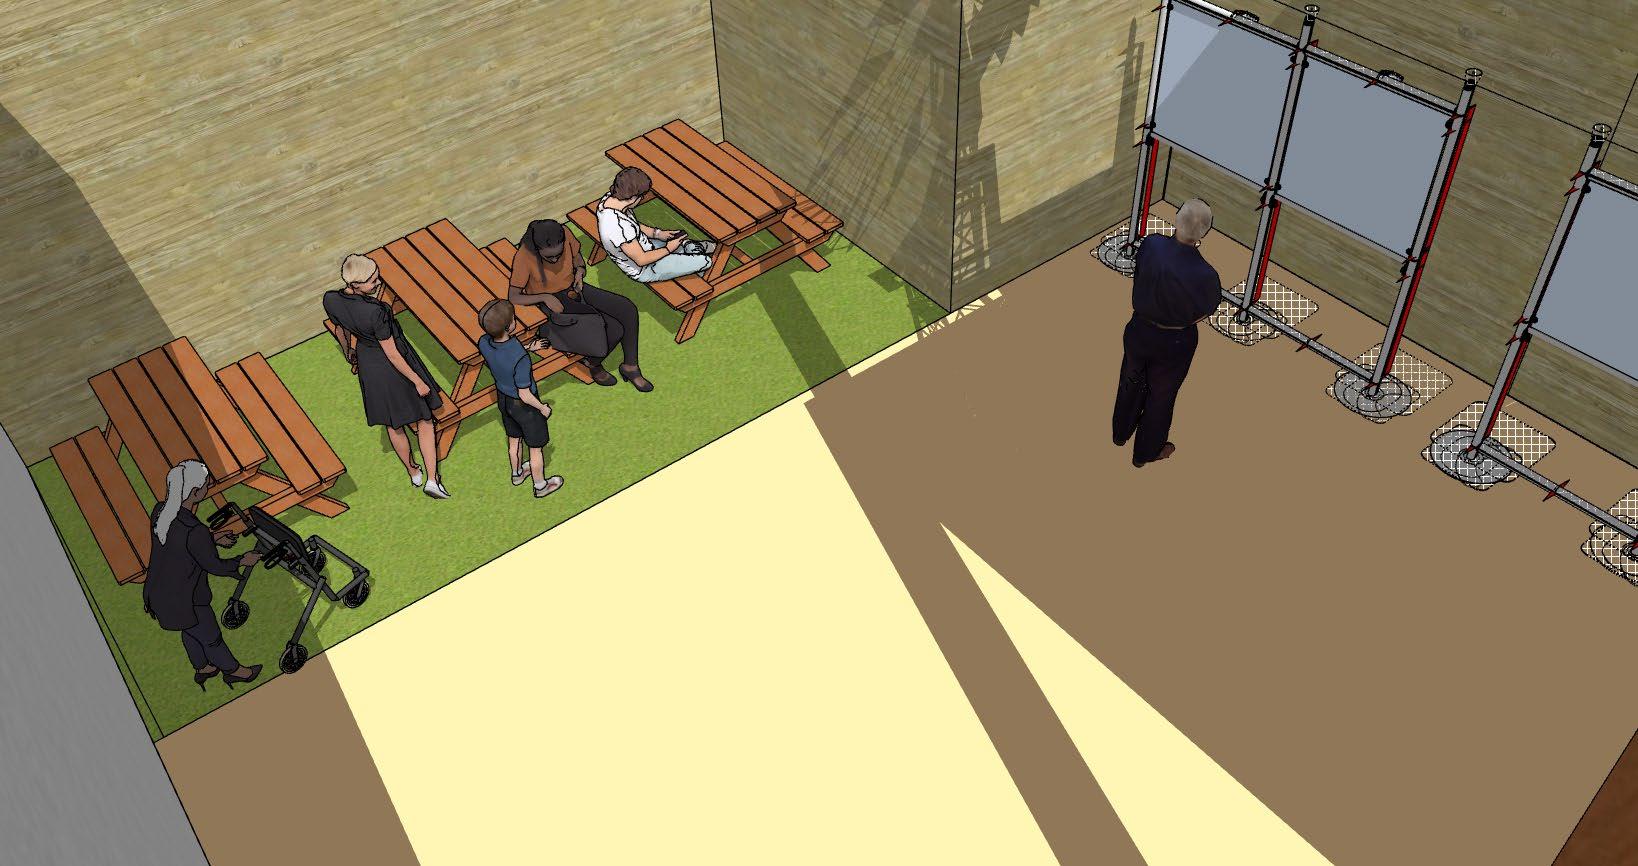
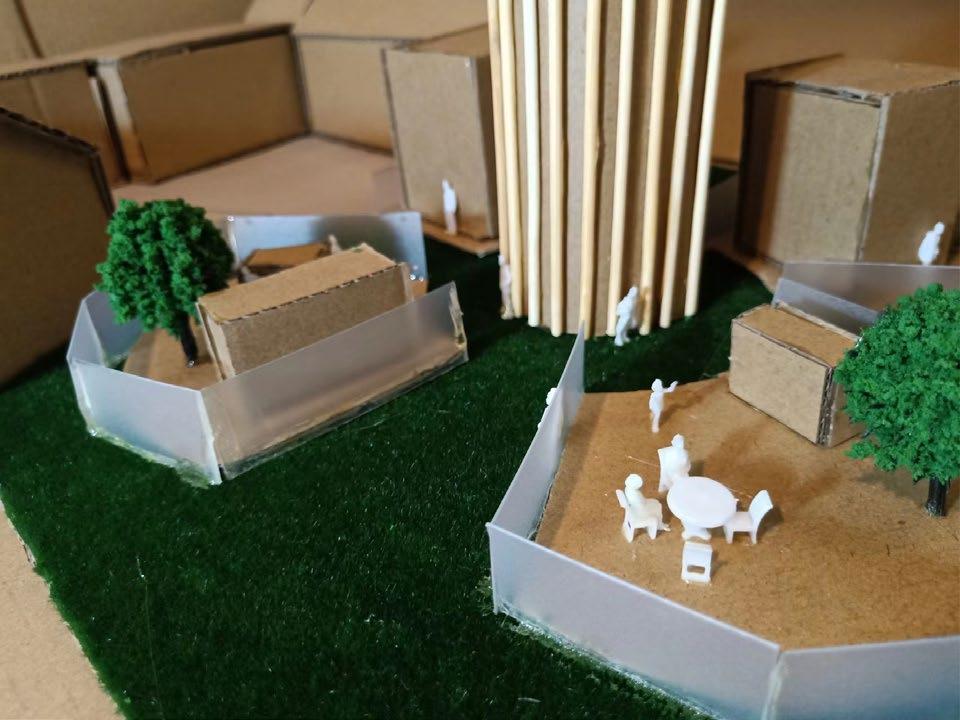
Courtyard
Stage in Courtyard
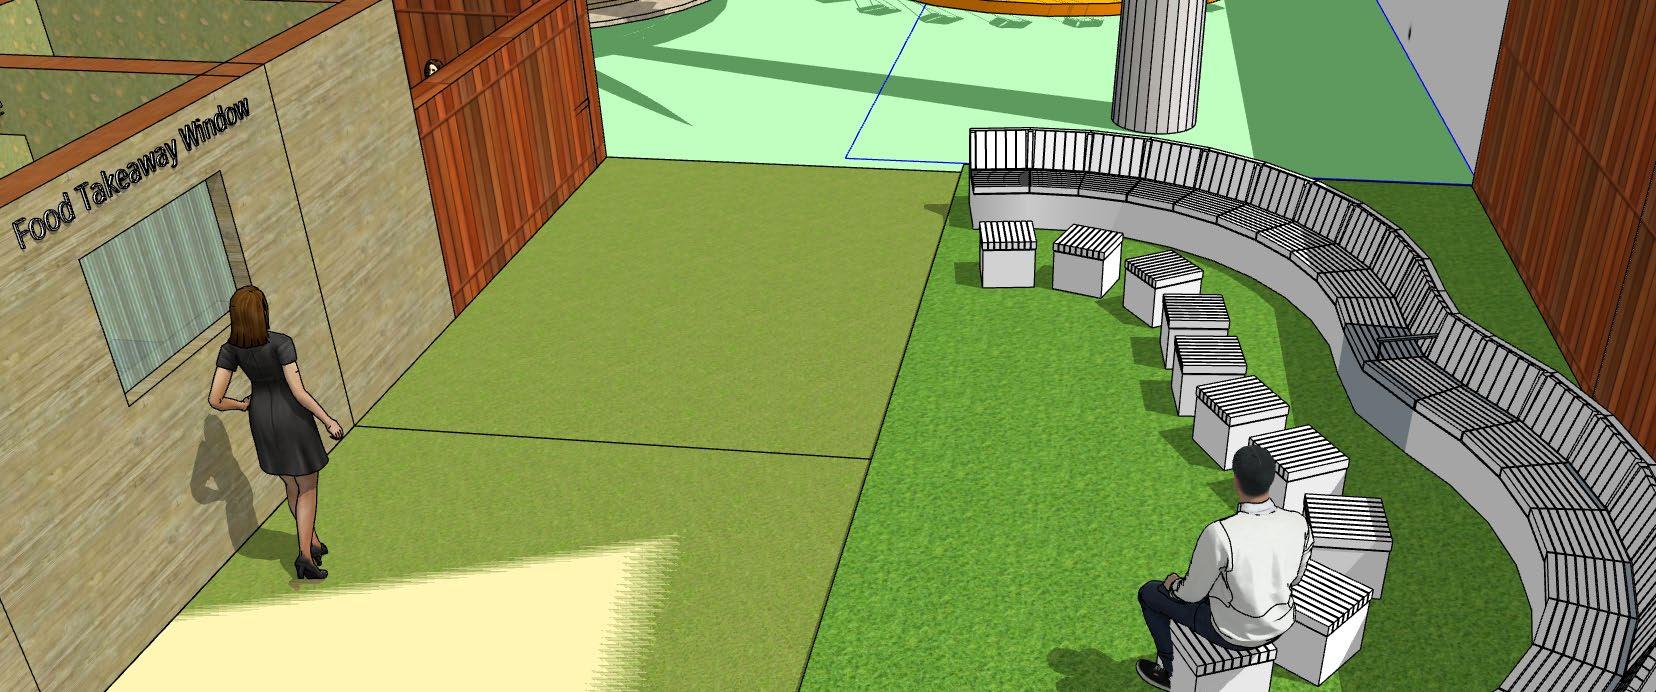
Food Takeaway Window in Courtyard
Gallery in Courtyard
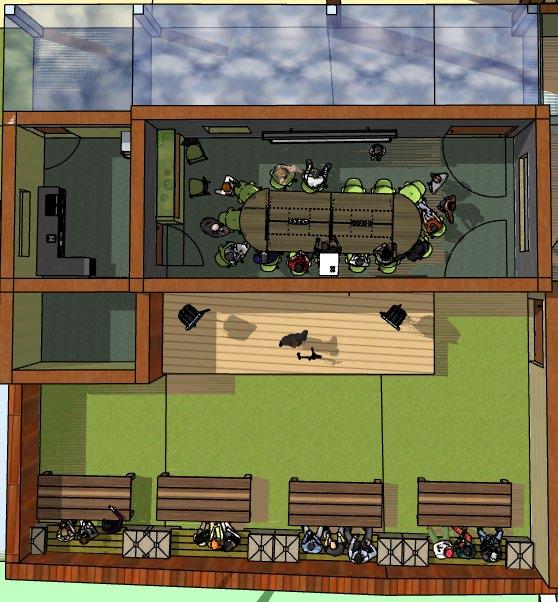
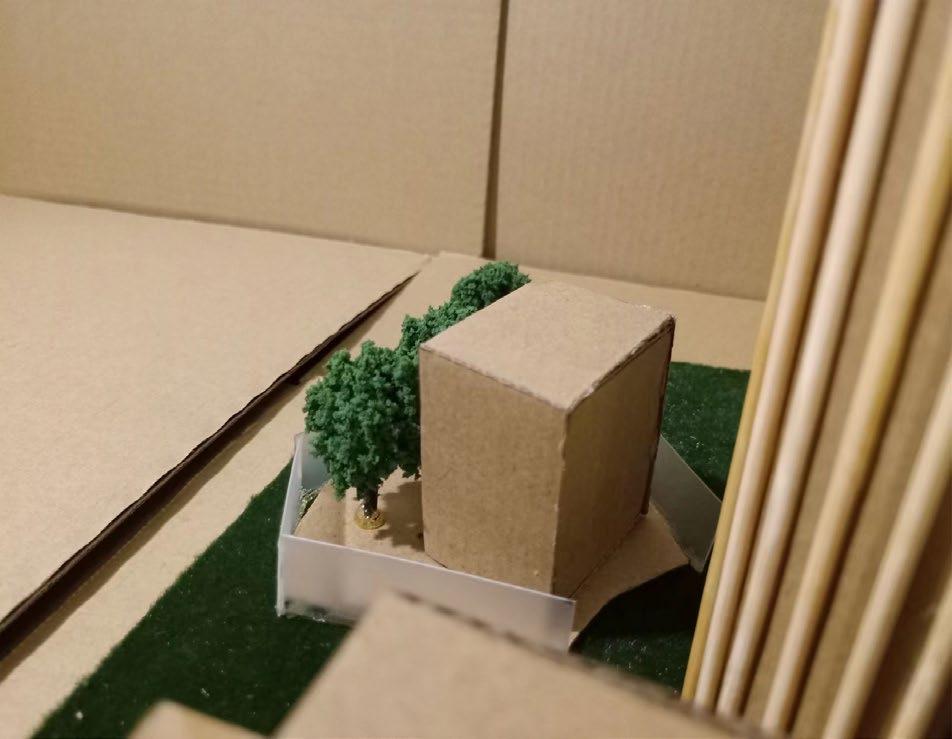
Chamber Model
Conference Room 36㎡
Bar and Kitchen 12㎡
Private Garden 78㎡
Top View of Chamber
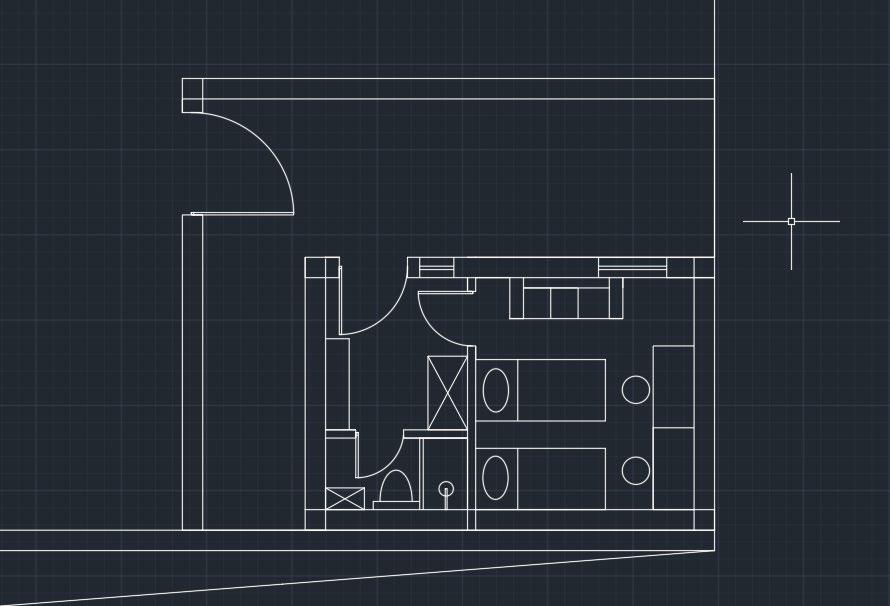
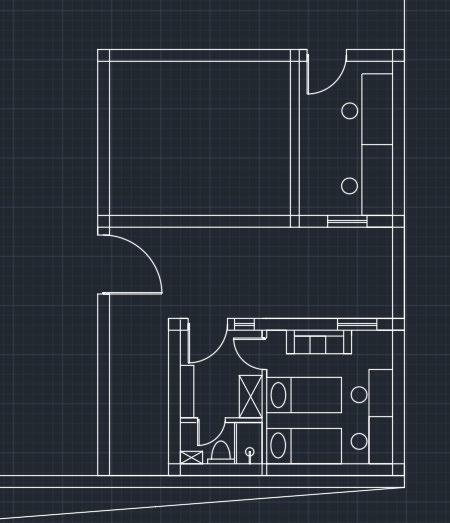
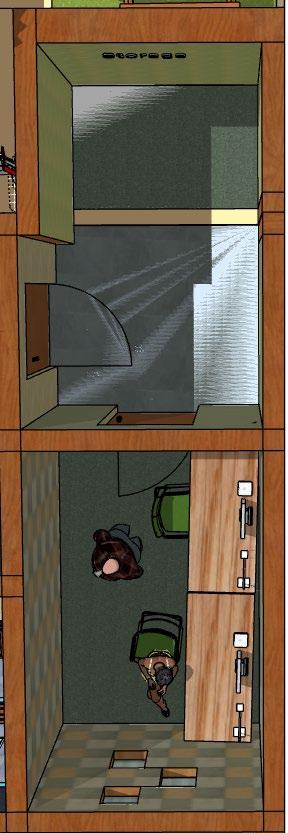
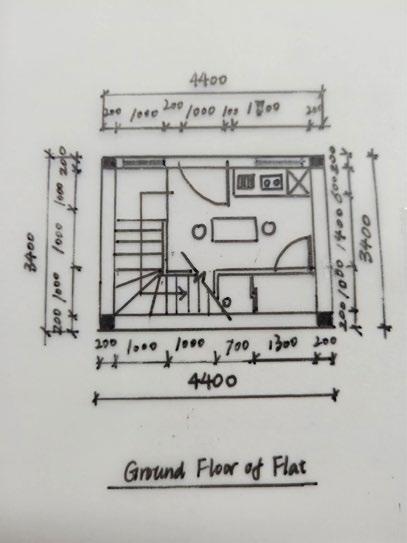
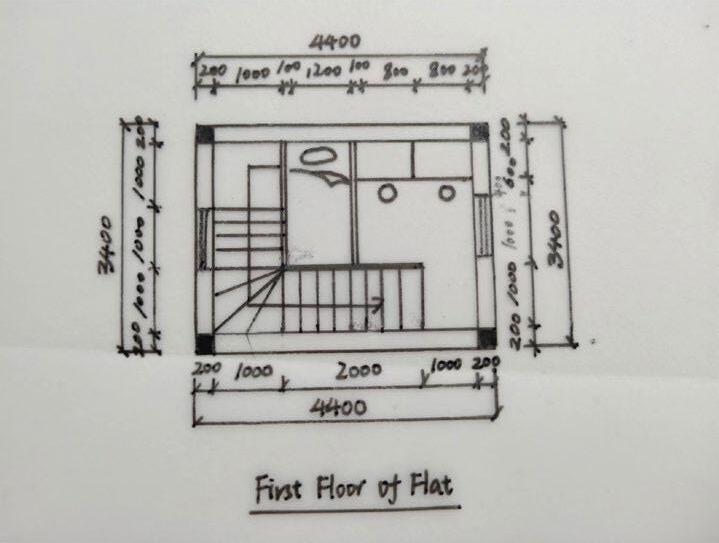
Top View of Flat
Bedroom 14㎡ Kitchen and Shower 10
1.4 Urban Observatory
Bedroom of Flat
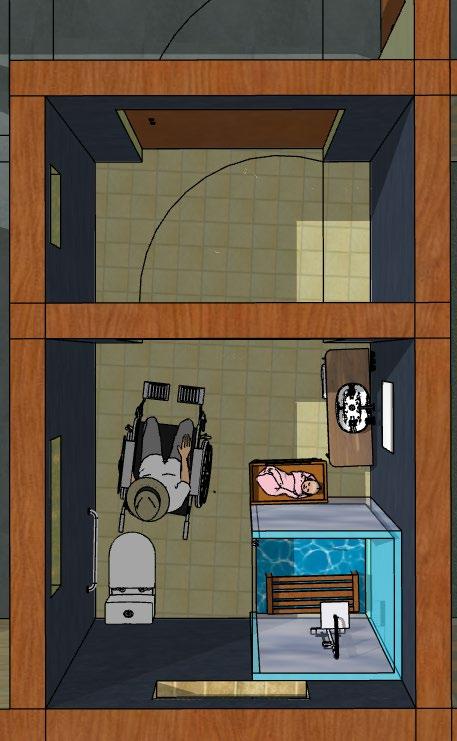
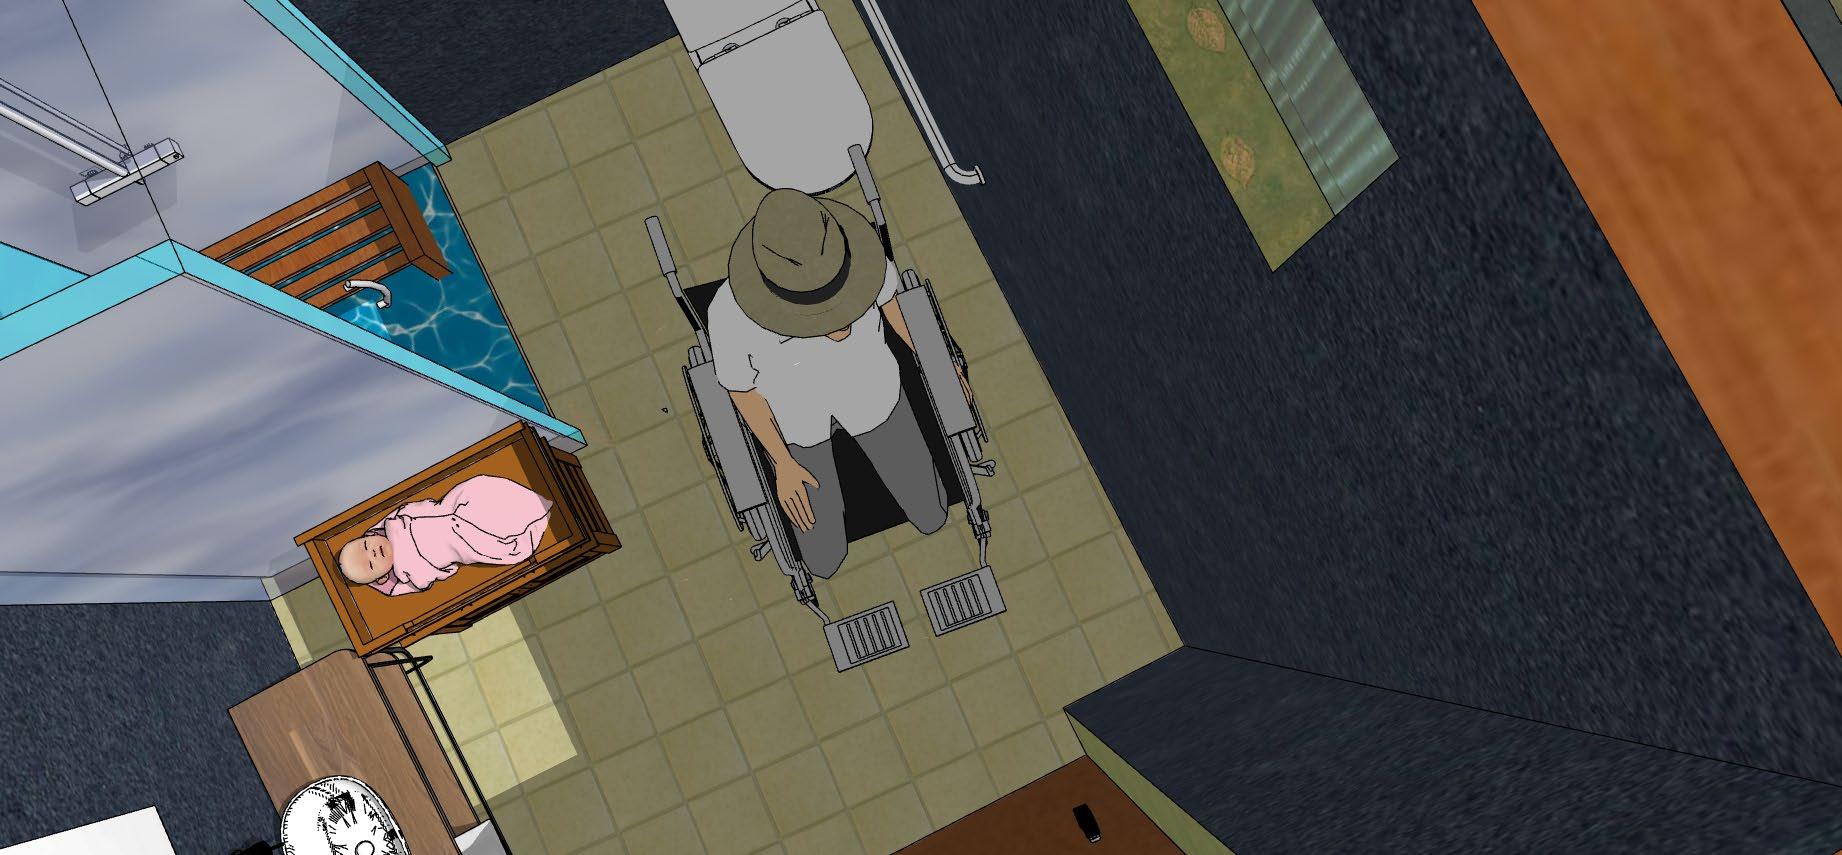
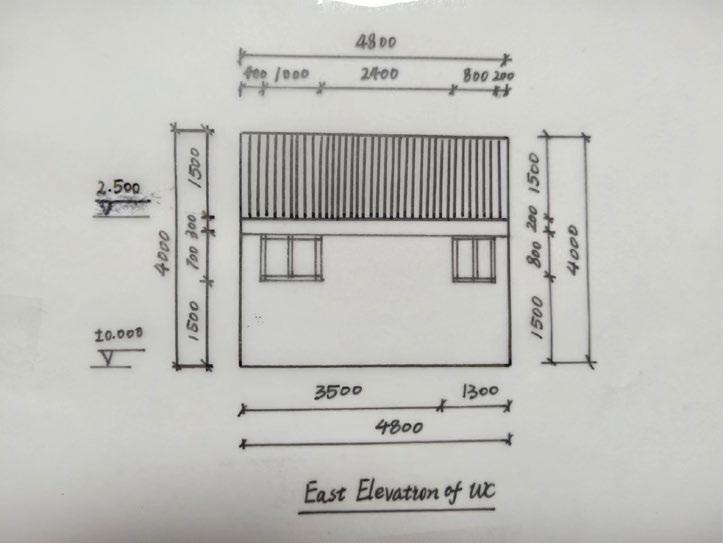
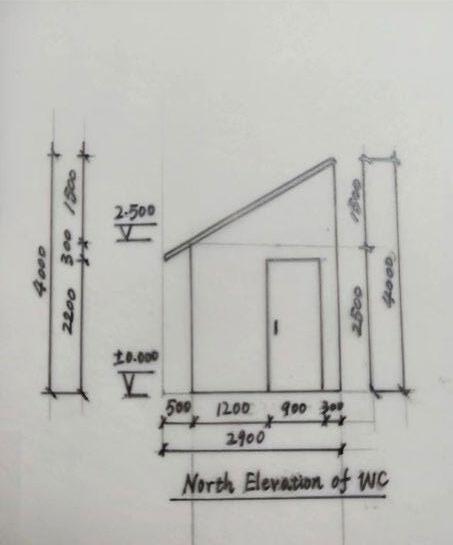
Public Toilet Model
Public Toilet
1.4 Urban Observatory
Landscape Model- Windy Party
Entertainment facilities for all ages can make everyone feel happy. Infants or seniors can play with the carousel, kids can play with flying chairs, and teenagers and adults can play with the Ferris wheel and roller coaster.
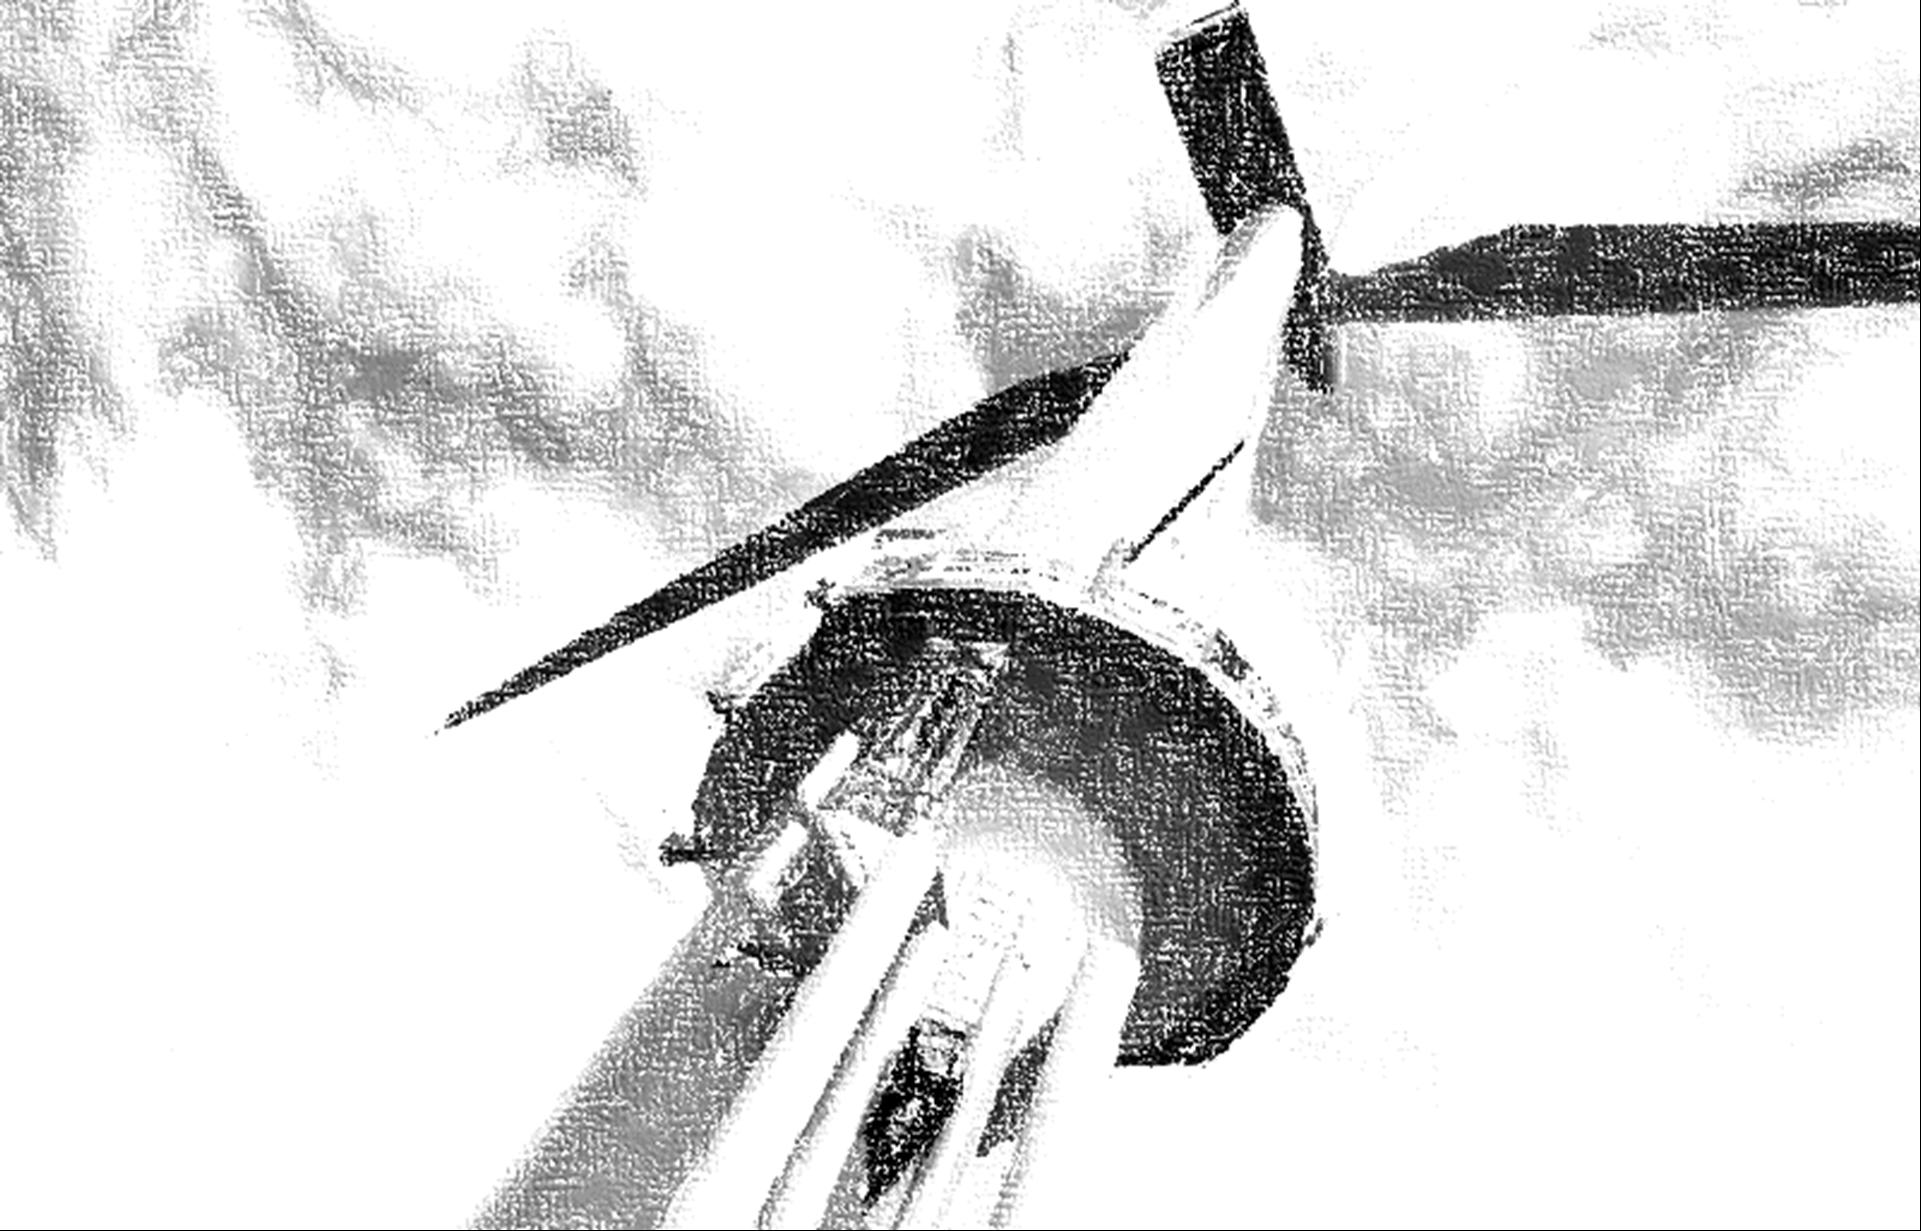
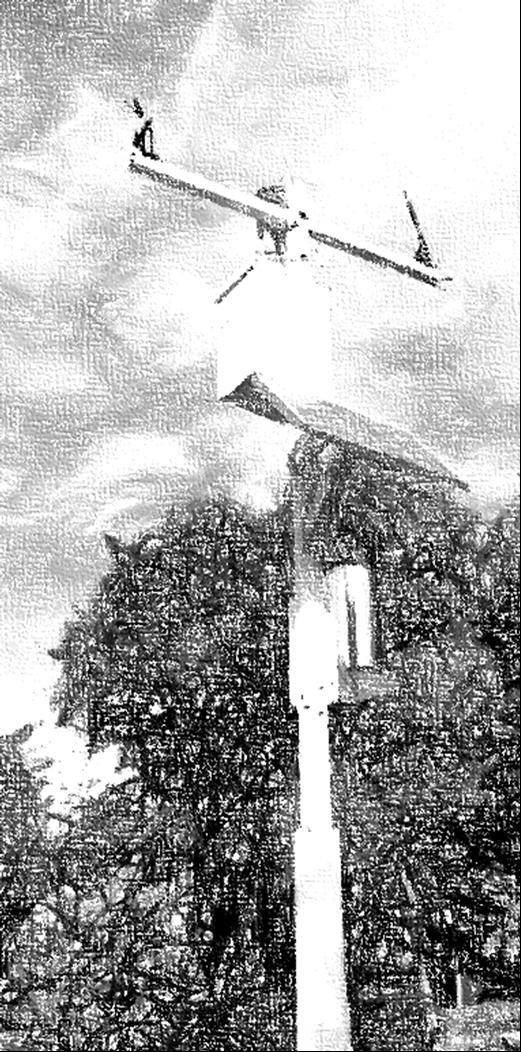
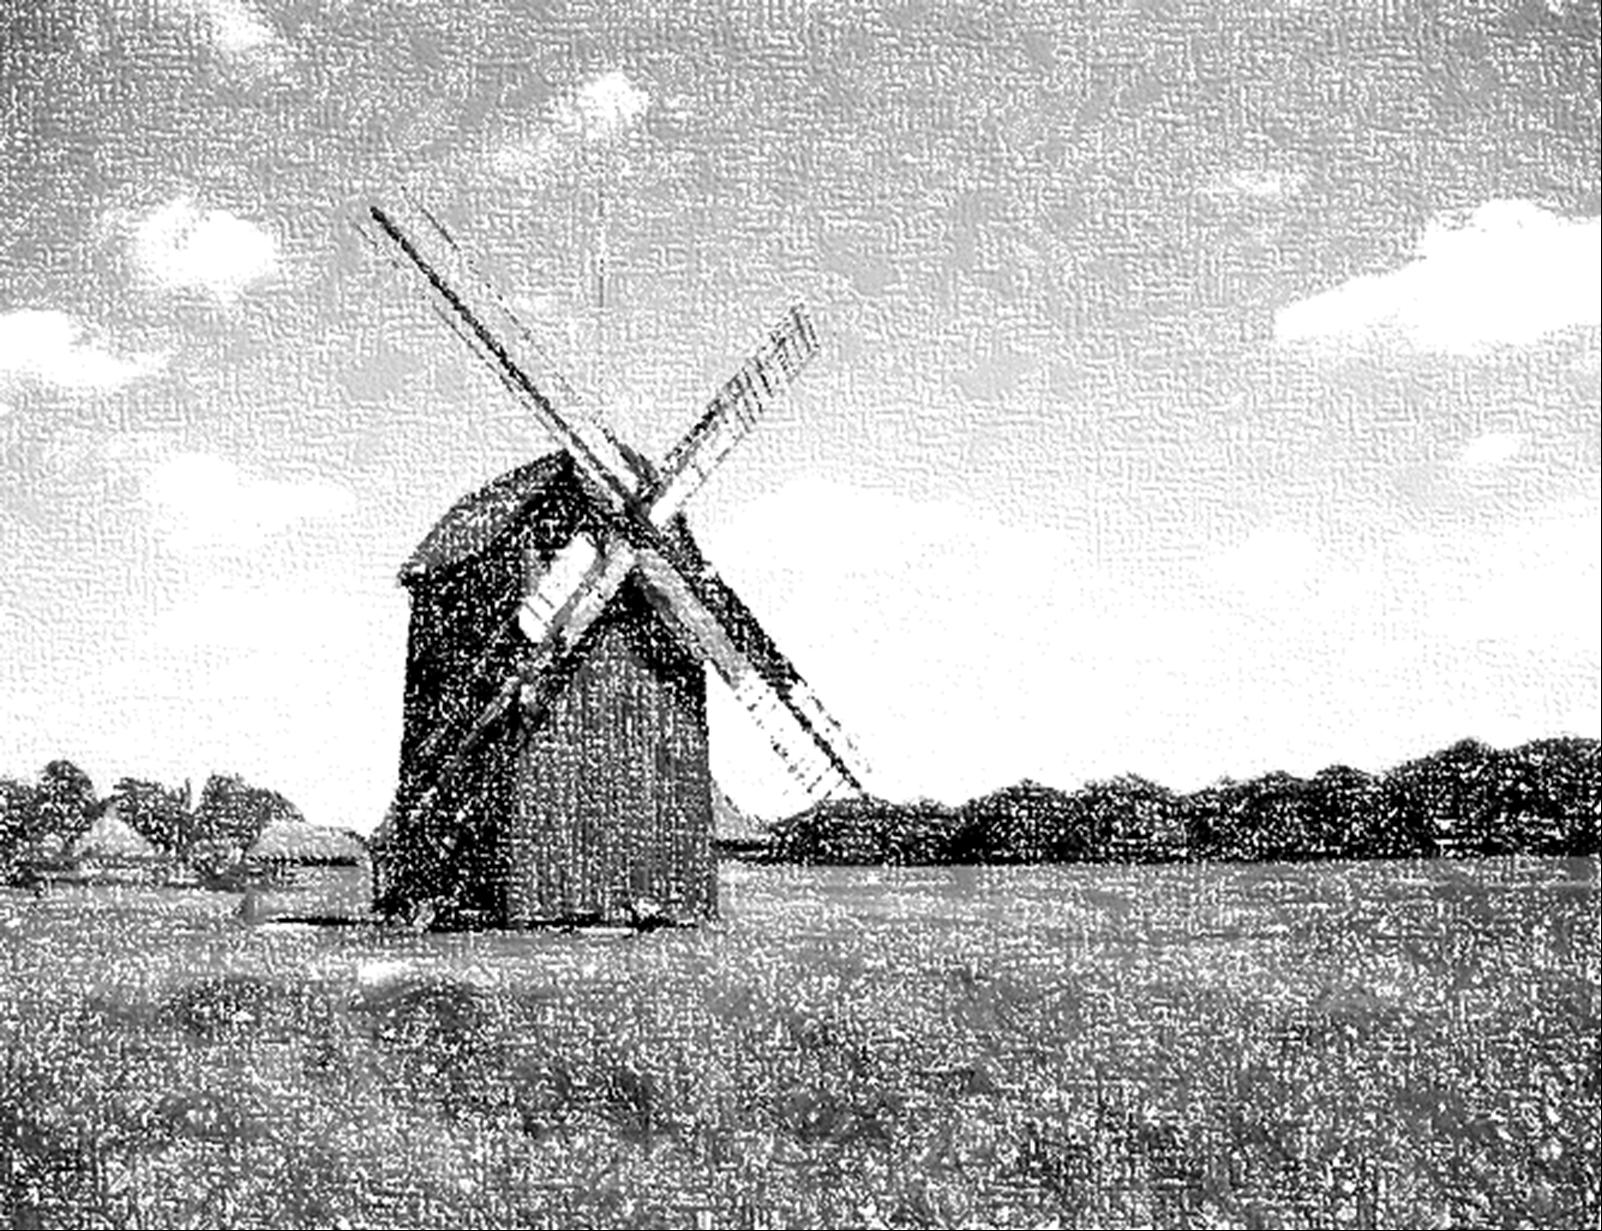
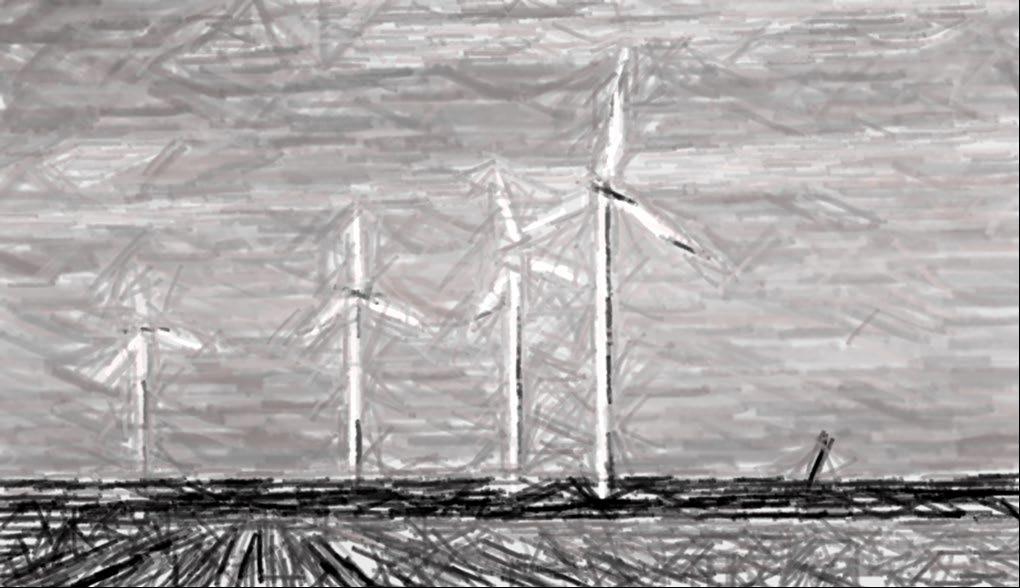
These recreational facilities are all maintained by the giant windmills next to the facilities through wind power. I placed the windmills on southwest of the site because according to the wind rose map, southwestern wind in Newcastle blows the hardest.
Carousel
Ferris Wheel
Swivel Flying Chair
Rollercoaster
Windmills
1.4 Urban Observatory
Ferris Wheel View of Site
1.4 Urban Observatory
Carousel in Landscape
‘Windy Party’ Amusement Park in Landscape
1.4 Urban Observatory
Sketchup Modelling Process
1.Decide the volumes
4.Draw the flat
6.Done!
2.Draw the tower (entrance view)
5.Draw the chamber, kitchen and courtyard
3.Draw the office and public toilet
6.Set up the landscape
The process was extremely challenging for me as a computer software green hand, but my super strong will for creating a wonderful virtual ‘world’ helped me throughout the whole process And the outcome is so satisfying!
Design Diary
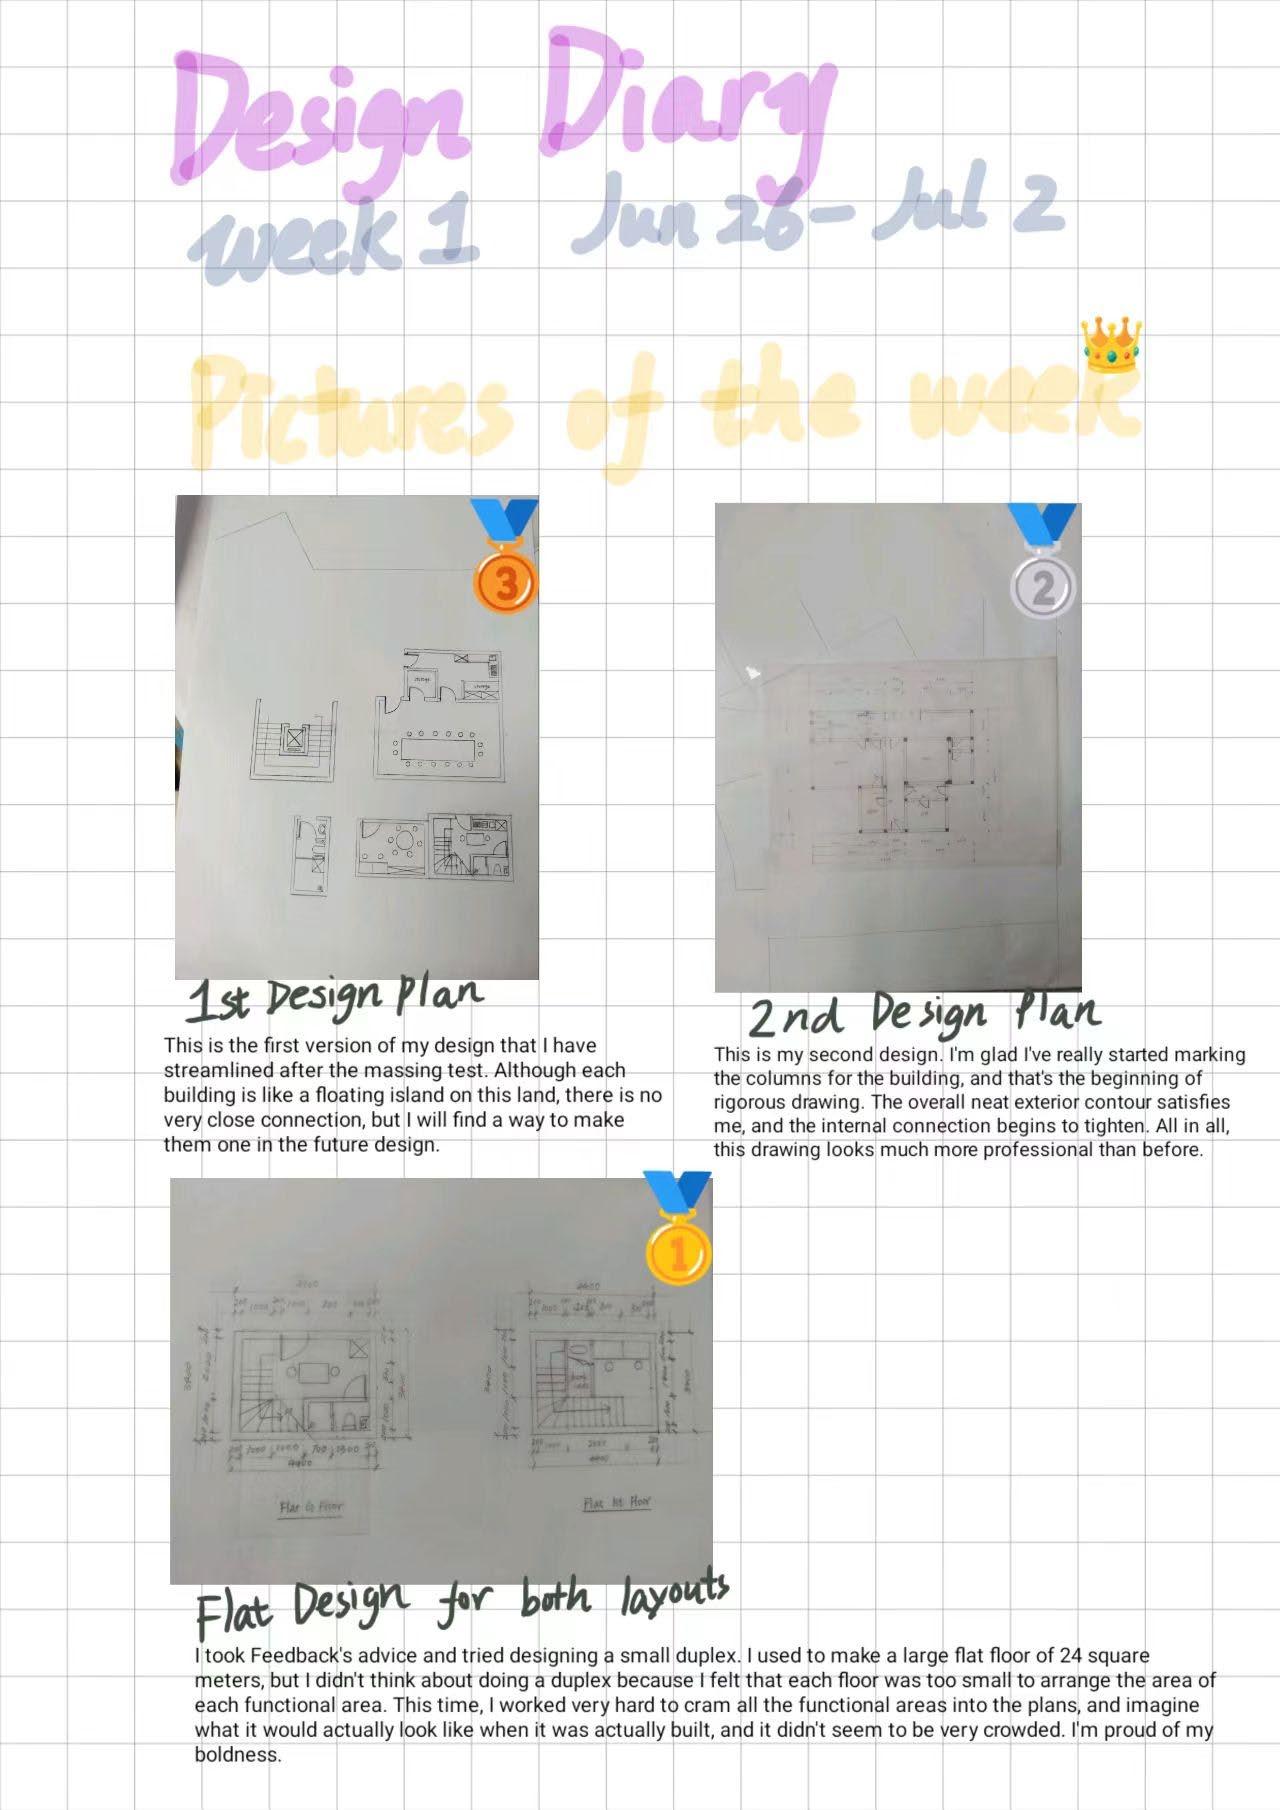
Week 1 Essence (June 26-July 2)
Week 1
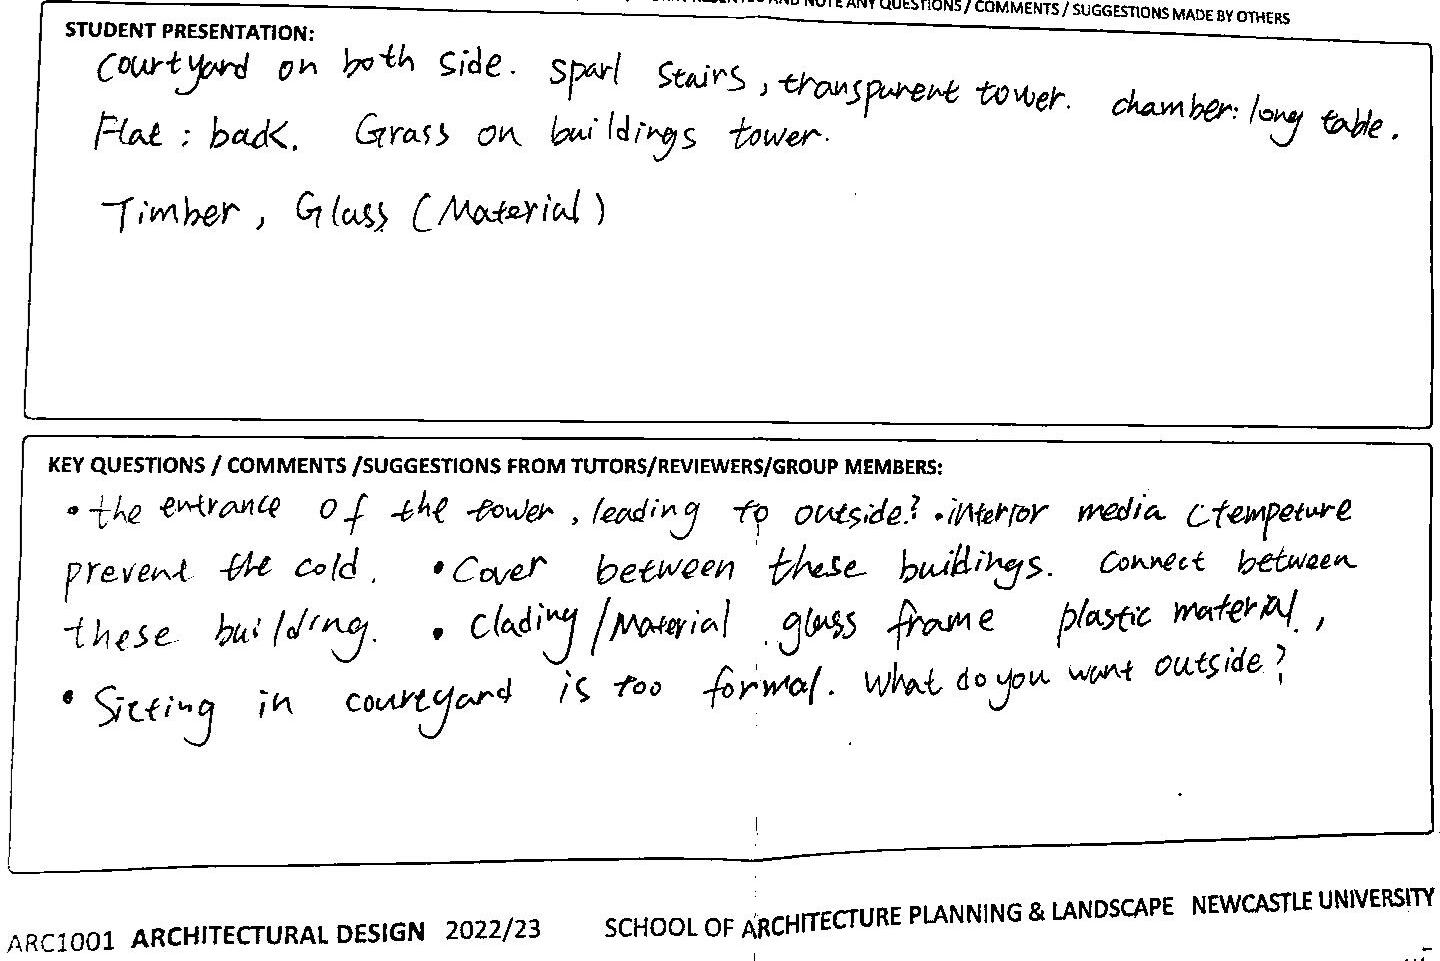
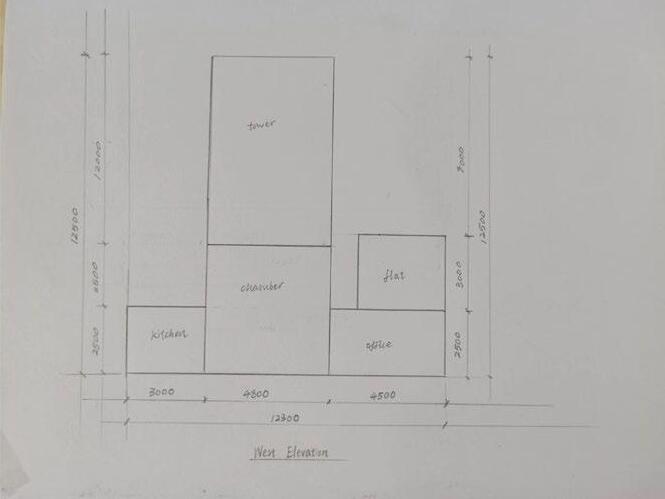
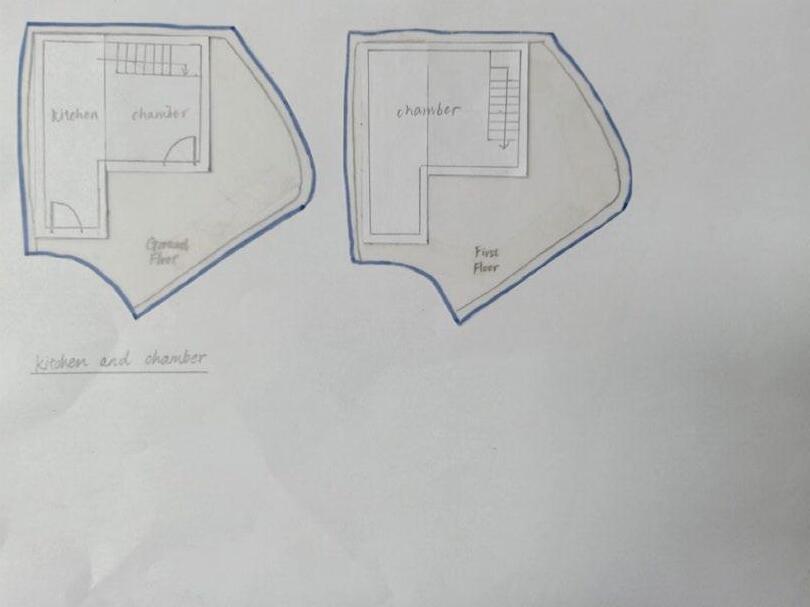
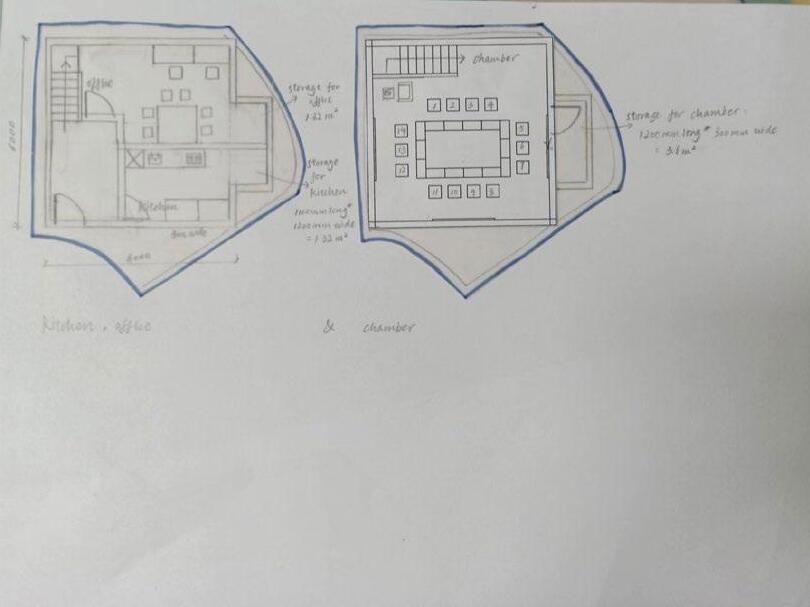
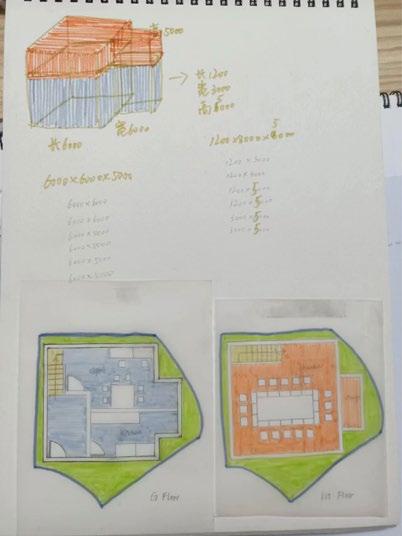
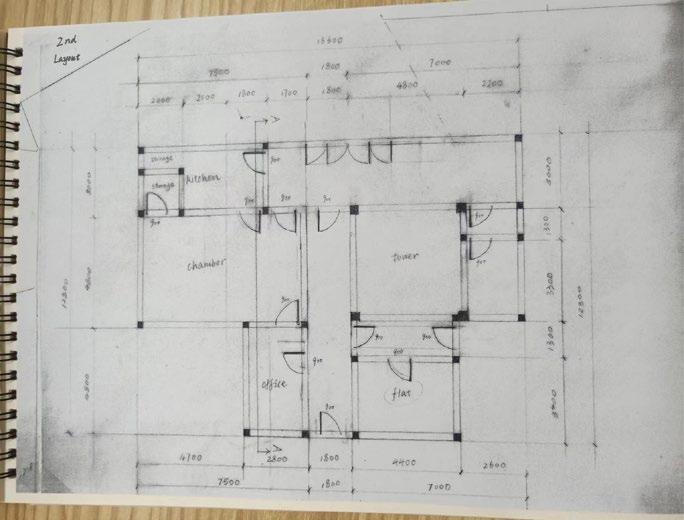
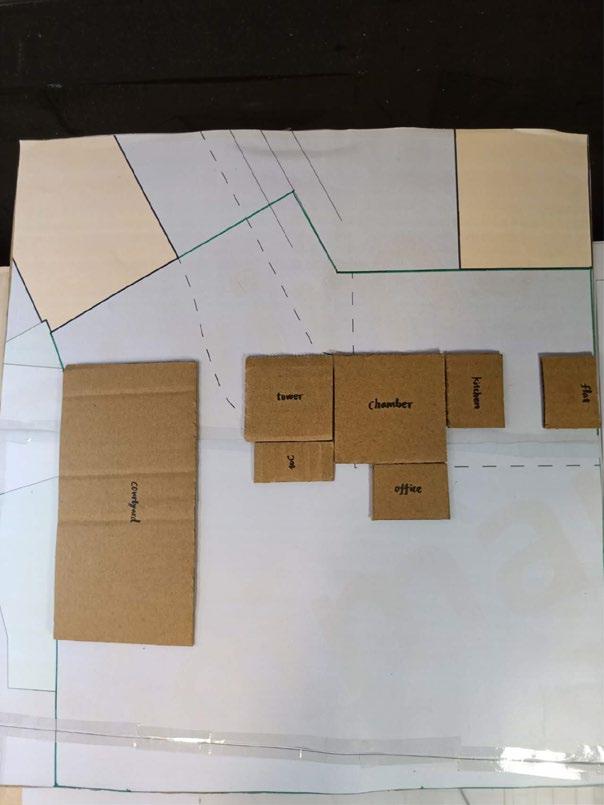
During the first week of design, I drew the drawings for the first and second layout of buildings on site. For the first layout , the tower was located at the centre of the site. Its base was a 4800mm*4800mm square with a height of 7500mm,which was changed into 12500mm later because it creates a stronger contrast with other surrounding buildings and better meets the height required for data collectors that accept urban wind It would be a tower being surrounded by many thin timber columns A 1600mm*1800mm lift would be at the centre of the tower The tightly-connected kitchen and chamber were located to the west of tower and opposite a corridor The kitchen has a small storage, and the chamber had the biggest storage among all the buildings on site. The kitchen had L-shaped cooking stations and a fridge.
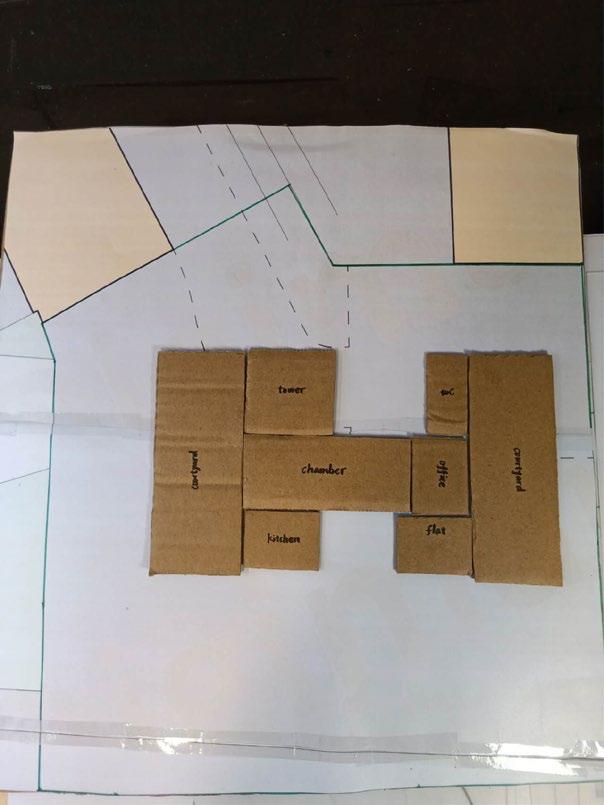
For the second layout , there were huge changes. Firstly, an ‘official’ lobby (not just a glass-shaded corridor as before, it had front door) acted as a traffic junction was put before entering the tower. Secondly, a wide corridor guided people to walk forward and let them see buildings clearly by both sides. Thirdly, office was connected to the chamber because I really want these working spaces to be together so that it would be more convenient Fourthly, the outline of the building group was neat and clear, moreover, it had the beauty of symmetry I made the circulation more natural Besides, this time I used these roofs to not only shade rain and snow but also for aesthetic effect of building groups Moreover, I changed the heights of different buildings I got the sense that different spaces may have their different heights for comfort.
Design Diary
Week 1 Summary (June 26-July 2)
Design Diary
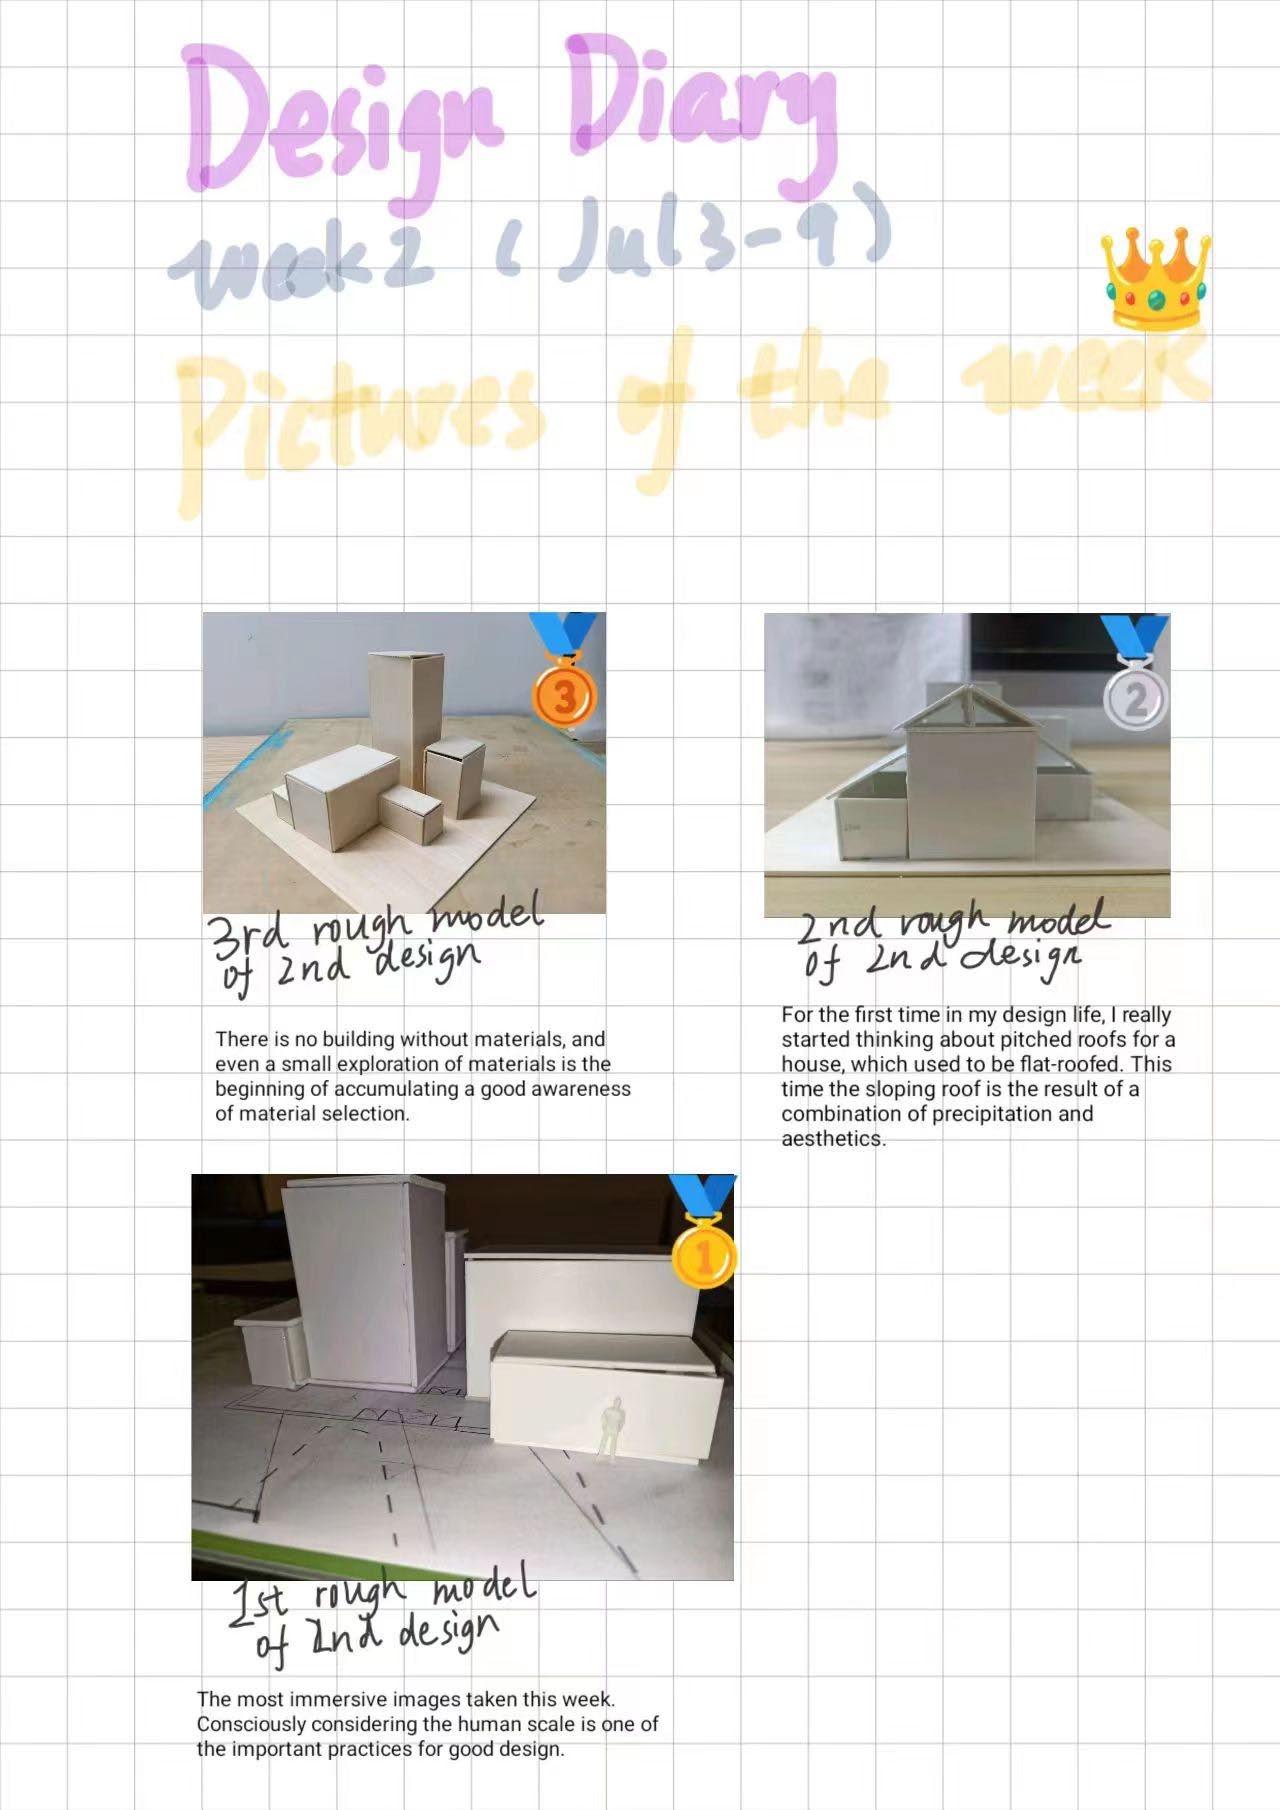
Week 2 Essence (July 3-9)
Week 2
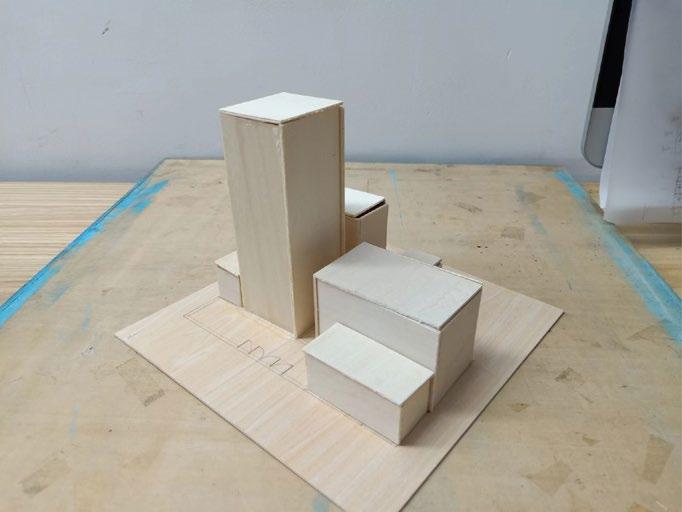
I continued studying the 2nd layout during this week I made three rough models of it The first one I made was made of foam I simply used massing blocks to represent the spaces in 3d just to feel whether this layout is suitable And I found it quite nice The little 1:100 scale person helped me to immerse into the little virtual world I created
My next step was to make it again but with more details. I wanted to represent the pitch roofs because they had certain rhythm in common, and they all contribute to the melody of the whole building group. This time I chose white paperboard because it looks neat and the dimensional error of the cut out is smaller. After this model was made, I had a better understanding of how the elevations affect the atmosphere and visitors’ feelings. Although the inner circulation path looked bit narrow, it was considered a convenient way for people to walk around the block. Besides, its visual connection was wonderful When people enter the site ,they will immediately see the tower and the inner circulation Buildings are arranged clearly, and the outline of the buildings is easy for them to figure out what is what
The third wooden model was the one I used for testing the construction material Even though they are blocks, they look like real buildings, which made me happy for a while.
Design Diary
Week 2 Summary (July 3-9)
Design Diary
Week 3 Essence (July 10-16)
Week 3
I started to look for some precedents for inspiration. I searched a few timber buildings and some buildings that are not made of timber just for admiring their shapes. Not only did I discovered some possibilities for shaping a building using timber, but also did I understood that there could be more connections between buildings, like using bridge or ramp to guide people to here and there, which made the whole building group more flexible. Besides , buildings could be designed to combine so that they will be a natural community, not an island group
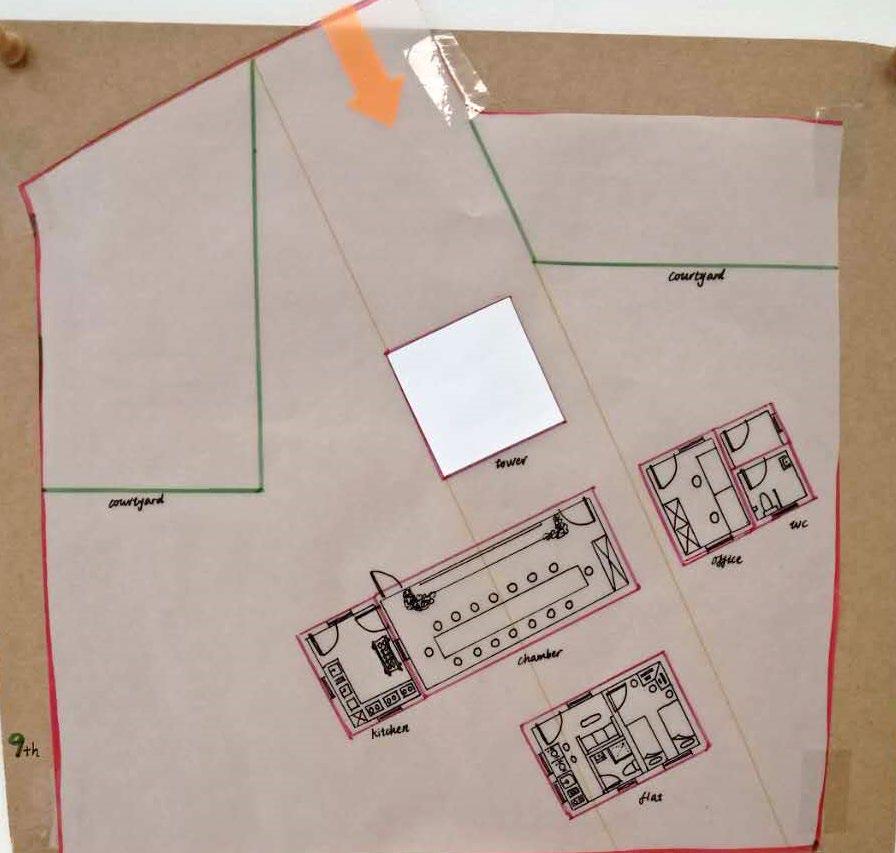
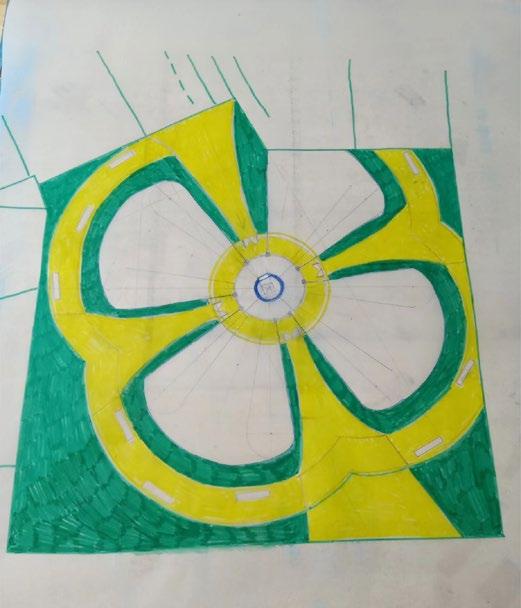
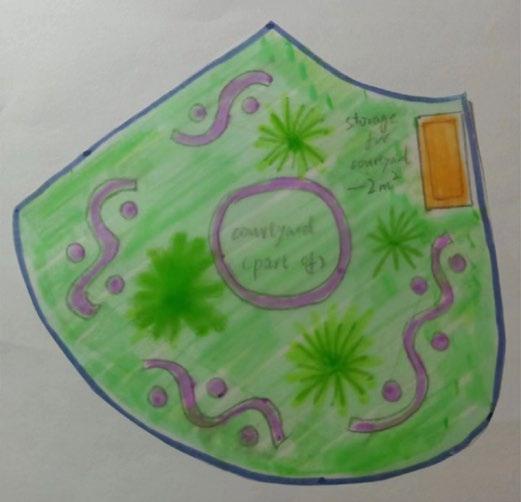
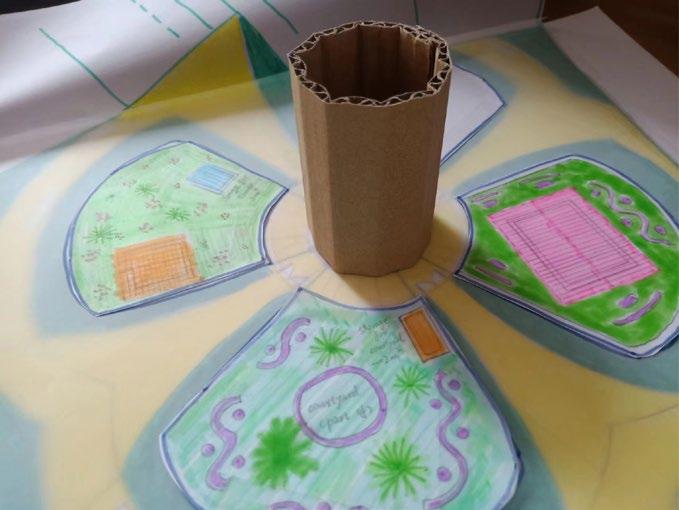
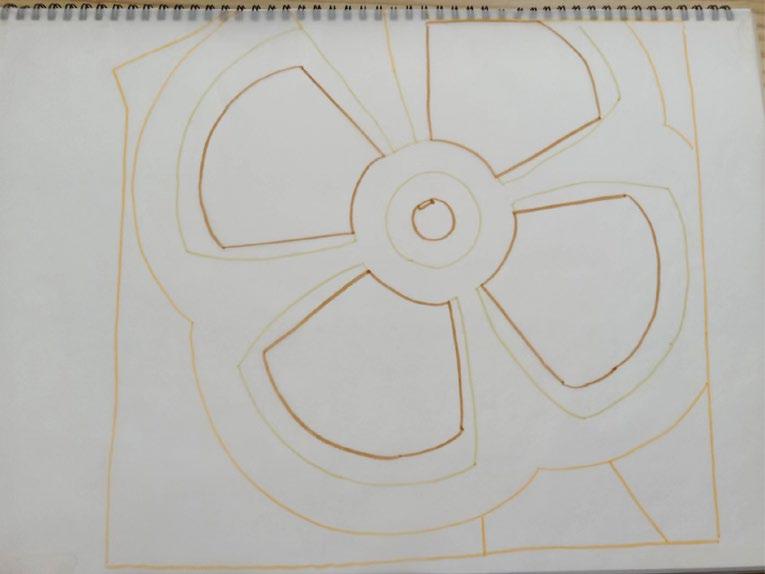
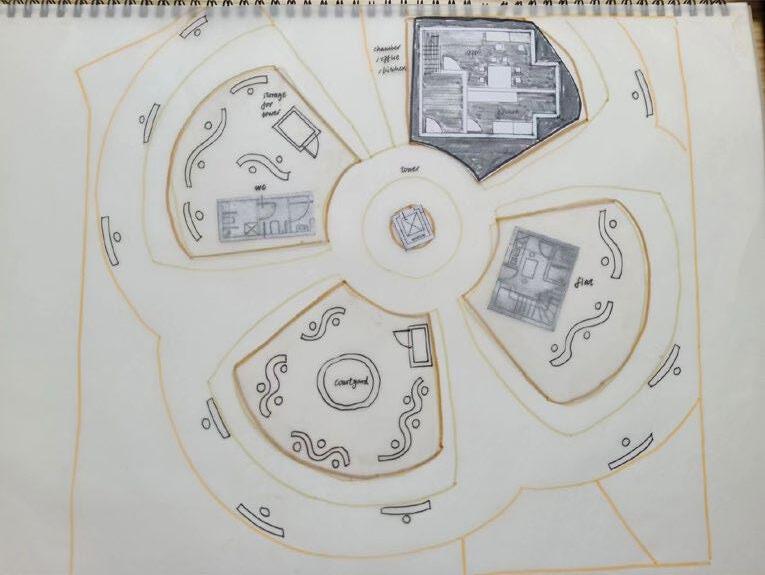
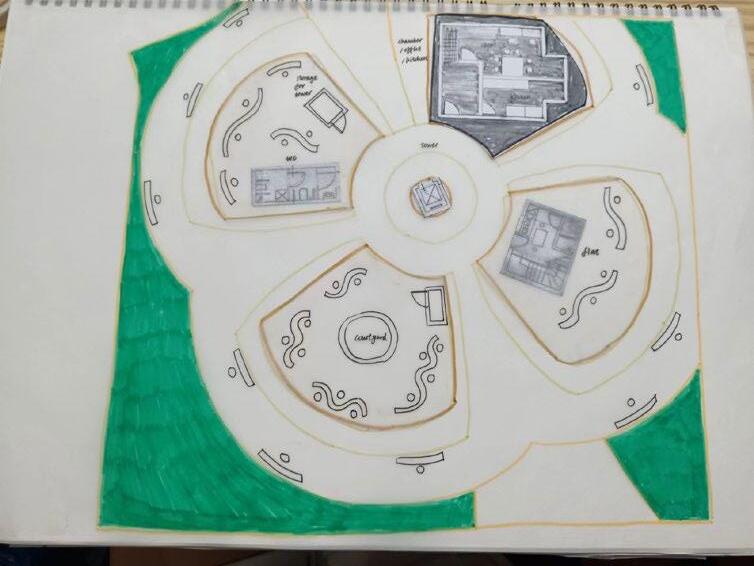
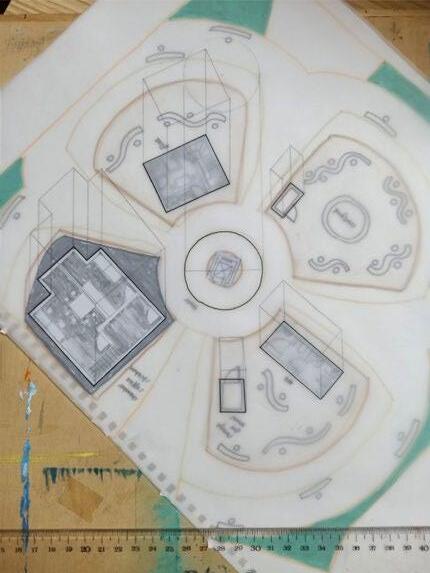
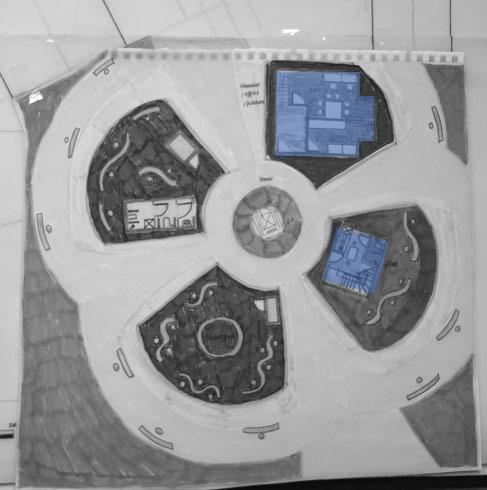
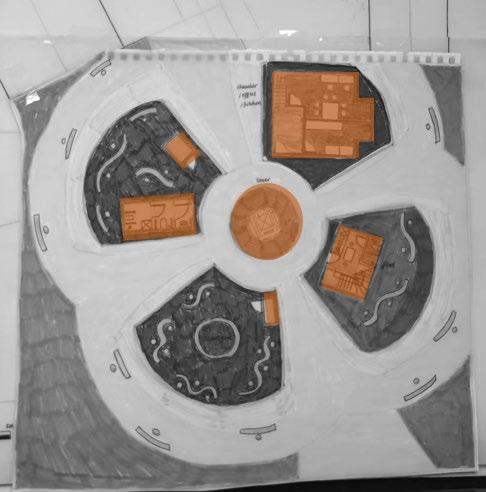
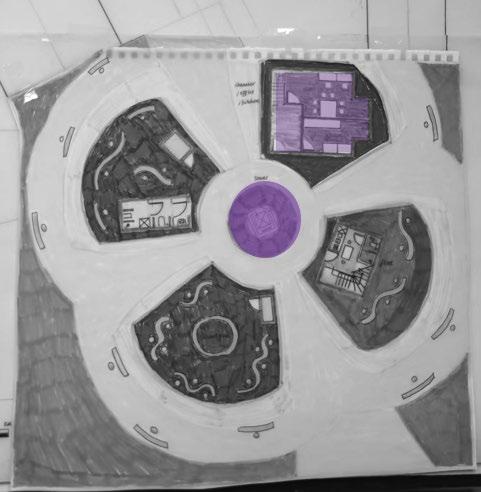
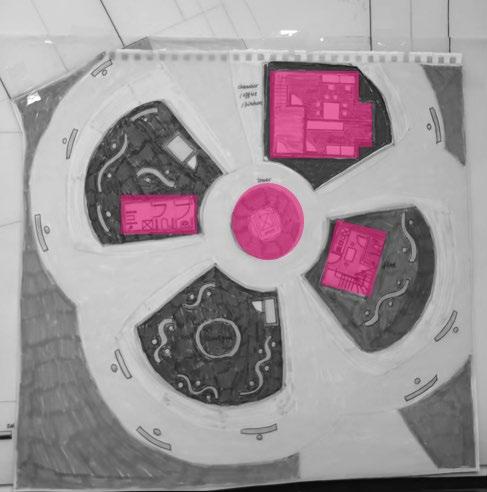
After my second layout, a completelydifferent third layout suddenly burst out at a midnight It was the first time that I consider using wide range of curves to express my division of spaces The plan looked like a huge ‘fan’, may making people directly think of ‘wind’ (that was my expectation). Or I could say it also looks like a beautiful flower with one round stamen( where lift/stairs/round corridor were located) and four scalloped petals(where various buildings were located). And it was also the first time that I considered doing a tower which was no longer a cube. (it is cylindrical ,for 360° wind experience and wellrounded scenery)
Design Diary
Week 3 Summary (July 10-16)
Design Diary
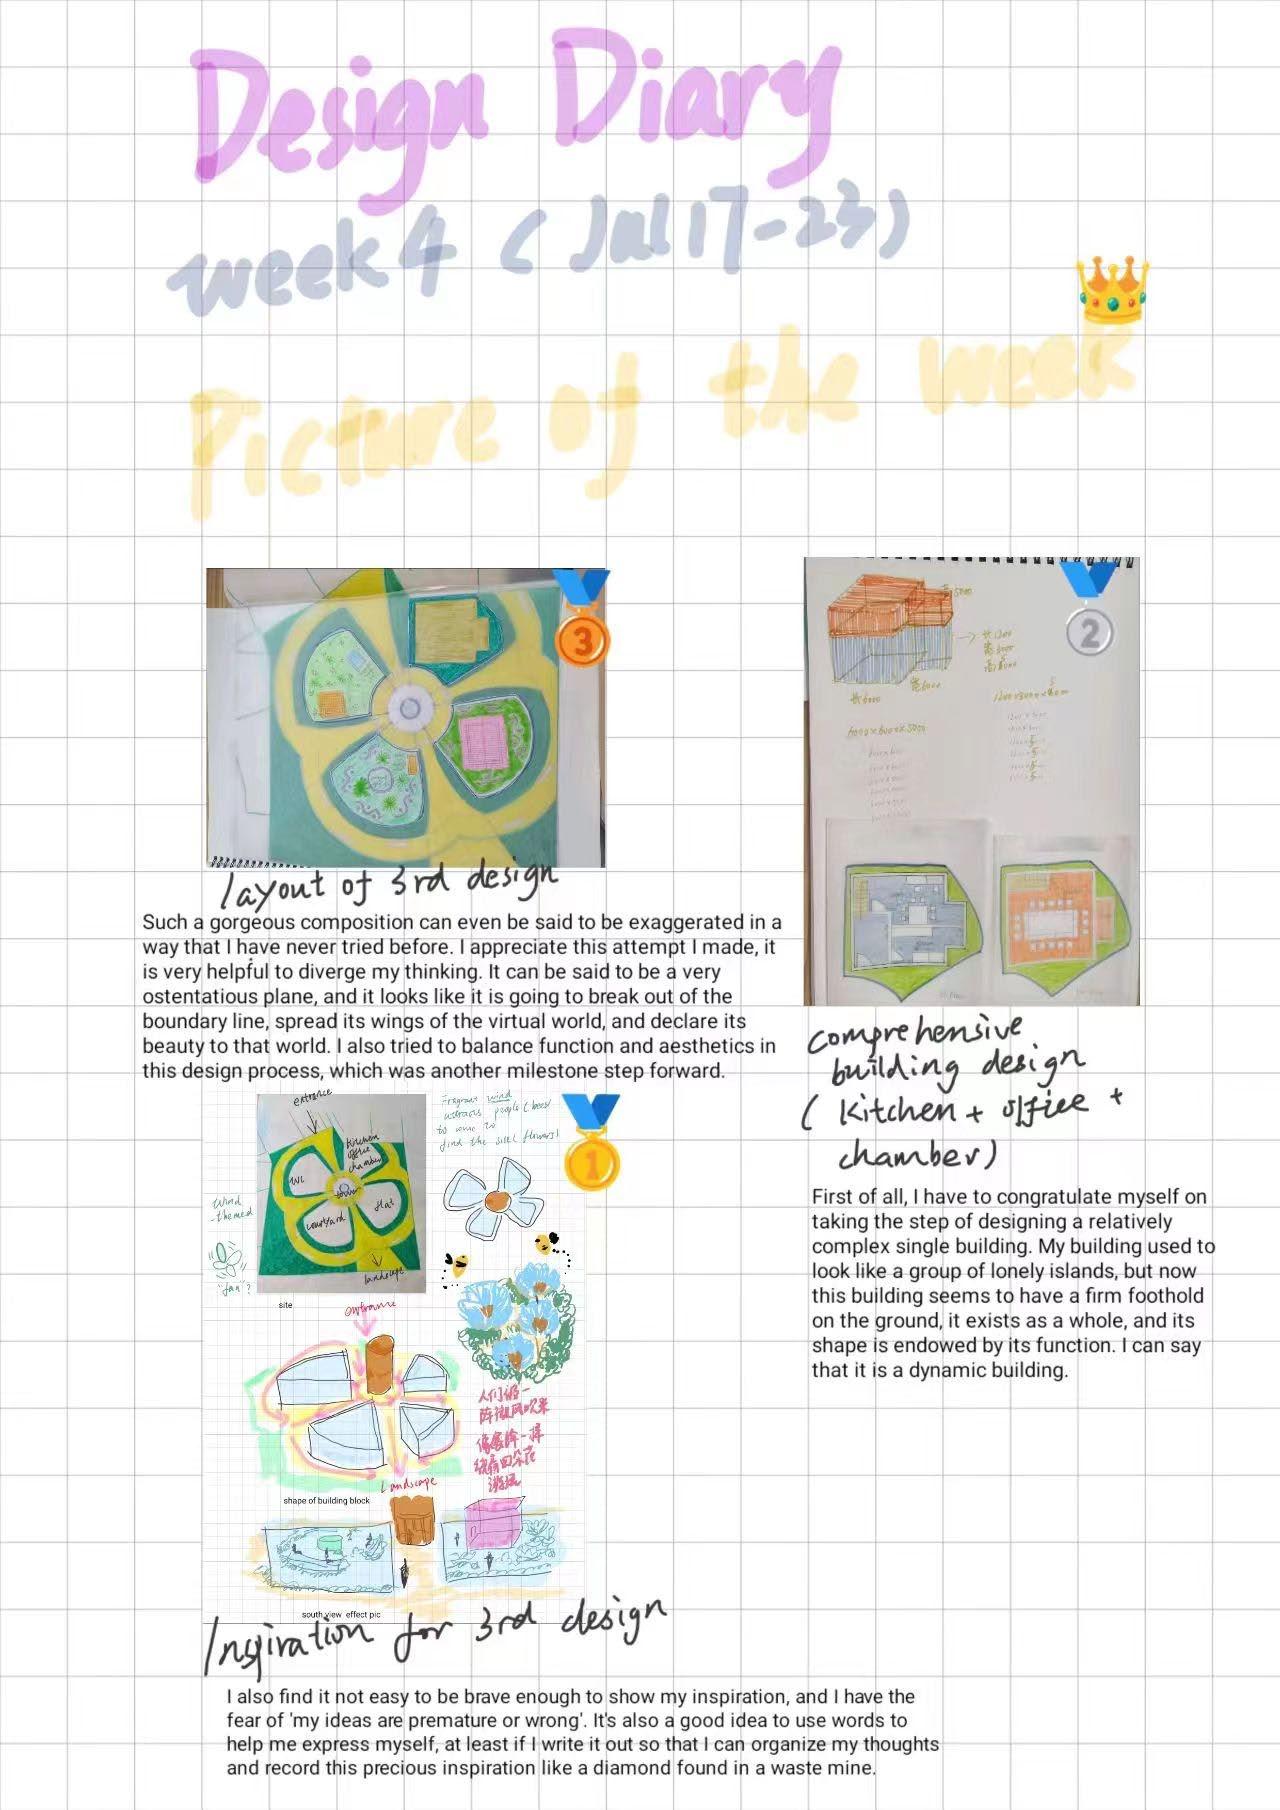
Week 4 Essence (July 17-23)
Week 4
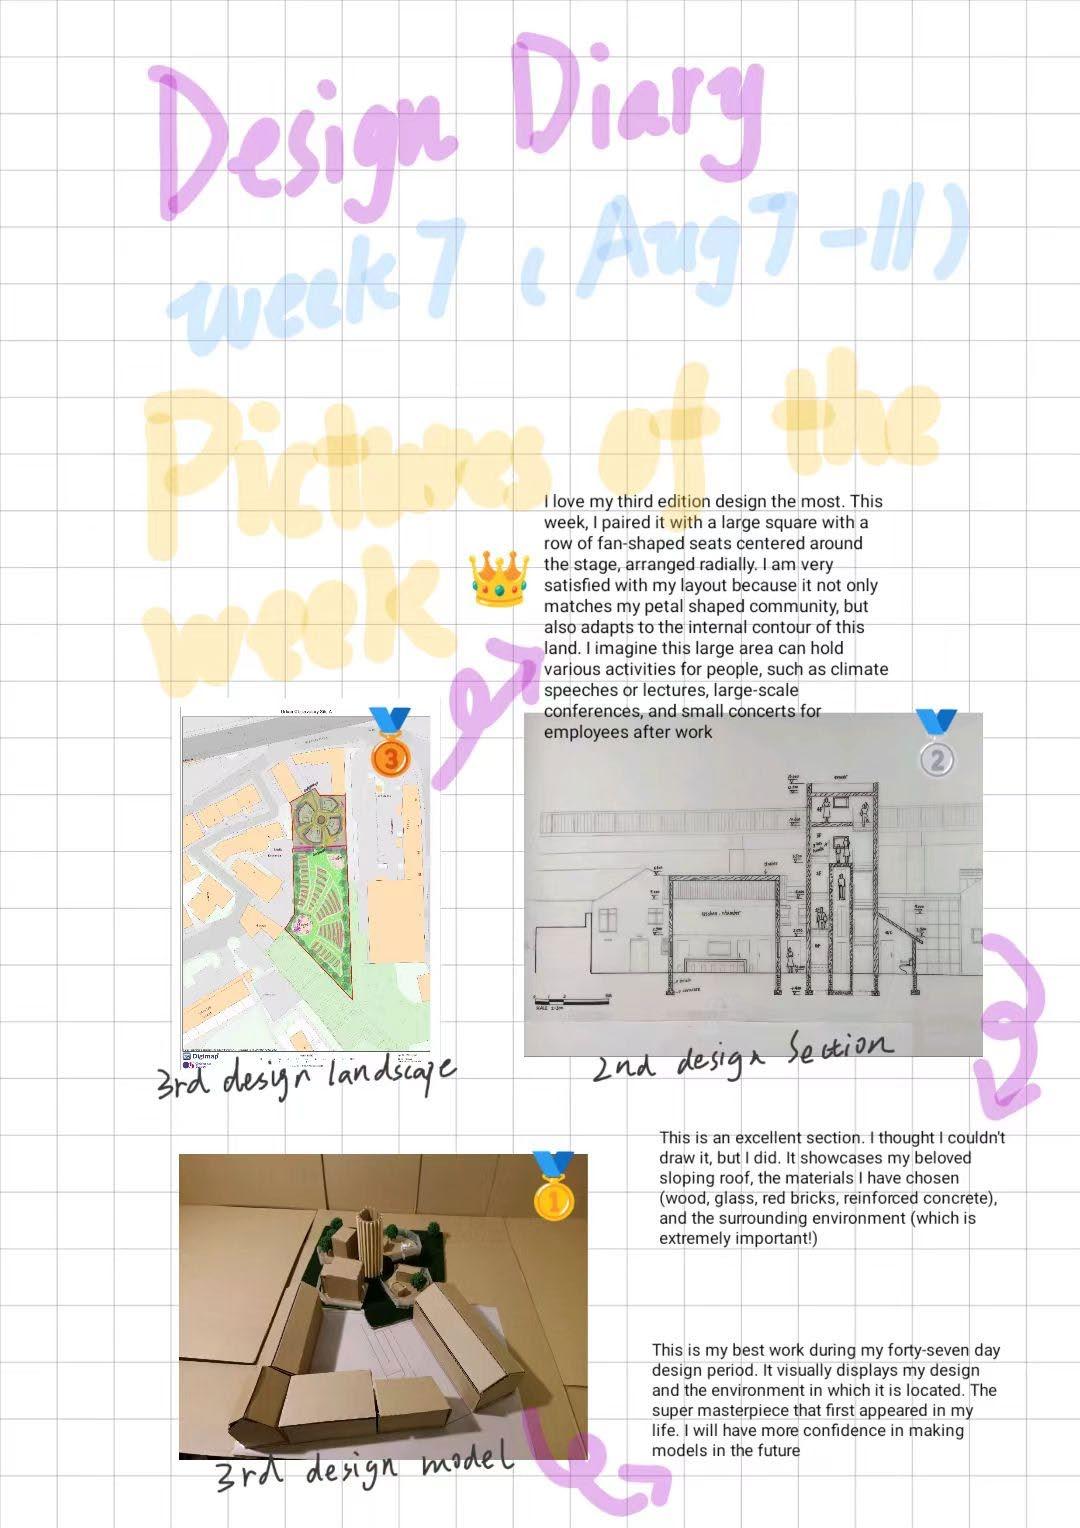
This week I feel like I'm slowly looking at it with a gem I've picked up. This gem is my third edition design. Although it seemed like an unrealistic and immature attempt, it ignited the fire of my design and made me see the light and possibility of design. I filled the four petal-like areas of my composition with several of the functional areas I needed to design Obviously, I didn't do a good job of implementing the requirements functionally, because the buildings were too scattered, although the layout of the entire courtyard allowed people to move between the functional areas I cherish this attempt, even though it is not considered my final design.
I also copied and pasted the key drawings I had drawn in the previous weeks in my sketchbook, which recorded my growth and inspired me to start again.
Design Diary
Week 4 Summary (July 17-23)
Design Diary
Week 5 Essence (July 24-30)
Week 5
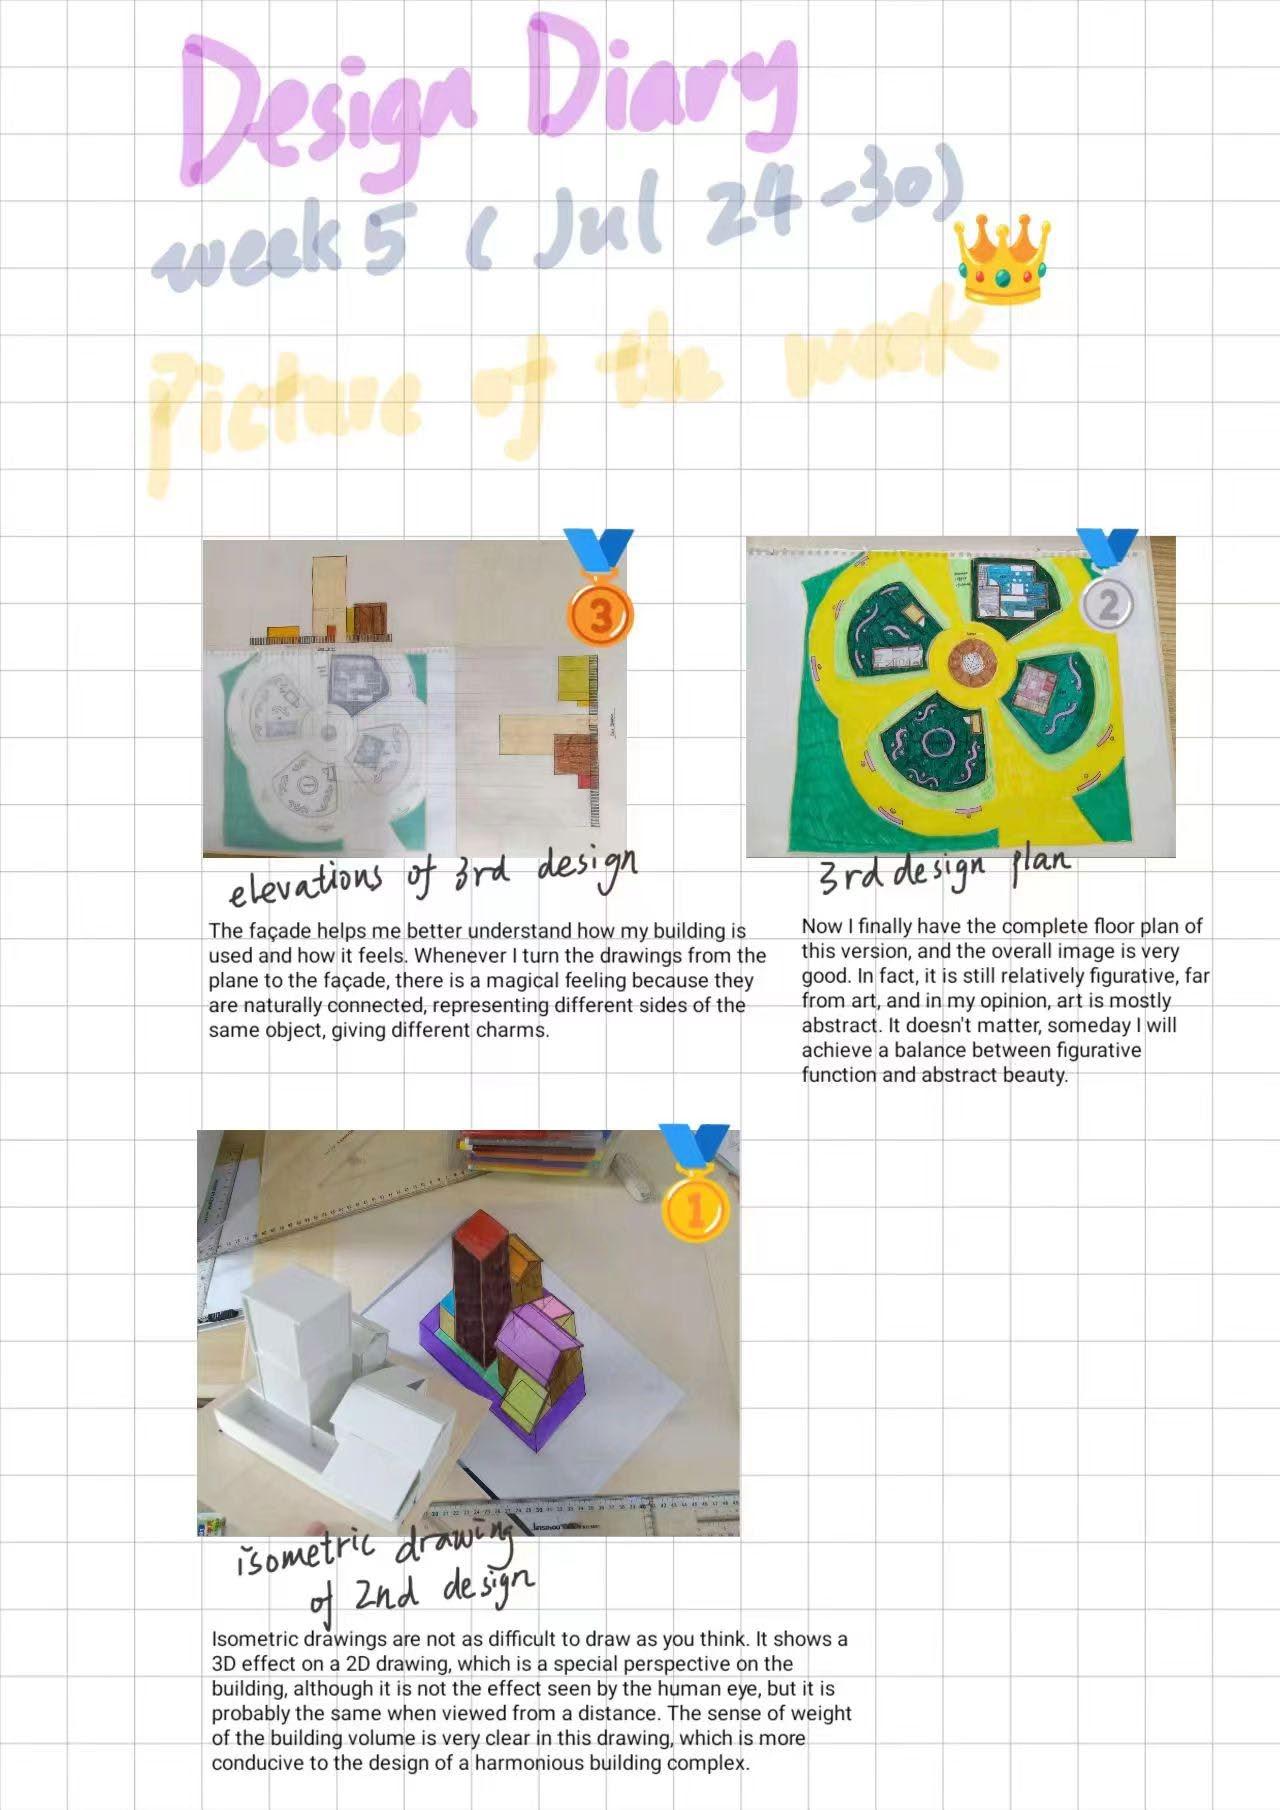
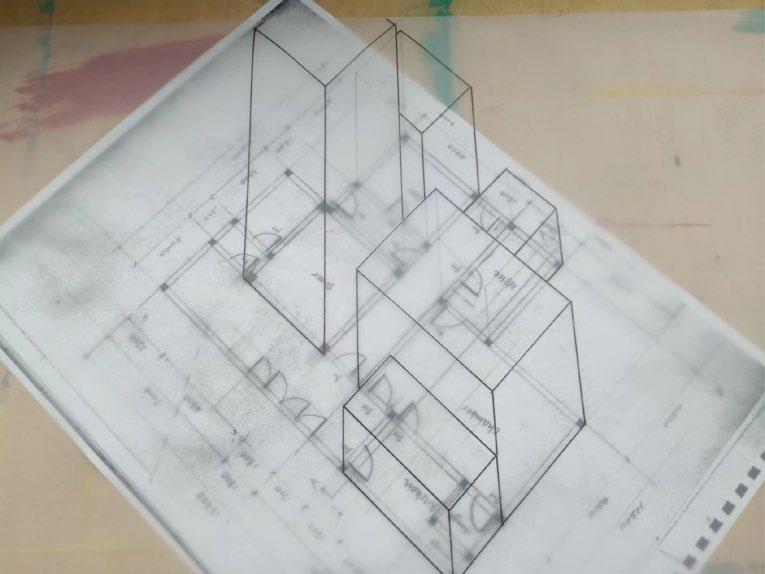
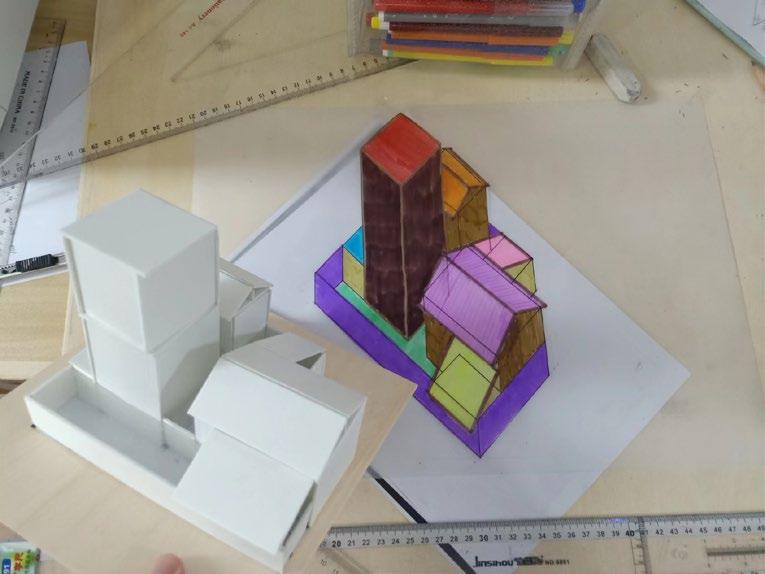
This week I explored the design of the second and third editions from different angles For the second edition of the design, I drew an axonometric drawing for the first time in my life, and I was very excited For the third version of the design, I perfected its plan, and roughly drew several of its facades, the effect is okay, can reflect some architectural language, but there is still a certain gap from the reality. The progress of isometric drawing is precious, which gives me the courage to continue to make axonometric drawings of buildings in the future, which is equivalent to opening a new pair of eyes and allowing me to see a whole new world. For the exploration of the façade, I think I still need to practice more and strive to make a building like building, haha!
Design Diary
Week 5 Summary (July 24-30)
Design Diary
Week 6 Essence (July 31-Aug
6)
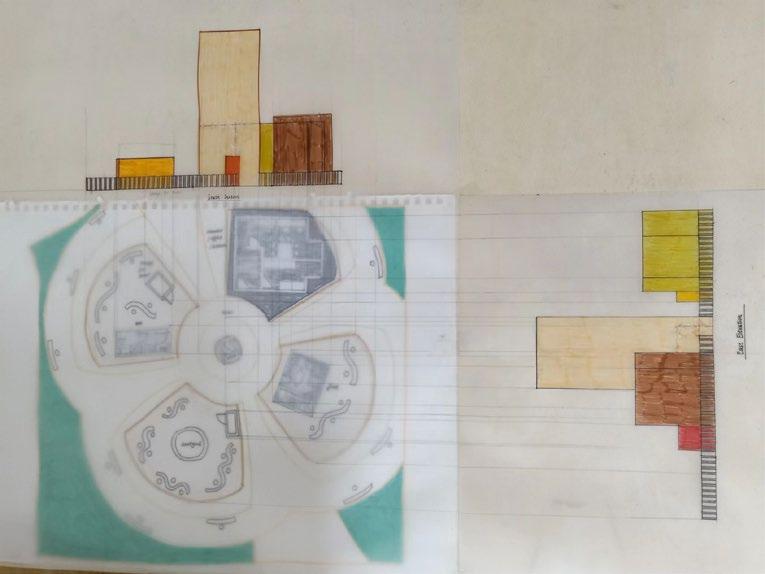
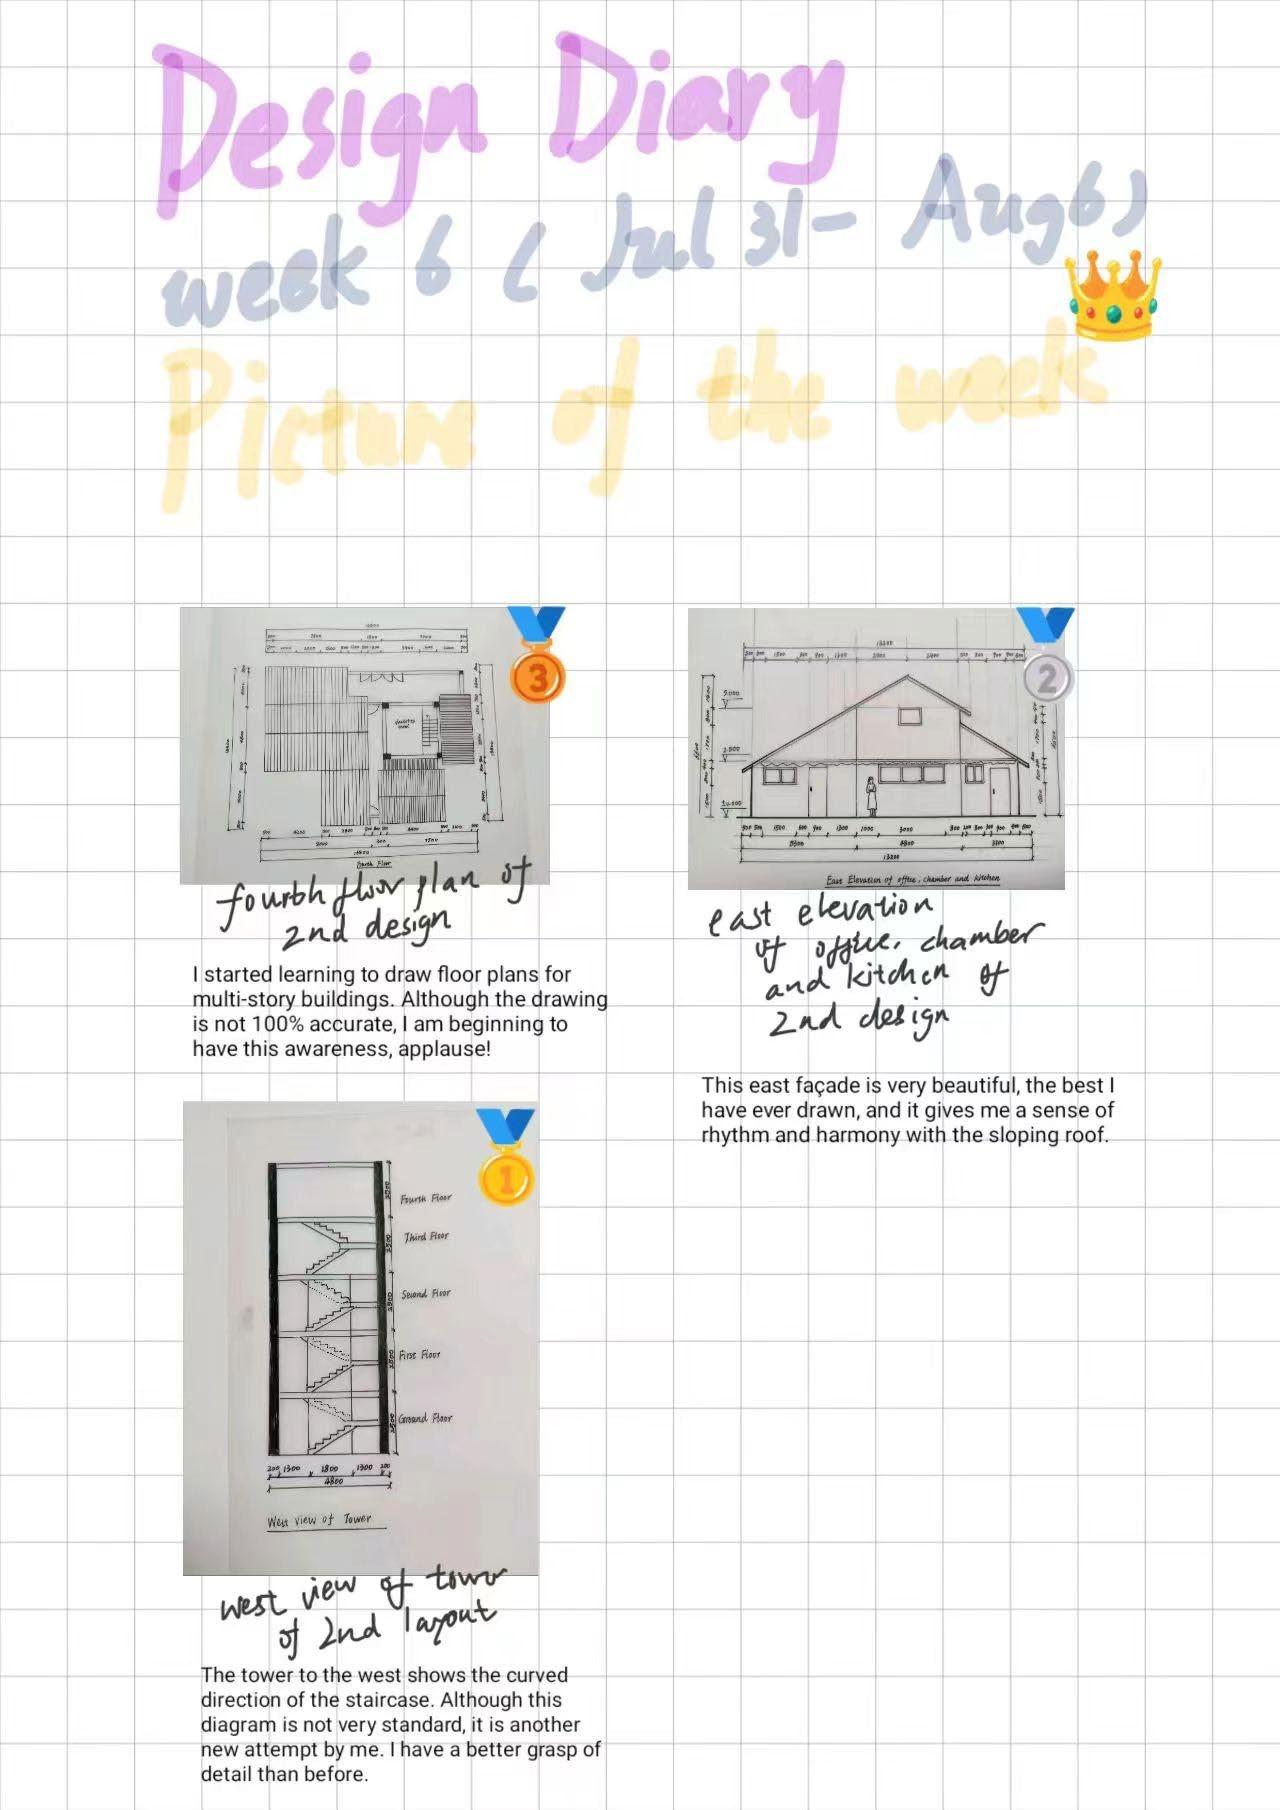
I have redrawn all the drawings for the second design this week The second drawing made me feel that I have made a lot of progress, not only expressing more accurately, but also making the lines cleaner. I once again felt the beauty of a sloping roof However, there are still some issues with my drawings, such as unclear division of line thickness and unnecessary content in other plan layers in the plan drawing of each plan layer I will pay more attention to it in the future.
Another thing I wanna mention is the tower. It is always the most difficult part of design for me, but I tried my best to draw the tower separately again and again before the time I need to draw the whole site elevation Practice makes progress!
Design Diary
Week 6 Summary (July 31-Aug 6)
Design Diary
Week 7 Essence (Aug 7-11)
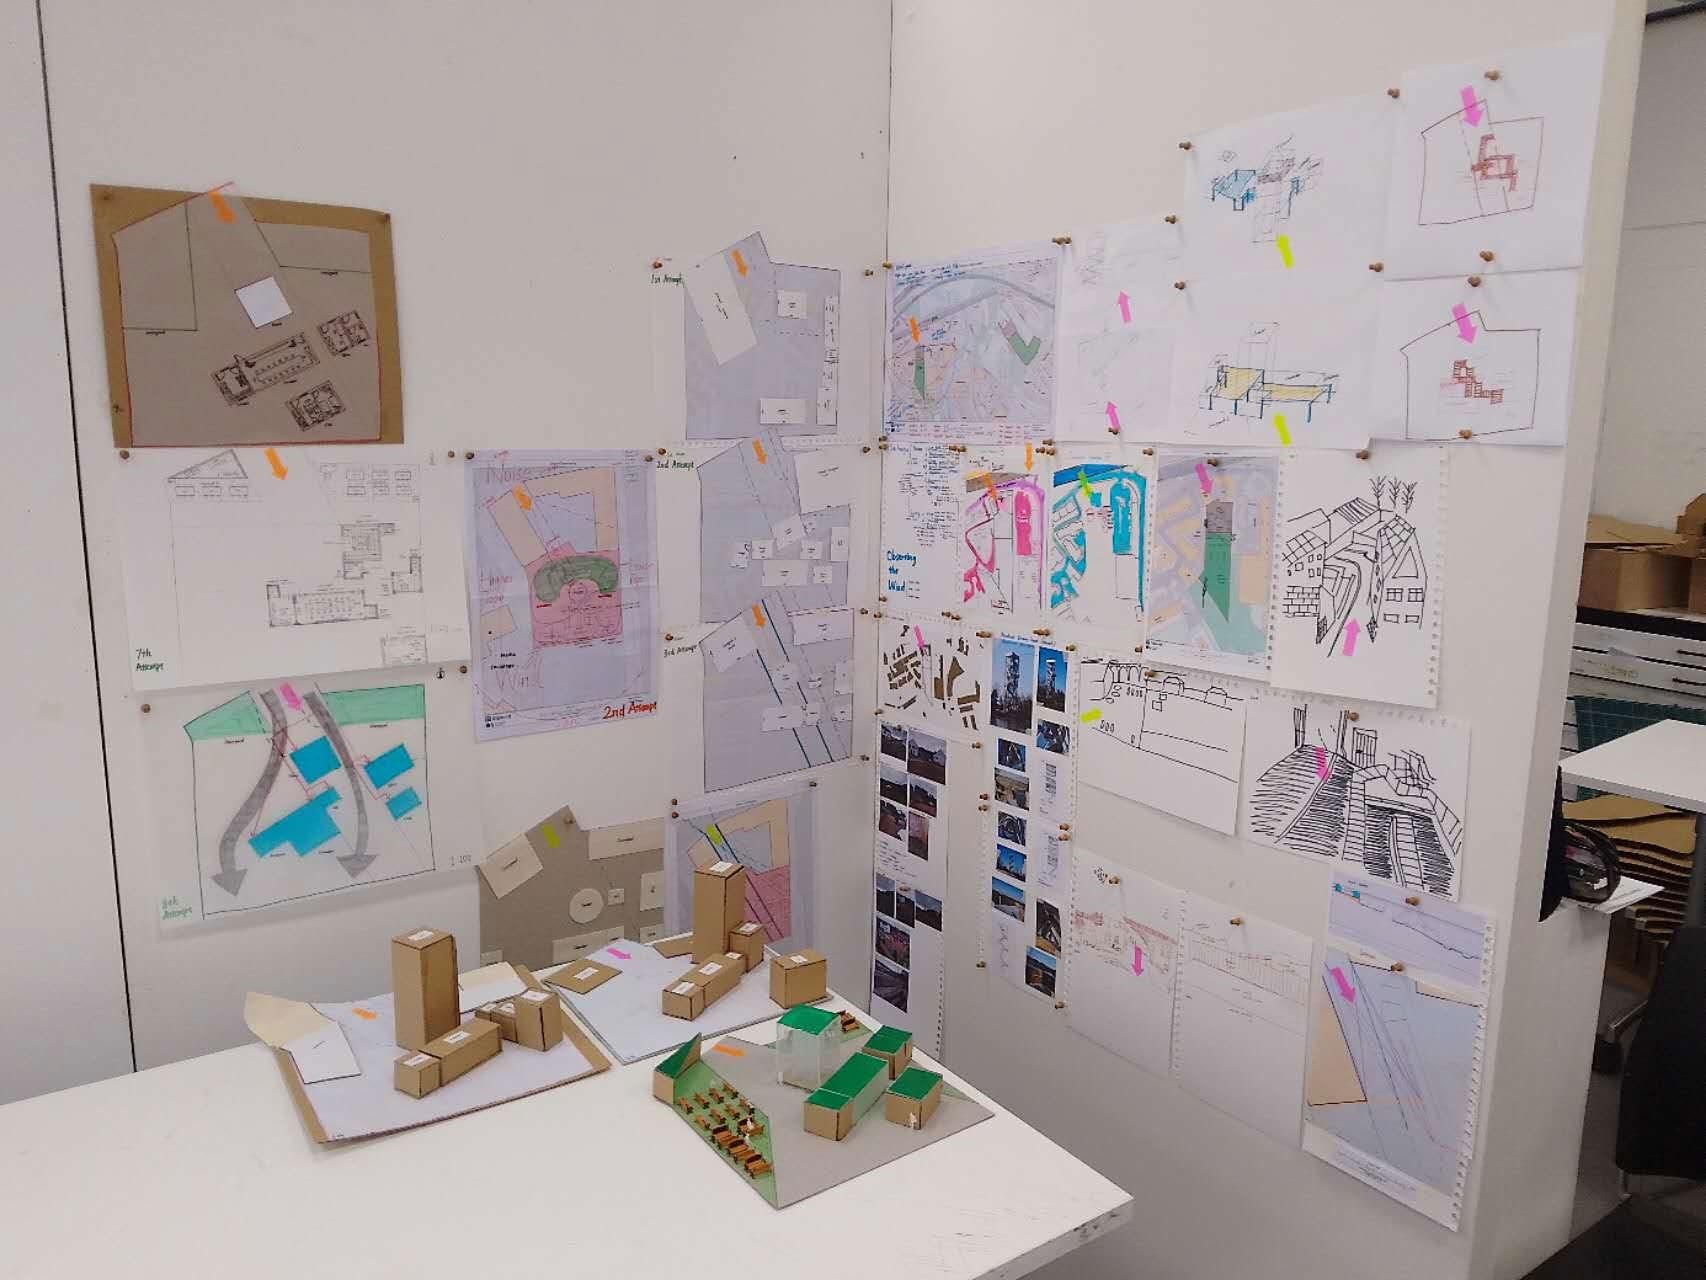
This week, I integrated the surrounding environment into the final drawings, drew important architectural drawings, created an interesting collage, designed two sets of supporting landscapes, produced two sets of models, and organized all the processes and achievements of the past 47 days. I felt very happy.
Design Diary
Week 7 Summary ( Aug 7-11)
Diagram Analysis
When I produced a massing diagram, I didn’t rush to make another new one I carefully analysed its advantages and disadvantages before I moved forward
Rigorous Plan
1 2
My plan looks more professional than before I gradually realized its importance and understood how to represent your thought through different lines.
Inspiration Exploration
4
Creativity is not easy to come by. After I finished the second version of the drawings, I had a bold new design Although it may seem unrealistic, it was a precious exploration for me
Precedent Study
5
I really learned to apply excellent architectural works to my own design this time, rather than letting them ‘drift with the wind’ in my world.
New Testing Method
3
For the first time in my history, I drew isometric drawings for my designs It seems to have opened a new window for me, who used to be enclosed, allowing me to see the world from different perspectives
Detailed Section in Context
6
This can be said to be a revolution for me. I successfully integrated my design into the surrounding environment, and for the first time in my life, I was able to imagine how my design would look in reality.
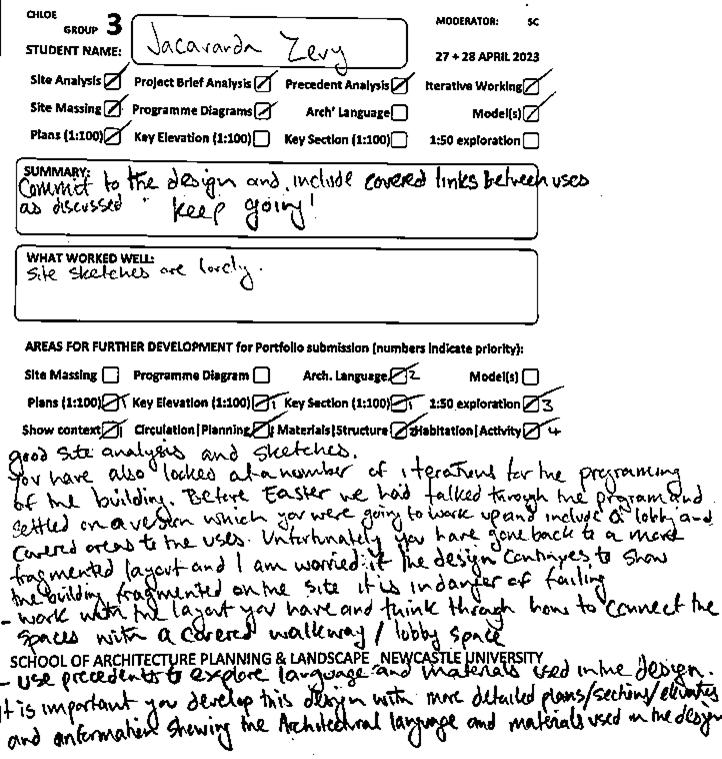
Project 1.4 Resubmission
Site Observation
Project 1.4 Resubmission
Site Analysis
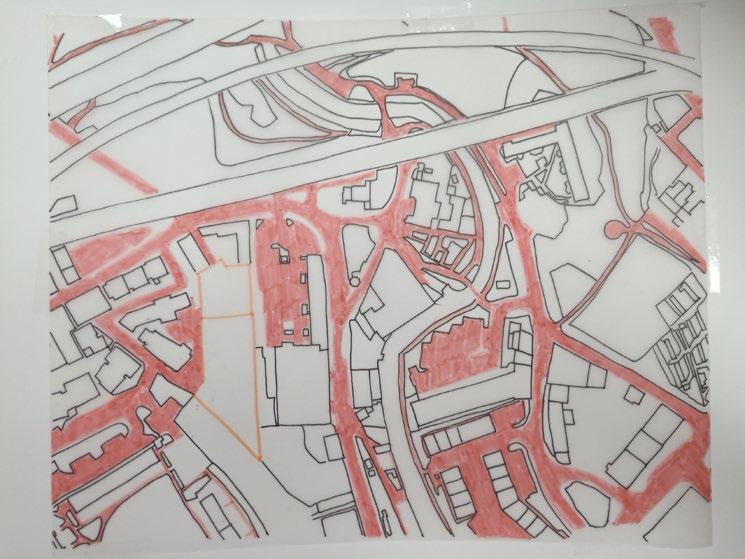
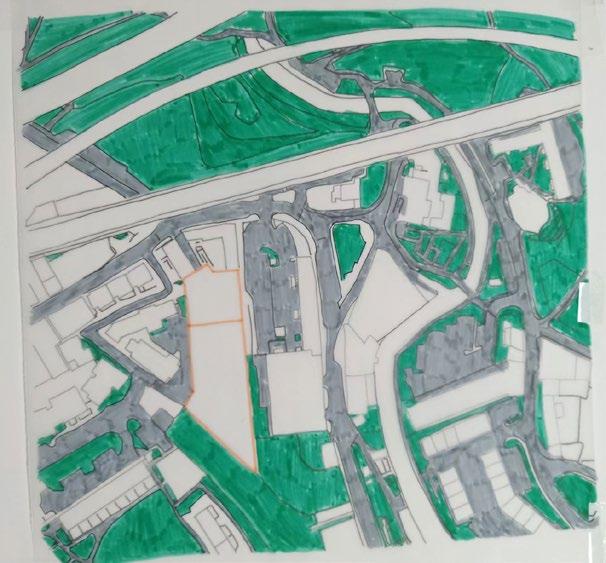
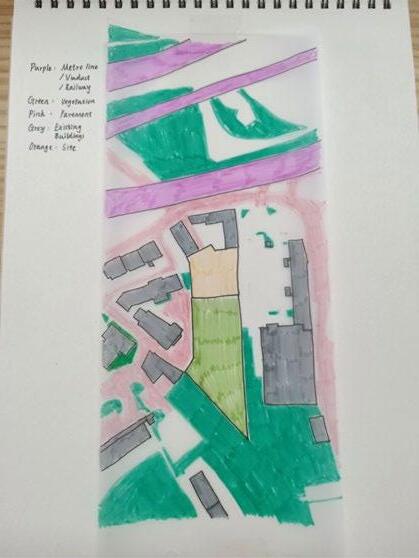
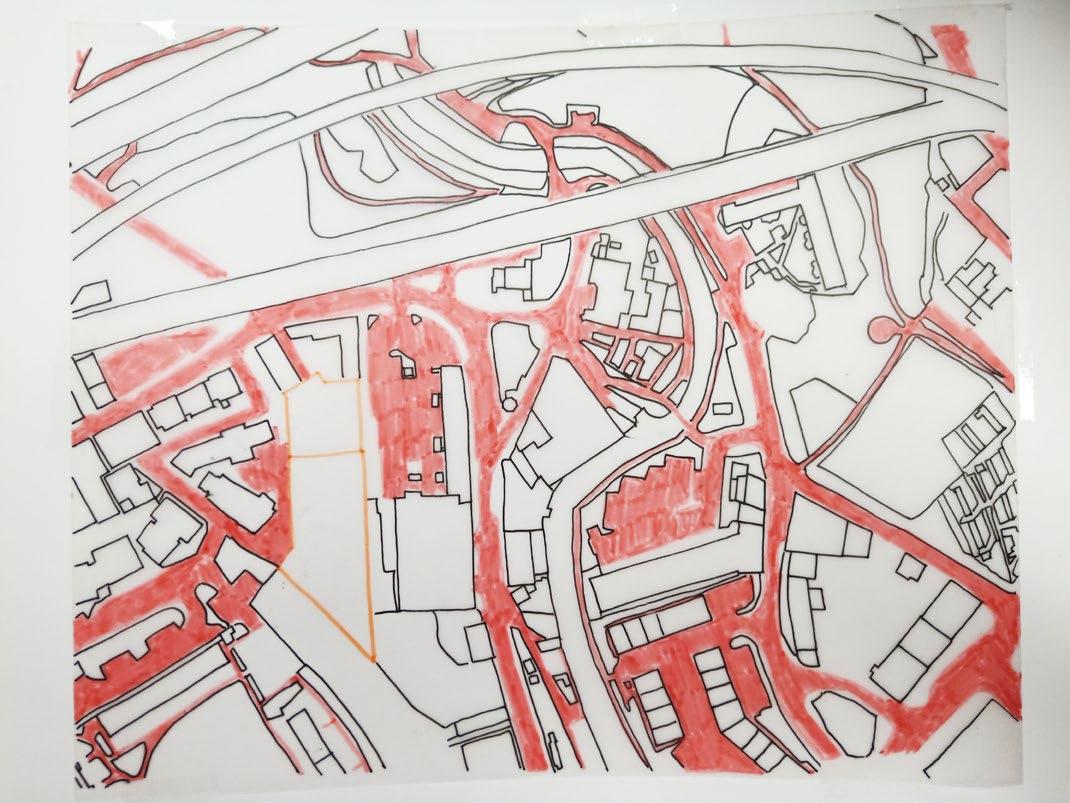
A long north-south river Plenty of Narrow Cement Road
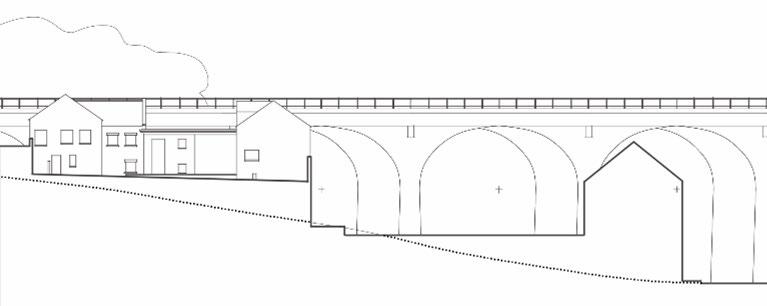
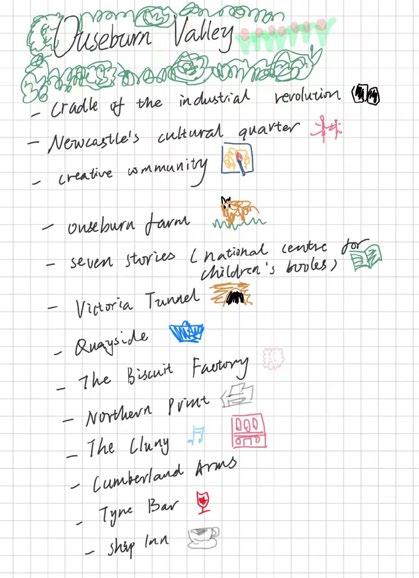
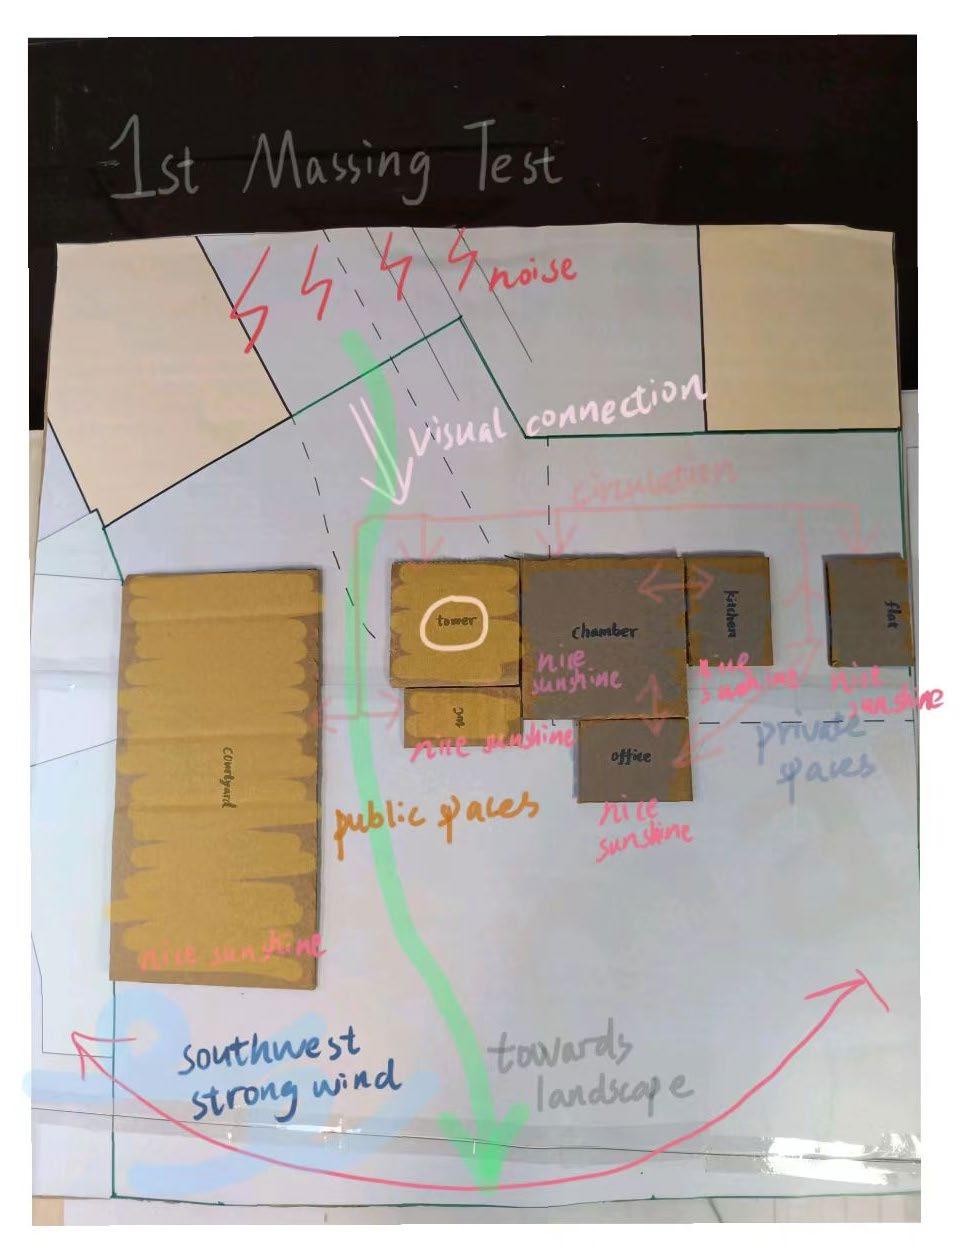
The site is in the middle of Newcastle Ouseburn Valley, a place where the remnants of old industry and artistic atmosphere blend together It seems like the bustling city centre of Newcastle and here are two different worlds, a relatively independent, scenic, pristine, and quiet area The sunlight from the south, the noise from the north, the strong winds from the west, and the livestock industry from the east are all imperceptibly affecting this land and surrounding buildings This time I am going to present three versions of design for this project
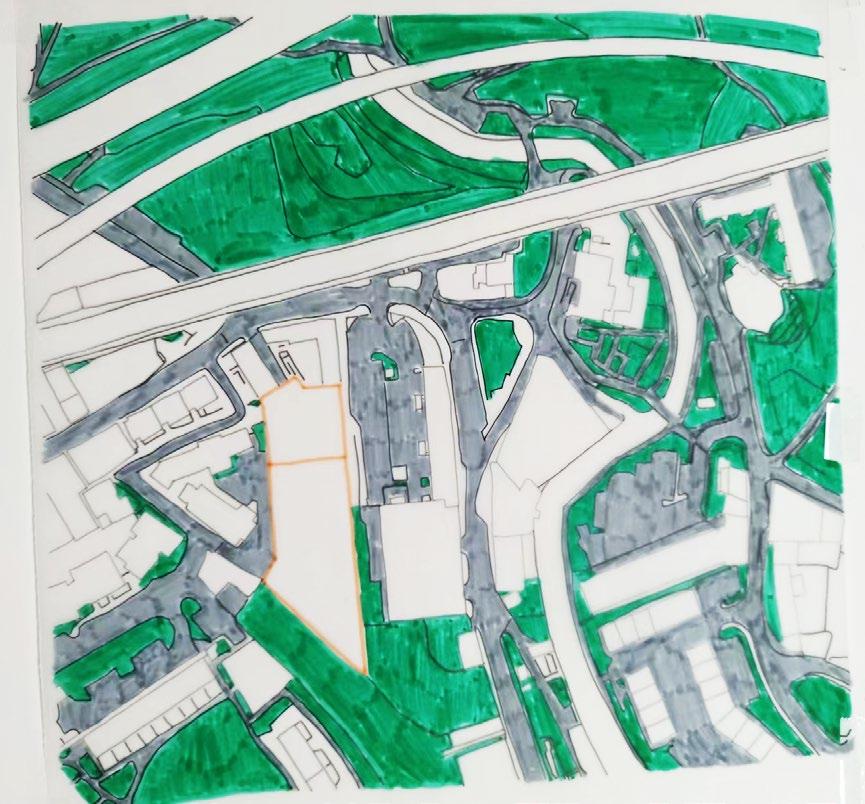
High Greening Rate Southern Sunlight W
Ouseburn Speciality
Project 1.4 Resubmission
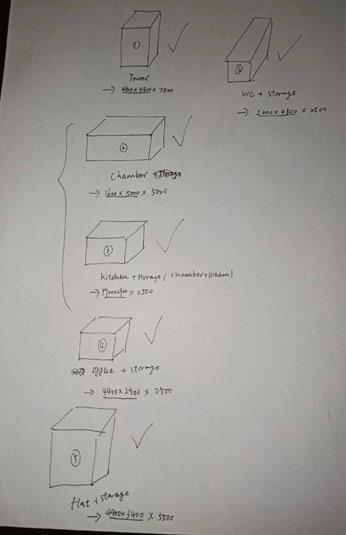
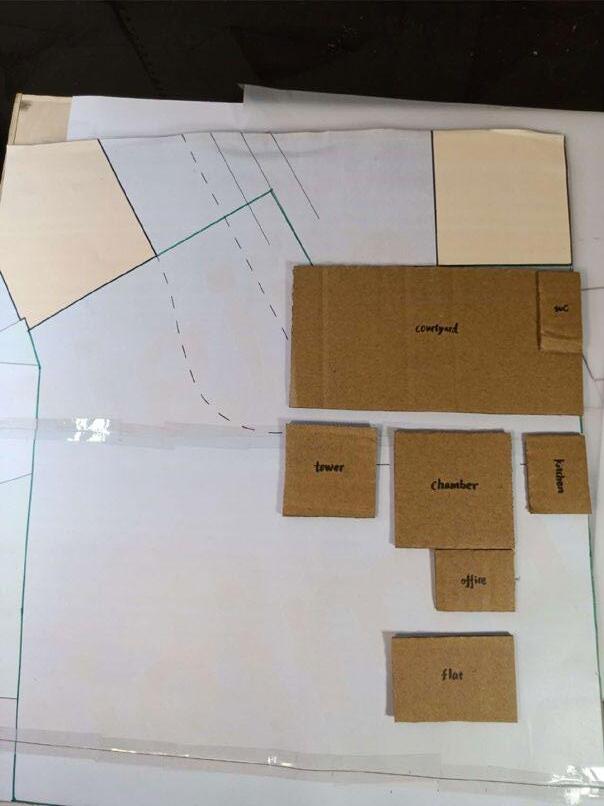
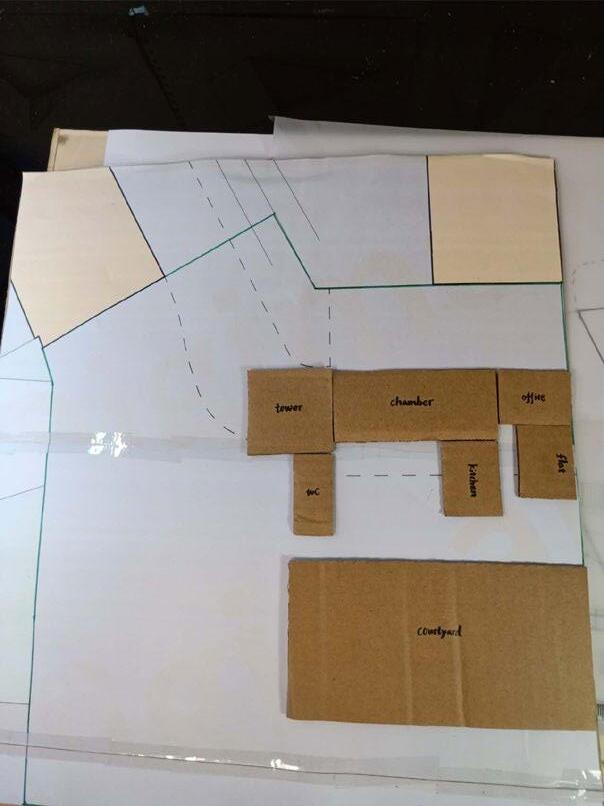
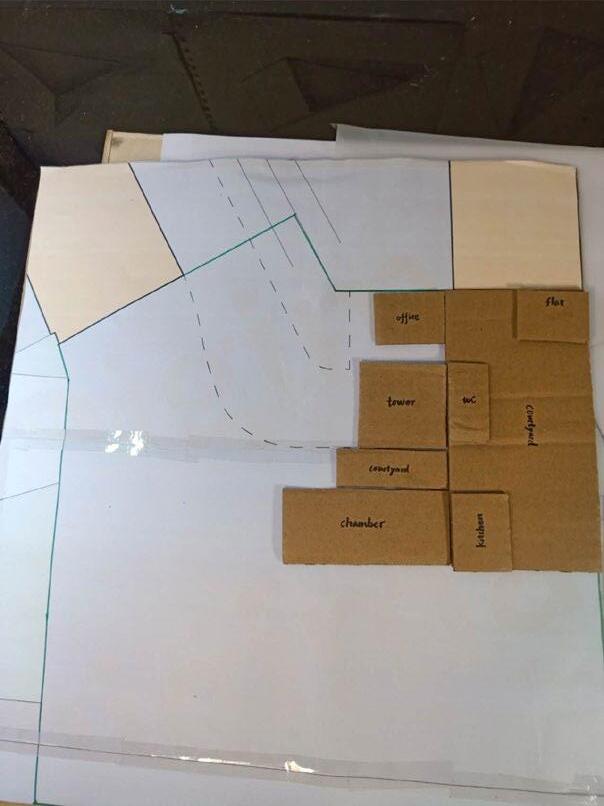
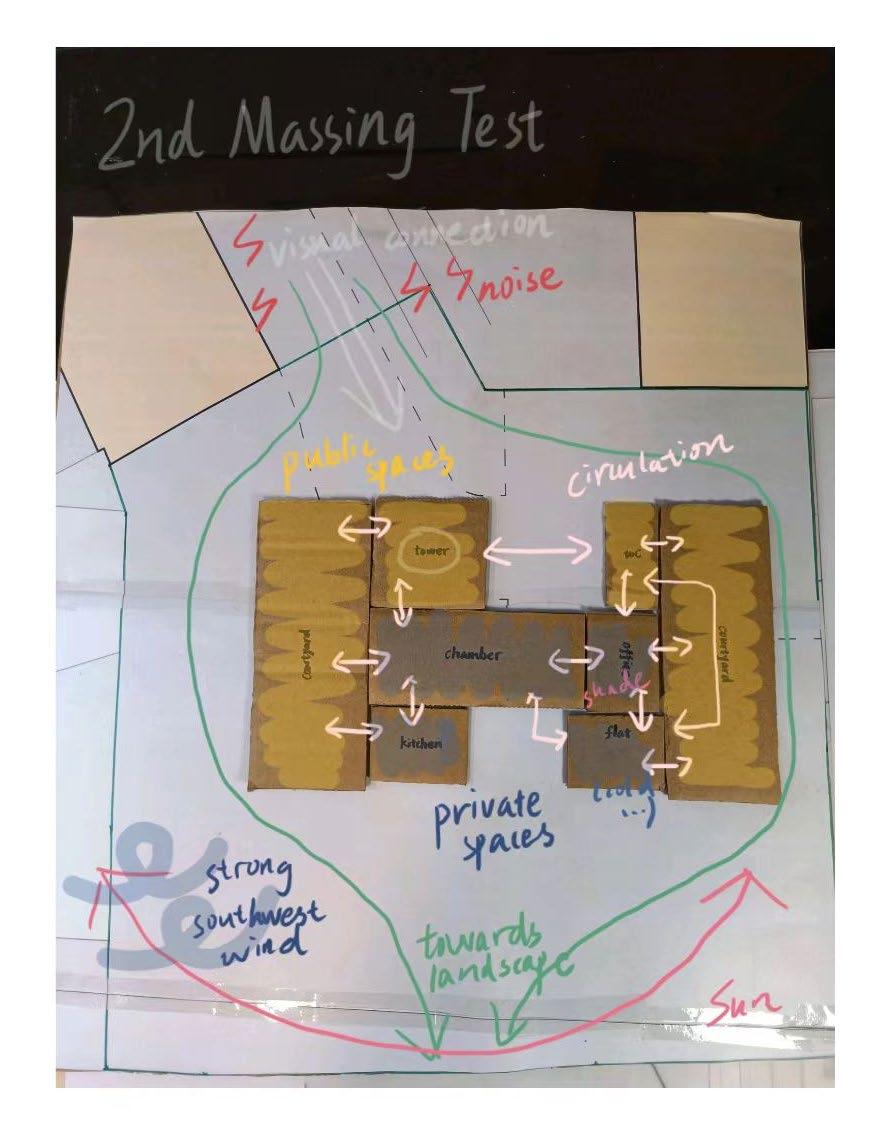
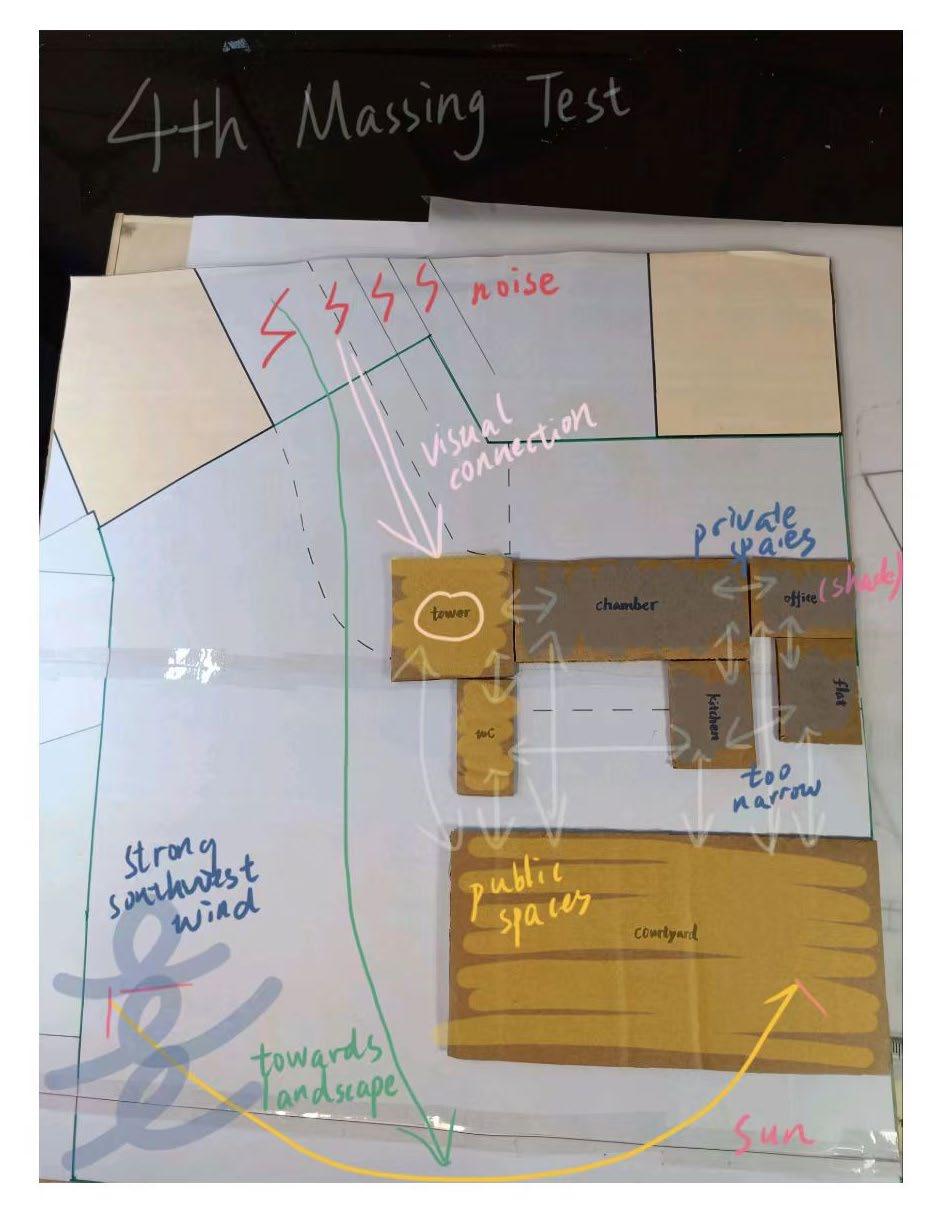
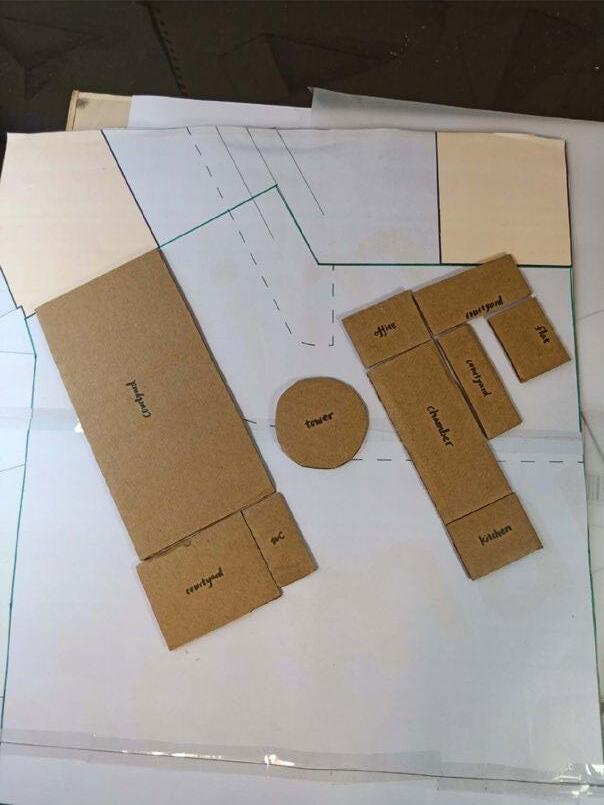
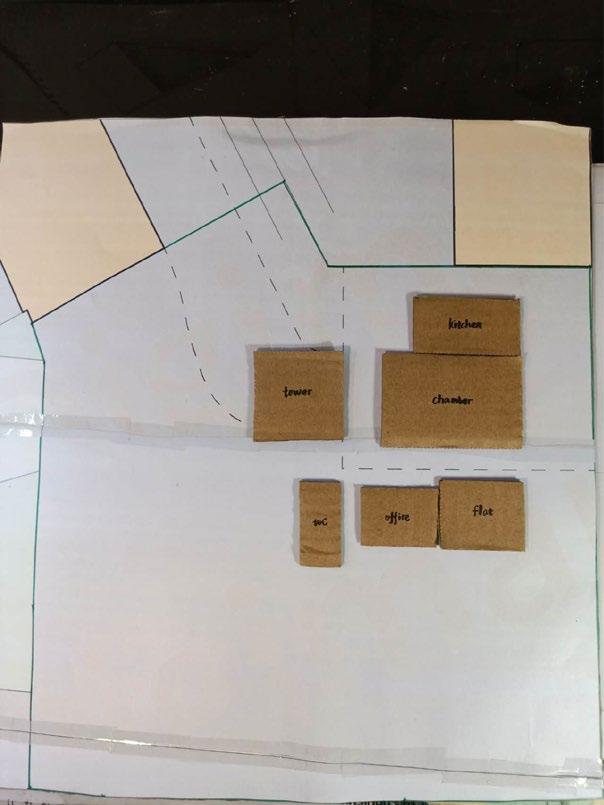
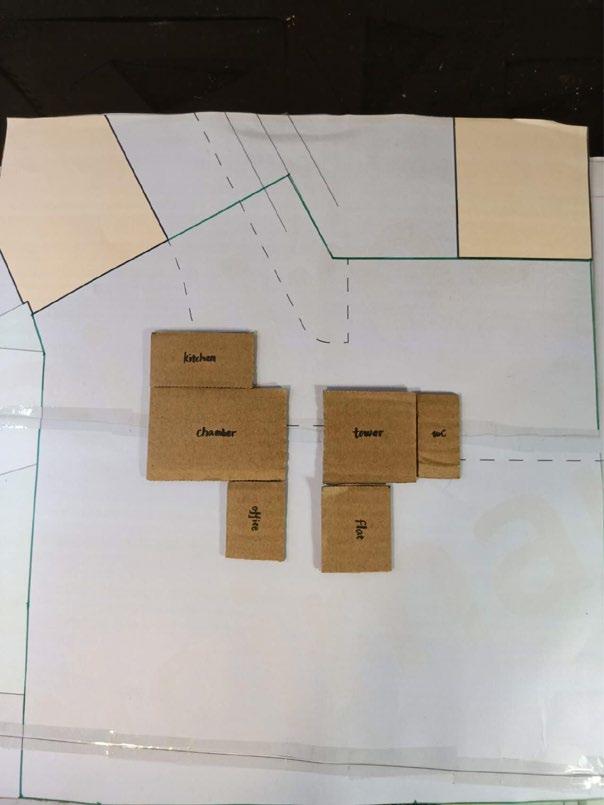
Massing Test Diagrams Page 1
Project 1.4 Resubmission
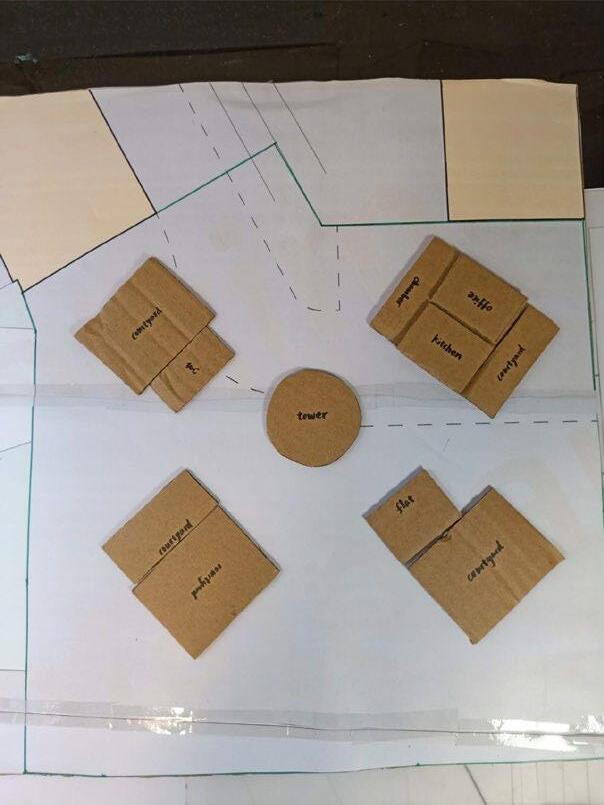
Massing Test Diagrams Page 2
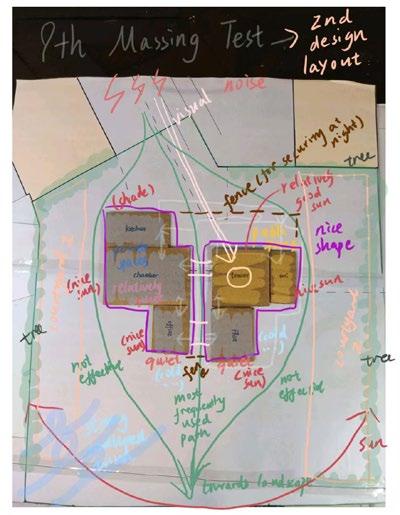
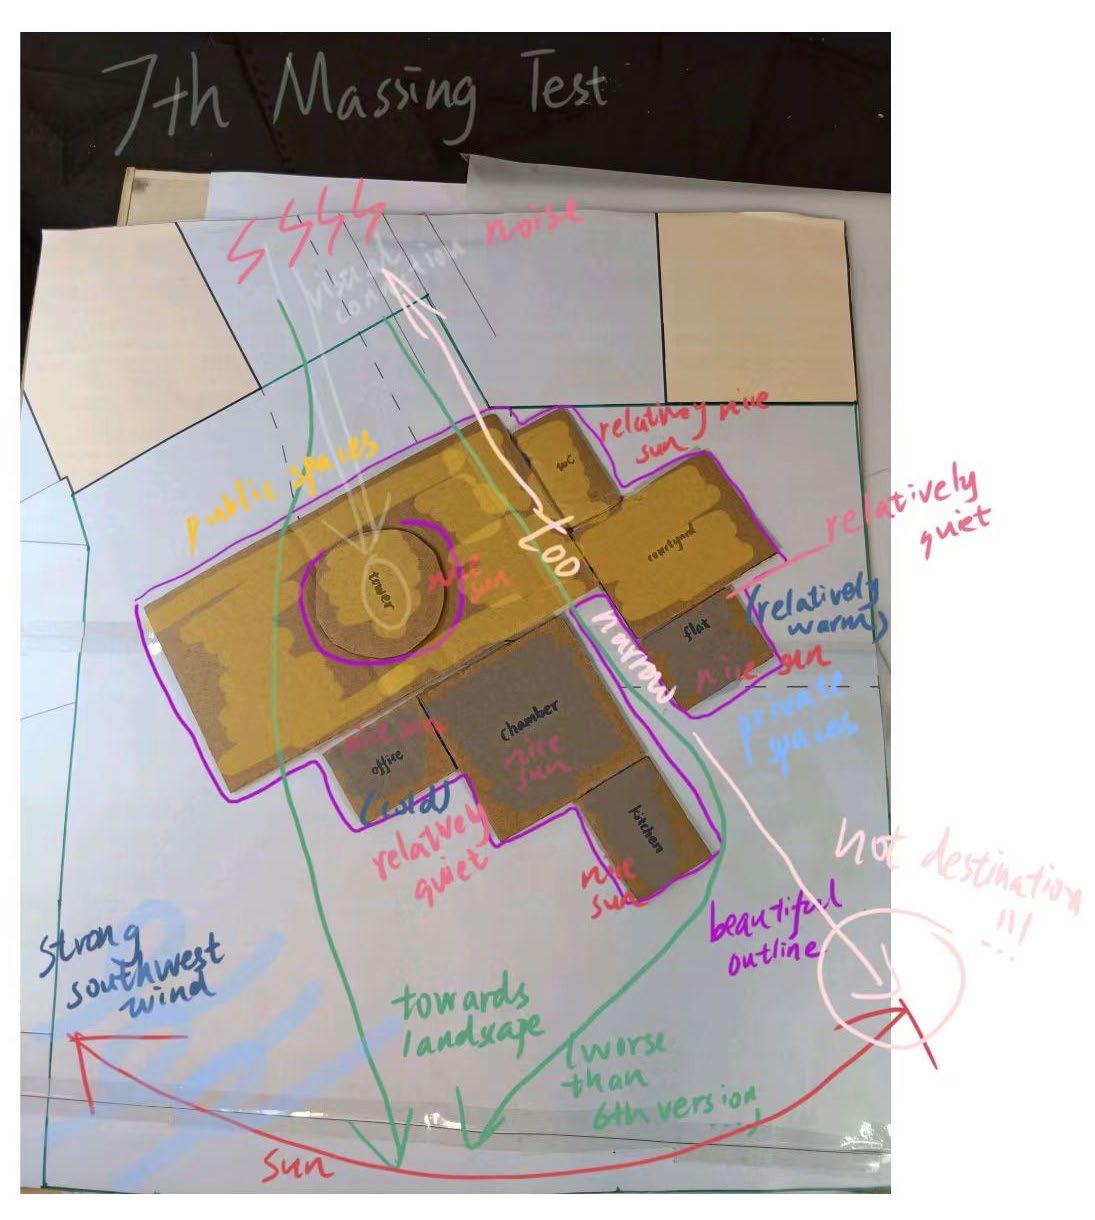
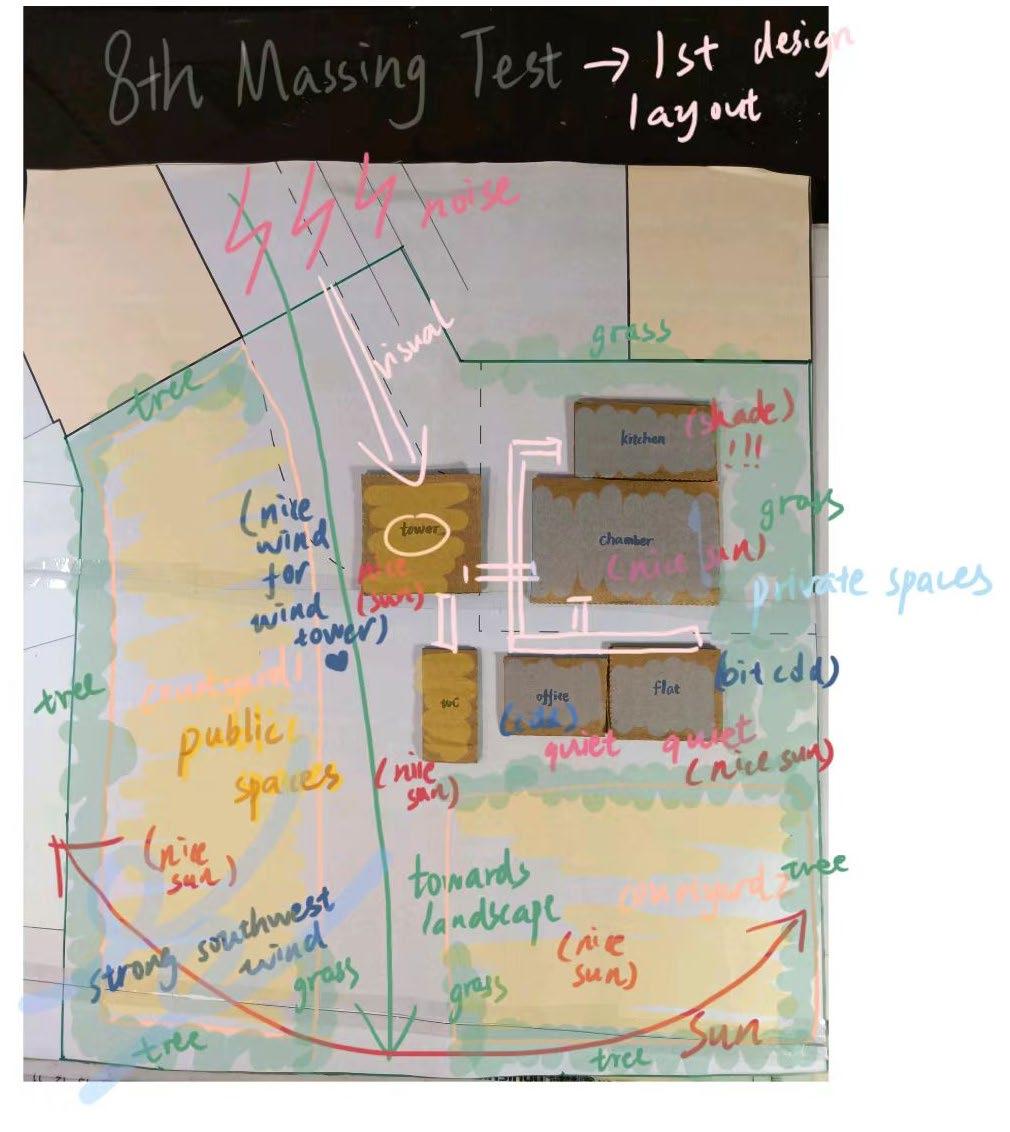
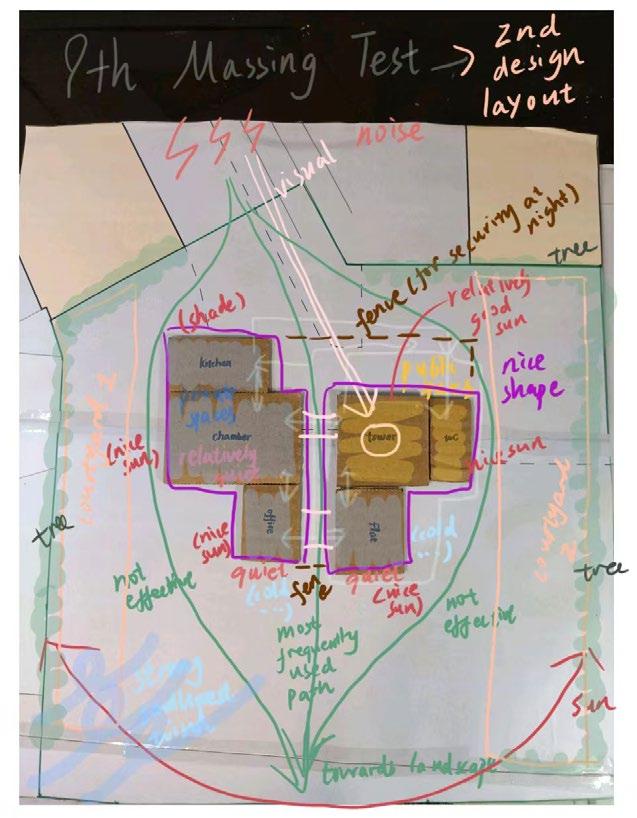
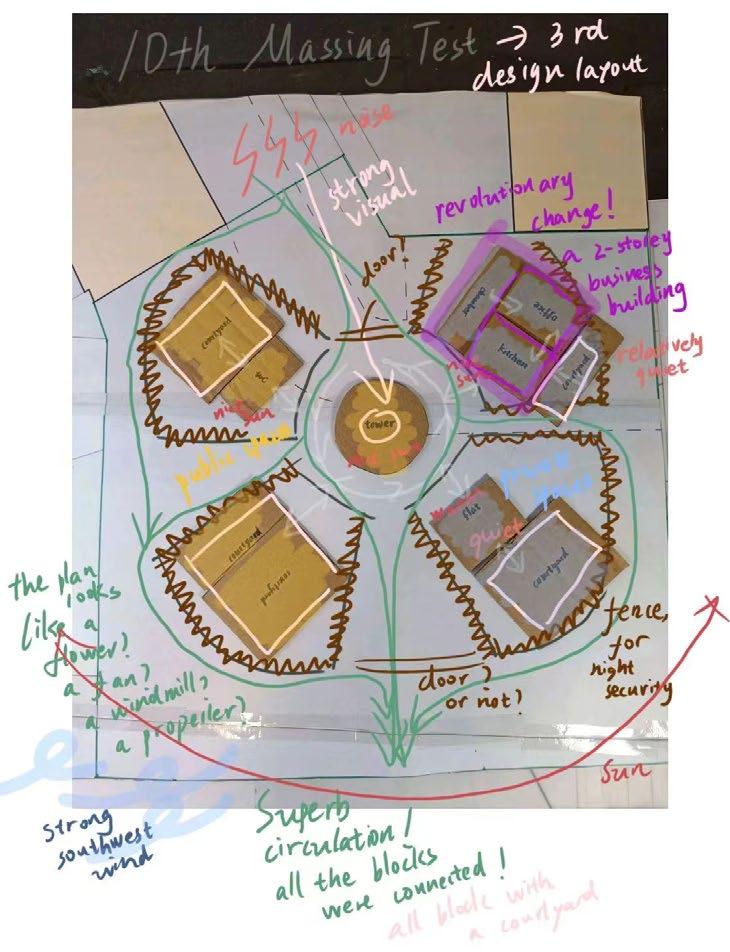
6th Test 7th Test 8th Test →1st Design Layout 9th Test →2nd Design Layout 10th Test →3rd Design Layout
6th Test Analysis 7th Test Analysis 8th Test Analysis 9th Test Analysis 10th Test Analysis
Project 1.4 Resubmission
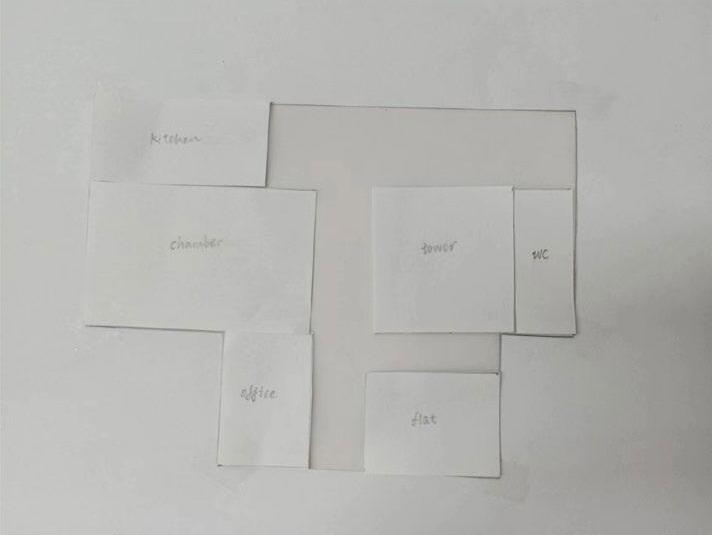
1st Design (An unfinished design due to dissatisfaction of layout)
1:100 Plan
Project 1.4 Resubmission
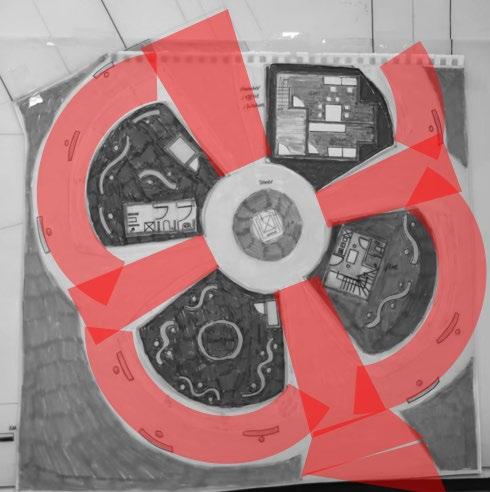
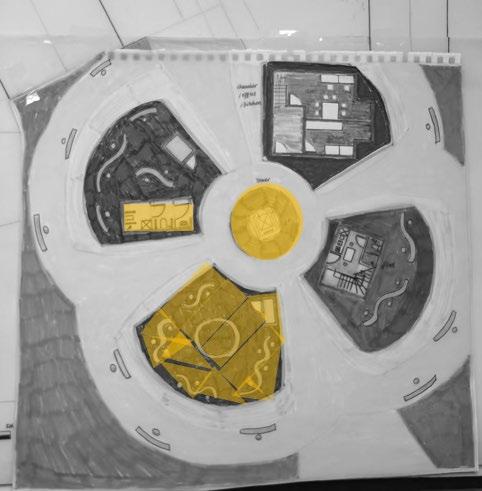
1st Design-Layout Analysis
Circulation Spaces Public Spaces Private Spaces
Working Spaces
Sheltered Spaces
Relaxing Spaces
Indoor Spaces
Storage Spaces
Project 1.4 Resubmission
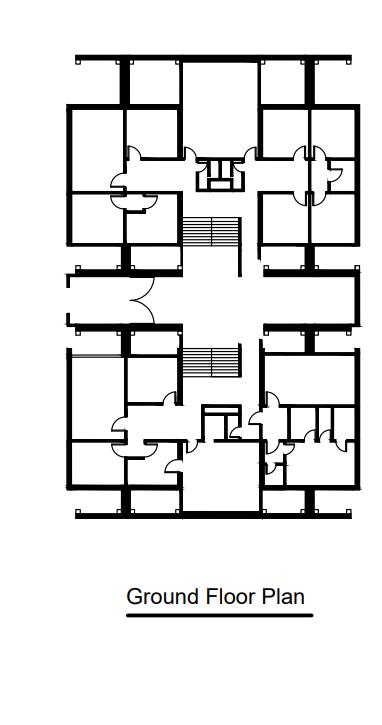
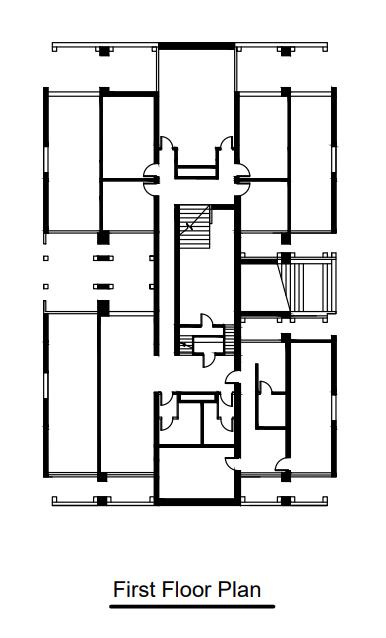
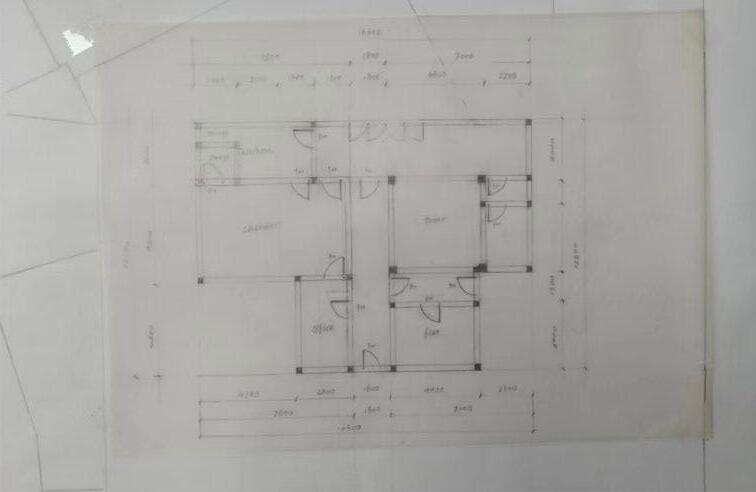
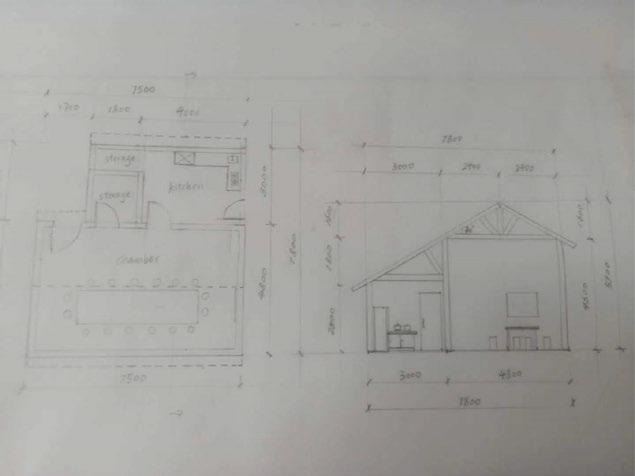
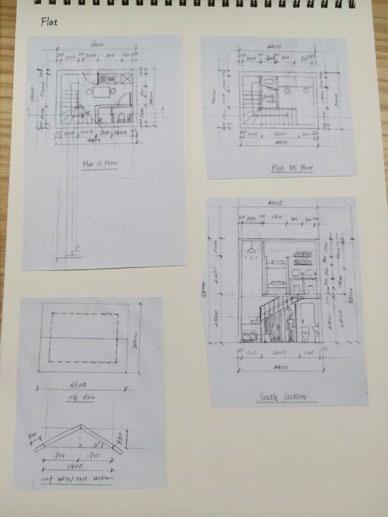
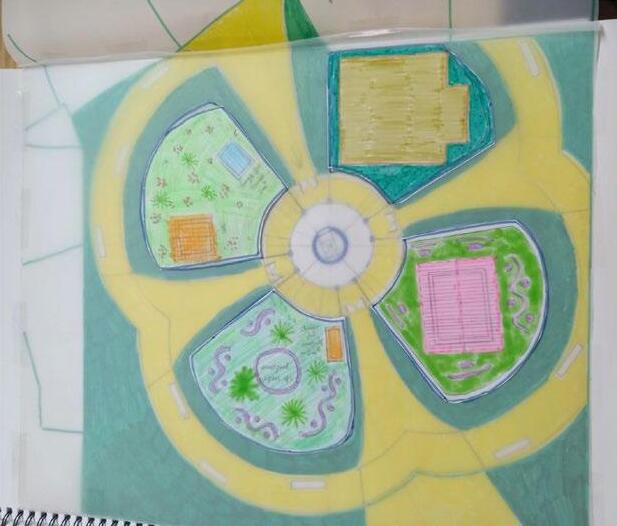
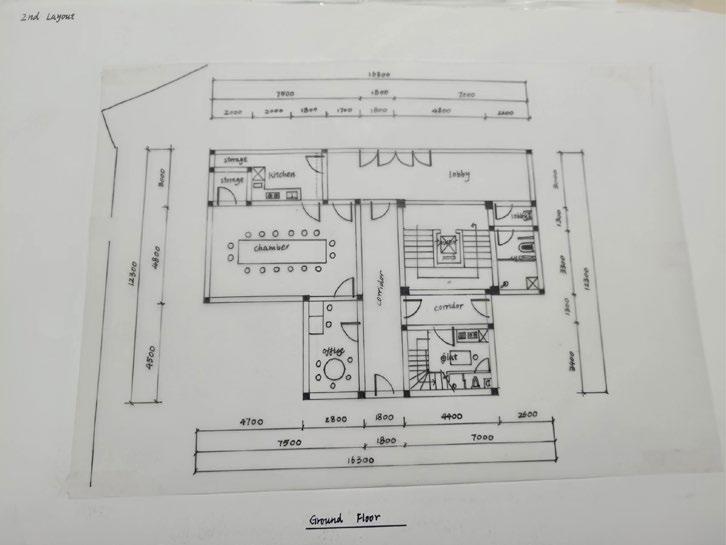
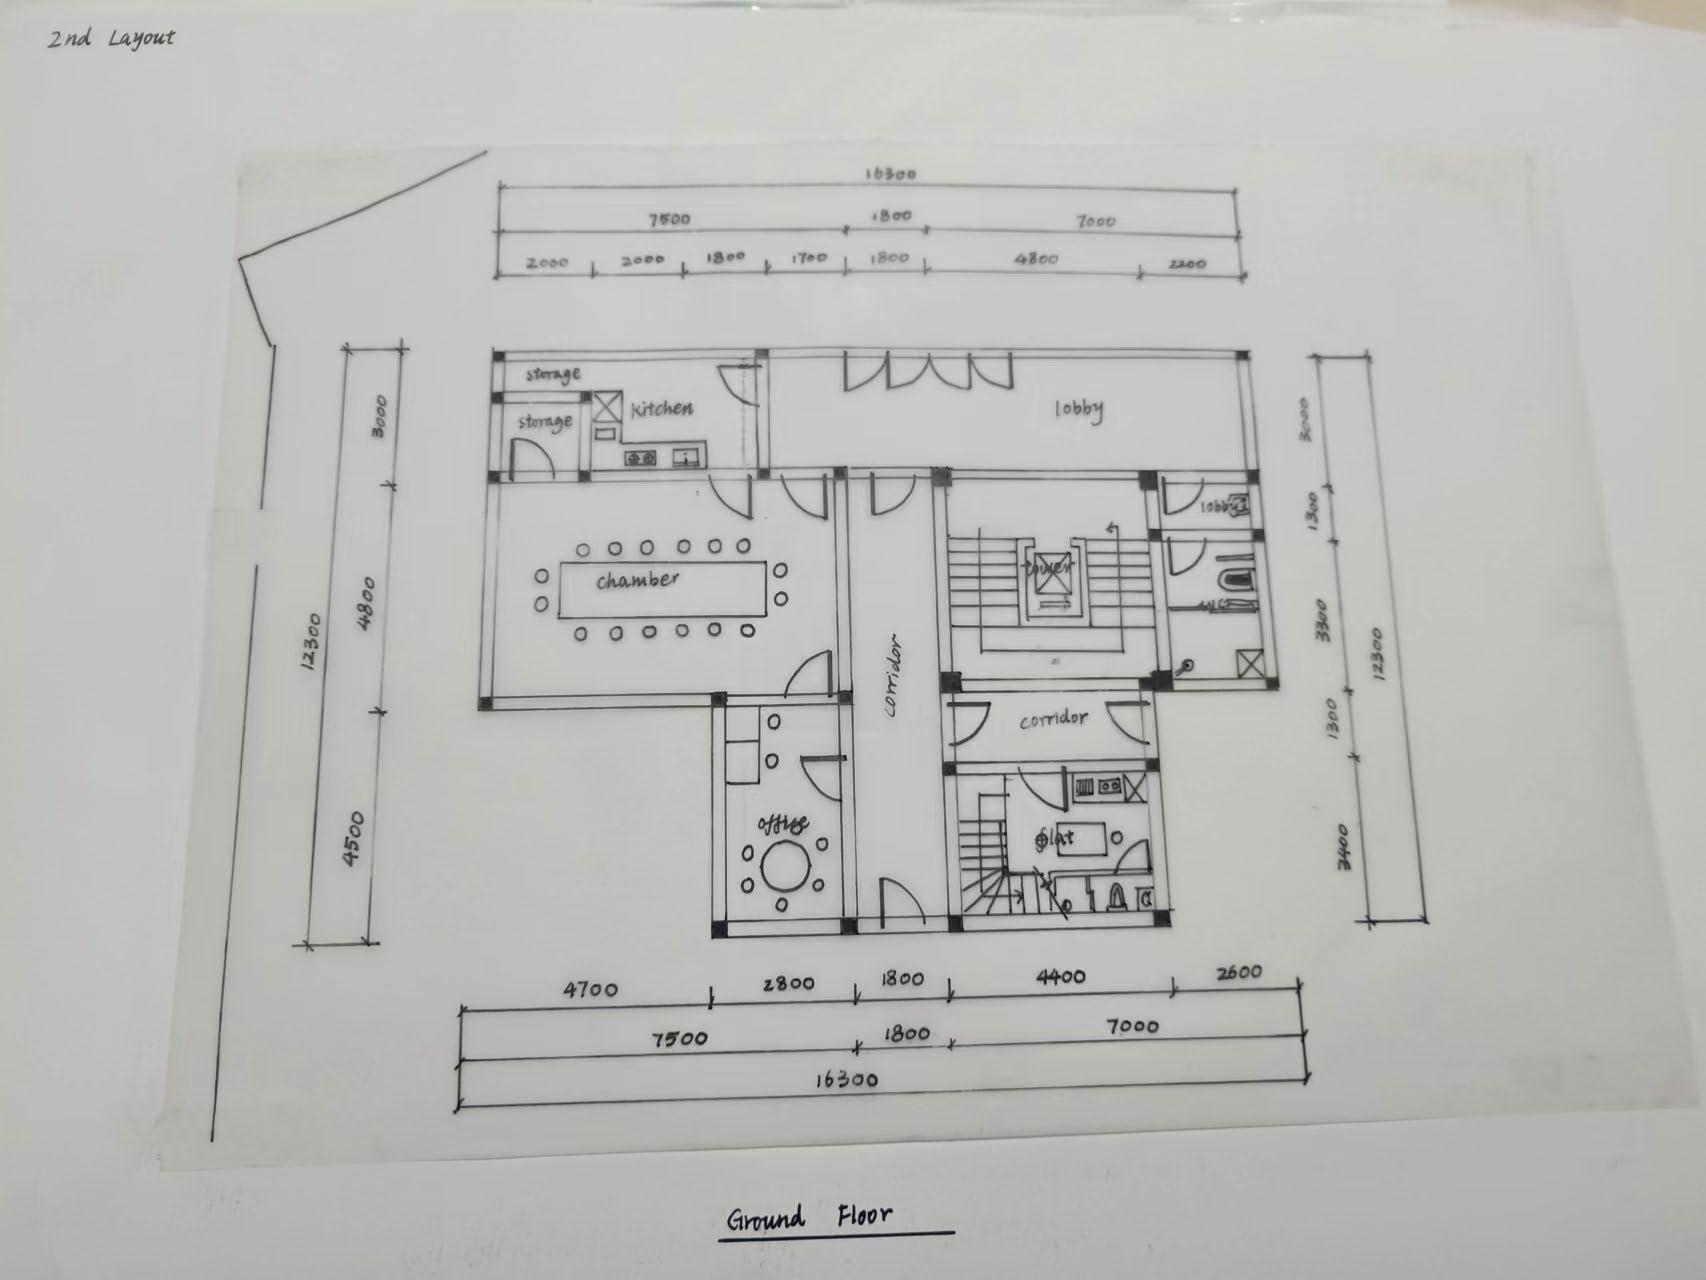
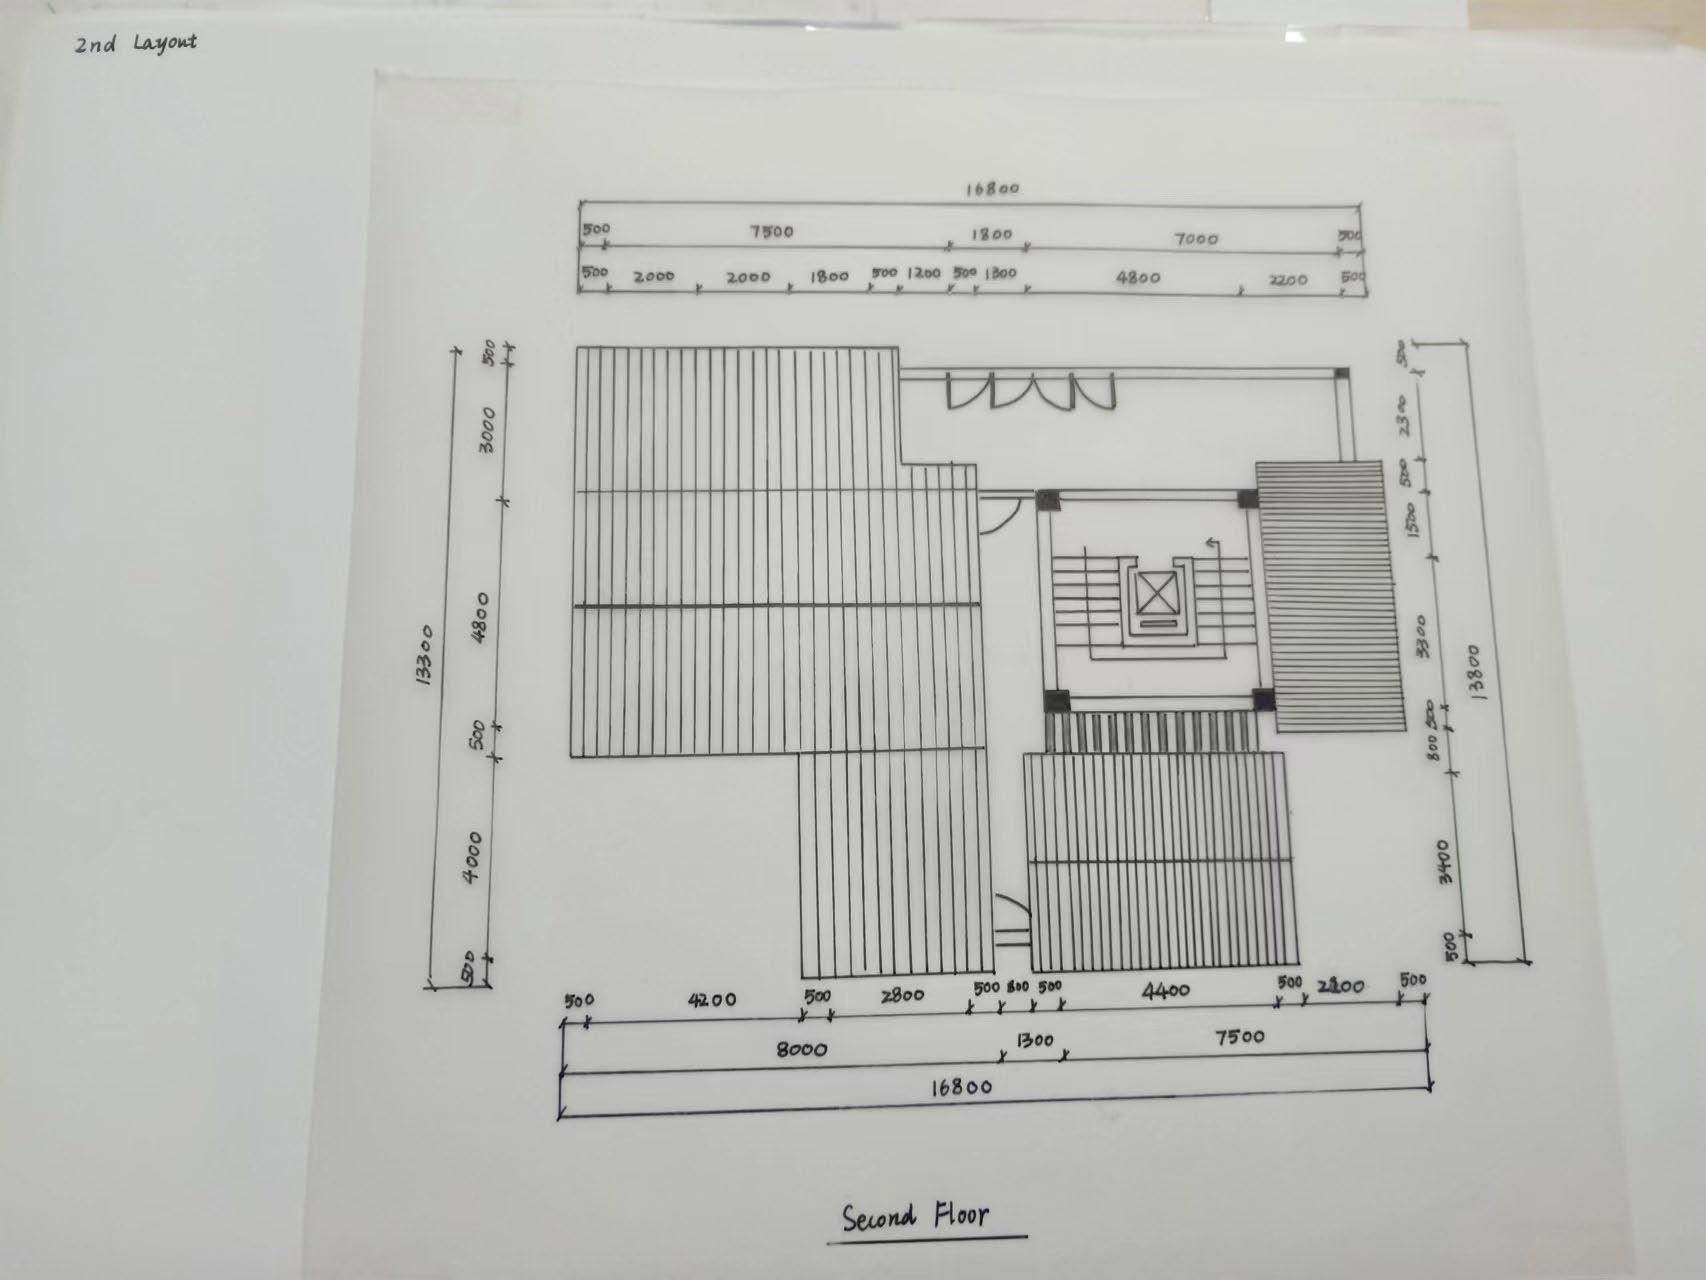
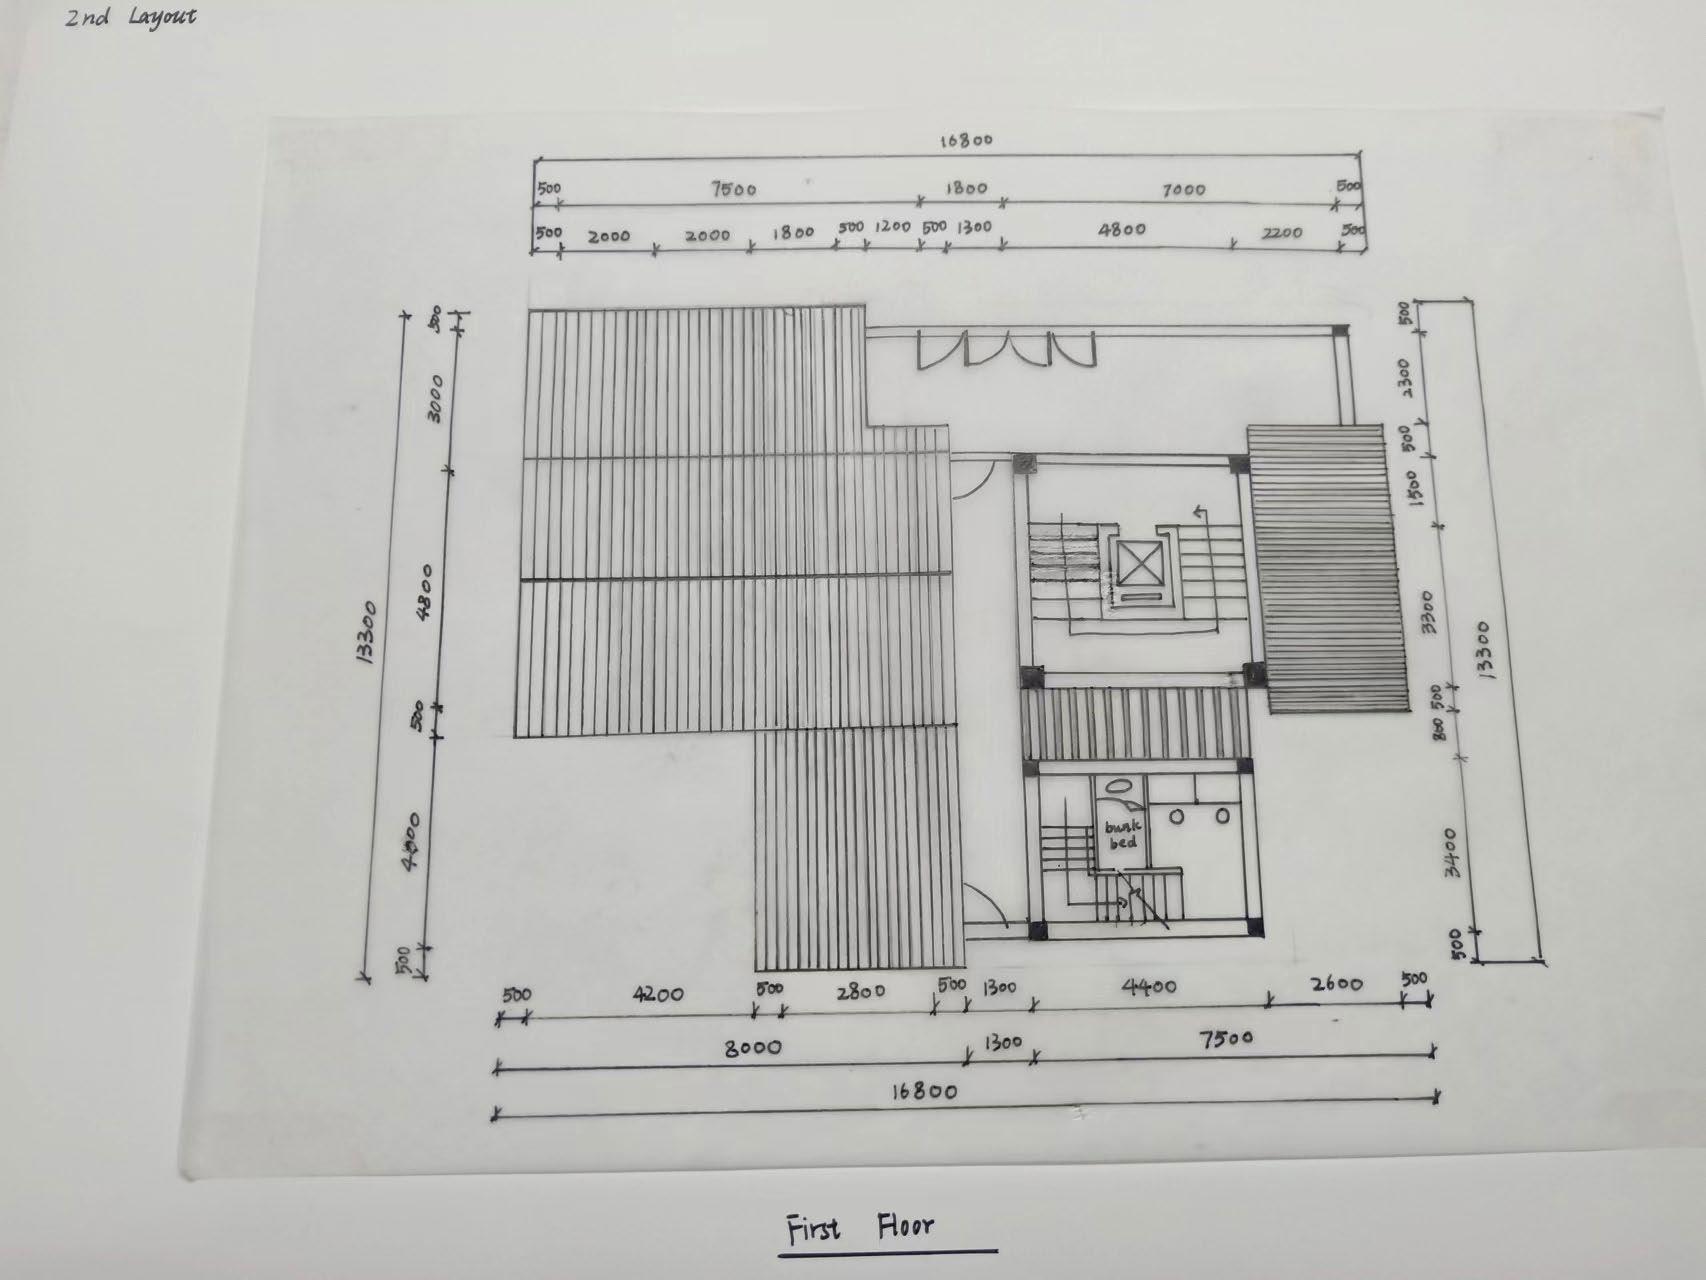
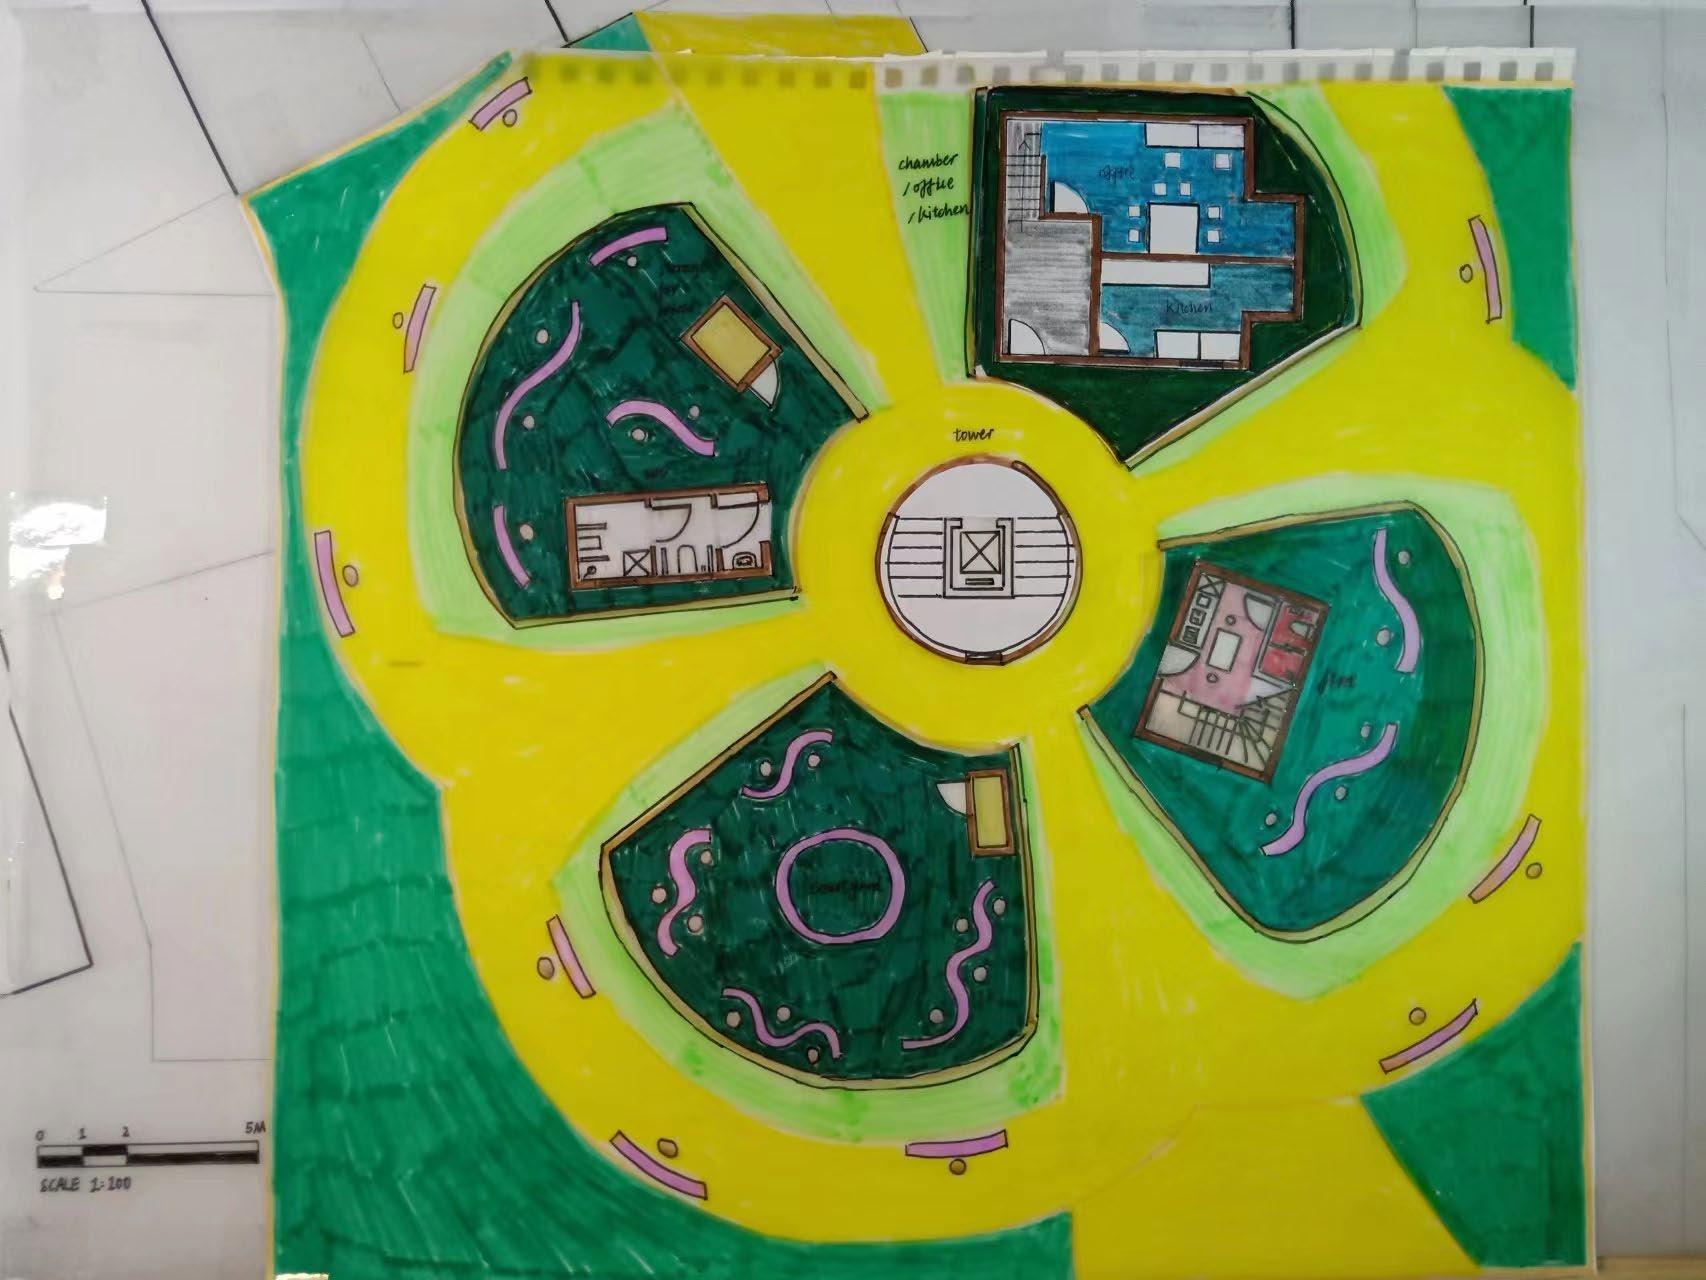
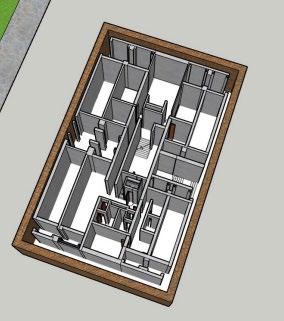
2nd Design( A complete design) 1:100 Plan
Project 1.4 Resubmission
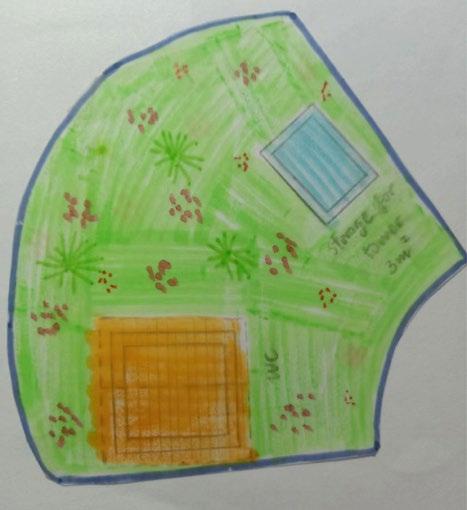
2nd Design- Landscape
Project 1.4 Resubmission
2nd Design-Layout Analysis
Project 1.4 Resubmission
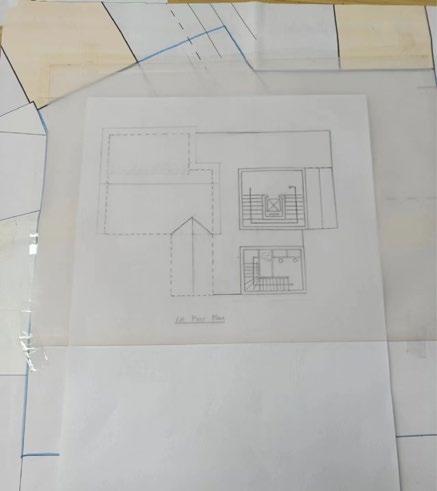
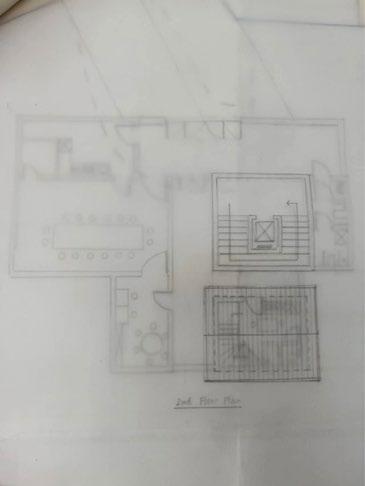
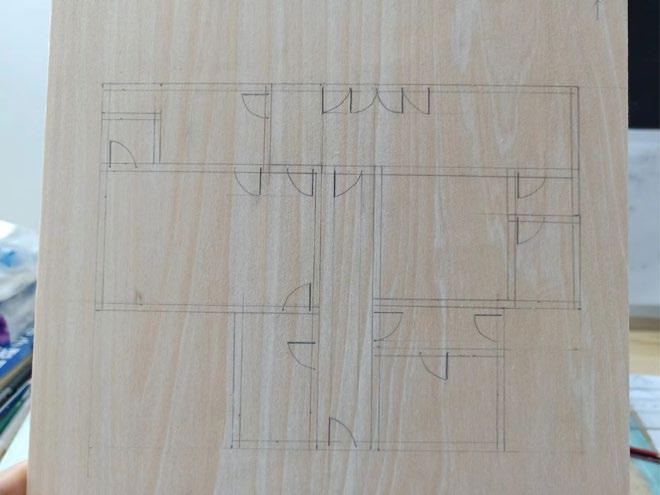
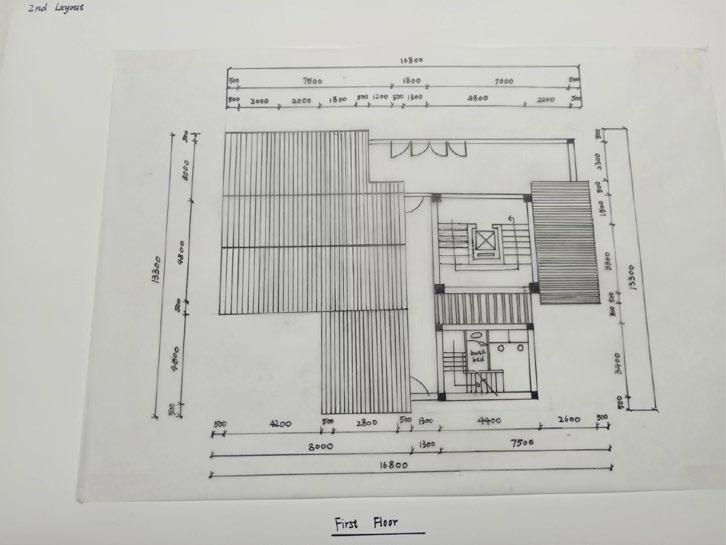
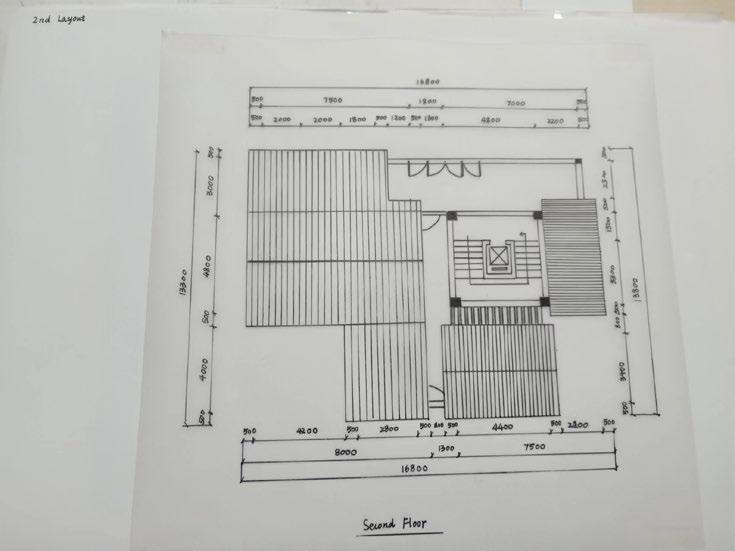
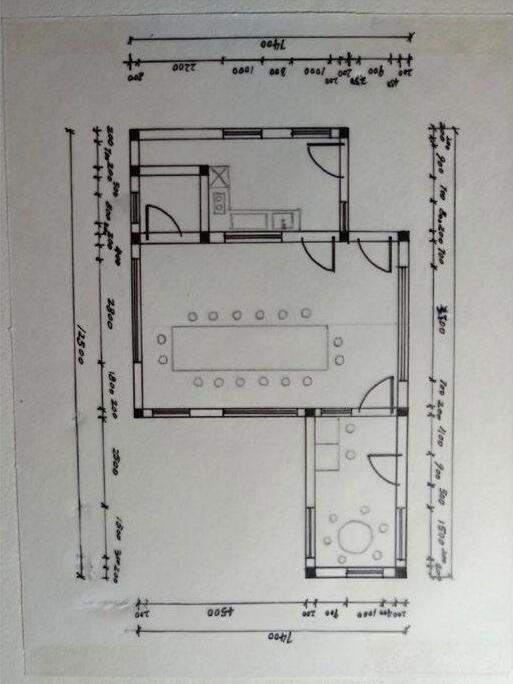
2nd Design-Plans
Ground Floor Plan
First Floor Plan
Second Floor Plan
Project 1.4 Resubmission
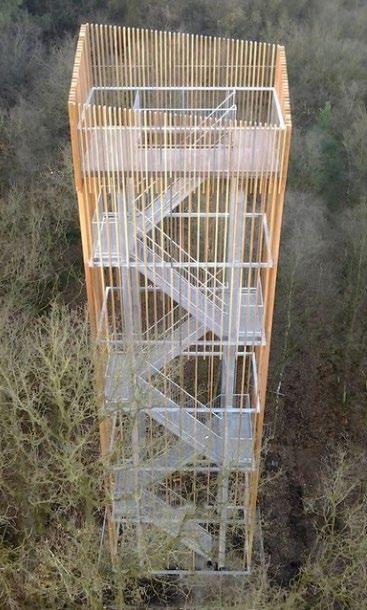
2nd Design-Precedent Page 1
The beautiful wooden outer fence has very rhythmic lines, giving a sense of elegance, especially suitable for use in high-rise tower buildings.
Project 1.4 Resubmission
2nd Design-Precedent Page 2
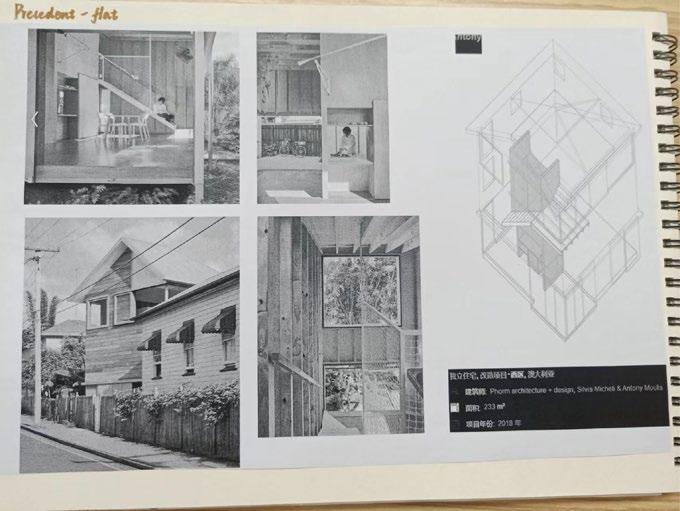
I really wanted to design a two-storey duplex pitched roof house like this, although it is not purely a timber structure building. The staircase orientation of the flat, which I ended up designing, and the stairway baffle of the first-floor bedroom are somewhat similar to this example
Project 1.4 Resubmission
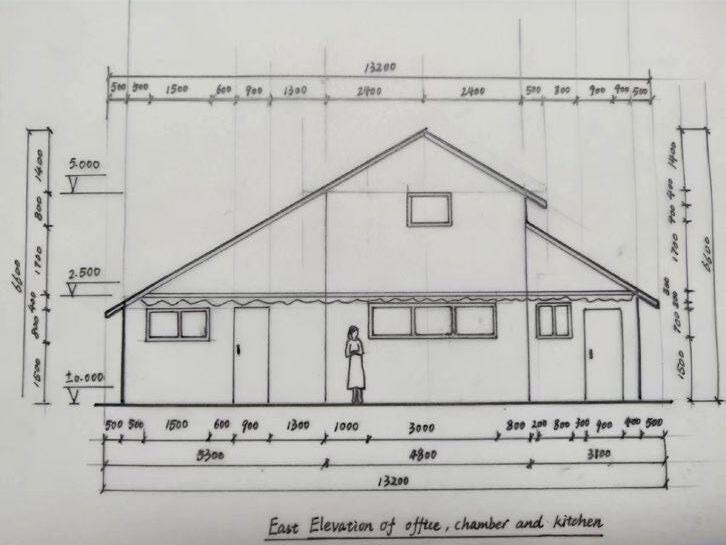
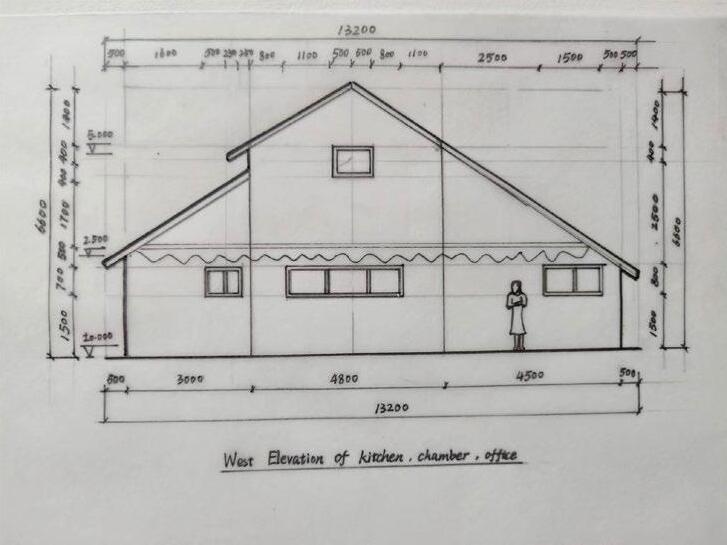
2nd Design- Elevation
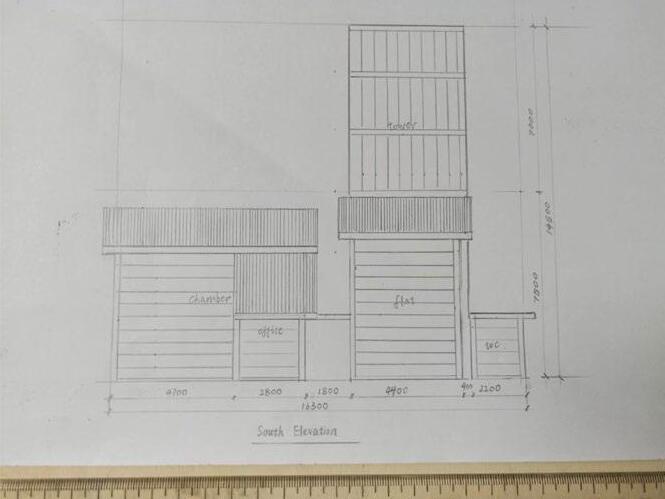
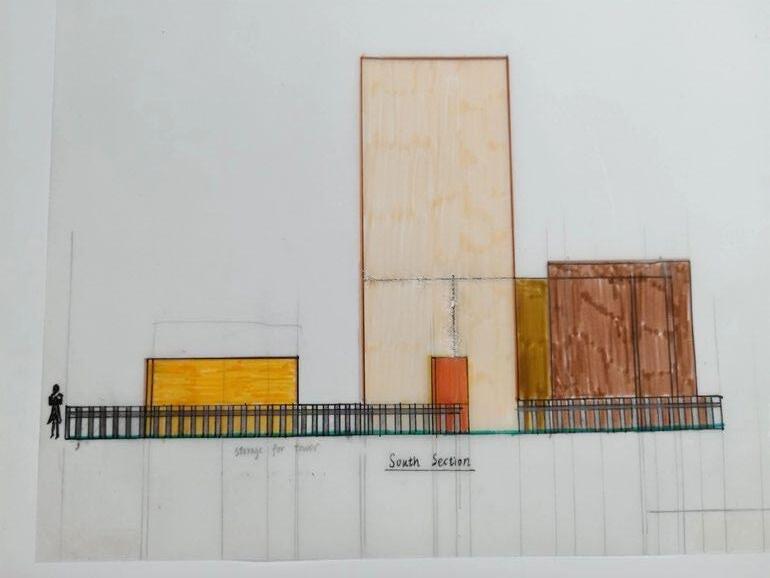
1:100 South Elevation
Project 1.4 Resubmission
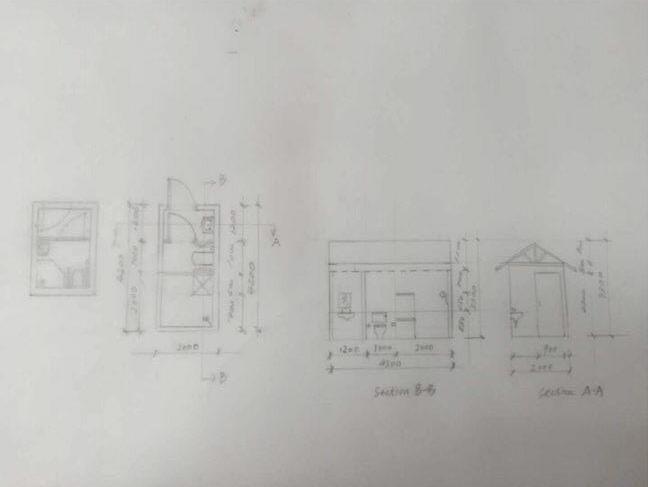
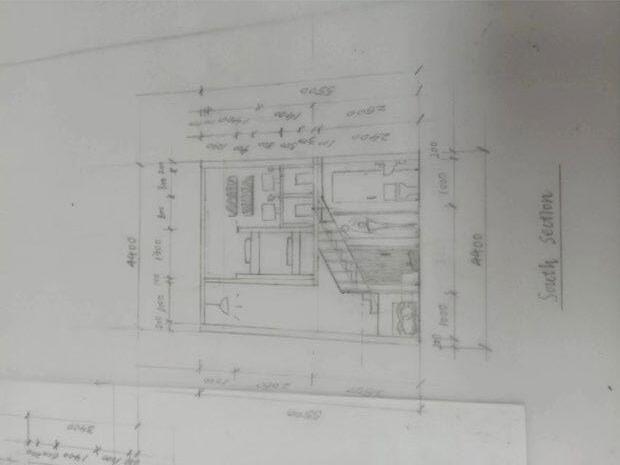
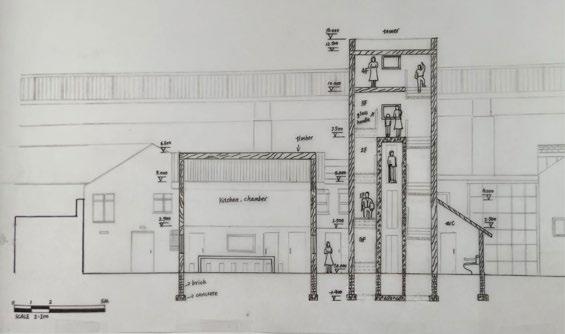
2nd Design-Section
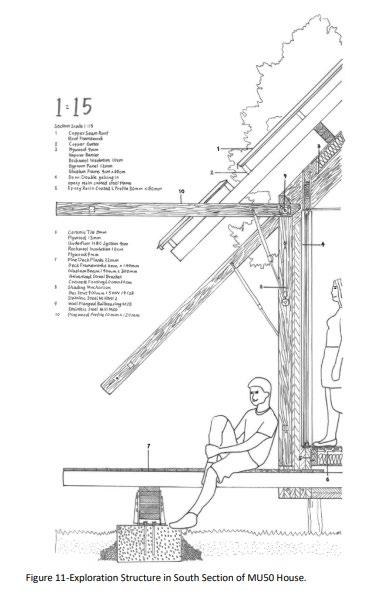
1:100 South Section (Section A-A)
Project 1.4 Resubmission
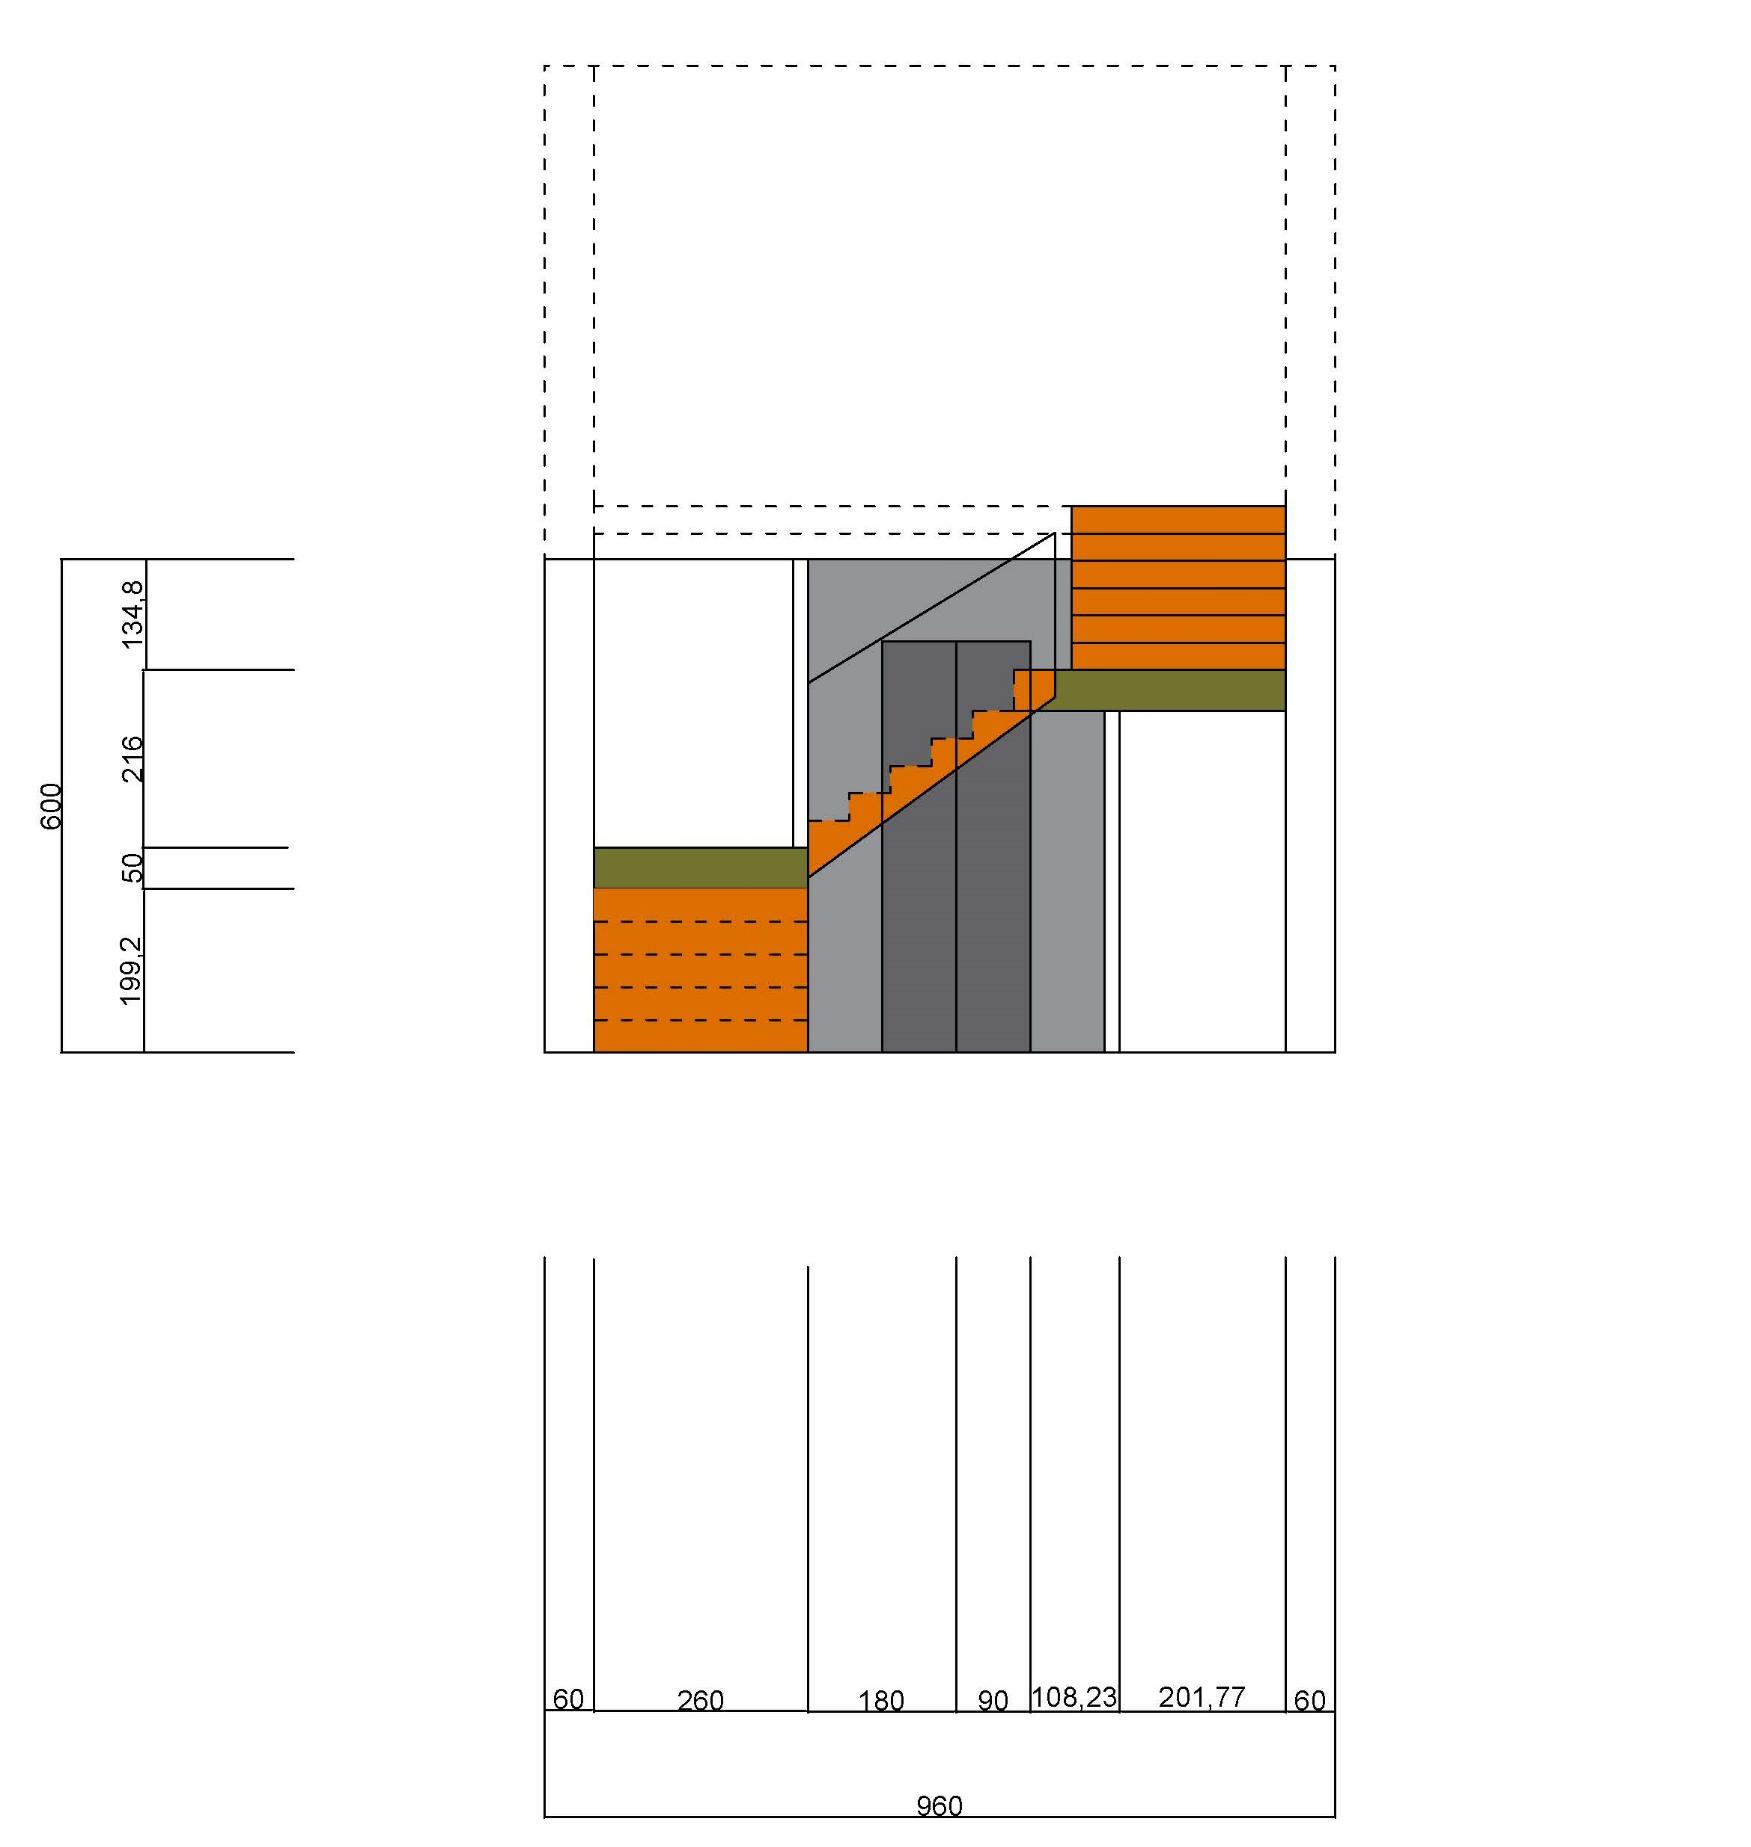
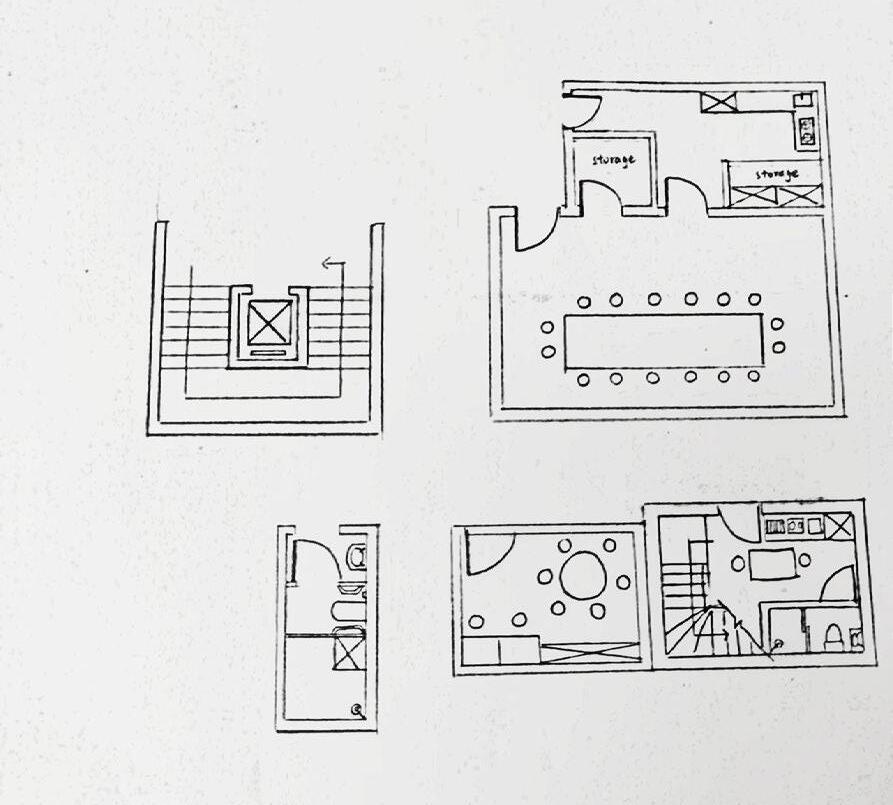
2nd Design- Detail
1:50 Detail Drawing (Section B-B)
Project 1.4 Resubmission
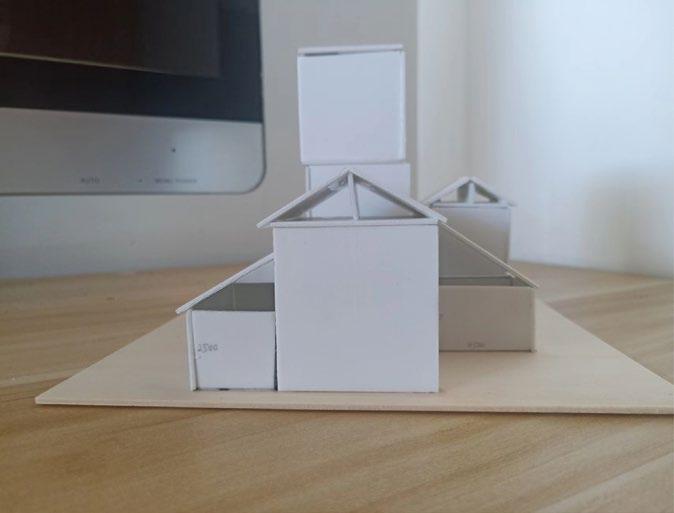
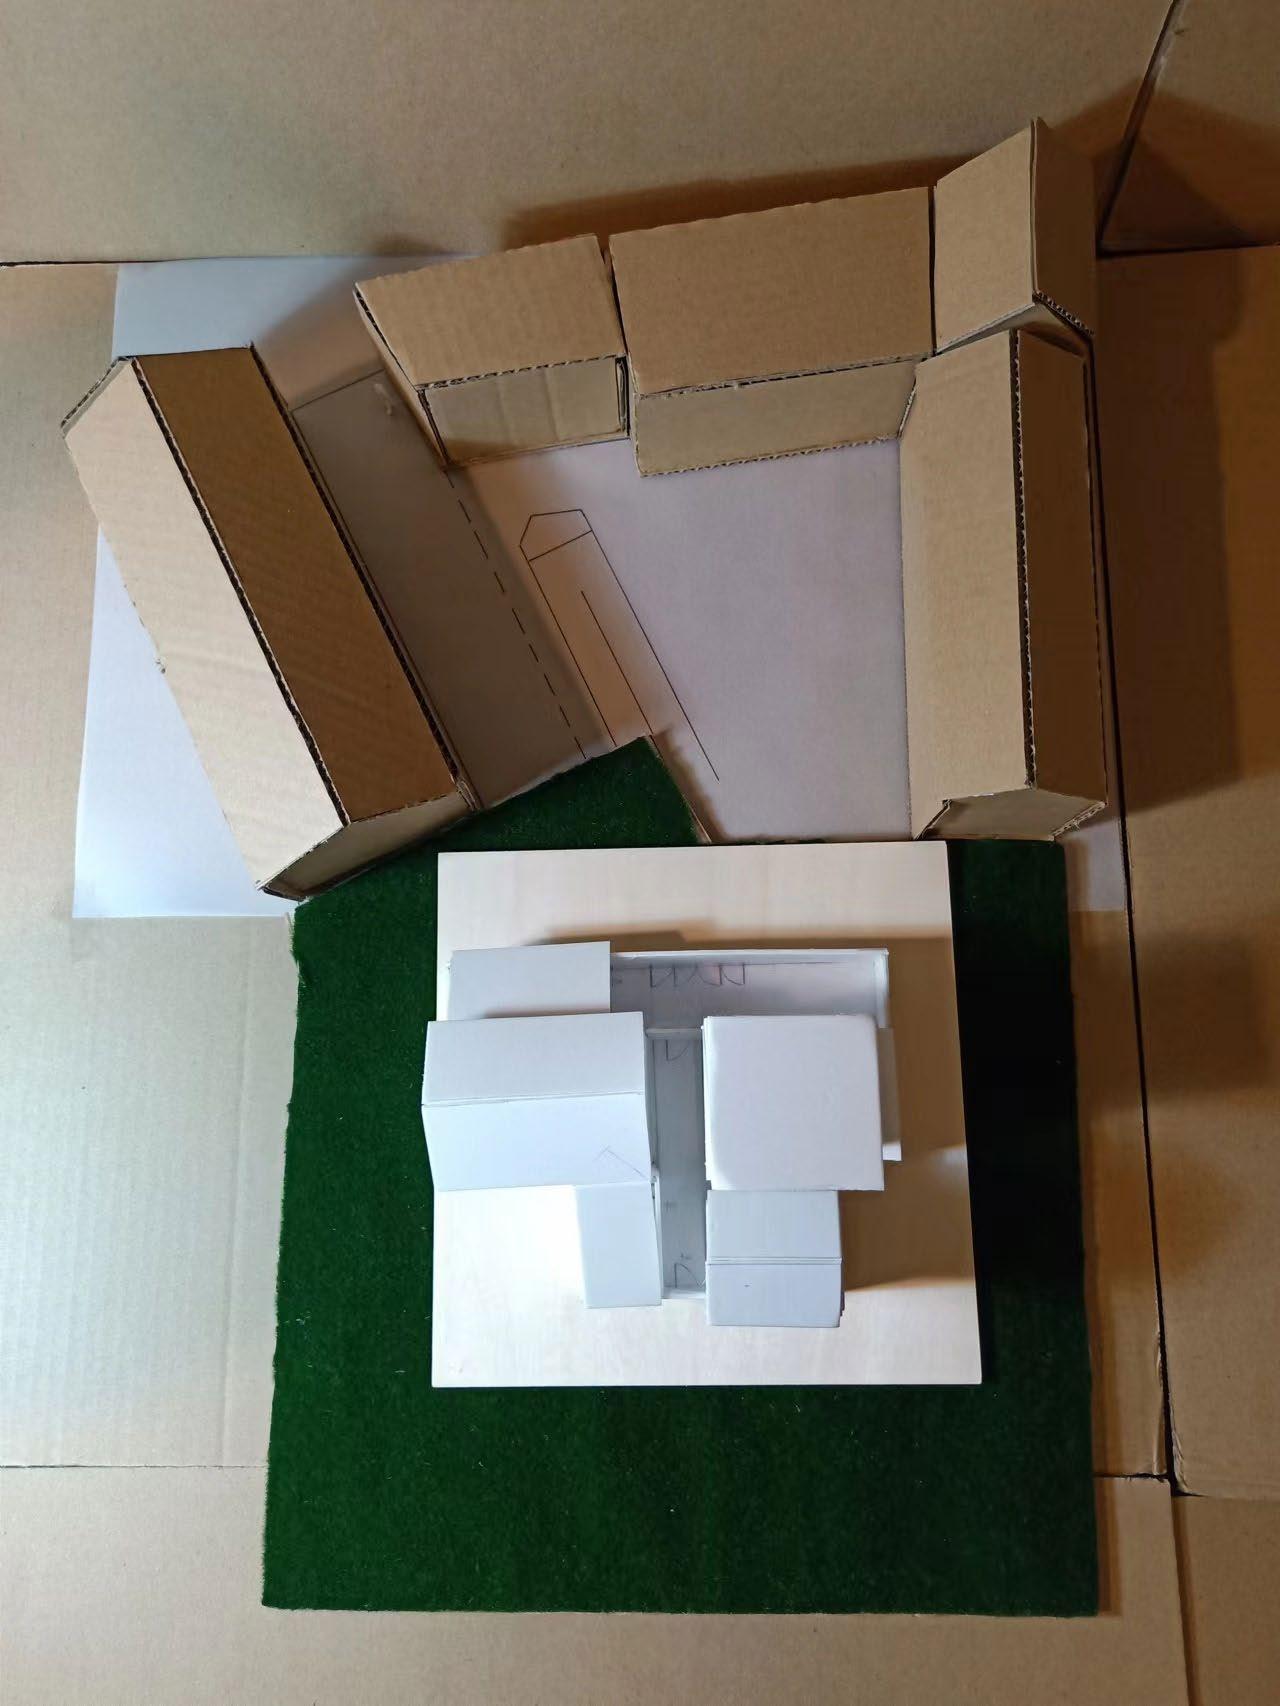
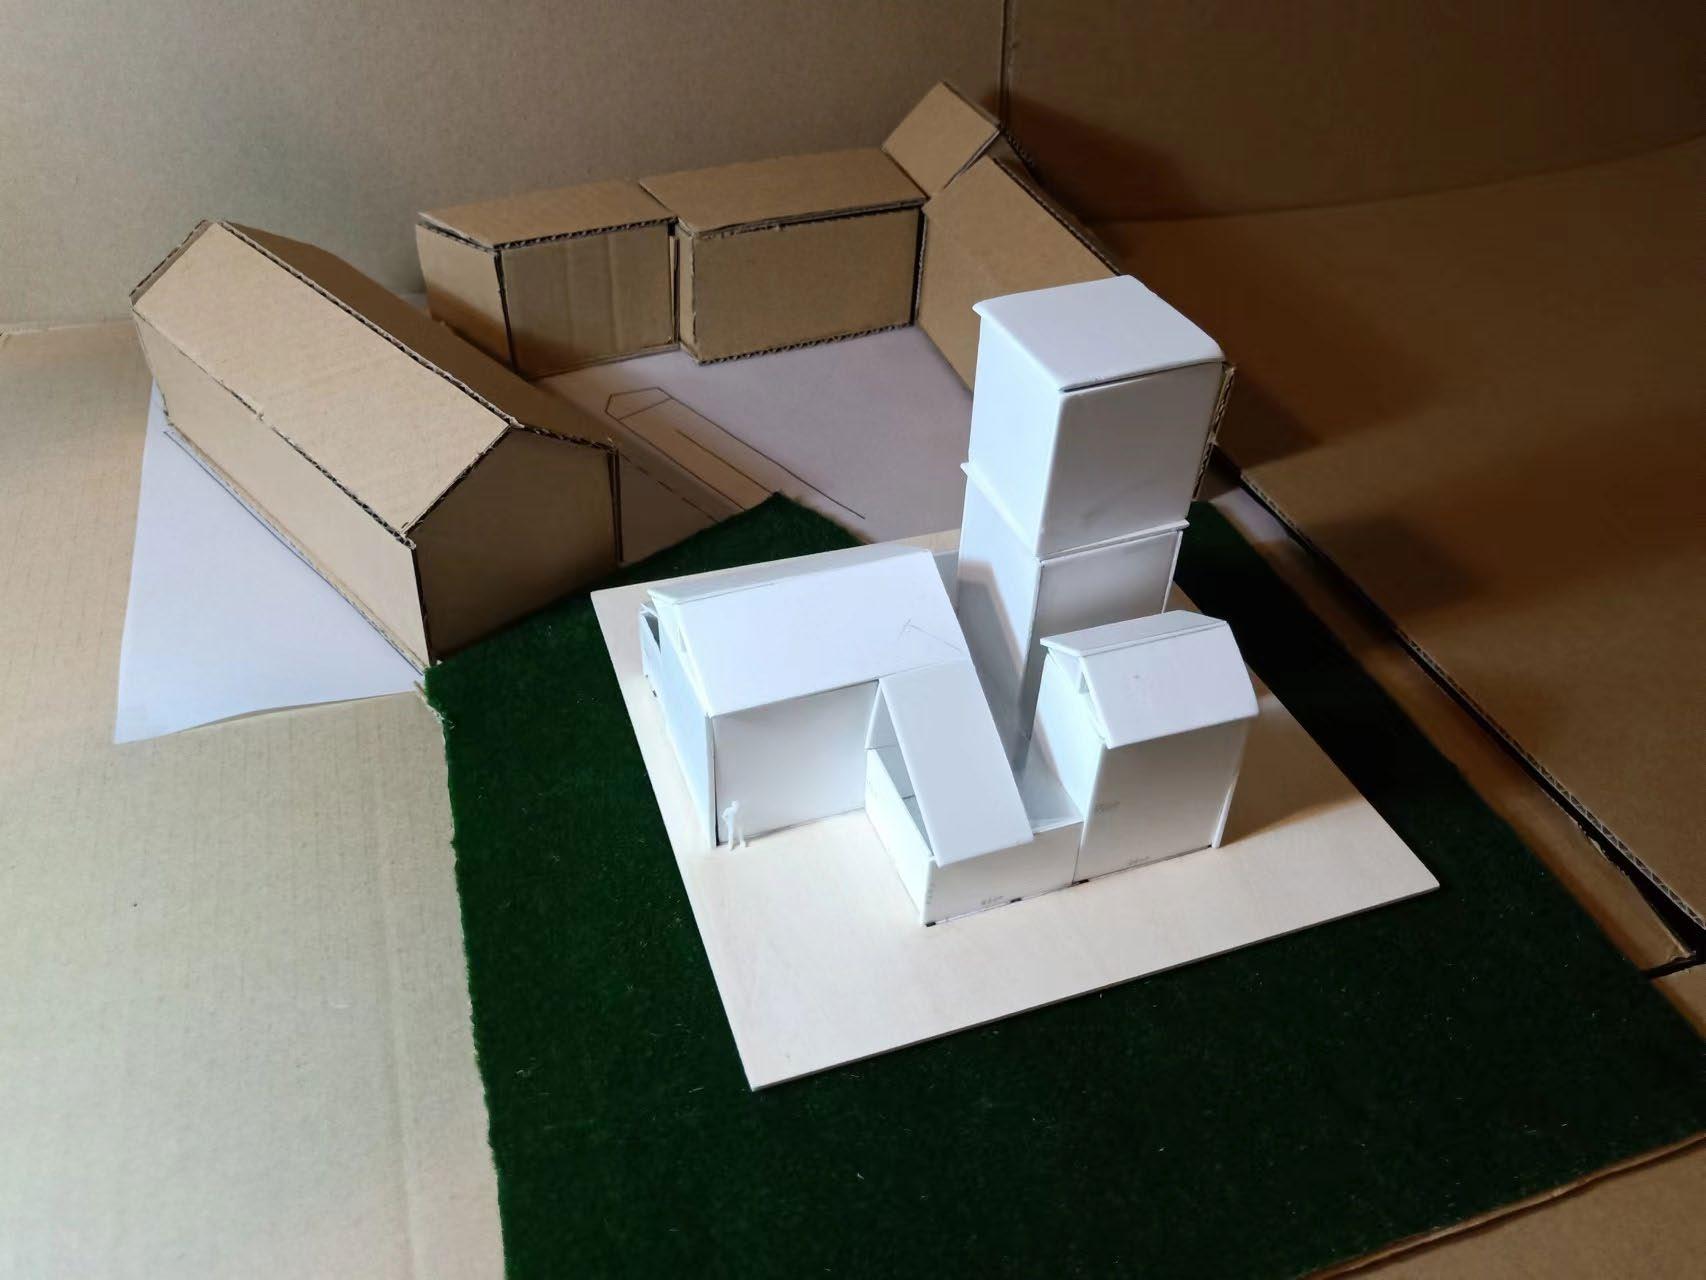
2nd Design-Model
1:100 Model of 2nd Design Bird View
Project 1.4 Resubmission
2nd Design-Model
Top View
Project 1.4 Resubmission
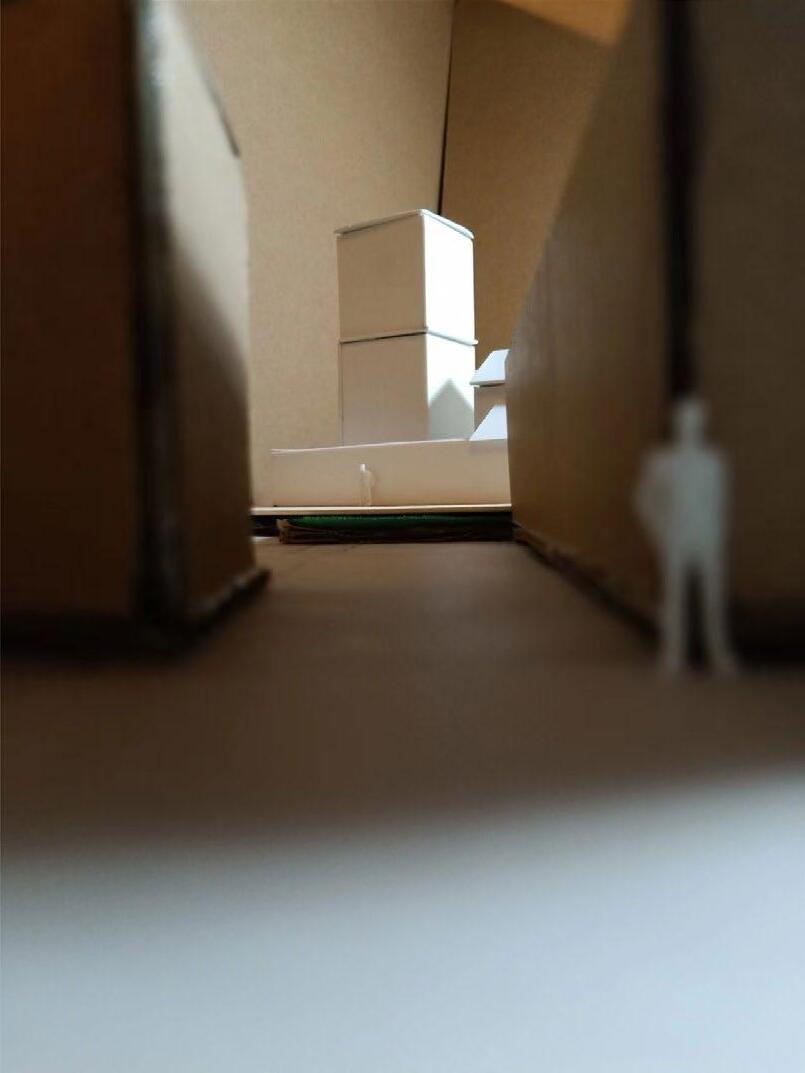
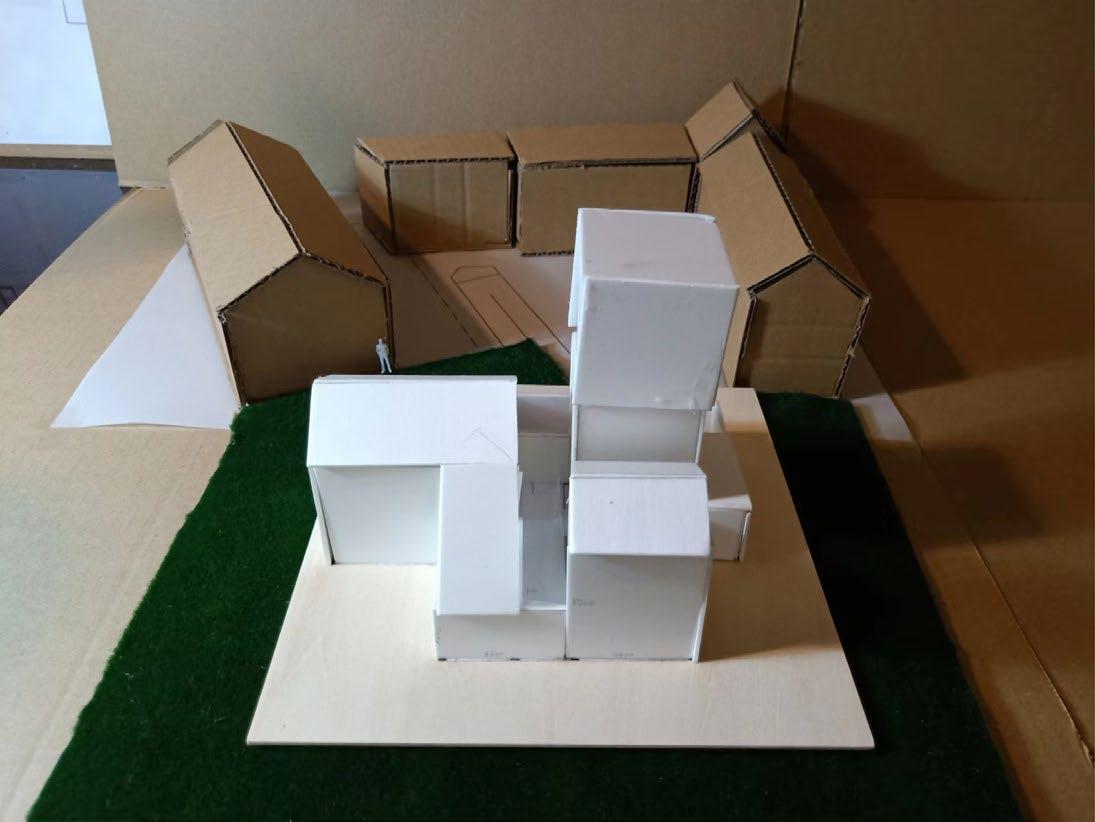
2nd Design-Model Views
Entrance View
Southwest View
South View
Southeast View
Project 1.4 Resubmission
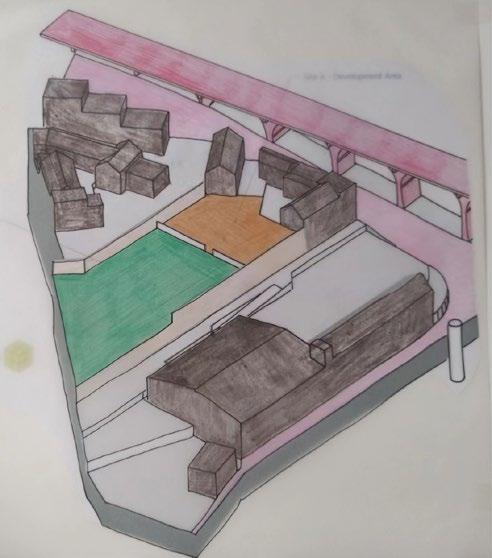
3rd Design (an experimental Design)
Project 1.4 Resubmission
3rd Design-Layout Analysis
Project 1.4 Resubmission
3rd Design-Collage of Wind
OWind, IfWintercomes,canSpringbe farbehind?
秋风起兮白云飞 草木黄落兮雁南归
g o n e w i t h t h e w i n d
But when the leaves hang trembling, The wind is passing through.
I tried to find the inspiration for doing a community-like building group and I found lots of things related to wind I hoped to create a shape to combine all the different functional parts together
Project 1.4 Resubmission
3rd Design-Ideation
Inspiration of Overall Building Blocks
Outline and Courtyard
Explanation of Design:
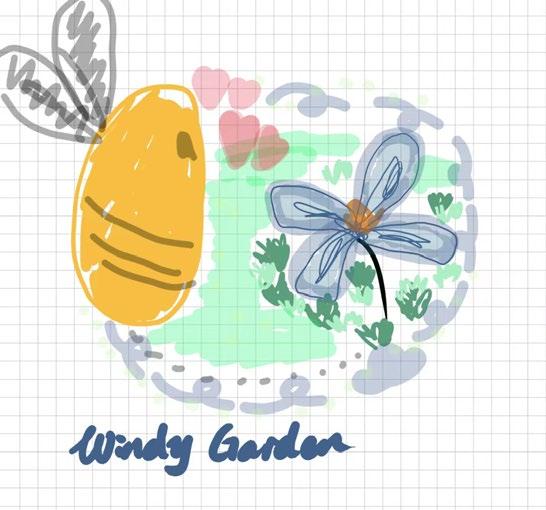
People are attracted to this site by the wind with the fragrance of flowers, and they see the beautiful courtyard like flower petals, circling around like bees, and exploring with interest The flower-scented wind tower became the final stop of their trip, and they will be a paradise from now on
Project 1.4 Resubmission
3rd Design- Landscape
Project 1.4 Resubmission
3rd Design-Precedents Page 1
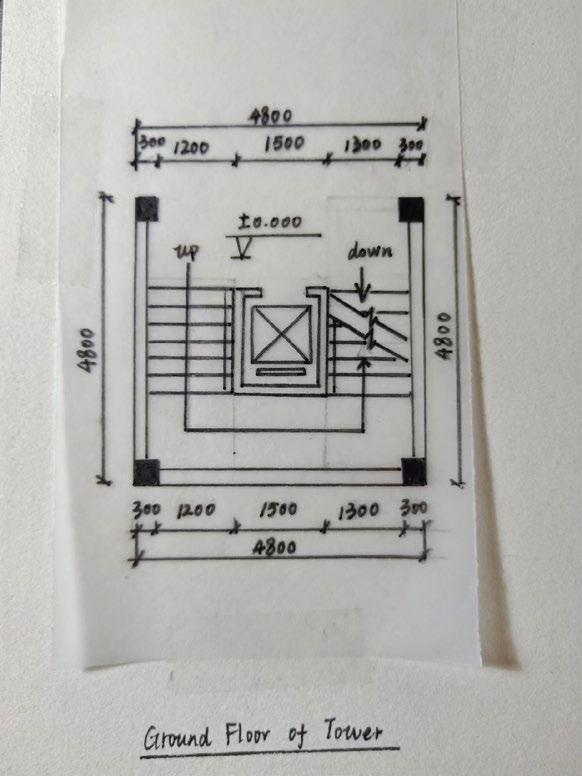
I can imitate this building, make a lift in the middle, then let the stairs surround the lift, and there are two floors of reserved lift machine rooms on the top, so if you want to go there, you can only use the stairs
It reminded me of opening windows of different shapes for different buildings to increase interaction
Project 1.4 Resubmission
3rd Design-Precedents Page 2
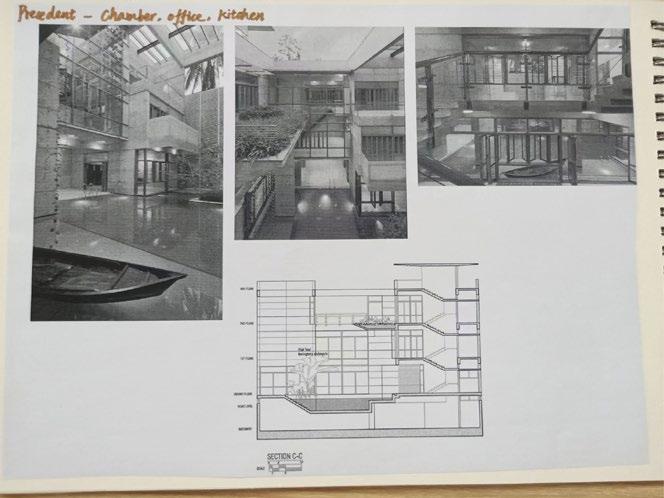
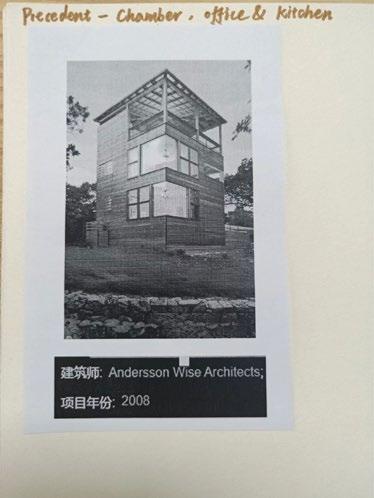
It inspired me to build a two-story comprehensive building, with a kitchen and office downstairs and a conference room upstairs, organically linking the three functions together
Project 1.4 Resubmission
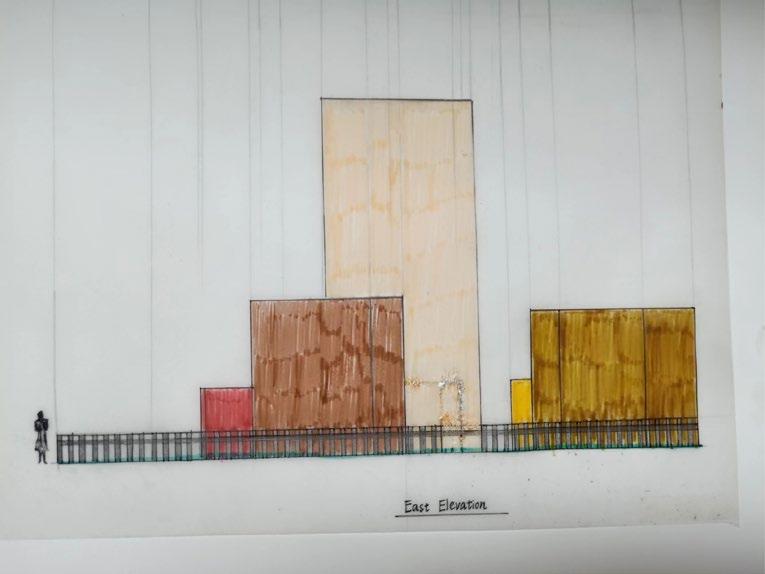
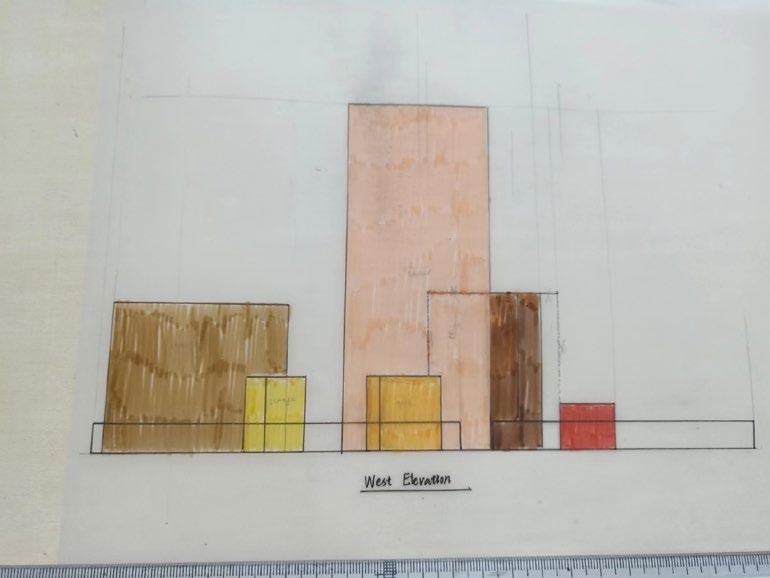
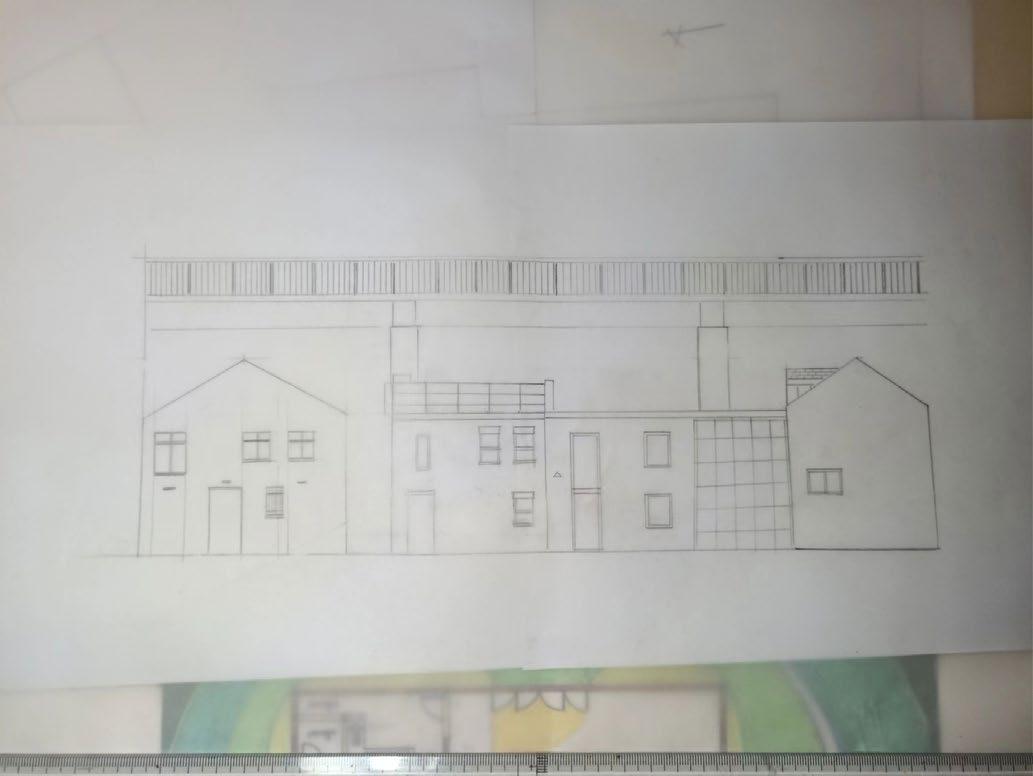
3rd Design - Elevation
Project 1.4 Resubmission
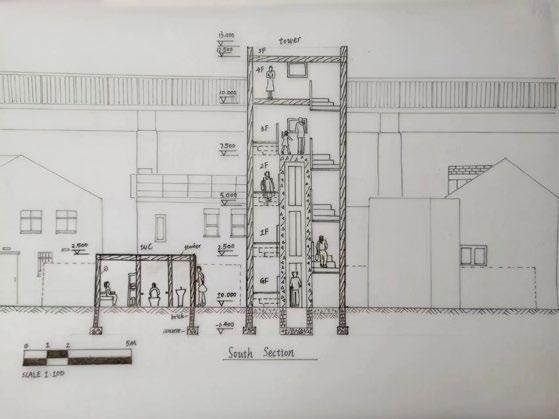
3rd Design-Section
1:100 South Section (Section C-C)
Project 1.4 Resubmission
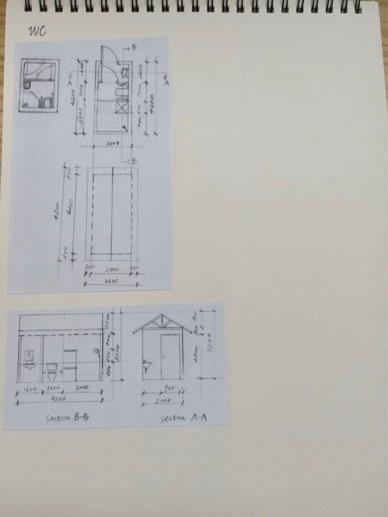
3rd Design- Detail
1:50 Detail Drawing (Section D-D)
Project 1.4 Resubmission
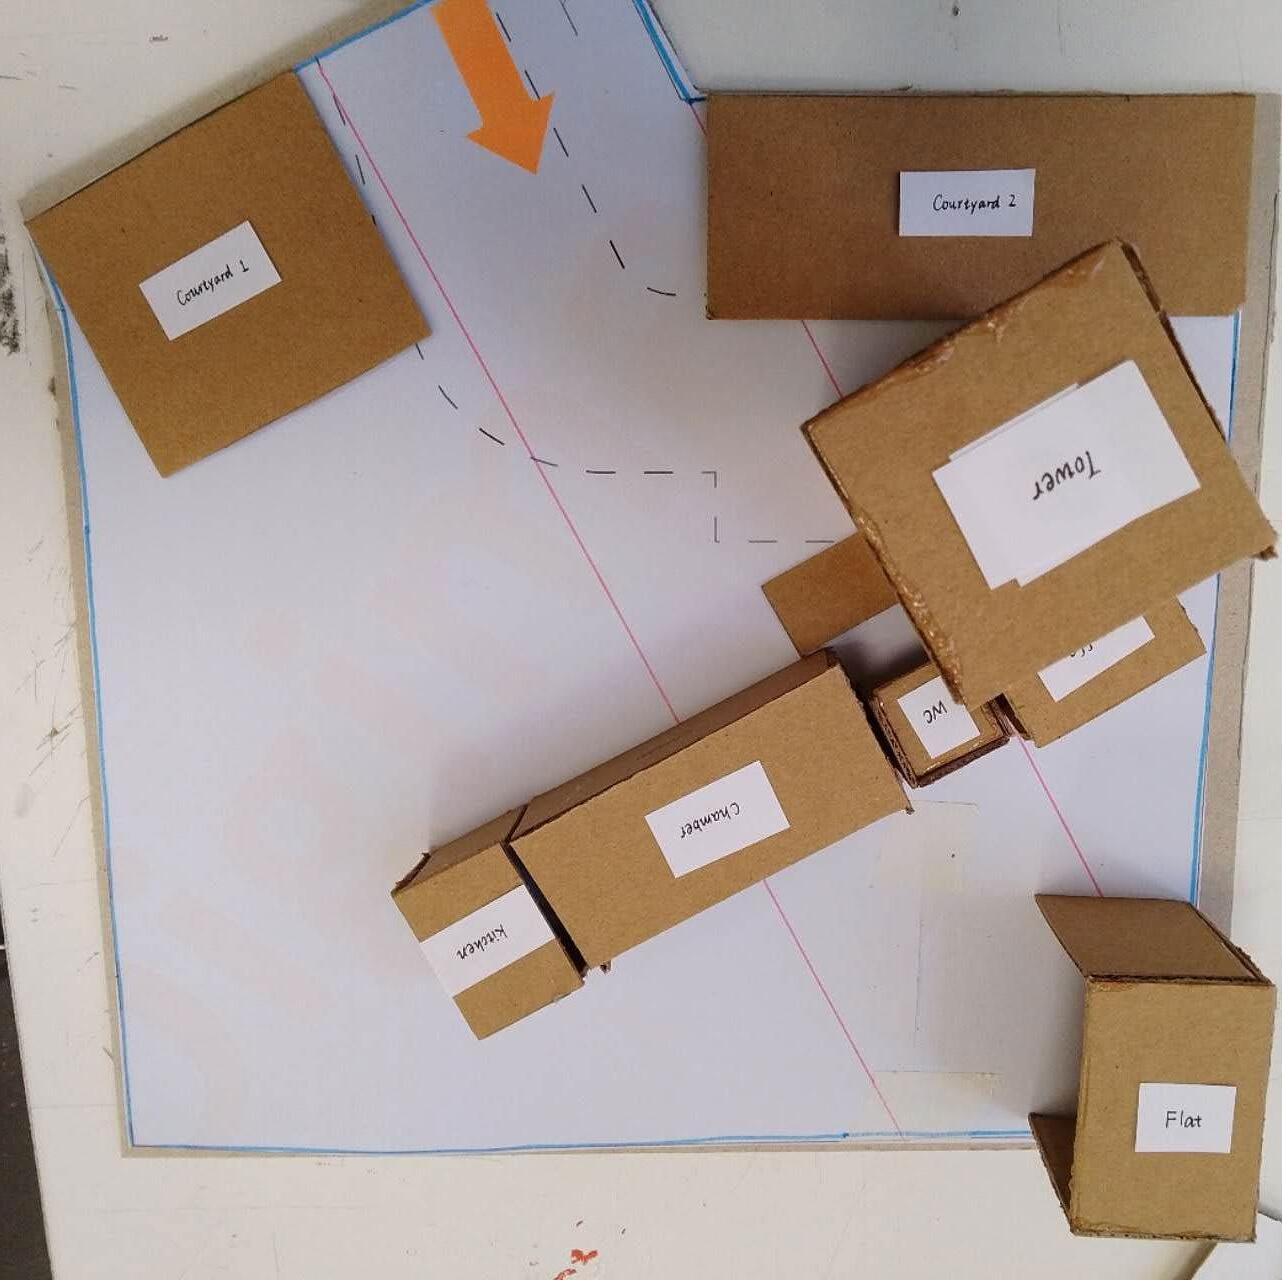
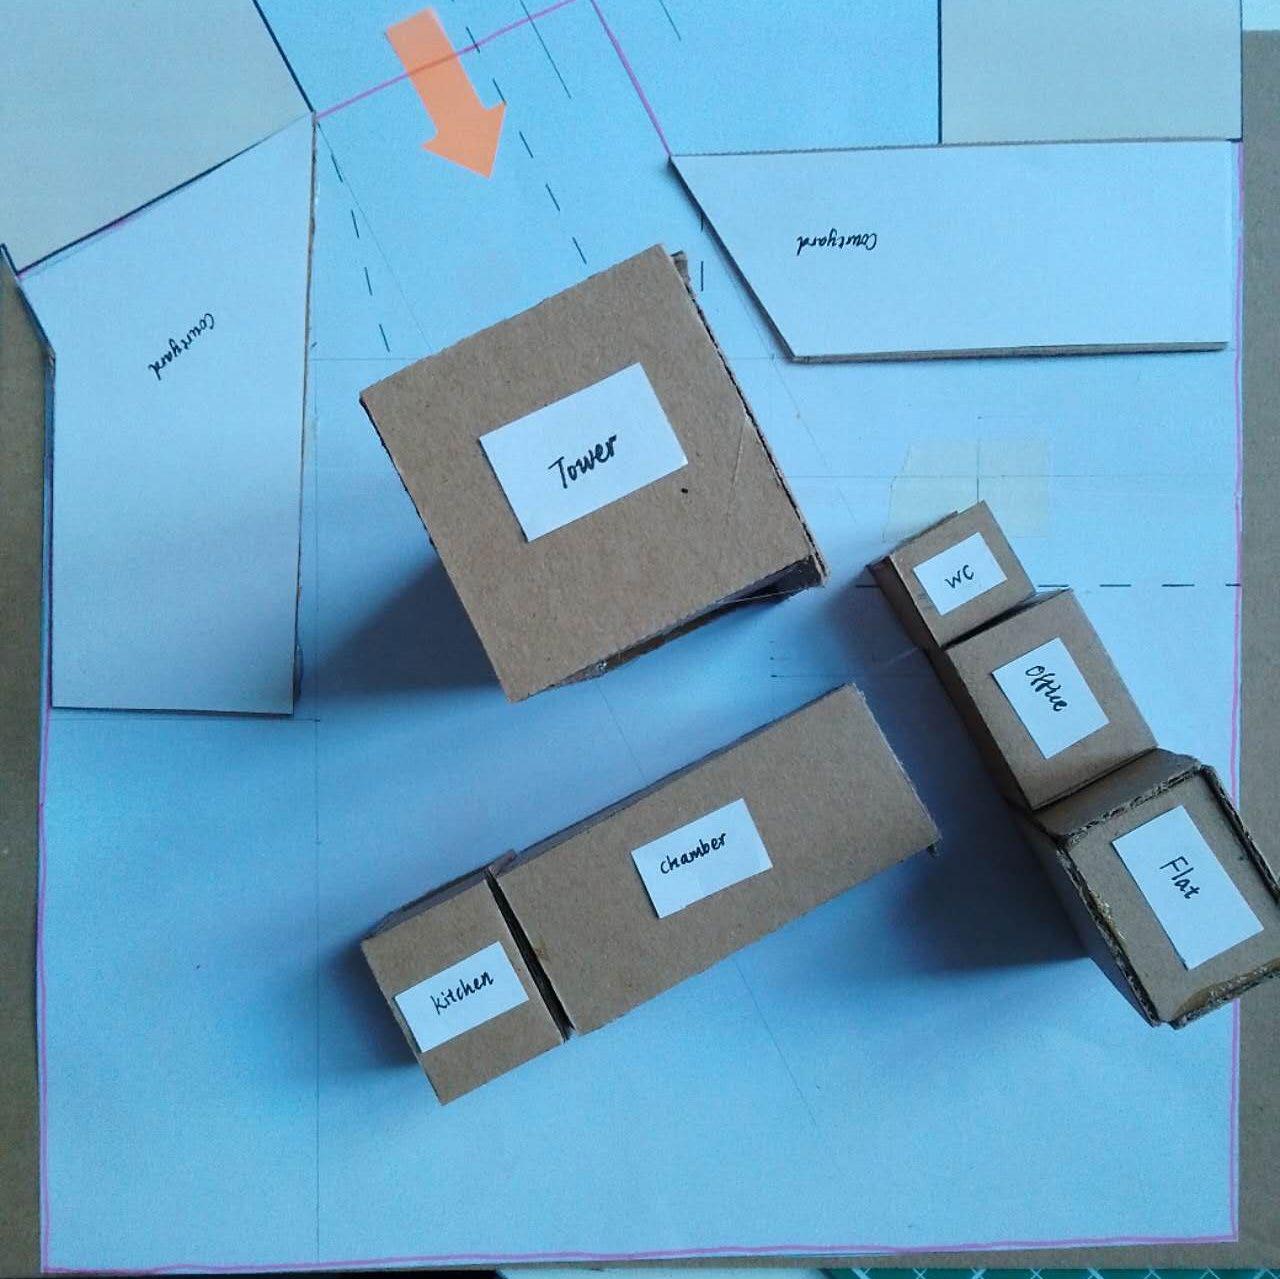
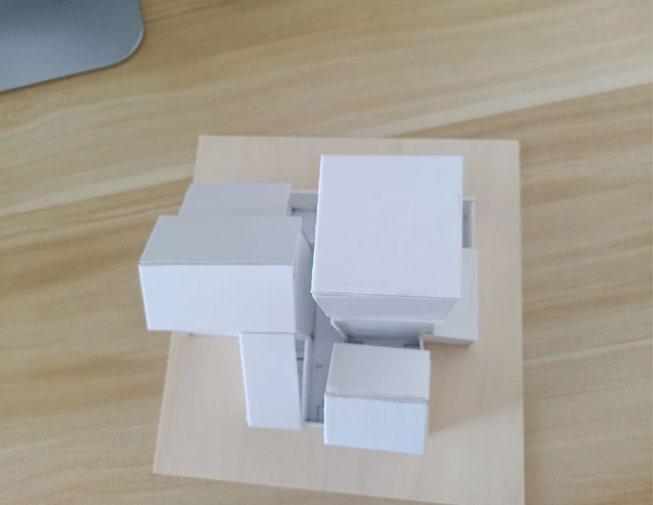
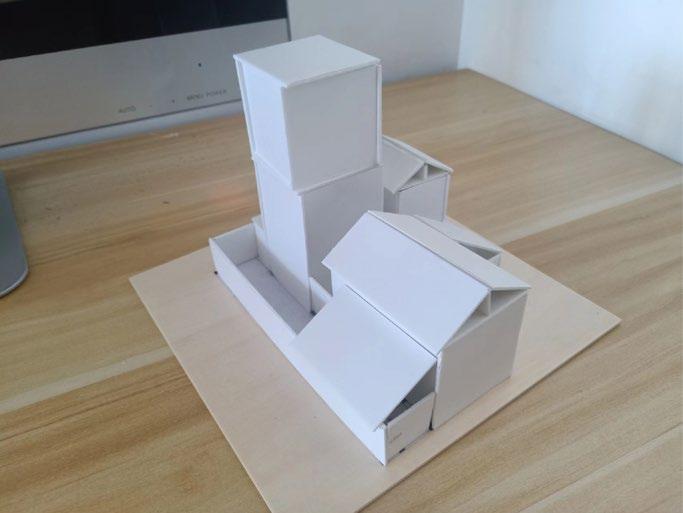
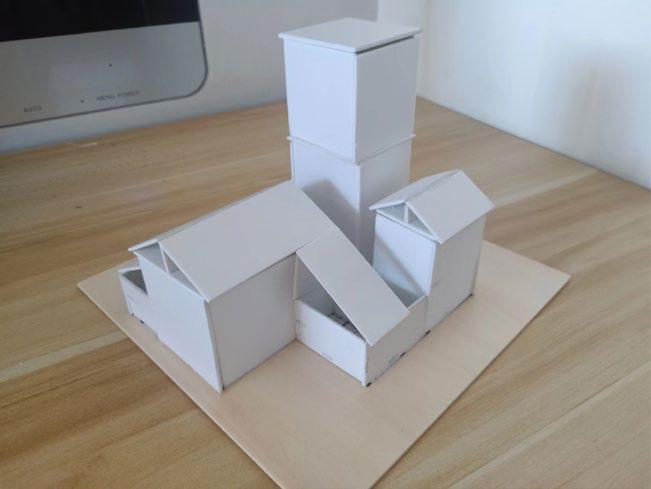
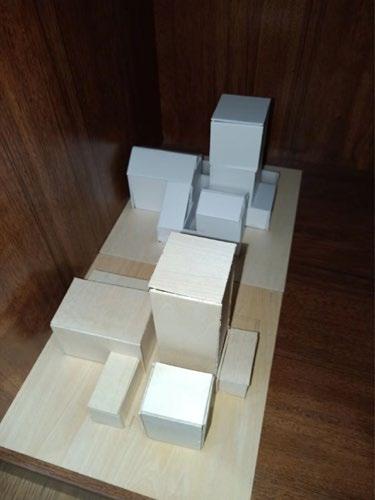
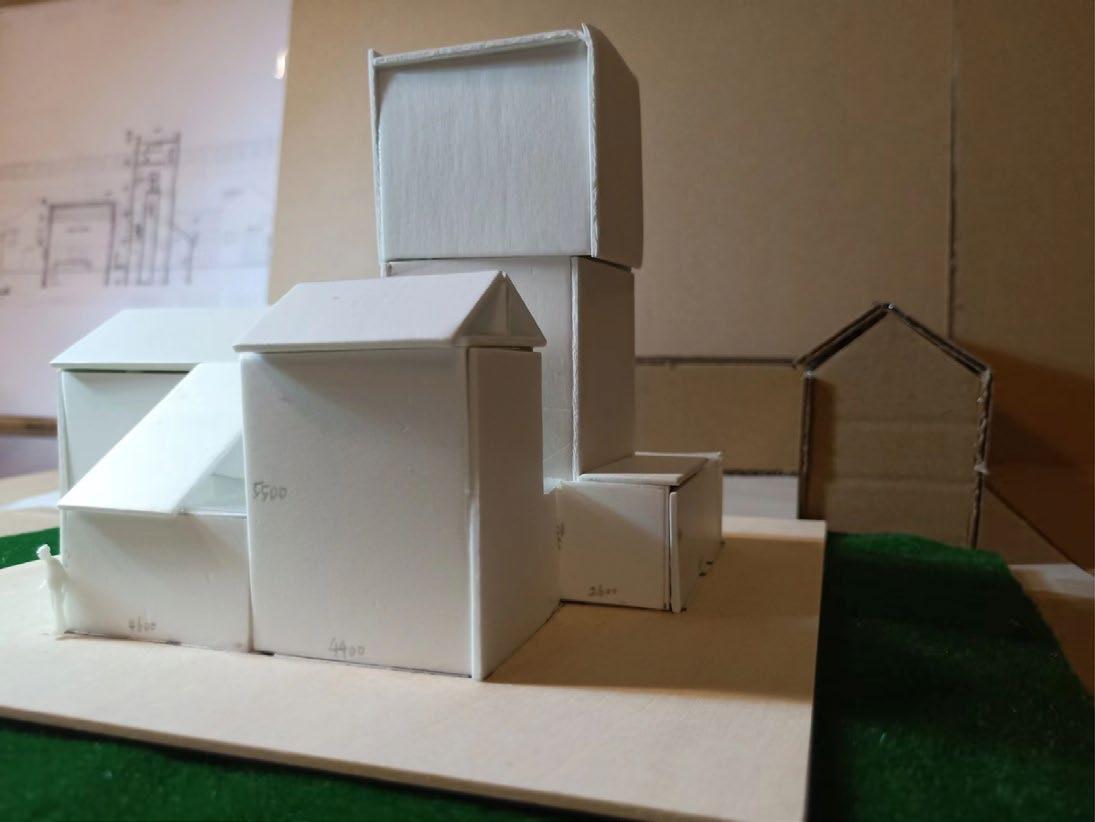
3rd Design-Model
1:100 Model of 3rd Design (Southeast View)
Project 1.4 Resubmission
3rd Design-Model Components
Tower (North View)
Kitchen, Office and Chamber (South View)
WC and Courtyard (Southwest View)
Flat (North View)
Project 1.4 Resubmission
3rd Design-Model Views
Top View
Project 1.4 Resubmission
3rd Design- Model Views
Site Entrance View
Project 1.4 Resubmission
3rd Design- Model Views
North View
North View Close-up
Project 1.4 Resubmission
3rd Design- Model Views
South View
South View Close-up
Project 1.4 Resubmission
3rd Design-Model Views
East View West View
Project 1.4 Resubmission
3rd Design-Atmosphere
Collision of straight lines and curve
Lively courtyard
That’s all for Project 4. Thank you !
Framework
1.3 Frameworks
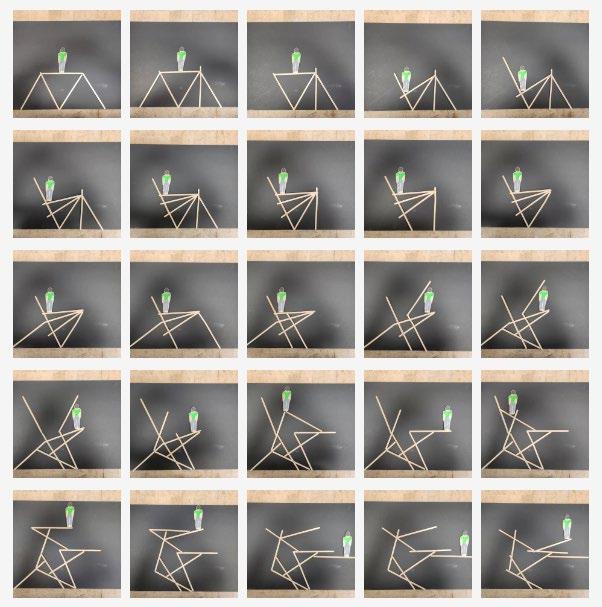
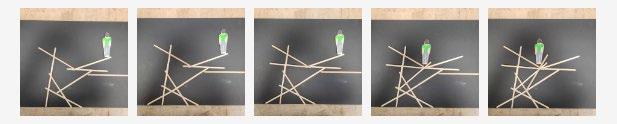
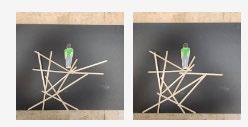
Task 1-Frame Game
My series photos of using wooden strips to create a structure
Frame Game Rules
I consider it a chance for me to open my mind and challenge my creativity. It is not just a game. A timber structure with human inhabited is real and common As a future architect, my mission is to build something for people that is safe and beautiful. This game helped me to explore the possibilities for doing various shapes of timber structure, which is always an environmentallyfriendly choice in architectural industry
My outcome looks like a human bird standing in a blooming nest This work made me feel the hope of design, and maybe that's the meaning of this assignment
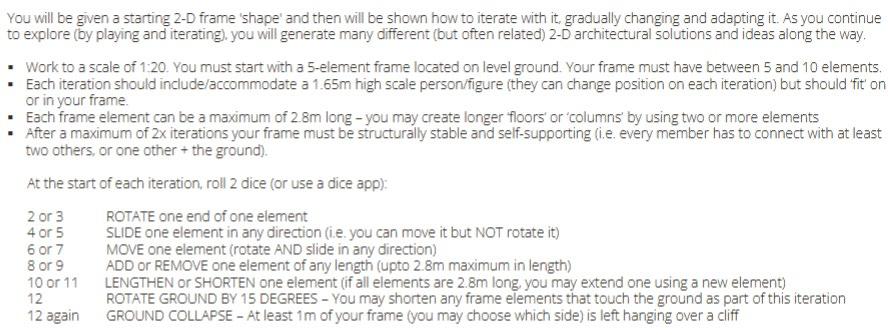
Task 2-2D Human Model
Exhibition of Our Group Member’s Human Models
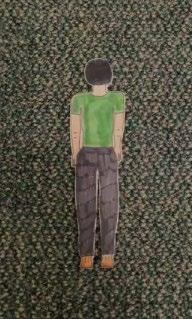
My Human Models of 1:2,1:10 and 1:20
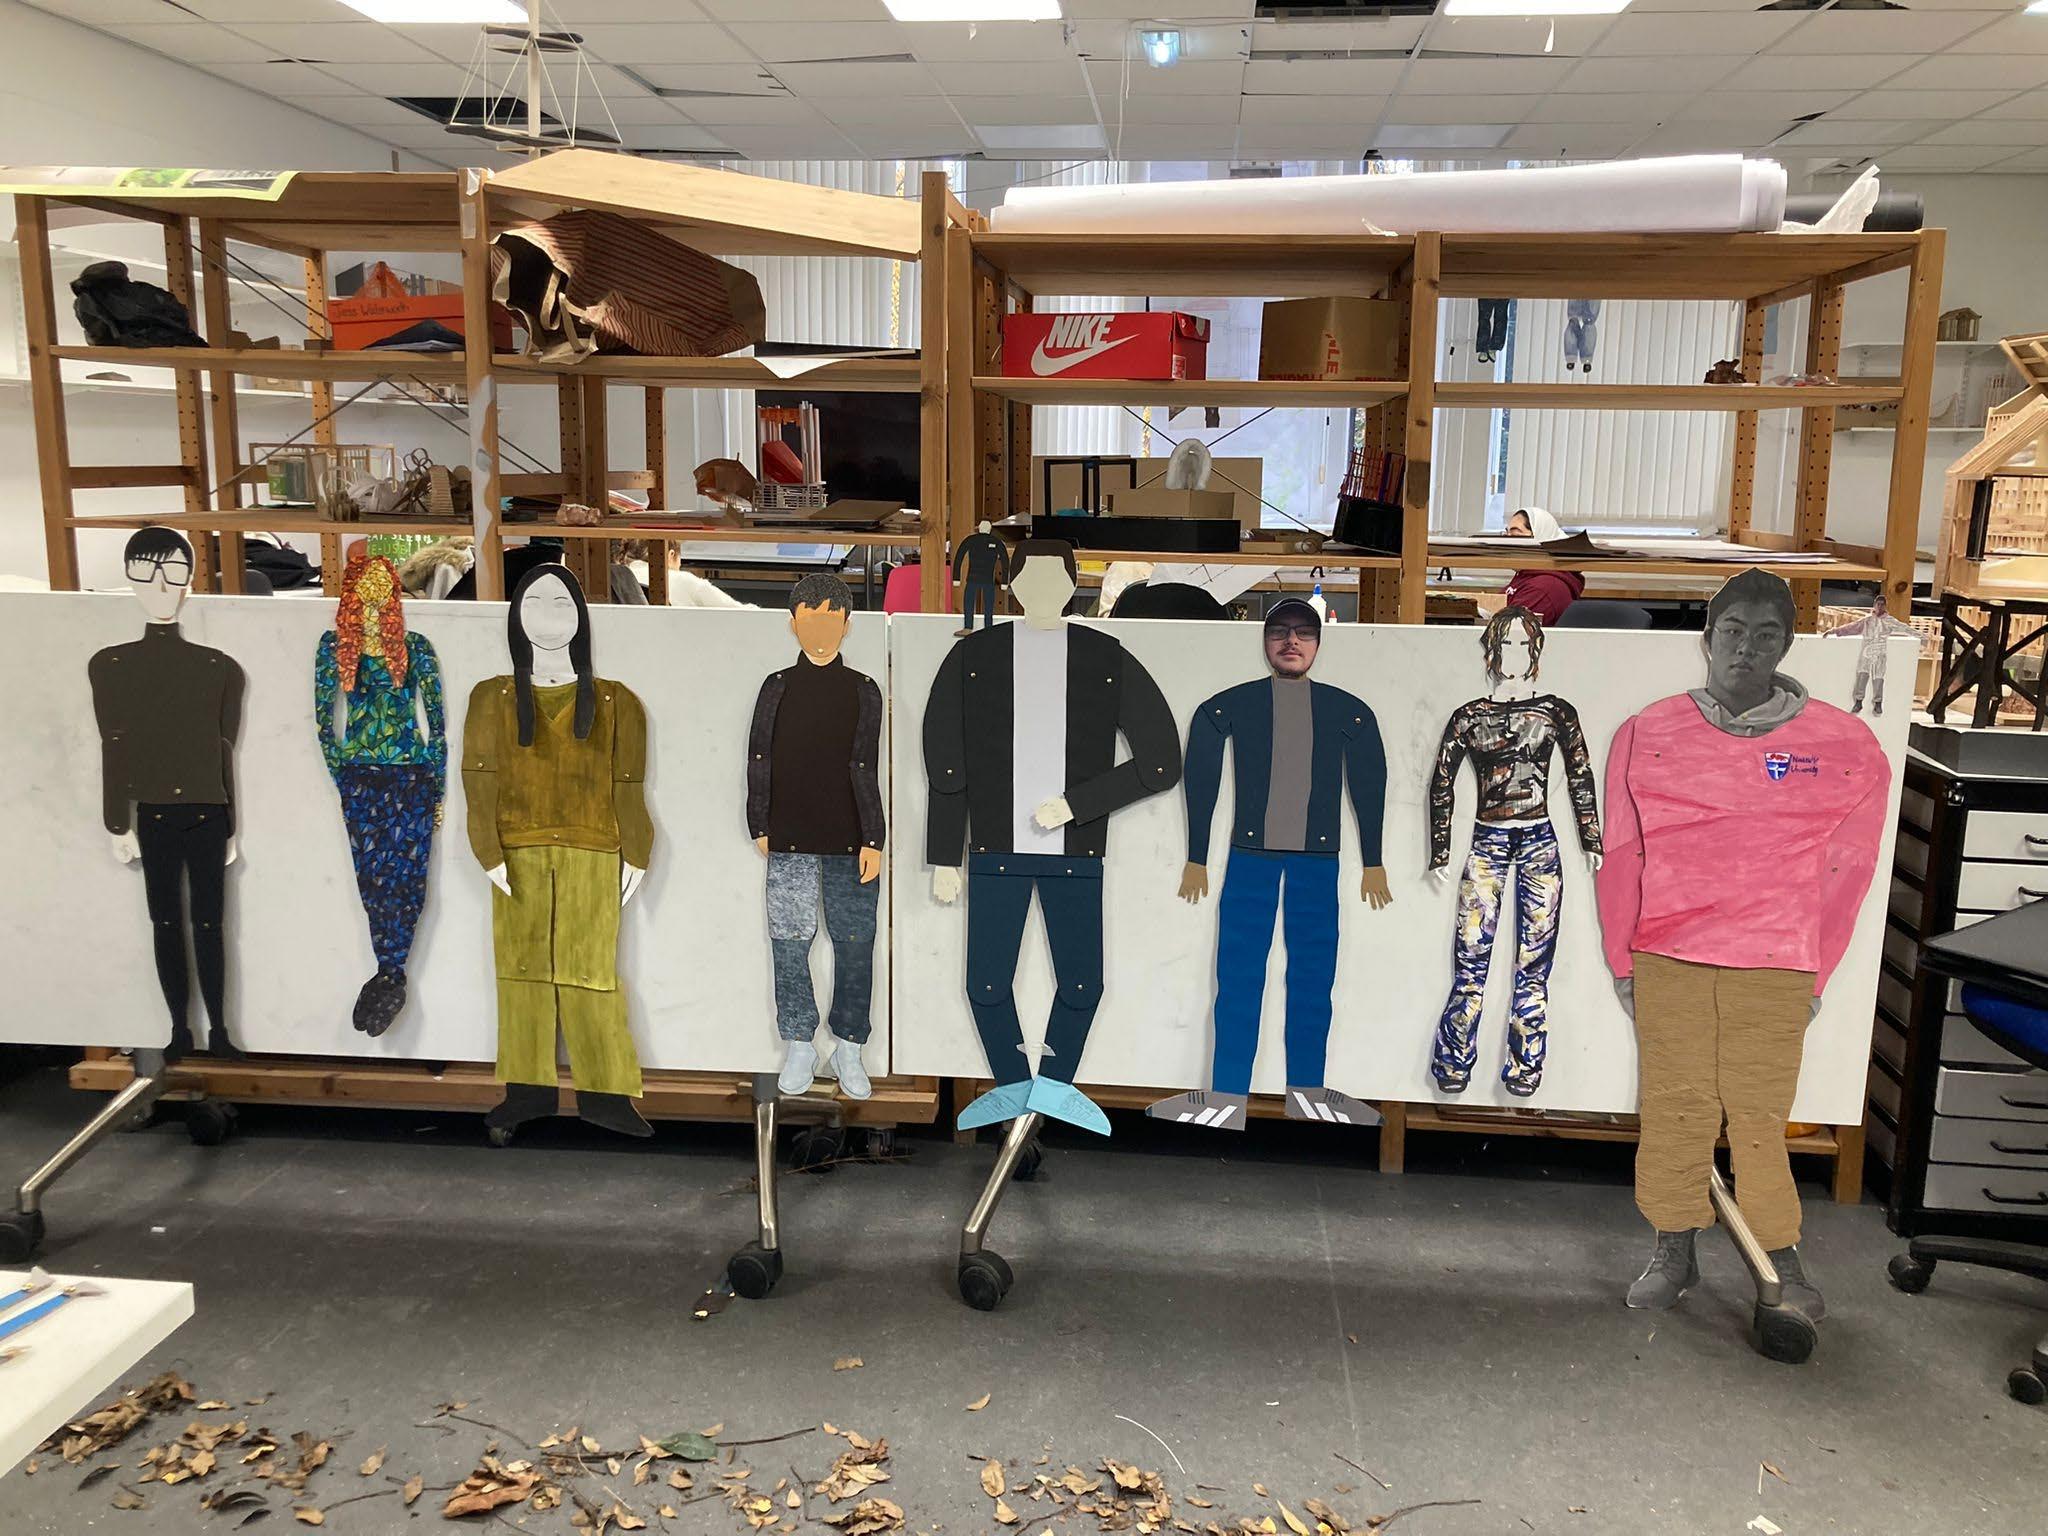
Task 2-2D Human Model
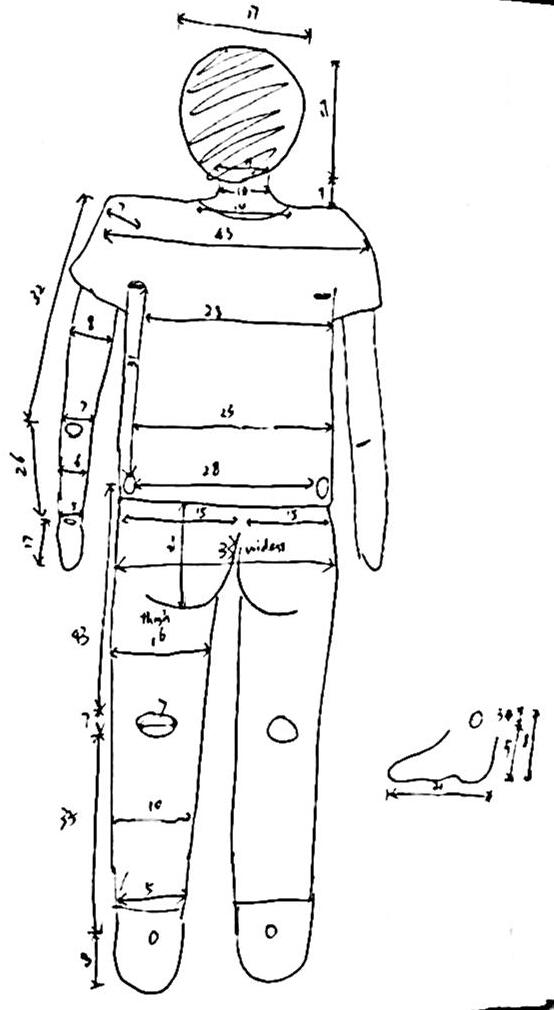
Measurements of Andy
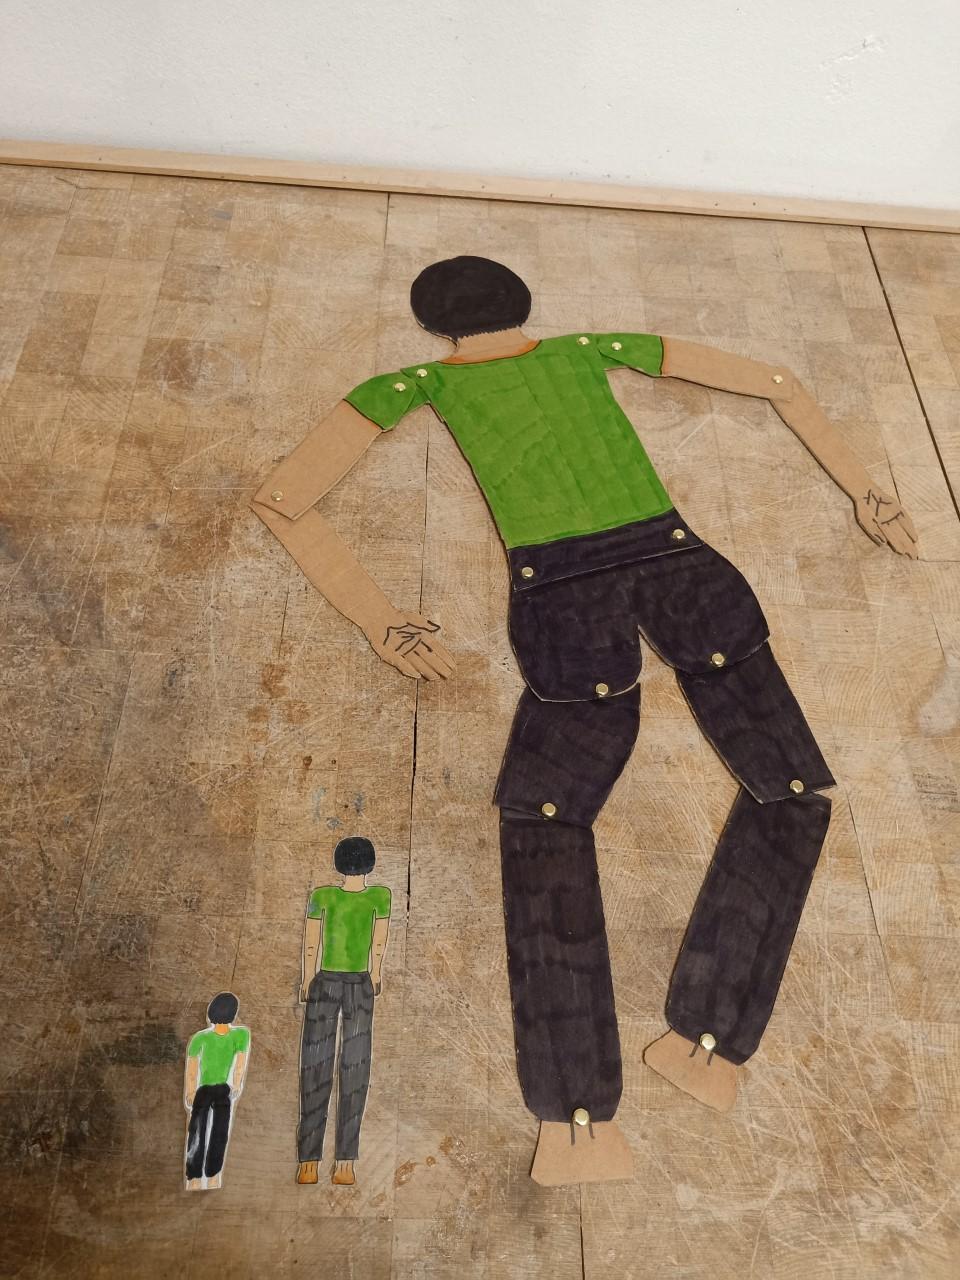
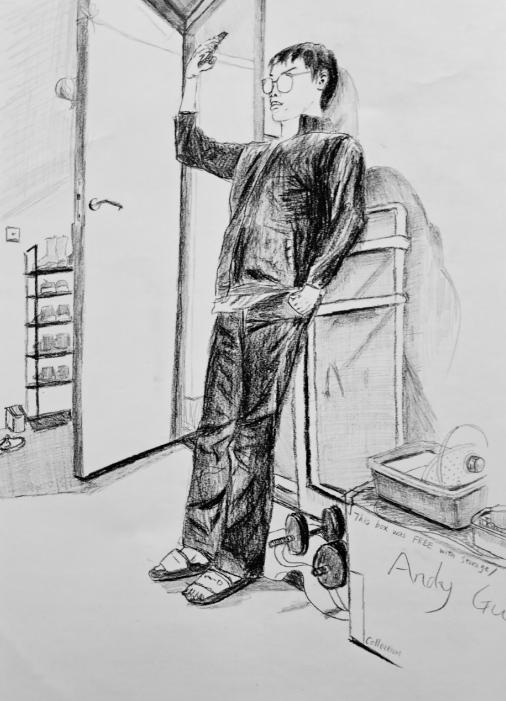
This task is one of the most interesting tasks during the whole year I sincerely asked my architecture friend Andy, who is a current stage 2 student, to be my human model I measured all the useful dimensions for making this giant 1:2 doll model and the small 1:10 one, then cut out all the sections of the body on the cardboard. After that, I used spilt nails to fix the joints. Last but not the least, I coloured ‘him’ When Andy saw ‘himself’, he felt a bit scared because it looked so real
1:2 Model of My friend Andy
1:10 Model of Andy
1.3 Frameworks
Task 3-Group Work
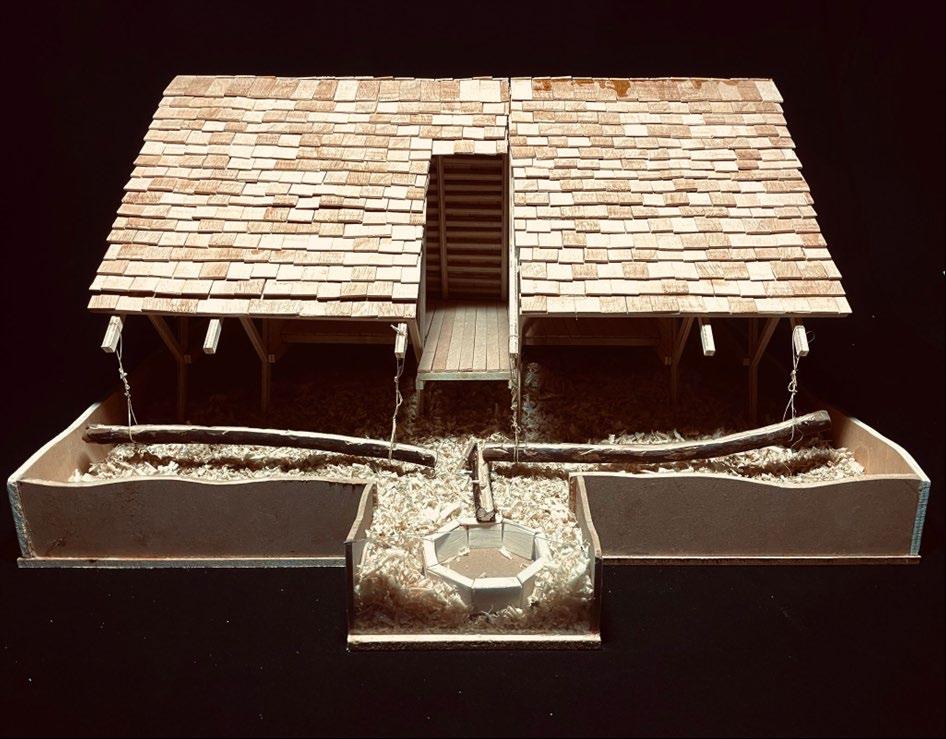
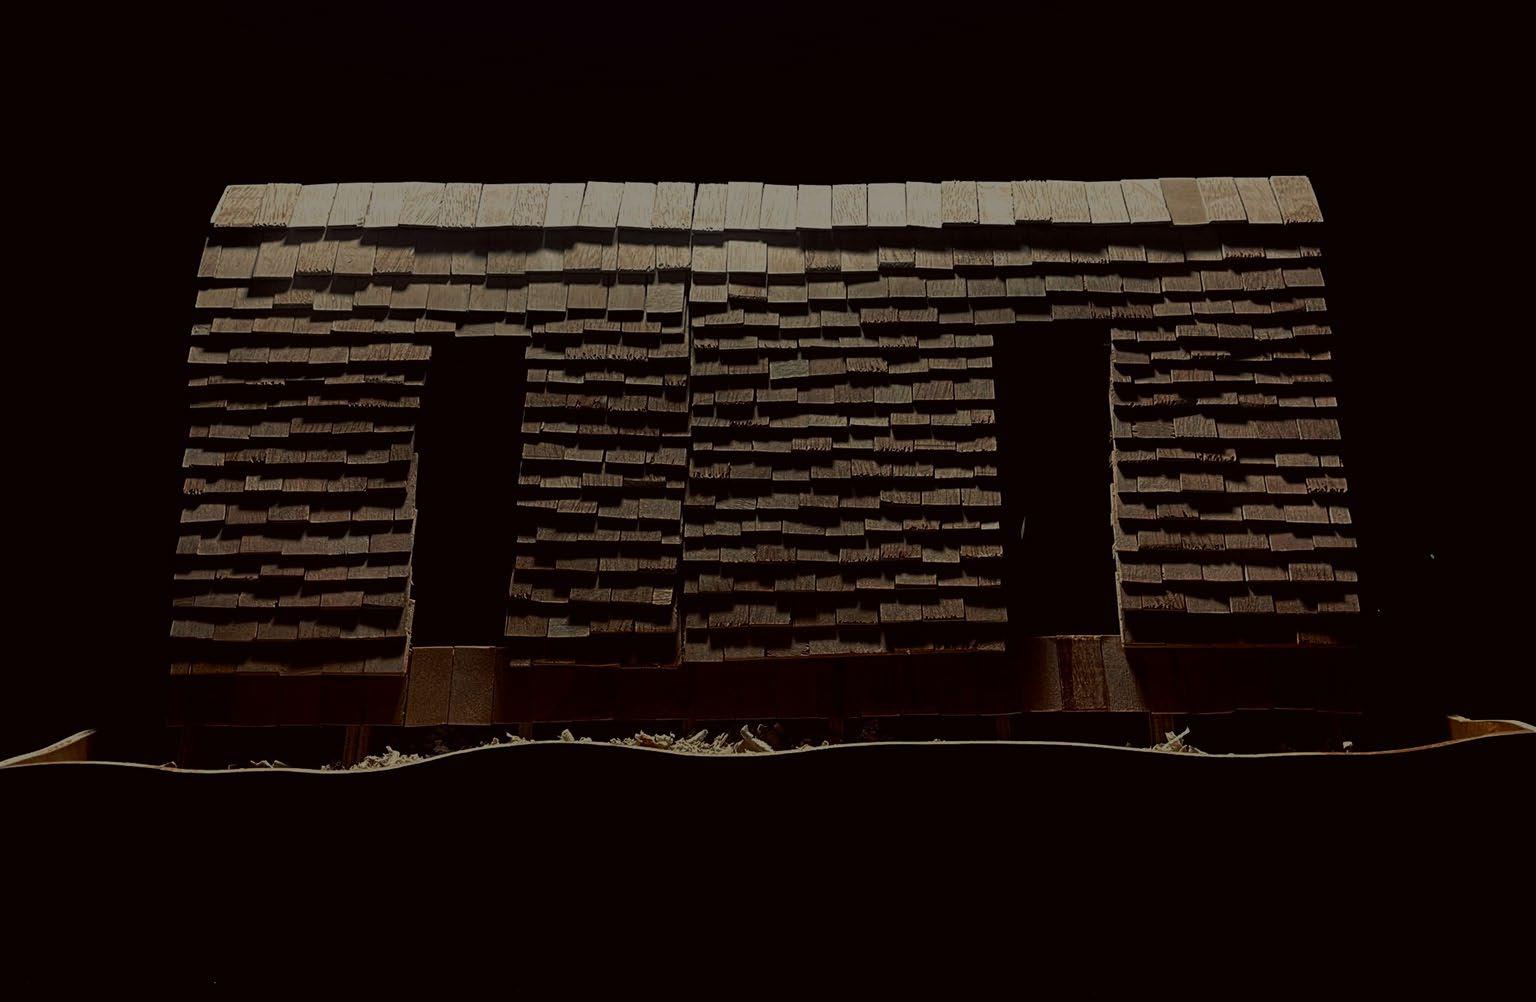
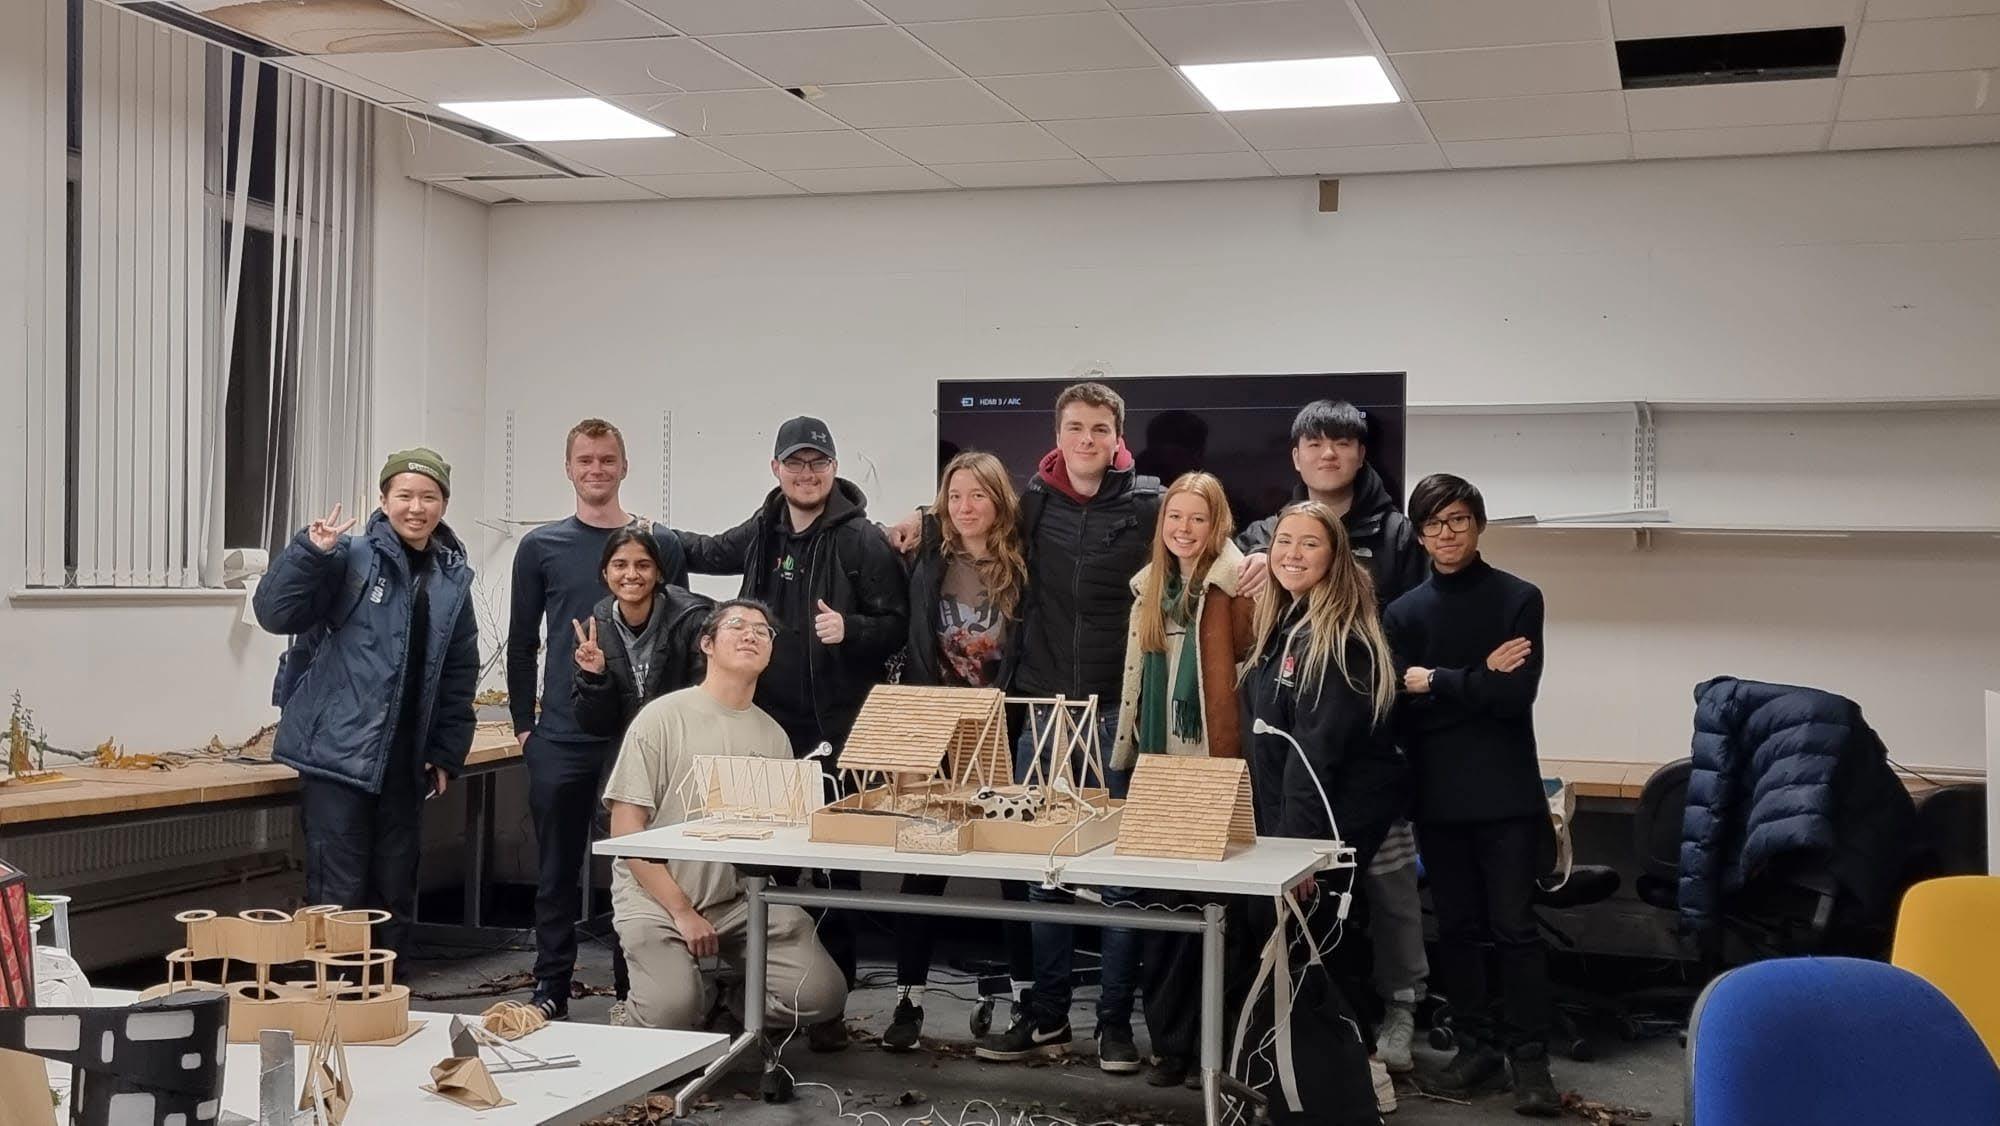
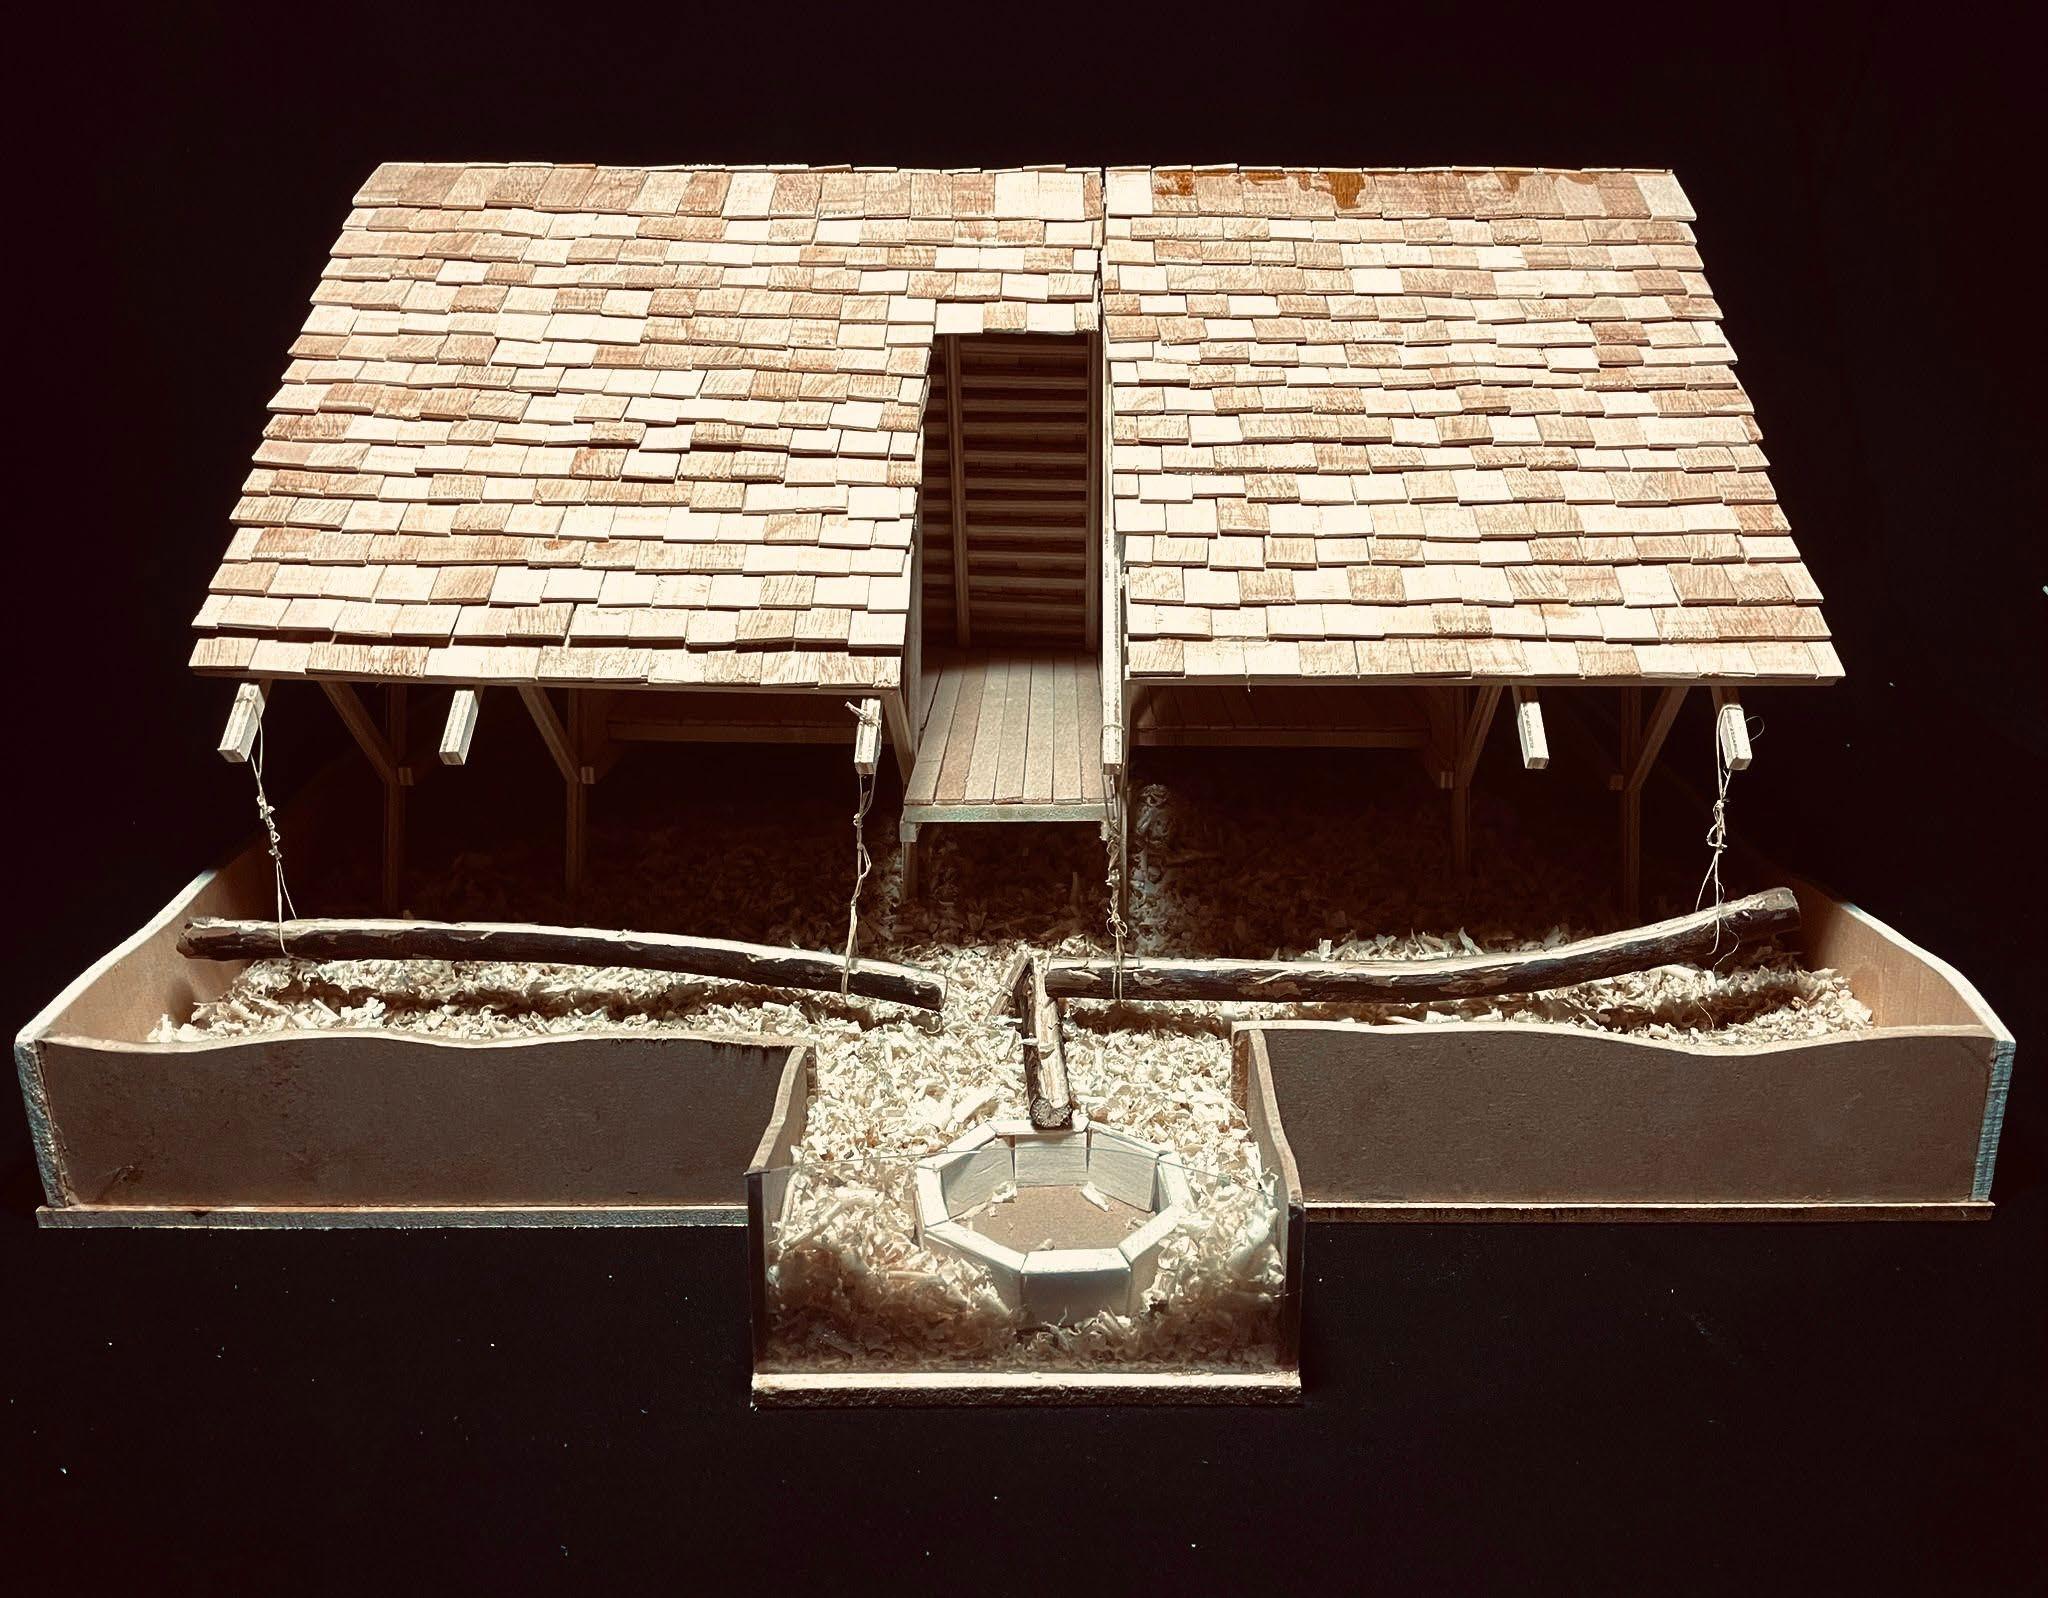
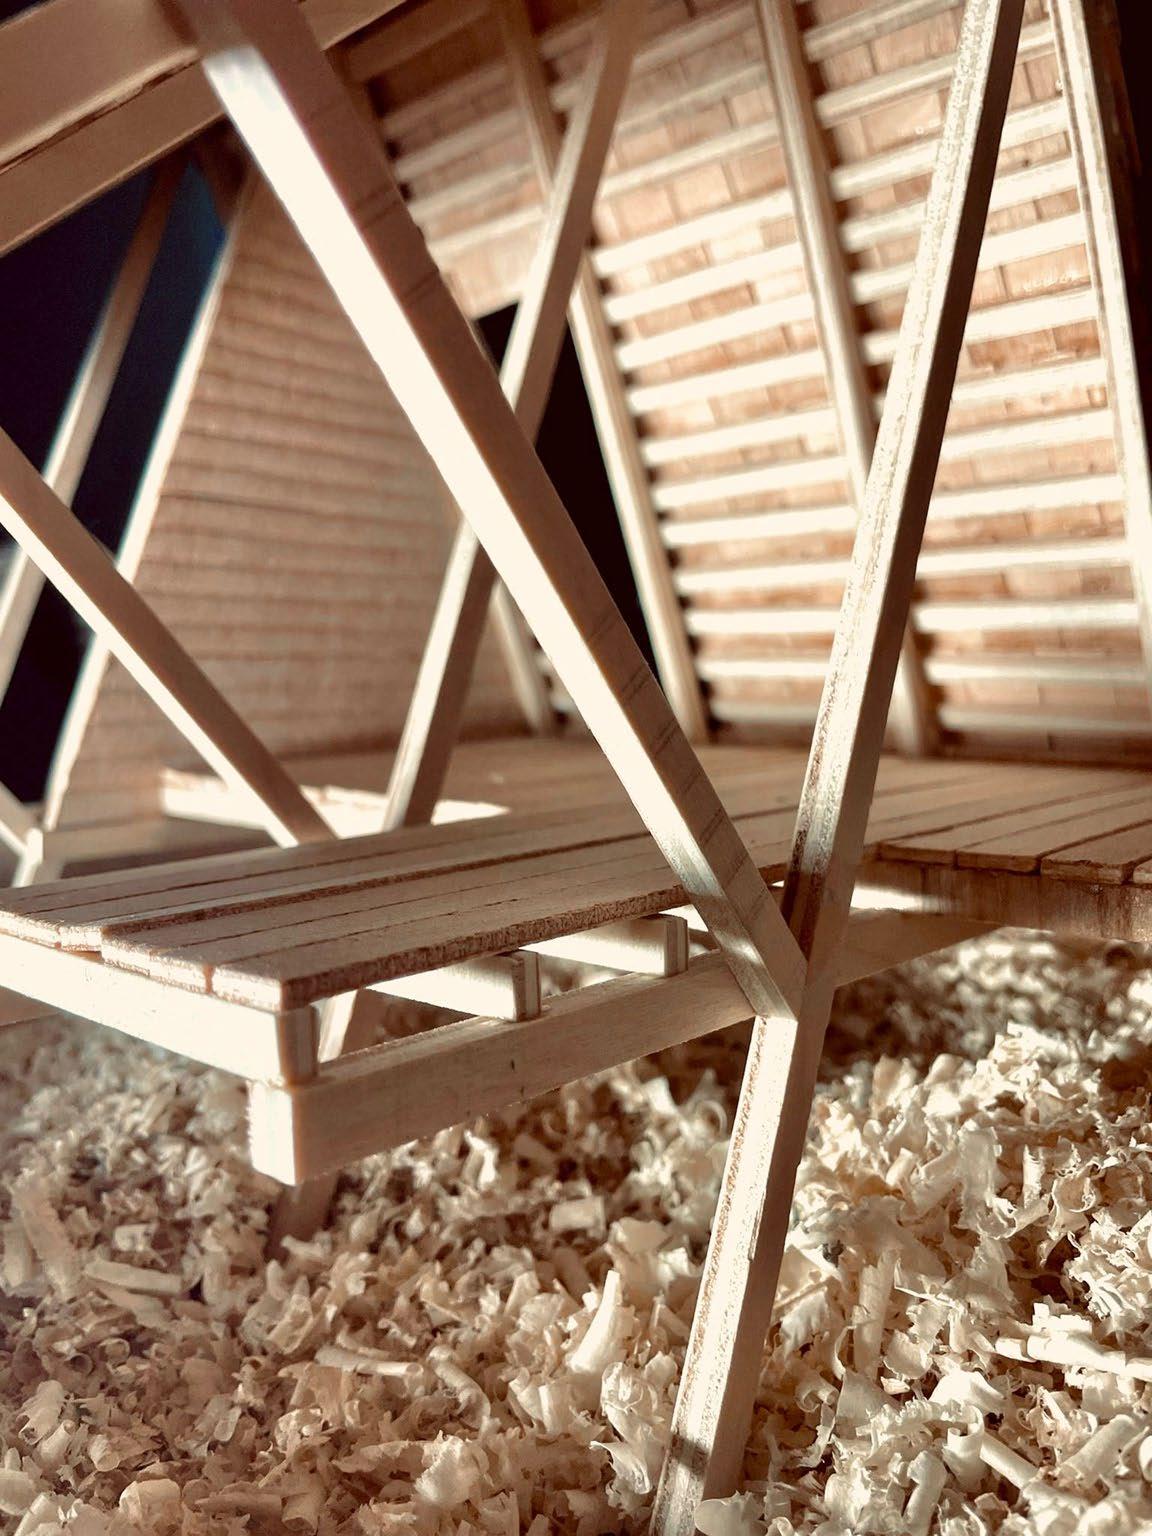
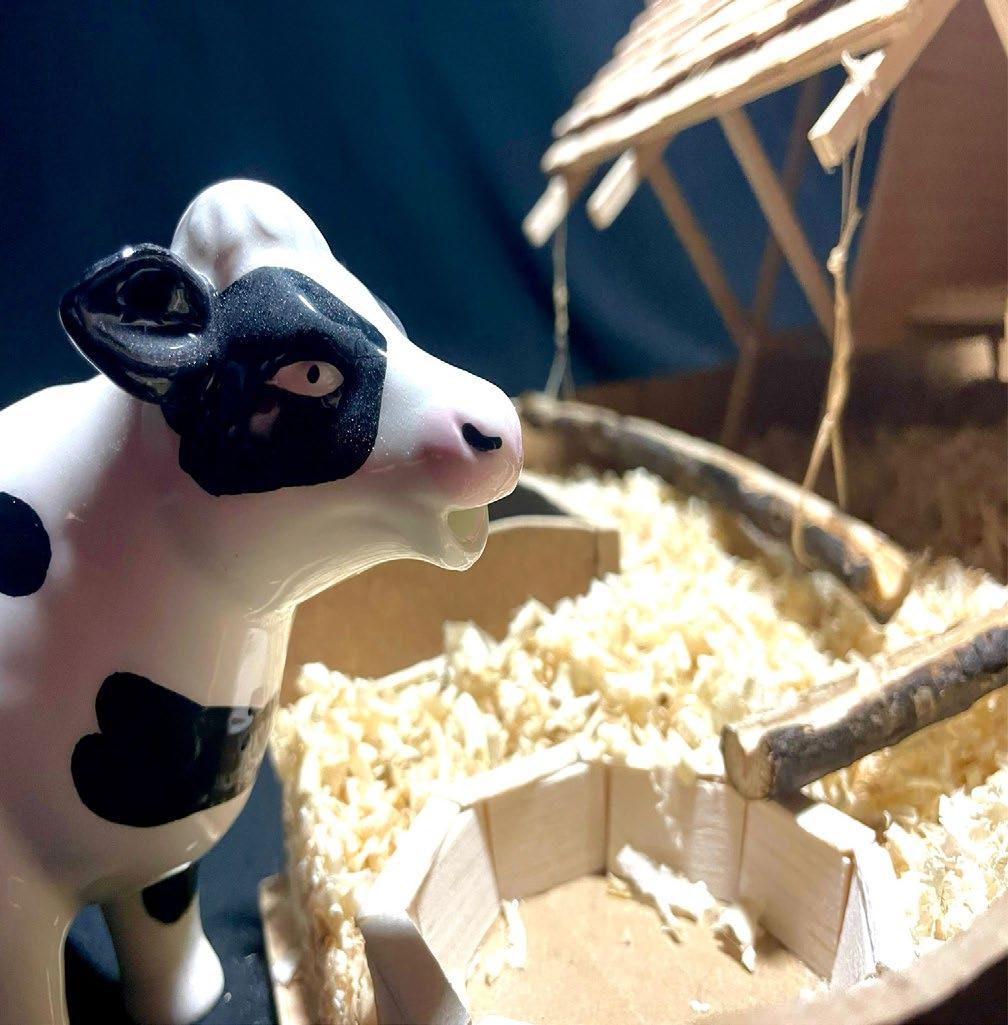
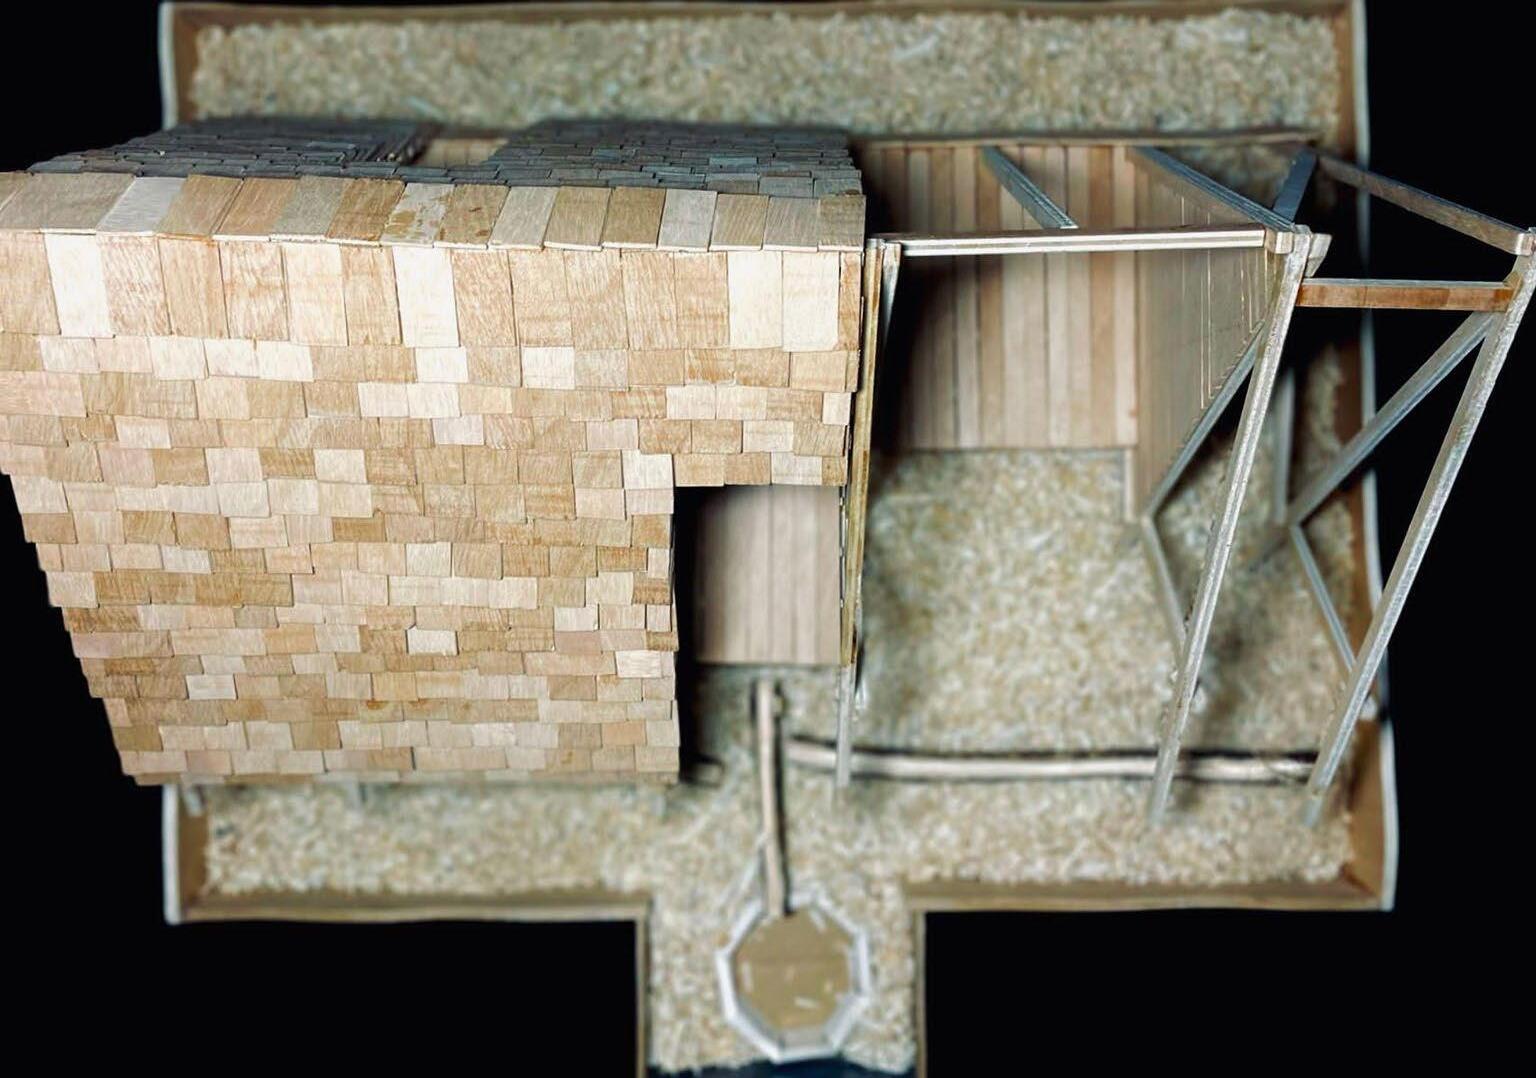
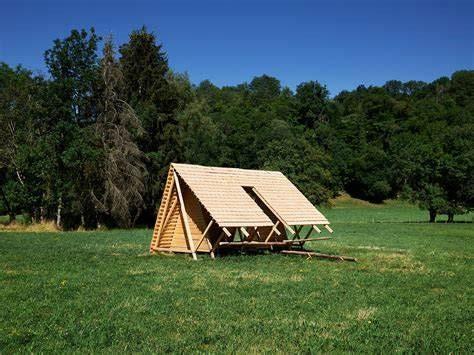
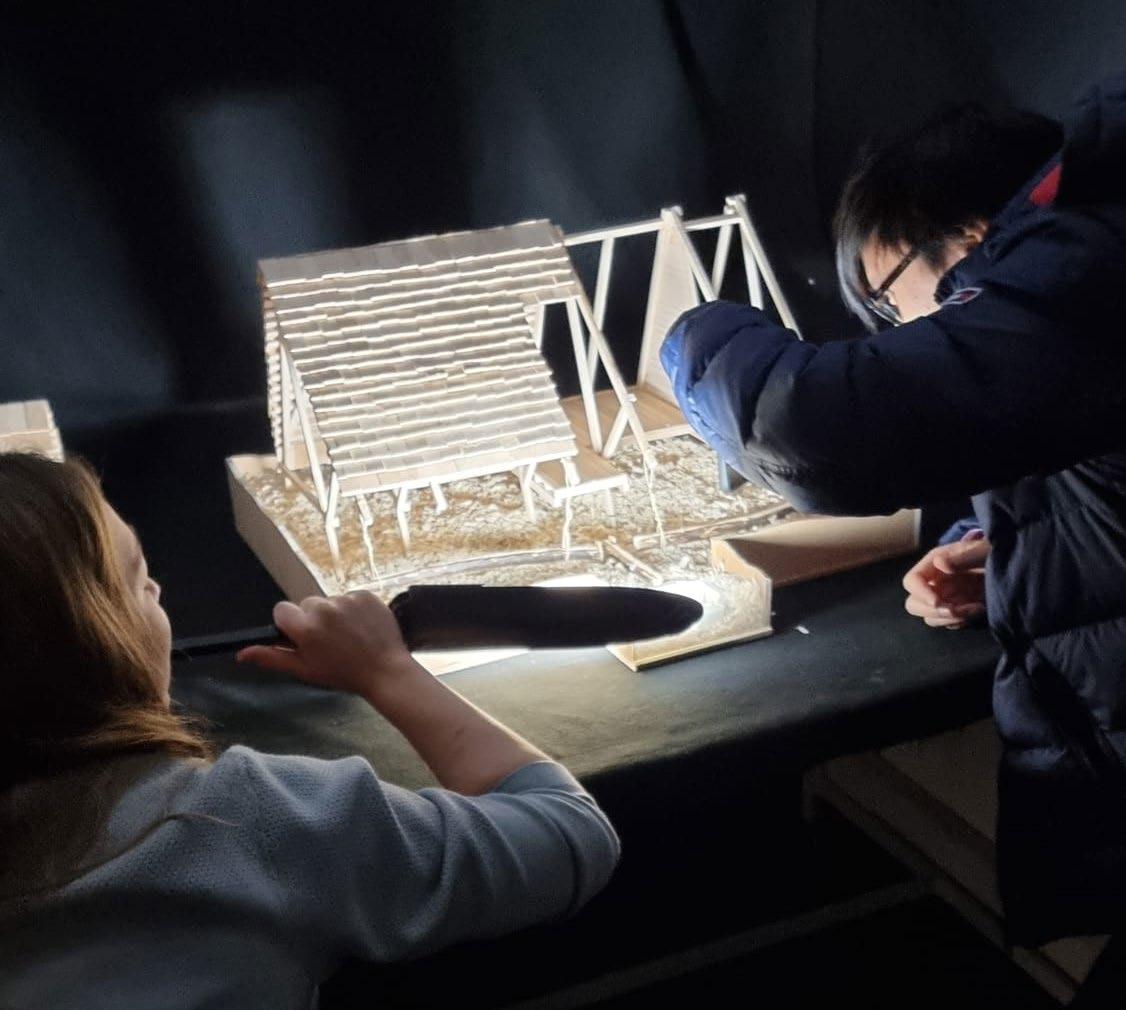
This task asked us to represent a structure by a 1:10 model. Our group was assigned to make a model of ‘Mazot’, a timber house created in a frame-making festival in France.
Group photo with our tutor Harry
Front View of LE FESTIVAL DES CABANES
Top View of LE FESTIVAL DES CABANES
Timber frames The cow and its bucket
Task 3-Group Work
MAZOT - LE FESTIVAL DES CABANES 2022 FAVERGES - FRANCE ARCHITECTURE BY LÉO CHANFRAY, MARTIN CRÉACH, LÉO GRIMONET, PIERRE MANOUKIAN, THÉO RICARD
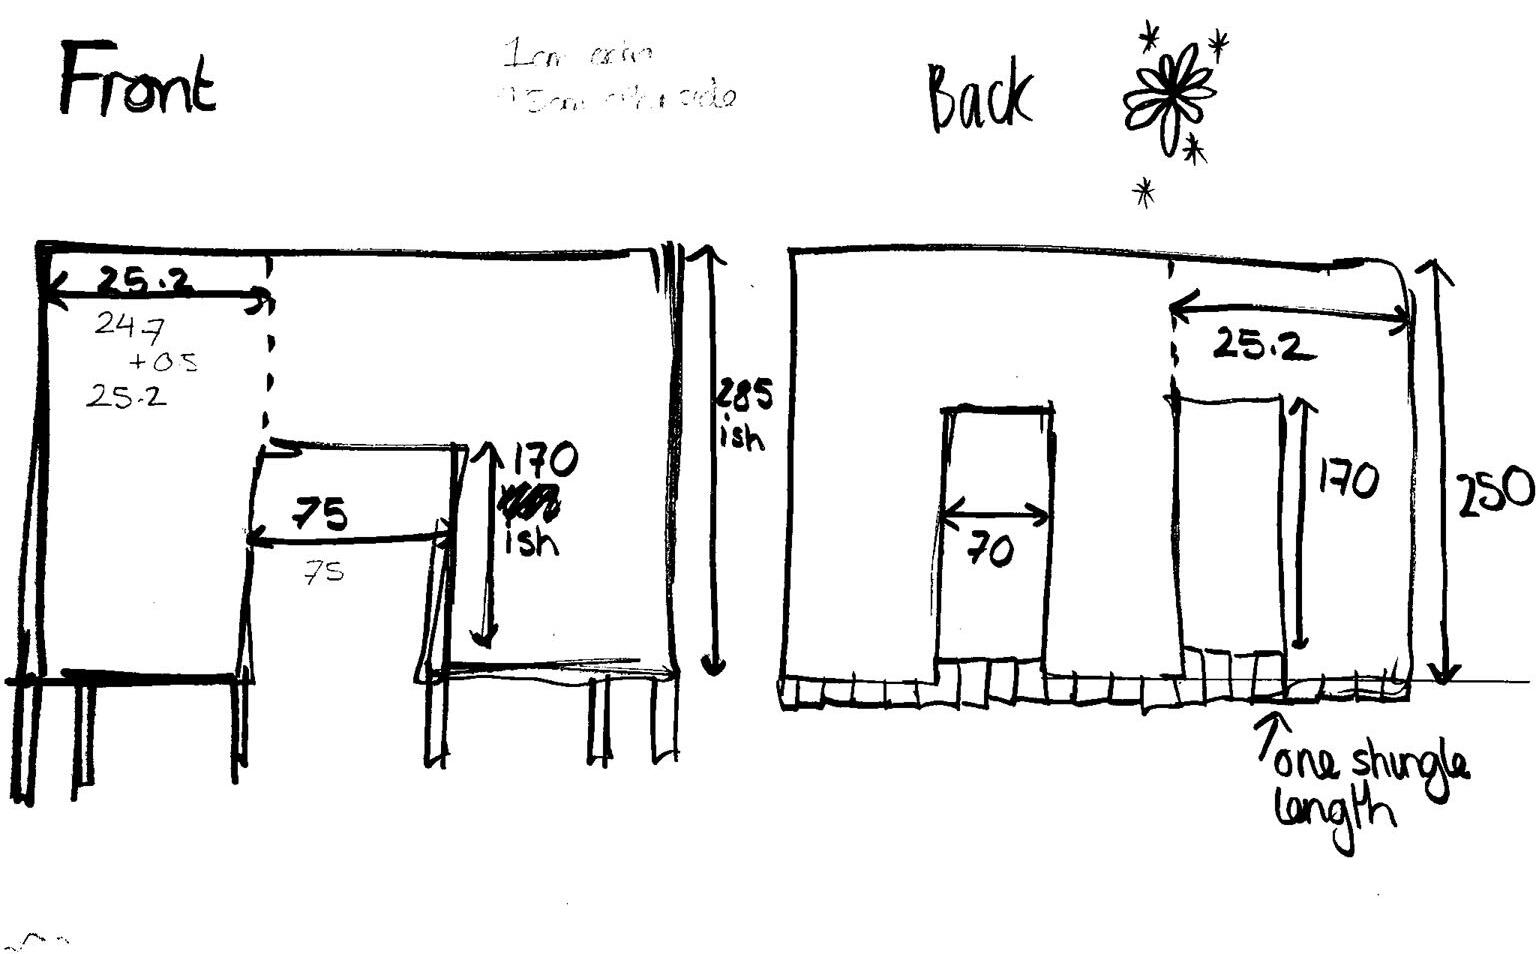
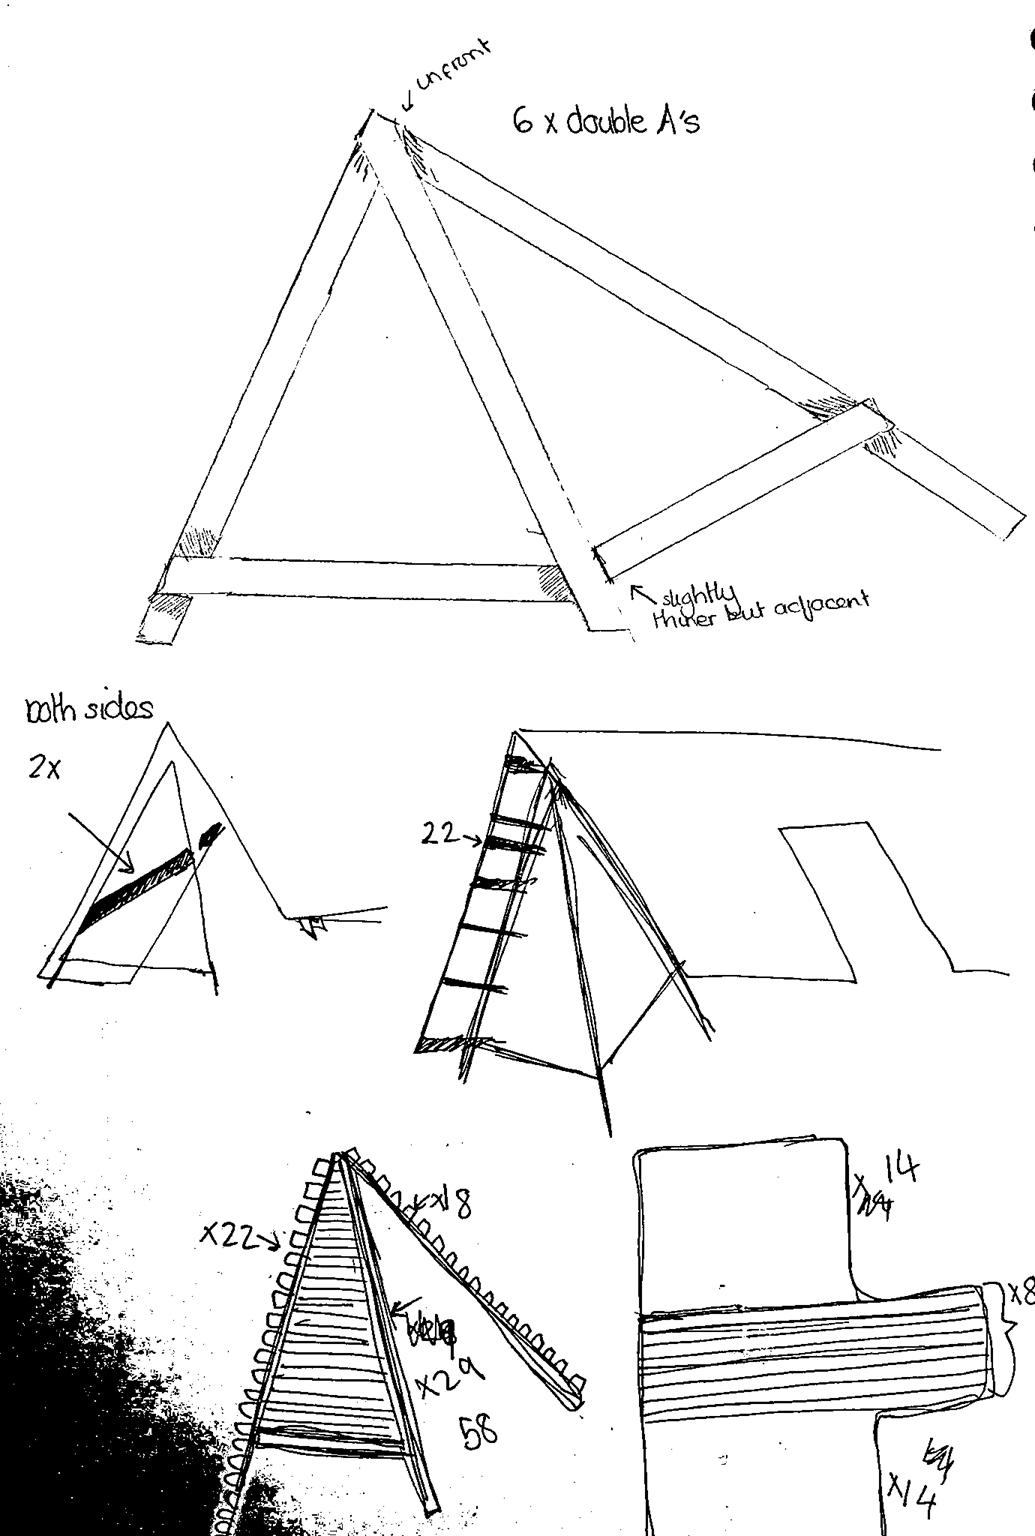
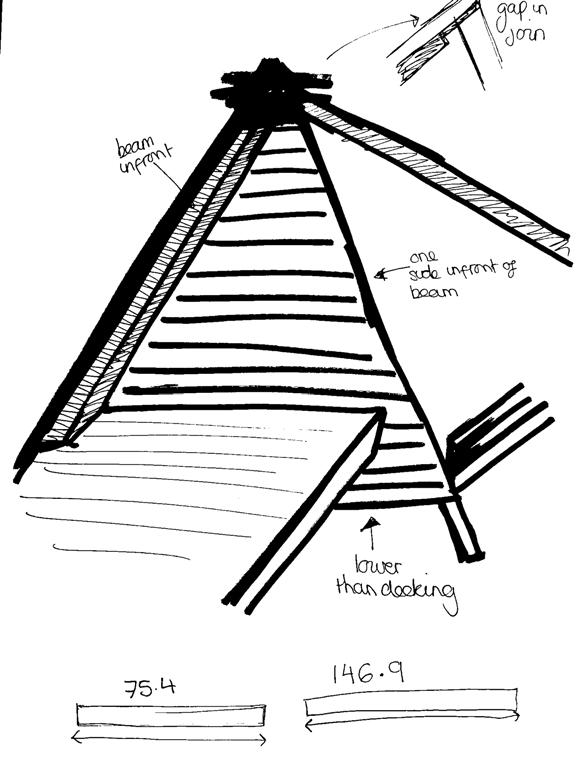
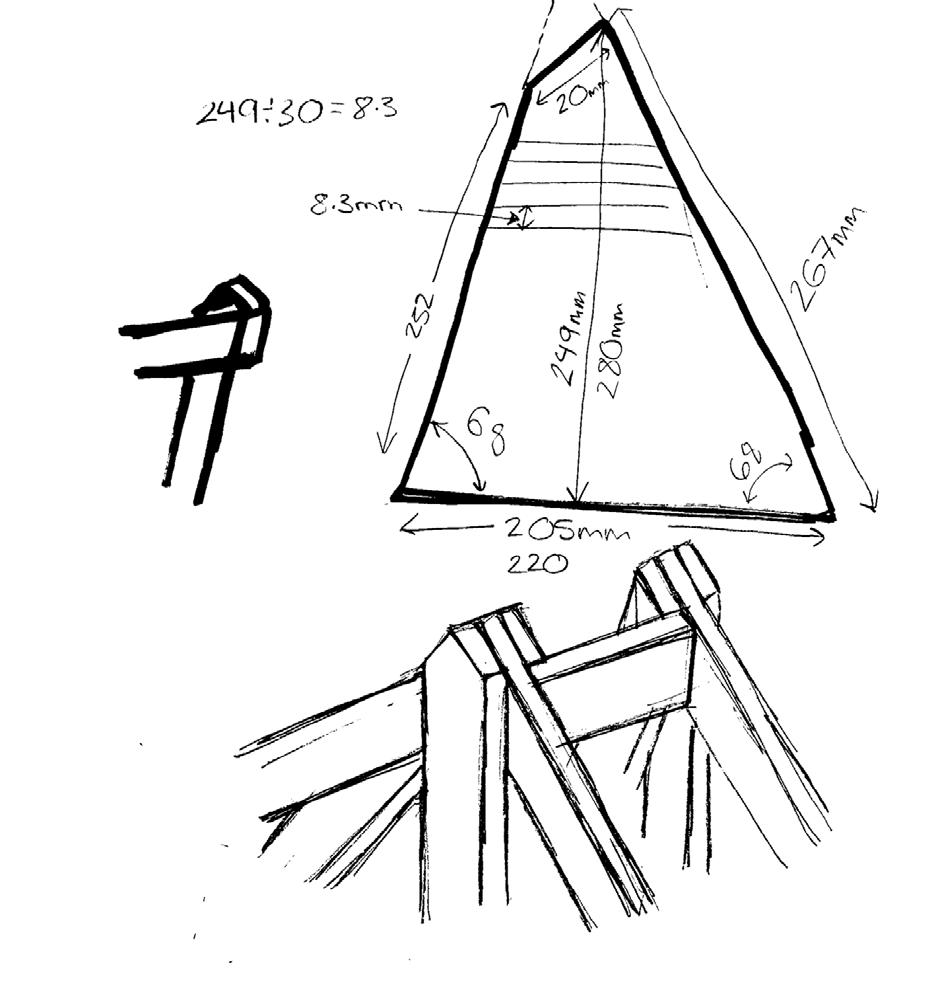
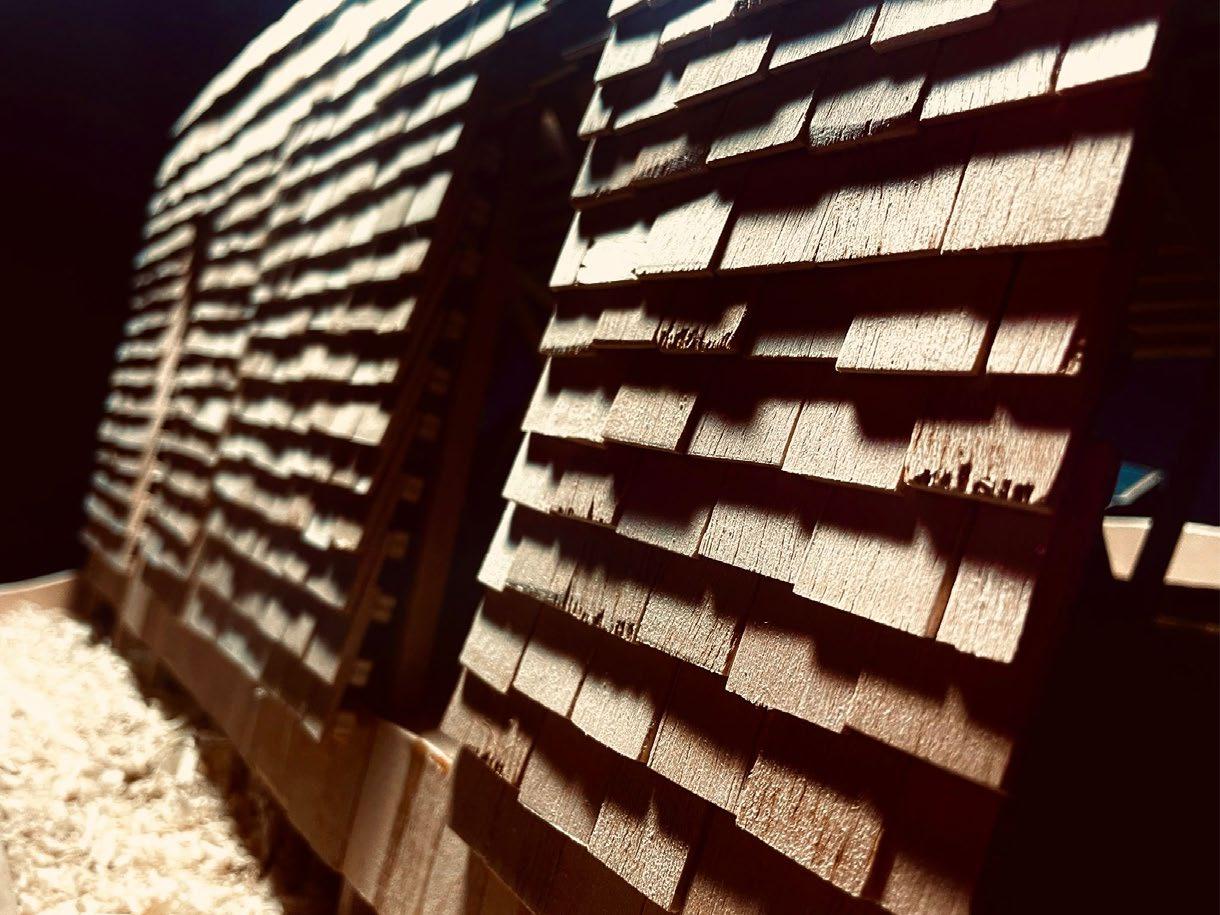
Our amazing group leader Amy assigned us different tasks so that we could work as a team. I marked the dimensions onto wooden board for people to go to workshop to cut, drew 1:10 plan and section, helped polished thousands of shingles ,bought a cow model from amazon and made the bucket for the cow by hand . The legendary cow made our groupwork famous among all the stage 1 exhibition at that time.
Sketches and Measurements done by our group
Task 3-Group Work
Amy and Gustavo doing photography
Spectacular shingles of the model
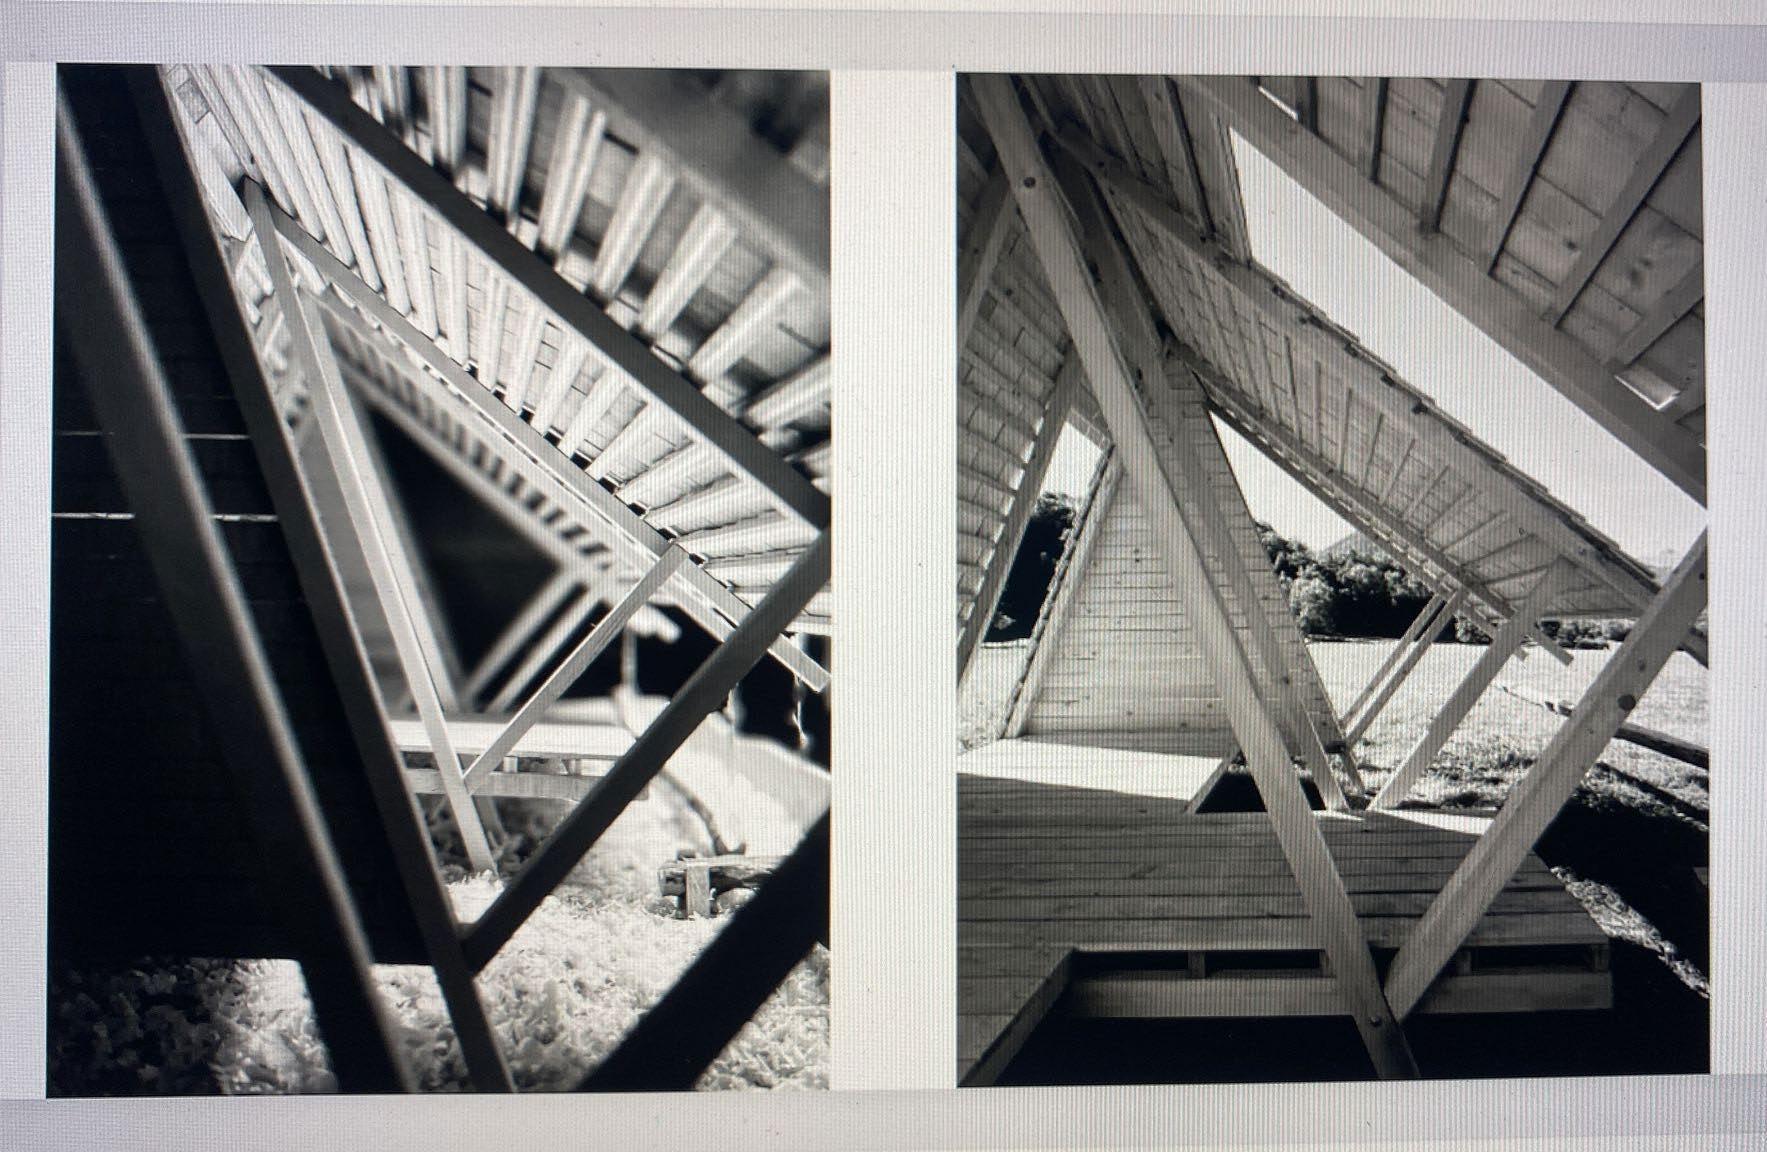
Comparison between our model and the real timber structure
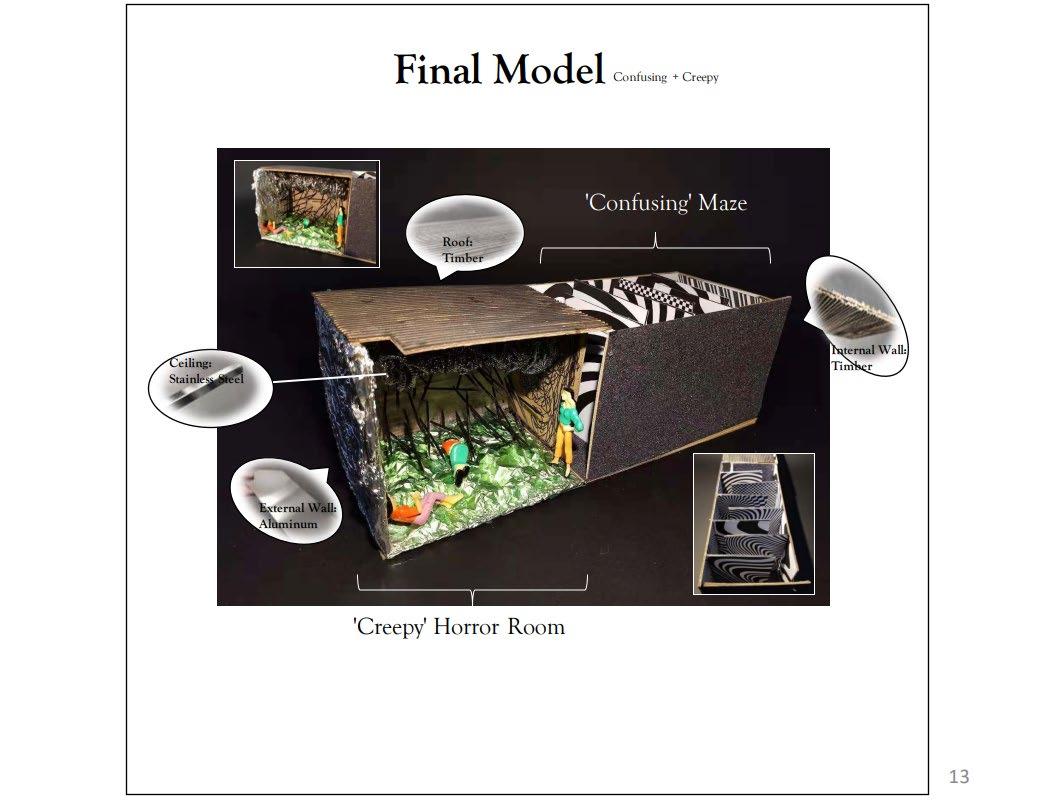
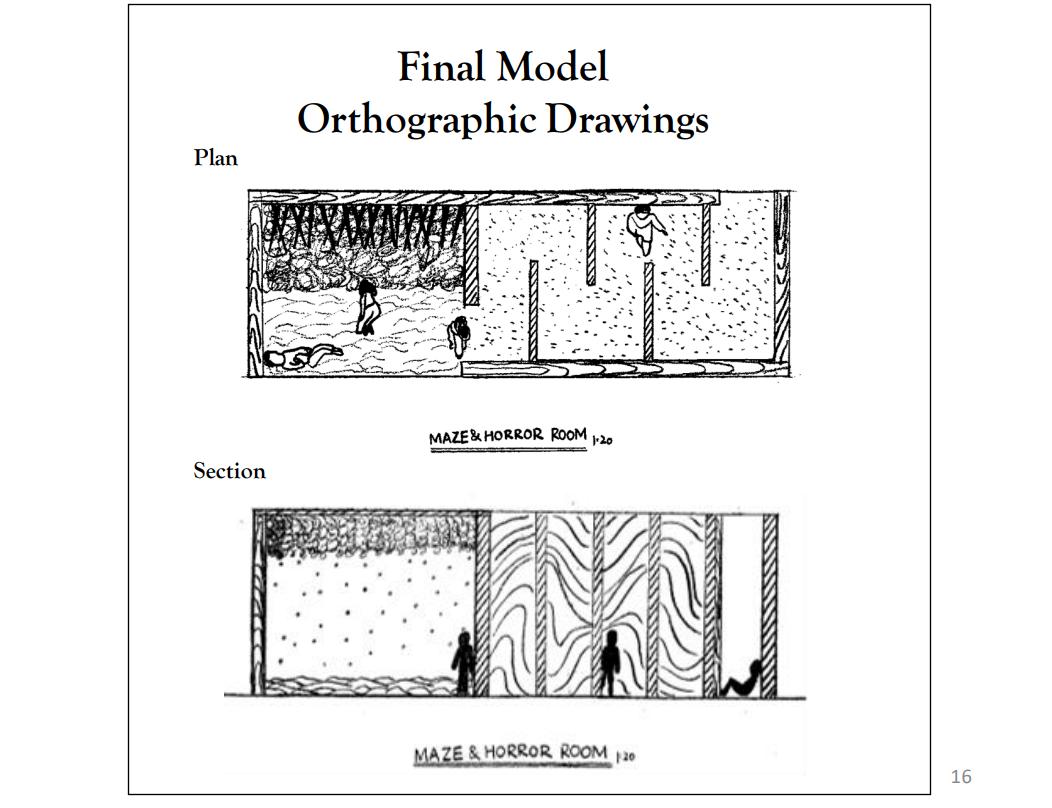
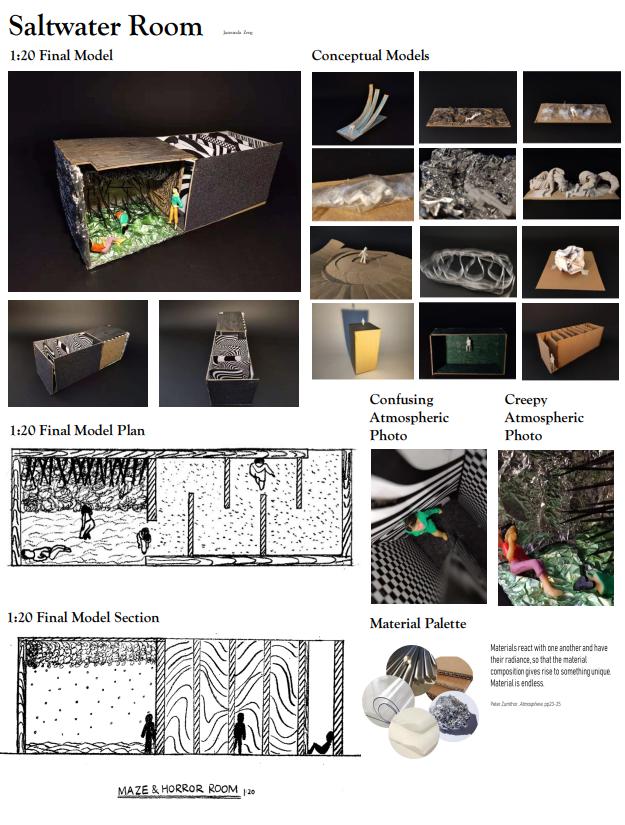
Memory Spot
1.2 Memory Spots
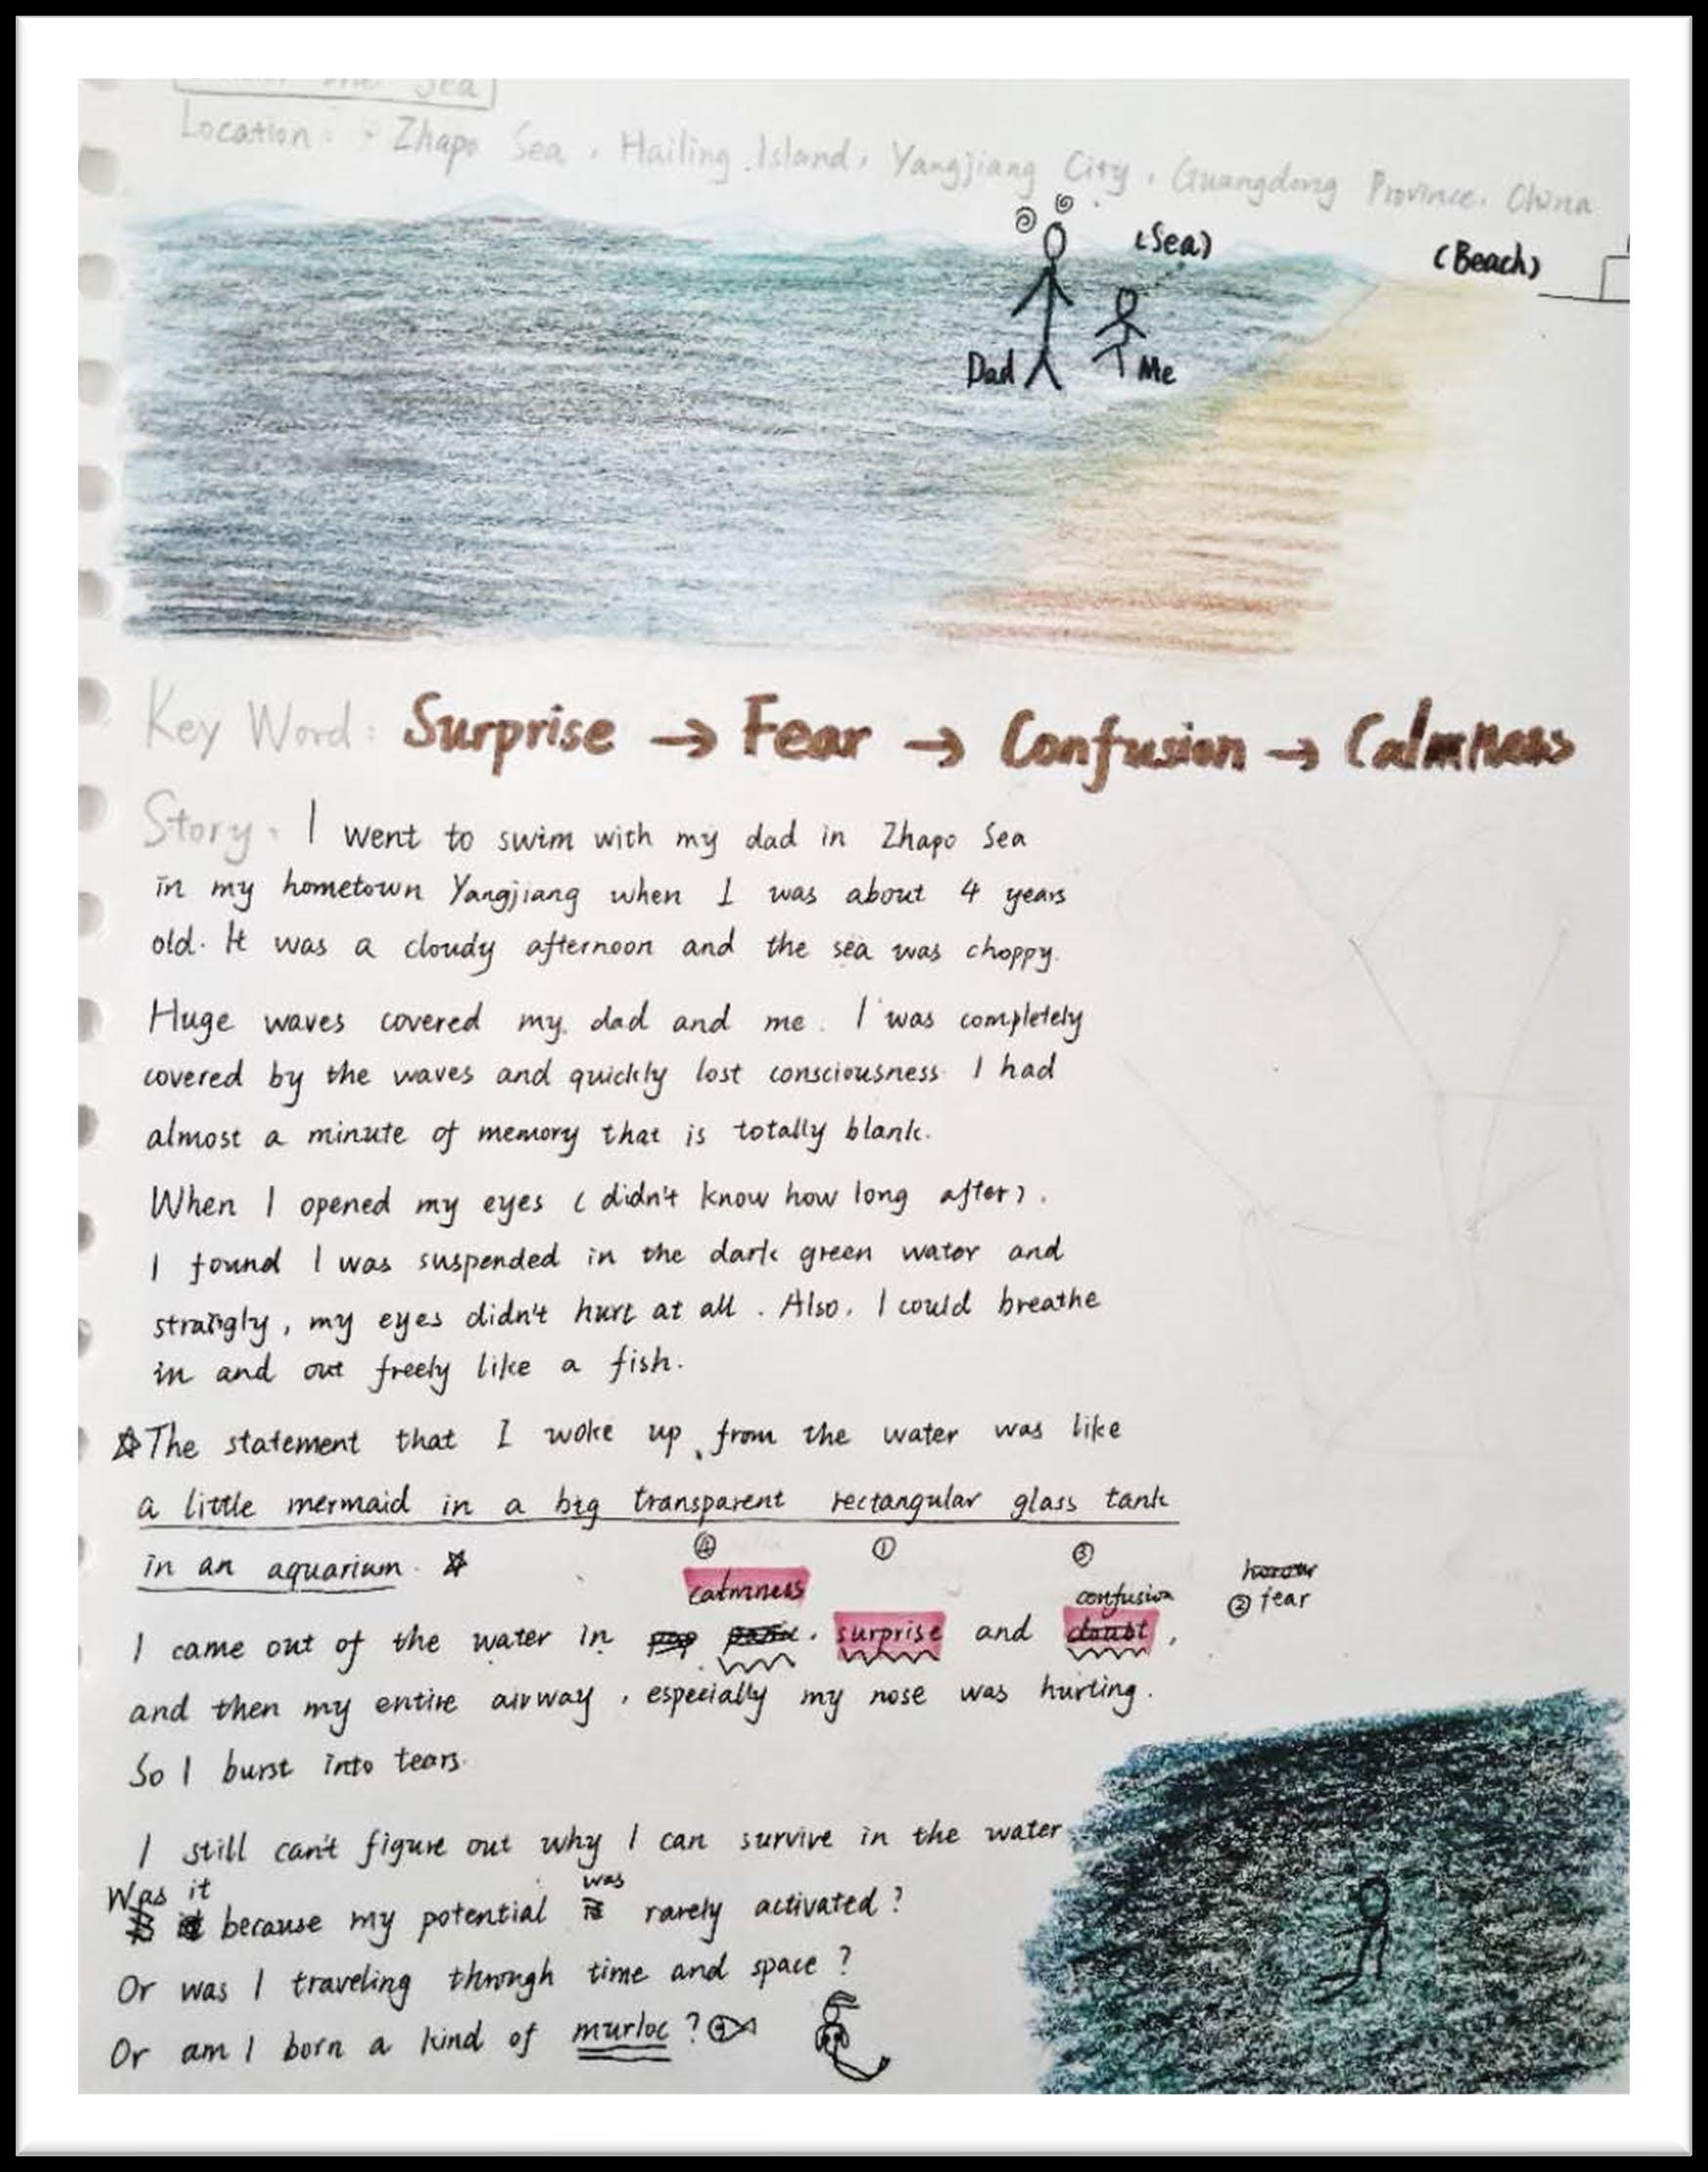
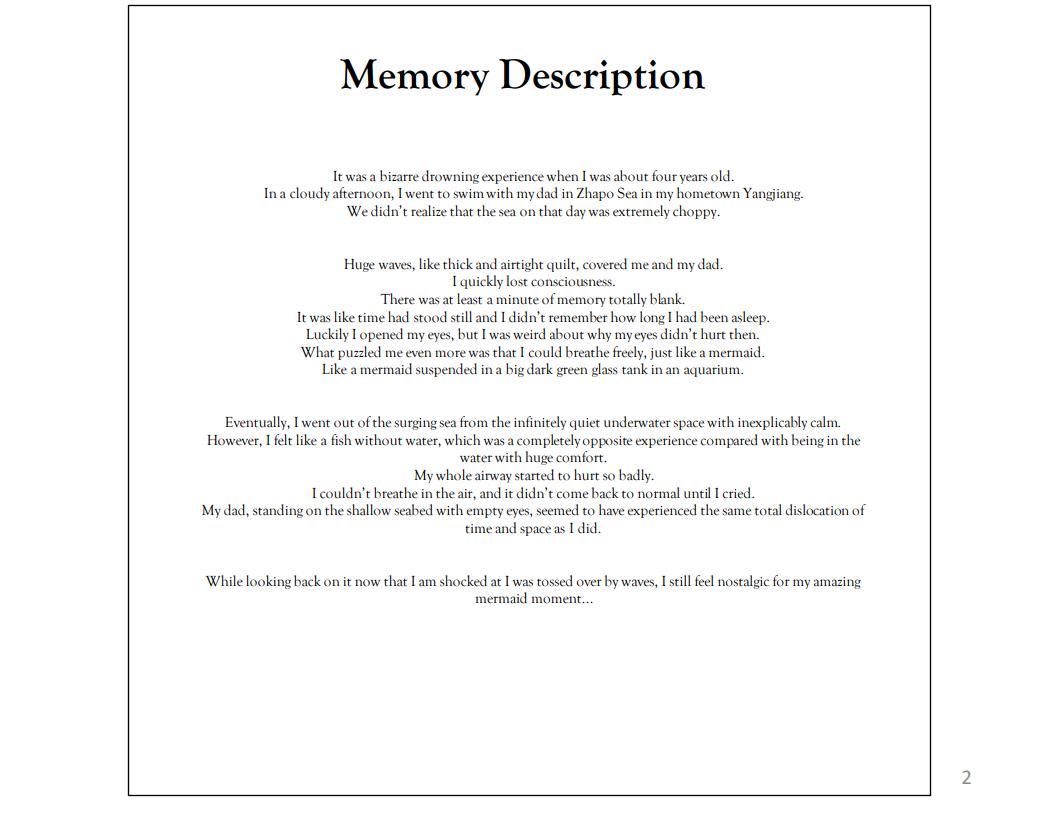
My Initial Description of A Childhood Memory
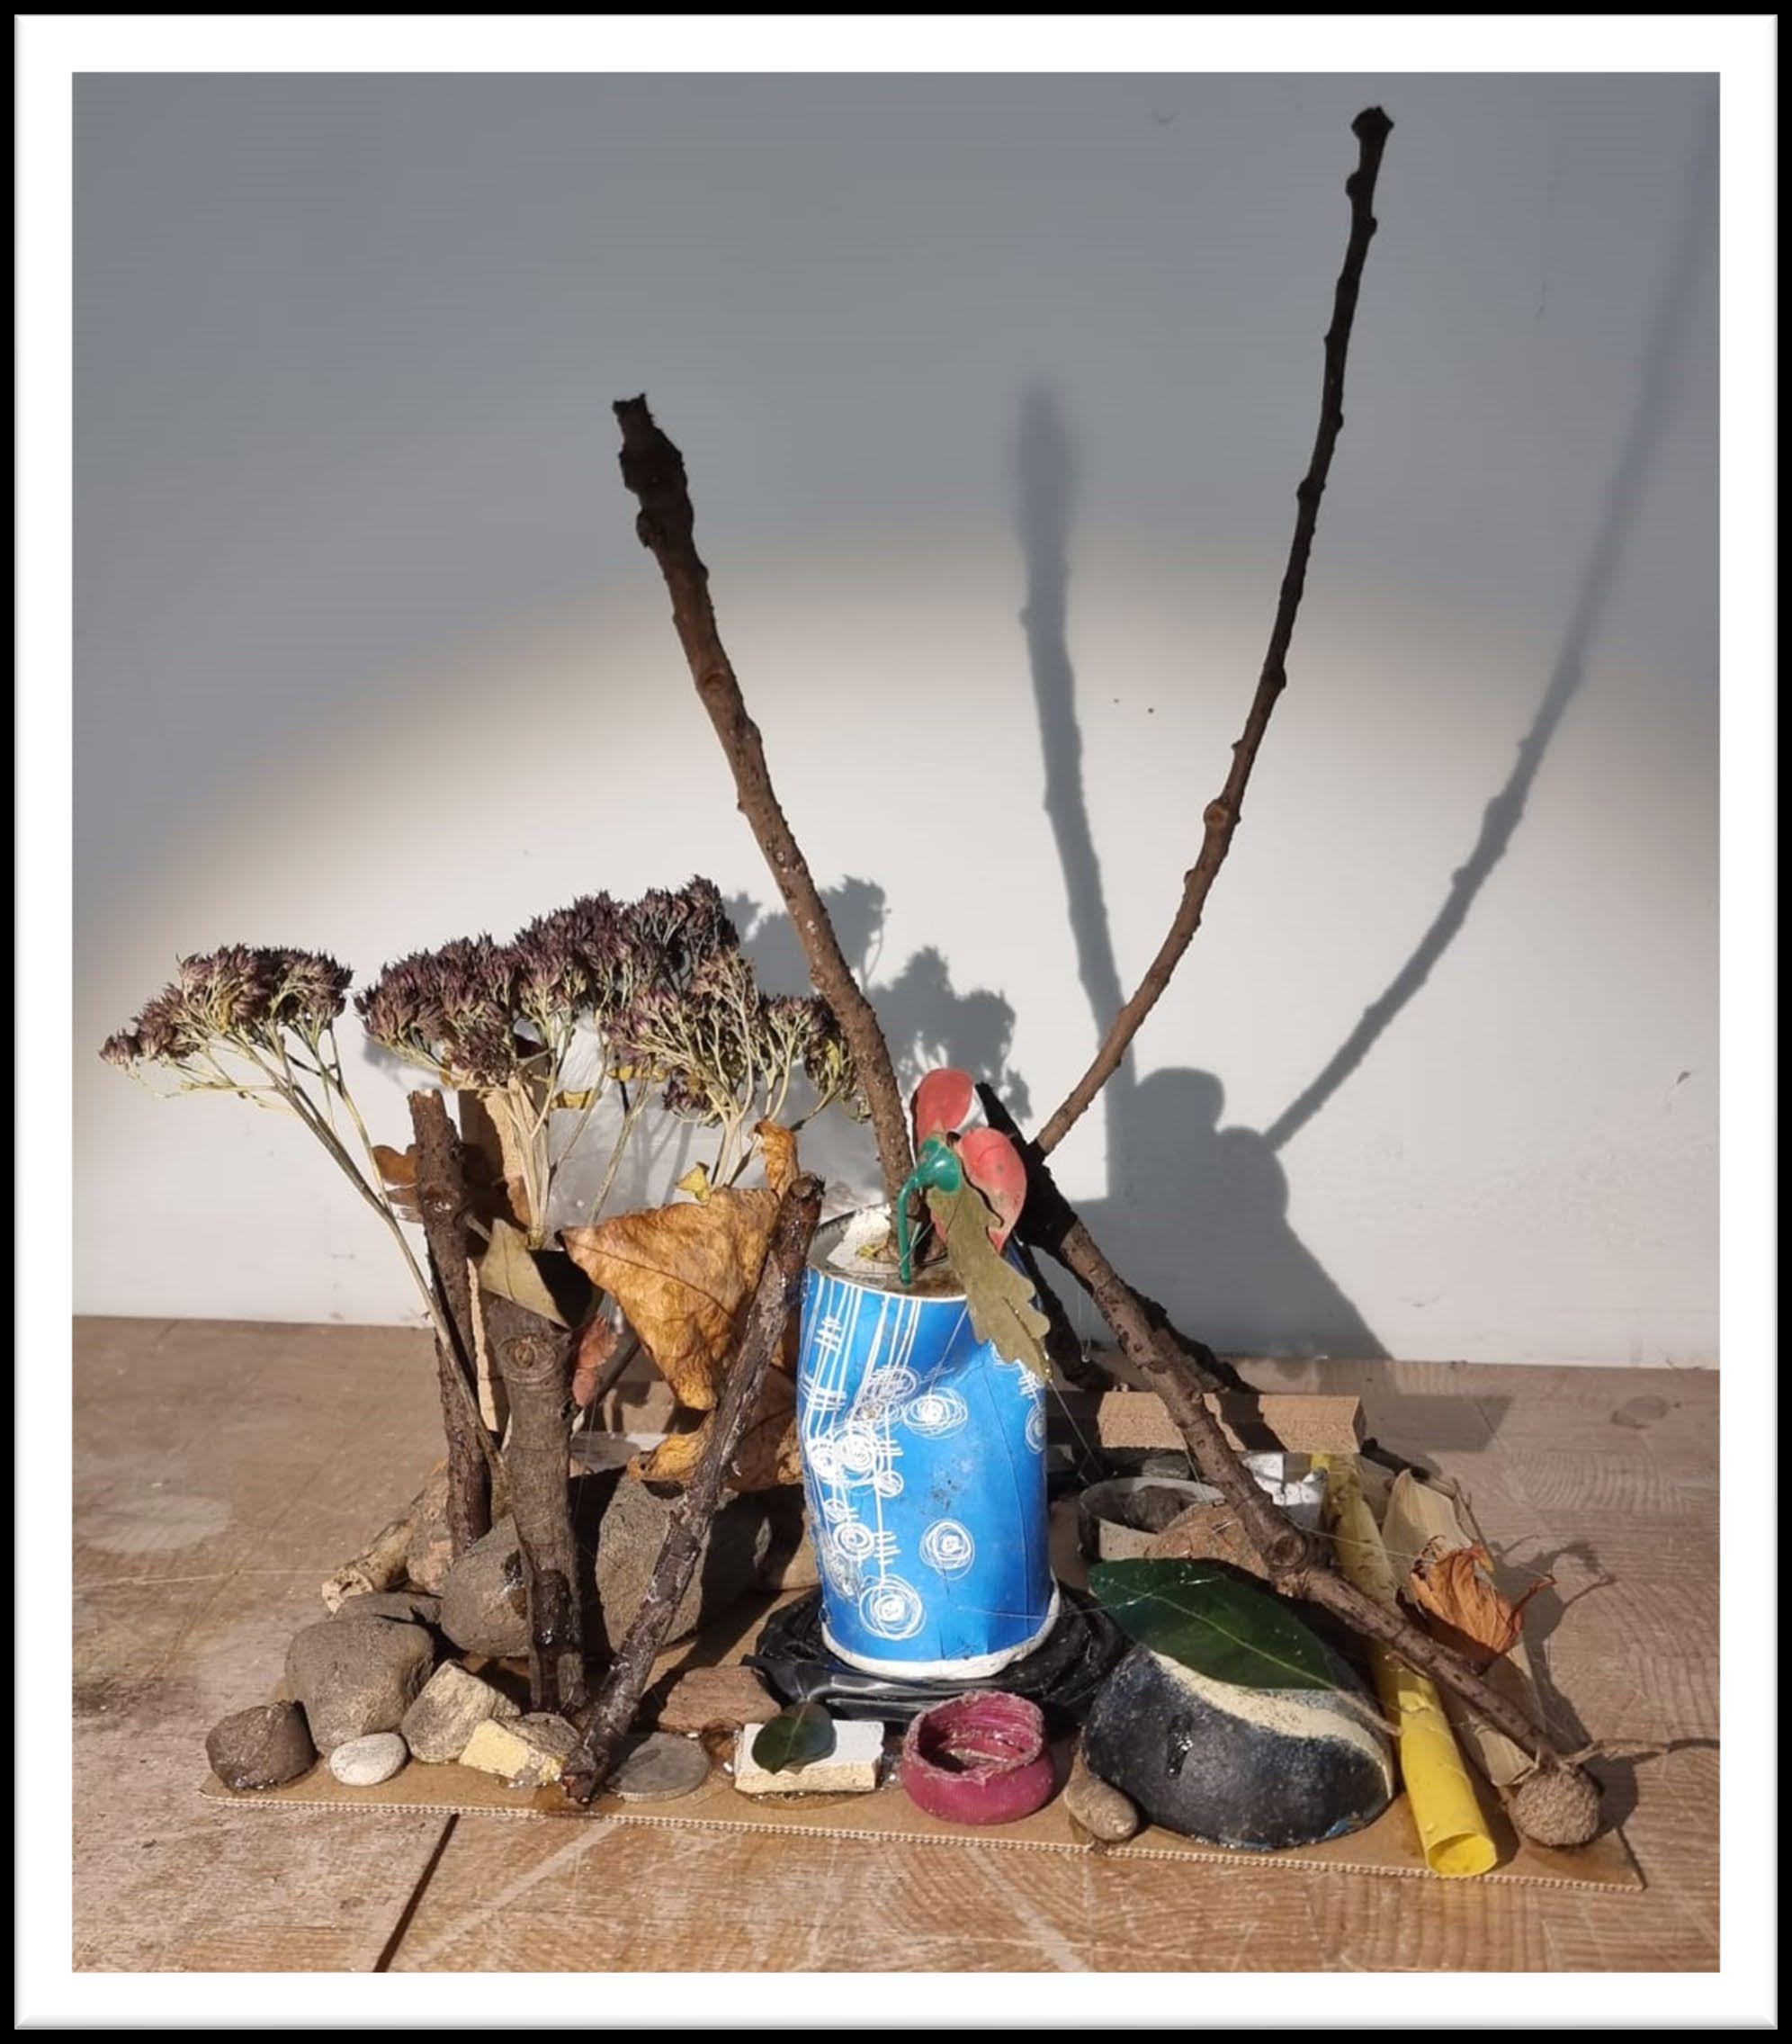
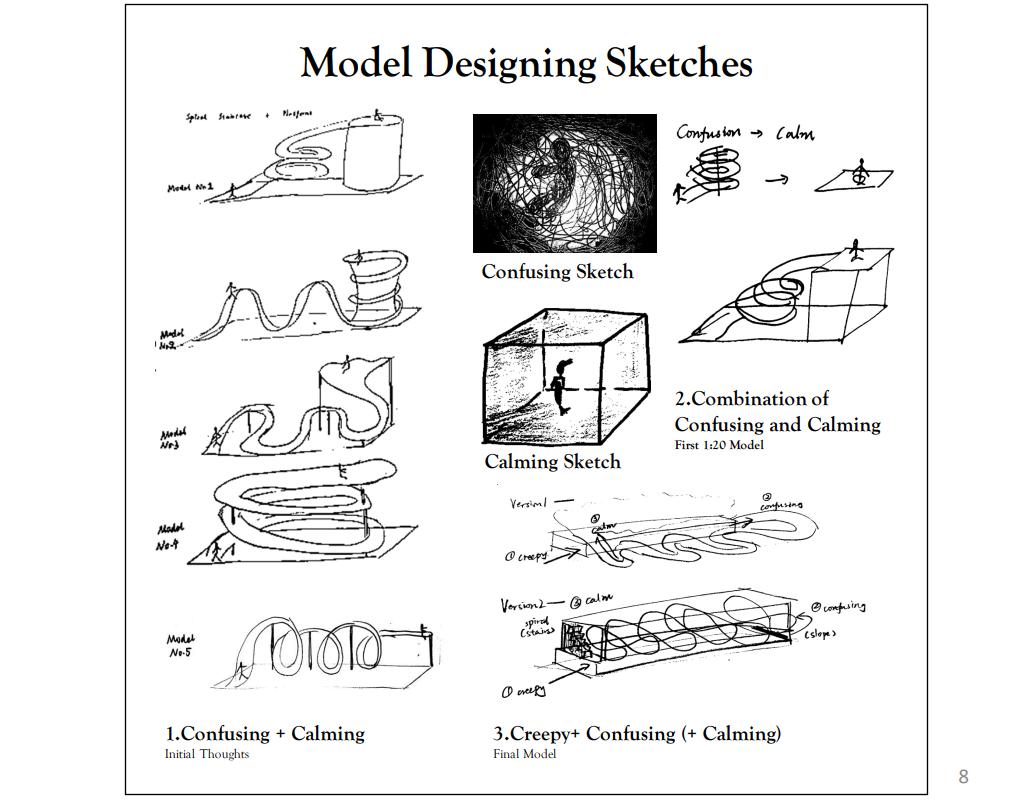
I consider this memory spot task the most romantic task in our design module. It was my first time to create a space representing certain atmosphere related to childhood. Sketches, drawings, texts, models.....we were encouraged to use all the way we can, all the materials we wanna use to realize that feeling.
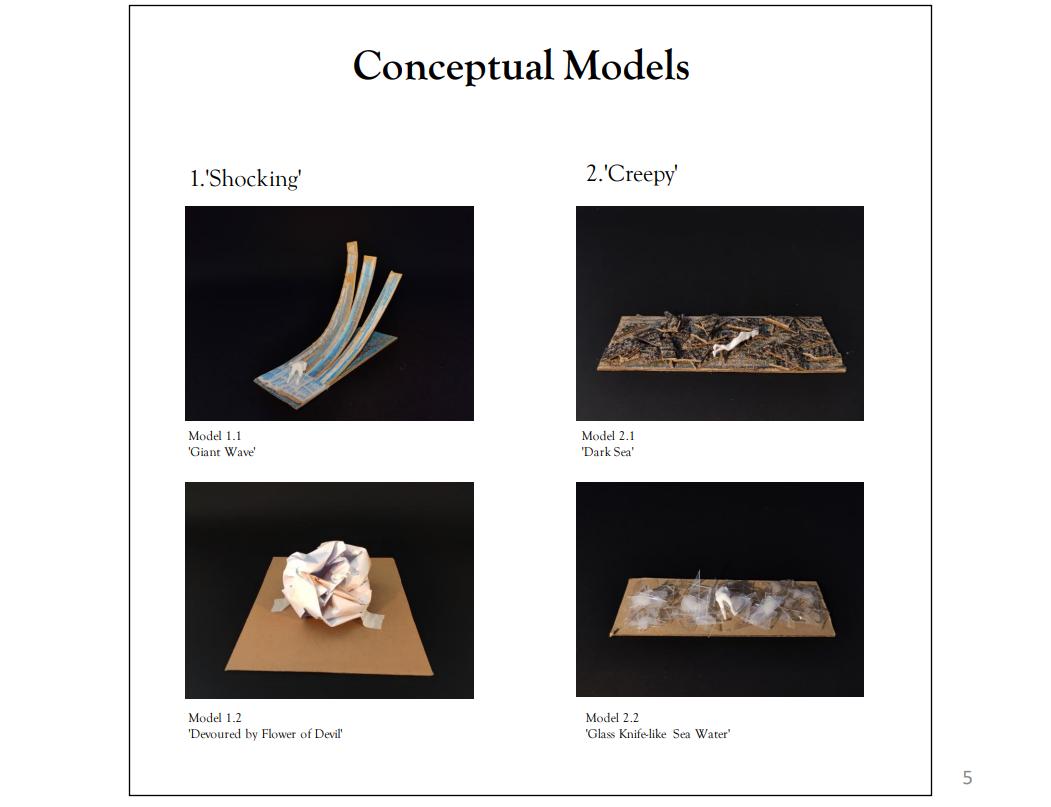
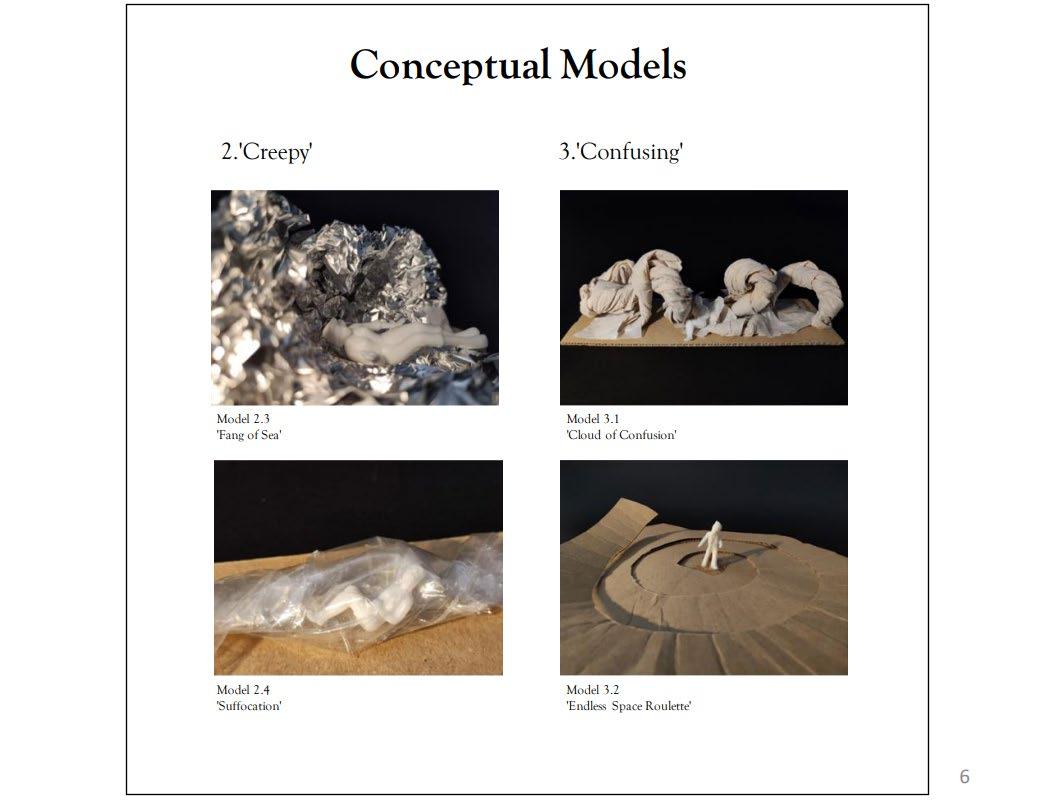
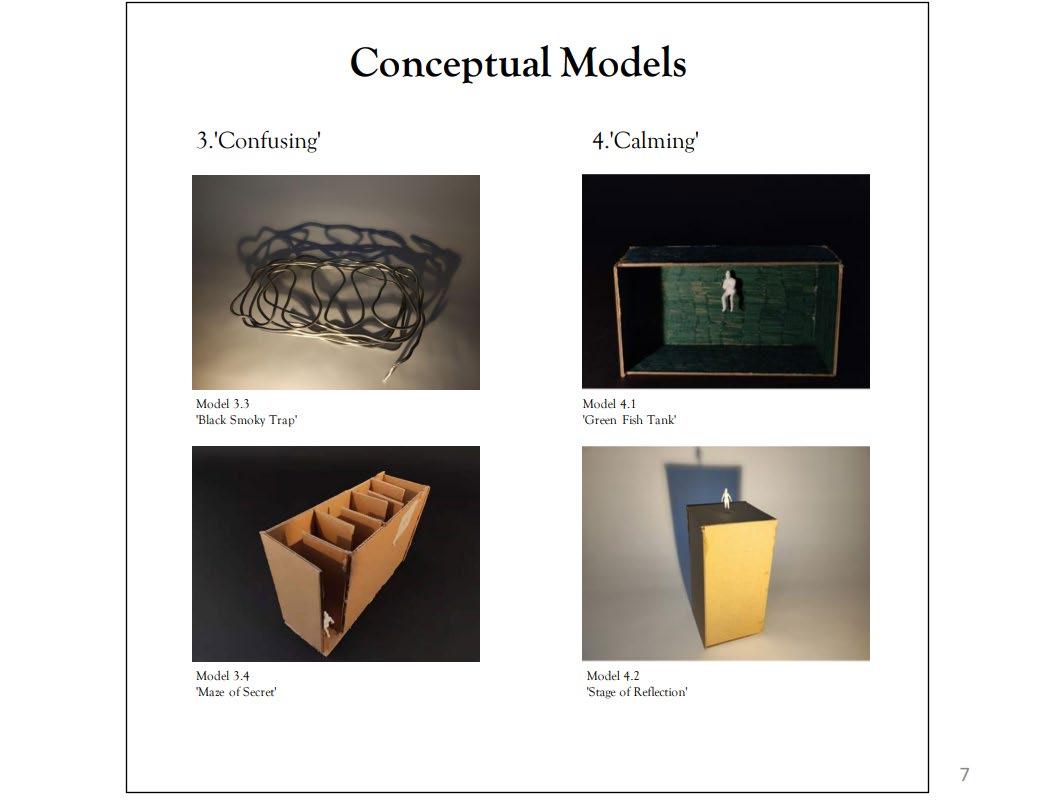
We extracted key words from one of our childhood memories. Then we started with conceptual models to try to express that emotion. A tectonic model will be our final representation. And the process will be made into a ‘memory book’.
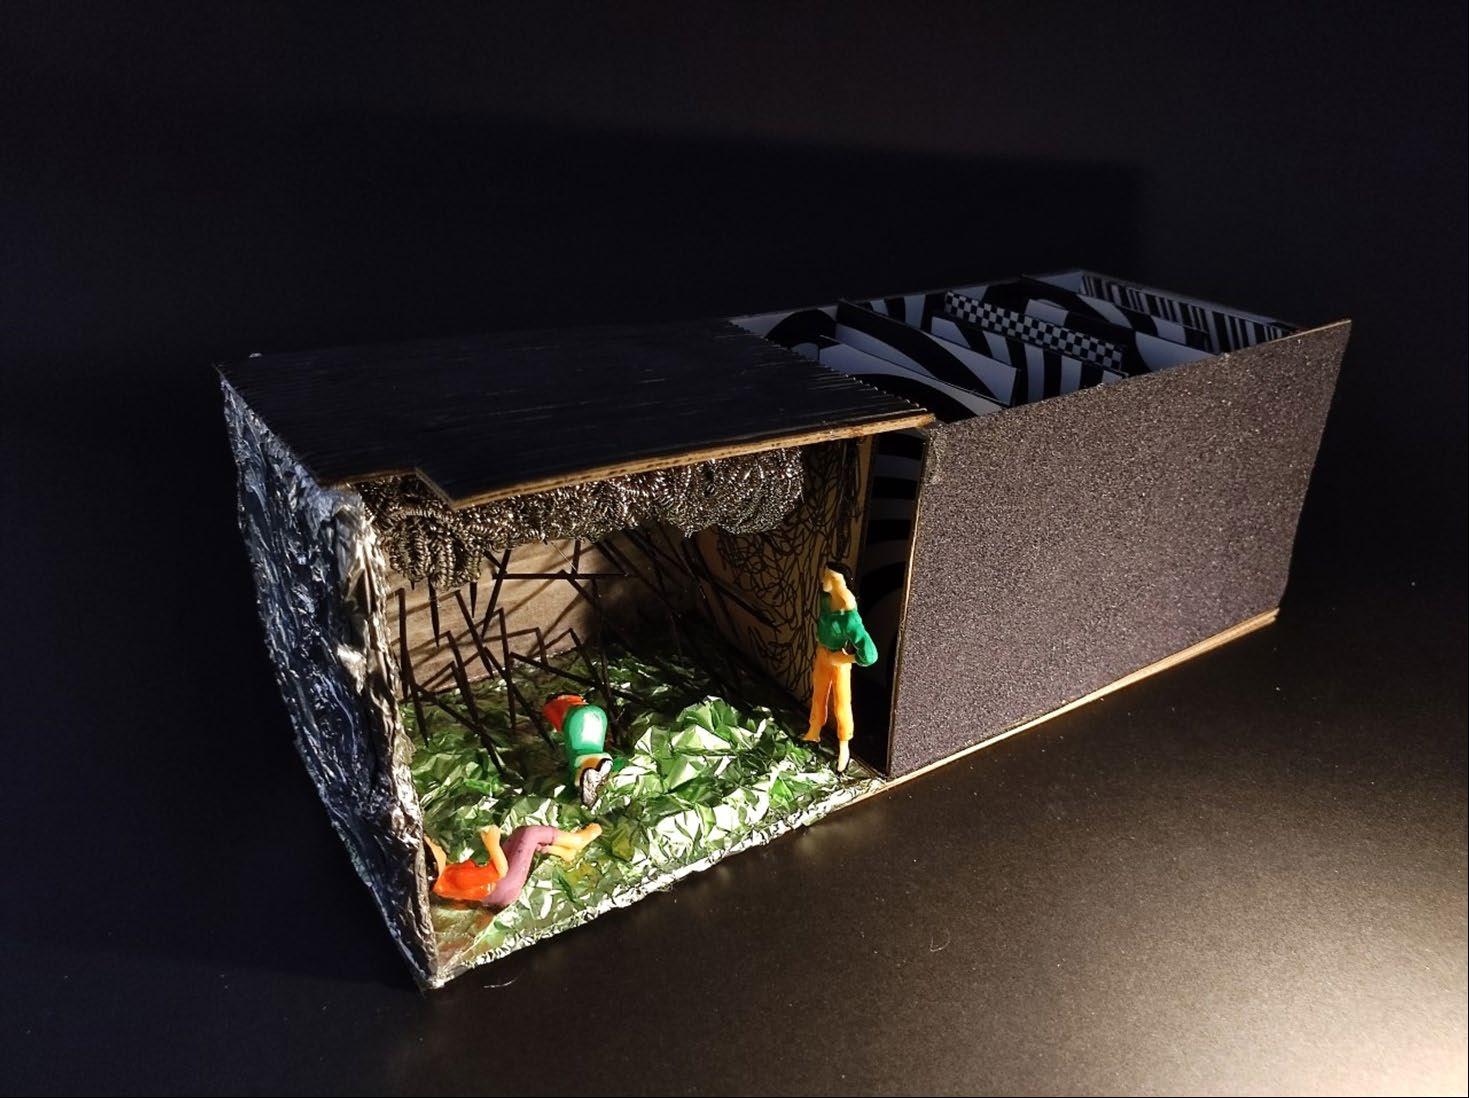
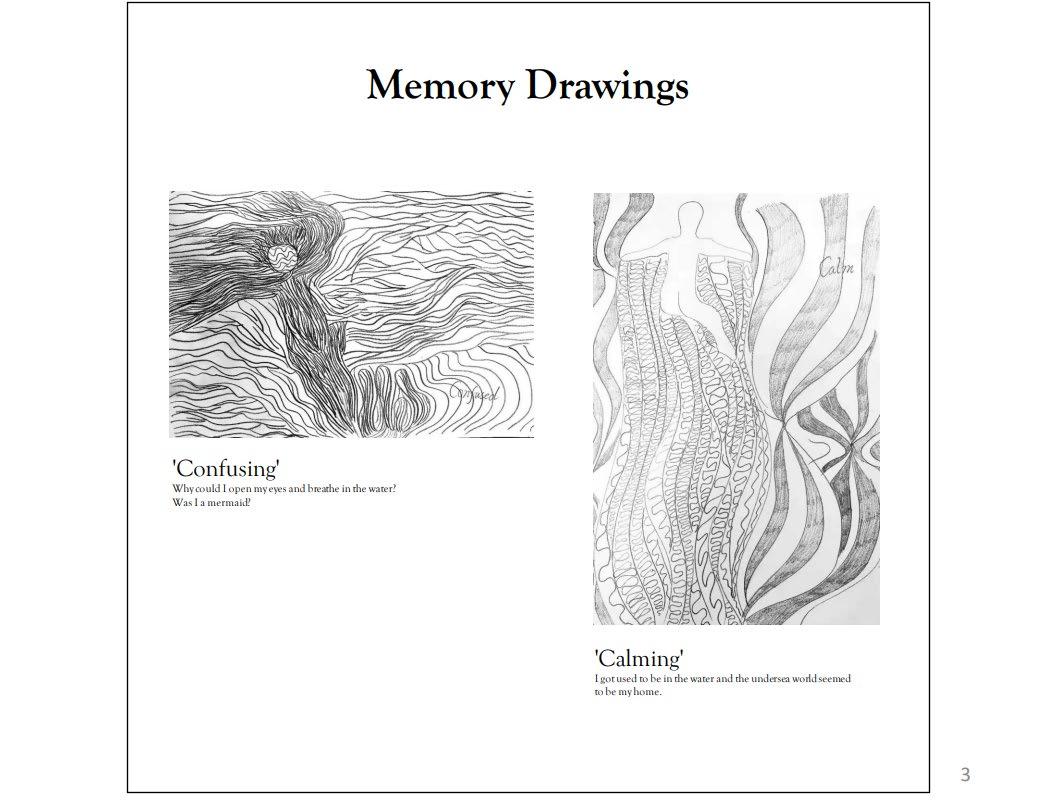
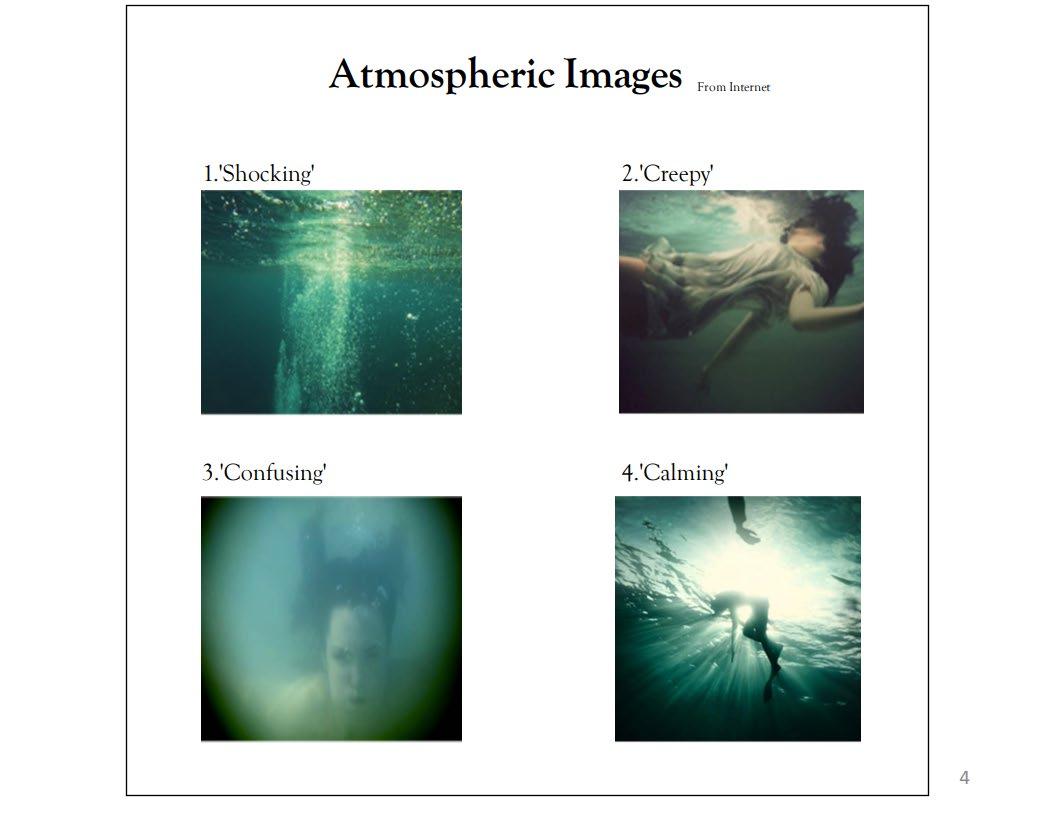
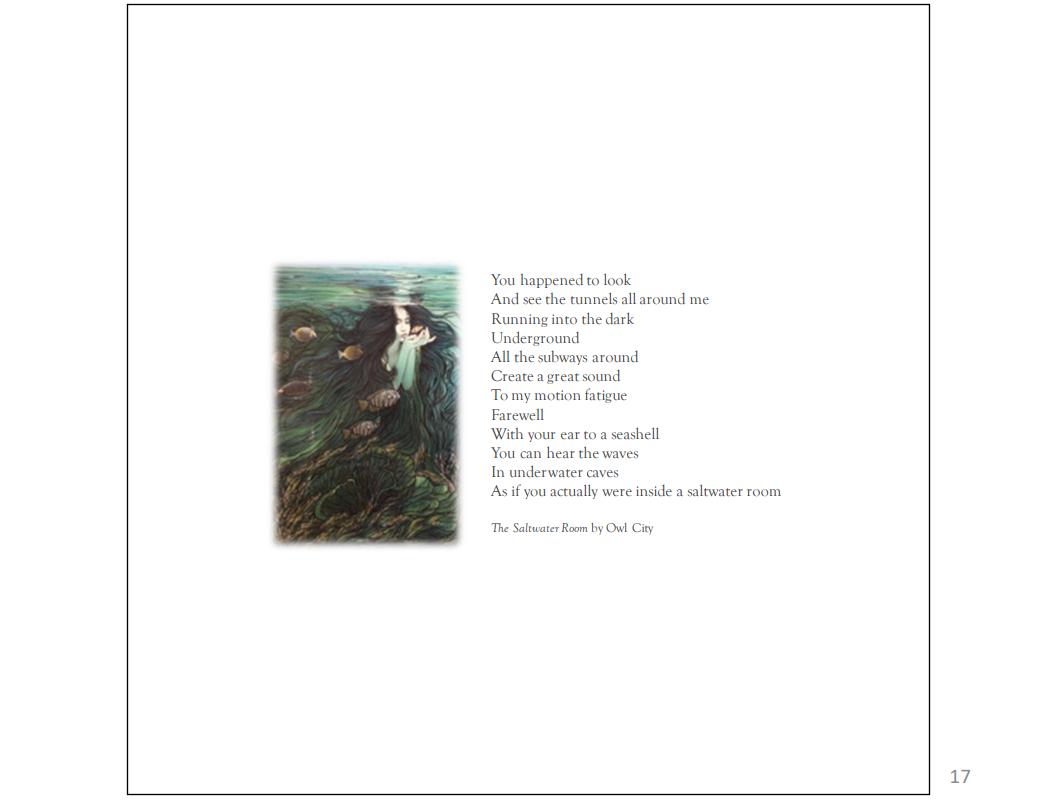
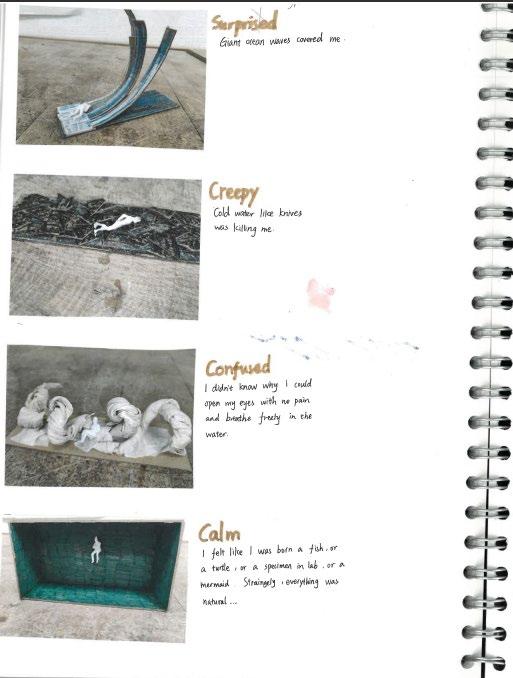
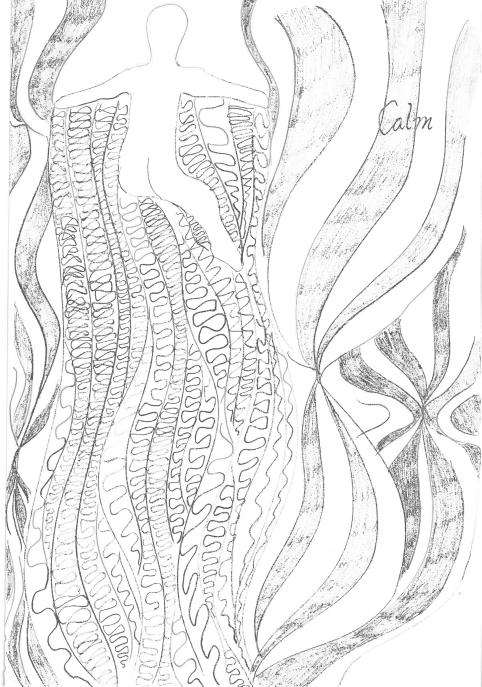
I chose a memory which happened in a sea when I was 4. I swam and was overturned by the waves, drowned, sank into the sea and passed out, and after a while miraculously opened my eyes and breathed comfortably underwater, as if I had been born to live in the sea, and finally swam to the glowing surface of the sea like a mermaid. My mood went from surprised/scared/confused/calm.
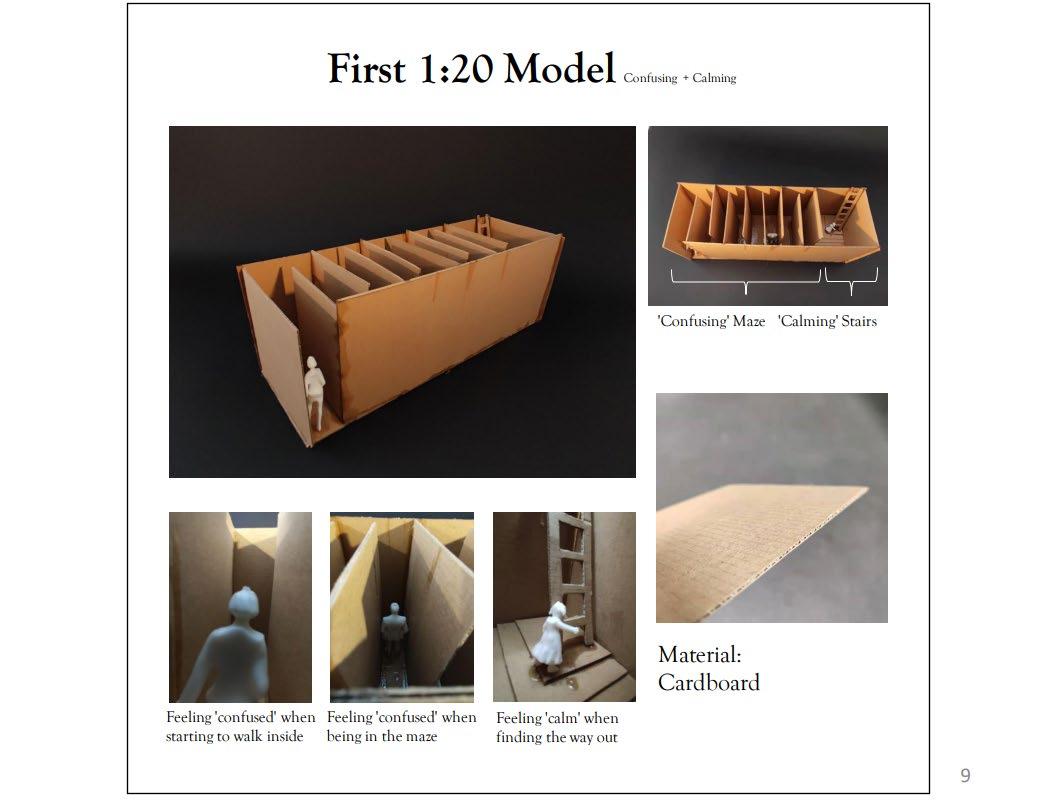
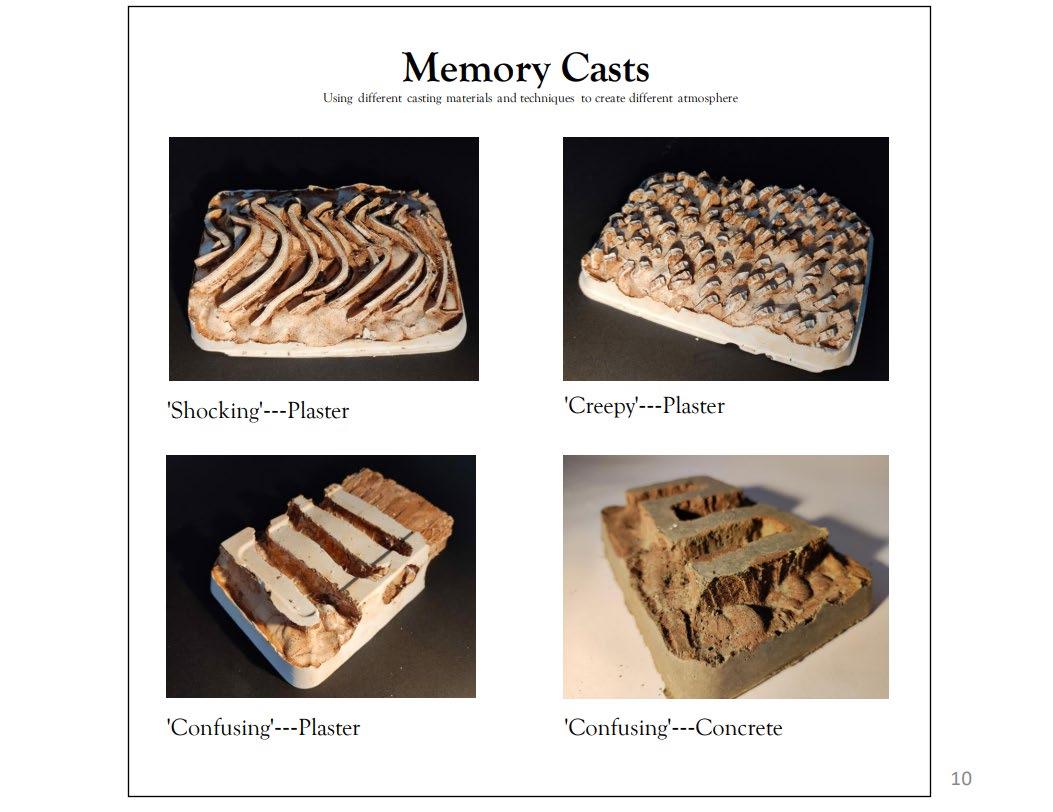
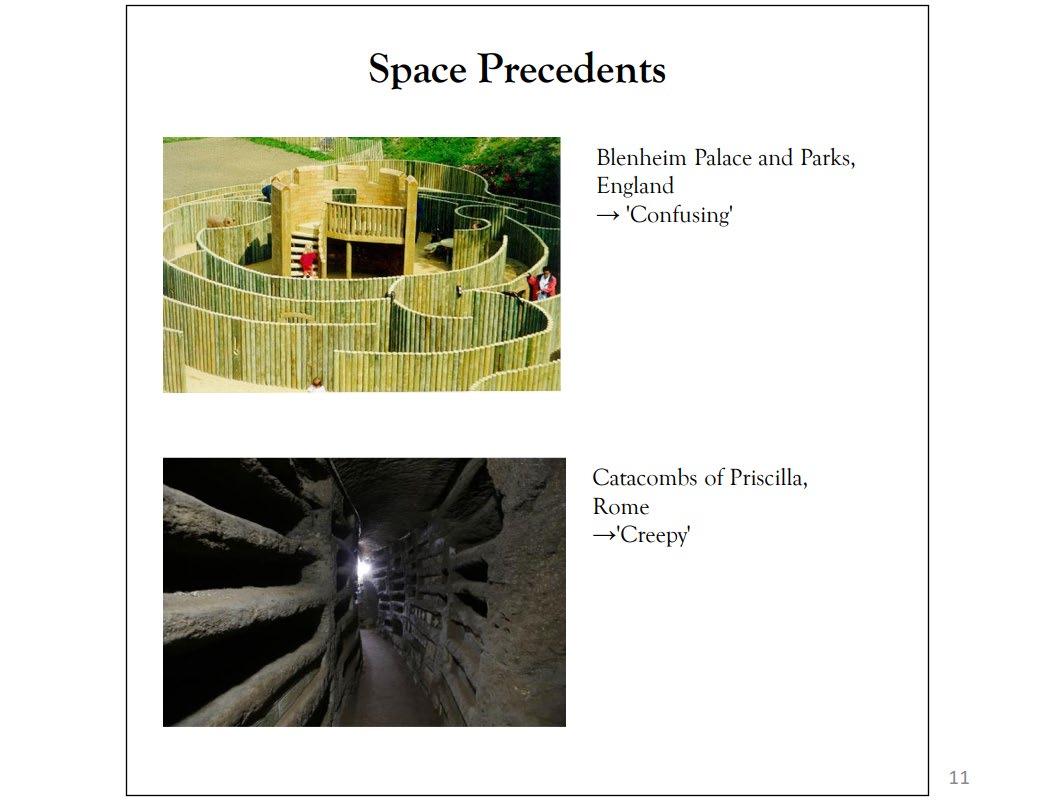
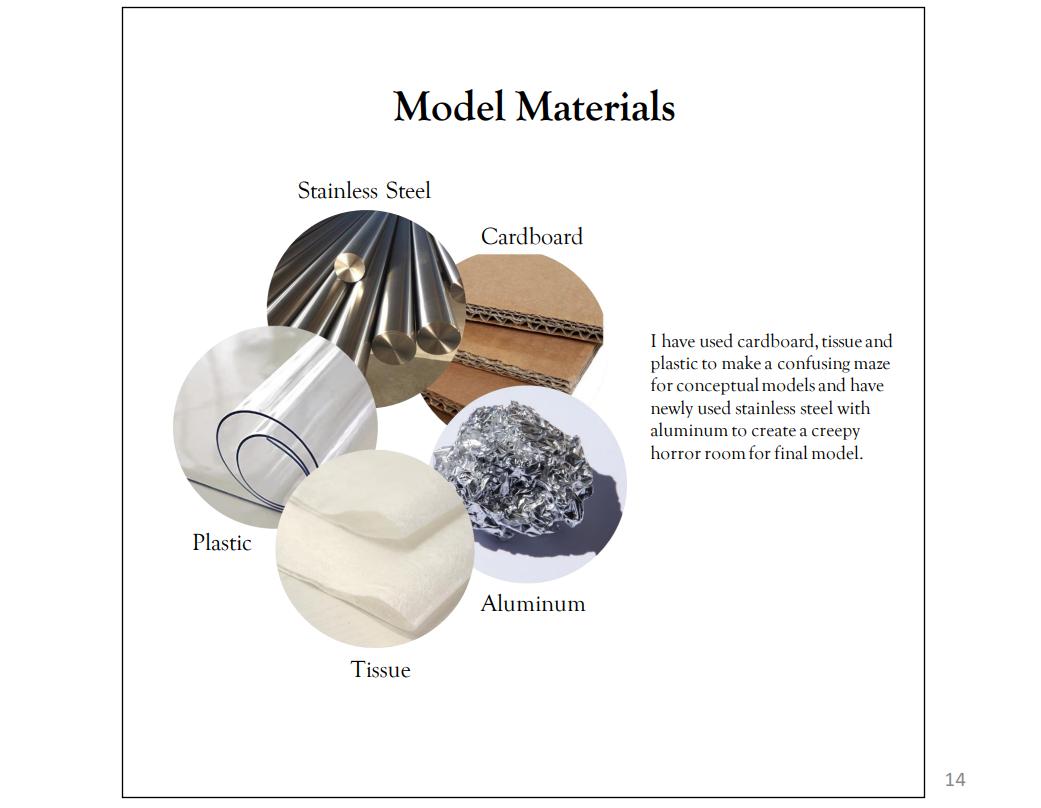
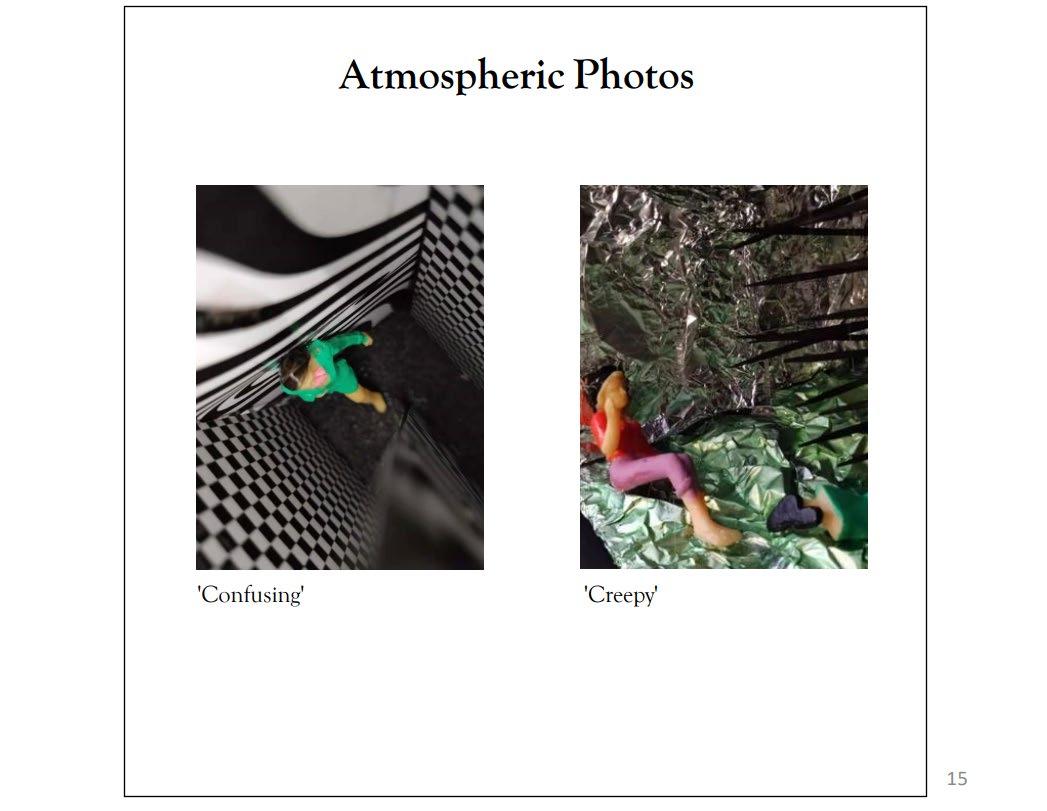
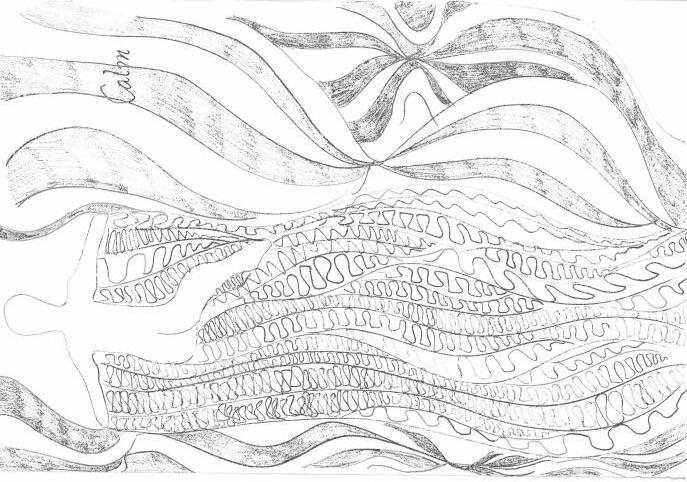
My four emotion keywords for my memory was shocking/creepy/confusing/calming. I made conceptual models about these feelings and then tried to make bigger and more architectural ones to let the people who visit my memory spot to feel the same feelings.
1.2 Memory Spots
Memory Book
Memory Book
Memory Book
Memory Book
Memory Book
Memory Book
Memory Book
Memory Book
Memory Book
Last page of my memory book
I selected a section of lyrics from the song The Saltwater Room by Owl City for this page showing where my inspiration came from.
Feedback from four of my colleagues
1.2 Memory Spots
Design Review and Feedback
A0 Review Board (Nov 2022)
Feedback from my tutor Harry
The review was to show the final model ,its drawings, and conceptuals into a big A0 board. All the physical models and your memory book would be aside. It was my first precious chance to talk through my design in front of my group and I finally started to do the designer’s job
Site
1.1 Site
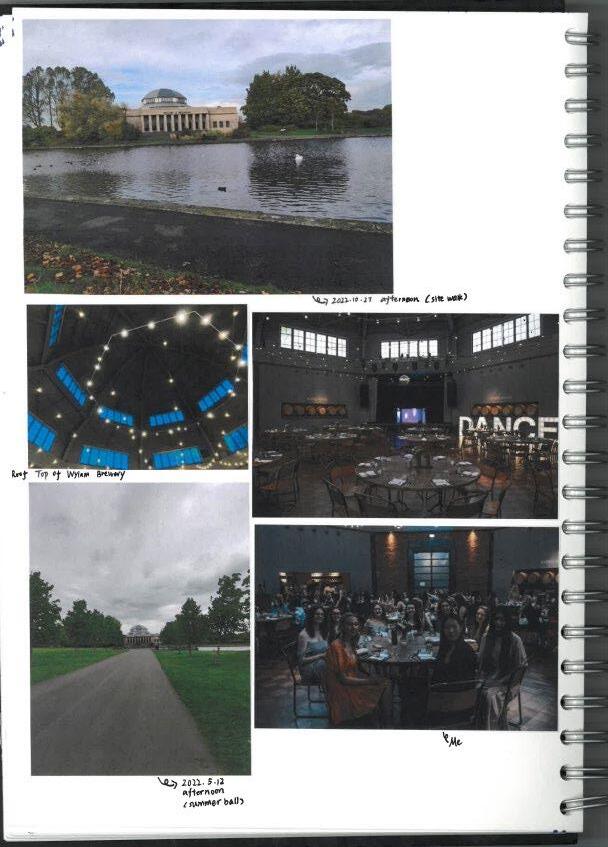
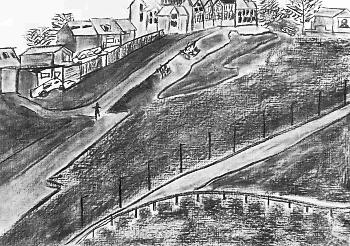
Early Autumn Walk
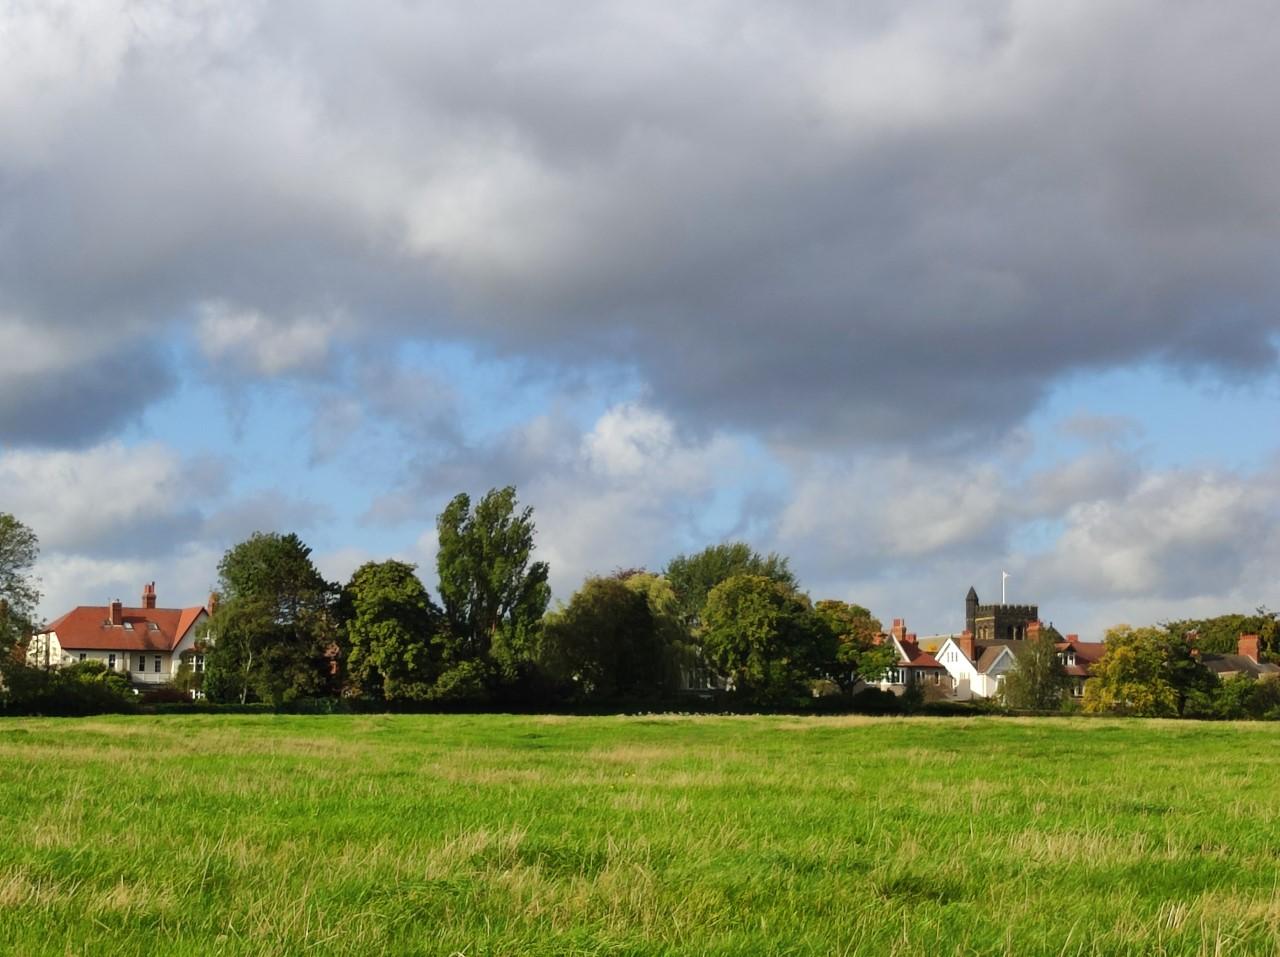
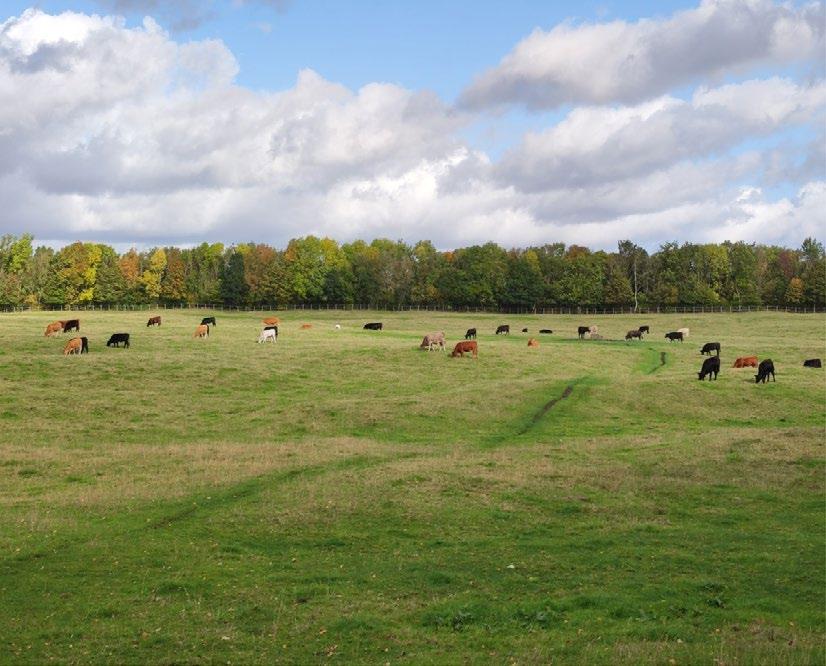
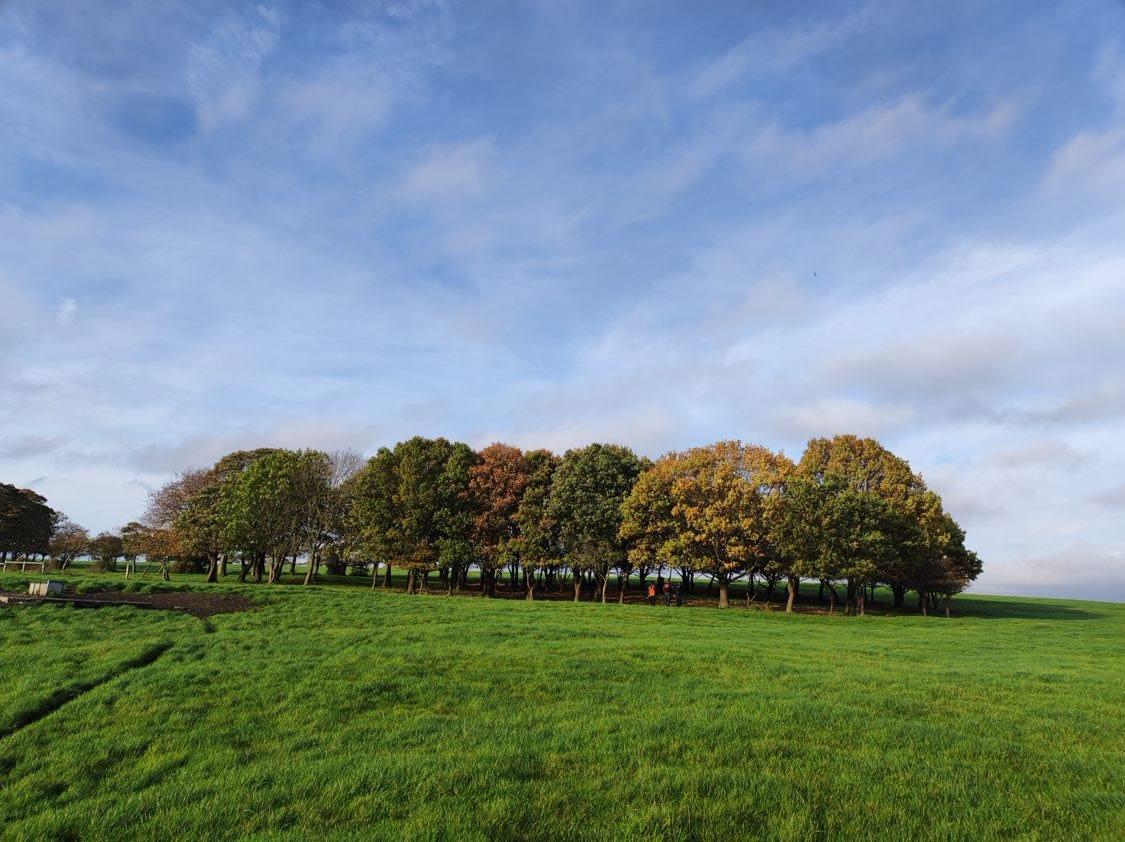
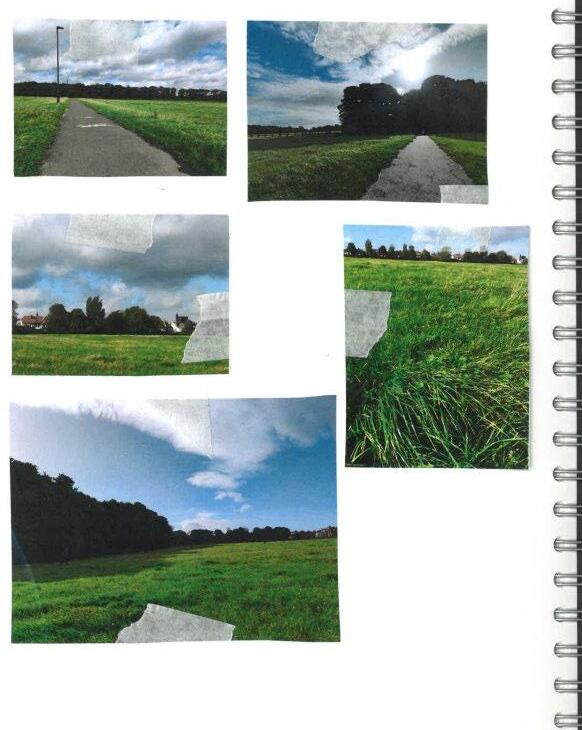
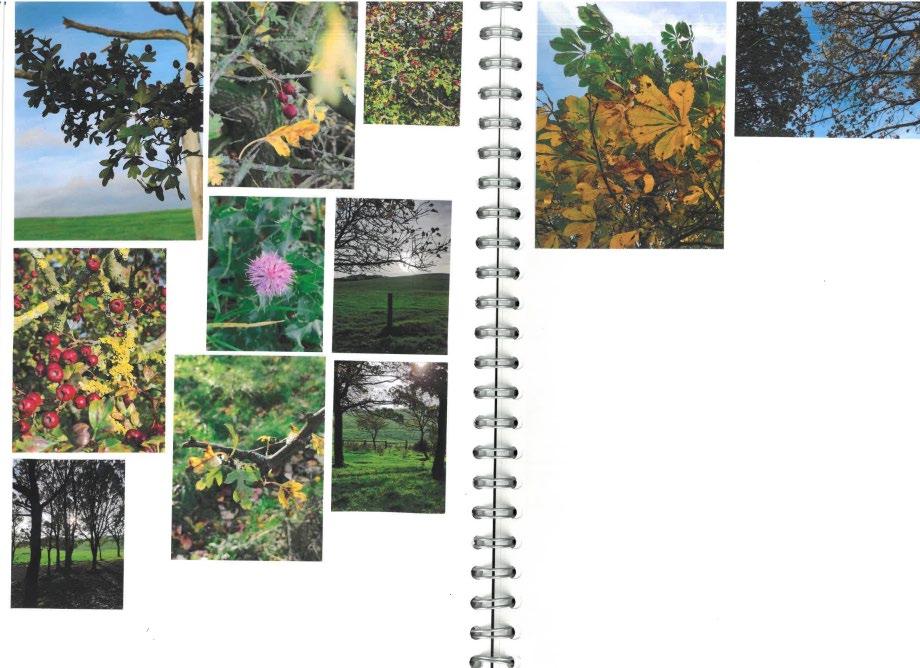
I used to considered ‘Site’ task the easiest and the most relaxing task I have ever had. But after I really dug into this task, I found that site is the basis of architectural design. It requires architects observe well, record well and represent well with regards to the site. Without site, there is no architecture. I was almost blinded by the happy site visits but fortunately, I really started to recognize the importance of site and our response to the site.
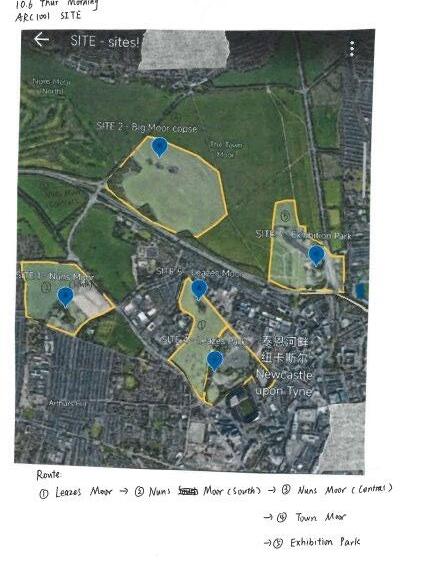
We went to four sites in October 2022 with our tutor Harry. These sites are mostly natural scenery with a few modern ‘vestiges’. We spent time just sitting there to feel the nature and afterwards do various kinds of recording and representation of the sites.
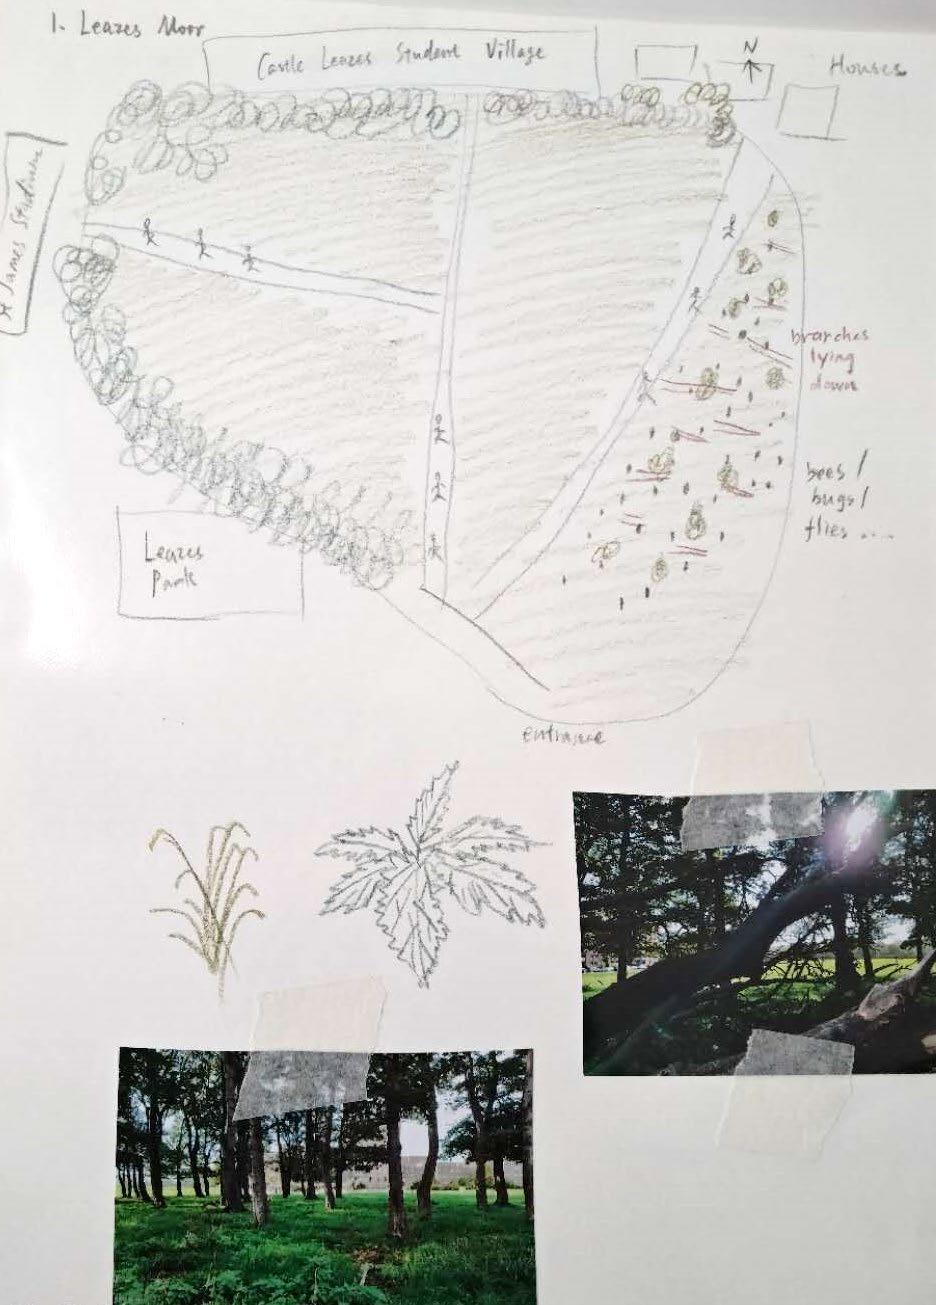
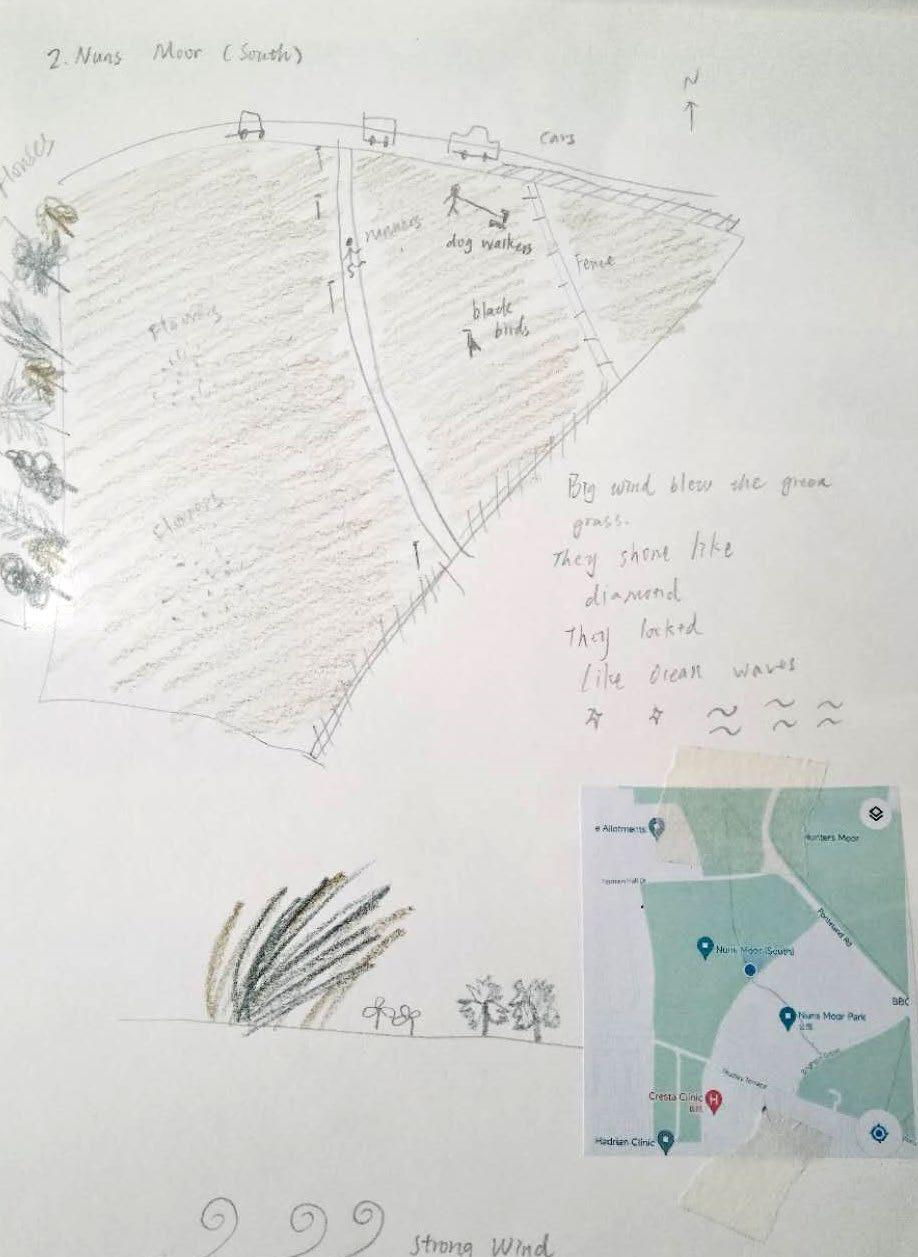
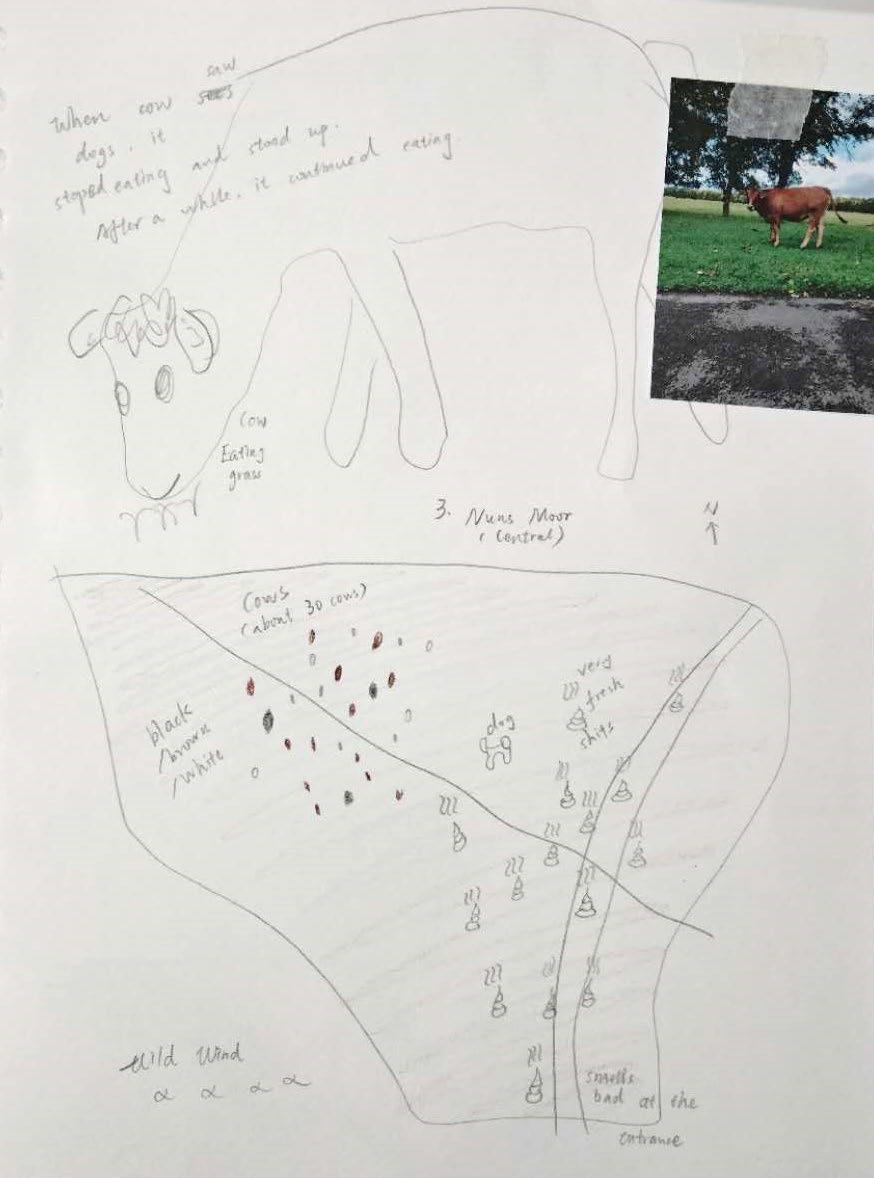
Site 1 Leazes Moor Site 2 Nuns Moor (South)
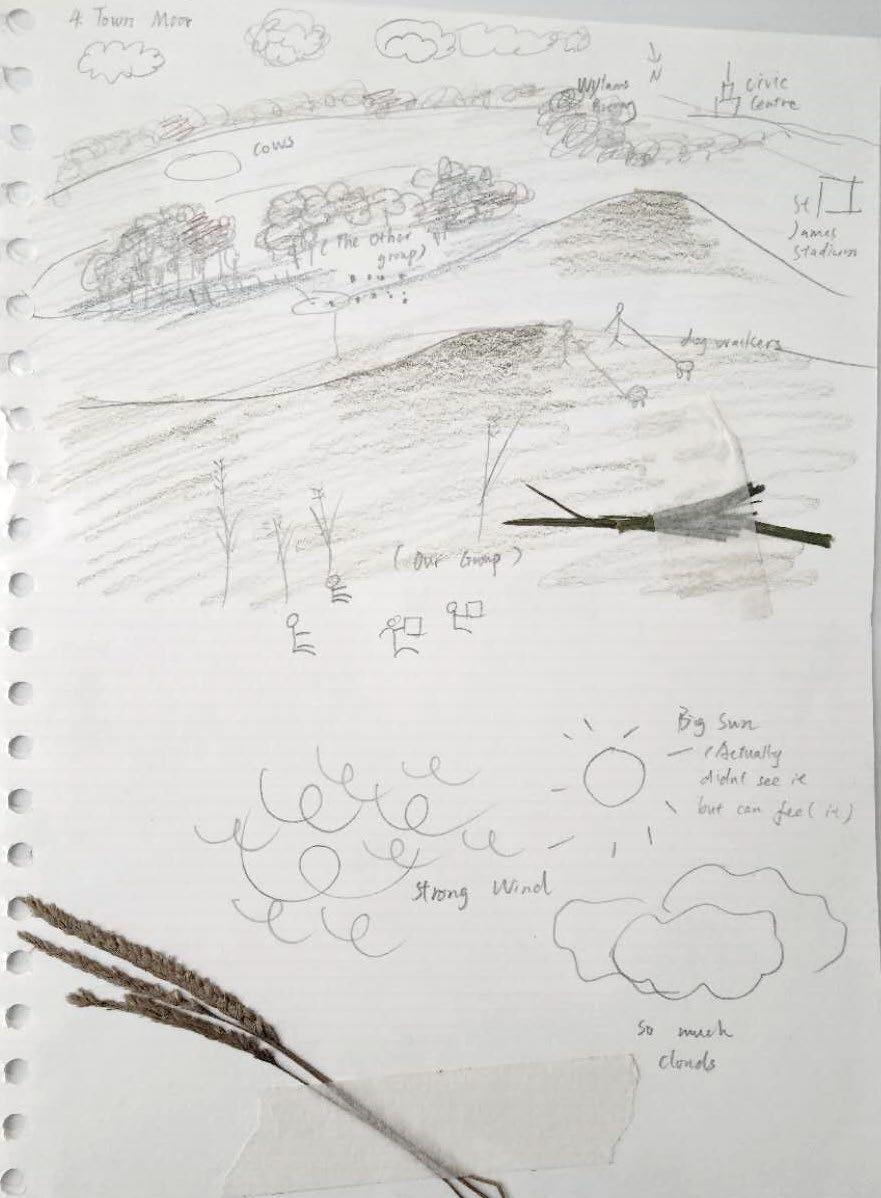
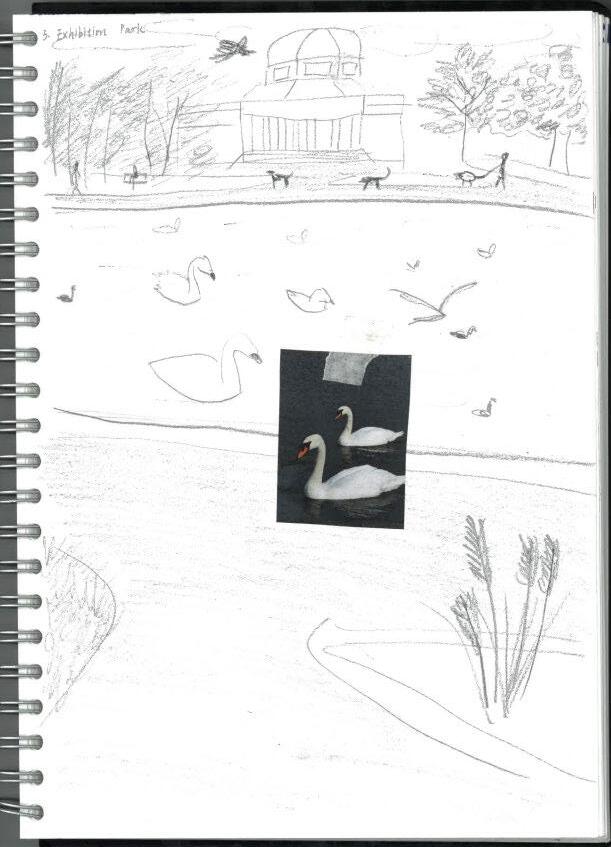
Site 3 Nuns Moor (Central) Site 4 Town Moor
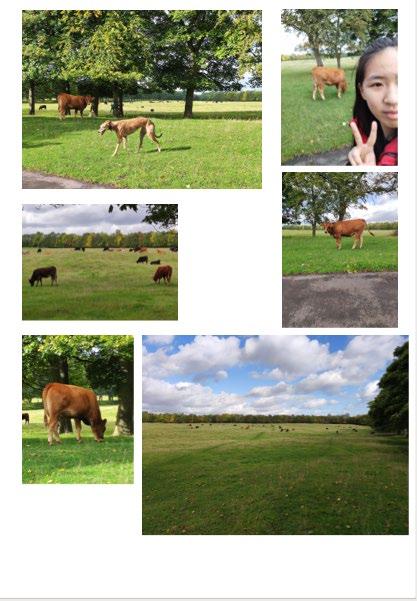
Site 4 Town Moor
Mid Autumn Walk
Nuns Moor north
Nuns Moor south Town Moor
Leazes Moor
Nuns Moor central
1.1 Site
Site Observation and Recording
Leazes Moor Nuns Moor south Nuns Moor central
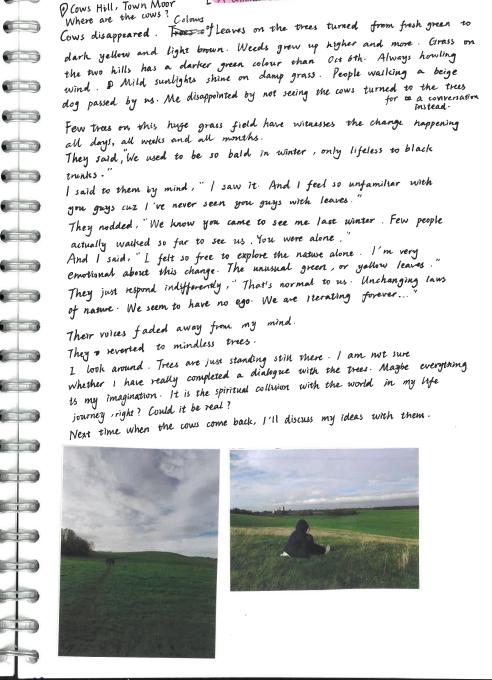
Town Moor-Cow’s Hill
Town Moor-Forest
Town Moor-Exhibition Park
My Stories-’Me, Ecology & Myth’
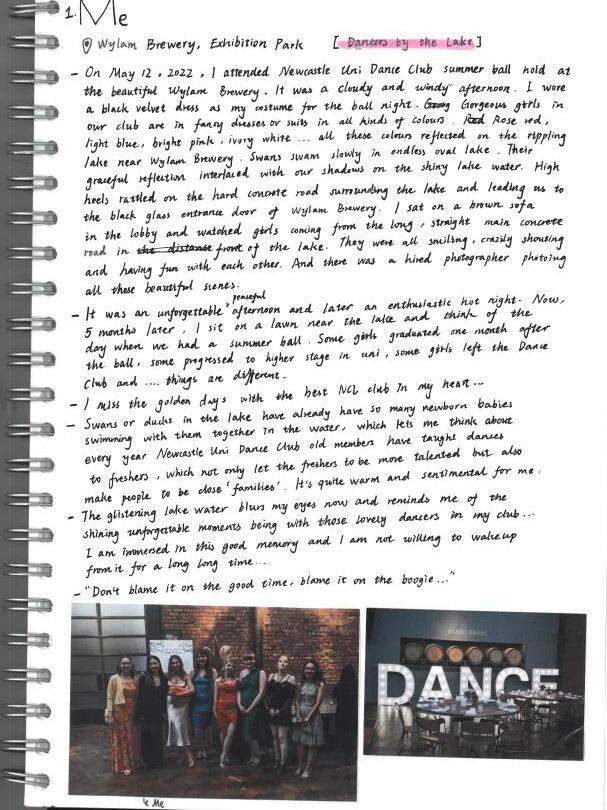
of Me-Dancing by the Lake
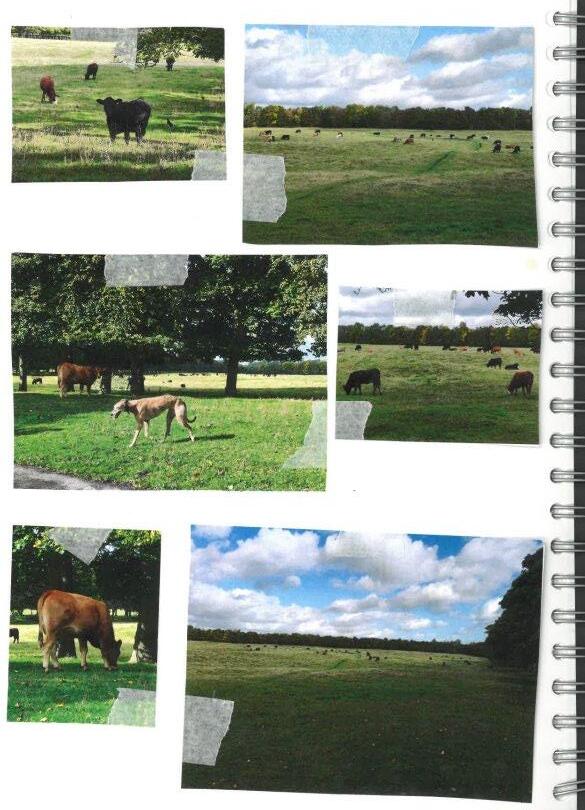
Ecology-Reunion
Story
Story of
with the Cow
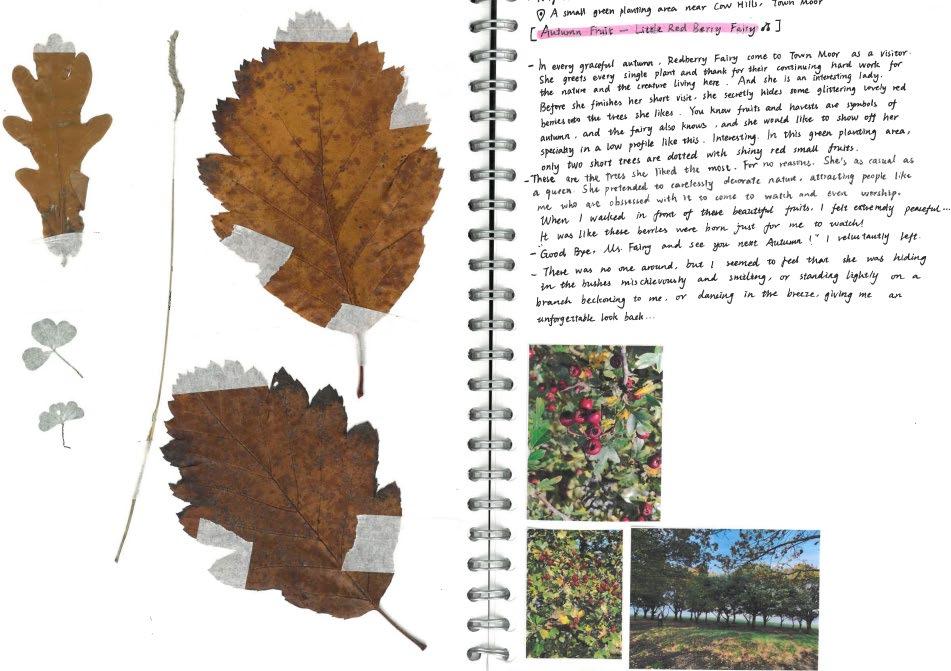
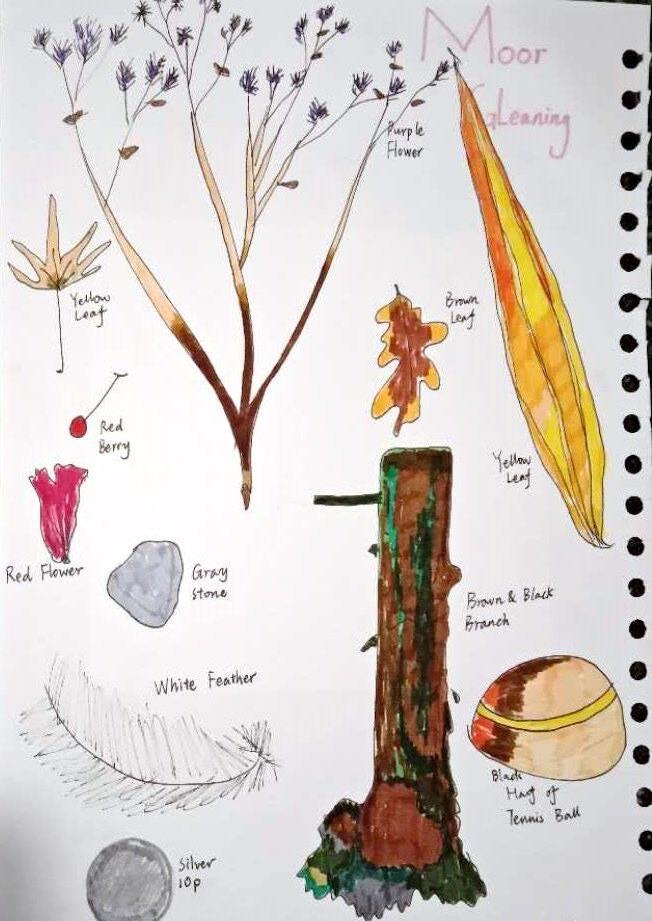
Story of Myth 1-Red Berry Fairy
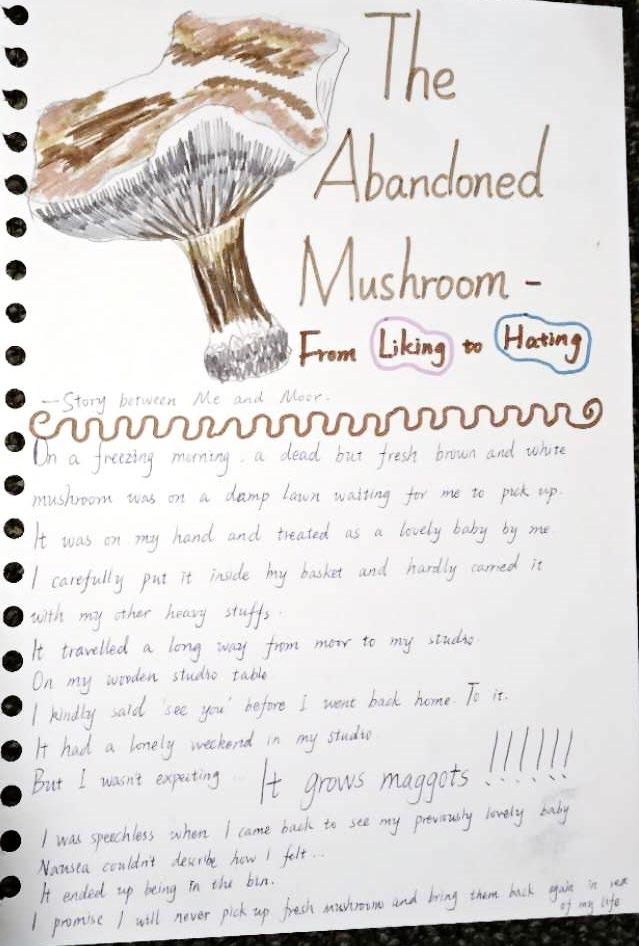
Story of Myth 2 –Abandoned Mushroom
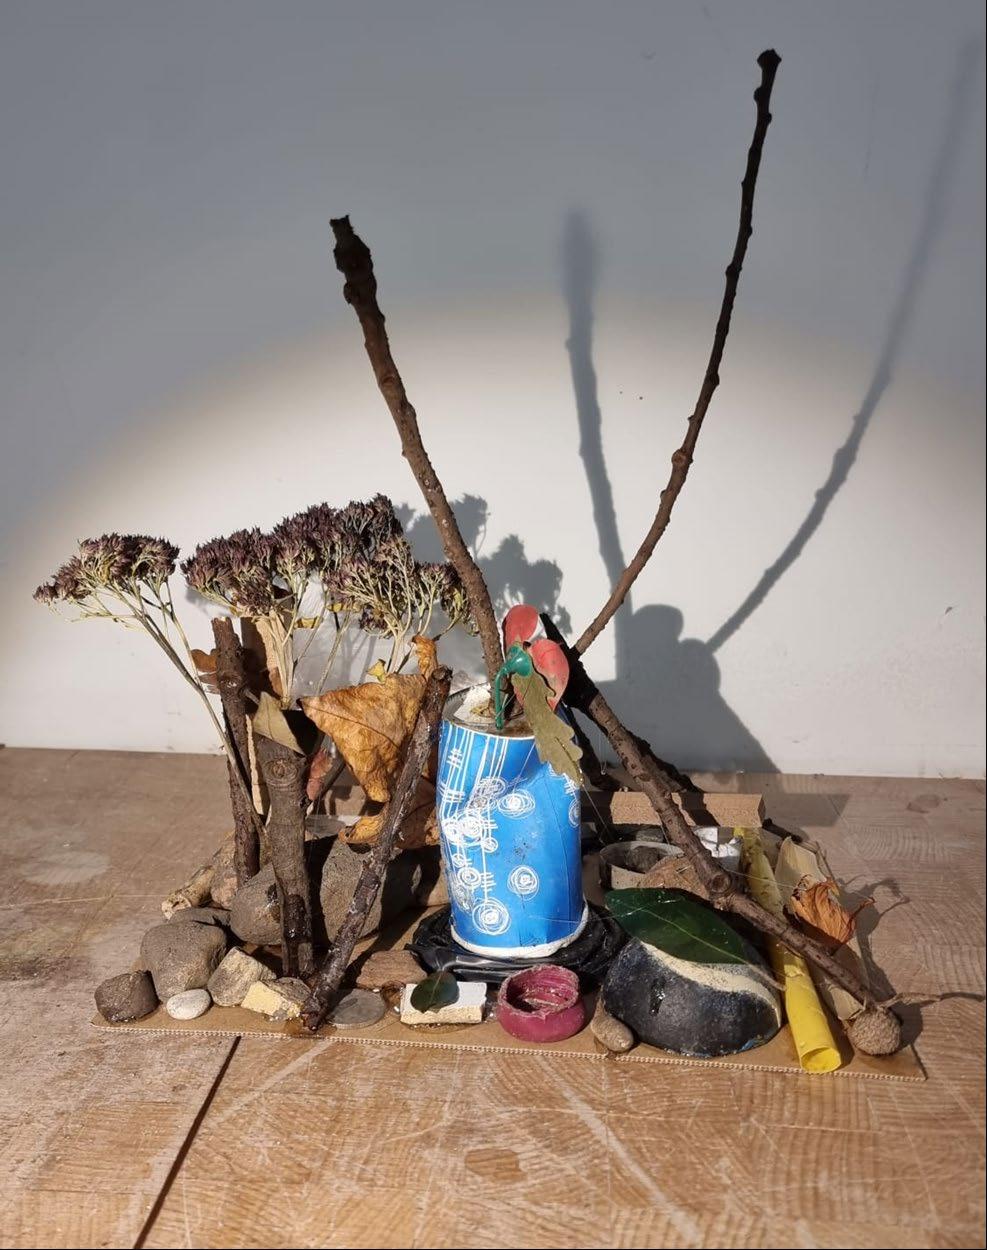
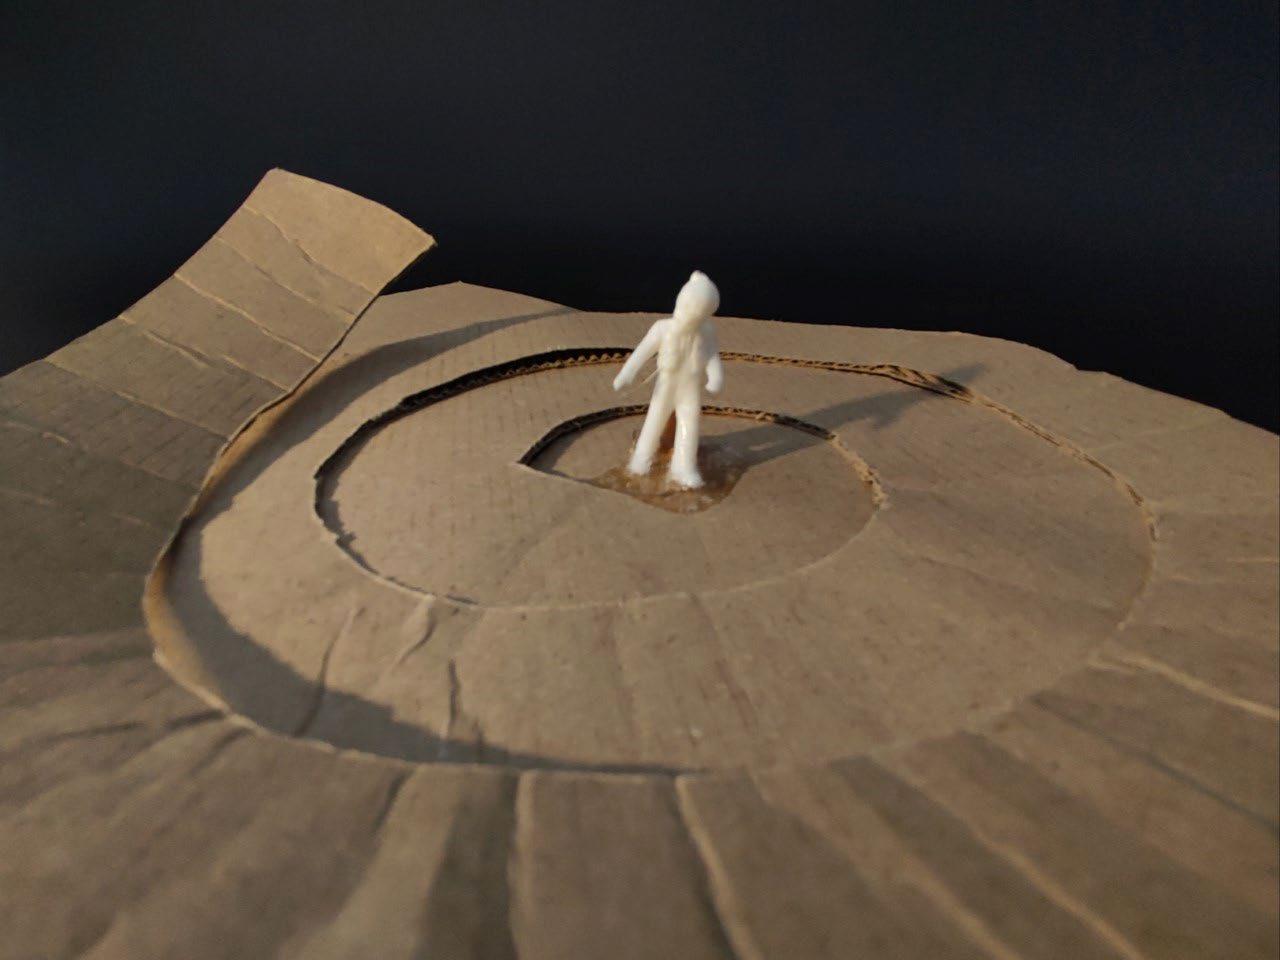
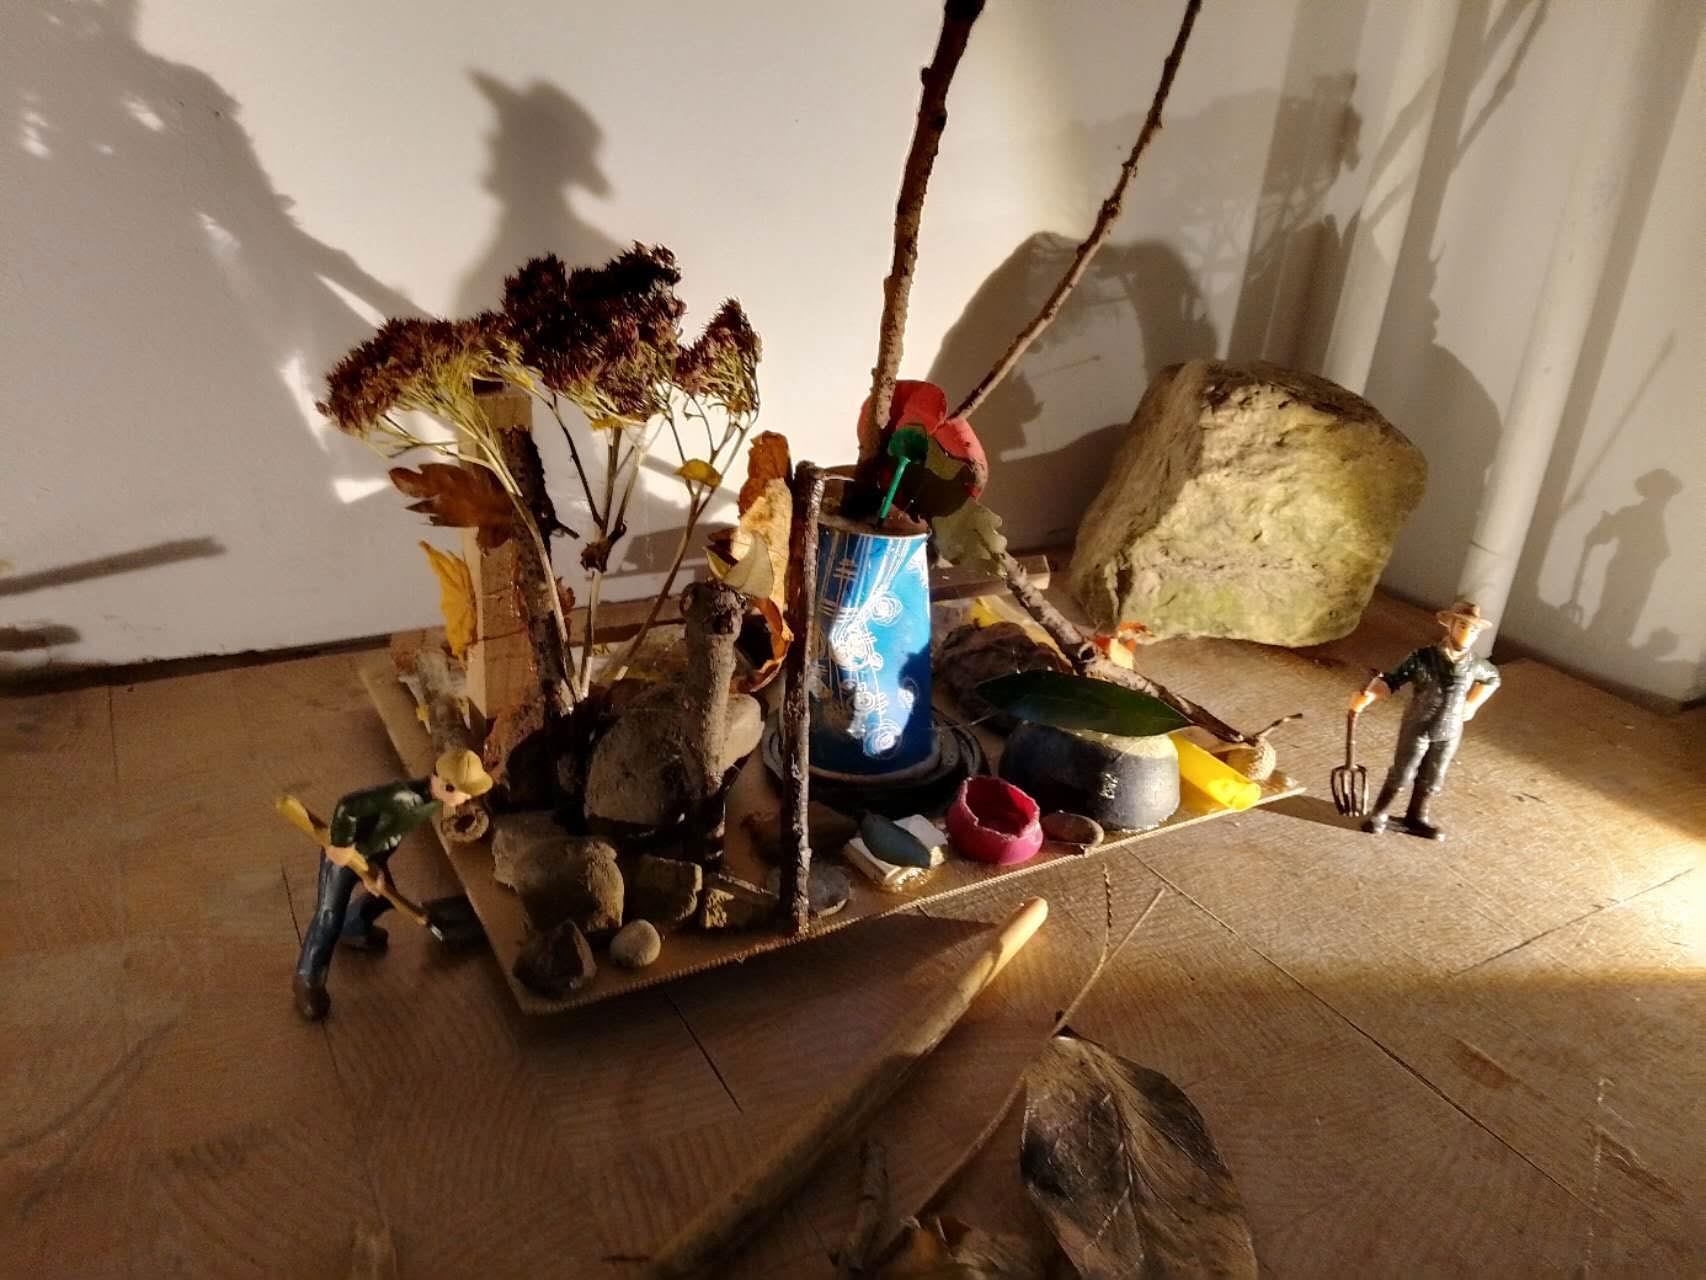
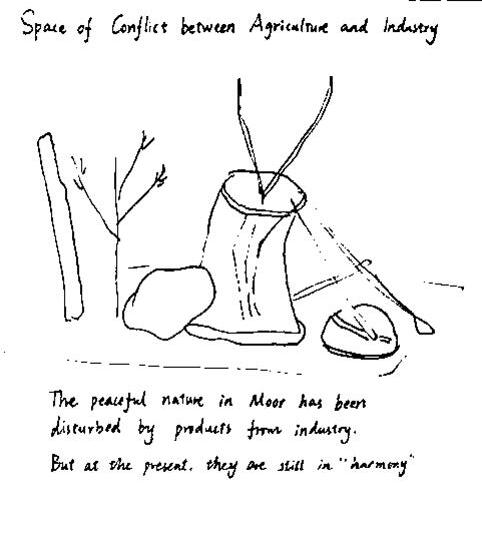
Explanation of Model
I did a model particularly for the exhibition It is a space of Conflict between agriculture and industry According to my observation of town moor, there are abandoned human items found in the beautiful natural scenes The number of them were not enough to disturb the beauty of nature but the appearance of the ‘trash’ means the ecological balance began to be quietly broken Human beings both protect and destroy ecology. There are both confrontation with nature and harmony with nature. This phenomenon was fixed by me and is a model worth pondering
My Space Model
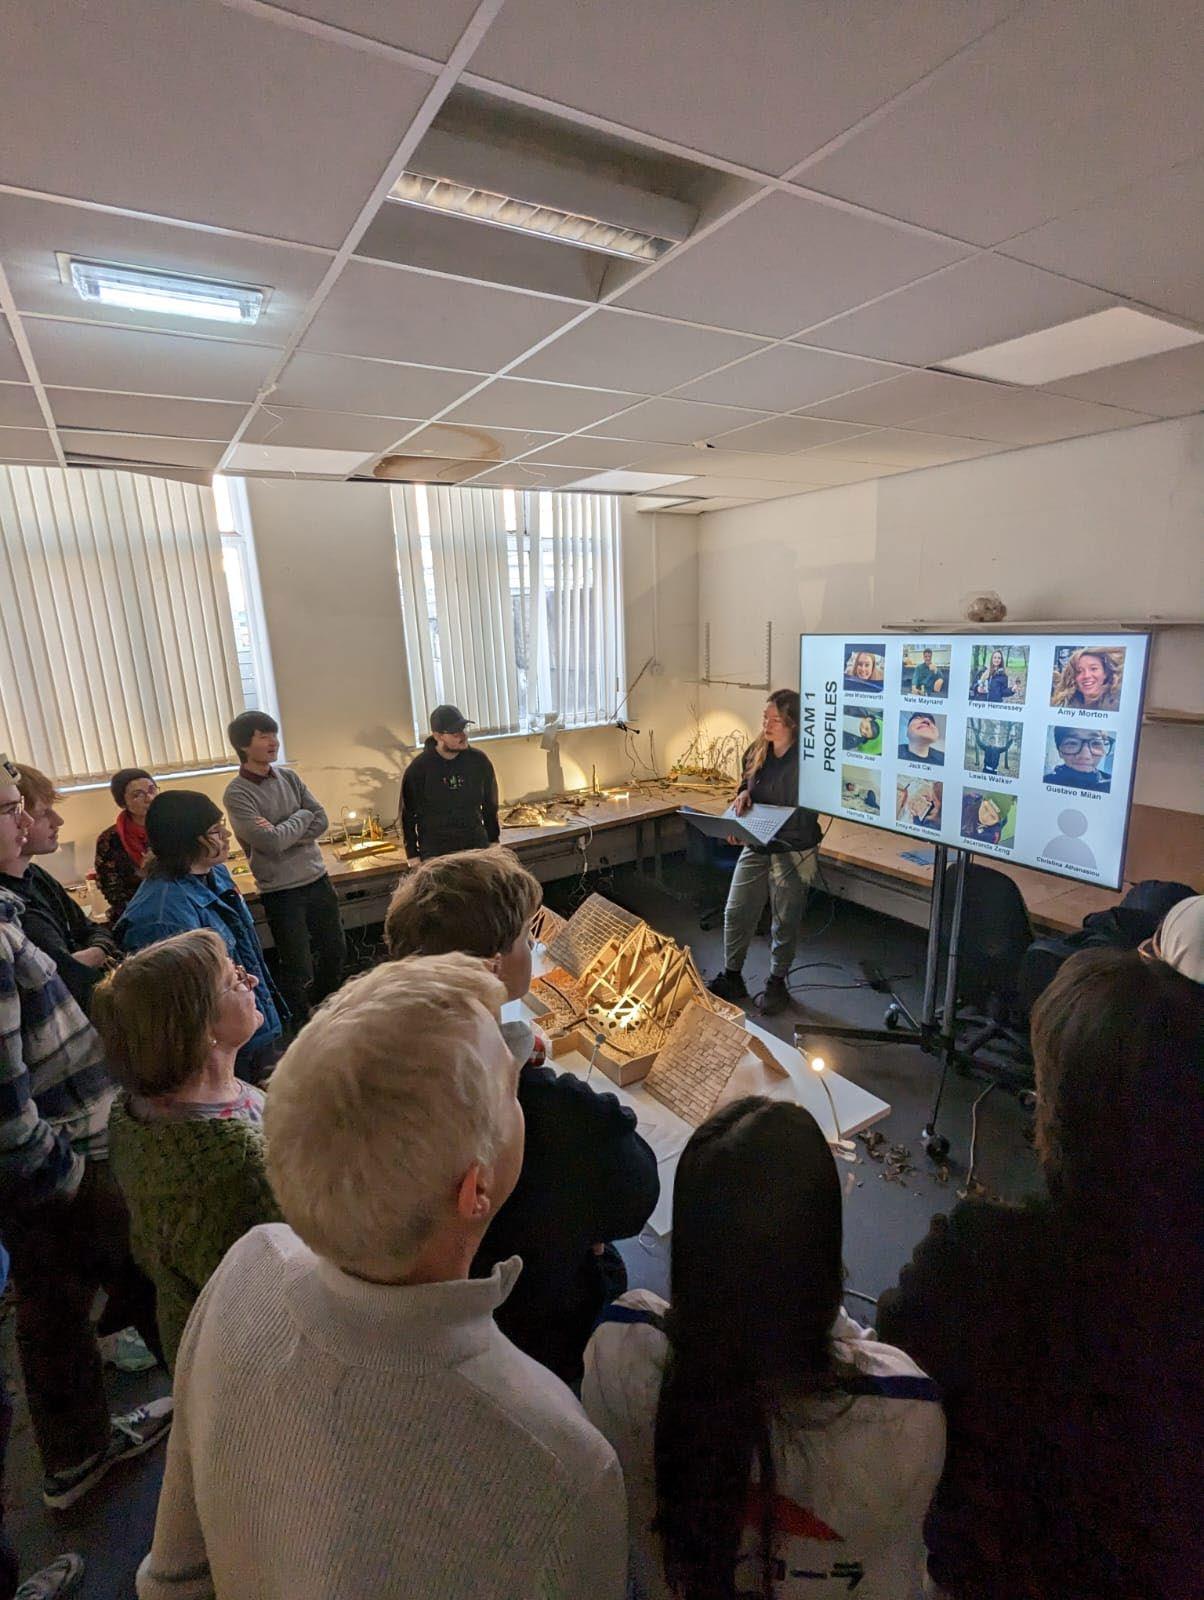
My groupmate Amy doing presentation for our group
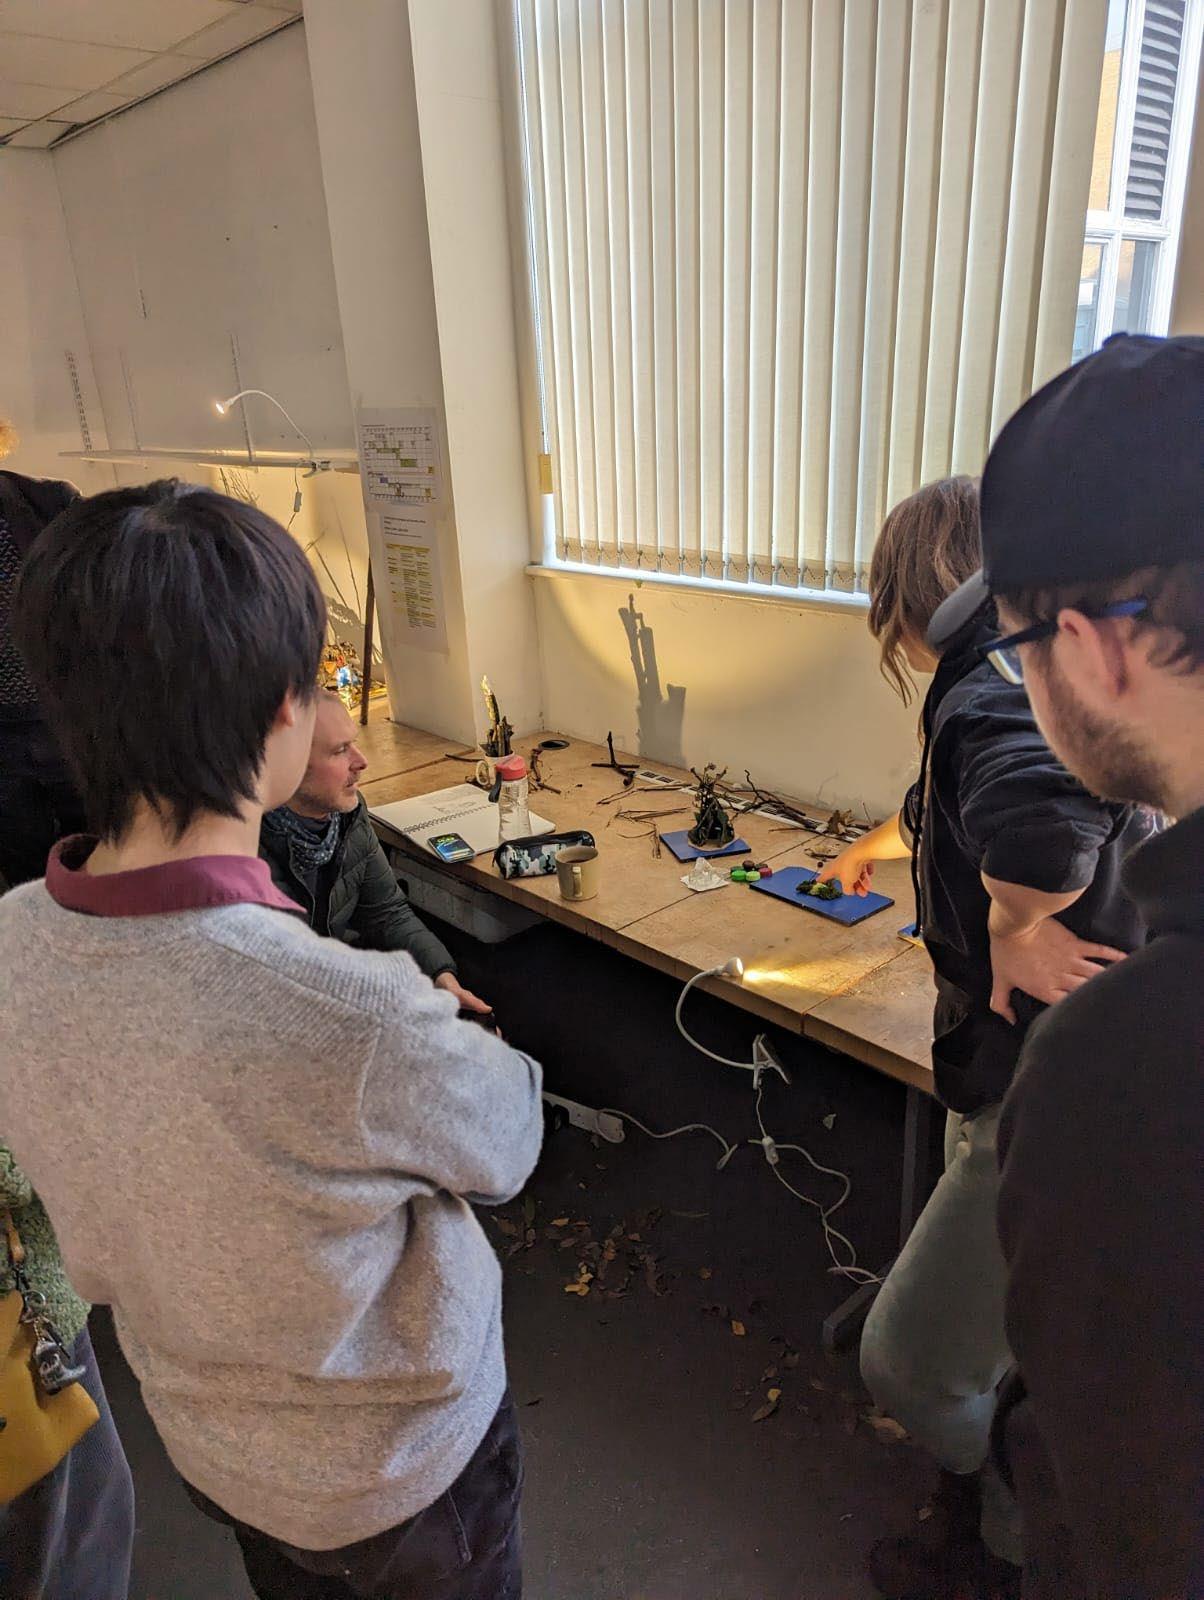
People observing our work
Our group’s exhibition (Dec 2022)
Sketchbook Pages
Sketchbook Pages
My first sketch in stage 1
City walk on a freezing morning with our tutor Ed
Sketchbook Pages
Describe my hollow object
Try to create spaces conveying certain atmosphere
Explore the materials to be used at memory spot Measure the dimension of my room
My photo of Newcastle urban life
My sketch of groupmate Louise
Drawings for my memory spot
Non- Design Works
Non-Design Works / Technology
Semester One-1500-word Essay
Page
Non-Design Works / Technology
Semester Two-Case Study
Excerpts
Non-Design Works / Technology
Semester Two-Case Study
Non-Design Works / History
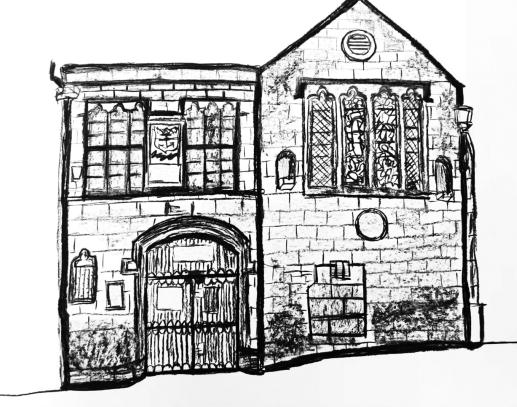
Semester One-History Walk Map
Map: Sparks of Education
(An Educational Tour on Nan’en Road of My Hometown Yangjiang)
Non-Design Works / History
Semester One-History Walk Map
100-word Description for Each Site
Non-Design Works / History
Semester One-History Walk Map
100-word Description for Each Site
Non-Design Works / History
Semester Two-2000-word Essay
Cover Page Excerpt
Non-Design Works / Representation
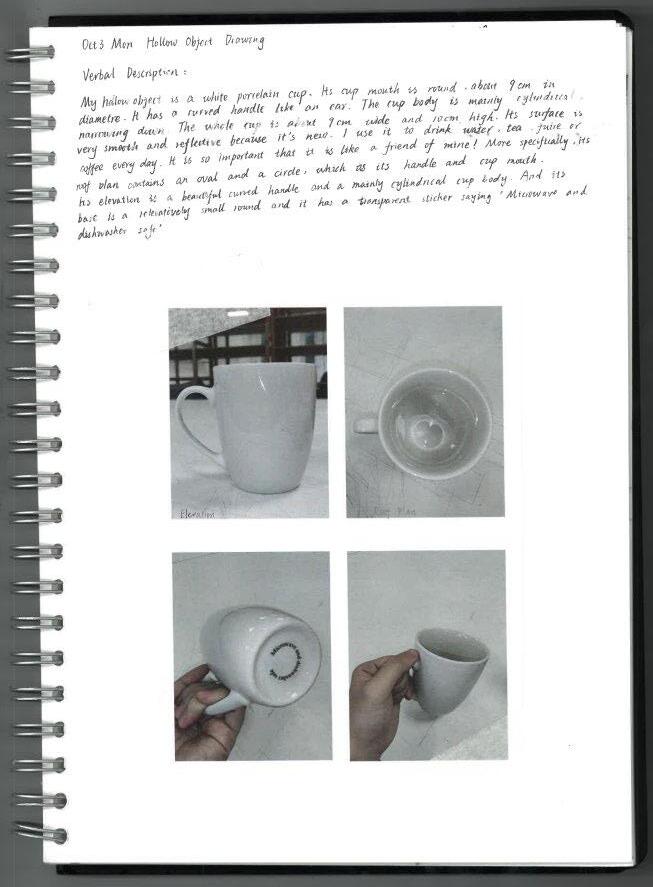
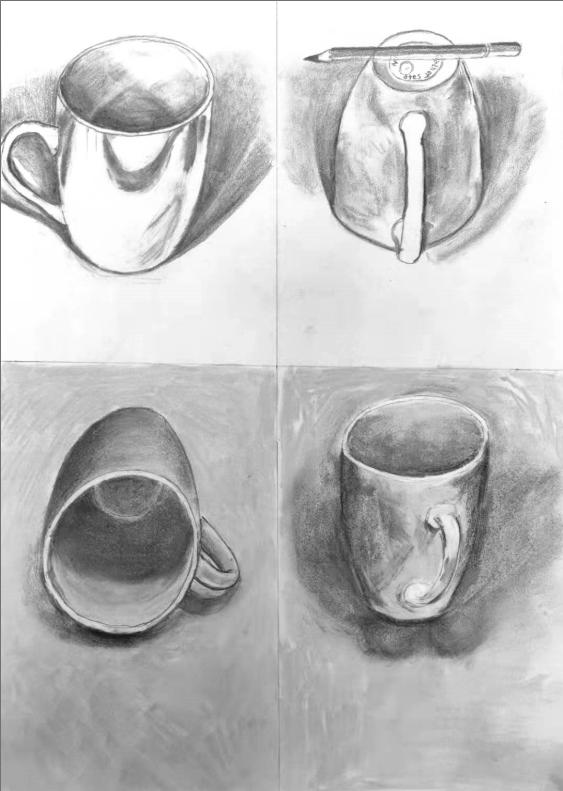
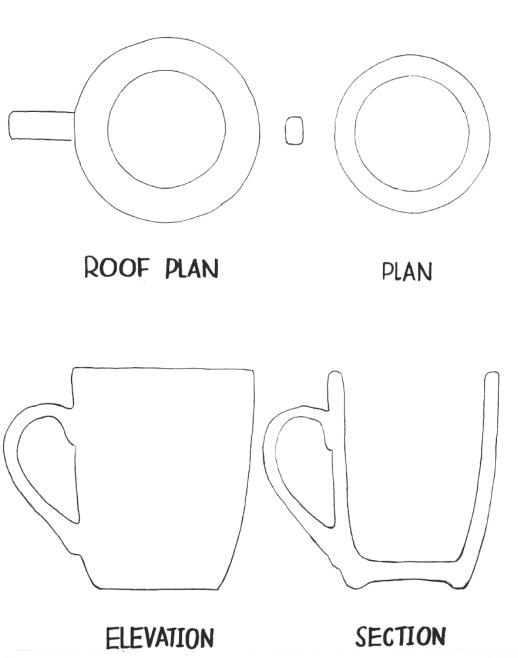
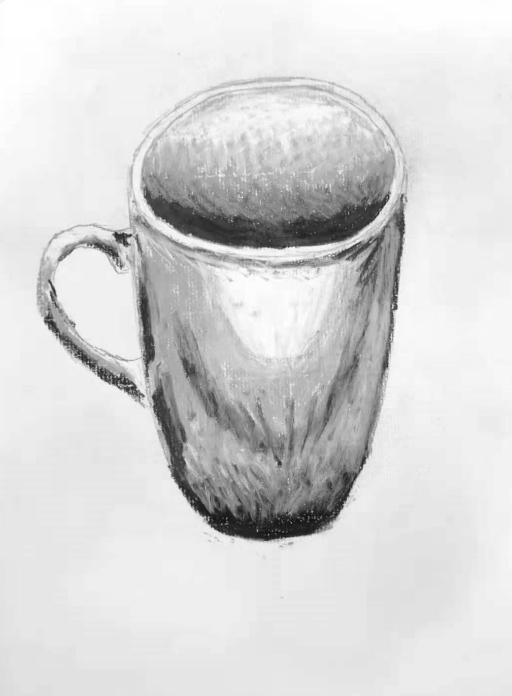
Semester One-Portfolio Task 1-Hollow Object
A4 Charcoal Sketch
1:1 Orthographic Drawings
A3 Charcoal Sketches
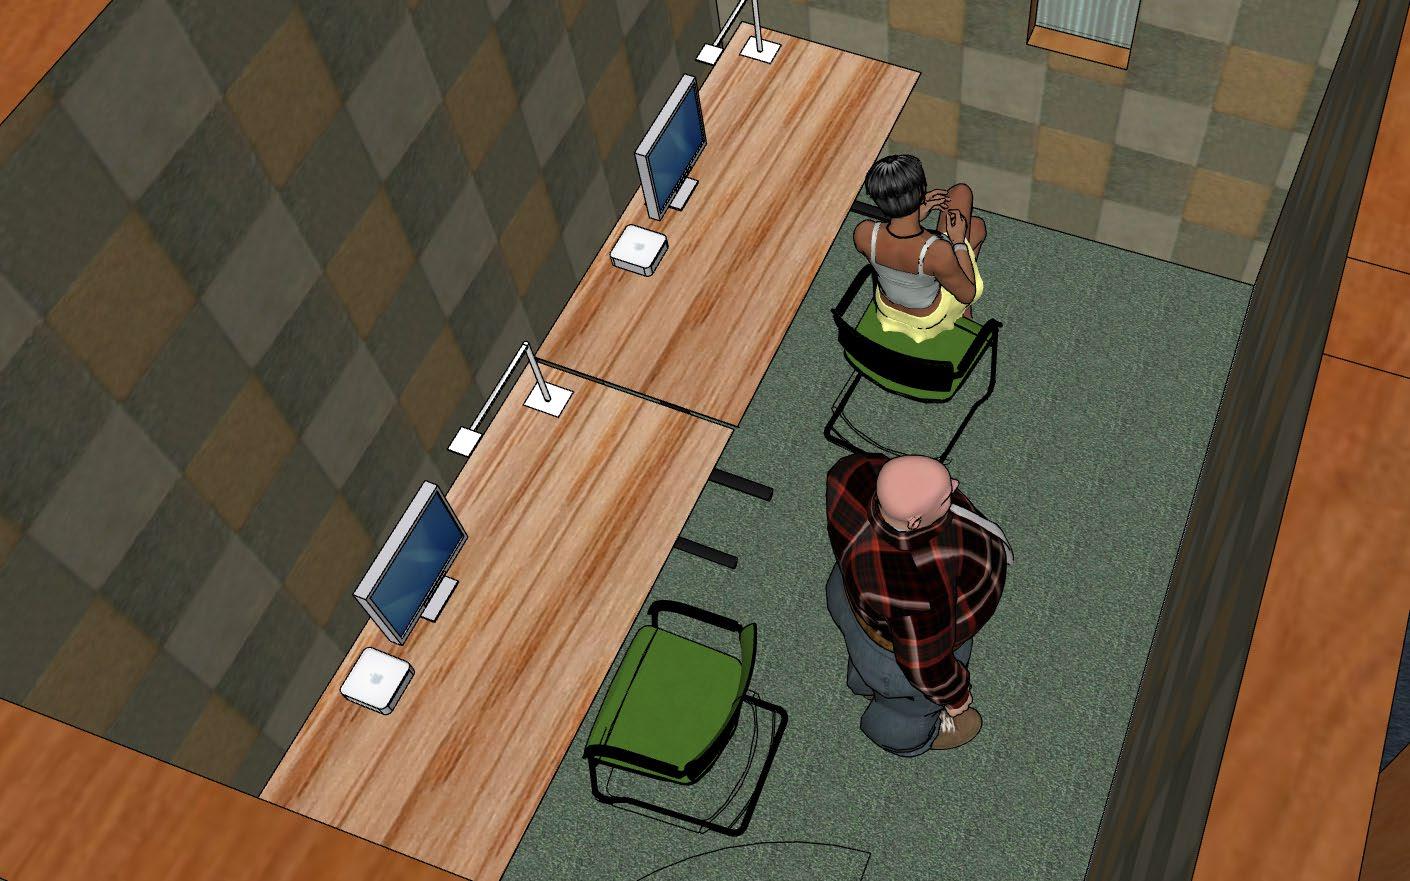
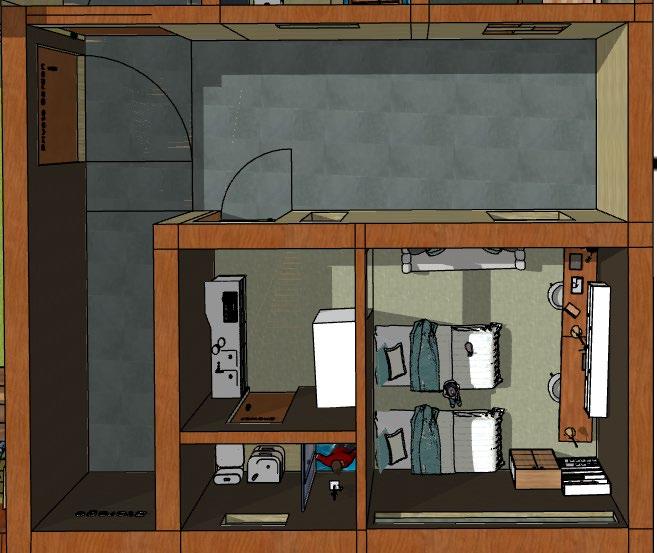
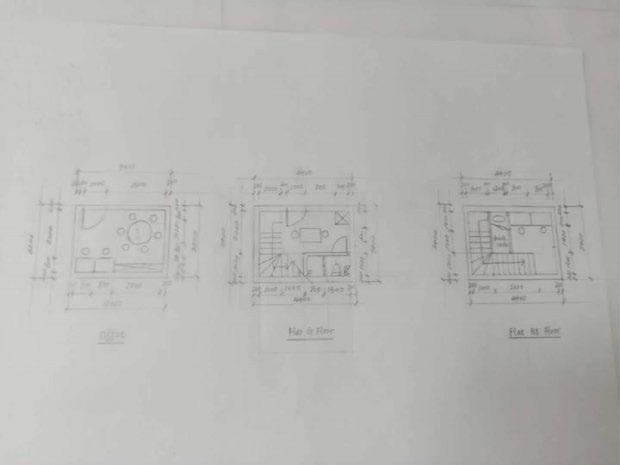
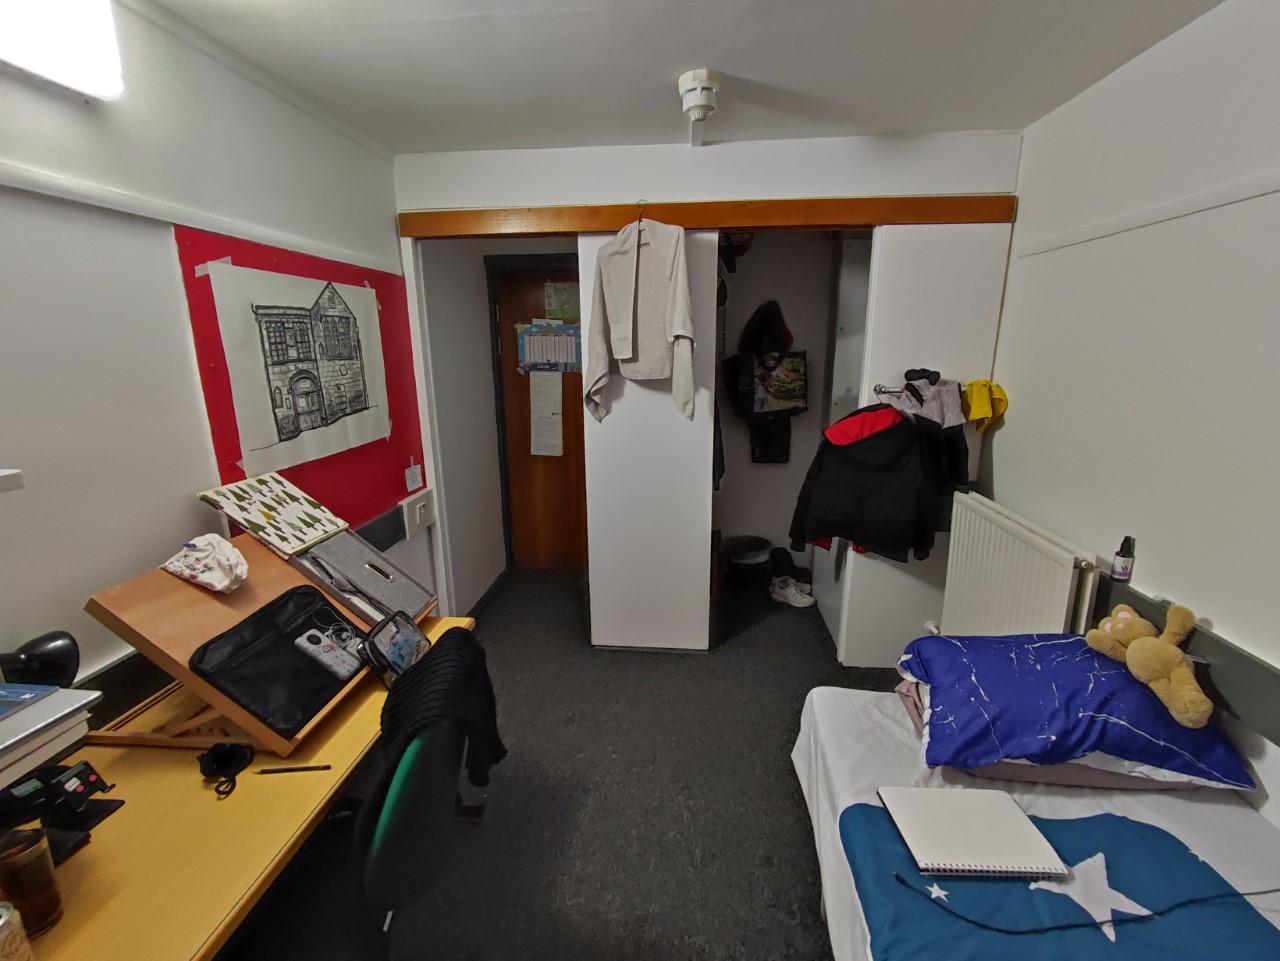
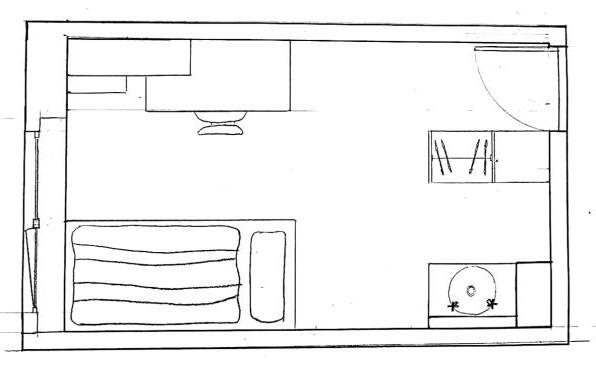
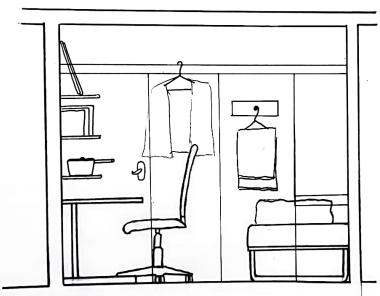
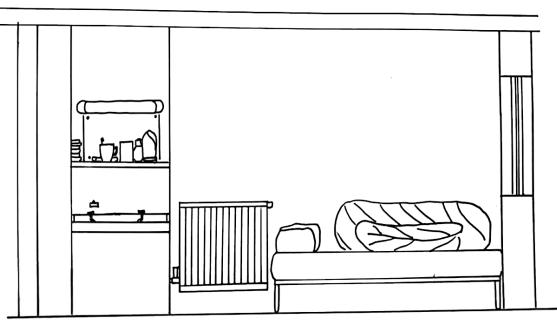
Non-Design Works / Representation
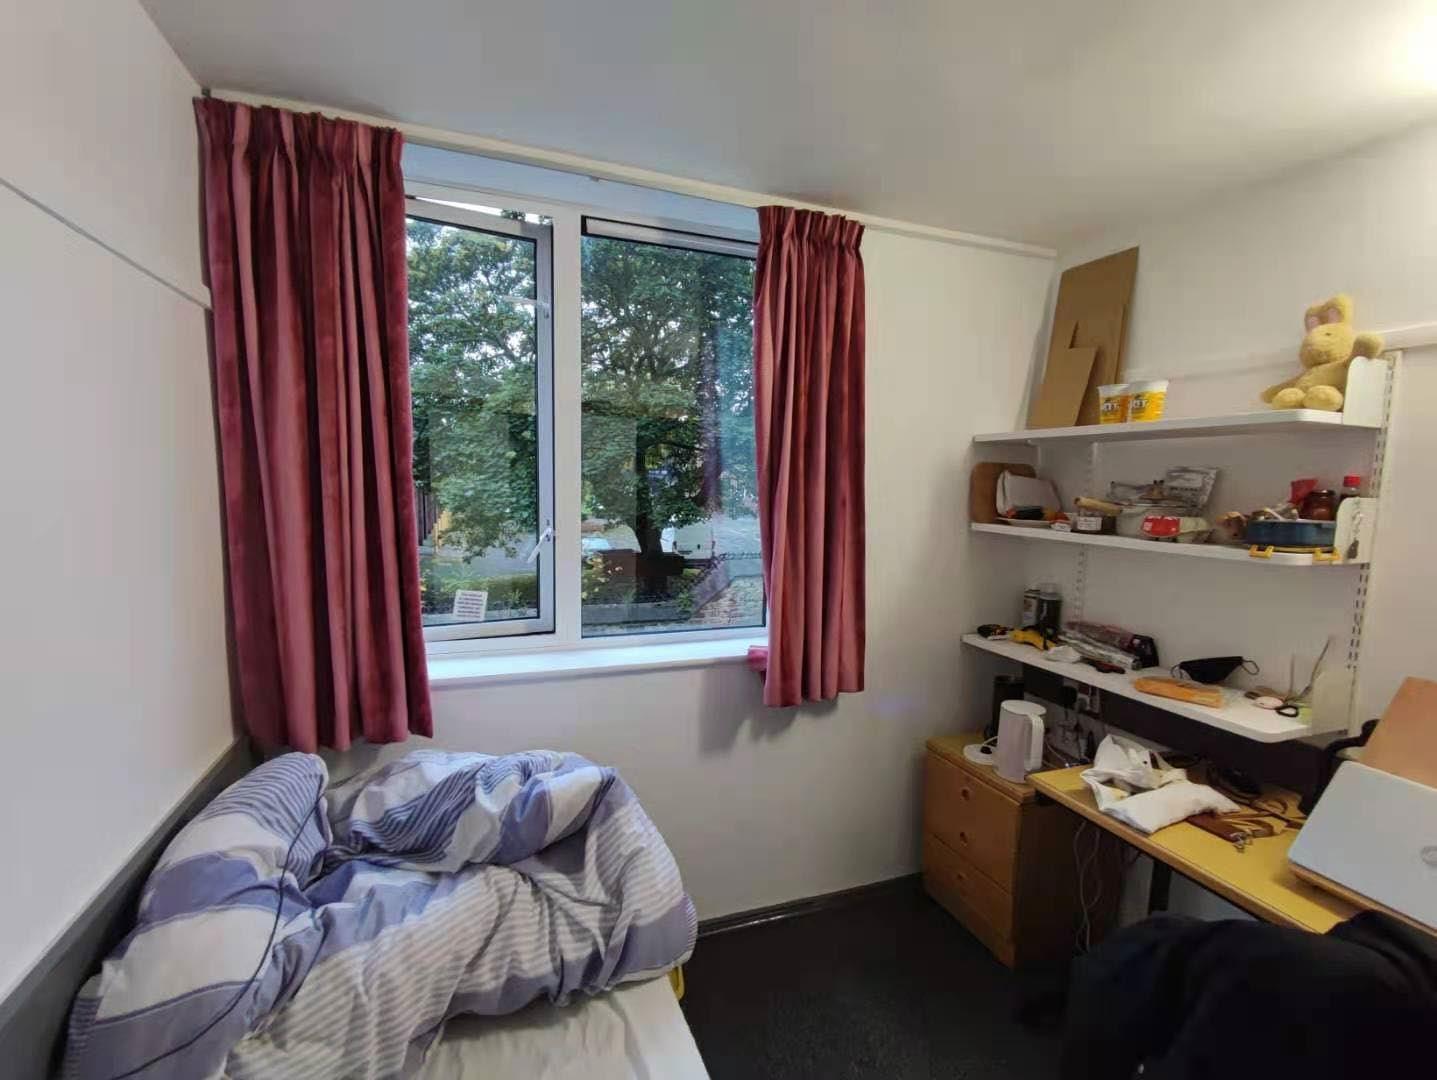
Semester One-Portfolio Task 2-Room
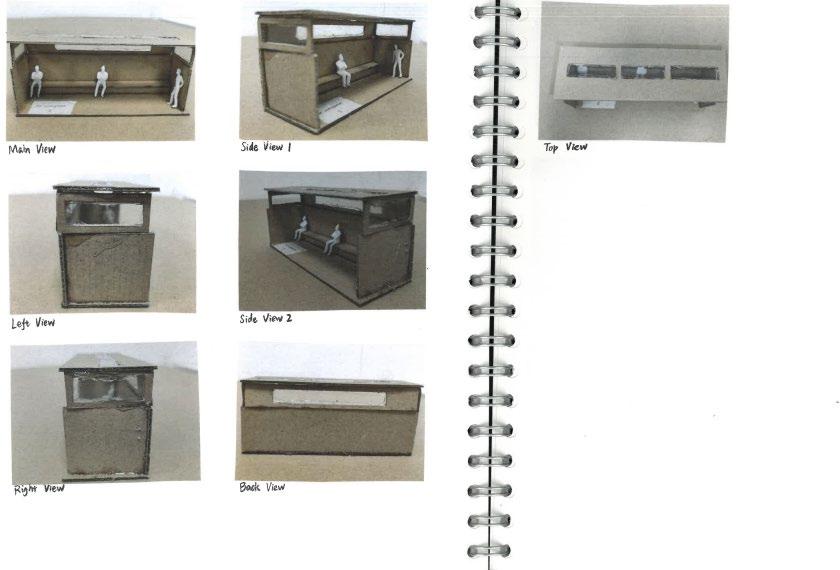
Final Drawings
Room Photos
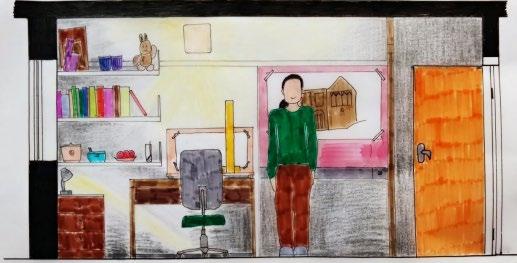
South View
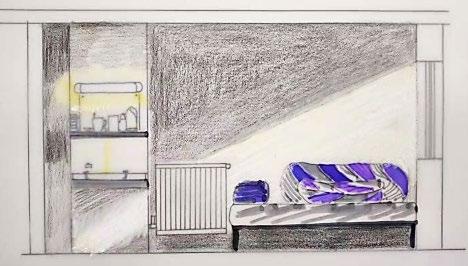
North View
Non-Design Works / Representation
Semester One-Portfolio Task 2-Room
Photo: Harsh sunshine in the morning South View
View
Non-Design Works / Representation
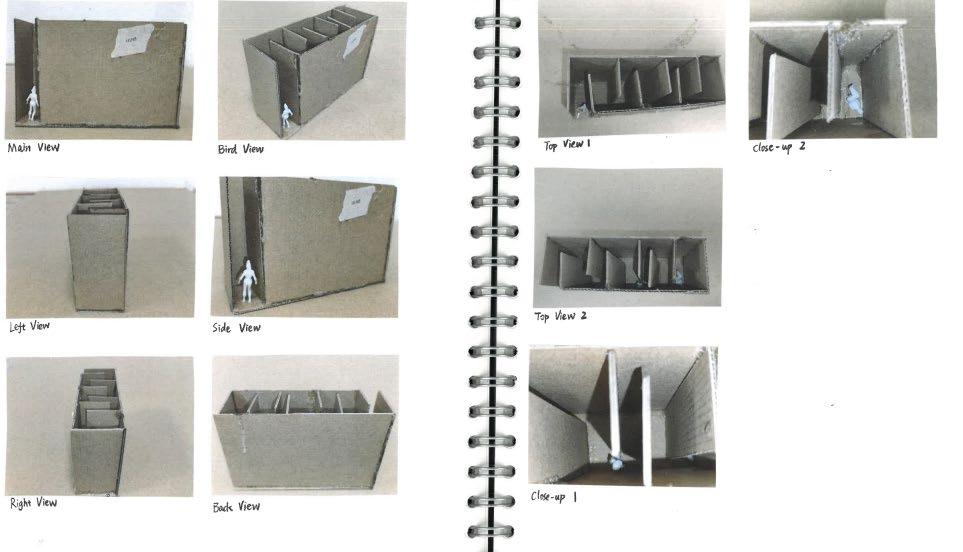
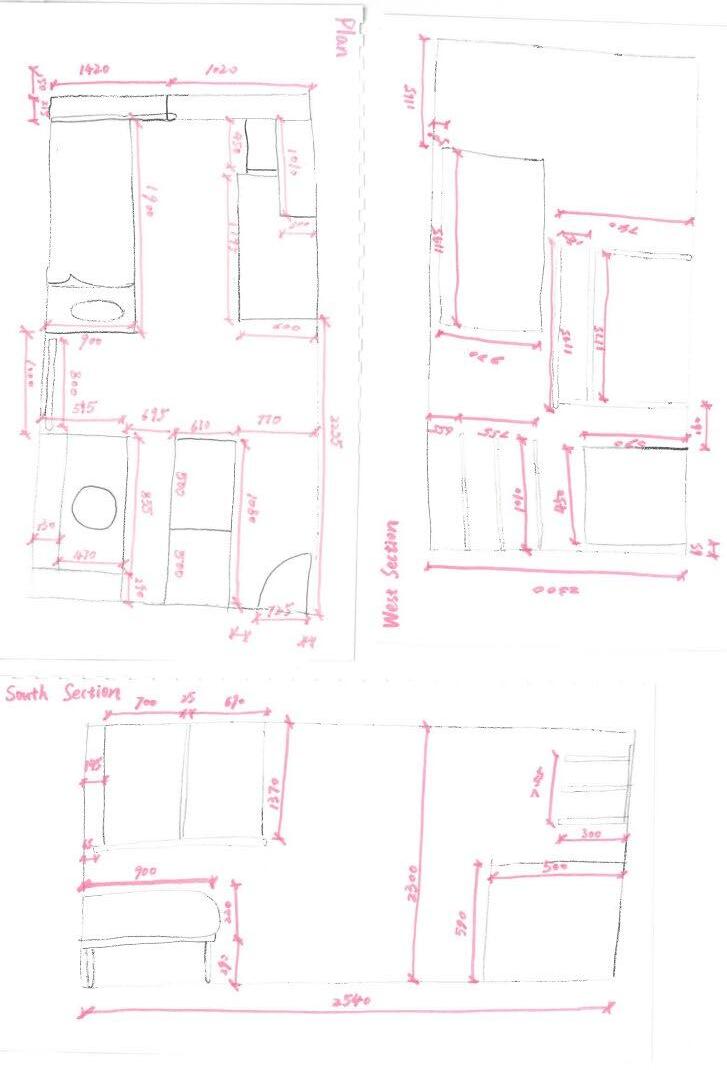
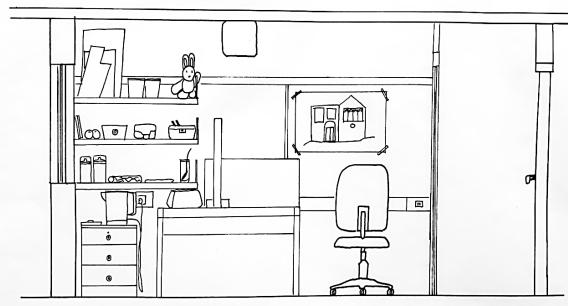
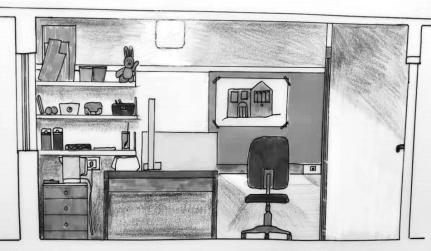
Semester One-Portfolio Task 3-Section
West View
West View East View
South View
Non-Design Works / Representation
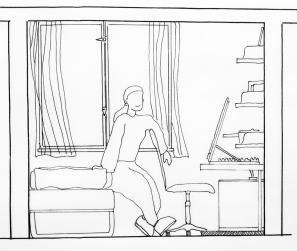
Semester One-Portfolio Task 3-Section
Adjusted West View
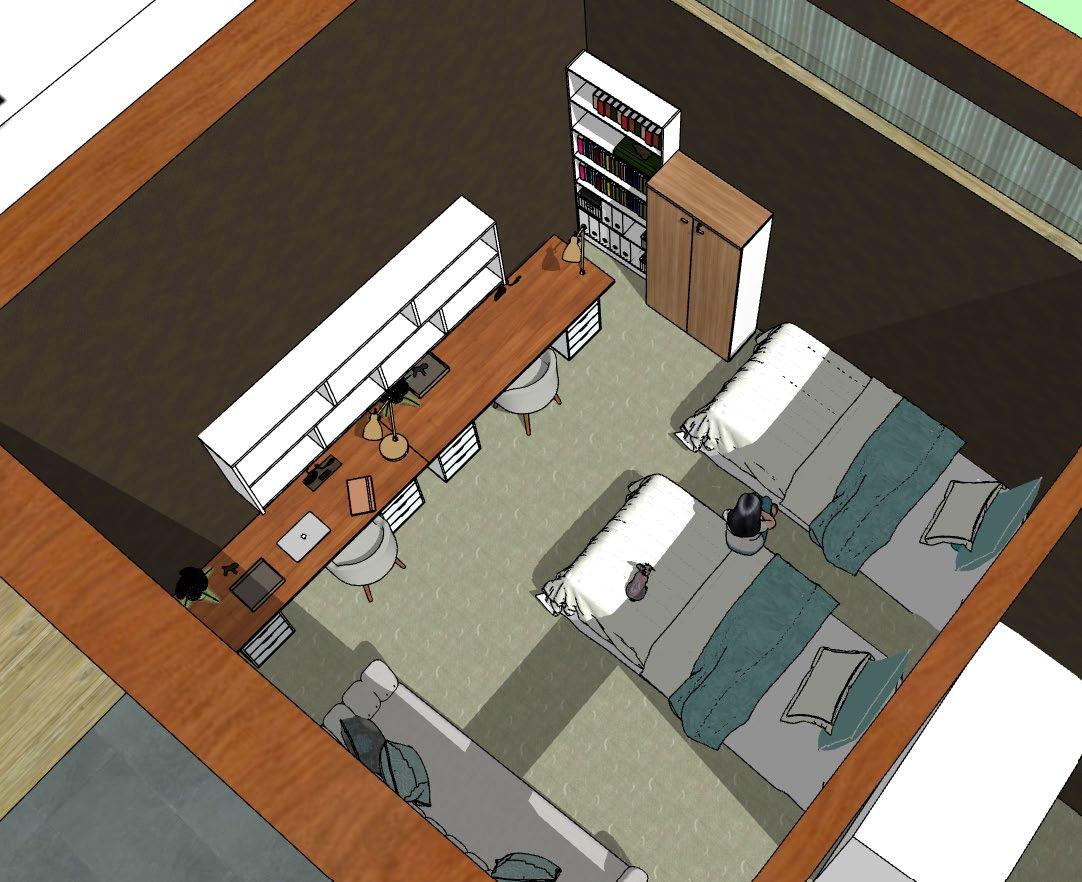
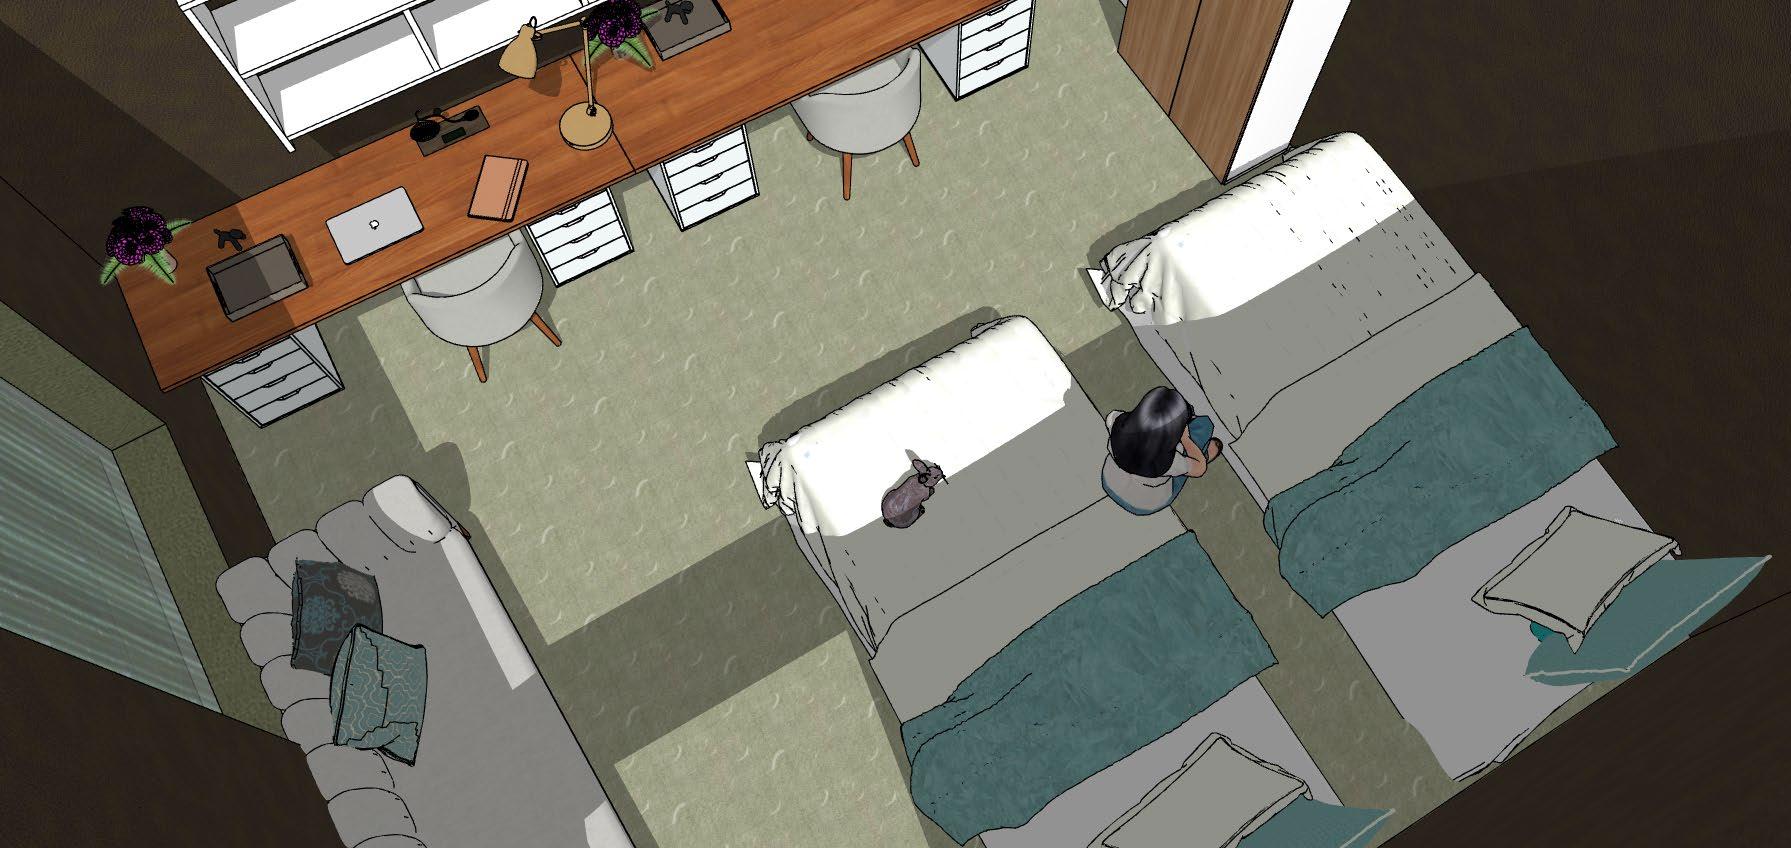
My biggest passion during my spare time is dancing and I am so obsessed with ballet. As an amateur dancer, apart from the time I am in dance studios, I always dance in my room For this bedroom remodelling task, I would definitely love to arrange a space just for dancing. Dancing is not only my hobby, but also a source of design inspiration. It made me realize the limitations and freedom of space.
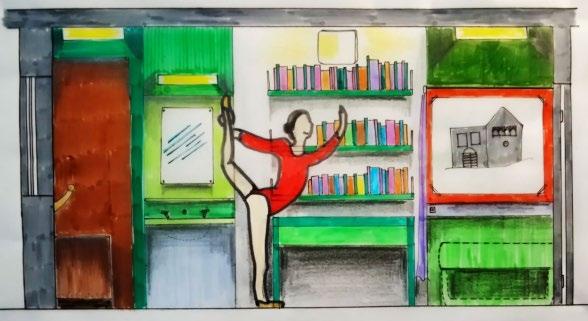
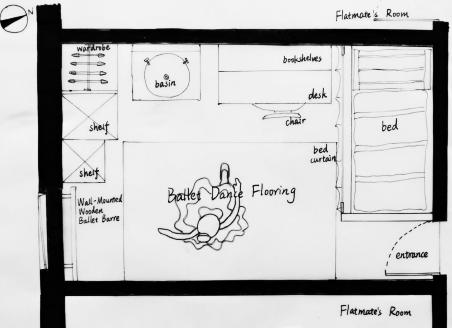
Adjusted South View Adjusted Plan
Non-Design Works / Representation
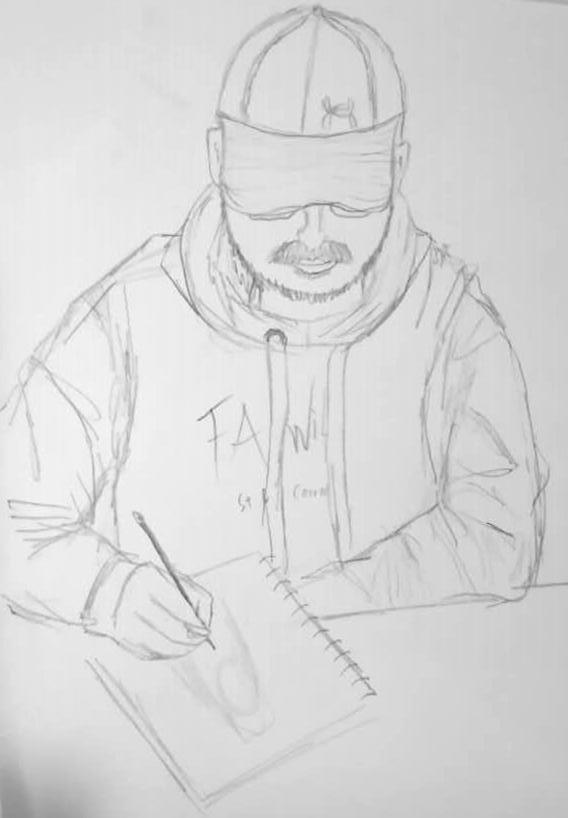
Semester One-Portfolio Task 4-Human Figure
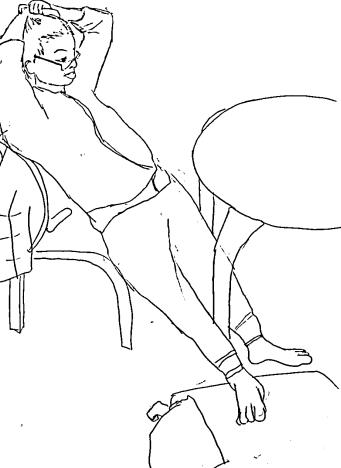
Sketch 1
Sketch 2
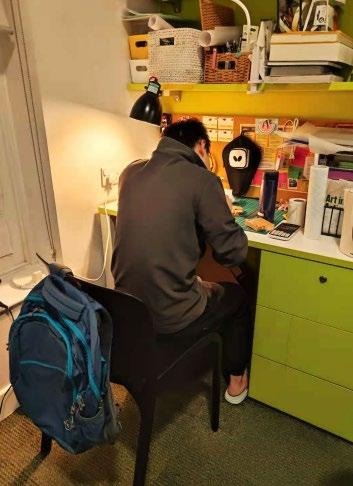
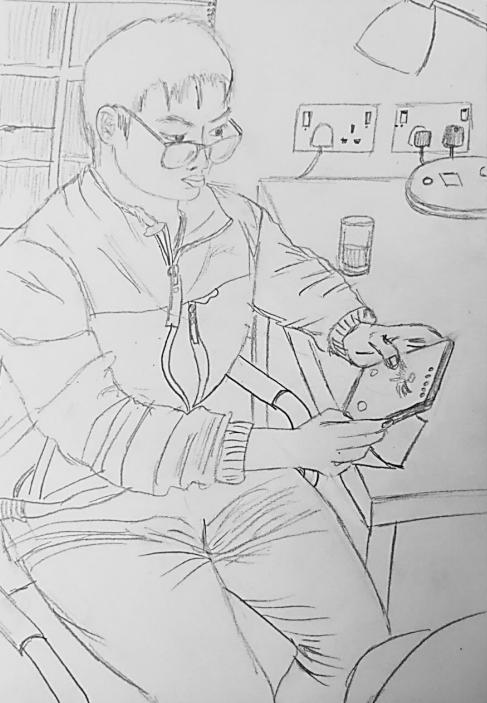
Photo: Andy doing homework
Photo: Andy in Town Moor
Non-Design Works / Representation
Semester One-Portfolio Task 4-Human Figure
A3 Charcoal Sketch
A3 Pencil Sketch 1
A3 Pencil Sketch 2
Non-Design Works / Representation
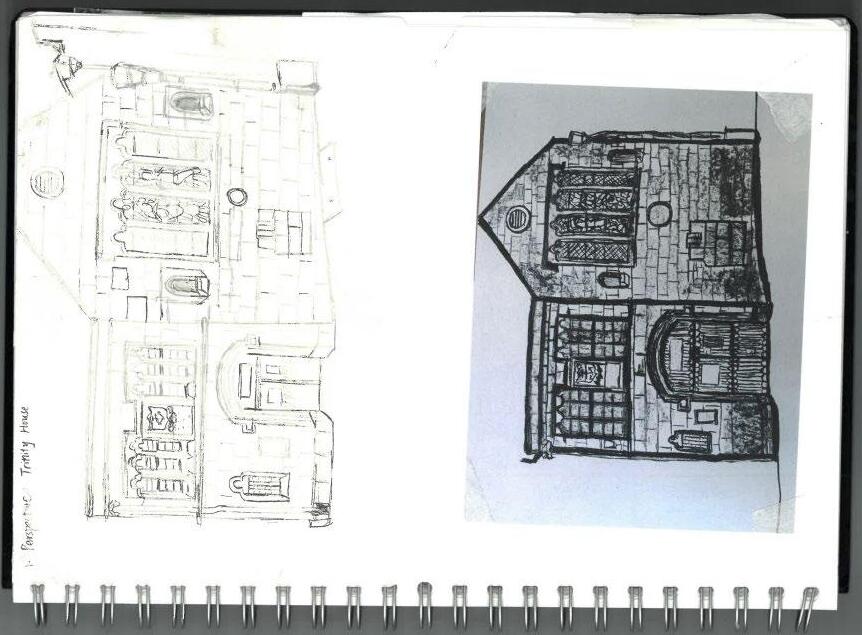
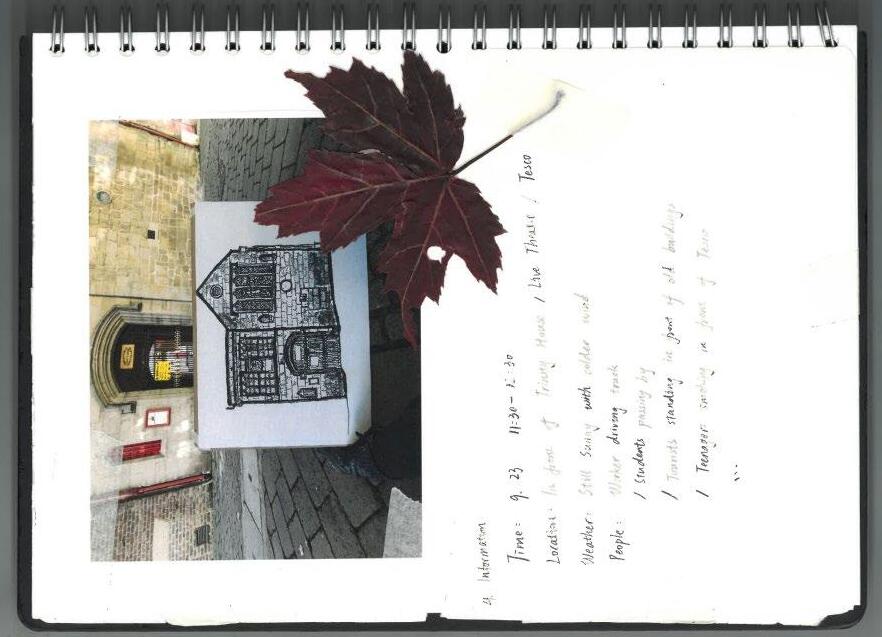
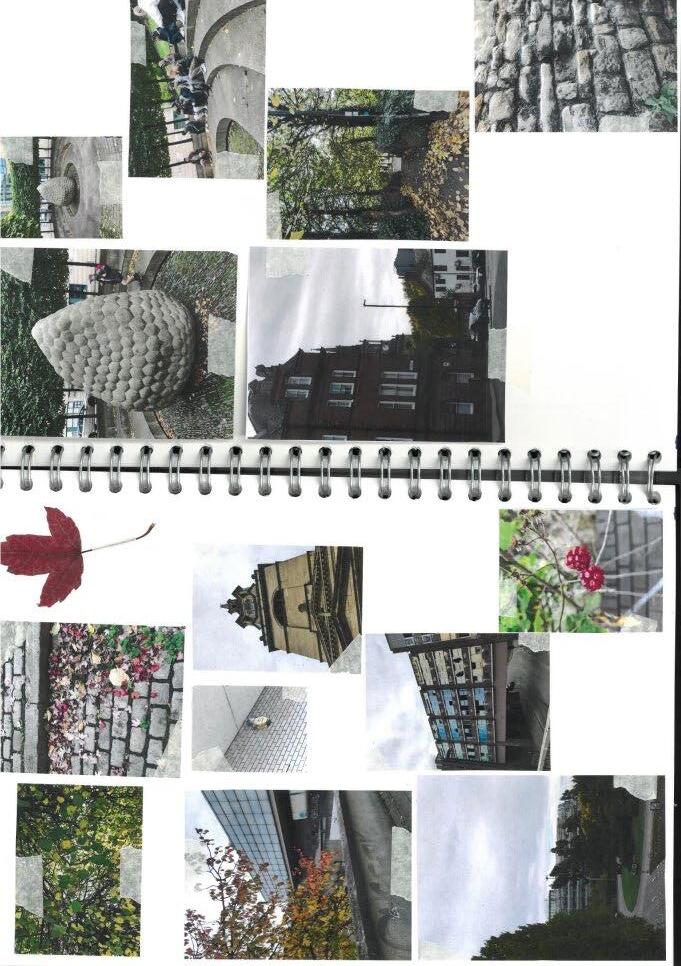
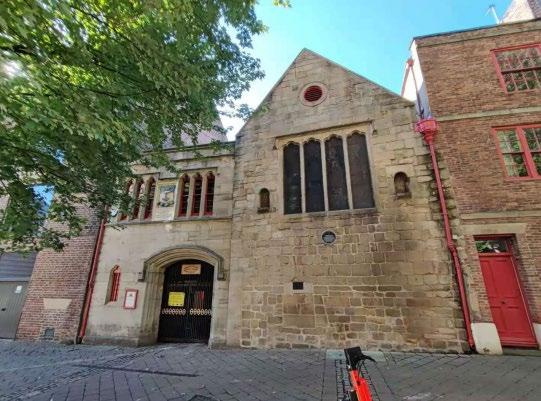
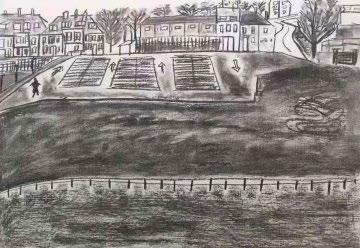
Semester One-Portfolio
Task 5-Urban Space
A1 Charcoal Sketch
Photo: Trinity House in Quayside
Non-Design Works / Representation
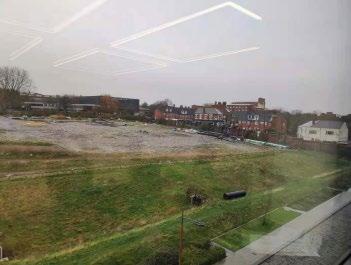
Semester One-Portfolio Task 5-Urban Space
A2 Charcoal Sketch
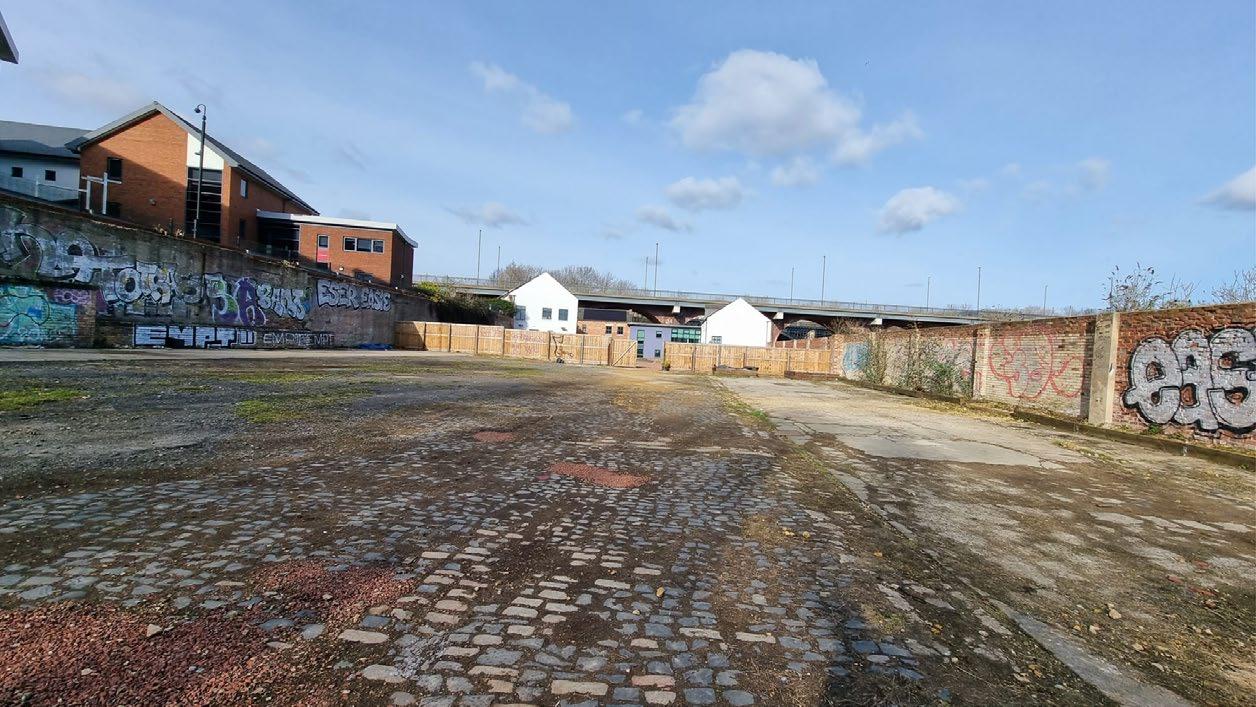
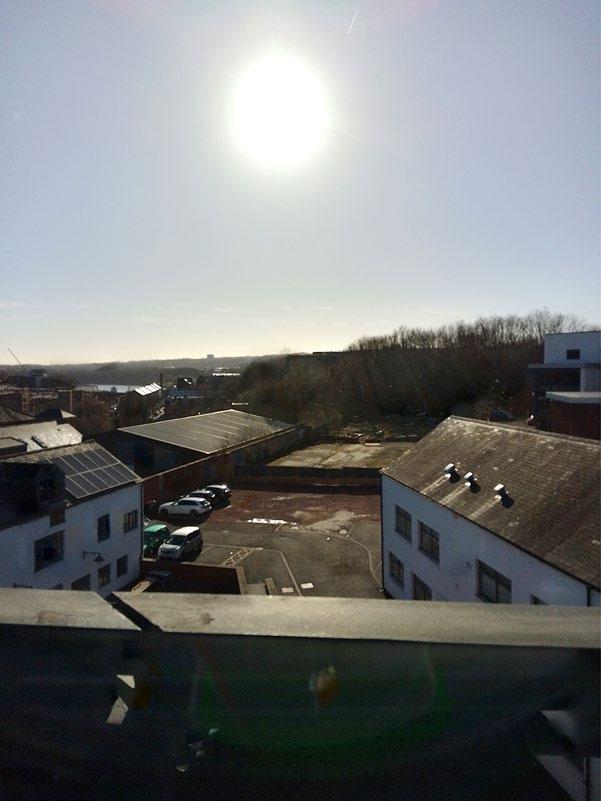
Photo: Wasteland behind Urban Science Building
Non-Design Works / Representation
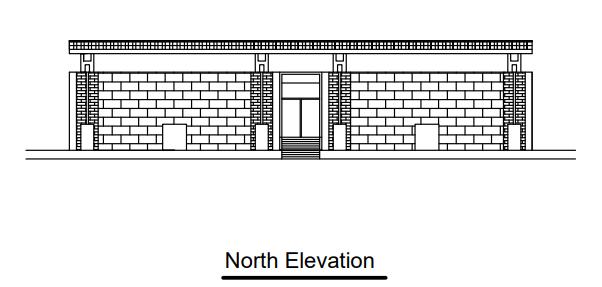
Semester Two- Digital Communication
Non-Design Works / Representation
Semester Two- Digital Communication
Ground Floor Elevation of Chancellery Building
Bird View of US Consulate in Luanda by Louise Kahn