6 minute read
APPENDICES
Appendix A Installing NOOBS to a microSD card
The New Out Of the Box Software (NOOBS) is designed to make it as easy as possible to install and set up operating systems on your Raspberry Pi. You can buy microSD cards with NOOBS pre-installed on them from all good Raspberry Pi retailers, or you can use the following instructions to install them to your own microSD card.
Advertisement
WARNING!
If you’ve purchased a microSD card with NOOBS already pre-installed, you don’t need to do anything else other than plug it into your Raspberry Pi. These instructions are for blank microSD cards, or for cards you want to restore back to a factory-fresh condition. Carrying out these instructions on a microSD card with files on it will lose those files, so make sure you’ve
backed things up first!
Downloading NOOBS
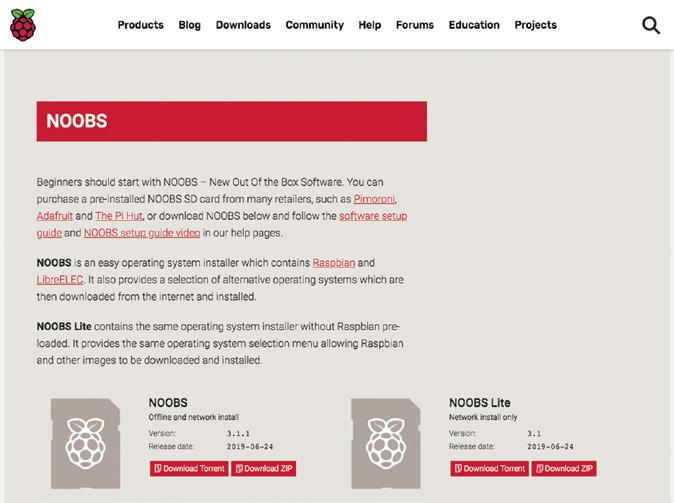
To install NOOBS onto a new blank or previously used microSD card, you’ll first need to download it from the Raspberry Pi website. On a computer with a microSD card reader, or a full-size SD card reader and a microSD card adapter, open the web browser and type rpf.io/downloads into its address bar. From the page that loads, click NOOBS – marked with a raspberry icon – then click ‘Download ZIP’ under ‘NOOBS Offline and network install’.
The NOOBS download is quite large, and can take a while to download on a slower internet connection. When the download has finished, plug your microSD card into your PC. It should show up as a single removable drive; if it doesn’t, it may need to be formatted first.
TWO OPTIONS
You may have noticed that there are two NOOBS download options: NOOBS and NOOBS Lite. NOOBS downloads both NOOBS and a copy of the latest Raspbian in a single bundle; NOOBS Lite downloads just NOOBS itself. Most users will want NOOBS; only download NOOBS Lite if you’re planning to install an operating system other than Raspbian. Both versions install in the same way, as described in this appendix.
Formatting the microSD
To format a previously used microSD card ready for NOOBS, Windows, and macOS users should download the SD Card Association SD Memory Card Formatter tool from rpf.io/sdcard, then double-click to install it; Linux users should use their distribution’s disk management tool to delete any existing partitions on the disk, create a single partition, and format it as VFAT, then move onto the next section of this guide.
Insert your microSD card into your card reader, if you haven’t done so already, and load the SD Card Formatter tool. Look for your microSD card in the ‘Select card’ list; if you’re reformatting a microSD card that has already been used with a Raspberry Pi, you may find it has more than one entry – just select any one of them. Double-check that you selected the correct drive by looking at the ‘Card information’ section: it should report the size and type of the microSD card you inserted. If the information is wrong, select a different entry from the ‘Select card’ list and check again.
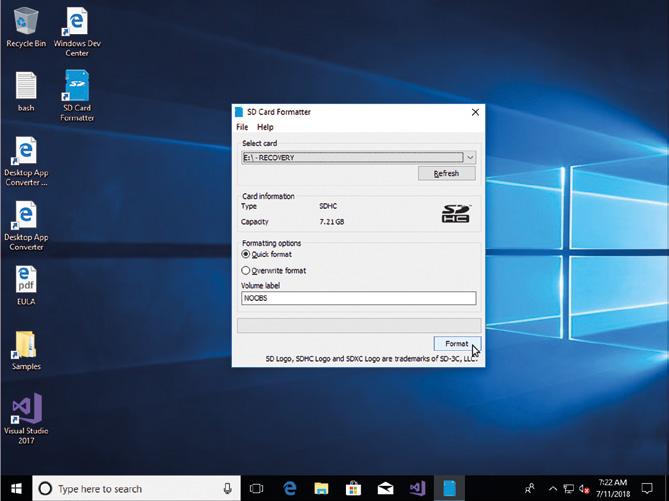
When you’re absolutely sure you’ve picked the correct microSD card, and you’ve backed up any files you want to keep if it’s a used card, type ‘NOOBS’ into the ‘Volume label’ box, click the Format button, and confirm you want to overwrite the card. The default ‘quick format’ mode should only take a few seconds to complete, after which you can close the SD Card Formatter.
Installing NOOBS
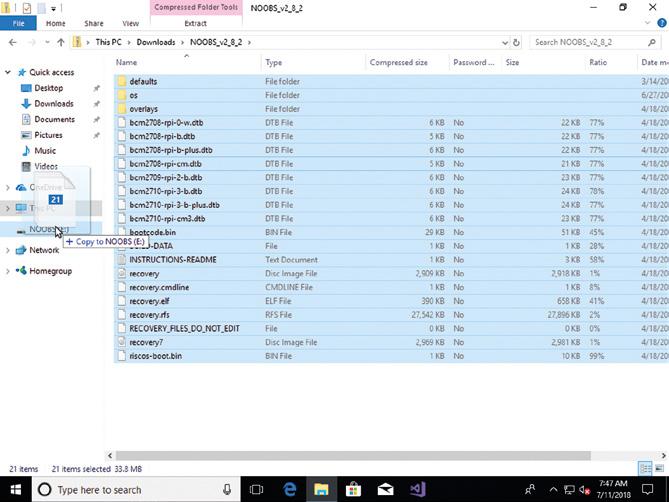
Installing NOOBS is as simple as drag-and-drop. Start by finding the NOOBS file, which should be in your Downloads folder. This file is known as an archive, a single file containing copies of lots of individual files which have been compressed to save space and make them quicker and easier to download.
Double-click on the archive to open it, then press CTRL+A on your keyboard – ⌘+A on macOS – to select all the files in the archive. Click on one of the files with the left mouse
button, and drag them to the removable drive representing your microSD card. Let go of the mouse button to drop the files, and wait for them to copy to the microSD; this can take a few minutes.
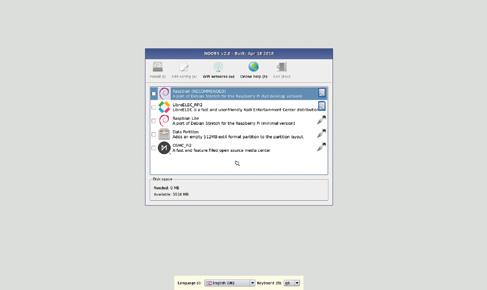
When the files have successfully copied, eject the microSD card from the computer and insert it into your Raspberry Pi. The next time your Raspberry Pi is switched on, NOOBS will load and ask you to choose your operating system (Figure A-1).
3Figure A-1: The NOOBS menu without any operating systems installed
NO PICTURE?
If you can’t see Raspberry Pi on your display, check you are using the correct input. If your TV or monitor has more than one HDMI input, switch through each in turn using the ‘Source’ or ‘Input’ button until you see the NOOBS menu.
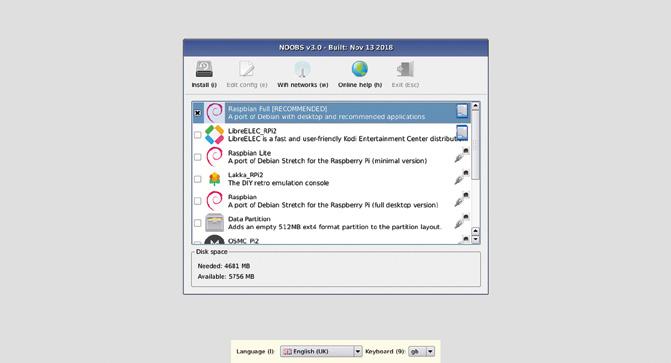
This is the NOOBS menu, a system which lets you choose the operating system to run on your Raspberry Pi. Two operating systems are included with NOOBS as standard: Raspbian, a version of the Debian Linux operating system tailored specifically for Raspberry Pi; and LibreELEC, a version of the Kodi Entertainment Centre software. If Raspberry Pi is connected to the network – either through a wired connection or using the ‘Wifi networks (w)’ option from the top bar of icons – you can also download and install other operating systems.
To begin installing an operating system, use the mouse to put a cross in the box to the left of Raspbian Full: point the cursor at the white box and click once with the left mouse button. When you’ve done so, you’ll see that the ‘Install (i)’ menu icon is no longer greyed-out; this lets you know that your operating system is ready to install (Figure A-2).
5Figure A-2: Choosing an operating system to install through NOOBS
Click the ‘Install (i)’ icon once with the left mouse button and you’ll see a warning message telling you that installing the operating system will overwrite any data currently stored on the microSD card – not counting NOOBS itself, which stays intact. Click ‘Yes’ and the installation process will begin (Figure 2-3).
5Figure A-3: Installing the Raspbian operating system
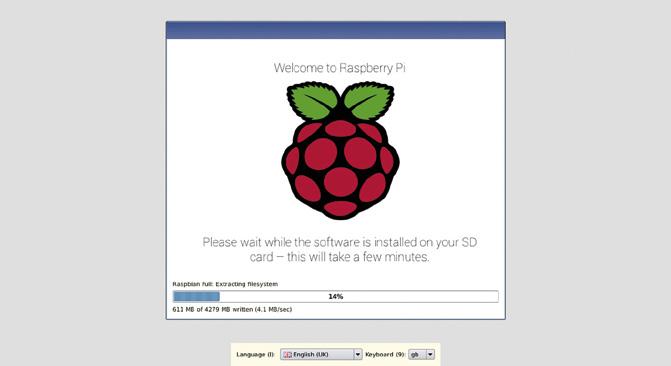
The installation process can take anything from 10 to 30 minutes, depending on the speed of your microSD card. As the operating system is installed, progress is shown in a bar along the bottom of the window, you’ll see a slide show highlighting some of its key features; you’ll learn more about these, and Raspbian itself, in Chapter 3, Using your Raspberry Pi.
WARNING!
It’s important that the installation isn’t interrupted as this has a high likelihood of damaging the software, a process known as data corruption. Do not remove the microSD card or unplug the power cable while the operating system is being installed; if something does happen to interrupt the installation, unplug Raspberry Pi from its power supply, then hold down the SHIFT key on the keyboard as you connect Raspberry Pi to its power supply to bring the NOOBS menu back up. This is known as recovery mode, and is a great way to restore a Raspberry Pi whose software has been corrupted to working order again. It also allows you to enter the NOOBS menu after a successful installation, to reinstall the operating system, or install one of the other operating systems.
When the installation has finished, a window will pop up with an ‘OK’ button; click this and Raspberry Pi will restart into its freshly installed operating system. Note that the first time you boot into Raspbian, it can take a minute or two as it adjusts itself to make the best use of the free space on your microSD card. The next time you boot, things will go more quickly.


