
8 minute read
AutoCAD

from AUGIWorld
by AUGI, Inc.

by: Sam Lucido AutoCAD 2020 PRODUCT FOCUS Tips and Tricks using AutoCAD 2020
INTRODUCTION A long time ago….in a workplace far, far, away, I started using AutoCAD. OK, it was not that long ago. But, when I started using the software, I always (and still do) get excited when I figure out something new, or a trick I did not know. Talking to fellow users, getting on forums, and seeing how people solve problems, is a great way to learn. I would grab those AUGIWorld magazines and read all I could to see if there was something in there I could incorporate into my workflow. Read on and find out some of my favorite techniques I use in AutoCAD and Civil 3D, one tip and trick at a time.

ATTIPEDIT
Have you ever wanted to edit an attribute without going into the dialog box? Normally we would type ATTEDIT (ATE) and select our block and edit. Hold down the CTRL key and select the attribute you want to edit. You will then enter the MTEXT editor to edit your text. You can also type ATTIPEDIT at the command prompt to achieve the same results. Figure 1
HPDLGMODE
This system variable displays the Hatch and Gradient dialog box, and the Hatch Edit dialog box. The variable, by default, is set to 2, which will activate the contextual ribbon. I do like using the ribbon, but I find myself selecting the setting options to bring up this dialog box at the command prompt. Type HPDLGMODE at the command prompt and set this variable to 1 to display the dialog box, as shown in Figure 2.


Have you ever wanted to use ortho and draw at a specific angle? You can do just that. You can rotate your cursor to draw with ortho on at a specific angle. Type SNAPANG at the command prompt and use your object snap to select the start angle (1), then the end angle (2), and your cursor will rotate to that angle, as shown in Figure 3. Use ORTHOMODE to create parallel lines or add a macro to your tool palette to perform with one click.
Remember to set the SNAPANG back to 0 when you are done working within that angle.
STARTUP SUITE
We all have those special LISP routines that we like to use each day. Create a folder. Then, make sure you add it in your trusted locations and add to your briefcase (Startup Suite). Type APPLOAD at the command prompt and add all those lisp routines you like to the startup suite by selecting content, as shown in Figure 4. They will be available each time you load AutoCAD. Figure 4
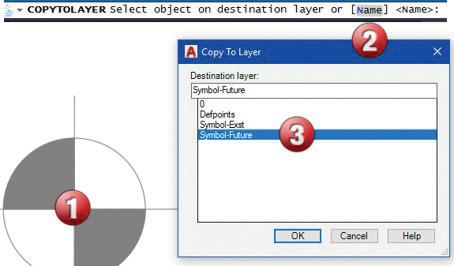
COPYTOLAYER
Allows you to make a copy of an object to another layer. Type
AutoCAD 2020 PRODUCT FOCUS COPYTOLAYER at the command prompt, select your object (1), select Name on the command line (2), select the new layer for the object to be copied to (3), and copy your object to a new location. SEARCH LAYERS Have you ever had a drawing which contained so many layers you became confused? Use the Search File in the Layer Properties Manager, as shown in Figure 6. For example, you want to see all the layers that are on the TOPO layer. Use the wildcard *TOPO* in the search.
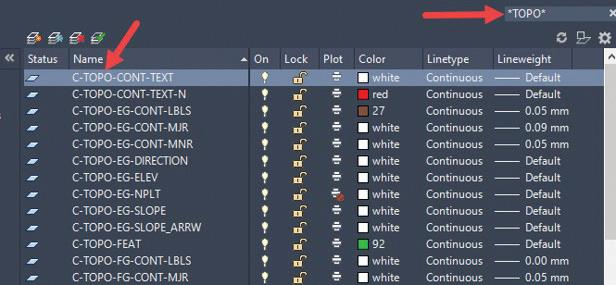
Figure 6
SAVE BLOCK AS
The ability to take an existing block and make some slight changes to accomodate your design need is awesome. Within the block editor contextual ribbon, to edit your existing block, pull down the saveas off the menu on the Open/Save panel. Now, save the block as a new name. Your existing block will remain untouched and you will now have a new block with the same properties of the existing one. Figure 7
FROM TEMPLATE

PRODUCT FOCUS AutoCAD 2020
This one is a real time saver. Have you ever wanted to just copy the title block and paper space items to a new drawing, or update an older drawing? Don’t let the term template distract you. You can select a drawing file from this method as well. Right-click on the layout tab, and choose From Template…, as shown in Figure 8. Navigate out to your .dwg or .dwt file and import the template into a new sheet (layout) in your drawing file.
TORIENT
Changing the text orientation to Most Readable or 0. Type TORIENT at the command prompt and select each of your text objects (1,2, and 3), as shown in Figure 9. Then, at the command prompt enter 0 and all of your text will line up perfectly with a 0 angle. Try this out when you are trying to orient text to an angled line or object. When you are asked for the angle, use your object snap and select the line you wish to have your text orientated to.
Figure 9

SUPERSCRIPT AND SUBSCRIPT
Did you know that you can add superscript and subscript to MTEXT objects? Type 1 x 10⁻² at the command prompt. AutoCAD can create exponential text values with MTEXT using the carat (^) character. First, create a text object using the MTEXT command, as shown in Figure 10.
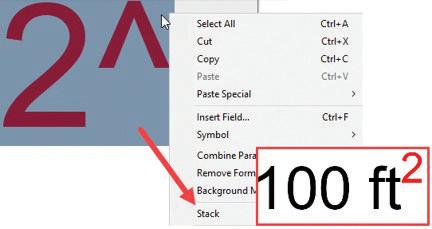
Figure 11
To have additional control over the stacking features, simply select the stacked text, and right-click again. From the shortcut menu, select Properties and the Stack Properties window will appear.
DELETE THOSE STUBBORN LAYERS
The LAYDEL command has been part of the express tools for a few releases now. What some people are not aware of, is that you can type N at the command prompt, as shown in Figure 12, and AutoCAD will bring up a dialogue box containing all the layers which are currently in your drawing.
Figure 12

CLEANSCREEN
When using, the screen displays only the menu bar, the Model & Layout tabs at the bottom of the drawing, the status bar, and the command line. Press Ctrl+0 (zero) to switch between CLEANSCREENON and CLEANSCREENOFF. A Clean Screen button is available in the lower right corner of the application status bar, as shown in Figure 13.
Figure 10
Create the carat character after the number, as shown in Figure 11 (2^).

Note: For subscript, place the carrot in front of the number, and follow the same procedure. Using the Multiline text editor, select the exponent value, and the carat (left click, drag, and highlight as shown in Figure 11). Then, right-click to view the shortcut menu and select stack.
Did you know you can drag and drop many different file types into AutoCAD? There are many drag and drop features in AutoCAD, and its verticals, that are not documented. Not only can we drag and drop drawing (.dwg) files, you can also do the same with lisp, script, images, pdf, and even text files. Just find the file location and drag into the active drawing window. For you Civil 3D users, notice how I have included a shape file in the image, shown in Figure 13. Yes, you can drag and drop those into Civil 3D as well.

SHEET SET MANAGER
How can I pass up this opportunity to talk about my favorite productivity tool in AutoCAD? The Sheet Set Manager is your ultimate document management tool. Essentially, every layout is a sheet and you can organize those sheets in a palette, called the Sheet Set Manager. You can effectively edit, organize, and plot drawings as one project. For a more detailed description of this process, please view my class from Autodesk University 2019 named: Advanced Topics Using the Sheet Set Manager. This class has 15 exercises and a full dataset for you to practice with. Don’t underestimate the power of Sheet Sets!
AutoCAD 2020 PRODUCT FOCUS THE RIBBON There is a reason why Autodesk stopped the deployment of the Classic Workspace. Yes, you can still get that classic workspace restored but…. we are not going to cover that. Autodesk is constantly evaluating AutoCAD, and how it can improve as technology changes, leading us into the issue of so many users who still create their own workspaces, using toolbars, and that classic workspace. We have become accustomed to one way of working, and that is fine. But, sometimes change is good and creates growth. Many objects in AutoCAD and Civil 3D will activate contextual ribbons that contain many features that are extremely helpful and productive. I encourage everyone to get rid of the classic workspace, and use the Ribbon and all the features that are included. The text editor contextual ribbon is shown in Figure 16.
Figure 16

CONCLUSION
Learning new software tips and tricks can be so much fun and very productive. Whether you are a rookie or a veteran, we all love our tips and tricks on how to use the software that makes our jobs easier. Listen to everyone when they tell you what they did to solve a problem using AutoCAD or Civil 3D. You might find yourself surprised at some of the cool tips and tricks people figure out while doing project work. We have only covered a handful in this article. But, always remember, nothing is better than learning something new and sharing it with people on your team. It can be a very rewarding experience.

Sam Lucido is a CAD Services Manager with Haley & Aldrich, Inc. He has over 25 years of experience involving design, user support, and customization. Sam is an AutoCAD and Civil 3D Certified Professional as well as an Autodesk Expert Elite Member. He uses his vast knowledge about AutoCAD and Civil 3D to help provide support to engineering and design teams by holding hands on workshops and online training. Sam is a top-rated Autodesk University and Midwest University Speaker. You can reach Sam at CADProTips.com or by email at lucido1373@gmail.com


