35 minute read
Revit Structure Revit Tips and Tricks for the

from AUGIWorld
by AUGI, Inc.

Revit Structure PRODUCT FOCUS by: Jason Peters Revit Tips and Tricks for the NonPower User
Power users always get the glory, and they love tips and tricks. As CAD/BIM Managers, we love trying to find ones that will blow people's minds. What we fail to remember a lot of the time is, not everyone is a power user. There are the rookies right out of school who really have only been using Revit for like 20 hours in total and have had no real-world experience. Then there are engineers and designers who use it daily. But, have no training in it and are excited to create a section. They need and want to do more without totally messing up the model. ➲
Keep in mind, if you have put off installing the newest version, there is a good chance there are already updates ready to load. So, make sure you go back and check for updates after a new install. A little trick handed down to me, is to set up a calendar reminder to check your app once a week, and if there is anything to install, do it right away. One install is a lot better then getting behind and having to do 5 or 6. Remember you cannot use Revit while it is updating.
If it is not installed on all your team’s machines, get it on their desktops, and start checking it.
These tips and tricks are for them; the “new Revit” user, the “old to design, but new to Revit” user, or those who “just want to maybe pick up one more, super sweet nugget of information” user.
Here are a few of my favorite tips and tricks I have shared with my team over the last year or so. These have saved time, blown minds, changed people’s workflows, or at the very least, kept the grumbling down to a dull mummer.
KEEP IT UP TO DATE!
In the fast-paced world of Design and Consulting, and with new software updates & versions coming out at a frantic pace, it may seem impossible to keep up to date. Not only with the current version of Revit, but also the updates to older versions you may be using at the time. Since we all know that not every client is using 2020.2.1, or by the time you read this, the next update has come out and I am now behind.
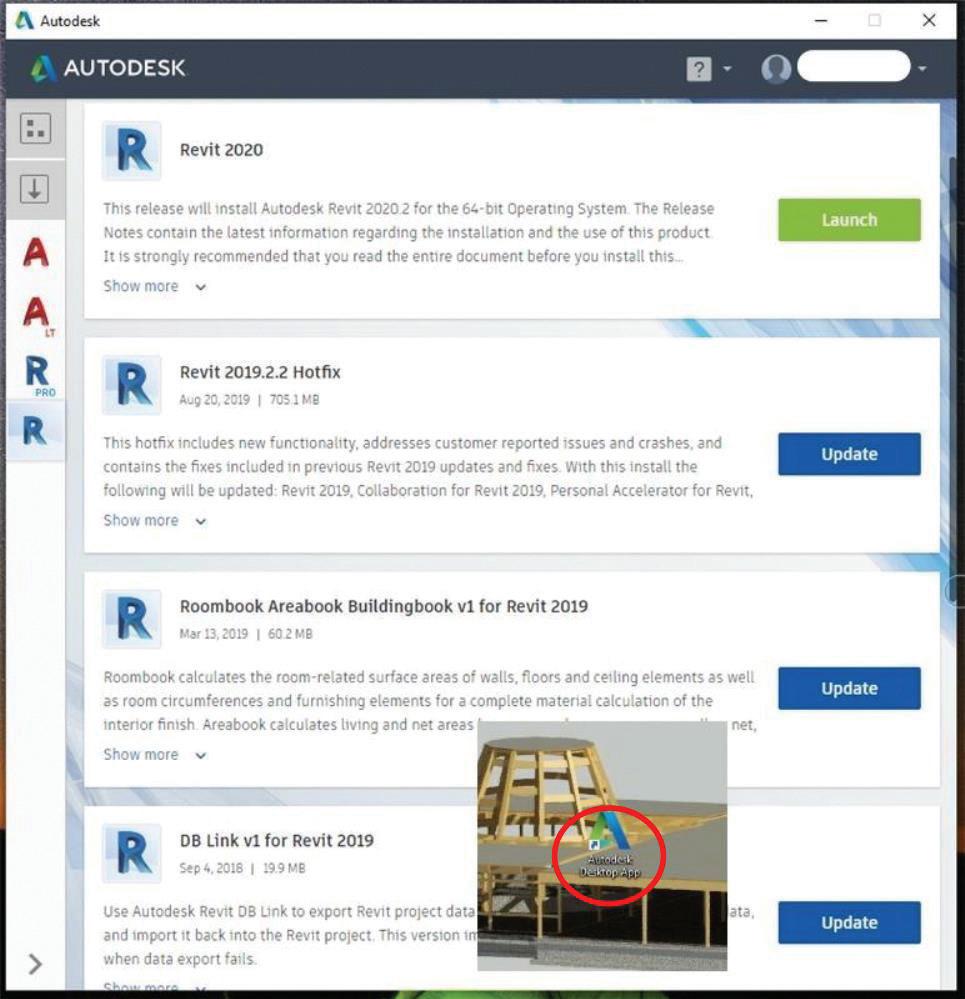
It is important though to make sure you keep yourself and your users up to date and current. Many problems part-time users have can be solved right off the bat with the simple question, "Is your Revit up to date?”. Keeping it up to date is easy with the Autodesk Desktop App. No, it is not going to update everything for you or install the latest version all by itself. It still takes a bit of effort on your part. It easily allows you to see when your Autodesk software has updates, or there are new versions waiting to install. Figure 1 – Autodesk Desktop App.
One more other little gem you may want to make sure you are doing, is to adjust your file naming to allow for the version of Revit that file was created in. As a consultant, we are at the wishes of our client, and they may be one or two versions behind. There is nothing worse, and time consuming, then having to try to open a model 3 times, in 3 versions of Revit before you get it right.
Revit Structure PRODUCT FOCUS

Figure 2 – 2D to 3D views.
I WANT TO SEE THAT IN 3D PLEASE?
Working closely with designers and engineers, it is a daily occurrence to have someone lean over and touch a part of the plan I am working on, or the section we are trying to flush out and ask, “I want to see that in 3D please”. Or from across the office you hear, “I like this section, where in the model is it?”.
First off, this will always tend to leave a nasty fingerprint on your screen. Or in the worst case, a nice pen line across your monitor. Yes, grumble about a dirty screen, the request is easily dealt with two ways; using the view cube or the selection box (BX) tool.
If you are great at naming your Sections and Elevations, using the View Cube in your 3D view is a great way to jump to the view of a specific section, elevation, or plan. First off, to go to a 3D view, right-click on the View Cube (fancy square in the top right corner, and select "Orient to View". Select the view type you want to see (FLOOR PLAN, ELEVATION, etc.). Then finally, select the view which you want to see in 3D. Bang it goes to the view you want to see. But initially it does not look 3D-ish. That is because it is in the view you have selected such as section, elevation, etc. Do not panic. Just start panning in your view. You will then start to see it in 3D. Really it is the view you selected, plus the view depth that it is set to. Want to see more depth or size? Just select the clip box and use the blue handles to move the depth. And there you go, that section or elevation is in a 3D view.
The other easy way, if you are discussing something on a plan view or in an elevation, is to select the item or items you are wanting to view in a 3D view. Then, under the Modify tab, select SELECTION BOX. Or if you are a keyboard short cut guru, type BX. There you go, a 3D view of what you need to discuss. If the view range is not what you need, select the section box, and use the blue handle to adjust the size of the view. Keep in mind, this is a cropped view of your Default #D View. To return to the overall 3D view, uncheck the “Section Box” under “Extents” on the “Properties” palette.
These two simple shortcuts to 3D views should make it so much easier when reviewing and coordinating on a project. And hopefully this will keep your screen clean and free of scratches and pen lines.
Revit Structure PRODUCT FOCUS
Revit is great for letting you create things; lots and lots of things. From reference plans, to sections, to plans, to families, to groups, and on and on. Sometimes it seems like you can spend your day just creating things and then hunting for them later.
Going into someone else’s project and not being able to find anything, or have no idea how things are organized, can make jumping into a project already underway very frustrating. Have fun trying to create the 3D view we just talked about when all the sections are named SECTION 1 through SECTION 65. Or, trying to set up plan view with a scope box, and all the names are SCOPE BOX 1 to SCOPE BOX 12. I think you see where I am going with this.
There are not many times in Revit that when you create something, it does not give you the chance to name it. Or, after you have created it, it allows you to change the name to something else.
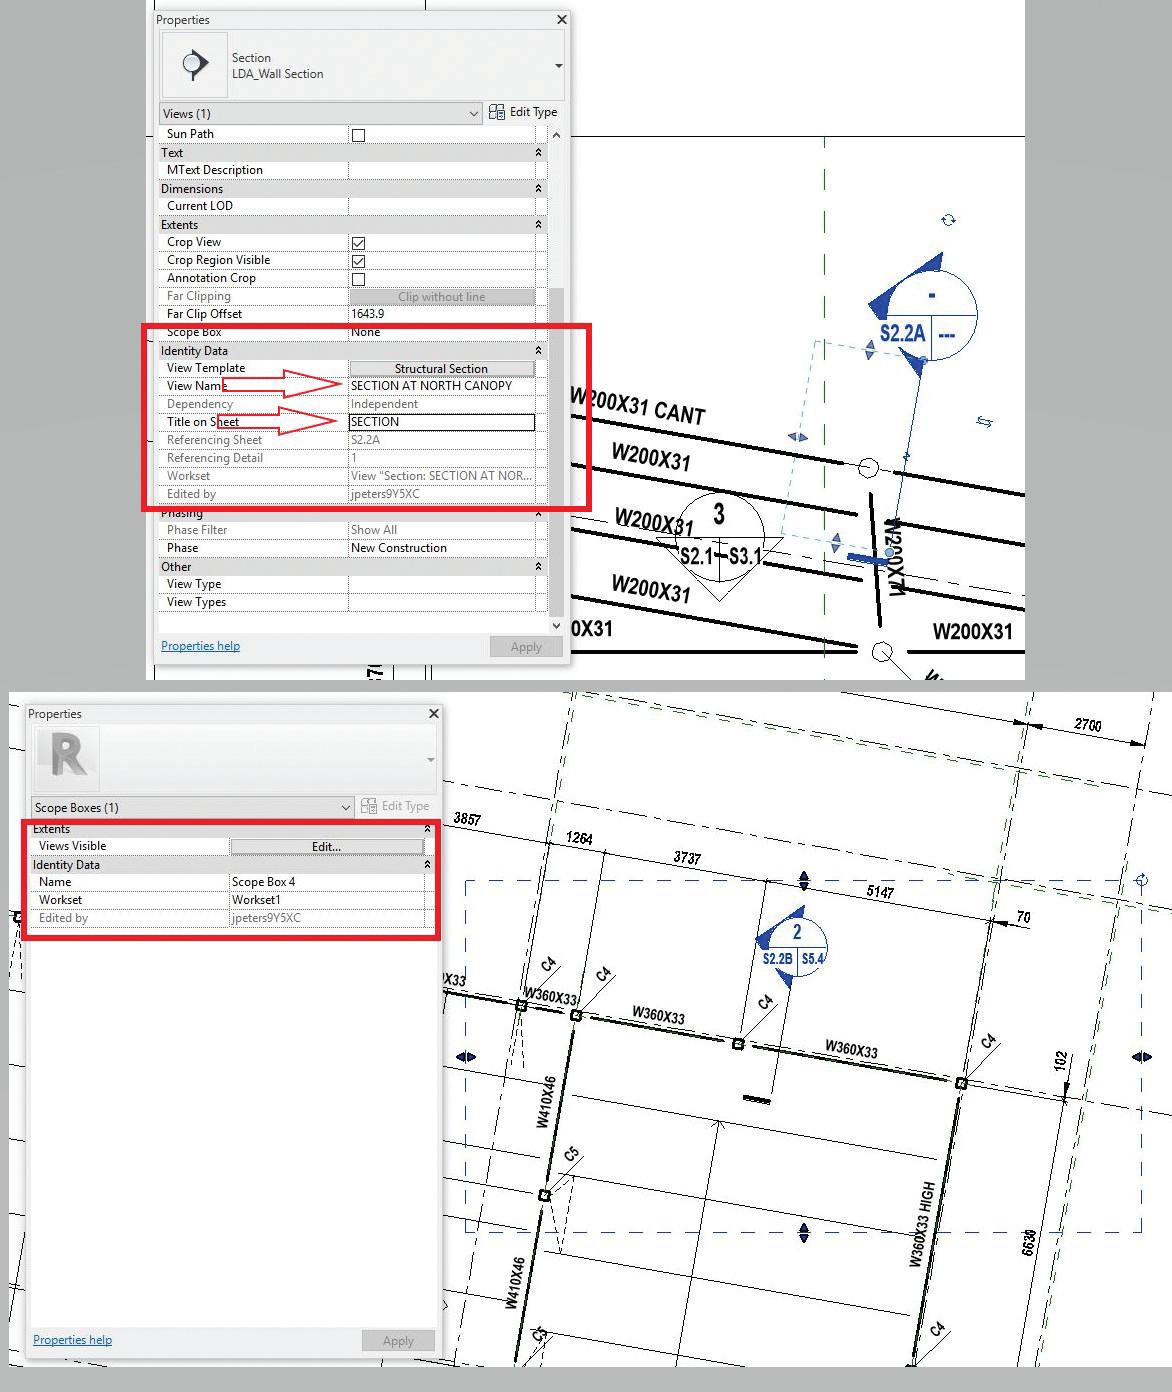
So maybe instead of SECTION 1, it can be SECTION 10/S2.2 AT CANOPY OVERHANG. Or, instead of SCOPE BOX 1, it can be PLAN AT CANOPY. One of the great things about Revit is if you need to, or want to change it down the road, you always can. Quickly changing view titles associated with the section or plan, as well as keeping the plan or section view name descriptive and allowing you to change the “Title on Sheet” to something more standard like just “SECTION”.
So, just do it. Take the time early in the project to name a view, or section, or scope box, or reference plane. Knowing that with proper naming and organization now, you or another team member will not have trouble finding or referencing unnamed views and items later in the project. Remember, the more care and coordination you do upfront in Revit, the easier the project becomes as it progresses.
WHAT HAPPENED TO MY GRID LINES?
Ever extend a grid line or an elevation line only to notice later it no longer shows up on a plan or a section? Yes, it is an easy thing to fix once you figure out which elevation or which plan to adjust them on. But why does it happen?
When extending a grid line or a level line in plan, elevation, section, etc., always check to see if it is in 2D extents or 3D extents. 2D meaning, what you do to the extents of the Grid/Level Line only happens in that 2D view. It does not affect any other view. 3D meaning, what you do to that Grid/Level Line will affect all other views and planes.
For example, if you are in a section and you select a Grid Line that is in 3D extents, and you drag it up above your main floor framing plan, that Grid Line will no longer show up on any plans below its lowest point. Such as basement or foundation plans.
Revit Structure PRODUCT FOCUS Once you get your levels and grids set at the beginning of the project, it is highly recommended that you pin them and leave them alone. If you must adjust them in a view down the road, make sure it is in 2D extents, or you will have to go back and re-adjust it. Just follow these quick guidelines and you should not have to worry about it again.

Figure 4 – 2D vs 3D extents.
WHY CAN I NOT MOVE IT JUST 4 INCHES?
If you work solely in metric, you can just skip over this one. Here in Canada, like other parts of the world, we work in both the metric and imperial system, meaning we switch back and forth between saying things such as, “this block wall is 190 thick” in one project, to saying “the same block wall is 8-inches” in another. It sounds confusing, but you get used to it. That being said, when working in an imperial project, if you want to move your beam over 4-inches, you cannot just type in 4, hit enter, and boom it is moved 4-inches. It moves it 4-feet. This becomes very frustrating for new users, users who do not use Revit a lot, or those who are used to working on a metric project. With imperial, you will need to put in the foot (‘) and inches (“) symbol. So, if you want to move an element 1’-6”. You have to enter it as 1'-6", 1'6", or 18". If you can do the math quick, then 1.5.
These are not the only options, there are a couple ways around this. The simplest is just get used to having to input the foot (‘) symbol all the time. Or, you start to use the space bar more in place of the symbols. Meaning for 1’-7 3/16” you would type 1<space>7<space>3/16 enter. Or if you are good with fractions on the fly, it would be 1<space>7.1875.
PRODUCT FOCUS Revit Structure
Another way would be to change your project units to fractional inches. This has drawbacks as well, such as changing all your units, including dimensions and temporary dimensions, to fractional inches. This makes it a bit easier to work with if you don't mind converting every distance you want to move something by, to inches. The downside is you will have to change the properties of all your dimensions to show them in feet and inches, not project units. This also means now your temporary dimensions will be in fractional inches.
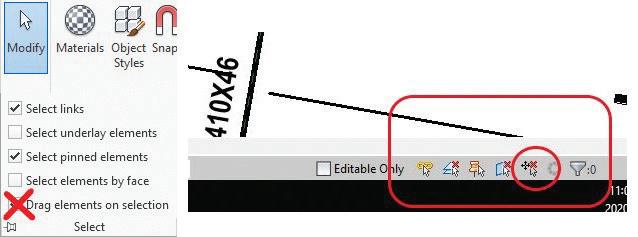
I personally would recommend getting all your users used to using the space bar option. You do not want to be changing many things in your project template when you switch from metric to imperial. You can find this in the ribbon under the Modify tab, which is always there, and unselect “Drag elements on selection”. Or, you can go down to the lower right corner and make sure “Drag elements on selection” is red X’d out. You can also change the other selection options in those two spots. Feel free to try them all out and set it up how you like.
I WANTED ALL THE COLUMNS EXCEPT THAT ONE?
Crossing windows are a great thing for selecting multiple items at once, so is holding down the control button to select (left mouse button) items one after another. But, imagine you have selected all your columns & a couple of beams, and all you wanted was one column type. Great. No worries. I can unselect the beams by using the filter button and unselecting structural framing. Awesome. All we have left is Columns. Wait! I only wanted 9 of the columns, not the 12 that are selected. Now what? Or as we all do, we zoned out while selecting multiple items and pick one or two or nine of the wrong things. No problem. Do not hit the magic ESC button and start again. Just use the SHIFT button as the opposite of the CTRL button. Hold SHIFT, then start selecting all the items you want unselected. What is so great about it is, if you go too far and unselect something (admit it, it happens), just go back to CTRL and start selecting.
I am just going to add this last tip here on selection. We have all been interrupted for the urgent call of “I want to see this in 3D” and have made all our selections and you quickly just hit ESC. Or, click in the white space and run for help. Maybe you have just moved a bunch of beams/columns, etc., and you moved them the wrong amount and really wished there was a way to reselect everything again. Well there is. You can rightclick, select “select previous”, or you can use the keyboard short cut of CTRL “right arrow”.
I DID NOT MOVE THAT?
Yes, yes you did! You did not mean to or want to. But yes, you moved that. Other than pinning it, which is the obvious solution, you can also make sure you do not move it again mistakenly by turning off your “Drag elements on selection”. What this means is, once it is turned off, you will physically have to select an item before you can move it. Figure 5 – Selection Options.
These are just a few of the many tips and tricks that are out there. The more you can share with your team, the easier Revit will be for them, and the more productive they will be. Do not settle with just using the help features in Revit. There are many great resources out there. AUGI.com has a great forum and Autodesk has the Autodesk Knowledge Network, (knowledge.autodesk.com). Both are full of great advice and places to ask your questions. Or, do the Google thing. You will be surprised at what is out there, and what Revit can do. Listen to your users. They will surprise you and have a bunch of little tips and tricks they know that will blow your mind.
Feel free to contact me with your mind-blowing tips and tricks or questions. I would like to hear from you. Together we can make Revit easier for all of us.
Jason is the BIM Manager at Lavergne Draward & Associates. A Structural Consulting Firm in Winnipeg, Manitoba Canada. Jason has over 20 years of experience in Structural Consulting using AutoCAD and Revit as a drafter, modeler, coordinator, team leader, and CAD Manager. In his current role as BIM Manager, Jason is responsible for implementing and maintaining BIM, and modeling standards. As well as providing technical support and training for both AutoCAD and Revit users, and continues to enjoy the challenges of daily production work. He can be reached for comments or questions at jpwpgcad@gmail.com on Twitter @JP_WPGCADGUY or LinkedIn.
Connect with AUGI Members Increase your revenue by advertising with AUGI and reaching its 400,000 Members.

AUGIWorld Print AUGI HotNews Digital

AUGI.com Website Thousands of visits per month Forum Advertising Active membership participation • Advertising Email Blasts • Targeted Mailings • Industry Leading Google Results Site

Visit www.AUGI.com/advertise
Revit MEP PRODUCT FOCUS By: Travis Head Revit Build Machine (Part 1)

In my capacity as both the IT Manager for my company, as well as a long-time Revit user myself, I have had the normal struggles with management over the years with the need to provide machines for our Revit users that are both sufficiently capable, as well as sufficiently inexpensive. For years, we had to use machines for our primary Revit users that were over 5 years old, and weren’t even the speediest models to begin with, because management didn’t want to spend the money upgrading the machines. Over the years though, they’ve come to accept that it is necessary to keep their Revit users productive, rather than have them sitting there waiting on the spinning icon to go away. ➲
But, there is still the argument regarding how much money is too much to spend on keeping the Revit machines as compatible as possible. Is $4000 too much to spend on a machine? In our owner’s minds, yes. Is $1000 more reasonable? Sure, but are you going to get a machine for that much that will keep your users as productive as possible? In fact, yes you can! We went through this exercise several years ago and discovered there actually was a way to get a machine that was as capable as the $4000 one, but for only around $1000 for the hardware. How did we do it? We built them ourselves.
The $4000 machines we were looking at were liquid-cooled, overclocked Intel processor machines that were purpose-built by a computer manufacturer specifically for running Revit. When management immediately rejected that idea as too costly, we started looking for alternatives. Since I had built my own computers before using stock parts from local retailers, I started looking at what it would cost to build a liquid-cooled, overclocked Intel processor machine myself that met our needs. Using parts I could buy from a computer retailer like Newegg or from Amazon, what I discovered was that I could build that same machine, buying all the components from local or online retailers, for around $1000, not including software. In the retail world, where we’ll be getting our parts, most of the important components we use are those typically used in high-end gaming systems. That’s because, just like Revit, high-end gamers want the most speed they can get out of their machines. However, we’re going to pair some of that down because we’re not trying to impress the gaming community with the coolness of our build, and we just don’t need that much video card or power supply. And let’s face it, we’re not trying to shoot the other guy before he shoots us.
Here are the different components necessary for the build, and my reasons for choosing them:
PROCESSOR
Revit is still almost completely a single core, single thread application. So, the massive number of processor cores on the typical high-end processors really do nothing for Revit. The most important characteristic of your processor, where Revit is concerned, is the clock speed. The more clock speed it can give you, the better. For the highest clock speed, you need to go the route of Intel’s Core I line of processors, specifically the Core I7’s or the Core I9’s. And, to increase that clock speed as high as possible, we decided that an overclockable processor was even better. On our current builds, we use the Intel i7-9700k processor.
I’ve found that the I9’s tend to be less about increasing the clock speed than they are about increasing the number of processor cores, and other things that do not benefit Revit. For example, if you look at the specs for an I7-9700k, and the specs for an I9- 9900k, the processor clock speeds are almost identical, but the cost is around $100 higher for the I9, and you’re paying extra for features that won’t benefit Revit at all.
To take advantage of the overclocking capability of your processor, you have to choose a motherboard that is made for overclocking the processor. That means you have to look at the “chipset” (or Northbridge), and choose one that starts with the letter Z. The one for the core I7-9700k is the Intel Z390 chipset.
Most motherboards these days come with either 2 memory sockets or 4. In my experience, go with a motherboard that has 4 memory sockets. That will allow you to add the amount of memory you need now with two memory sticks (dual channel), and still leave two sockets empty for the future if you ever need to add more.
If you can add a few more dollars to your build budget, there is a type of solid state hard drive called an M.2 PCIe SSD that is much faster than a standard SATA SSD. But the motherboard has to have a socket specifically for that. But in my experience, most boards that have a Z chipset will usually have at least one of these. It is worth the extra money for the drive if you can swing it.
Whichever motherboard you decide to use, be sure to get one that has at least three fan headers. If you can find a motherboard that has two CPU fan headers, that will be even better (for liquid cooling, more on that later).
MEMORY
Next, to the Processor. The memory is the second most important component where Revit is concerned. Not only is Revit a processor intensive application, it’s also a memory hog. And if your machine doesn’t have enough memory for the complexity and size of the models you work on, it will slow your machine to a crawl, or worse. I recommend that any Revit machine have a minimum of 16GB, but we prefer 32GB. And, buy the fastest speed of memory you can afford, and that the motherboard will support.
I have found it prudent to provide memory in two equal size memory sticks (2 x 8GB for 16GB total, or 2 x 16GB for 32GB total) to take advantage of the better performance from dual channel configuration. And as I mentioned in the motherboard section, if you have 4 total memory slots that will leave two of the slots open for future needs.
DISK DRIVE
The type and size of your disk drive can have a huge effect on the overall speed and capability of your machine. Do yourself a huge favor and spend the extra money for an SSD (Solid State Drive) instead of the older and cheaper magnetic disk drive (HDD). The speed difference between a solid state drive and a traditional magnetic hard disk drive is huge. No matter how much you spend on the fastest processor and memory you can buy, it will mean nothing if you put a magnetic hard disk drive in it.
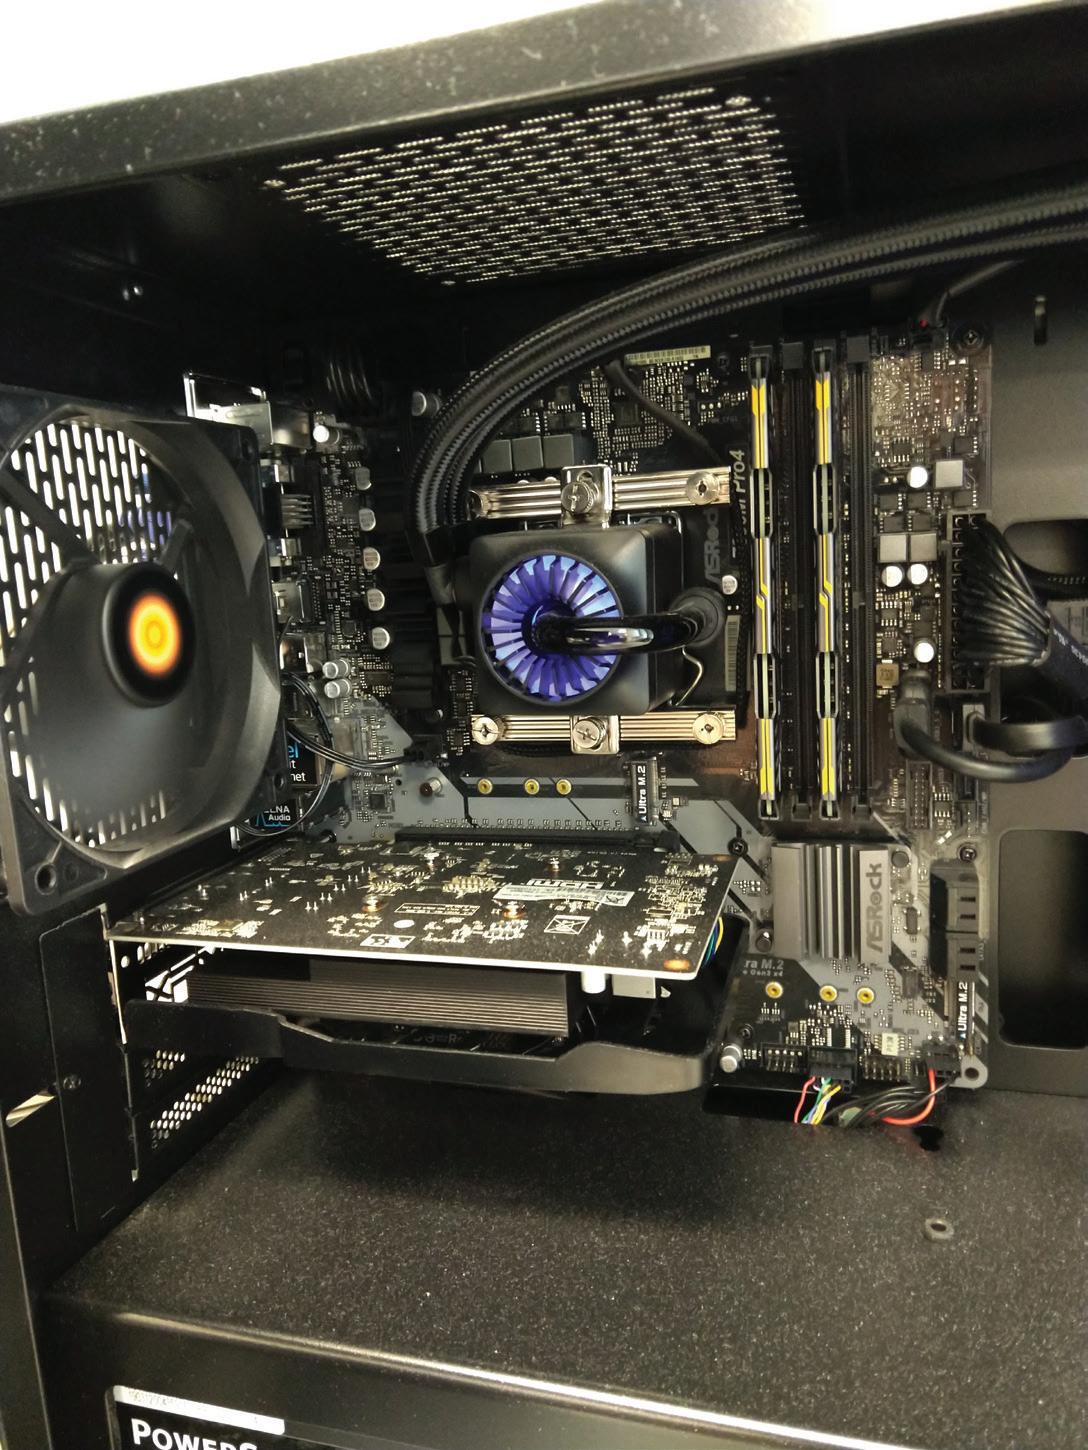
Revit MEP PRODUCT FOCUS As discussed in motherboards above, you can get an even greater speed increase, for anywhere between $50 and $100 dollars more, by going with a PCIe M.2 SSD. These are drives that come in the form of a circuit board that is long and slim, with pins on one end that slip into the M.2 socket on the motherboard. However, M.2 drives come both in the faster PCIe standard, and also in the slower SATA standard. So, if you want the added speed increase, make sure you buy a PCIe M.2, not a SATA M.2. You’ll see an example of an M.2 installed in the build pictures I’ve included. Regarding the capacity of your SSD, I started out with these builds putting 240GB or 256GB drives in, thinking they would be enough. However, over the years, I have now had to replace all of those drives with larger drives. So, I’m now putting 480GB or 500GB drives in my machines.
COOLER
For all of our builds, I chose to go the route of liquid cooling. I’m talking about All-In-One liquid coolers (AIO for short). They all come pre-assembled with a water pump that is already attached to a radiator with two hoses and has the liquid already in it. You don’t have to attach the hoses, nor do you ever have to add liquid. And, the liquid never spills or leaks out. There are fans that are attached to the radiator that bring cool air from outside the case through the radiator carrying the heat from the processor away.
They come in different capacities that are based on how big a radiator you want. For instance, typical sizes are 120, 240, and 360. These numbers refer to the nominal length of the radiator, based on how many 120mm diameter fans it’s designed for. The 120 refers to one 120mm fan, the 240 refers to two 120 fans side-byside, and the 360 refers to three 120 fans side-by-side. I’ve had heat issues with 120 radiators. 360s are overkill for what we need and would take a monster size case to fit it. So I’ve stayed with the more common 240 size.
VIDEO CARD
Revit is far more dependent on the processor than the video card, but it can make use of a quality video card for things like rendering. We don’t use any of that at our firm. Being a MEP engineer, we go for lower-end video cards than say, an architectural firm might want. Now, every motherboard out there in the consumer world has on-board video with output ports built in. Those will do fine for additional monitors to put things like Excel & Outlook, or web browser windows. But, for your main Revit model screen, I recommend you get a discreet (separate) video card.
We’ve had good luck with what we need to do with inexpensive (around $120) 2GB cards with either NVIDIA GeForce or AMD Radeon chips. If you do a lot of rendering, feel free to spend more for something much higher, but you’ll have to be the judge of that.
PRODUCT FOCUS Revit MEP
Cases come in all kinds of sizes, colors, materials, and configurations. You can decide for yourself on color & style. Configuration is what I’m going to stress here. And that is mostly to do with the liquid cooler radiator. As I stated in that section, I have been using liquid coolers with 240 radiators. The radiator has to mount to the case at a location on the outside wall of the case that is made for fans/radiators so it can pull cool air in from outside the case. You have to find a case that has a configuration that includes mounting spots for a 240 radiator (or 2-120mm fans mounted side-by-side). Most often, that is at the front of the case or at the top. I prefer the front. I’ve tried cases where the radiator mount is at the top, but I’ve run into issues with the radiator and fans in that location interfering with the memory sticks.
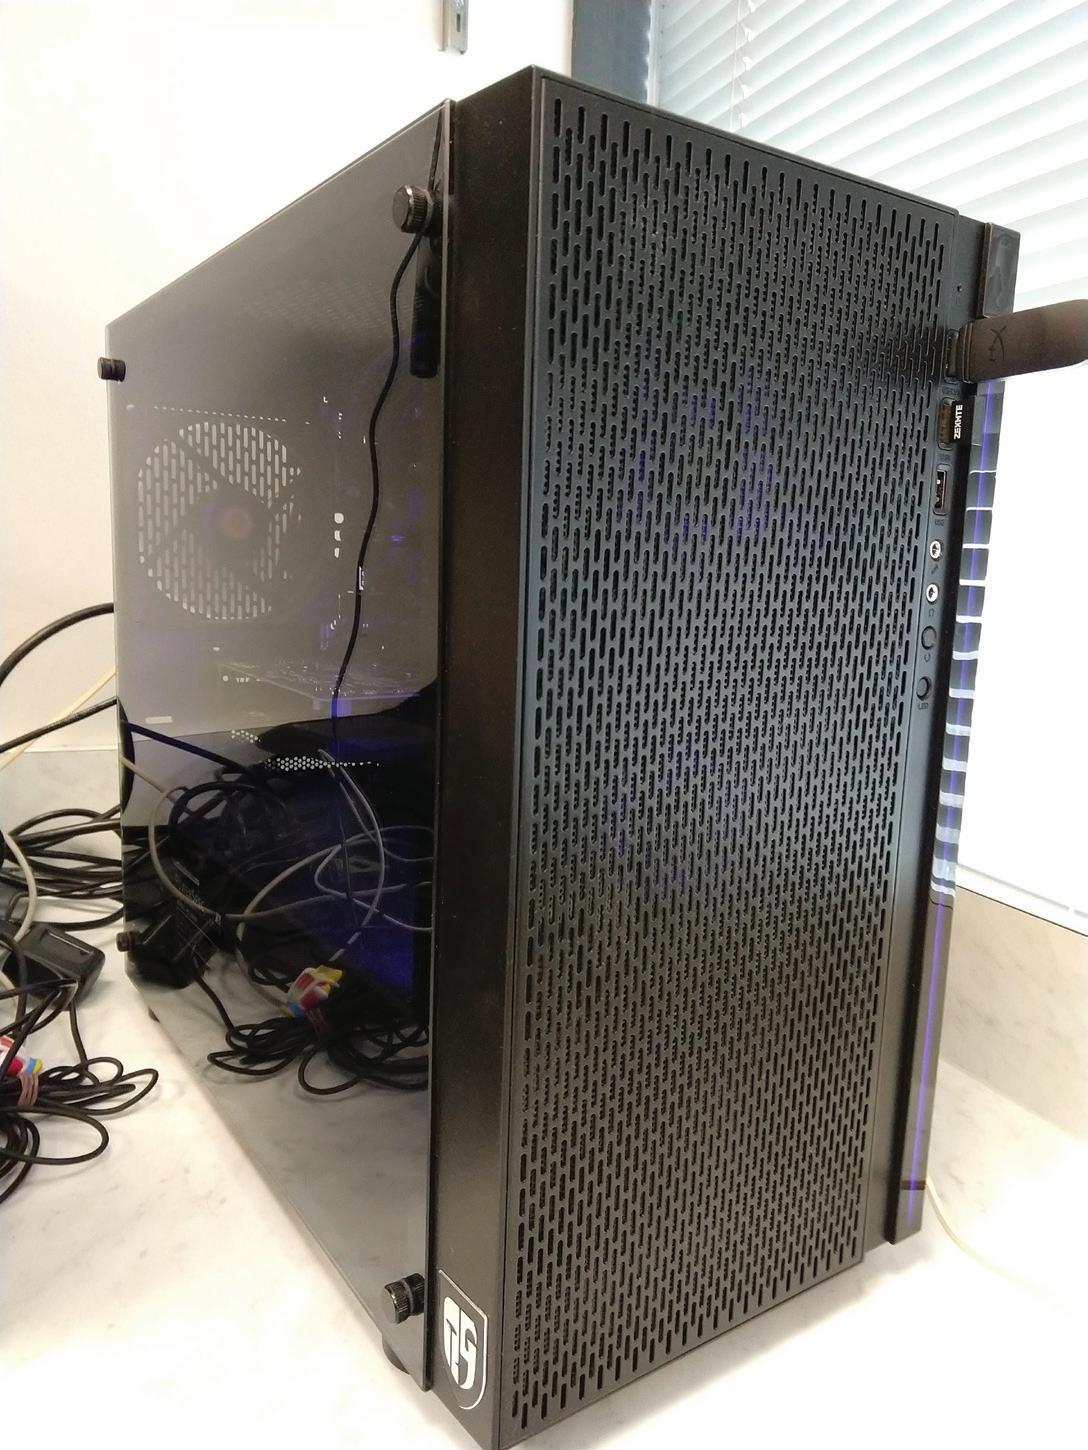
And, with front mounting radiator, you’ll probably want to avoid cases that have an external drive bay for an optical drive. Even if the case has front mounts that would seem to fit the 240 radiator, the drive bay mount on the inside usually interferes with the radiator. The photos I’ve included are from an early case I used that did have external drive bays, but happened to be big enough where this wasn’t an issue.


Revit MEP PRODUCT FOCUS POWER SUPPLY Notice I put the power supply at the end. About the only thing we need to discuss with these is the wattage. I’ve found that 500 watts is enough, and I usually get something that’s 500 watts to 650 watts depending on what’s the least cost that day. The only thing you might alter for your build that may require higher watt- ages, is if you need a higher-end video card. These are the various components that I’ve been using in these custombuilt Revit workstations for the past 4 years. And so far, they’ve worked out great. Here are some photos of a couple of the machines I’ve built.
Even with hardware specs and models changing over the years, I can still build them for between $1000 and $1100. That doesn’t count software costs. Obviously, with this being a build from scratch, it will not have Windows on it like a pre-built machine from a computer manufacturer. So, you will have to purchase Win- dows and install it yourself.
In closing, if you want a good machine to run Revit without spending your entire IT budget, and you’re willing to build it yourself, you can get the same performance without the high cost. And if you’ve never built a computer before, but you’d like to give it a shot, in Part 2 of this article, I’ll go into much more depth for those who may not be comfortable yet going inside the guts of their computer case.
Travis L. Head IT & CAD Manager Reed, Wells, Benson & Company MEP Consulting Engineers

For the past 11-1/2 years I have been the entire IT & Network Administration Department, and CAD Department Manager, for a 55 person MEP Engineering firm in Dallas, Texas. Prior to this position, I worked as the IT Manager, the Autodesk Software Coordinator, and an Electrical Designer for another small MEP firm, also in Dallas. I’ve been responsible for the initial Revit implementation, installation, setup, and training at both companies. I’ve been building Windows PC’s for over 20 years and have been building overclocked & water-cooled workstations for Revit for the past 5 years.
COLUMN Inside Track
Welcome to AUGIWorld Inside Track! Check out the latest opportunities to advance your skills, processes, and workflows in your firm, with the most current AEC-related software and hardware updates available.
CONSTRUCTIONLINES https://apps.autodesk.com/ACD/en/Detail/Index?id= 6678732553206347993&appLang=en&os=Win32_64 Autodesk AutoCAD Version: 2020, 2019, 2018, 2017 Autodesk AutoCAD Mechanical Version: 2020, 2019, 2018, 2017
Creates a construction line of infinite length. A “block” and “xref ” are selectable too. You can set the layer freely. There are 23 commands. • Horizontal construction line (CLH) • Vertical construction line (CLV) • Cross construction line (CLC) • Select 2points construction line (CLA) • Construction line parallel to entity (CLEP) • Construction line perpendicular to entity (CLEV) • Construction line parallel to 2points (CL2P) • Construction line perpendicular to 2points (CL2V) • Two divided distance construction line (CL2D) • Equally divided distance construction line (CLND) • Two divided angle construction line (CL2A) • Equally divided angle construction line (CLNA) • Offset construction line (CLOF) • Offset distance collective input. • Sample: 50,100,150,200 50,200*5,100 ••• • Rectangle construction line (CLRC) • Intersection of entity (CLIP) • Divided calculation Lite (CLDCL) • Circle construction line (CLCI) • Concentric circle construction line (CLCC) • Tangent construction line (CLTP) • Touching a circle construction line (CL2T) • Erase all construction lines (CLE) • Select and erase construction lines (CLES) • Construction lines layer setting (CLS)
TAG LEGEND https://apps.autodesk.com/RVT/en/Detail/Index?id =2597869698847820293&appLang=en&os=Win64 Autodesk Revit Version: 2020, 2019, 2018, 2017 This application allows Autodesk® Revit® users to place a tag for Legend Component and keep the tag updated automatically. By using this app, Revit users can also input door & window information to door & window type parameter automatically such as: number of instances, level, sill height, room name. Trial Description: The 30 days trial with full functions will be active immediately after installing the tool.
AUGIWorld brings you recent developments in Autodesk and related software items

FLIPPER https://apps.autodesk.com/RVT/en/Detail/Index?id =4825202806152148653&appLang=en&os=Win64 Autodesk Revit Version: 2020, 2019, 2018, 2017 While placing the host-based elements from the Ceiling Plan or Floor Plan, sometimes our components are not in the same direction as we expect. We end up in a situation, where we manually flip the work planes of all elements. This version tool allows the user to select multiple elements and flip the work plane all together. By default, if we wish to rotate multiple selected elements, we use SPACE key which rotates elements by 90 degrees. Using the rotate feature of this app, the angle for bulk rotate can be specified. If you have some news to share with us for future issues, please let us know. Likewise, if you are a user of a featured product or news item and would like to write a review, we want to know. brian.andresen@augi.com
The Premier Global BIM Events, for user by users
ASIA
April 2-4, 2020 Marina Bay Sands, Singapore
ANZ
June 18-20, 2020 Sydney, Australia
EUROPE
October 8-10, 2020 Valencia, Spain
NORTH AMERICA
August 11-15, 2020 San Diego, California
Register Now!

www.dbeinstitute.org
Tech Manager COLUMN
Running on Empty - Tips for refilling Your Tech Tank

Last month, I asked, ”What Have I Done for You Lately?”. I talked about what you have been doing for others and your company. I encouraged you to write down everything that transpires, because you do so much that it might be easy for you (and others) to forget. I suggested keeping a journal and tracking accomplishments (not to brag), but to remind others of your value. It also helps you remember key dates and decisions. Then you can answer those that tend to forget how often you help others. Now, I move on to what you can, and should, do for yourself. Don’t forget to provide what you might need to reinvigorate your efforts, sharpen your focus, or bring clarity to your visions of the future. Let’s take a quick stab at what you might want to do for yourself.
You have a personal Tech Tank that gets filled and then gets used, and used, and used. You need to refill it so that you are not running on empty. Just like the gas tank in your car, sometimes we have a full tank and can make some great progress. Other times it seems like we are running on fumes. Personal disclosure: I run way past
empty all the time in my car. The estimated range for miles I can drive my car, tells me, has gone to zero many times and I just keep driving. I take it as a challenge to see how far past “empty” I can drive. This may leave me stranded on the side of the road if I guess wrong. May it never be like that with my tech skills, knowledge, and desire. I want a full tank. I do not want to run on empty. I do not want to be stranded.
We all go through flat periods in our work life. Things just don’t ramp up the way we expect. Cycles are expected. But snapping out of them should be our focus. Our “Tech” accounts, on many levels, need to be refilled and topped off so that you can draw on those resources when we need to fuel the future. Your tank gets drained as people need technology support and efforts from you. You must fill it from time to time to ensure it is there when you need it most.
Tech Manager COLUMN and dig into the tools that we use every day and review the features list months after an upgrade to see what we may be missing out on. Get Yourself Something
Get a new phone. Add a second or third monitor. Upgrade your laptop. Buy that software utility to address that lingering little annoyance that you keep putting off. We usually are good at budgeting and buying technology for the firm and others, but we may seldom buy something just for ourselves. Don’t forget to treat yourself. Seeing what new tech can do for you personally can open your eyes to things that might work for others.
Delegate More
TIPS FOR REFILLING YOUR TECH BANK ACCOUNT
Research Some Tech
Tech changes so quickly that we all need to stay up with the latest trends. We have to do it with purpose. We have to follow up on innovative ideas no matter where they come from. I have followed up on leads from junk emails (no – I did not click the links, I searched apart from the email). I chase down ideas that are mentioned in meetings. I make notes about something that was said in passing on a webinar. I dig into items that family members mention at holidays or birthday parties. I investigate things I hear on the radio, TV, or while surfing the web. I do not spend hours doing it. I may see that some ideas are out of our league, rather than quickly move on. Others may take more searching. But I do the research, the reading, and the pondering. As I do this, the needle moves a little from E to F.
Buy Some Tech
Moving from research to purchases for the entire firm is a first step. When you look at technology and find something that might benefit the company, you need to get your hands on it. Buying technology tools needs to happen on a small scale at first. It might be a trial version or you may have to buy it. Your budget should have some funds devoted to R&D (if you followed my advice from the budgeting articles in the past). Now is the time to spend that funding. Get copies for yourself and if it looks promising, get copies for others and get their input.
Play with Tech
Whether you get it free, buy it, or already have it, you need to actually play with tech to get a good feel on if it will work for your environment. As you know, not every tool does what it claims to do. Not every tech supplies what you might need. There are tons of features and many processes that might be improved, but unless it scratches where you itch, it may not be a good fit. Some of the best advances I have made is with software and hardware we already own that is not used to its fullest. I dig Need some free time for the above items? Then ask others to help by taking on some of your load. Even if they do not work for you, there are others in your firm that would love to help you get your job done. Define some things that can be delegated to others. There are plenty of people that can do an excellent job of making progress on your initiatives. Allow them to do some research. Ask them to test out new tools. Get them to try another process that you think might be a better way. Let them have input.
Do the Obvious
Get some training. Video training, online webinars (you must get as many email invites as I do). Attend an event in your local area. Full day or half day, these can be a gold mine when you need to see what is happening in technology. Join a User Group, listen to a peer give a talk. Talk to others at the events and compare notes. Take a mental health day, just go to the park with the kids.
Take some time to rejuvenate your skills, perspectives and focus, as well as, time to play with the tech tools that may soon define the future of your firm. Move your needle fully to “Full” so that when you are called on to make tech progress, you have what it takes to get to your destination.
Mark Kiker has more than 25 years of hands-on experience with technology. He is fully versed in every area of management from deployment planning, installation, and configuration to training and strategic planning. As an internationally known speaker and writer, he is a returning speaker at Autodesk University since 1996. Mark is currently serving as Director of IT for SIATech, a non-profit public charter high school focused on dropout recovery. He maintains two blog sites, www.caddmanager.com and www.bimmanager.com.
AUGI Members Reach Higher with Expanded Benefits AUGI is introducing three new Membership levels that will bring you more benefits than ever before. Each level will bring you more content and expertise to share with fellow members, plus provide an expanded, more interactive website, publication access, and much more! MEMBER MEMBER MEMBER

MEMBER MEMBER MEMBER
Basic members have access to: • Forums • HotNews (last 12 months) • AUGIWorld (last 12 months) Premier members have access to: • Forums • HotNews (last 24 months) • AUGIWorld (last 24 months)
DUES: Free
MEMBER
DUES: $25
MEMBER
Professional members have access to: • Forums • HotNews (full access) • AUGIWorld (full access and in print) • ADN 2013 Standard Membership Offer
DUES: $100
Are you ready to upgrade yourself and your membership? Access additional benefits and upgrade at www.augi.com
Accelerate your career
Learn new skills with hundreds of free online resources

https://www.autodesk.com/autodeskuniversity/?mktvar002=1044717&dspl=1 autodeskuniversity.com


