16 minute read
Civil 3D Better Management of Civil 3D with Profiles

from AUGIWorld
by AUGI, Inc.

Better Management of Civil 3D with Profiles
Profiles in AutoCAD and Civil 3D are a great way to standardize settings for consistency across your organization. In this article, we explain the benefits of profiles and how to share your settings.
Have you ever noticed that your prints do not necessarily match other people’s prints? Or maybe your Civil 3D interface does not look like a coworkers’ Civil 3D? It is possible that your profiles are different. Now when we think of Civil 3D, the term “profile” usually means Plan & Profile, or the side view of a road. In this case, profiles are .arg files that control common paths and the settings that Civil 3D uses to function. Where should the software look for fonts? Where should it look for print settings? What drafting settings should be adjusted from default? This all lives in the profile. It is the main file that holds all your Civil 3D Option settings.
PROFILE PURPOSE AND USAGE
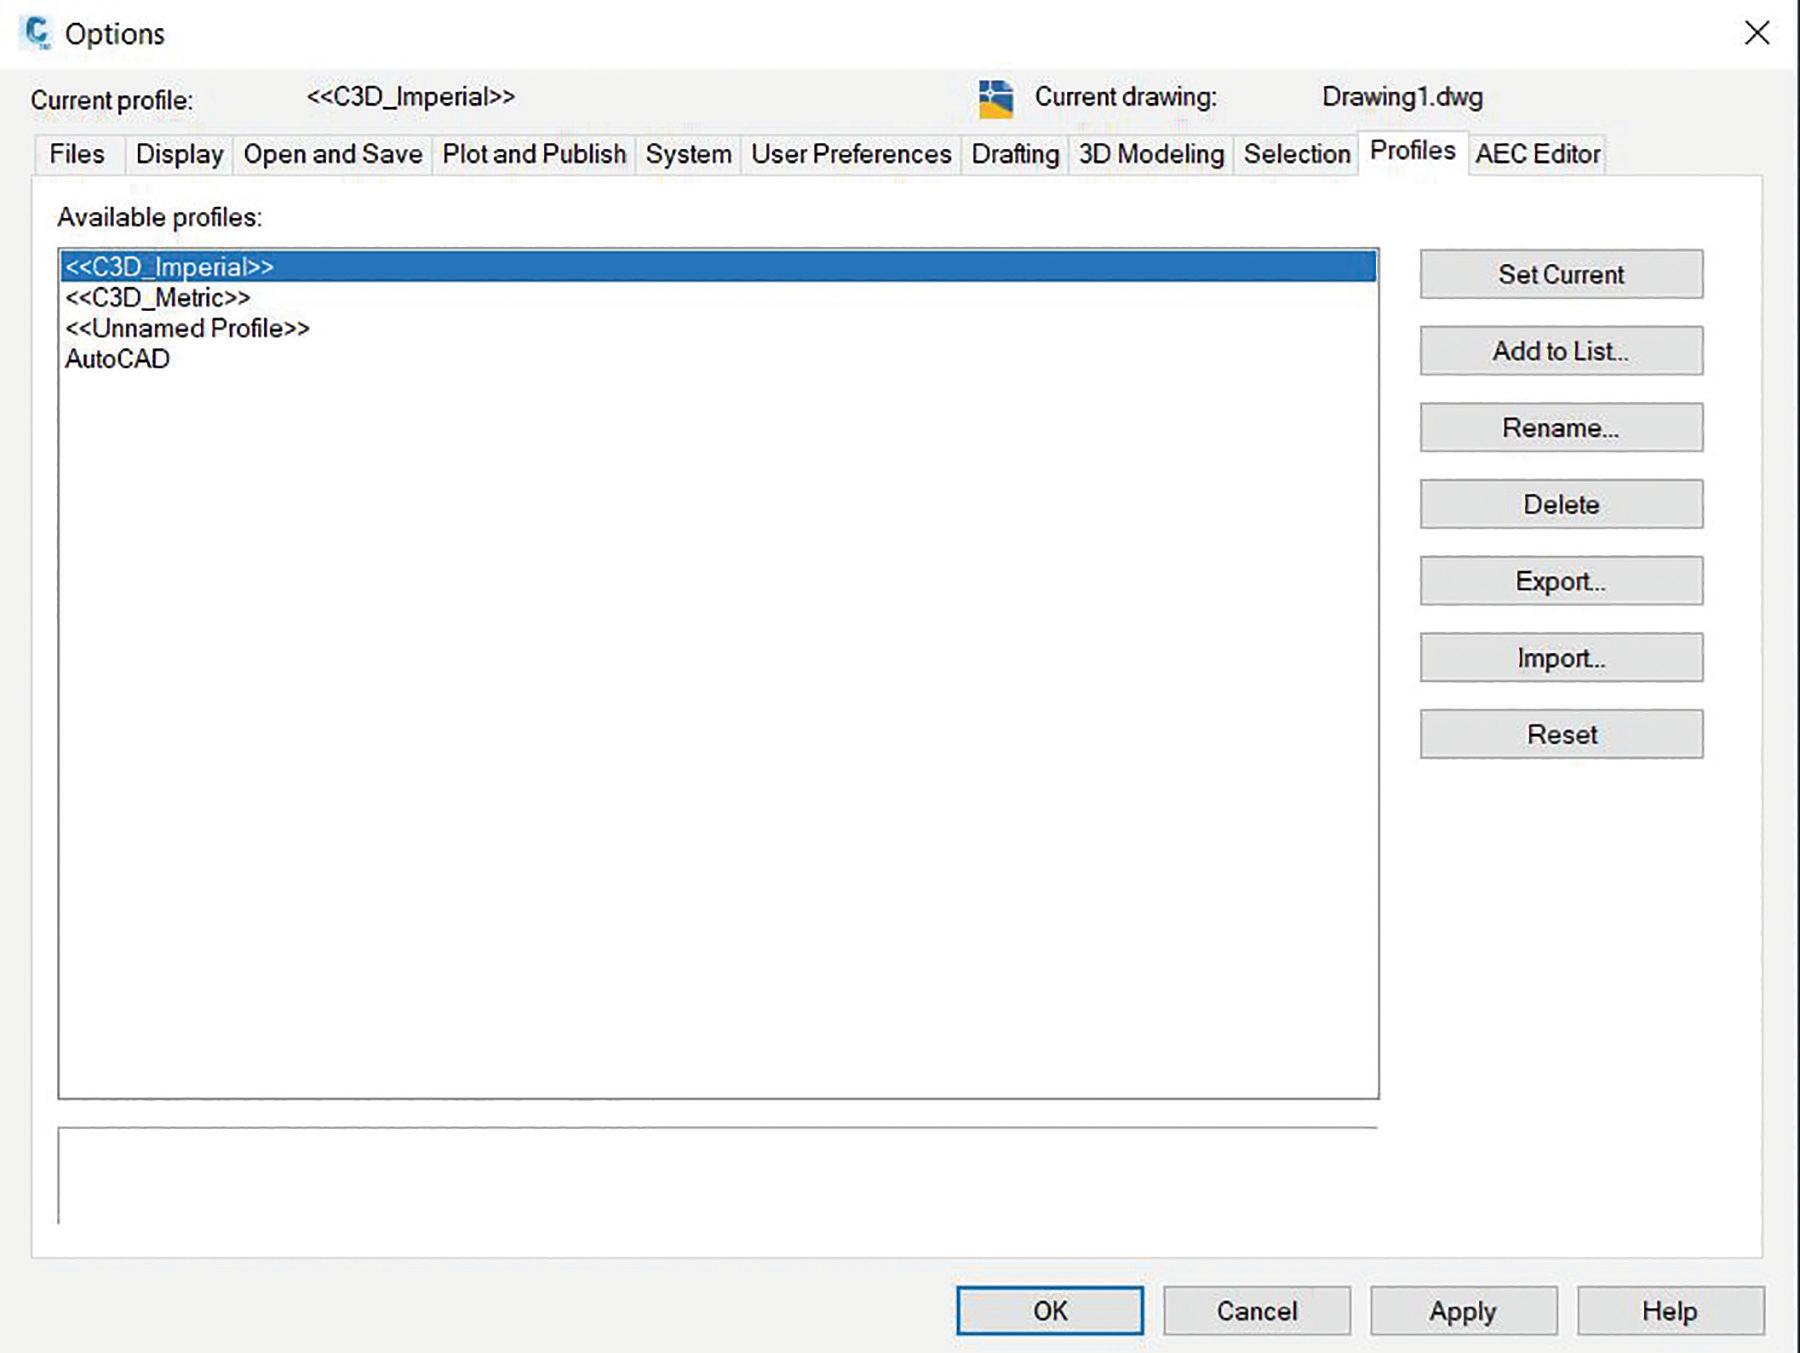
In the out-of-the-box configuration, Civil 3D will contain 4 profiles, C3D Imperial, C3D Metric, Unnamed Profile, and AutoCAD. These are all accessible in the “Profiles” tab of the Options dialog box. Switching between them is as easy as, selecting the one you want and clicking on the “Set Current” button to the right. Your interface may flicker quickly as it adjusts.
You might also notice that when a new version of Civil 3D is installed, you will get 2 shortcuts planted on your desktop, Civil 3D Imperial and Civil 3D Metric. The only differences in these desktop icons is the profile it points to. More on that in a bit.
The trusty <<C3D_Imperial>> profile is used by a majority of Civil 3D users across the country that have not done proper customization. If that profile is set current, it is a sign that there is significant room for improvement.
Figure 1 – The “Out-of-the-Box” Profiles.
CUSTOMIZING PROFILES
As soon as you make a change to the settings in the Options window, you are modifying the default profile. From Supporting File Paths, to Drafting Settings, to Pickbox Settings, there are dozens of small changes that can be made to the AutoCAD/Civil 3D user interface to make it more efficient and usable for daily design work. Since Civil 3D is built on top of AutoCAD, you can expect similar results with these customizations regardless of which program you use most often. Civil 3D Profiles simply contain extra information that doesn’t apply to AutoCAD. Things like Survey, Pipe Network Catalogs, Quantity Take Off, and Intersection information are specific to the Civil 3D Profile. Keep this in mind before you start modifying things too much. Do not expect the same profile to work the same way in both AutoCAD and Civil 3D. You will want to keep them separate, and you will want different profiles for each “year” version of the software as well.
PROFILE INGREDIENTS
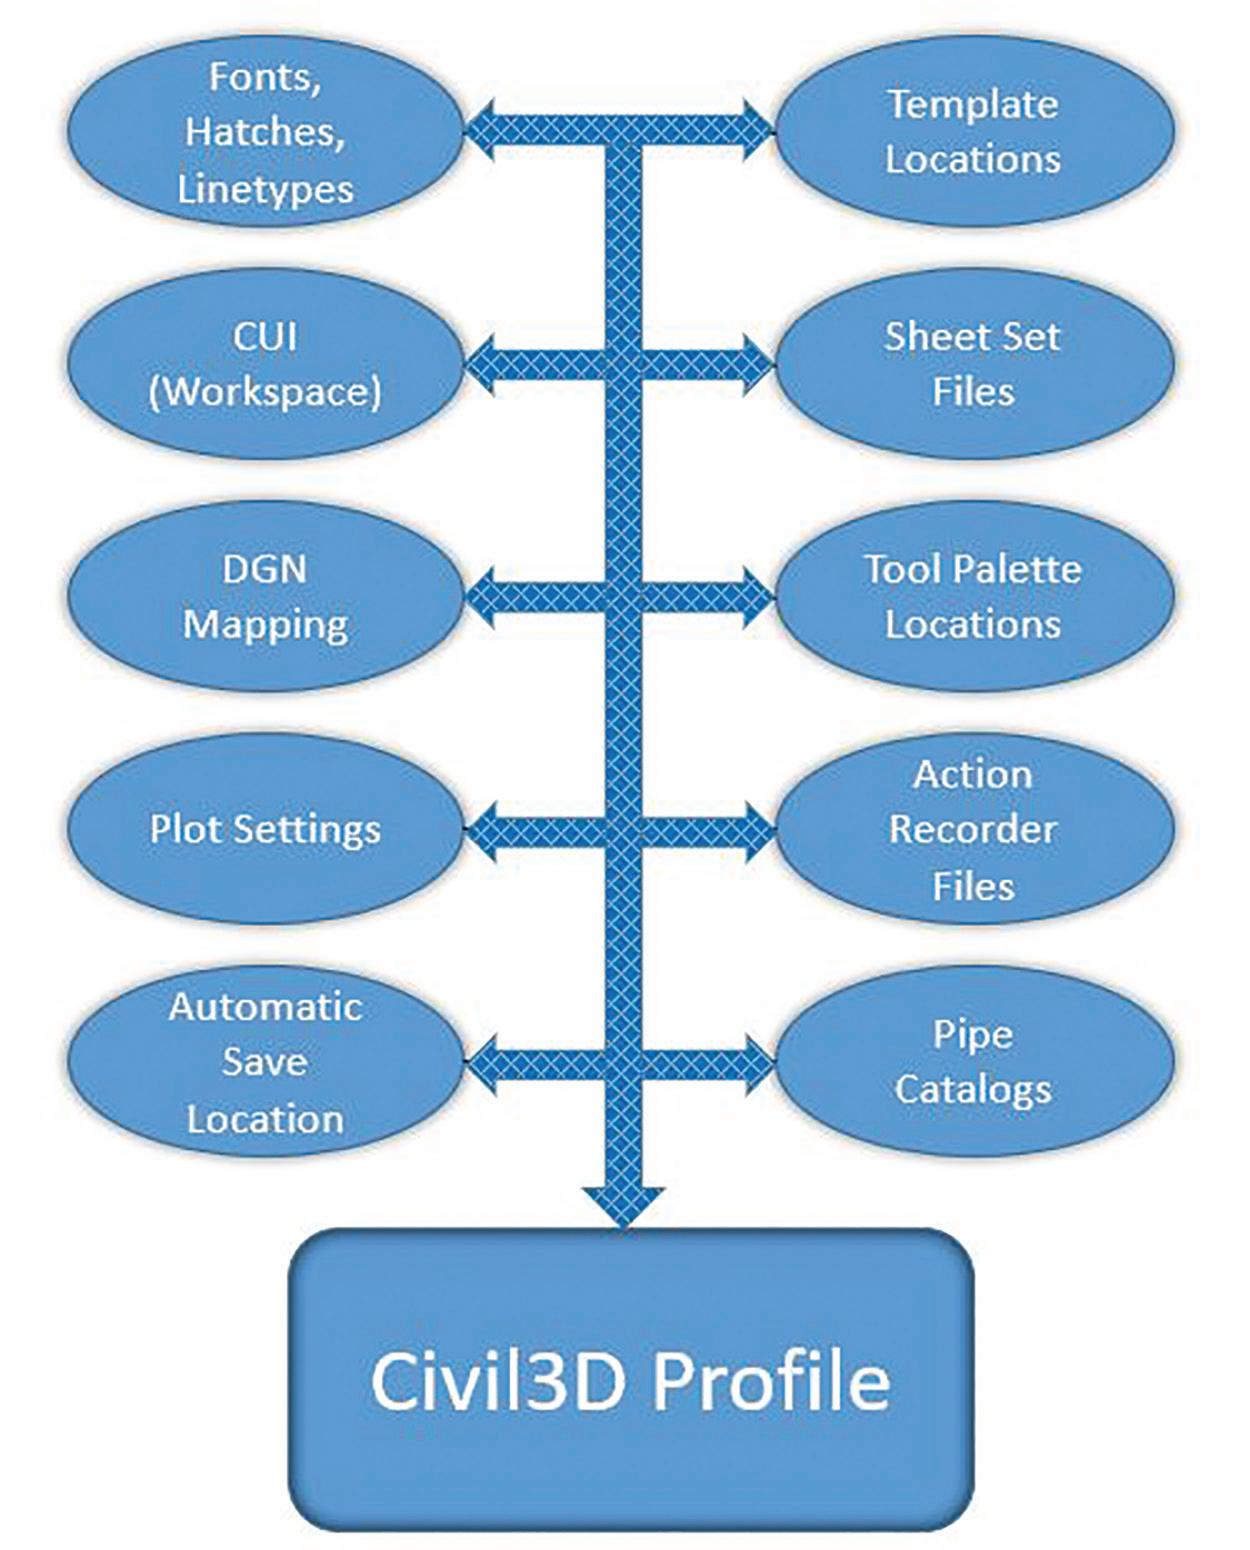
The heart of the Profile lies in the Files tab of the Options dialog box. This will give Civil 3D the “addresses” it needs to find everything. What fonts are available? What Workspaces are available? Things like that. Chances are that your firm has a few locations on your server where these objects are stored. Wouldn’t it be nice if Civil 3D could just find them as soon as it started the software up? Searching for these things takes valuable time away from your design and production. By harnessing these profile settings, we can regain that efficiency and consistency that we are missing likely out on. Now the Options dialog box has a lot of settings, but what gets saved into the simple .arg file? Lots of things!
As shown in the image above, the .arg file contains paths and settings for many of the key functions of Civil 3D. It is highly recommended to spend time configuring these settings, and then sharing this .arg file with others. Keep in mind that this file will need to be recreated with each new version of Civil 3D. It doesn’t always work to reuse an older .arg file. Something else to add to the list before deployment! What I have normally done is just expand all the settings and take a screenshot. That way you can easily match up the paths when creating the new Profile for the new version of Civil 3D.
PRODUCT FOCUS Civil 3D 2021
As mentioned earlier, the icon that you launch Civil 3D with, controls what profile is loaded. You are using the desktop icon to start Civil 3D right? You absolutely should! This profile switch is yet another reason to do so. When you double click a .dwg file in Windows Explorer, it bypasses this profile and can cause all sorts of odd issues.
BASIC CONFIGURATION
After populating the Options and all the File Paths needed for your organization, we then need to export that Profile to share with others. There are a couple ways to do this, and the way you choose really depends on company size. We will start with a small firm. If you have a handful of users, this workflow is a little faster. export it to a network location from the Profiles tab of the
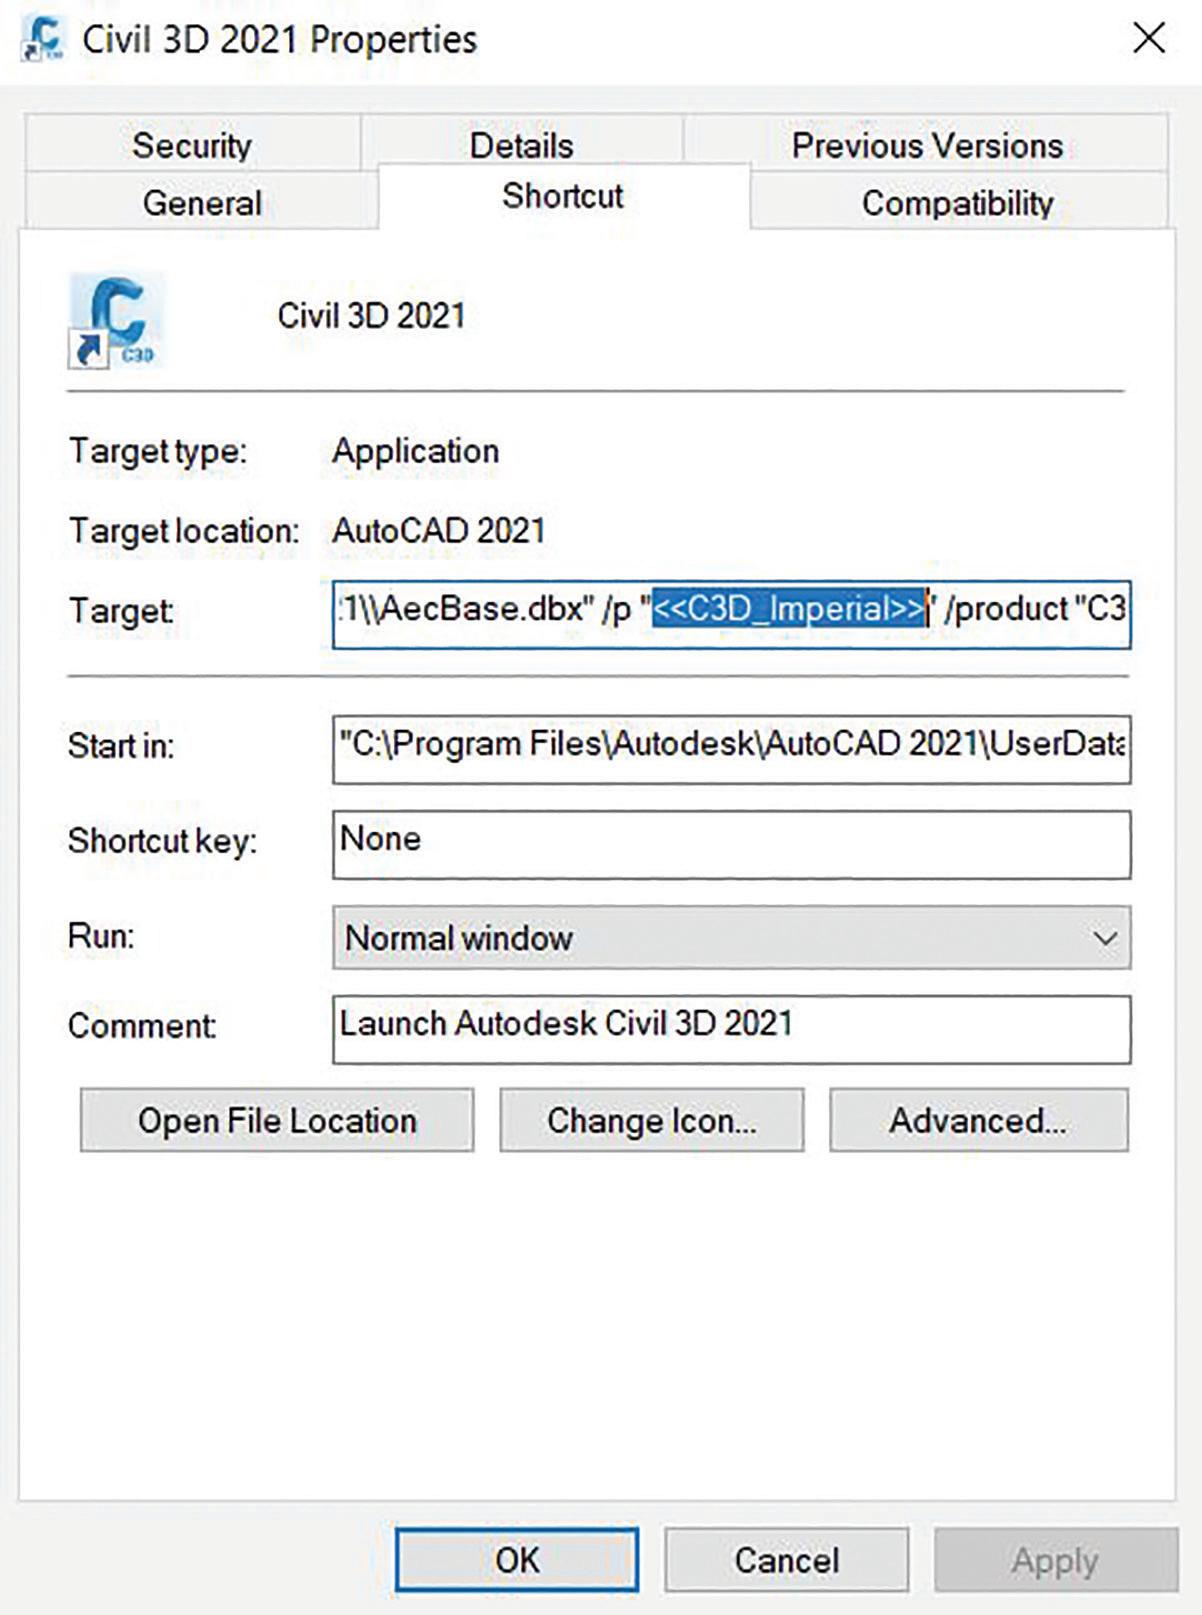
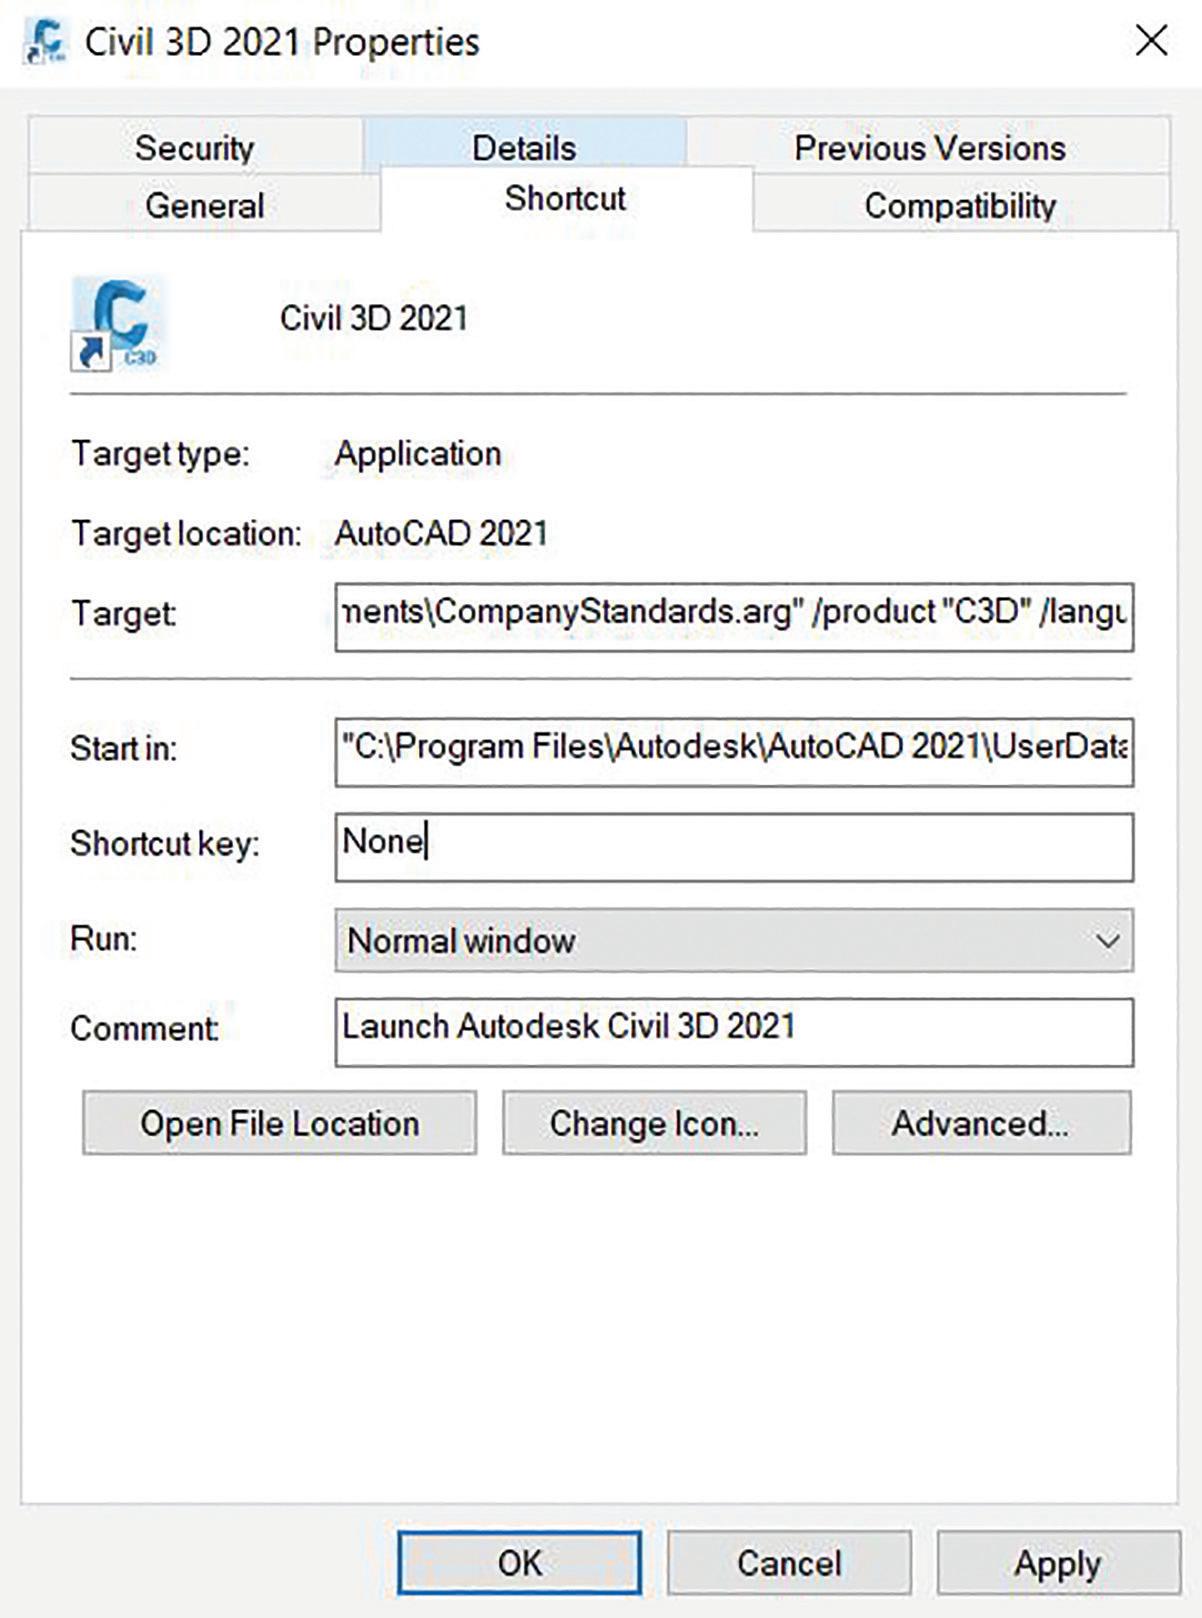
Options dialog box. network location. Simply make a copy of the C3D Imperial shortcut and change the <<C3D_Imperial>> in the Target path to match the network location. Keep this path inside of the quotation marks and include the. arg extension. The entire path would look like this: “C:\ProgramFiles\Autodesk\AutoCAD 2021\acad.exe” /ld “C:\ Program Files\Autodesk\AutoCAD 2021\\AecBase.dbx” /p “PROFILE PATH\CompanyStandards.arg” /product “C3D” / language “en-US”
3.
4. Copy this new shortcut to the same network location as the Profile (Optional, but recommended) Copy this shortcut to user’s desktops and remove the default
Figure 3 – Default C3D Imperial Shortcut Icon uses the <<C3D_Imperial>> Profile.
BASIC OPERATION
Create your Profile by making your desired changes, then Create a customized desktop icon that points to the defined C3D Imperial shortcut.
Figure 4 – Your Custom Profile Path needs to be inside of the quotation marks.
ADVANCED OPERATION
Obviously, there is more to Civil 3D than just these Profile settings. If you are really using Civil 3D for all its capabilities, then you have many other components that go into getting the job done. Survey configurations, Tool Palettes, system variables (SYSVAR), and LISP routines are also commonly used tools in the average CAD user’s toolbox. So how can we do everything all at once? Use one of two methods. Utilize the acaddoc.lsp at startup or use Windows scripts to make copies from a dedicated server location onto each user’s machine.
ADVANCED CONFIGURATION
There are numerous resources out there for using the acaddoc.lsp functionality, so I do not need to get into too much depth. Basically, it is a simple LISP routine that loads when Civil 3D is started, and it configures the settings to be used. System variables, other
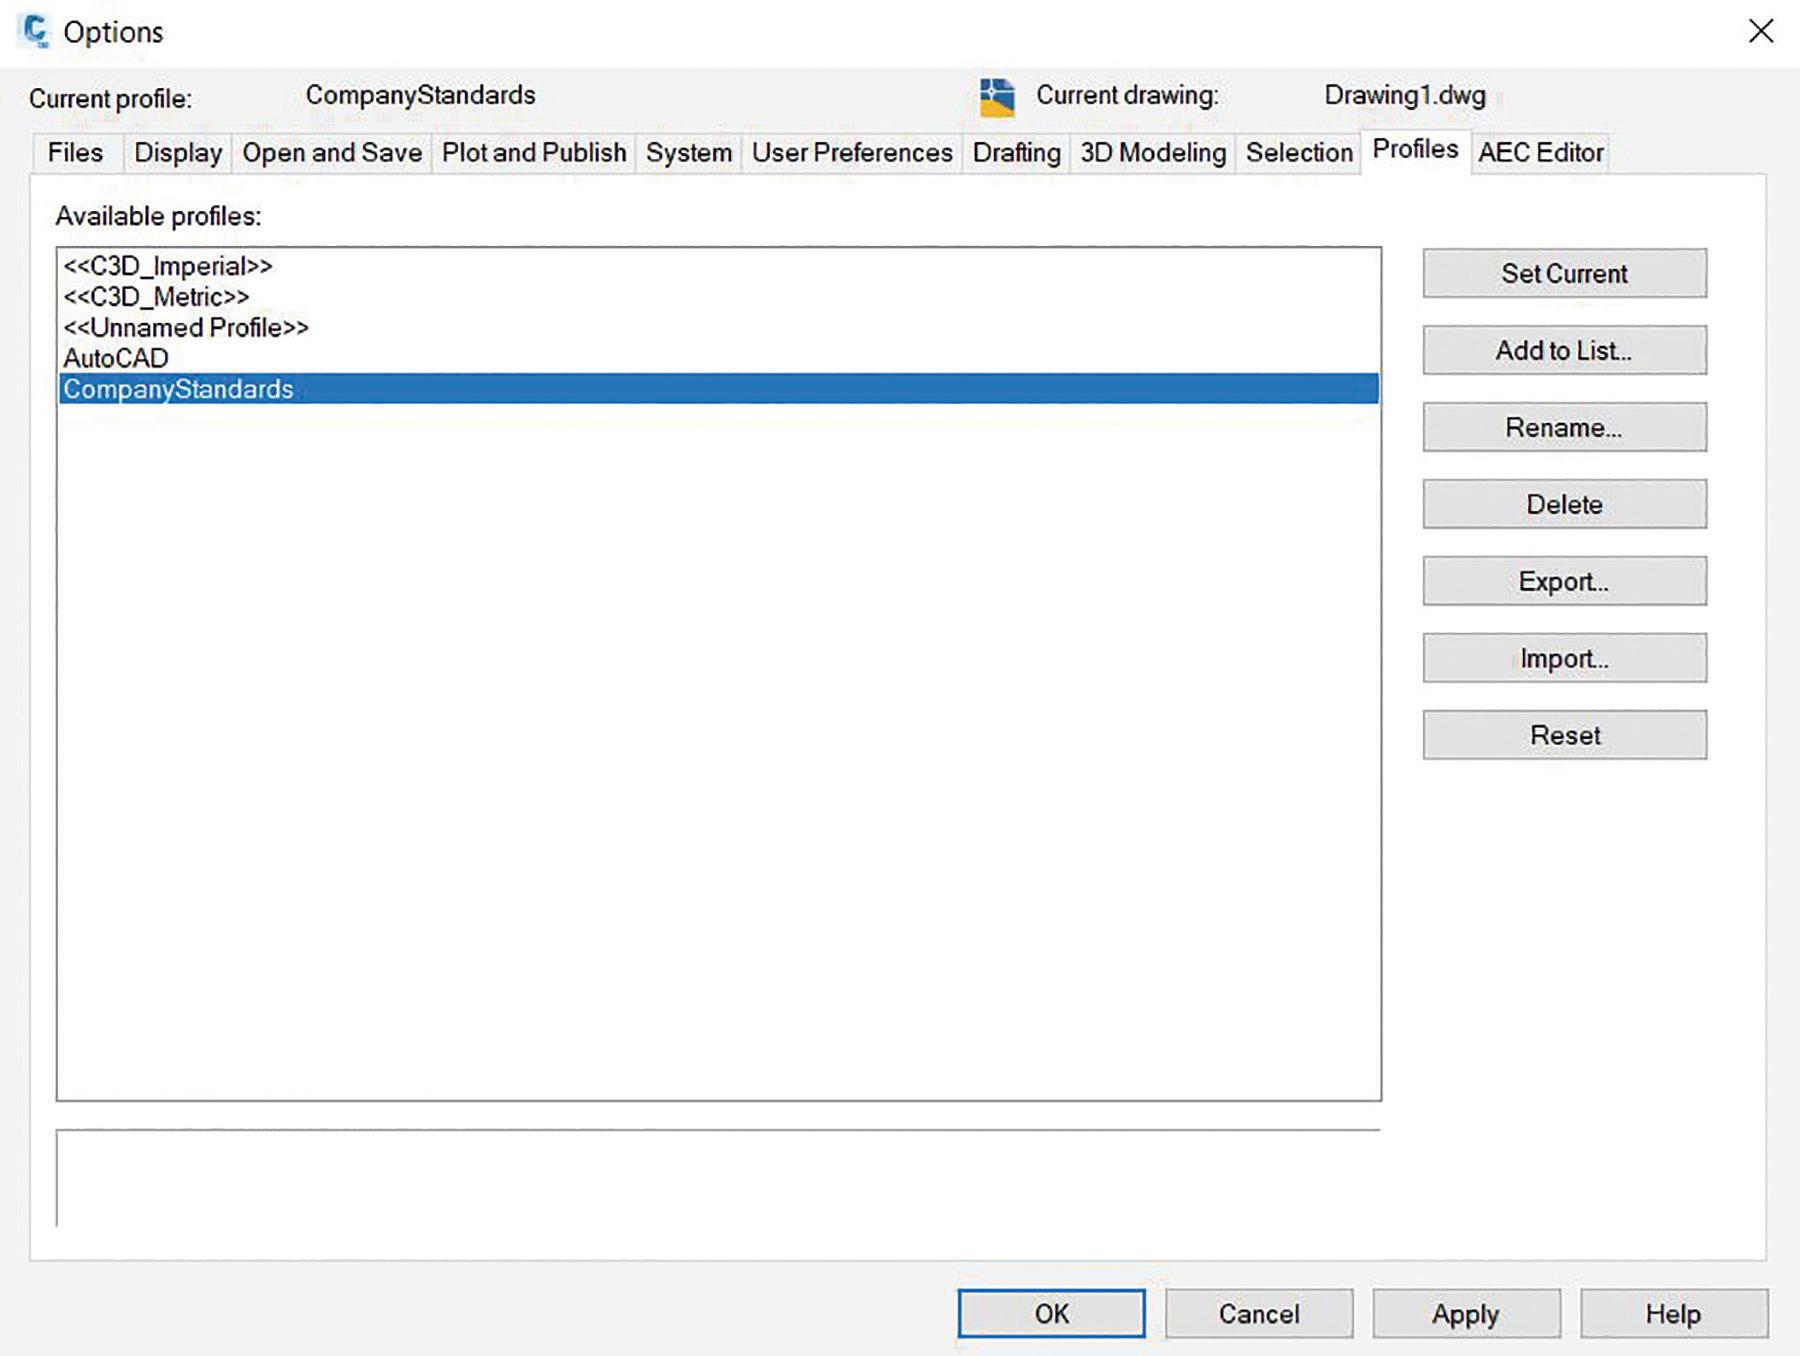
Figure 5 – Your Company Standards are in place and ready for use!
lisp routines, and many other configurations can be used with the acaddoc.lsp function. Profile loading certainly falls into that list as well. Configure the acaddoc.lsp to load the desired profile and all the other settings (do not forget your Survey Settings, Pipe Catalogs, etc.) and do it that way. You will still need to maintain a centralized location for these files, but then the acaddoc.lsp will set them.
Additionally, basic scripting can be utilized to make a copy from that central location (Server) to the user hard drive. This leans on the robocopy command, and it is easier than you would think. The basic function that needs to happen is that the CAD Manager or IT Professional would configure the required Profile and settings into a folder on their Host or Main computer. The script then makes a copy of that folder onto the Server, then another script will copy that folder from the server onto the user machines. This can be configured to run daily, weekly, or whenever and will overwrite whatever the users had before. This makes consistency easier, while silently resetting those rogue users! The robocopy command would then be used to copy that desktop shortcut as well so that it targets the correct profile, along with copying all of the other supporting files your organization might have like custom Tool Palettes, Survey Settings, and Workspaces. With more and more people needing to work remotely these days, this is a great way to keep people updated while away from the office. Once they log into the network, this script will copy the objects to their local machine, then they can do their work on their local machine and have all the resources they need.
BONUS TIP
You just might want additional profiles for different types of work, depending on client or jurisdiction. Repeat these settings and steps for new profiles! Switching your settings for the next project is as easy as clicking on the applicable desktop icon.
Jason Artley, LEED AP is an Autodesk Certified Instructor with over 20 years of experience in the Civil Engineering Industry. From surveying to to design to CAD Management, Jason has seen all aspects of Civil workflows from field to finish. Jason works as a Senior Technical Specialist for ATG USA, An Autodesk Platinum Partner.
Welcome to AUGIWorld Inside Track! Check out the latest opportunities to advance your skills, processes, and workflows in your firm with the most current AEC-related software and hardware updates available.
planBIM
https://www.planbim.io/
Autodesk Revit Version: 2021 , 2020 , 2019 , 2018
With the help of the planBIM plugin, take your BIM workflows to the next level. This plugin provides Autodesk® Revit® users with various productivity enhancements and acts as a tool for better BIM Management. Users can connect to their BIM data on the planBIM cloud directly using the planBIM Revit plugin. Scope: Visually classify elements inside your models according to Level of Detail (LOD), Level of Information (LOI), and Level of accuracy (LOA) as per the Scope defined in planBIM (https://app.planbim.io). The user can view the LOD Specification for a specific category in Revit by merely clicking on a relevant element in the model space. The specification gives an idea of the LOD, LOI, LOA as well as the parameters that need inclusion in the Revit element. There is also functionality to associate a family or family type of selected element to a scope specified in planBIM. Using this plugin, the BIM team can stay on top of the modeled elements and their respective LOD in a Revit file.
Files: Visualize detailed analytics of your Revit files as dashboards on the cloud. Data including families, warnings, sheets, schedules and more is automatically extracted and privately published to your
workspace in planBIM. Content: Access all your Revit family libraries on the cloud and insert them into your projects. View which families are approved and which ones rejected by your BIM Managers.
BIM Managers also have the ability to track who downloaded which objects using our web app in conjunction.
InstaFoundation
https://www.rcccad.com/revit-plugin-instacrete/
Autodesk Revit Version: 2020 , 2019 , 2018 , 2017
“InstaFoundation” can build a stepped, as well as, a trapezoidal foundation. The user can use this tool in the Autodesk® Revit® structural foundation template. The foundation is formed using the dialogue box. The user is not required to draw a single line in the graphics window. 1. You can create footings in Imperial as well as Metric units. 2. It saves 90% of your time. 3. Very easy to use. 4. The user can also create a single pedestal footing. 5. Along with step footing the user can also create trapezoidal footing. 6. InstaFoundation is a free tool.
AUGIWorld brings you recent developments in Autodesk and related software items

EditAtt
http://www.cadprograms.ca/
Autodesk AutoCAD: 2021, 2020, 2019, 2018, 2017 AutoCAD Electrical: 2021, 2020, 2019, 2018, 2017 AutoCAD Mechanical: 2021, 2020, 2019, 2018, 2017 AutoCAD Architecture: 2021, 2020, 2019, 2018, 2017
This app will allow the user to directly edit the value of an attribute without using the Block Attribute Editor or the properties panel.
If you have some news to share with us for future issues, please let us know. Likewise, if you are a user of a featured product or news item and would like to write a review, we want to know. brian.andresen@augi.com


How Bad Timing Can Derail Your Next Software Upgrade
➲ I like the latest versions of software. I usually upgrade when a new release comes out. On the personal side, I auto upgrade the OS and apps on my Pixel phone. I do not do that on my wife’s iPhone. I upgrade my MacBook when a new OS is about 2 months old and the kinks are worked out. I upgrade my WinOS after the troubles die down also. My Chromebook autoupdates all the time.
So, you can see that while I have a desire to upgrade to the latest versions, I do not do that across the board. I do not do it all at the same time. I do not treat every device the same. I also time the upgrade for a convenient time, or an opportune time, or a time when the negative, that might happen, won’t annoy me beyond belief. I also do not do every device at the same time. I make sure that I have a stable device handy in case I need to search out a fix for a problem. So timing is key. Back in 2008 I wrote some advice on getting the timing right for an upgrade and I “update” that advice below.
DON’T LET IT HAPPEN WITHOUT GOOD TIMING
You probably get the popups on your phone or laptop that an update is ready to install. You could just hit “Start” and make it happen, but it might be advantageous to think about doing it later. You get emails urging you to jump to the latest release. The temptation to just get it done can be daunting. Timing a personal device upgrade impacts only you but timing a firm-wide upgrade is another matter. The timing needs to set you up for success.
BEFORE THE NEXT PROJECT BEGINS
Many Tech Managers want to prepare and move before a major project starts. Rather than move the whole company at one time they take one project into the next release and manage the process like a Project Manager. This can be a good thing and a bad thing.
This would set you up to use the increased productivity in the new release for the new project. It also places you on track for the future since the project will outlast your prior release use. By taking one project into the new release, you can control the tools used on a small scale, selecting which new tools to apply. No need to use all the new improvements, just select the ones that will impact the project for the better. And you can take the successes into the next new project, expanding as the work rolls in.
Be aware that the upgrade may slow down the project schedule as staff get up to speed. Training and tech support issues may impede project timeline. Productivity may (will) take a slight dip until users stabilize. All this impacts the project. Also, make sure the Project Manager is supportive. Let him/her know the issues surrounding the use of the new software. Make them your ally. If not – they could turn into your worst critic. If they are reticent to upgrade, wait for another project.
Make sure you track the troubles you have and the successes. Document anything that is a concern. Define new processes and establish new guidelines. Make a definitive process of expanding it to the next project.
AFTER TRAINING
Most firms want to do some form of training prior to a new rollout. It may be formal, informal, or just a handout.
When you have completed training your users are hopefully excited and ready to use the software. Training can create momentum for the migration. It could be a one-day, new features training. It could be a webinar to remote workers. I might take on many forms, but it needs to be done just as the software is made available. I have seen some firms upgrade the desktop machines while the person was in the training. When they returned to their station, the new was already in place.
Training does takes time away from project work, but productivity loss from training time will be recovered as users return to the project environment and use new tools that make things run faster. Training does not stop when the class ends. Keep in touch with the users. Make handouts that can be used as reference material. Have refresher talks. Do not let them slip back into old habits.
WHEN CLIENTS REQUIRE A SPECIFIC VERSION
Sometimes the client sets the pace for upgrades. Part of the contract agreement was to get everyone to use a version that is one or two steps ahead of where you are. Sometimes you don’t have a choice. You just need to move so that all project teams and firms are on the same platform.
Don’t fret, this may force your team to make a move if you are having difficulty making progress. It is often hard to get the migration started. After I was prepared, I have used a client’s demand for upgrades to get my team moving. The demand may come before you are ready. You may not have trained. You are forced to move and may be reluctant. Bad morale may creep in since it was not your choice.
WHEN YOU ARE BUYING NEW HARDWARE
When new hardware is coming, it may be time to move to new software. You will have the horsepower to make the move and you need to capture that inertia. I have most often seen the software push you toward new hardware, but the opposite may happen too. Opening a new branch office might be a good time to take the entire office to a new level. They will get new hardware and they are open to change.
THE TIME IS COMING
The timing of when to move may or may not be in your hands. If it is, you can think about the timing as outlined above. If it is not, and others might foist it on you, you should prepare for it because it may be inevitable. Be prepared! Be prepared before anyone asks you. Get everything set and handle the migration on your terms, even if the timing is not.
Mark Kiker has more than 25 years of hands-on experience with technology. He is fully versed in every area of management from deployment planning, installation, and configuration to training and strategic planning. As an internationally known speaker and writer, he is a returning speaker at Autodesk University since 1996. Mark is currently serving as Director of IT for SIATech, a non-profit public charter high school focused on dropout recovery. He maintains two blog sites, www.caddmanager.com and www.bimmanager.com.


