
7 minute read
Revit What's in Your Units

from AUGIWorld
by AUGI, Inc.

What’s in Your Units
Implementing Revit (any flavor)? If your units are set up like Figure 1, then you are dismissed… EVERYONE ELSE, implement your templates and files with maximum precision, put building components in the correct place, and dimension as always.
IF YOU GET A “BAD” DIMENSION: MOVE THE OBJECT!
If you do not understand the difference between the 2 following choices, please leave AEC immediately! A. PUTTING THINGS IN THE CORRECT PLACE Vs. B. ROUNDING DIMENSION STYLES TO APPEAR
CORRECT
That is not a hyperbole. Rounded dimensions cost everyone in the entire AEC chain through construction and these costs of waste grow simply because of tolerances (ironic;) that are set for lazy, unobservant imbeciles in my honest opinion.
Building Information Modeling takes even more and even better mindfulness than Computer Aided 2D Drafting, BUT CAD IS THE WORST!!! It’s been a long time since I challenged all of you and all of your firms to show me a coordinated set with no “slightly off axis” lines, or with no objects at funny dimensions. And I’m still waiting…
So Please… 1. Set Units Precisely 2.
3. Draft & Model Precisely (THIS IS REALLY WHERE WE GET THE 1/8” OR 1/16” ‘Tolerance’) Dimensions will REPORT correctly

Okay, so since you are still here, I hope this will clear up a few ideas or at least give a starting point for more research into quality, precision, and what it is we are doing in AECO.
If your Revit project template’s units (today we are talking Revit, but I do not care about the software: set Units as granular as possible) are NOT set as shown in Figure 1, and they are more like Figure 2, set your units up as I will explain. IMMEDIATELY after reading this. NO JOKE!!!
I will hold back on much more editorializations, except to say that if you disagree with any of these concepts, please contact me on twitter @JayZallan and try your best! I dare you… For what it’s worth, I have geometry, floating-point precision, and quality in my corner.
Do you have any “Wall is slightly off axis” or worse yet “Line is slightly off axis” warnings? “Slightly Off Axis” warnings are directly related to mediocre, or just plain bad, modeling. If you use any CAD drawing in your process, you will most likely have found that in these files are some of the causal factors (and if you’re still reading, have ignored such Revit warnings). Regardless, a BIM process shall be correct, and not approximated or rounded to the 1/8” (or whatever contractual precision has been set) until the dirt hits the shovel (AKA: during construction). Both bad modeling, and bad CAD, create bad BIM, which is costing your firm time and money.
So here we go—only tech from here on out. 1. Do not use the following setup. 1. I am not saying leave dimensions that report to the x/256 of an inch. 2. What I am saying is: 1. IF A DIMENSION REPORTS BAD NUMBERS (1/256” etc.) FIX IT! 2. Fix the model, do not override dimensions. I do create one Dimension Type that does not use Project Units and rounds to 1/8” (if that is your contractual obligation). 1. Make this rounded dimension red. 2. Rarely use this for individual dimensions, where geometry dictates or when the site dictates odd angles, etc. 3. Never use these for dimension strings. FIX THE
MODEL in that case!
UNITS
Setting up Revit units correctly and professionally. 1. Type “UN”
LENGTH
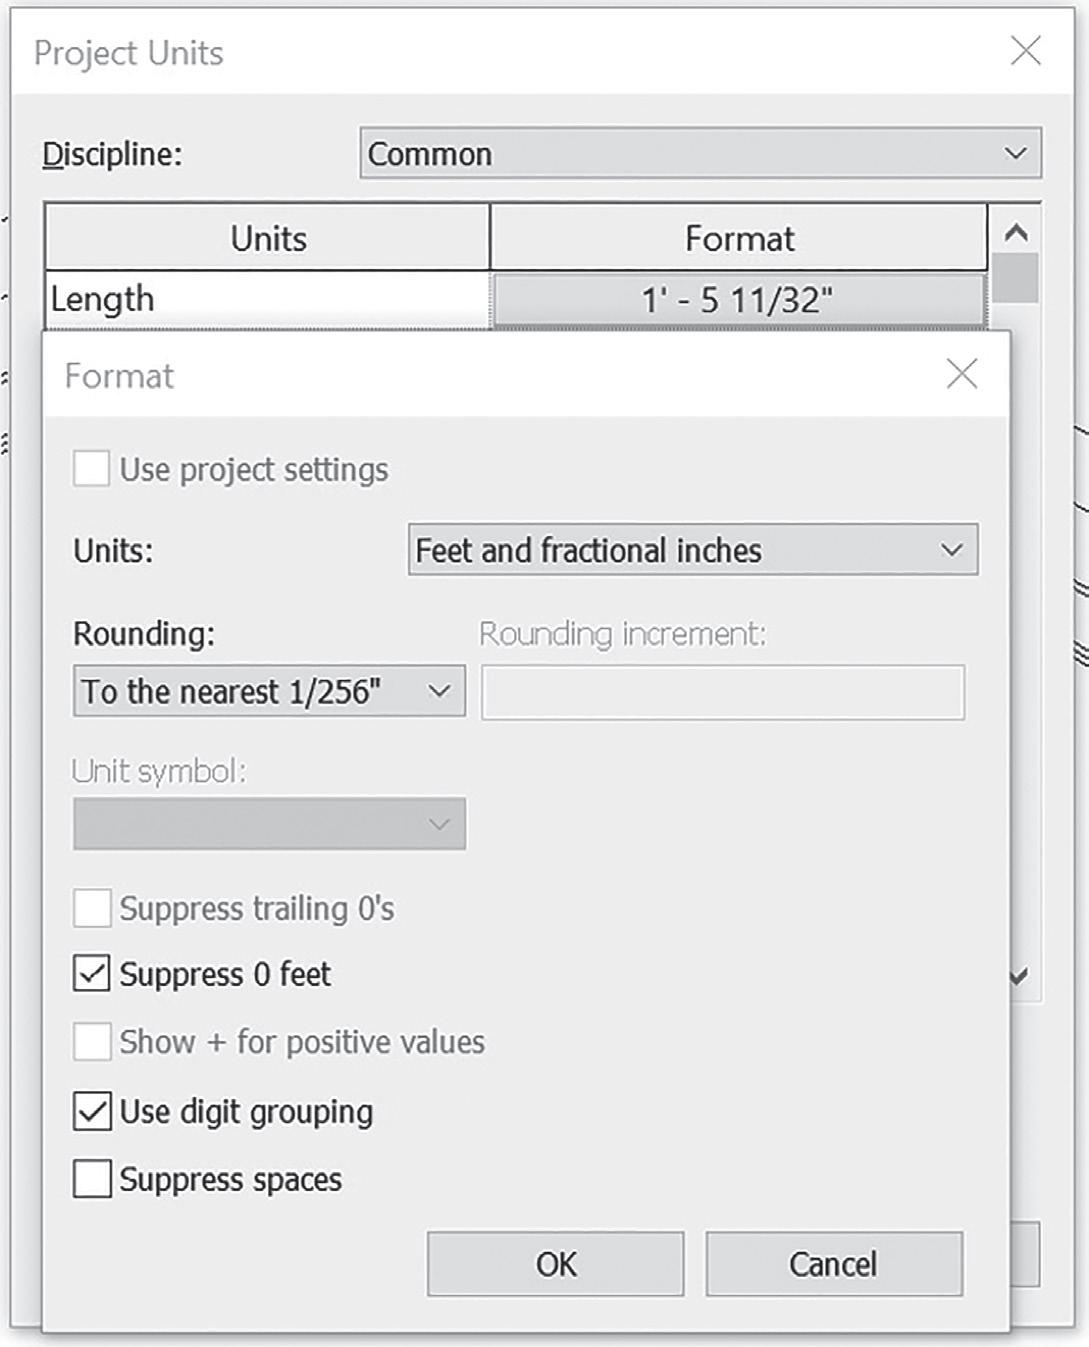
1. Click the button under the “Format” heading for “Length” and set up as follows: 2. YES, 1/256”. 3. “Suppress 0 feet” is cool to uncheck if you’re into that sort of old-timey thing. I like it personally but still I do not usually use it. 4. Digit grouping makes numbers look as we like in the USA… commas and all. 5. “Suppress spaces” is ok to check if you’re into that sort of thing. 1. Please understand that this comment goes for all following Units’ dialogs as well, as I am not into

Figure 2: Image illustrating possibly the most unprofessional and unintelligent setup of units possible
Set up Dimensions to respect Project Units. suppressing spaces.
Figure 3: Image illustrating proper “Length” units
AREA
1. Click the button under the “Format” heading for “Area” and set up as follows. 1. Two decimal places. 2. Suppress trailing 0s. 1. This is key. One will only see extra 0s if there are numbers other than 0 to the right of the decimal (0s are visible in Temporary Dimensions and when OBJs are selected, but that’s how it should be. Let me see reality!) 3. All the rest as shown.
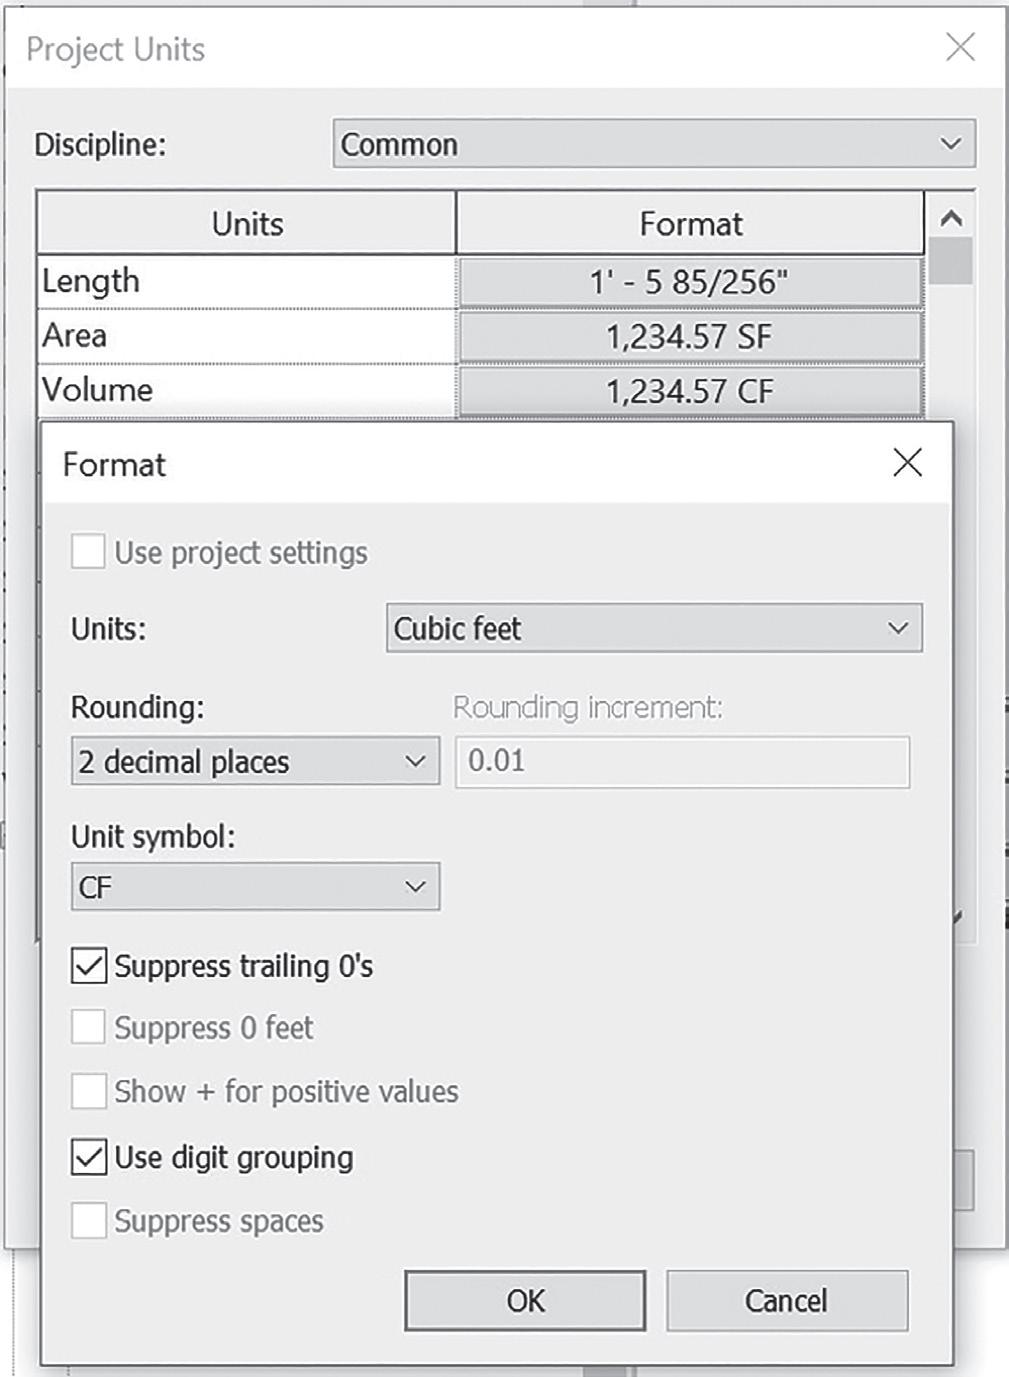

Figure 5: Image illustrating proper “Volume” units
Figure 4: Image illustrating proper “Area” units
VOLUME
1. Click the button under the “Format” heading for “Volume” and set up as follows. See figure 5. 1. Note: one may want to get more granular with this if refined calculations are desired.
ANGLE
The following settings are even more important than the length settings, as we geolocate our models and need this granularity and quality. (Full Stop) 1. “Rounding” set to “Custom” 1. Place cursor between the 0 and 1, to the right of the decimal point. 2. Enter “0” ten (10) times. 1. Just do it, you will thank me when Shared Coordinates don’t blow up anymore (as if ).

3. Remember, the trailing 0s will only show up when the geometry is… well, let’s just say “probably needs work” (at best) and “is totally a joke for someone who calls themselves professional” (at worst). 1. Just do it, you will thank me when Shared Coordinates don’t blow up anymore (as if ). See figure 6.
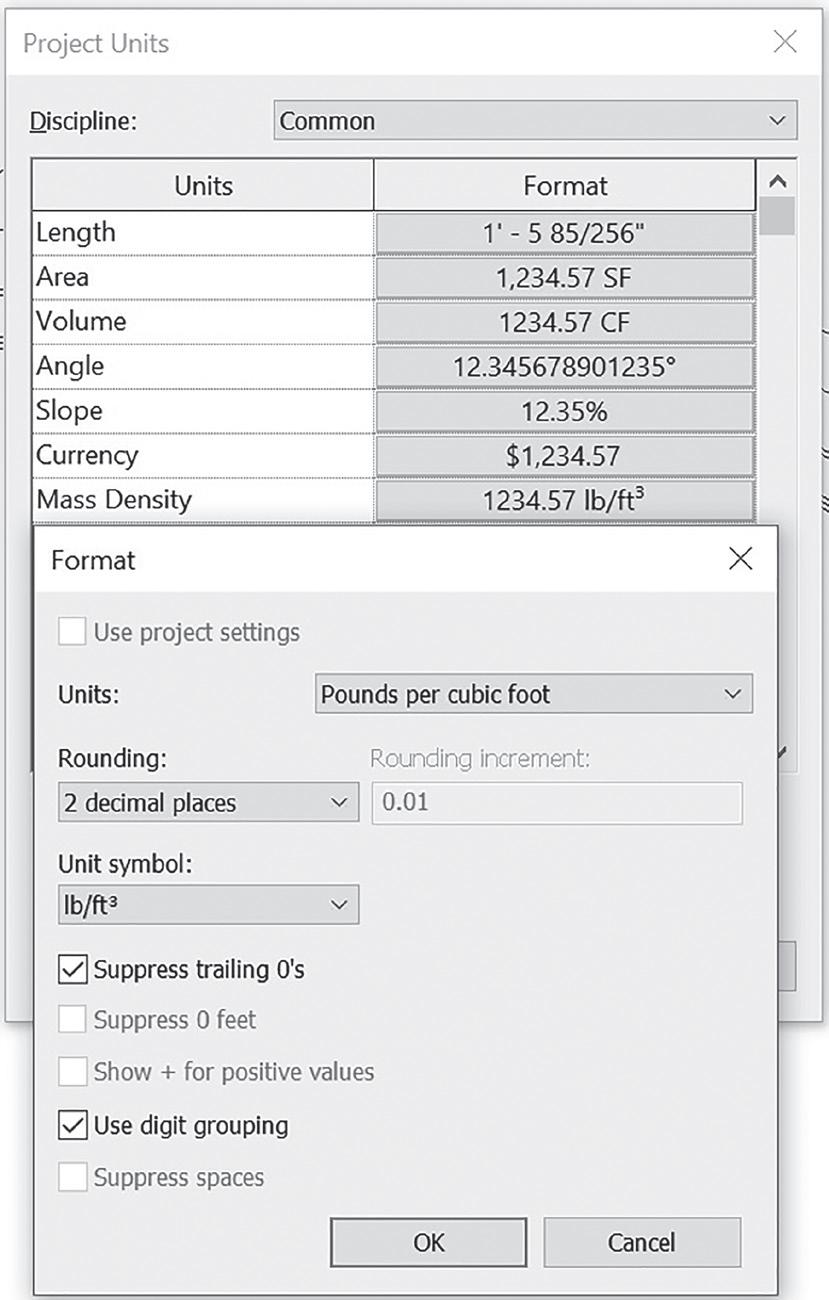
SLOPE, CURRENCY, AND MASS DENSITY
Settings are all in figures 7-9. There are not many comments until “Time.”


Figure 8: Image illustrating proper “Currency” units (add the dollar sign!) I like to set it up like money (since that is what this unit is lol…) so I let the trailing 0s show proudly
Figure 7: Image illustrating proper “Slope” units. (Yeah, you can set them up for Rise/12, etc… these are often modified to satisfy municipalities, outside jurisdictions, etc.)
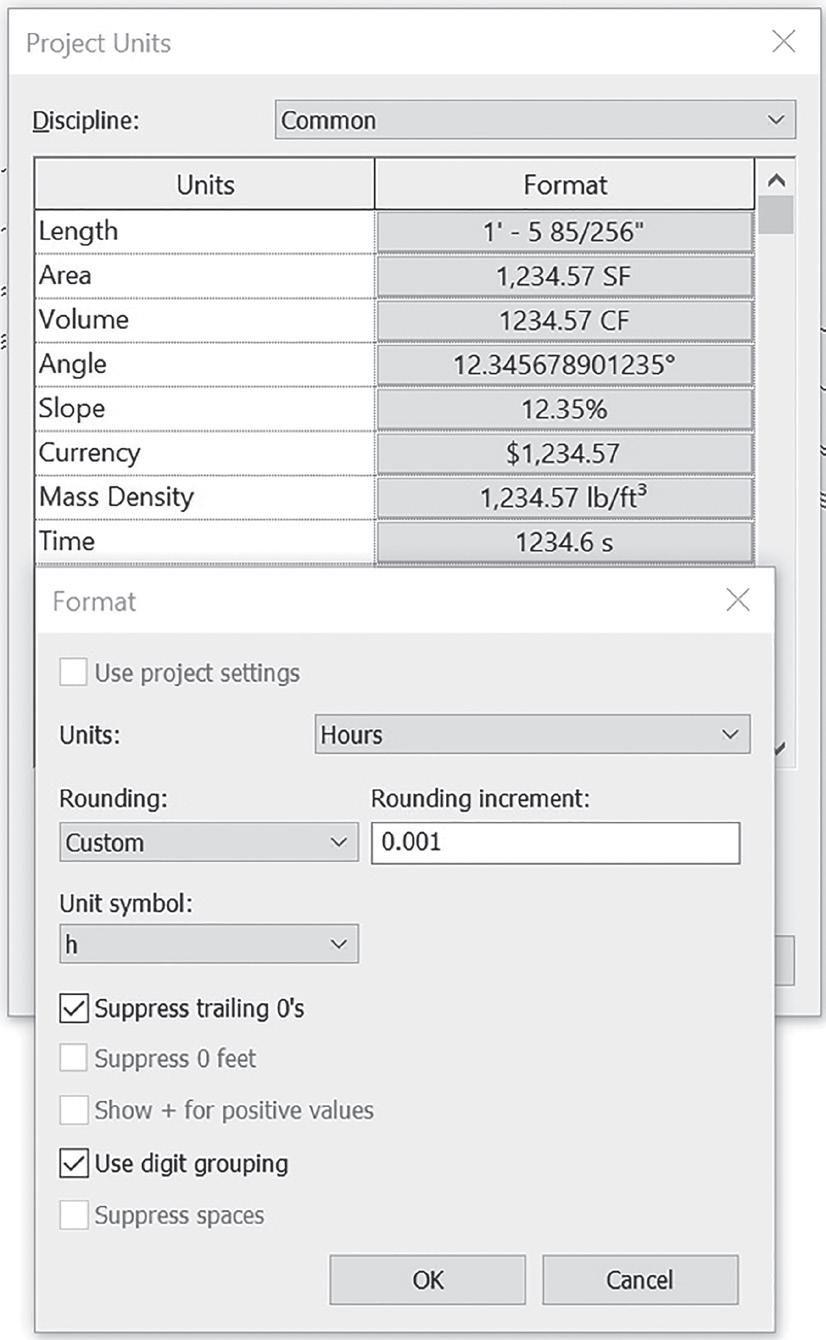
TIME AND SPEED
1. New to Revit 2020, Time and Speed are going to allow a lot of future capabilities and I am looking forward to it! 2. Currently used in the new (and one day to be working properly)
Exiting Path tools, with more potential functionality and workflows, beyond exiting alone for the creative masterminds.
PRODUCT FOCUS Revit 2021
UNITS CONCLUSION
1. Revit Units should look something like Figure 12, but if there are differences, a few things should (if not must, in my opinion) remain constant: Length and Angle must be as granular as allowed, whether in Revit, CAD, or any other software used to author BIM processes or any portion therein. Set the Units granular and then draw and model to rational dimensions. PERIOD!)
Figure 10: Image illustrating proper “Time” units
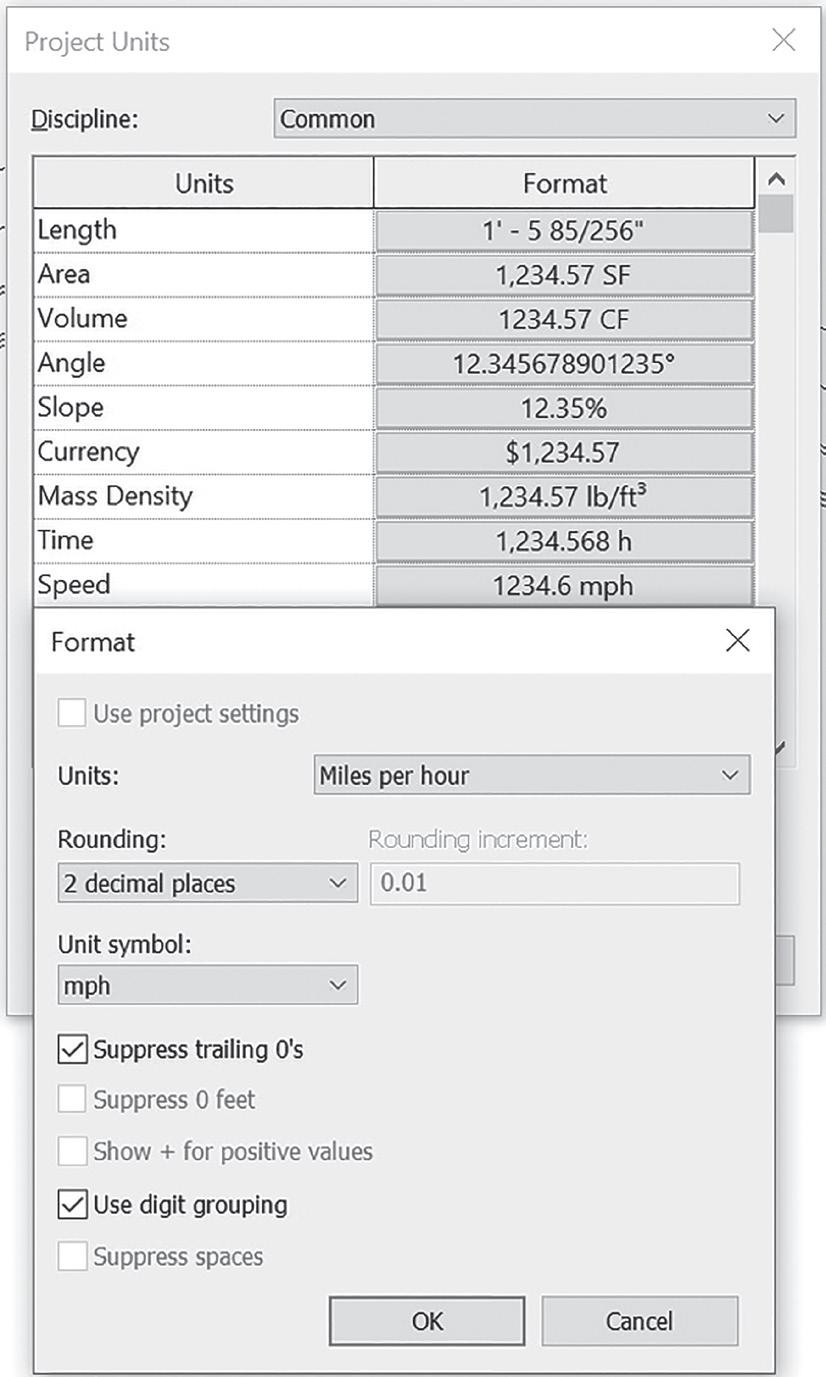
Figure 12: Image illustrating a properly set up Units dialog

Jay B Zallan | AECO | VDC | Design/Construction Technology Conductor| Fine Artist Jay brings wide-ranging Design, Delivery, Management, Mentoring and Teaching experiences to the readily changing AECO industries, founded on an expansive 35 plus year career. He has focused on VDC planning, production, process development and research & development to help enable efficiency-generative creative project execution, delivery and success throughout the AECO landscape. This JayZ is an educator, author and industry lecturer throughout the BIM world; Jz strives to inspire current and future generations to achieve and exceed beyond even their own expectations. Being a Fine Artist (large format oil & mixed media canvases), Jay adds unique and collaborative insights and perspectives to every team he is part of.
The Future is
Introducing FLEXX, the revolutionary BOXX data center platform purpose-built for content creation.
Whether it’s CPU or NVIDIA Quadro RTX GPU rendering, creating in Revit, Maya, 3ds Max, Arnold, or other applications, FLEXX features multiple nodes for a variety of workflows. You can even mix and match


nodes inside one chassis.
Accelerate rendering and content creation, remotely access data, enhance team projects, and more, because with FLEXX in your data center, you’ll have all the power and performance of a desktop workstation enclosed in a secure, rack-mounted, high-density form factor.


