8 minute read
PHOTOSHOP TIPS

from photoshopuser232020
by baranovmir2

COLINSMITH >Photoshop Tips
BOOST YOUR PRODUCTIVITY & CREATIVITY
Advertisement
Hello, everyone! Welcome to this issue’s “Photoshop Tips.” In this edition, we’re looking at some features that are brand-new to Photoshop, as well as some that are as old as the (digital) hills. You should try all of these for yourself; I’m sure there’s something in this article you’ll want to incorporate into your workflow.
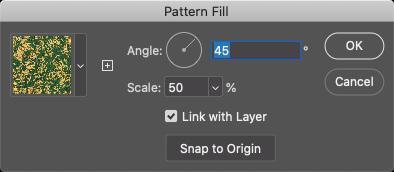
CHANGING THE SIZE AND ANGLE OF TEXTURES
It’s amazing how much visual interest simple textures can add to a design or composition. Since Photoshop 2020, these can now be managed from the Patterns panel (Window>Patterns). To apply a texture is as simple as dragging the pattern from the panel to the canvas. To change the size and angle of the texture, double-click on the Pattern Fill layer’s thumbnail in the Layers panel. In the Pattern Fill dialog, you now have Scale and Angle options for adjusting the way the texture is applied. If you scale the texture smaller than your document, it will tile.
CLICK IN THE CANVAS TO ACTIVATE A LAYER
Selecting layers is something we do all the time in Photoshop. If you have lots of layers and layer groups, it can be difficult to find the correct layer in the Layers panel, especially if you didn’t name them (or even if you did name them). Here’s the fastest way I know to select layers (and it’s the way I use all the time): Choose the Move tool (V), and up in the Options Bar, make sure Auto-Select is off. Set the drop-down to the right of Auto-Select to Layer (not Group). All you need to do now is hold down the Command (PC: Ctrl) key and click on a layer on the canvas to make it active. When you hold down Command (PC: Ctrl) and move your cursor around the document, you’ll see pink smart guides appear around the various layers, which will help you target the correct layer before you click.
Note: The reason I turn off Auto-Select is simple: If I want to drag the selected layer, I don’t want to accidentally select a different layer each time I click.
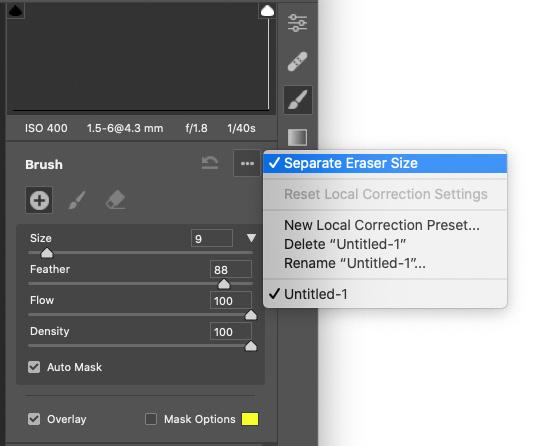
KEEPING THE ERASER SIZE THE SAME IN ADOBE CAMERA RAW
If you’ve ever used the local adjustment tools in Camera Raw (the Radial and Graduated filters or the Adjustment Brush), you probably know they come with an eraser, which allows you to paint away the adjustment. The eraser can be activated by holding down the Option (PC: Alt) key. One way I use the Adjustment Brush is to go a little loose with painting on a difficult area, and then erase the “overspray.” One thing that can be frustrating is that the eraser doesn’t scale with the brush; you can enlarge the brush, but the eraser stays the same. If you find this annoying, here’s how you can lock the eraser so it’s always the same size as the brush. With a local adjustment tool active, click on the three-dot icon at the top right of the panel and turn
off Separate Eraser Size.
TURN OFF SMOOTHING FOR BETTER BRUSH PERFORMANCE
Have you ever been painting or retouching with the Brush tool (B) and found it to be laggy—I mean really laggy? Some people might think that the Brush tool is broken but, believe it or not, this is a feature. No, not the Slow Brush feature, but Smoothing. For people who do illustration in Photoshop, it smooths out the lines by reducing the little jiggles and simplifying the brushstrokes. Of course, this causes lag. When
you choose a brush, look up at the Options Bar and you’ll see Smoothing is set to 10% by default. Change the setting to 0% (zero) to release the Brush and experience its full speed.
WHY THERE’S A LASSO MODE WITH THE OBJECT SELECTION TOOL
The Object Selection tool (W) is one of my favorite additions to Photoshop in the past year. Once you have the tool selected, draw a rectangle around any object you want to select in a photo and presto! This little tool works like magic using Sensei, Adobe’s AI (artificial intelligence). You might have noticed a Lasso option in the Options Bar. But why? It seems to work just fine in Rectangle Mode. My tip is to use the Lasso Mode for such things as long diagonal objects that would be difficult to select with the Rectangle, and for cleanup work. If you hold down the Option (PC: Alt) key, the Lasso will work in reverse and deselect areas.


REMOVE THE HOME SCREEN
The Home Screen is like Times Square in the middle of Photoshop; and if you use Application Frame (Window> Application Frame), it completely takes over Photoshop when you close your documents. While that can actually be useful for, say, seeing a visual representation of previous documents, it has one serious flaw in Application
ALL IMAGES BY COLIN SMITH
Frame mode: If you want to start with an image from the Libraries panel (Window>Libraries), you have to create a throwaway document first to get access to the Photoshop interface. (And some people just find this screen annoying.) Here’s how you can disable it: Choose Photoshop (PC: Edit)>Preferences>General, and turn off Auto Show the Home Screen. The next time you close all documents, it should now skip the welcome wagon.
TEST YOUR TIME-LAPSE FIRST
Did you know there’s a slide show option in Adobe Bridge? You can use this to play the contents of a stack. You can also hack it to preview your time-lapse sequences without stitching them together. Here’s how: Open the image folder in Bridge, and select all the images in the sequence. Right-click on one of the images and choose Stack>Group as Stack. When you hover your cursor over the stack, you’ll see a little play button at the top. Right-click on the stack and go to Stack again. This time you’ll see an option that says Frame Rate. Change it to 24 or 30. Click the play button to play your timelapse. Remember you can always click-and-drag the top of the Content panel to resize the stack thumbnail for a larger view.
SHARPEN YOUR TONES, NOT YOUR COLORS
Do you worry about colors shifting when you sharpen an image? Fear no longer! Choose Filter>Sharpen and use Unsharp Mask, or Smart Sharpen, as you normally do. Now before you touch anything else, select Edit>Fade>Unsharp Mask (or the name of your last filter). When the dialog pops up, change the Mode to Luminosity, and click OK. This will remove any color shift.
CHANGE CONTENT OF A SMART OBJECT
Did you know that when you create a smart object, you can easily switch out the image that it contains? This means you can maintain the smart filters and adjustment layers, and apply the exact appearance to a different image. Right-click on the name of the layer that contains the smart object, and choose Replace Contents. Navigate to a different image, click Place, and it will replace the current image in the smart object. This is great for making templates and other reusable assets. n
PETERBAUER >From the Help Desk
ANSWERS TO PHOTOSHOP AND GEAR-RELATED QUESTIONS
I recently saw your presentation for my company and I’m still not clear on why my Brush tool seems to “jump” while I’m trying to paint a smooth line in a mask.—T’Laine
The key is this: Don’t think of the Brush tool as painting a line, but rather creating a series of “instances” as you drag the tool. Each instance is similar to tapping a pen, pencil, marker, or other device on a sheet of paper. Each creates an imprint in the shape of the device’s tip. For a pen or a standard #2 pencil, that’s typically round; for a marker or highlighter, it’s perhaps rectangular.
If you tap your drawing instrument several times and the instances overlap, it may look like a straight line. The more the instances overlap, the smoother the line. The less they overlap, the rougher the edges as you see the shapes of the individual instances.
When using Photoshop, if you zoom in and paint slowly, you can actually see each of the instances as they’re painted on your canvas. That’s what you’re referring to when you say you see the tool “jump.” Not only can this be annoying, it can ruin the edge of a painted line. It’s especially noticeable when painting in a mask with a small brush.
If, unlike T’Laine, you’ve never seen this problem before, here’s a simple little experiment you can try:
1.
In Photoshop, create a new document about 300 pixels tall and perhaps 500 pixels wide; the resolution doesn’t matter. The background should be white.
2.
If you’ve changed the Cursors settings in the Photoshop (PC: Edit)>Preferences, reset the Painting Cursors to Normal Brush Tip.
3. Select the Brush tool (B).
4.
Open the Brush Settings panel through Photoshop’s Window menu.
5.
In the Brush Tip Shape section of the panel, choose a round tip, set the Size to 125 pixels, with Hardness at 100%, and Spacing at 25%.
6. Set the Foreground color to any color other than white.
7.
Close the Brush Settings panel and zoom in on your canvas to 400% (or more for huge monitors).
8.
Position the cursor at the left edge of the canvas.
9.
Hold down the Shift key.
10.
Press-and-hold down the mouse button and drag slowly to the right.
11. As you drag, you’ll see the circle of the cursor move without actually laying down color until one-quarter of the circle is visible, then suddenly the circle will fill with color. You’ll also see that the top and bottom edges of the painted line aren’t smooth and straight, but rather a series of little rounded humps—the tops of the brush tip instances.
Okay, we’ve identified the problem and seen it in action. So what do we do to eliminate these little rounded humps along the top and bottom of the painted line? Open the Brush Settings panel, and in the Brush Tip Shape section, uncheck Spacing. Yes, it’s that simple! Now when you drag the tool, you’ll have a nice neat line.
Remember, too, that if you select Spacing and set it to a value over 100% (try 133% and 150%), you’ll create a dotted line; with a square or rectangular brush tip, you’ll create a dashed line. n