24 minute read
PHOTOSHOP Q&A
from photoshopuser232020
by baranovmir2
DAVECROSS >Photoshop Q&A
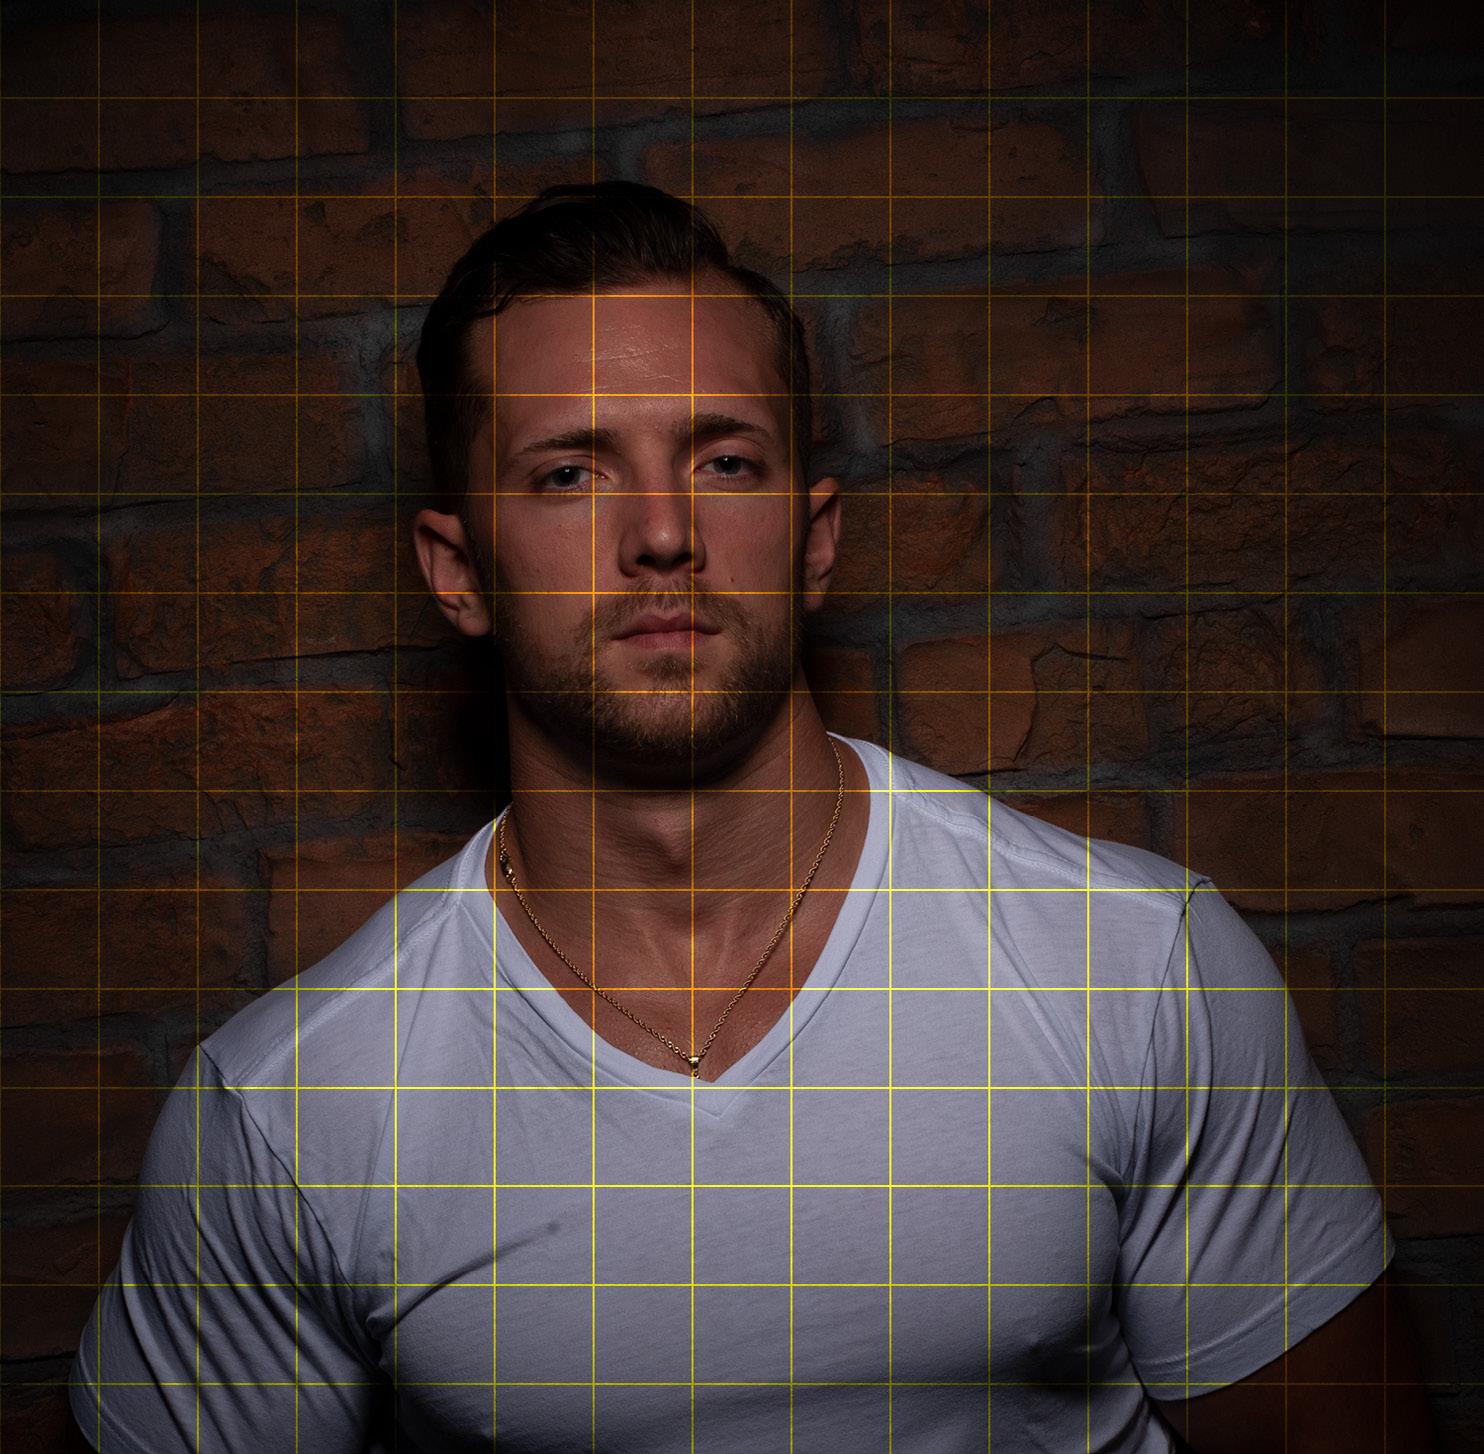
Q: I’d like to add a 100x100-pixel grid to a document, but have it visible when I save it as a JPEG. How can I easily do this?
Advertisement
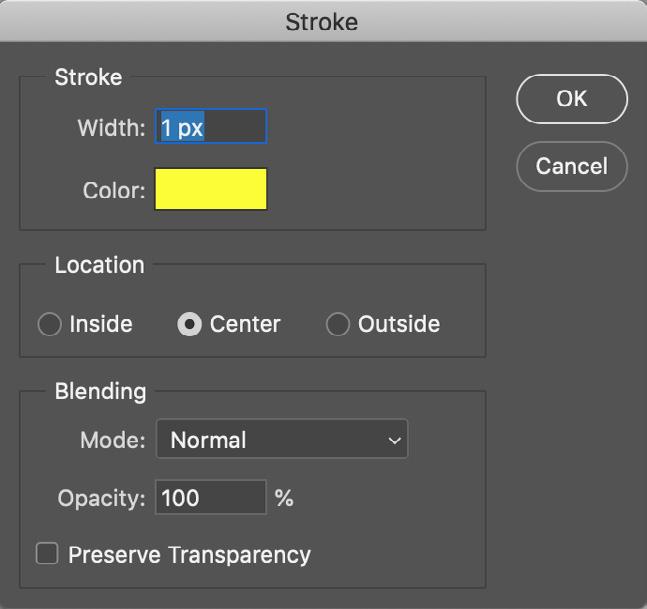
A: If you want a grid on its own layer that’s part of a design (rather than the reference Grid that’s built into Photoshop), your best bet is probably to create a custom pattern. Start by creating a new document (File>New) that has a Width and Height of 100 pixels. Assuming you want just a grid with no background, add a new layer and click the Eye icon next to Background layer in the Layers panel to hide it. Then, press Command
A (PC: Ctrl-A) to Select All, and from the Edit menu, choose Stroke. Choose the Color and Width of the stroke, and use Center as the Location. Click OK to close the Stroke dialog. Finally, go to the Edit menu and choose Define Pattern. In the Pattern Name dialog, give your pattern a meaningful name, and click OK.
To use the pattern in your image, go to Layer>New
Fill Layer>Pattern. Click OK in the New Layer dialog, and
Dave Cross the Pattern Fill dialog will pop up. Click on the pattern preview thumbnail to open the Pattern Picker, choose your new pattern at the bottom of the Picker, and you’re good to go! (In this example, the pattern layer was set to the Overlay blend mode in the Layers panel.)
Q: I used to use the Preset Manager to delete and change the order of my brushes and swatches, but they aren’t there anymore.
It only shows Contours and Tools. How do
I organize these presets in Photoshop 2020?
A: Rather than having to go to the Preset Manager, management of most presets in Photoshop 2020 is done right in the panel for each type of preset. For example, to change the order of the brushes, click-and-drag them in the Brushes panel.


Q: I’d like to create swatches based on the colors in a photo. Is there a way to do that automatically?
A: You can, by temporarily changing the mode of your photo to Indexed Color. Go to the Image menu and choose Mode>Indexed Color. If your image is in 16 bits, you’ll have to first change it to 8 bits, and if you have layers, you’ll have to flatten them, but don’t worry, you’ll undo all of these steps at the end. In the Indexed Color dialog, enter the minimum number of Colors you want, using the preview to see the number of colors that keeps your photo looking the way you want (or includes the colors you want as swatches). Once you’ve found and entered the ideal number of colors, click OK. Go back to the Image>Mode menu and choose
Color Table. Keeping in mind that there may be a few repeating colors (we’ll fix that later), click the Save button, give your set of swatches a meaningful name, navigate to where you want to save them, and click
Save to create an .act file. Click OK to close the Color
Table dialog. Now step backwards, revert the image, or close without saving to make sure you don’t permanently change the file to an Indexed Color document.
In the Swatches panel (Window>Swatches), click on the flyout menu at the top right, and select Import
Swatches. Navigate to your saved .act file, and click
Open. You’ll see a new folder appear in the Swatches panel that’s named the same as the .act file. Then, if necessary, click on unwanted swatches and click on the Delete Swatch icon (trash can) at the bottom of the panel to delete the swatches you don’t want.
Tips: Command-click (PC: Ctrl-click) to select multiple


swatches, and hold down Option (PC: Alt) when you click on the trash can to avoid the “Delete the Swatch?” warning dialog.)
Q: Two of us share the same computer, so every time one of us uses Photoshop, he has to rearrange the other’s panel layout; plus I want to make my own shortcuts and the other user doesn’t. Is there a way to have two different users on one Photoshop?
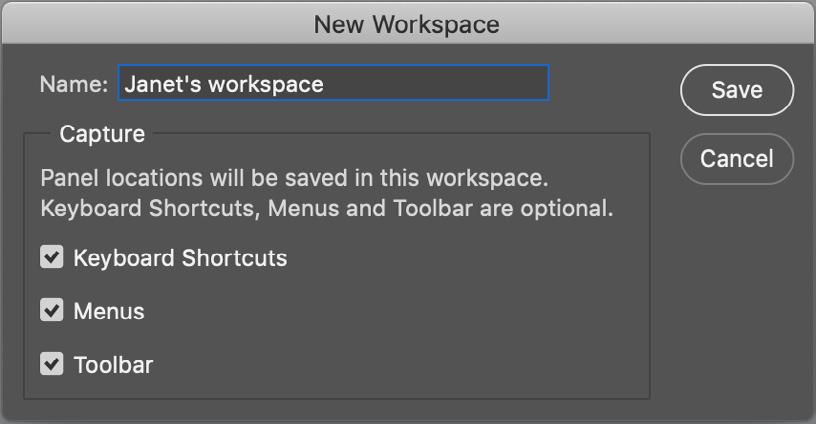
A: Sounds like a job for Workspaces! Each of you can go through these steps: Create the custom keyboard shortcuts you want, rearrange panels to suit your needs (you can also customize the Toolbar if you like), and then go to Window>Workspace>New Workspace. Name your workspace and check what you’d like to include in addition to the panel locations: Keyboard Shortcuts, Menus, and the Toolbar. Once you’ve both created your own workspaces, it’s a simple matter of choosing your workspace from the list under Window>Workspace. When you do, it will automatically change to your panel layout and your keyboard shortcuts. Then, when your colleague chooses his workspace, everything will change to his saved settings.
Q: How do I fine-tune a selection that’s been made with the Object Selection tool?
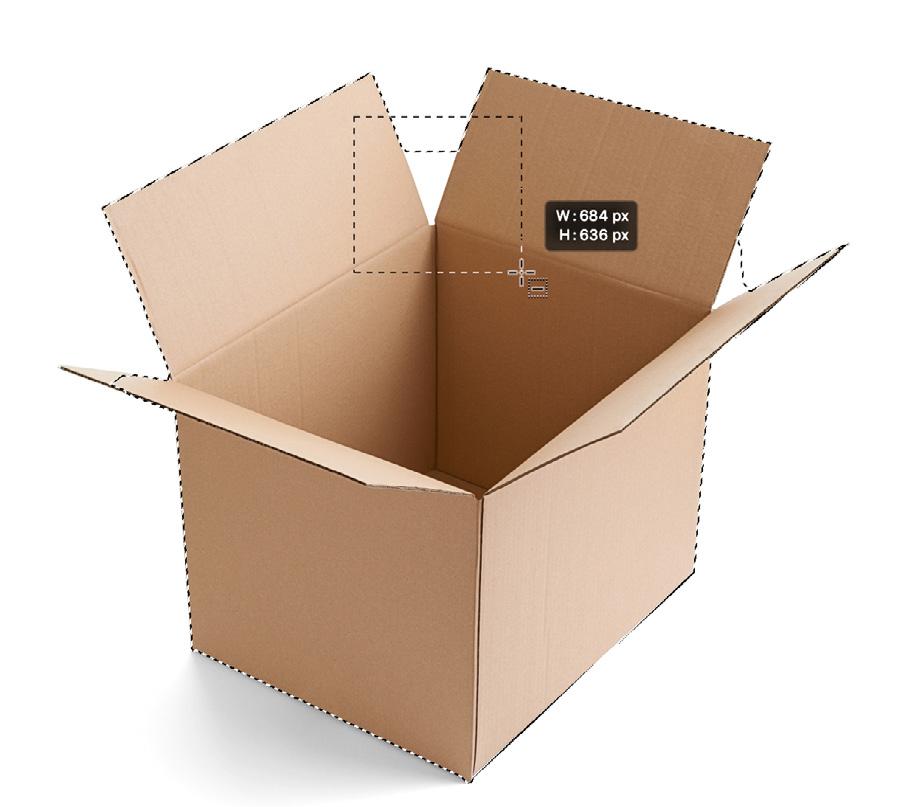
A: You can try using the Object Selection tool (W) itself.
To add to the selection, hold down the Shift key. If you need to remove areas from a selection, hold down
Option (PC: Alt) and “surround” the area that you want to fine-tune. Success will depend on factors such as contrasting edges. If using the Object Selection tool doesn’t work the way you need it to, you can also switch to the Lasso tool (L) or the Quick Selection tool (nested below the Object Selection tool in the Toolbar), and use the same shortcuts to fine-tune the selection:
Shift to add to the selection, Option (PC: Alt) to remove from the selection.
©Adobe Stock/picsfive
Q: I’ve tried using the Dust & Scratches filter to fix an old scanned photo that has lots of small spots on it, but it makes the overall image look a little blurry. Any suggestions?



If you have a Photoshop question that you’d like Dave Cross to answer in the pages of Photoshop User magazine, send it to letters@photoshopuser.com.
A:
One way to use the Dust & Scratches filter is to apply it as a smart filter and use its mask to apply it where you need it. To do this, convert your photo to a smart object by going to the Filter menu and choosing Convert for Smart Filters. Then go back to the Filter menu and choose Noise>Dust & Scratches. If you hover your cursor over the main image, you’ll see it turn into a small square. Use that small square to click on an area of your photo to set the preview area of the Dust & Scratches filter dialog.
Ideally, you want to use the lowest number possible for the Radius and the highest number possible for Threshold to remove the spots. After clicking OK, click on the Smart Filters mask thumbnail in the Layers panel, and press Command-I (PC: Ctrl-I) to Invert the mask (fill it with black) to hide the effect of the Dust & Scratches filter.
Now use the Brush tool (B) with white as the Foreground color (press D) and a small brush size to paint over all the spots. If necessary, you can double-click on the Dust & Scratches smart filter in the Layers panel to edit the settings. n
>Reviews
GET THE SCOOP ON THE LATEST GEAR
DxO Nik Collection 3
New Perspective Module & Nondestructive Editing for Lightroom Users
Review by Erik Vlietinck
Company:
DxO
Price: $149
Rating:
Hot: Perspective Efex; Quick Edit tools; Lightroom Classic nondestructive workflow
Not: Nondestructive workflow applies only to TIFF files The newest Nik Collection version 3 from DxO works with Affinity Photo, has a newly designed Nik Selective Tool, and new Quick Edit tools. It also offers a nondestructive workflow for Adobe
Lightroom Classic users. And, last but not least, the suite now has a perspective plug-in, Perspective Efex.
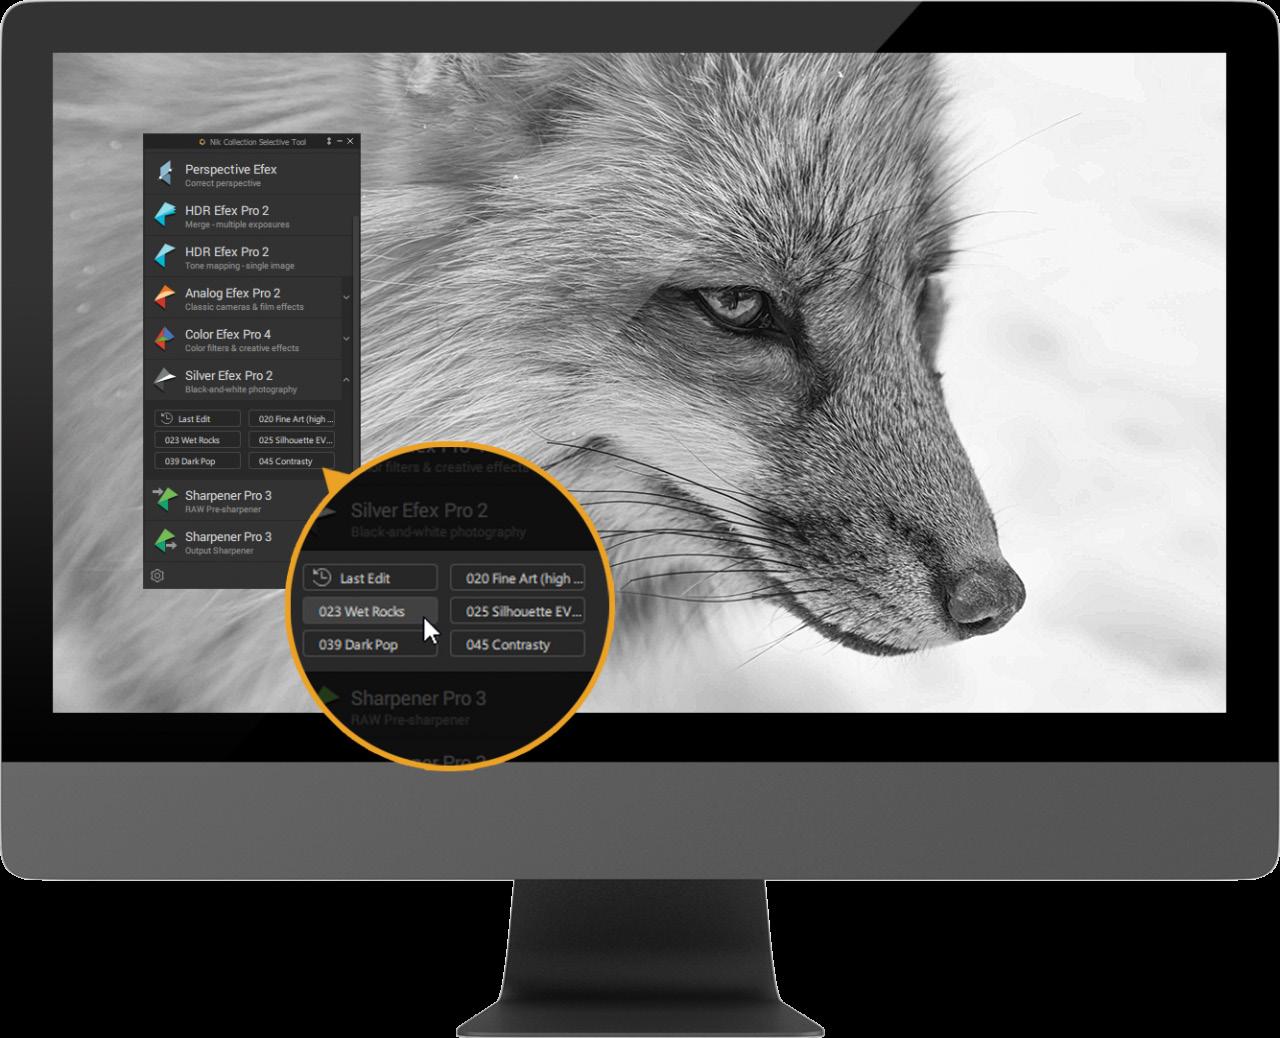
The Nik Selective Tool is a dedicated palette that gives users direct access to the suite’s various plug-ins from Adobe Photoshop. The latest version simplifies the suite and provides faster access to editing features. To optimize workspace in Adobe Photoshop, the palette can be automatically collapsed. The tool is also fully compatible with HiDPI screens and can be used in dual-monitor mode.
The Selective Tool has a new Last Edit feature that reapplies the last edits, which is especially useful for editing a batch of images or when users want to create a preset after editing a photo. Very useful, too, is the Quick Edit option that lets you edit images by applying the last action you used without having to launch the plug-in interface.

Adobe Lightroom Classic users can now freely edit their files nondestructively within the same plug-in using a technology based on the TIFF multipage file format, which combines the input image, the saved editing parameters, and the results, all in the same file. This workflow, however, doesn’t apply to RAW files.
Perspective Efex is a new geometric correction plug-in that resembles the capabilities found in DxO Photolab, but with the typical Nik Collection interface design. Perspective Efex also offers automatic shape-distortion correction. It can even automatically correct fisheye distortion. In addition, Perspective Efex can also be used creatively to simulate a shallow depth-offield effect, the so-called miniature effect, or used to simulate wide-aperture settings. [For more on Nik Collection 3, check out “Maximum Workflow” in our sister publication, Lightroom Magazine.–Ed.] n
Media Mod for GoPro HERO 8
Good Clarity Directional Mic and Clean HDMI Out
Review by Erik Vlietinck
Company:
GoPro
Price: $79.99
Rating:
Hot: Bidirectional microphone with great clarity; mini-jack; sturdy build
Not: Clean HDMI-out requires an extra step
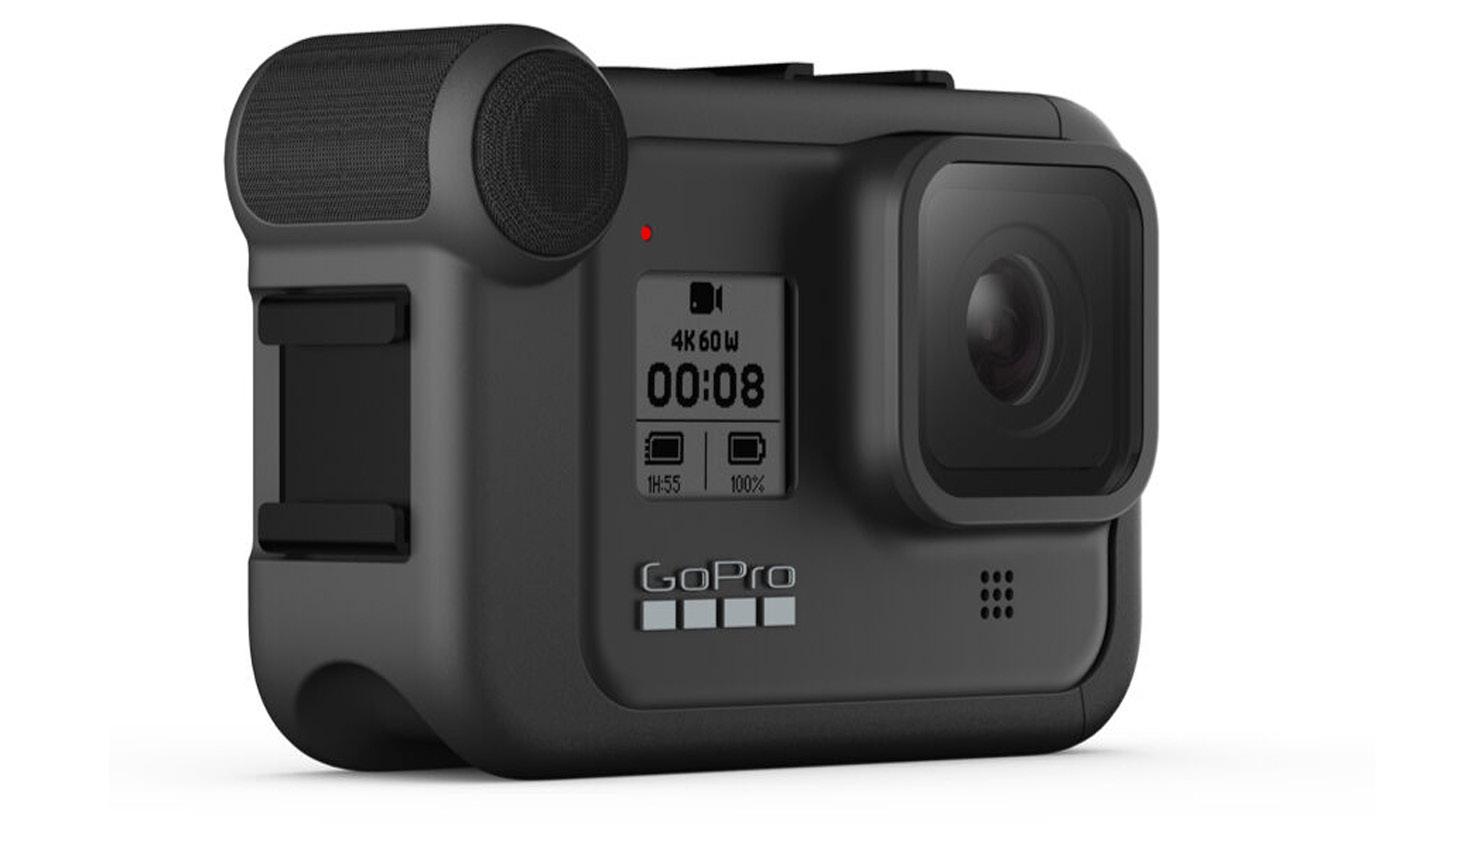
You can extend GoPro’s HERO 8 Black action camera with so-called “Mods.” There are three of them: the Media Mod, Light Mod, and Display Mod. At the time of this writing, only the Media and Light Mod were available. We tested the Media Mod, which is the one you need if you plan on using either of the other two Mods. Media Mod is a robust polycarbonate enclosure for the HERO 8 that encapsulates the camera, except for the front and back. The top corner opposite the lens is home to a directional microphone with what appears to be a figure-8 polar pattern that’s slightly more sensitive at the front. Furthermore, the Media Mod has two cold shoes, one at the side and one on top. Below the backside microphone grill, you’ll find a USB-C type interface, a micro-HDMI port, and a minijack socket for a third-party microphone.
The cold shoes are made of metal and are very strong. I mounted a heavy aluminum Aputure LED video light on each shoe and shook the whole construction violently to see whether the thing would fall apart. It didn’t! In fact, even the door latch of the Media Mod is so strong I hurt my hand trying to open it the first time. It does get better, though it will never be easy to lock/unlock, which is good, of course.
The built-in microphone gives a nice, bright sound. Vloggers will like to mount their own mic, so I’m happy to say there wasn’t a synchronization problem with third-party mics. The HDMI port could output a 100% clean signal only after switching off the icons on the display, which isn’t an easy thing to do with older Ninja recorders.
The Media Mod lives up to expectations, but is really only a first step toward being able to monitor your recordings once the Display Mod becomes available. n


Barcode Studio and Honeywell Voyager Xp 1472g 2D Scanner
From Password Obfuscation to Digital Archiving
Review by Erik Vlietinck
Company: TEC-IT GmbH and
Honeywell International Inc.
Price: Barcode Studio: $104 (1D), $209 (2D); Honeywell Voyager XP 1472g: $187.10
Rating: Barcode Studio: Voyager XP 1472g:
Hot: Barcode Studio: Complete barcode creation solution, data assistant, inexpensive, and free online tool for occasional use Voyager XP 1472g: Fast scanning, accurate, full Bluetooth range, no need to accurately focus scanner on barcode, and robust

Archiving images, video, and other files locally comes with the problem of figuring out what’s on the media after any number of years. Labeling with barcodes is helpful as it avoids typos while quickly showing what an archive contains. TEC-IT has developed Barcode Studio, the most powerful barcode creation app for macOS, and Honeywell has a scanner to match.
Barcode Studio creates more than 100 different symbologies, including linear, 2D, postal, and GS1 composite barcodes. It allows you to adjust every parameter, and create barcodes as image files or vector graphics with the ability to save and print them. It also supports batch barcode generation from an existing list or manually entered data, as well as direct printing to Avery labels and other brands. The app comes in two licensing versions: one for 1D barcodes only, or a more expensive one for 2D barcodes. The interface looks dated, and Retina resolution is nowhere to be found, but its feature set is excellent and the app stable. Barcode Studio even has creative features that you can use, always within each single barcode standard. Its Data Input Assistant helps you to enter barcode data in different formats.
Barcodes need scanning and the Honeywell Voyager XP 1472g is one heck of a scanner. It even scans broken barcodes and very small ones. The 1472g is cordless, scans from a large distance, frees you from exactly pointing the scanner at the barcode, and supports batch scanning, as well as other advanced features.
For archiving, I found that both tools require some setup time but save lots of time afterwards, especially when you’re trying to find images dating back 10 or more years on optical media. Using a disk catalog app as a media asset manager, you can quickly see what’s on any given disc without effort. n
ProGrade Digital Workflow Readers & Memory Cards
Bigger, Faster, and Compatible with Refresh Software
Review by Erik Vlietinck
Company:
ProGrade Digital
Price: CFexpress Type-B & XQD reader: $129.99 • USB 3.2 Gen 2 CFexpress Type-B & SDXC reader: $79.99 • CFexpress Type-B Cobalt 325-GB card, 1,600 MB/s: $549.99 • SDXC UHS-II V90 300R, 300 MB/s 128-GB card: $129.99 • 64-GB microSDXC UHS-II, U3, Class 10 V60 card, 250 MB/s: $34.99
Rating:
Hot: Cards’ speed and sizes; readers’ perfo rmances ProGrade Digital has updated its range of fast memory cards. The SDXC UHS-II, U3, CLASS 10, V90 card and the microSDXC UHS-II, U3, Class 10, V60 card were upgraded to faster speeds, support for ProGrade Digital’s Refresh Pro software, and are now available up to 256-GB capacity. The new 325-GB CFexpress Type-B 2.0 Cobalt class memory card leverages PCIe, Gen 3 interconnects with NVMe host controller interfaces for use in future mirrorless, DSLR, and high-definition video cameras. It offers read speeds of up to 1,600 MB/s.
The company further updated its range of card readers with a Thunderbolt 3 reader for CFexpress Type-B and XQD cards that’s capable of transferring data at speeds up to 5 GB/s and a new USB 3.2 Gen 2 reader that enables the simultaneous transfer of data from both card slots at up to 1.25 GB/s, supporting CFexpress Type-B, SDXC, and UHS-II cards. These readers come with a generous-length cable, as well as an adhesive metal plate to mount the magnet-holding readers onto any surface in your environment (including your laptop’s lid).
One of the major updates is that ProGrade Digital’s Refresh Pro is now supported. This is a software tool that monitors card health, and ensures cards will always perform at maximum
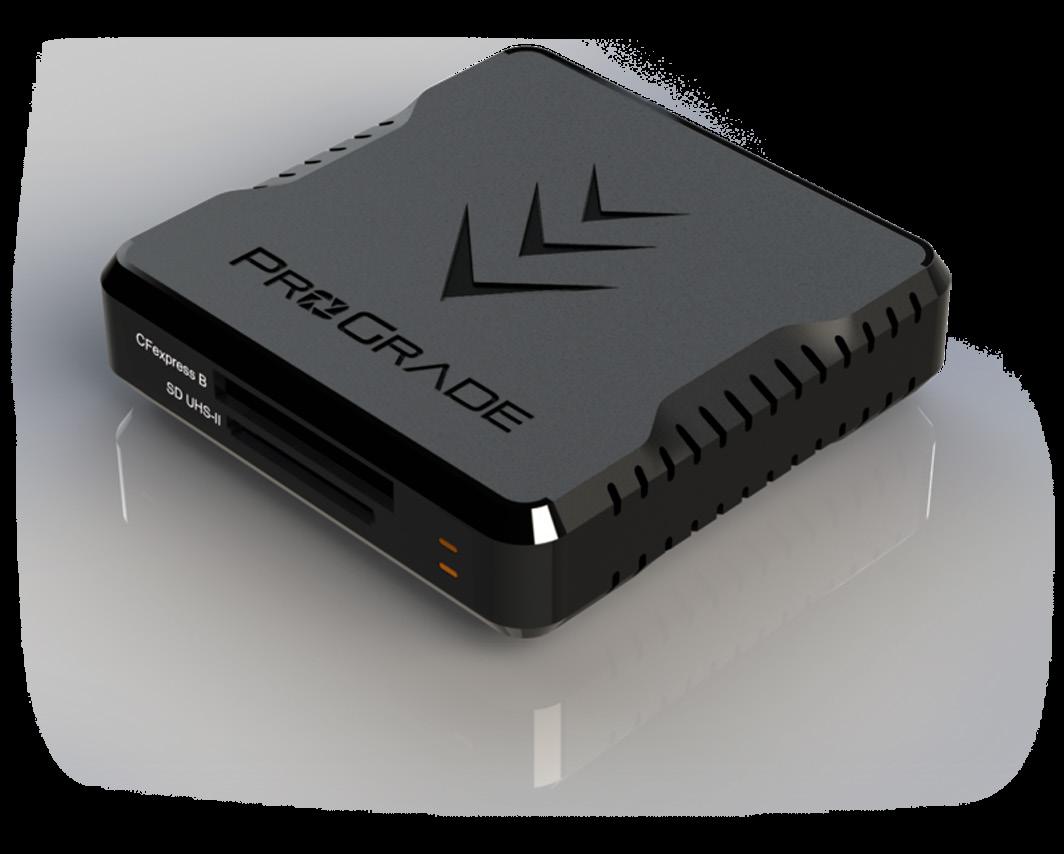

performance. Despite it being around for almost a year, the Refresh Pro software is only compatible with Windows 10 and higher, with a macOS version yet to be released. The new cards and readers all support Refresh Pro whereas the previous versions seemingly did not.
I tested the 325-GB CFexpress Cobalt card with my iMac and its Thunderbolt 3 reader, as well as with a Canon EOS-1D X Mark III, which has a pair of CFexpress slots and is capable of 20 fps fed to a 1,000 images buffer.
The iMac numbers were impressively high with a 733 MB/s write and 1,462 MB/s read speed.
The camera figures were pretty impressive as well. I set the EOS-1D X Mark III to JPEG first, then shot at 20 fps and timed when the buffer would start slowing down the capture speed. That happened only after 160 images and a few hundreds of a second below 10 seconds. That results in the ProGrade Cobalt card supporting a nice 16 fps, which is close to the Canon’s 20-fps capability.
The two other cards ProGrade Digital sent me were a 128-GB SDXC (300 MB/s) and a 64-GB microSDXC (250 MB/s). I tested both of these cards with the previous generation USB-C and the new USB 3.2 Gen 2 combination CFexpress Type-B and SDXC readers.
In tests with AJA System test, the SDXC card managed to read data at 244 MB/s and write it at 203 MB/s, with a few drops in speed at two moments in the transfer of the 1-GB test file. The microSDXC card read data at 225 MB/s and wrote it at 94 MB/s. Both worked fine in a GoPro HERO 8 where they had no trouble shooting at 4K/60 without becoming hotter than a chili pepper.
In the meantime, ProGrade Digital has released their newest 650-GB and 1-TB CFexpress Type-B cards that now have a maximum throughput of up to 1,700 MB/s. n

MindManager for Mac 13

Mac’s Mind Mapping and Flowcharting Tool Gains Project Management Features
Review by Erik Vlietinck
Company:
Corel Corporation
Price: $349
Rating:
Hot: Tag view; Gantt view; more pleasing images; better drag-and-drop; calendar sync
Not: Calendar sync is slow and one-way only MindManager for Mac 13 is a full-scale project management tool, complete with Gantt charts, Project Costing, resource allocation, a choice between simple mind maps and flowcharts, and more.
The app has new templates, such as Kanban. It has both its own view and tags. The new Tag View lets you view the whole map as Kanban, but if you tag a few topics as Kanban, the Tag View lets you switch between Kanban and ordinary views quickly and easily.
A second new feature is the MindManager Snap function that allows you to capture content from anywhere using your iOS (or Android) device and add it to the queue for later use in any mind map. It works incredibly well, and it’s fast with a userfriendly interface on iOS. Once you’ve captured the data, it’s immediately sent to the Mac.
Very important is that you can insert calendar events: You create new ones or insert them from existing events in your Apple Calendar. If you change the event in Apple Calendar, it automatically updates in MindManager. If you adjust the time of the event in MindManager, it won’t automatically ripple through to your calendar app, though. The events feature works a little slowly as it collects all calendar data from Calendar every time you add an event. That should definitely be faster in an update.
Version 13 also has a Gantt view for basic project management, albeit with the cost and project time functionality that you’ll find in every project management app. I do think, however, you’ll need a more powerful app such as OmniPlan or Merlin Project for large, complex projects. Less important perhaps is that you can now also make your diagrams richer in information and more engaging with image thumbnails. The shapes and SmartShapes have been enhanced, as well. n
H&Y KC-100 Magnetic Filter Holder
Simple and Effective Lens Filter Solution
Review by Dave Williams
Company:
H&Y Filters
Price: $119
Rating:
Hot: Simple, effective system
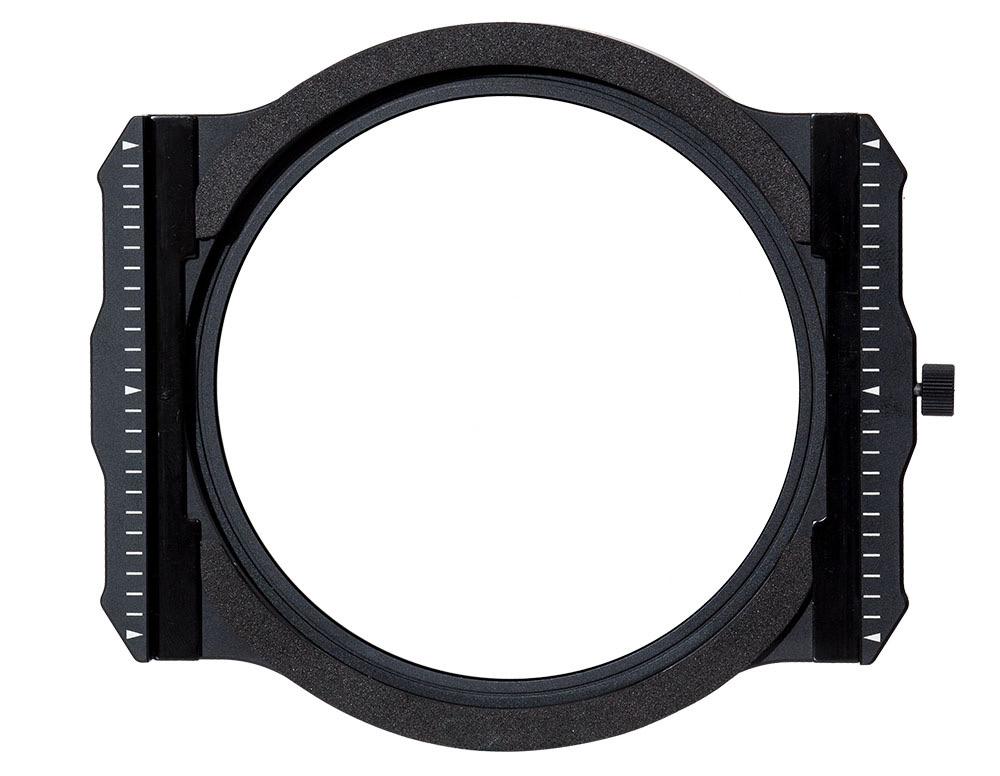
Not: Even though it hasn’t happened, there’s a niggling thought that an expensive filter might fall off H&Y have broken some new ground and may be about to revolutionize the world of filters with their versatile and innovative lens filter system, the KC-100 Magnetic 100mm Filter Holder. This holder includes adapters to fit a range of lens diameters, including 67mm, 72mm, 77mm, and 82mm. And the range of filters that you can attach to the holder is not only compatible with H&Y’s Soft, Hard, Centre and Reverse Graduated Neutral Density Filters but also with your existing third-party 100mm filter glass.
Even though the KC-100 Magnetic 100mm Filter Holder allows you to use your own filters, H&Y’s filters are made of Gorilla Glass, strengthened to atomic precision, affording us the reassurance we need in every shooting situation. Their glass is exceptional throughout their filter range.
The KC-100 holder incorporates an ultra-thin design but still allows for stacking of multiple filters, while the KH-100 model is a little larger and has the additional ability to drop in a rear CPL filter (of course, it’s more expensive at $229).
Just like film cameras, the use of filters seem to be fading away, because their application can be unwieldy and photographers often apply these effects to their images in postproduction. But, when filters can be used in place of postproduction techniques, they should be used, and this thin, magnetic system removes a lot of the hindrances involved in using filters out in the field. In terms of solutions, H&Y has really nailed the simplicity and effectiveness we need as photographers. n

EIZO ColorEdge CS2740
Amazing 27" 4K Monitor
Review by Gilmar Smith
Company:
EIZO Corporation
Price: $1,789
Rating:
Hot: Great color accuracy and quality
Not: Who are we? We’re photographers and retouchers. What do we want in a monitor? We want consistency and color accuracy across the screen. EIZO heard us and recently released the ColorEdge CS2740. It’s the first in the ColorEdge CS series to implement 4K UHD resolution (3840x2160), which is four times the pixel count of Full HD. The ColorEdge CS2740 has a pixel density of 164 ppi for 4K image display, plus USB Type-C connectivity that displays video, transmits USB signals, and supplies power to a connected device such as a laptop or a smartphone.
The display also features a 27" IPS panel; 350cd/m2 brightness; 99% Adobe RGB; 1,000:1 static contrast ratio; and 10-bit simultaneous display from 16-bit LUT for more than one billion colors. The Digital Uniformity Equalizer ensures corner-to-corner color and brightness uniformity. It also comes with Eizo’s ColorNavigator 7 software for color management, Quick Color Match software, and a 5-year warranty.
The ColorEdge CS2740 design features electrostatic switches to access the settings seamlessly on the front of the monitor. It has a built-in carry handle, and it comes with an ergonomic, versatile stand that allows you to swivel, tilt, adjust the height, and pivot the monitor 90°. Unlike the ColorEdge CG series, the CS2740 doesn’t come with a built-in calibrator sensor.
I’ve been using the CS2740 for more than a month now, and I can say that nothing compares to EIZO when it comes to monitors. I spend a lot of time retouching my work, and precise color management is a must for me (and it should be for you, as well!). This is, in my opinion, the perfect 4K monitor for photographers, designers, and video editors, and it comes with an excellent price tag. n

Neon 5
Review by Gilmar Smith
Company:
AKVIS
Price: Home Plugin or Standalone: $39; Home Deluxe: $49; Business: $72
Rating: 4
Hot: Easy to use
Not: Business version is a little pricey for what it does AKVIS Neon 5 is easy-to-use software for adding glowing line effects to an image to make it look like a drawing made with luminescent ink. It’s available for Mac and Windows as a standalone program or as a plug-in to various photo editors, including Photoshop.
AKVIS Neon has two interface modes, Express and Advanced. It also has a series of Presets from which you can choose. The Express mode is very straightforward with five sliders: Detail, Color Variety, Glow Intensity, Image Blur, and Darken. The Advanced mode offers more options. Besides the sliders mentioned above in the Express mode, you get access to Extra Detail, Extra Glow Intensity, Extra Image Blur, and Extra Sharpen Detail. Adjusting the sliders can create effects from sharp glowing contours to blurry glows.
The Advanced mode also has a Decoration tab where you can add and modify Text, Canvas textures, and Frames, plus it has an Adjustment tab for further creative tweaking. The image above was created using the Advanced features.
AKVIS offers four different license types: Home Plugin, Home Standalone, Home Deluxe, and Business. The Home licenses are for personal use only and cost $39 for the Plugin and Standalone versions. For $49, you can get the Home Deluxe version, which gives you both the Photoshop plug-in and standalone versions, but they’re still only for personal use. If you plan to use it for commercial purposes, you’ll need to get the Business version, which goes for $72.
AKVIS Neon does everything it claims on its website, and it’s easy to use. It’s a matter of taste whether you like or don’t like the effect it adds to images. For what it does, I found it to be a little pricey for the Business version. n

Adobe Photoshop Beginners’ Guide 2020: The Hidden Secret
Richard Steve
Review by Peter Bauer
Publisher:
Amazon.com Services LLC
Pages: 89
Price: $2.99 (Kindle); $9.99 (paperback)
Rating:

You can tell a lot about a book by the way it’s organized. In the table of contents, there are eight major headings: Getting Started, The Interface, Layers, The Type Tool, Selection Tools, Retouching Tools, Other Tools, Removing the Background of a Photo, and Designing a Logo. When Photoshop’s Crop tool, Eraser, Pen, and even the Brush tool are relegated to “Other Tools,” you can bet the book has a limited scope. Nonetheless, I tried to keep an open mind. Which lasted until page 5, in which the author shows a screenshot of Photoshop’s New dialog box from several versions ago. (Remember, the title specifies “2020.”) Things went downhill from there: for example, Refine Edge rather than Select and Mask! The book’s content is very outdated and at times somewhat misleading. Don’t waste your money on this book, not even three bucks for the Kindle edition. n

Adobe Photoshop Lightroom Classic Classroom in a Book (2020 release), 1st Edition
Rafael “RC” Concepcion
Review by Peter Bauer
Publisher:
Adobe Press
Pages: 880 (Kindle); 432 (paperback)
Price: $37.67 (Kindle); $59.99 (paperback)
Rating: 5
This is an in-depth look at the latest version of Lightroom Classic. It’s not a new edition of an older Classroom in a Book about
Lightroom; it’s a new book. And it’s by RC Concepcion, so you know the writing style will be comfortable, yet comprehensive. Should you desire to play along, the lesson files are available online to purchasers of the book (Kindle or paperback). Each of the major chapters ends with a series of review questions (and, thankfully, also the answers). The chapters also have a “Photography Showcase,” featuring a bio of a prominent photographer and links to her or his website. Among the names you’ll likely recognize are Joe McNally and Katrin Eismann, but check out all of the photographers’ work. There’s also a bonus lesson, “Publishing Your Photos Online.” If Lightroom is a program you don’t use to its fullest, here’s a great place to learn. n


