


• Decofoam Eggs – Pack of 24 – 12344
• Bright Coloured Buttons Pack of 6 Colours – 20707
• CleverPatch™ Triangular Maxi Coloured Markers – Pack of 10 – 16523
• CleverPatch™ Tacky Glue – 250ml – 16494
• Wooden Skewers – Pack of 100 – 10014
• Other materials required: Scrap paper and a pencil.

1. Plan your button egg designs on a piece of scrap paper. We have chosen to use a different colour for each egg and to create different patterns. The number of buttons you need will depend on your design.

4. Glue the buttons to the egg according to the placement on your plan. Try not to use too much glue as the buttons may slide off your egg before the glue dries.


2. Colour the decofoam eggs using markers, ensuring they match the plan you made in step 1.

5. Continue gluing the buttons until your design is complete. Allow to dry. Repeat steps 3-5 for the remaining coloured eggs and buttons. Allow to dry completely.
CleverTip: You can use a skewer inserted into the bottom of the egg to hold while you glue your buttons. This is especially handy if you need to cover the whole egg!

3. Gather a group of buttons in the colour/s and size/s you need to create a design from your plan.

6. Your Button Eggs are now ready to display!
Place your eggs into a basket or bowl as a centrepiece. Or you could use ribbon to create a hanger for your eggs - glue the ribbon to your egg and allow to dry, then hang them up to display!
• Cardboard Weaving Shapes – White – Pack of 20 – 13261
• Soft Yarn – 100g – Set of 10 Colours – 12257
• CleverPatch™ Cardboard – Assorted Colours – A4 – Pack of 100 – 14932
• Pom Poms – Assorted – Pack of 150 – 16600
• CleverPatch™ Tacky Glue – 250ml – 16494
• Other materials required: Scissors, a pencil, ruler and templates (page 10).

1. Choose a colour of yarn and cut a 3m length.
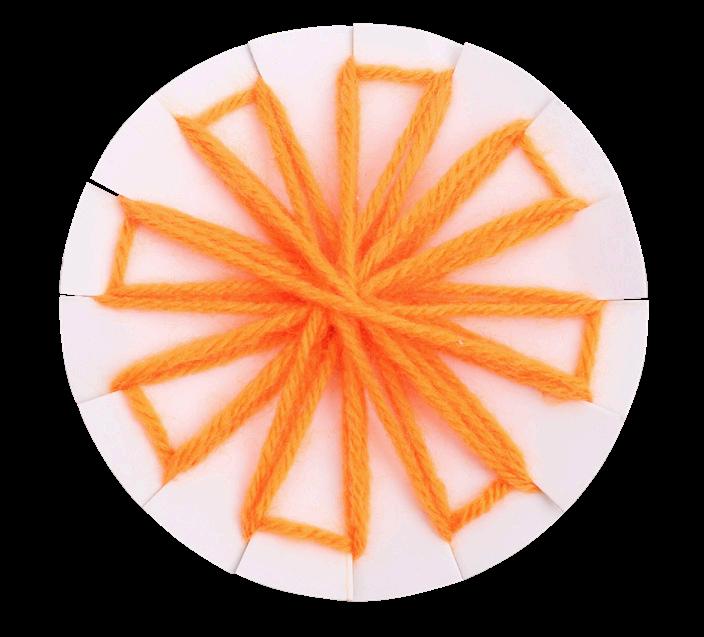
4. Continue weaving a pattern around the shape until you are happy with the design. You might like to experiment with patterns and weave in different directions. Tie a knot to secure and trim any excess yarn.

7. Glue the feet to the bottom and allow to dry.


2. Make a knot in one end of the yarn then place the end through a slit in a cardboard weaving shape.

5. Print out the templates on page 10. Cut out the pieces and trace onto your choice of coloured cardboard. We have chosen to use the same colour as the yarn. You can mix and match colours if you like!

8. Flip the shape over then glue a coloured pom pom near the bottom of your woven design. Allow to dry.

3. Wrap the yarn around the shape, slotting the length between the slits around the edge.

6. Flip the weaving shape over to the back. Glue the ears to the top as shown and allow to dry.

9. Thread a 20cm length of yarn through a woven section near the top. Tie a knot in the ends to create a hanger. Your Woven Bunny is now ready to display!

• CleverPatch™ Air Dry Modelling Clay – White – 1kg Pack – 18634
• Pottery Tool Kit – Pack of 8 – 17273
• Wooden Rolling Pins – Pack of 4 – 16599
• CleverPatch™ Gloss Finish – 240ml – 18797
• CleverPatch™ Acrylic Paint Tube – White – 75ml – 16886
• EverZart Permanent Pens – Black – Pack of 20 – 19810
• Other materials required: Scissors, brushes and template (page 10).

1. Print out the template provided on page 10. Cut out the template and set it aside.

4. Remove the excess clay so you can return it to the pack for future use. Smooth the edges of the clay with your finger until you are happy with the shape.

7. Once your clay has set, paint the dish white and allow to dry.


2. Measure 90g of clay and roll it into a ball. Roll the clay flat so it is 5mm thick and the surface is smooth. Use a small amount of water on your finger to help smooth the surface.


5. Place the clay into the palm of your hand. Using your other hand, press the centre of the clay slightly. Pinch the edges of the clay up to create a shallow dish.

8. Use a permanent pen to add details to your bunny. You might like to add a face or create a pattern!
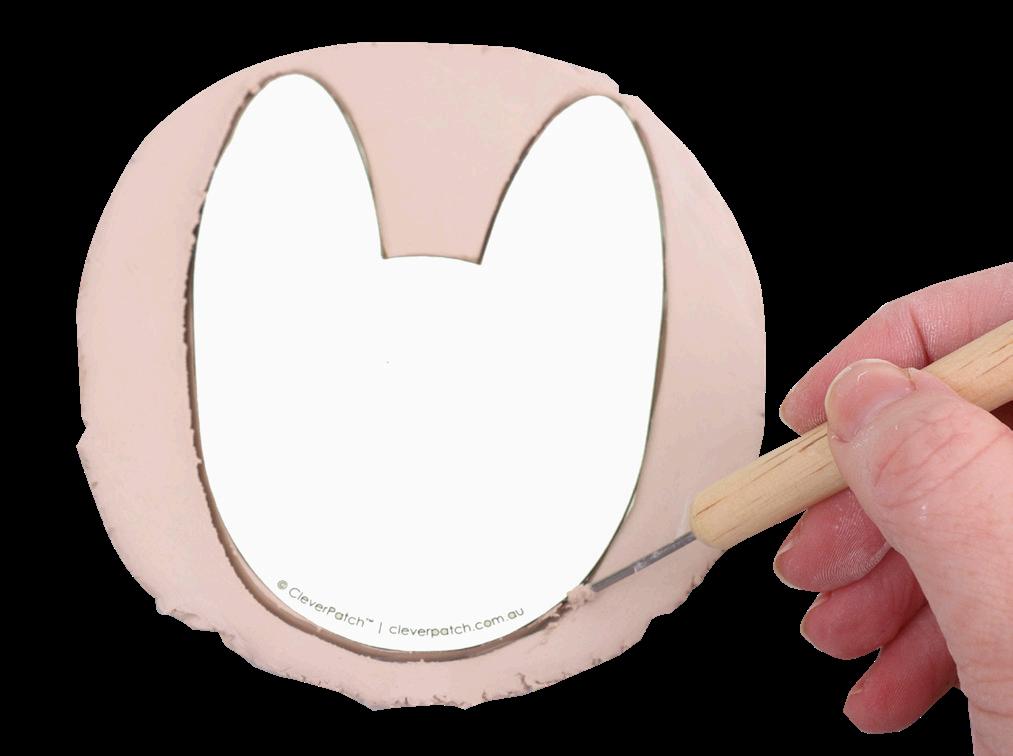
3. Place the template on top of the clay. Use the needle tool to trace around the template and cut away the excess clay. Remove the template.

6. Set aside your bunny dish to dry for at least 24 hours.

9. Apply a coat of gloss finish over your dish and allow to dry. Your Clay Bunny Trinket Dish is now ready to use or gift for Easter!
• CleverPatch™ Air Dry Modelling Clay – Terracotta 1kg Pack – 18636
• Modelling Boards – Pack of 10 – 10909
• Wooden Rolling Pins – Pack of 4 – 16599
• Masking Tape – 24mm x 50m – 11775
• CleverPatch™ Tacky Glue – 250ml – 16494
• CleverPatch™ Acrylic Paint Tube – Dark Green 75ml – 16913
• CleverPatch™ Acrylic Paint Tube – Black 75ml – 16885
• CleverPatch™ Acrylic Paint Tube – White 75ml – 16886

• Other materials required: Scrap paper and paint brushes.

1. Scrunch pieces of scrap paper into a few balls and place onto your modelling board. Scrunch the pieces together to create an arch shape.
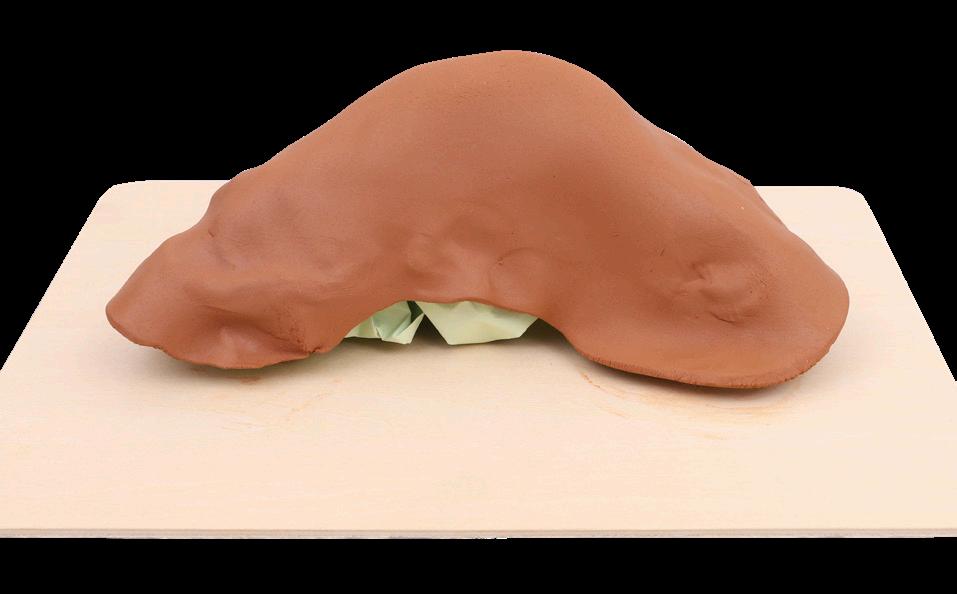
2. Roll 170g of air dry clay flat so it is about 5mm thick. Place the flat piece over your scrunched paper.

4. Roll 80g of clay into a log and bend it into an arch shape. Place the arch at the front to create the opening of the cave. You may not need the whole 80g. Use your fingers to push and smooth the clay together.

5. Blend the clay together, adding more clay pieces as needed. Use your thumb and finger to push the clay and paper into the cave opening slightly to give it more depth.

3. Take another 170g of clay and push small pieces onto the clay arch and paper. Use your finger to blend the clay sections together. Continue adding clay pieces until the paper is completely covered. Start to build up the doorway with any extra clay pieces.

6. Continue smoothing over the clay and adding pieces where needed until you are happy with the surface and shape. Add some clay to the board in front of the opening and smooth over the surface.
Research the story of Jesus’ crucifixion and resurrection as you create your own ‘He is Risen’ Clay Sculpture!


10. Once your clay has completely dried, you should be able to carefully pick up the cave from the modelling board. Apply glue to the board and place the cave back down. Allow to dry.

13. Paint the back wall of the
and allow to dry.

8. Place the disc against the cave opening and make a small mark with your finger where it sits. Roll the disc to the left of the opening and make another mark. Remove the disc and place aside to dry. Use your finger to create an indent in the clay from one mark to the other, for the door to slide across.

11. Apply small pieces of masking tape around the edges of the cave, overlapping onto the board. The pieces don’t need to be perfect as it will create texture for the ground.
CleverTip: If you notice some small cracks in the clay, apply a small amount of water to your finger and smooth over the cracks to blend together. Allow to dry if needed.

14. Mix a small amount of black and white paint together to create grey. Use a dry brush to apply a few brush strokes across the cave’s surface and on the clay disc. Allow to dry.

7. Roll 45g of clay into a thick disc shape about the same size as the opening on your cave.

9. Place the clay aside to dry completely for at least 24 hours. You may need to allow more time depending on how thick your clay is.

12. Use a dry brush and dark green paint to add grass to the board around the cave. Allow to dry.

15. Place the door onto the indent in front of the cave and roll it across to open or close. Your ‘He is Risen’ Clay Sculpture is now ready to display!
• Metal Hoop – 19750
• Embroidery Thread – Set of 10 Colours – 20175
• Armature Wire – 1.5mm x 50m – 20963
• Chain Nose Pliers – 18864
• Other materials required: Scissors, a ruler and template (page 11).

1. Print out the template on page 11. Cut a 30cm length of armature wire.

4. Choose two colours of embroidery thread. Cut four 10cm lengths in one colour. Cut eight 2m lengths in each colour.


7. Continue weaving the thread through the cross and around the hoop until you have filled in the top section between the two small lengths of thread. Tie the thread to the hoop with a double knot and trim any excess. Repeat steps 6 and 7 for the bottom section of the cross and hoop – this will keep the cross centred in the hoop.


2. Place a wire end on the cross template as shown. Use pliers to help bend the wire into position, following the template.

5. Tie each 10cm length to the top and bottom corners of the cross. Tie the other ends of the lengths to the hoop as shown. Make double knots to secure.


8. Repeat the same weaving process for the left and right sections of the hoop using the remaining lengths. Tie a double knot to secure and trim the excess thread. You may need to adjust the spacing of the thread.

3. Twist the ends of the wire together to complete the cross. Use pliers to ensure the wire ends are secure.
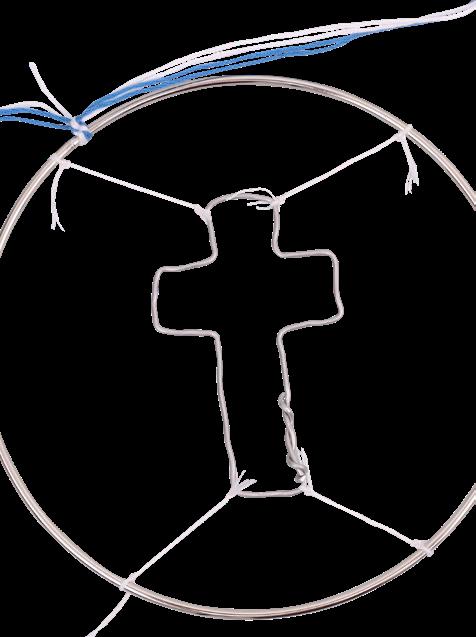

6. Space the tied lengths of thread apart so they become taut. Gather the ends of two 2m lengths in each of your chosen colours. Tie the ends to the top left of the hoop. Weave the thread down through the wire cross and up over the hoop.

9. Thread a 30cm length of thread through the top of the hoop and tie a knot in the ends to create a hanger. Your String Art Cross is now ready to display!
• Impasto Medium – 500ml – 21114
• Stretched Canvas Frame – Large – Square – 16598
• CleverPatch™ Acrylic Paint Tubes – 75ml Set of 14 Colours – 20811
• Other materials required: Scissors, paint brushes, a pencil and template (page 11).

1. Paint the top two thirds of your canvas light blue. Gradually add white from the bottom and blend the two colours using long brush strokes. Add water to your brush if the paint starts to dry to help create a smooth gradient. Allow to dry.

4. Mix impasto with burnt sienna paint. Paint the cross using the mixture. The impasto will add thickness to your paint to help you create a 3D texture. Allow to dry.

7. Choose a light or metallic colour of paint to add highlights to the raised areas on the canvas from the impasto. Use a small paint brush to paint the raised sections with your chosen colour. Allow to dry.


2. Paint a dark green semicircle on the bottom half of your canvas. Allow to dry.

5. Add impasto to white and a small amount of black paint to create a thick grey mixture. Paint another smaller semicircle inside the green. Allow to dry.

8. Paint a yellow border around the outside edge of the cross. Use a dry flat brush to pull the paint away to create a glowing effect. Allow to dry. Paint a thin white border around the cross to add extra glow! Allow to dry.

3. Print out the template on page 11. Cut out the cross and place it near the top edge of the green semicircle on your canvas. Trace around the cross with a pencil and remove the template.

6. Paint a small black semicircle in the centre at the bottom of the grey semicircle. Allow to dry.

9. Paint clouds in the sky along the top third using a dry brush and white paint. Allow to dry. Your 3D Cross Artwork is now ready to display!
Use these templates to help you complete the activity on page 4.
Ears Feet
©CleverPatch™ | cleverpatch.com. au ©CleverPatch™| cleverpatch.com.au ©CleverPatch™ | cleverpatch com.au ©CleverPatch™ | cleverpatch com.au
Clay Bunny Trinket Dish Word Search
Use this template to help you complete the activity on page 5.
| cleverpatch com.au
Use this template to help you complete the activity on page 8.
Use this template to help you complete the activity on page 9.