
18 minute read
Off-Grid Solar Systems


Electrical Energy Independent of the Mains Grid
By Dr. Thomas Scherer (Germany)
What is an off-grid solar system? Where are such installations necessary or practical? What are the most important design considerations? These questions and more will be answered in this article.
In the September/October 2021 edition of Elektor, we took a look at a photovoltaic system connected to the mains grid [1]. Here we will consider essentially autonomous solar installations that are isolated from the public grid. These can be used to generate electrical energy where otherwise a grid connection would be too costly, such as in a shed on an allotment, or impossible, such as on a motorboat or sailing boat. In general these are low-power systems which can handle a peak demand in the range of a few watts to a couple of kilowatts. Also, as the levels of feed-in tariffs continue to fall, new and simplified designs for fixed domestic solar installations that store the generated energy locally in rechargeable batteries solely for private use, rather than feeding into the public supply grid, begin to make more sense. These installations typically have a maximum nominal power output of a few kWp (‘kilowatts peak’). Let us now look at these small-scale systems in more detail.
Principle of Operation
An off-grid solar installation requires at least three components: the solar panel itself; some energy storage in the form of a rechargeable battery; and finally a charge controller that ensures that the battery is not overcharged. For smaller systems, typically operating at 12 V, that is in theory all that is needed. If, however, a 230 V AC output is required at 50 Hz or 60 Hz, a fourth component comes into play: an inverter. Figure 1 shows a typical four-component solution: superficially it looks very simple, but as ever the devil is in the detail. In the following sections we will therefore take a look at these individual components.
Here’s a real-life example: Klaus, a good friend of mine, decided to install a 12 V system in his shed because of the low prices and manageable size of the components involved. To design the system and specify the components there are two questions that first need to be answered.
Energy and Power
The first question to answer is how much total energy needs to be stored by the system. This directly affects the required capacity of the rechargeable battery and hence it is necessary to estimate the average load on the installation. Bearing on this calculation is the number of cloudy days that the system must be able to ‘survive’. Klaus would like to use an electric drill in his shed, and brew the occasional cup of tea, but these relatively rare loads do not significantly affect the
average load calculation. More significant is the requirement to keep cool beer always at hand: this calls for a 12 V refrigerator operating continuously with an average power draw of 20 W. The system should be able to run for at least one day without sun.
The second question is the peak power requirement. From this we can determine the maximum current that will be drawn from the rechargeable battery and hence also specify the parameters of the charge controller (and inverter, if used). Usually this question is very easy to answer: in the case of my friend’s allotment shed the answer was 1 kW, covering the power draw of the water heater, a standard drill and possibly also a water pump, all operating at 230 V.
The Solar Panel Over a 24-hour period the refrigerator in Klaus’ shed will consume a maximum of 500 Wh. Although he lives in a sunny part of southwest Germany, the roof of his shed is unfortunately in the shadow of a tree and so the panel cannot be installed there. Instead it will have to be mounted vertically on the south-facing wall of the shed, which reduces its power output by some 30 % compared to mounting it at the optimal angle to the sun. The panel will therefore have to be over-specified by some 40 % to compensate for this loss. Fortunately there is plenty of space available and the price of panels has fallen considerably in recent years. An advantage of vertical mounting is that in winter snow will not lie on the panel, and moreover, since the sun is at a lower angle, the output will increase: in the best-case scenario the beer will be kept cool even on sunny winter days.
Now we can calculate the required power output from the panel. In this part of Germany we can reckon on an total incident energy of over 1200 kWh/m2 over the course of a year. Over and above the expected daily energy use we should allow a safety margin of 100 %, and so for 500 Wh/day (from spring to autumn) we should be looking to generate 1 kWh/day. On the basis of 8 hours of sunshine per day we arrive at a required power output from the panel of around 125 Wp. On top of that we add the compensation for vertical mounting and arrive at 175 Wp. That means we need a 180 W panel, which will fit comfortably on the shed wall: see Figure 2. The Rechargeable Battery or Batteries The energy required to provide one day of reserve power is at least 500 Wh. At a nominal voltage of 12 V we will need a battery with a capacity of at least 40 Ah. Since our inverter is specified with an output power of 1 kW, we must also keep in mind that at maximum load it will be drawing a current of at least 85 A at its input. This is an important consideration in selecting a battery. First we must decide on the battery chemistry. A lithium battery pack rated at 40 Ah can comfortably deal with this current (about ‘2C’, or twice the current that the battery can deliver for one hour) because of its low internal resistance. However, such a pack can easily cost over €250/US$280/£210
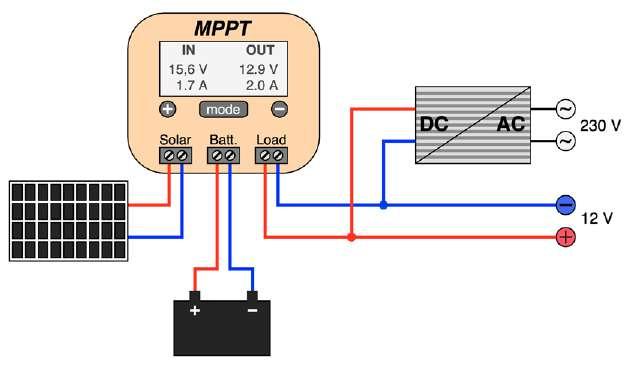
Figure 1: The standard wiring of the four components normally found in an off-grid solar installation. The inverter on the right is only required if it is desired to run equipment designed for 230 V operation.
Figure 2: The 12 V solar panel mounted vertically on the wall of Klaus’ shed. It has an output rating of 180 Wp.
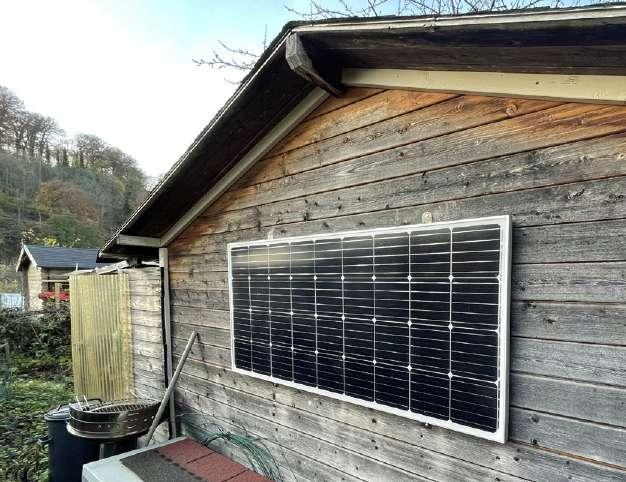
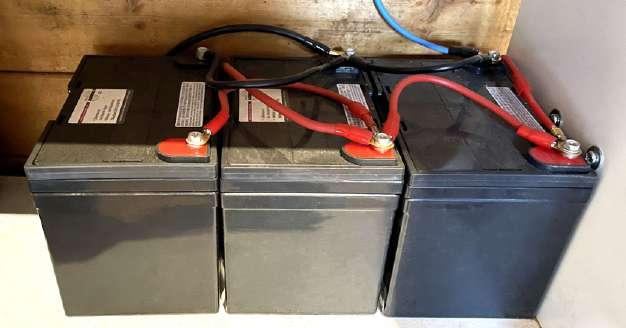
Figure 3: Three 12 V lead gel batteries, each rated at 36 Ah, are wired in parallel to act as energy storage in Klaus’ shed.
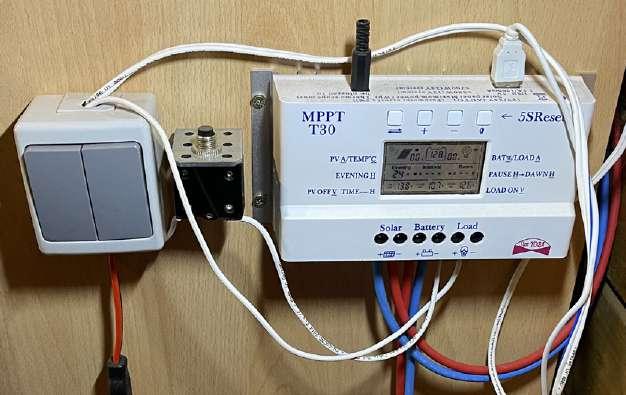
Figure 4: From left to right: light switch, 30 A electromagnetic circuit breaker, and MPPT charge controller.
Figure 5: Charge controllers that look like this one certainly do not have MPPT functionality (even if they carry a sticker bearing those letters!). (Source: United States Department of Energy) and requires careful management. Instead, Klaus plumped for a simple lead-based battery costing a fraction of that price. An obvious choice was a car battery, since these are designed for high peak currents. However, they have disadvantages: low efficiency, low cycle life and high self-discharge rate. For that reason he compromised on a gel battery: this type does not like high discharge currents, and so two batteries, each rated at 36 Ah, were connected in parallel. This combination offers a nominal 864 Wh of stored energy and cost a little under €150/US$170/£130.
In direct sunshine the selected solar panel delivers so much power that it can easily fully charge the batteries in a single day, and their capacity is enough to cover 1.5 days without sunshine. I had some misgivings about the high current draw at the input of the inverter, but Klaus decided to give it a shot and, if two batteries proved not up to the job, to buy another and add it in parallel. With the system installed and the batteries fully charged, a first test was fun using a 1 kW water heater. While running the voltage at the battery terminals fell to 11.7 V, but nevertheless it was easy enough to bring half a litre of water to the boil. At a rough estimate the efficiency of the battery (output energy divided by input energy) at these high currents is at most 50 % and the current does not do the battery’s health any favours. A further 36 Ah battery was therefore ordered and wired in: see Figure 3. Now the initial terminal voltage when discharging at 85 A is a more acceptable 12.6 V, and the total capacity has been increased to nearly 1.3 kWh, guaranteeing over two days of reserve.
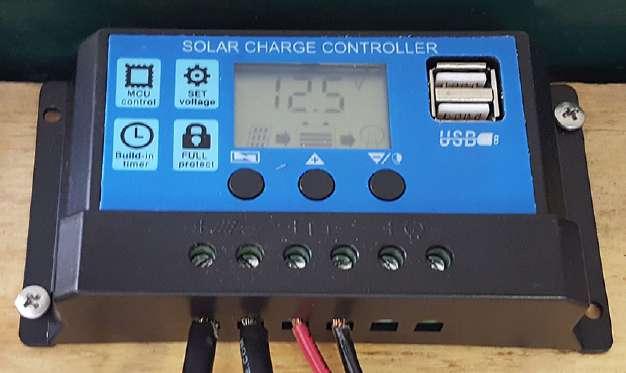
The Charge Controller A search of eBay or of specialist distributors will turn up a wide range of charge controllers. Controllers rated at 10 A go for as little as €15/US$17/£13. However, a 180 Wp panel will deliver up to 15 A at 12 V, and so we need a controller rated at at least 20 A: these cost around €20/US$23/£17. If the charge controller is to be connected as shown in Figure 1, then it is better to choose a 100 A version, costing perhaps a little under €50/US$55/£45. Now let’s go into the details.
The charge controller has the job of charging the battery using the power delivered from the panel, and terminating the charging process when a threshold voltage is reached. This
ensures that the connected battery is not overcharged and hence damaged. Almost all charge controllers also control the load connection and ensure that the load is disconnected when a lower voltage threshold is reached, this time protecting the battery from deep discharge. They invariably employ a microcontroller and so most can be configured to work with different battery types, including lead-acid, lead gel and lithium chemistries. They also automatically adapt to a nominal terminal voltage of either 12 V or 24 V. Often it is also possible to configure the undervoltage and overvoltage thresholds manually.
The next consideration is the charger topology. All low-cost examples use PWM control, even if it says ‘MPPT’ on the device: labels are cheap, but a ‘real’ MPPT charger is better, more complicated and therefore rather more expensive.
In a PWM controller the charge current is adjusted so that the output voltage of the panel is just above the current battery terminal voltage. The battery is therefore charged at the maximum possible current given the amount of incident light on the panel and its size, and the state of charge of the battery over a wide range of conditions. The circuit to do this requires just a simple microcontroller and a power MOSFET: a low-cost solution, but not optimal.
Now, the output power of a panel is given by the product of its output voltage and output current. For any given panel and level of illumination there is a point where this product is maximized; almost invariably at this maximum power point the output voltage of the panel is above the battery voltage. An MPPT (maximum power point tracking) controller continuously determines where this ‘sweet spot’ is and drives a step-down voltage regulator circuit such that it draws the optimal current and delivers the maximum possible output power. In the best case the output power from an MPPT controller can be 30% higher than that from a PWM controller. However, this comes at a cost : even a low-cost MPPT controller will set you back over €50/US$55/£45, and a name-brand unit will be at least €100/US$110/£85. The 30 A charge controller shown in Figure 4 is a low-cost MPPT type, and costs about €60/ US$70/£50, but Klaus felt that the extra output power was worth the money. If you are looking for an MPPT controller, avoid ones like that shown in Figure 5: this type is available in a range of colours and with different markings.
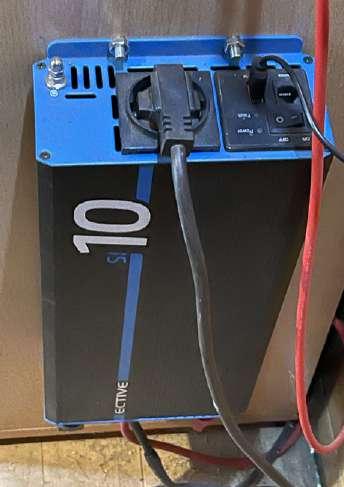
Figure 6: This 1 kW inverter made by Ective has proved very stable and reliable over time.
The Inverter If it is a requirement to generate a 230 V AC output, then an inverter is essential. Low-cost examples with implausible power specifications and output voltage waveforms at best distantly related to a sinusoid are best given a wide berth. An important point to note is that the specification for maximum continuous
Advertisement
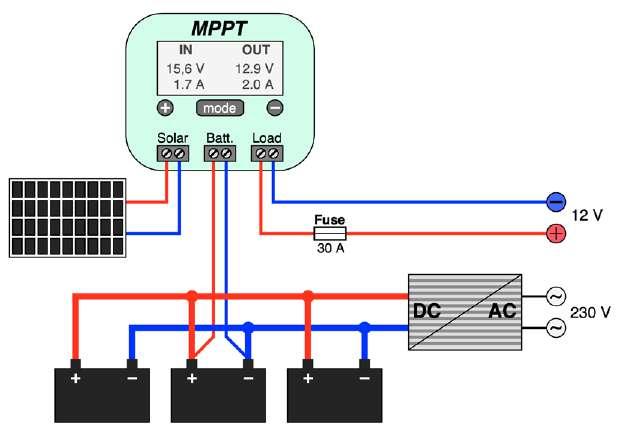
Figure 7: In Klaus’ installation the inverter is connected directly to the rechargeable battery, and the 12 V output of the charge controller is provided with extra protection.
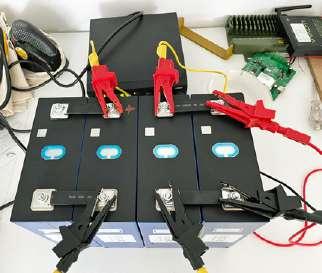
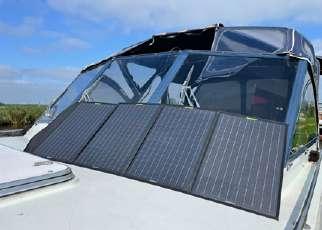
Figure 8: LiFePO4 batteries under test before installation in Martin’s boat. (Source: Martin Jepkens) Figure 9: The foldable solar panel chosen by both Martin and Detlev can be stored below deck when underway. It is rated at 120 Wp. (Source: Martin Jepkens)
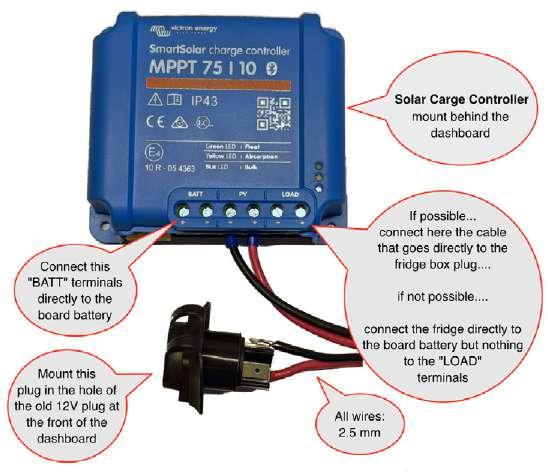
Figure 10: Guide to installing the charge controller in Detlev’s boat. power is given for an ohmic load. Klaus’ 1 kW inverter is perfectly suitable for driving a 1 kW 500 ml water heater; but the situation with an inductive or, less commonly, capacitive load is completely different. In this case we must also check the reactive power: note that the apparent power is always at least as great as the true power. Among the most problematic devices are electric motors, which can exhibit high inrush currents that will trigger the built-in overload protection circuitry on an inadequately-rated inverter. An allowance of 100 % when running motors is not excessive even for a high-quality inverter. Klaus’ 1 kW inverter, shown in Figure 6, can comfortably handle an electric drill and a water pump rated at 450 W. It cost over €200/US$225/£170.
Wiring As you may have surmised from the images so far, the wiring between the solar panel, charge controller, and battery is done using multistranded wire with a 6 mm2 cross-section; the connections to the 12 V cigarette lighter sockets are not shown. The parallel connections between the batteries themselves are made using 16 mm2 wire. The thicknesses of wire used need to be appropriate for the currents to be carried: this is not a good place to try to save money.
The inverter is connected directly to the battery using 16 mm2 wire to minimize losses. A direct connection is only possible when the inverter (like the one here) offers undervoltage protection, switching off to protect the battery from deep discharge. The inverter is only enabled when the 230 V output is actually required: its quiescent current consumption, in the tens of milliamps, would otherwise be an unnecessary waste of energy. The final set-up is thus as shown in Figure 7.
Other Off-Grid Systems
The electricity supply in Klaus’ shed is a typical example of an off-grid solar installation. Various suppliers offer ready-to-go packages comprising a solar panel, charge controller and inverter, with various nominal power levels. If you decide to opt for wind energy rather than solar, then again suitable generators and charge controllers are available based on broadly the same principles. For my part, last year I modified my robot lawn mower for autonomous power [2]. This needed just a 50 W panel and a simple PWM charge controller; no inverter was neces-
sary. Since then I upped the battery capacity from 12 Ah to 30 Ah to help cover the periods of rainy weather we have had. I have also recently replaced the PWM charge controller with a better (and more expensive) MPPT controller, and the system can now generate enough electricity to mow the lawn even late into autumn.
There are of course many other applications for off-grid power. Two of my other friends have boats: Martin navigates his large steelhulled boat through the riverscapes of the Netherlands, while Detlev makes mischief in the Med in his sportsboat with a planing hull. Both often spend days away from a harbour or other mooring where electricity is available and therefore would like to have more independence, especially as far as refrigeration is concerned: not in this instance just for beer, but for other sustenance as well. It would be ecologically unfriendly, not to mention inefficient, to run the engine frequently in order to charge the on-board battery, and so both have installed solar systems.
Now Martin is a smart engineer and doesn’t need to rely on any advice from me. Nevertheless he discusses his ideas with me from time to time. He was wondering whether the generator on his boat could be overloaded if he happened to connect a huge 200 Ah LiFePO4 battery across it. The dangers of such a course of action are explained in a YouTube video [3]. Figure 8 shows how he set up his batteries for capacity testing: he decided on a battery with a LiFePO4 chemistry mainly because of their long cycle life, but also because of their compactness compared to lead-based batteries. In Martin’s boat the on-board battery is separate from the starter battery. In order to ease the burden on the alternator, the batteries are each charged via their own charge controller when the engine is running. A 120 Wp foldable solar panel and charge controller are also fitted for charging when underway (see Figure 9).
Because of the lack of available space, a fixed solar panel installation is not a practical proposition on Detlev’s sportsboat. He therefore decided to use the same type of solar panel as Martin, although neither knew what the other had chosen! Detlev is not an electronics specialist, and at first he wanted to use his extra 120 A on-board battery because it was still rather new. I did some calculations for him and advised him that using the cigarette lighter socket on the ‘bridge’ of his vessel to connect the solar panel was not a great idea from a reliability point of view: I suggested the use a a waterproof Neutrik connector instead. I pre-wired the connector and drew up an installation guide (Figure 10) for his boatbuilder, so that the whole system could be set up in harbour in Istria. The combination of
Advertisement
Advanced ML for every solution
Try free at edgeimpulse.com

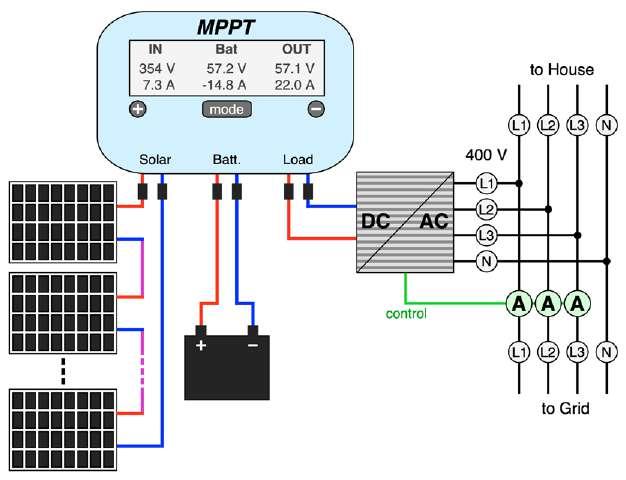
Figure 11: Semi-off-grid solar installation for a house. The three-phase current measurement controls the inverter in such a way that no electrical energy is driven into the grid. most costly part of the system is the battery: a 6.5 kWh LiFePO4 battery costs over €3000/ US$3400/£2600. With a guaranteed 6000 charging cycles at 90 % discharge depth that means that around 36 MWh of energy will have flowed via the battery, making the battery cost around €0.09/US$0.10/£0.08 per kWh. Furthermore, at that point the battery is still not completely dead and so the effective cost per kWh will be even lower. Over the life of the battery a solution like this can save costs of very roughly €13000/US$15000/£11000 using energy one has generated locally. If an electric vehicle is also charged (at a low charge rate) then an installation of this kind can pay for itself within a few years.
210644-01
foldable 120 Wp panel plus a Victron Energy MPPT charge controller came to a total of just under €500/US$550/£450. The charge controller has a Bluetooth connection and all parameters and graphs can be monitored using a smartphone app.
The Semi-Off-Grid House
In these times of dwindling feed-in tariffs interest has grown in a version of the fixed solar installation that as far as possible dedicates all of the generated energy to the demand of the house. An array of, for example, 10 modern solar panels will generate some 3.75 kWp; a suitable MPPT solar charge controller could then charge a LiFePO4 battery with a capacity of say 6.5 kWh; and then a three-phase inverter could be controlled using a current monitoring circuit (the three ammeters towards the bottom right of Figure 11) to ensure that under no circumstances is any electrical energy driven into the grid. All the ‘current’ is therefore locally used. With electricity in Europe in 2022 costing around €0.35/ US$0.40/£0.30 per kWh this is a very attractive option: not only does it avoid having a complex and also expensive grid-tied inverter with integrated charging electronics for the battery, it also avoids a large amount of bureaucracy: not a negligible consideration! (Note that such an arrangement may not be legal in all countries.)
In the arrangement in Figure 11 the savings from using the simplified design add up to €1000/US$1150/£850 to €2000/ US$2300/£1700. It would take a few years to make up for that using a feed-in tariff. The Contributors
Text and figures (unless otherwise stated): Dr. Thomas Scherer Editor: Jens Nickel Translation: Mark Owen Layout: Harmen Heida
Questions or Comments?
Feel free to send technical questions to the Elektor editorial team by e-mail to editor@elektor.com.
RELATED PRODUCTS
> PeakTech 4350 Clamp Meter (SKU 18161) www.elektor.com/18161
> Pokit Meter: Portable Multimeter, Oscilloscope and Logger (SKU 19854) www.elektor.com/19854
> PeakTech 3445 True RMS Digital Multimeter with Bluetooth (SKU 18774) www.elektor.com/18774
WEB LINKS
[1] T. Scherer, “Balcony Power Plant,” Elektor Magazine September/October 2021: www.elektormagazine.com/210326-01 [2] T. Scherer, “Solar Power for Mowing Robots,” Elektor Magazine July/August 2021: www.elektormagazine.com/200553-01 [3] Victron Energy, “How to not blow up your alternator when charging lithium,” YouTube: www.youtube.com/watch?v=jgoIocPgOug


