

Arduino for Radio Amateur Applications
Program and build Arduino-based ham station utilities, tools, and instruments


Bluetooth CW Keyer
Station Power Monitor
AC Current Monitor


Mini Weather Station
RF Probe
DTMF Tone Encoder/Decoder
Waveform Generator


 Glen Popiel, KW5GP
A
A r d u i n o booksbooks
Arduino for Radio Amateur Applications
Program and build Arduino-based ham station utilities, tools, and instruments
● Glen Popiel, KW5GP● This is an Elektor Publication. Elektor is the media brand of Elektor International Media B.V.
PO Box 11, NL-6114-ZG Susteren, The Netherlands
Phone: +31 46 4389444
● All rights reserved. No part of this book may be reproduced in any material form, including photocopying, or storing in any medium by electronic means and whether or not transiently or incidentally to some other use of this publication, without the written permission of the copyright holder except in accordance with the provisions of the Copyright Designs and Patents Act 1988 or under the terms of a licence issued by the Copyright Licencing Agency Ltd., 90 Tottenham Court Road, London, England W1P 9HE. Applications for the copyright holder's permission to reproduce any part of the publication should be addressed to the publishers.
● Declaration
The author, editor, and publisher have used their best efforts in ensuring the correctness of the information contained in this book. They do not assume, and hereby disclaim, any liability to any party for any loss or damage caused by errors or omissions in this book, whether such errors or omissions result from negligence, accident or any other cause. All the programs given in the book are Copyright of the Author and Elektor International Media. These programs may only be used for educational purposes. Written permission from the Author or Elektor must be obtained before any of these programs can be used for commercial purposes.
● British Library Cataloguing in Publication Data
A catalogue record for this book is available from the British Library
●
ISBN 978-3-89576-601-5 Print
ISBN 978-3-89576-602-2 eBook
● © Copyright Elektor International Media
www.elektor.com
Editor: Jan Buiting, MA
Prepress Production: D-Vision, Julian van den Berg
Print: Ipskamp Printing, Enschede, The Netherlands
Elektor is the world's leading source of essential technical information and electronics products for pro engineers, electronics designers, and the companies seeking to engage them. Each day, our international team develops and delivers high-quality content - via a variety of media channels (including magazines, video, digital media, and social media) in several languages - relating to electronics design and DIY electronics. www.elektormagazine.com
● 4
Contents ● 5 Contents About The Author ................................................... 10 Acknowledgements ................................................. 11 How This Book is Organized ........................................... 12 Introduction ....................................................... 14 Chapter 1 ● Welcome To The Arduino .................................... 16 Introduction ..................................................... 16 The Hardware .................................................... 17 History......................................................... 18 What is Open Source? . . . . . . . . . . . . . . . . . . . . . . . . . . . . . . . . . . . . . . . . . . . . . . 19 Open Source Licensing and How it Works ................................. 19 The GNU GPL .................................................... 20 The Lesser Gnu General Public License (LGPL) ............................. 20 The MIT License .................................................. 21 The Creative Commons License........................................ 21 Chapter 2 ● Arduino Boards and Variants ................................ 23 The Arduino UNO ................................................. 23 The Arduino Nano ................................................. 24 The SparkFun Microview ............................................ 25 Wearable Arduinos ................................................ 26 The ATmega32u4 Series ............................................. 28 The Arduino Mega Series ............................................ 29 More Powerful Boards 30 The Arduino Zero 30 The Arduino MKR1000 and MKRZero 31 The PJRC Teensy 4.1 32 The Espressif ESP32 32 The Adafruit Feathers 33 The STM32 34 The Arduino R4 34 New Nanos 35
Arduino for Radio Amateur Applications ● 6 The Raspberry Pi Pico/RP2040 36 The Arduino Nano RP2040 Connect 37 Chapter 3 ● Arduino Shields, Modules and Devices ......................... 38 Arduino Shields 38 LCD Display Shield 39 Color TFT Display Shield 39 Audeme MOVITM Shield 40 Adafruit PowerBoost Shield 41 USB Host Shield 41 Ethernet Shield ................................................... 42 CAN-BUS Shield .................................................. 42 Arduino Modules .................................................. 43 The LCD display .................................................. 43 The Nokia 5110 Display ............................................. 44 Organic LED (OLED) Displays . . . . . . . . . . . . . . . . . . . . . . . . . . . . . . . . . . . . . . . . . 45 Thin Film Transistor (TFT) Color Displays ................................. 46 Level Shifter ..................................................... 47 Bluetooth Module ................................................. 47 GPS Module ..................................................... 48 Real-Time Clock Module ............................................. 48 DS18B20 Temperature Sensor ........................................ 49 DHT20 Relative Humidity and Temperature Sensor Module ..................... 49 GY-906 Infrared Temperature Sensor ................................... 50 BMP280 Air Pressure and Temperature Sensor ............................. 50 BME280 Air Pressure and Temperature Sensor ............................. 50 Rain and Water Sensor ............................................. 51 Wind Speed Sensor ................................................ 51 Lightning Detector Module ........................................... 52 Ethernet Module .................................................. 52 Direct Digital Frequency Synthesis (DDS) Module ........................... 53 Si5351 High Frequency Programmable Clock Generator Module ................. 54
Contents ● 7 DFRobot Gravity: Speech Synthesis V2.0 Module 54 DFRobot Gravity: Offline Language Learning Voice Recognition Module 55 MP3 Player Module 56 ISD1820 Voice Recorder and Playback module 56 DFRobot Gesture Sensor Module 57 TI ADS1115 16-bit Analog to Digital (A/D) Converter Module 57 MCP4725 12-bit Digital to Analog (A/D) Converter Module 58 9 Degree of Freedom (9DOF) Sensor Module 59 ACS712 Hall-Effect Current Sensor Module 59 Non-Invasive AC Current Sensor 60 Ferroelectric RAM (FRAM) Memory Module ................................ 60 SC16IS750 UART Module ............................................ 61 USB Host Module ................................................. 62 4x4 Membrane Keypad ............................................. 62 4x4 Analog Keypad ................................................ 63 Adafruit 4x4 Elastomer Keypad, Monochrome Driver, and Enclosure .............. 63 Addressable RGB LEDs .............................................. 64 eInk/ePaper Displays ............................................... 64 Enclosures ...................................................... 65 Chapter 4 ● Creating Sketches and Documenting Arduino Projects............. 67 Adding New Boards ................................................ 73 Arduino Libraries .................................................. 76 Installing Libraries................................................. 76 Using Libraries ................................................... 78 Troubleshooting .................................................. 79 Memory Issues ................................................... 80 Simple Debugging Methods .......................................... 81 Chapter 5 ● Project Ideas, Tools, Construction, and Troubleshooting ........... 82 From Dreams to Reality ............................................. 82 Finishing Touches ................................................. 86 Tools .......................................................... 87
Arduino for Radio Amateur Applications ● 8 Breadboard and Development Systems 90 Working with the Arduino and External Power 95 Chapter 6 ● Arduino I/O Methods ...................................... 96 Digital I/O 96 Digital I/O with Pulse Width Modulation 97 Analog Input 97 Analog Output 97 Serial I/O 98 1-Wire Bus 99 Serial Peripheral Interface (SPI) Bus 99 Inter-Integrated Circuit (I²C) Bus ..................................... 100 Bluetooth Communication .......................................... 101 USB Communications ............................................. 103 WiFi .......................................................... 105 The CAN Bus ................................................... 105 Interrupts ..................................................... 105 Processing ..................................................... 107 ArduGraph ..................................................... 108 Chapter 7 ● Project 1 – CW Beacon and Foxhunt Keyer ..................... 109 Enhancement Ideas ............................................... 118 Chapter 8 ● Project 2 – Mini Weather Station ............................ 119 Construction Notes ............................................... 129 Enhancement Ideas ............................................... 130 Chapter 9 ● Project 3 — RF Probe with LED Bar Graph ..................... 132 Enhancement Ideas ............................................... 138 Chapter 10 ● Project 4 — DTMF Tone Encoder ............................ 139 Enhancement Ideas ............................................... 147 Chapter 11 ● Project 5 — DTMF Tone Decoder ............................ 148 Troubleshooting ................................................. 158 Enhancement Ideas ............................................... 159 Chapter 12 ● Project 6 — Waveform Generator ........................... 160
Contents ● 9 Enhancement Ideas 181 Chapter 13 ● Project 7 — Auto Power On/Off ............................ 182 Design Parameters 183 The Project Design 184 The Project Flowchart 184 Creating the Sketch 187 Enhancement Ideas 199 Chapter 14 ● Project 8 — Bluetooth CW Keyer ............................ 200 The Master Unit Flowchart 207 The Master Unit Sketch 208 Putting it to use ................................................. 216 Enhancement Ideas ............................................... 217 Chapter 15 ● Project 9 — Station Power Monitor .......................... 218 Design Goals ................................................... 220 Designing the project ............................................. 220 Project Flowchart ................................................ 223 Schematic ..................................................... 224 The Sketch ..................................................... 225 Enhancement Ideas ............................................... 230 Chapter 16 ● Project 10 — AC Current Monitor ........................... 231 Design Goals ................................................... 233 The Design ..................................................... 233 The Sketch ..................................................... 237 Enhancement Ideas ............................................... 240 Chapter 17 ● In Conclusion .......................................... 241 Index ........................................................... 247
Arduino for Radio Amateur Applications
About The Author
Glen Popiel, KW5GP, is a retired network engineer and technology consultant and the author of the ARRL's Arduino for Ham Radio series of books, High Speed Multimedia for Amateur Radio, and numerous magazine articles and product reviews. He is also a regular on W5KUB.com's Amateur Radio Roundtable weekly webcast.
Always taking things apart (and sometimes even getting them to work afterwards), he discovered electronics in high school and has never looked back. As a teenager, he had one of the first "home computers", a Digital Equipment (DEC) PDP-8 minicomputer, complete with state-of-the-art Model 35 Teletype, in his bedroom that he and his friends salvaged from the scrap heap. Over his 50-year career, he has worked for various aerospace and computer manufacturers on radio and military turbojet research data acquisition and control systems, as well as hospital data systems, large-scale governmental agency networks, and utility company data networks.
First published in Kilobaud Microcomputing in 1979 for a project he designed using the RCA CDP1802 "Cosmac" microprocessor, he continues to work with microcontrollers and their applications in Amateur Radio. Since discovering the Arduino a number of years ago, he has developed a passion for this small, powerful, and inexpensive microcontroller and has given a number of seminars and hamfest forums on the subject of microcontrollers and Amateur Radio.
He is a member of the Olive Branch Amateur Radio Club (OBARC), Chickasaw Amateur Radio Association (CARA), and QRP Amateur Radio International (QRP-ARCI). Glen is also a former cat show judge and has exhibited his champion Maine Coon cats all over the United States, with the highlight of winning a Best in Show at Madison Square Garden in 1989.
He currently resides in Southaven, Mississippi, where he continues to create fun and exciting new Arduino projects for ham radio with his mischievous Maine Coon companions, Shadow and Angel.
● 10
Acknowledgements
This book is dedicated to my father, who has always encouraged and inspired me to learn and try new things. Without his guidance and support, I would never have discovered my love for electronics and ham radio.
My personal Arduino adventure would never have happened if my friend, Tim Billingsley (SK), KD5CKP, had not introduced me to the Arduino in 2011. Tim was my sounding board, spellchecker, and grammar coach for my first Arduino book, and somehow managed to keep me sane throughout the whole process. I also need to thank Craig Behrens (SK), NM4T, for his knowledge, guidance, and support in helping my first book become a reality. There are too many others who have helped me along the way to list here, but I want to take this opportunity to thank them all as well.
● 11
Acknowledgements
Arduino for Radio Amateur Applications
How This Book is Organized
This book contains a collection of amateur radio-related projects for the Arduino microcontroller. While the projects in this book were designed with the Arduino Nano in mind, you can also substitute an Arduino UNO without having to make any additional design changes.
While I understand your desire to skip ahead and dive right into the projects, I urge you to take the time to read the chapters leading up to the projects. These preliminary chapters will provide you with vital information and insights into the various modules, components, and technologies used in the projects that follow. They will also provide you with information and guidance on creating a good, functional work area to build and troubleshoot your Arduino projects. The more prepared and organized you are in these areas, the better things will often turn out. This doesn't necessarily mean your work area will stay clean and uncluttered for very long, but it helps to at least start out that way. After working for 20 minutes on a project, my work area tends to degenerate into a complete and total mess, but at least I had good intentions when I started.
Chapter 1, "Welcome to the Arduino", introduces you to the Arduino microcontroller and its history, and also provides a basic understanding of the concepts of Open Source as it pertains to the Arduino, along with the various types of Open Source licenses.
Chapter 2, "Arduino Boards and Variants", discusses the most common Arduino processor boards with an emphasis on the newer Arduino and Arduino-compatible boards, highlighting the boards of interest for use in ham radio-related projects.
Chapter 3, "Arduino Modules and Shields", discusses the various boards and modules that can be used to interface with the Arduino, allowing the Arduino to sense and communicate with the outside world, again, with an emphasis placed on those devices that lend themselves for use in ham radio-related projects.
Chapter 4, "Creating Sketches and Documenting Arduino Projects", introduces the Arduino Integrated Development Environment (IDE), creating sketches (programs), designing and flowcharting sketches, and documenting your Arduino projects.
Chapter 5, "Project Ideas, Tools, Construction, and Troubleshooting", discusses the project creation process, including how to decide what projects to build. It also covers tools, test equipment, and methods on how to troubleshoot your sketches, library problems, hardware, and other issues you may encounter while building Arduino projects.
Chapter 6, "Arduino I/O Methods", discusses in detail the I/O capabilities of the Arduino, including some of the newer methods now available, which method is best for communicating with the various shields and components, and how to best implement each I/O method.
Chapter 7, "Project 1 — CW Beacon and Foxhunt Keyer", shows how to build a CW transmitter beacon controller and foxhunt keyer.
● 12
Chapter 8, "Project 2 — Weather Station", covers how to build a mini-weather station that can sense and display temperature, humidity, barometric pressure, and wind speed without any moving parts.
Chapter 9, "Project 3 — RF Probe with LED Bar Graph", measures RF signal strength and displays it using an addressable RGB LED strip.
Chapter 10, "Project 4 — Touch-tone Encoder", shows how to build a 16-button touchtone encoder to control devices remotely.
Chapter 11, "Project 5 — Touch-tone Decoder", shows how to build a 16-button touchtone decoder to control devices remotely.
Chapter 12, "Project 6 — Waveform Generator", shows how to use a programmable Direct Digital Synthesis (DDS) module to generate sine, square, and triangle waves.
Chapter 13, "Project 7 — Auto Power On/Off", shows how to build an automatic power on/ off project to automatically power on and turn off devices in your vehicle based on whether the engine is running or not, including programmable startup and shutdown delays.
Chapter 14, "Project 8 — Bluetooth CW Keyer", shows how to wirelessly connect your CW keyer paddle to your transmitter via Bluetooth.
Chapter 15, "Project 9 — Station Power Monitor", shows how to monitor your shack's DC power supply voltage and current, as well as ambient temperature.
Chapter 16, "Project 10 —AC Current Monitor", shows how to non-intrusively measure AC current, calculate the Kilowatt/hour usage, and the estimated cost of the measured power usage.
Chapter 17, "In Conclusion", discusses Arduino processors, devices, projects, ideas, and concepts not included in this book to provide inspiration and ideas for other projects to take you beyond the scope of this book.
How This Book is Organized ● 13
Arduino for Radio Amateur Applications
Introduction
Welcome to Arduino for Amateur Radio. I have often said that working with the Arduino is more of an adventure than anything else. Based on my own personal experiences with the Arduino, nothing could be closer to the truth. When I started out on my own Arduino adventure a little over 12 years ago, my first thoughts were of all of the amateur radio projects I could build with the Arduino. Previously, such projects had seemed too complex or expensive to build. At the same time, I did not want to "reinvent the wheel" and revisit amateur radio projects that had already been created just for the sake of using an Arduino, but rather focus on new and unique projects ideas that would be ideally suited for the Arduino.
Additionally, I wanted each of my projects to highlight the unique features of the Arduino, the various hardware modules available, and go beyond the introductory "Hello World" and ‘blinking lights" projects so often associated with basic Arduino projects. Emphasis was placed on creating a wide range of Arduino-based amateur radio projects that could easily be constructed in just a few short days. Along the way, I found that certain modules and components were simply not well documented or understood. I've done my best to "demystify" and simplify the usage of these modules and components so that you can easily incorporate them into your Arduino projects.
My goal was to provide ham-related Arduino projects that would also serve as a platform for you to not only learn about the Arduino, but also to allow you to expand upon the projects themselves, adding your own personal touches to your Arduino projects. To help you on this journey, this book starts by introducing some of the more common Arduino processor boards and add-on components that I have found to be most useful in creating my amateur radio Arduino projects. Each of these boards or components are described in detail, providing you with valuable information about the components that are available for you to use in your own Arduino amateur radio projects.
Above all, don't be afraid to experiment and try something new. The Arduino is inexpensive and easy to work with. The price of Arduino processor boards and modules tends to take away the fear of making mistakes and damaging the board. Without that fear, it's so much easier to learn how to solder and build projects, and not obsess over what happens if you make a mistake. Go for it and have fun along the way.
Since there are a large number of introductory Arduino books already available, this book assumes that you have a working knowledge of the Arduino and the Arduino Integrated Development Environment (IDE). If you are new to the Arduino, there are several excellent books and tutorials that you may find helpful. My personal favorites include Beginning Arduino by Michael McRoberts (ISBN 978-1430232407) and Arduino Cookbook by Michael Margolis (ISBN 978-1449313876). Another excellent book for learning the hardware interfacing aspect of the Arduino is Exploring Arduino: Tools and Techniques for Engineering Wizardry by Jeremy Blum (ISBN 978-1-118-54936-0). There are also some excellent Arduino tutorials available online at www.arduino.cc, www.learn.adafruit.com, and https://learn.sparkfun.com. Recently, I have discovered several other very good online course and tutorials available for the Arduino. The Programming Learning Academy
● 14
(www.programmingelectronics.com) offers a free 12-lesson Arduino Video Course and an inexpensive e-book PDF download of the Arduino Course for Absolute Beginners by Michael James. Both are excellent Arduino learning tools. YouTube also has a tremendous amount of tutorial videos for the Arduino.
This book also assumes that you have a basic working knowledge of electronic components and construction techniques. Because the Arduino is so easy to work with, you don't have to be an expert, but you should be able to solder and build basic electronic projects. If you're new to electronics, check out Electronics For Dummies by Cathleen Shamieh (ISBN 978 1119675594), Understanding Basic Electronics 2nd Edition by Walter Banzhaf, WB1ANE (ISBN 978-087259-082-3), Beginner's Guide to Reading Schematics by Stan Gibilsco (ISBN 978-1260031102), and the ARRL Handbook (ISBN 978-1-62595-158-8), published annually by the American Radio Relay League (ARRL). Personally, I feel that every ham should have a copy of the ARRL Handbook in their library. I find myself constantly referring to mine for research or when I want to learn some new aspect of electronics or ham radio.
Since the projects in this book are ham radio-related, you may need an Amateur Radio Operator's license to use those projects on the air. While not all of the projects require a ham license, I strongly encourage you to become a ham if you are not already. As a ham, you'll find that there is strength in numbers, and more than likely, you can find other hams in your area that are interested in constructing Arduino and other projects. There is something for everyone in the ham radio community, and there is no reason for you to go it alone as you begin your Arduino adventure. I recommend that you find a local club at www.arrl.org/find-a-club and attend a meeting or two. You will not find a friendlier, more helpful group of people anywhere, and there's a good chance that you'll find other Arduino enthusiasts to work with. If you're interested in becoming a radio amateur, check out Ham Radio for Dummies (ISBN 978-1119695608) by H. Ward Silver, N0AX, and the ARRL Ham Radio Licensing Manual.
All of the sketches in this book were created using version 1.8.19 of the Arduino IDE available from www.arduino.cc. The libraries and sketches for the projects in this book are available from www.kw5gp.com/Elektor. If you encounter any problems compiling the sketches, please verify that you are using the correct version of the IDE and that you have the libraries properly installed. And by all means, feel free to contact me, I'll be glad to help as much as I can.
Glen Popiel – KW5GPkw5gp@arrl.net
Fall 2023
Introduction ● 15
Chapter 1 ● Welcome To The Arduino
Introduction
Since its introduction in 2005, the Arduino has become wildly popular among the hobbyist community. There are now an estimated ten million Arduino UNO boards in use, not counting the many "clone" and "variant" boards produced under the Arduino's unique Open Source licensing model. With its standalone single-board design, the Arduino can be interfaced to a wide variety of sensors and devices easily and inexpensively. Originally based on the Atmel (now Microchip Technology) series of microcontrollers, the Arduino, has onboard digital and analog I/O pins, along with support for two industry-standard bus protocols, Serial Peripheral Interface (SPI) and Inter-Integrated Circuit (I2C). This built-in functionality is what helps make the Arduino such an easy and inexpensive way to build powerful and versatile electronic projects.
Released under the Open Source Creative Commons Attribution Share-Alike license, the Arduino is totally Open Source. From the board designs and schematic files to the program sketches (a sketch is the term for an Arduino program) and libraries, everything is Open Source, and you are free to do whatever you desire, as long as you properly attribute the authors in your work and share any changes you make to the existing code and libraries. For the most part, this means that everything about the Arduino is either free or very low cost. Because of this Open Source freedom to develop and market Arduino–compatible boards, the term "Arduino" is often used to describe both the official Arduino boards, as well as the many compatible boards. Over time, the term "Arduino" has also become the generic designation for the many other microcontrollers that can be used with the Arduino Integrated Development Environment (IDE).
One of the primary benefits of Open Source is that you have a whole community of hobbyists developing and freely sharing their projects. This can save you many hours of work if someone is working on a project similar to yours. You can integrate their libraries and code into your project, turning what could have been a months-long programming ordeal into a much shorter, more enjoyable path to a finished project.
Along with the Arduino board itself, there is a vast selection of components and modules designed to interface with the Arduino. These devices use the various device communication protocols such as SPI and I²C that are already built into the Arduino, allowing simple connections to the Arduino using only a few wires. Now you can create complex projects without having to dig through piles of datasheets and solder for months like you had to in days gone by. Through the use of pre-existing "libraries" that are used to communicate with these external modules, often all that is needed is a little bit of additional coding to create a fully functional project. Libraries are pre-written blocks of code, similar to the device drivers you install on a PC, that you can use to interface external modules such as a TFT (Thin-Film Transistor) display without having to know the technical details of how to communicate with the device. Additional libraries are easily added to the IDE, allowing instant access to everything you need to integrate a new module or device into your Arduino project.
● 16
Arduino for Radio Amateur Applications

The Hardware
Although there are now numerous variations on the Arduino (also known as "variants"), the most common Arduino, the UNO, consists of an Atmel ATmega328 8-bit microcontroller with a clock speed of 16 MHz. The ATmega328 has 32 KB of Flash memory, 2 KB of Static RAM (SRAM), and 1 KB of EEPROM onboard. For I/O, the Arduino has 14 digital I/O pins with 6 of these pins capable of Pulse Width Modulation (PWM), and six 10-bit Analog Inputs that can also be used for digital I/O pins. Two of the digital pins also directly support external hardware interrupts, and all 24 I/O pins support pin state change interrupts, allowing external hardware control of program execution.
Typically powered via the USB programming port, with its low current drain and onboard power regulator, the Arduino is ideally suited for battery powered projects. The Arduino supports multiple communication protocols, including standard Serial, SPI, I2C, and OneWire. Designed for expandability, the Arduino I/O and power connections are brought out to a series of headers on the main board. The header layout is standard among the majority of the UNO-type boards and many of the basic Arduino add-on boards, known as Shields, can be plugged directly into these headers and stacked one on top of the other, providing power and I/O directly to the Shield without any additional wiring needed.
Many types of shields are available, including all manner of displays, Ethernet, WiFi, Motor Driver, MP3, and a wide array of other devices. My personal favorite is the Prototyping shield, which allows you to build your own interface to an even wider array of Arduino-compatible components, modules, and breakout boards such as GPS, Real Time Clock, Compass, Text to Speech, and Lightning Detection modules along with an endless list of sensors such accelerometers, pressure, humidity, proximity, motion, vibration, temperature, wind speed, and many more.
● 17
Figure 1.1: An Arduino UNO R3, the most common of the Arduino microcontroller boards.
● Welcome To The
Chapter 1
Arduino
Arduino for Radio Amateur Applications
History
As living proof that necessity is the mother of invention; the Arduino was created at the Interaction Design Institute Ivrea, in the northern Italian town of Ivrea. Originally designed as an inexpensive Open Source tool for students, replacing the more expensive and less powerful Parallax "Basic Stamp" development platform then used by students at the institute, the Arduino began as a thesis project in 2003 by artist and design student, Hernando Barragán, designed for a non-technical audience.
This project, known as Wiring, was designed on a ready-to-use circuit board with an Integrated Development Environment (IDE) based on the Processing Language created by Ben Fry and one of Barragán's thesis advisors, Casey Reas. Wiring was then adapted in 2005 by a team co-founded by another of Barragán's thesis advisors, Massimo Banzi. This team consisted of Hernando Barragán, Massimo Banzi, David Cuartielles, Dave Mellis, Gianluca Marino, and Nicholas Zambetti. Their goal was to further simplify the Wiring platform and design a simple, inexpensive Open Source prototyping platform to be used by non-technical artists, designers, and others in the creative field. Banzi's design philosophy regarding the Arduino is best outlined in his quote "Fifty years ago, to write software you needed people in white aprons who knew everything about vacuum tubes. Now, even my mom can program".
Unfortunately, at the same time, due a lack of funding the Institute was forced to close its doors. Fearing their projects would not survive or be misappropriated, the team decided to make the entire project Open Source. Released under the Open Source Creative Commons license, the Arduino became one of the first, if not the first, Open Source hardware products. Needing a name for the project, the team decided to name it Arduino; after a local pub named "Bar Di Re Arduino" which honors the memory of Italian King Arduin.
Everything about the Arduino is Open Source. The board designs and schematic files are Open Source, meaning that anyone can create their own version of the Arduino free of charge. The Creative Commons licensing agreement allows for unrestricted personal and commercial derivatives as long as the developer gives credit to Arduino and releases their work under the same license. Only the name Arduino is trademarked, which is why the various Arduino-compatible boards have names like Iduino, Ardweeny, Boarduino, Freeduino, etc. Typically these boards are fully compatible with their official Arduino counterpart and may include additional features not on the original Arduino board.
Massimo Banzi's statement about the Arduino project, "You don't need anyone's permission to make something great", and Arduino team member David Cuartielles quote, "The philosophy behind Arduino is that if you want to learn electronics, you should be able to learn as you go from day one, instead of starting by learning algebra" sums up what has made the Arduino so popular among hobbyists and builders. The collective knowledge base of Arduino sketches and program libraries is immense and constantly growing, allowing the average hobbyist to quickly and easily develop complex projects that once took mountains of datasheets and components to build. The Arduino phenomenon has sparked the establishment of a number of suppliers for add-on boards, modules, and sensors adapted for the Arduino. The current Arduino team consisting of Massimo Banzi, David Cuartielles, Tom
● 18
Igoe, Gianluca Martino, and David Mellis has continued to expand and promote the Arduino family of products.
Since its inception, the Arduino product line has been constantly expanding to include more powerful and faster platforms such as the recently released Arduino UNO R4 series with Renesas RA4M1 and ESP32-S3 microcontrollers, the ARM-Cortex M-series microcontroller-based MKR family, and the enhanced Arduino Nano family. Because of this ongoing expansion of the microcontrollers that support the Arduino "ecosystem", the Arduino and all of its variations now have the power needed to support processing-intensive applications and high speed communications.
What is Open Source?
Generally speaking, Open Source refers to software in which the source code is freely available to the general public for use and/or modification. Probably the best example of Open Source software is the Linux Operating System created by Linus Torvalds. Linux has evolved into a very powerful operating system, and the vast majority of applications that run on Linux are Open Source. A large percentage of the web servers on the Internet are Linux-based, running the Open Source Apache Web Server. The popular Firefox web browser is also Open Source, and the list goes on. Even the Android phone operating system is based on Linux and is itself Open Source. This ability to modify and adapt existing software is one of the cornerstones of the Open Source movement and is what had led to its popularity and success.
The Arduino team took the concept of Open Source to a whole new level. Everything about the Arduino, hardware and software, is released under the Creative Commons Open Source License. This means that not only is the Integrated Development Environment (IDE) software for the Arduino Open Source, the Arduino hardware itself is also Open Source. All of the board design files and schematics are Open Source, meaning that anyone can use these files to create their own Arduino board. In fact, everything on the Arduino website, www.arduino.cc, is released as Open Source. As the Arduino developer community grows, so does the number of Open Source Applications and add-on products, also released as Open Source. While it may be easier to buy an Arduino board, shield or module, in the vast majority of cases, everything you need to etch and build your own board is freely available for you to do as you wish. The only real restriction is that you have to give your work back to the Open Source Community under the same Open Source Licensing. What more could a hobbyist ask for? Everything about the Arduino is either free or low cost. You have a whole community of developers at your back, creating code and projects that you can use in your own projects, saving you weeks and months of development. As you will see in some of the projects in this book, it takes longer to wire and solder things together than it does to actually get it working. That is the true power of Open Source, everyone working together as a collective, freely sharing their work, so that others can join in on the fun.
Open Source Licensing and How it Works
There are several main variations on the Open Source Licensing Model, but all are intended to allow the general public to freely use, modify, and distribute their work. The most common Open Sources License models you will encounter include the Gnu General Public
Chapter 1 ● Welcome To The Arduino ● 19
License (GPL), Lesser GPL (LGPL), MIT, and the Creative Commons Licenses. As a general rule, for the average hobbyist, this means you are free to do as you wish. However, there will always be those of us that come up with that really cool project we can package up and sell to finance our next idea. It is important for that group to review and understand the various license models you may encounter in the Open Source world.
The GNU GPL
As with all Open Source Licensing models, the GNU General Public License (GPL) is intended to guarantee your freedom to share, modify, and distribute software freely. Developers who release software under the GPL desire their work to be free and remain free, no matter who changes or distribute the program. The GPL allows you to distribute and publish the software as long as you provide the copyright notice, disclaimer of warranty, and keep intact all notices that refer to the license. Any modified files must carry prominent notices stating that you changed the files and the date of any changes.
Any work that you distribute and publish must be licensed as a whole under the same license. You must also accompany the software with either a machine-readable copy of the source code or a written offer to provide a complete machine readable copy of the software. Recipients of your software will automatically be granted the same license to copy, distribute, and modify the software. One major restriction to the GPL is that it does not permit incorporating GPL software into proprietary programs.
The copyright usage in the GPL is commonly referred to as "copyleft", meaning that rather than using the copyright process to restrict users as with proprietary software, the GPL copyright is used to ensure that every user has the same freedoms as the creator of the software.
There are two major versions of the GPL, Version 2, and the more recent Version 3. There are no radical differences between the two versions, the changes are primarily to make the license easier for everyone to use and understand. Version 3 also addresses laws that prohibit bypassing Digital Rights Management (DRM). This is primarily for codecs and other software that deals with DRM content. Additional changes were made to protect your right to "tinker" and prevent hardware restrictions that don't allow modified GPL programs to run. In an effort to prevent this form of restriction, also known as Tivoization, Version 3 of the GPL has language that specifically prevents such restriction and restores your right to make changes to the software that works on the hardware it was originally intended to run on. Finally, Version 3 of the GPL also includes stronger protections against patent threats.
The Lesser Gnu General Public License (LGPL)
The LGPL is very similar to the GPL, except that it permits the usage of program libraries in proprietary programs. This form of licensing is generally to encourage more widespread usage of a program library in an effort for the library to become a de-facto standard, or as a substitute for a proprietary library. As with the GPL, you must make your library modifications available under the same licensing model, but you do not have to release your proprietary code. In most cases, it is preferable to use the standard GPL licensing model.
Arduino for Radio Amateur Applications ● 20
The MIT License
Originating at the Massachusetts Institute of Technology, the MIT license is a permissive free software license. This license permits reuse of the software within proprietary software, provided all copies of the software include the MIT license terms. The proprietary software will retain its proprietary nature even though it incorporates software licensed under the MIT license. This license is considered to be GPL-compatible, meaning that the GPL permits combination and redistribution with software that uses the MIT License. The MIT license also states more explicitly the rights granted to the end user, including the right to use, copy, modify, merge, publish, distribute, sublicense, and/or sell the software.
The Creative Commons License
There are multiple versions of the Creative Commons License, each with different terms and conditions:
1. Attribution (CC BY) - This license allows others to distribute, remix, tweak, and build upon a work, even commercially, as long as they credit the creator for the original creation.
2. Attribution-NonCommercial (CC BY-NC) – This license allows others to remix, tweak, and build upon a work non-commercially. While any new works must also acknowledge the creator and be non-commercial, any derivative works are not required to be licensed on the same terms.
3. Attribution-ShareAlike (CC BY-SA) – This is the most common form of the Creative Commons License. As with the Attribution license, it allows others to distribute, remix, tweak, and build upon a work, even commercially, as long as they credit the creator for the original creation and license their new creation under the same license terms. All new works based on yours convey the same license, so any derivatives will also allow commercial use.
4. Attribution-NonCommercial-ShareAlike (CC BY-NC-SA) – This license allows others to distribute, remix, tweak, and build upon a work non-commercially, as long as they credit the creator and license their new creations under the identical licensing terms.
5. Attribution-No Derivs (CC BY-ND) – This license allows for redistribution, both commercial and non-commercial, as long as it is passed along unchanged and in its entirety, with credit given to the original creator.
6. Attribution-NonCommercial-NoDerivs (CC BY-NC-ND) – This is the most restrictive of the Creative Commons licenses, only allowing others to download a work and share them with others as long as they credit the creator. Works released under this license cannot be modified in any way, nor can they be used commercially.
The Arduino is released under the Creative Commons Attribution-ShareAlike (CC BY-SA) license. You can freely use the original design files and content from the Arduino website, www.arduino.cc, both commercially and non-commercially, as long as credit is given to Arduino and any derivative work is released under the same licensing. So, if by chance you do create something that you would like to sell, you are free to do so, as long as you give the appropriate credit to Arduino and follow the requirements outlined in the FAQ on the Arduino website, as you may not be required to release your source code if you follow specific
Chapter 1 ● Welcome To The Arduino ● 21
Arduino for Radio Amateur Applications
guidelines. If you include libraries in your work, be sure you use them within their licensing guidelines. The core Arduino libraries are released under the LGPL and the Java-based IDE is released under the GPL.
It is this Open Source licensing that has made the Arduino so popular among hobbyists. You have the freedom to do just about anything you want and there are many others developing code and libraries you can freely incorporate in your code, which helps make developing on the Arduino so much fun. For example, I know very little about Fast Fourier transforms, but there is a fully functional library out there just waiting for me to come up with a way to use it. That's the beauty of the Arduino and Open Source. You don't have to be a programming genius to create fully functional projects as long as you have the entire Open Source developer community at your back. And, when you do start creating wonderful new things, remember to share them back to the community, so that others following in your footsteps can benefit from your work and create wonderful new things of their own.
● 22
Chapter 2 ● Arduino Boards and Variants
Choosing which Arduino board to use in your project can be a daunting task. Since the Arduino was first introduced in 2005, many new Arduino and Arduino variant boards have been developed, each with its own set of features and enhancements. Some of the older boards have gone by the wayside and been discontinued, but due to the Open Source nature of the Arduino, many of these older boards can still be found online. In this chapter, we will take a look at a few of the various Arduino boards that are currently available to help you determine which board would be best suited for your Arduino project ideas.
The Arduino UNO
When you talk about Arduino boards, the Arduino UNO (Figure 2.1) is often the first thing that comes to mind. The UNO is considered to be the original "mainstream" Arduino board and is the Arduino board that most people start out with. The majority of the existing libraries and sketches are designed to work with the UNO, so you have a wide variety of existing code to work with as you start out on your Arduino adventures. The Atmel ATmega328 series of processors has formed the core of the Arduino environment for a number of years, however, newer, faster, and more powerful processors are beginning to dominate the Arduino family. That being said, I still prefer to use the UNO in many of my projects, primarily for its low cost, simplicity, and ease of use.

The UNO uses an ATmega328 series microcontroller running at a clock speed of 16 MHz. It has 14 digital I/O pins and six 10-bit Analog-to-Digital pins that can also be used for digital I/O, if desired. Six of the digital I/O pins support pulse width modulation (PWM). Pulse Width Modulation allows you to control the pulse width of a square wave on a digital I/O pin to do things like dim an LED or generate an audio tone. Two of the digital I/O pins
Chapter
● Arduino Boards and Variants ● 23
2
Figure 2.1: The Arduino UNO R3.
Arduino for Radio Amateur Applications
can be configured to support external interrupts for hardware program control, and all 20 I/O pins can be configured to provide a program interrupt when the I/O pin changes state. Interrupts can be pretty handy, and we'll talk more about them later.
The Arduino UNO has three types of onboard memory: Flash memory, Static Random Access memory (SRAM), and Electrically-Erasable Programmable Read-Only memory (EEPROM). Flash memory is rewritable memory that is primarily used to store your Arduino programs, known as sketches. Flash memory is semi-permanent and retains its contents even when power to the Arduino is turned off. You can rewrite the contents of Flash memory approximately 100,000 times, meaning that you can use the same Arduino board in dozens, and even hundreds of projects simply by uploading a different sketch. Flash memory can also be used to hold data that doesn't change, such as lookup tables, text, and other constants in order to save valuable SRAM space through the use of the PROGMEM keyword. SRAM is used to hold your program and system variables, and its contents are volatile, meaning that the contents are lost when the Arduino is reset or powered off. The onboard EEPROM can be used to retain data such as calibration values and similar settings between reset or power cycles. As with Flash memory, the Arduino EEPROM has a lifetime of approximately 100,000 write cycles. The Arduino UNO has 32 KB of Flash, 2 KB of SRAM, and 1KB of EEPROM onboard.
The Arduino UNO can be powered through the USB port or by 7-20 VDC on either its onboard DC power jack or connected to the Vin pin on the board itself. The ATmega-series microcontrollers support the industry-standard Serial Peripheral Interface (SPI), and Inter-Integrated (I2C) bus communication protocols. The UNO, as with many other Arduino boards, has a standard 2.7 x 2.1 inch (58.6 mm x 53.3 mm) footprint. Female headers on the edges of the board allow for the stacking of add-on interface boards, known as shields, without the need for additional wiring.
The Arduino Nano

Not all boards come in the standard Arduino footprint that allows the use of shields. Some, such as the Arduino Nano (Figure 2.2), Mini (Figure 2.3), and Pico (Figure 2.4), are much smaller, yet have the same functionality and features of their larger brothers. These smaller boards allow you to build smaller, more compact projects, yet still have access to all of the
● 24
Figure 2.2: The Arduino Nano.
standard libraries and code bases available for the UNO. These baby Arduinos, some not much larger than a postage stamp or two, are typically based on the ATmega328 and have the same features and functionality of the Arduino UNO.


The SparkFun Microview
Taking the concept of tiny Arduino to the next level, SparkFun has combined the ATmega328 with a 64 x 48 pixel Organic LED (OLED) display. The SparkFun Microview – OLED (Figure 2.5) is not much larger than a digital watch. Once programmed using the external USB programming adapter (Figure 2.6), all the Microview needs is 3.3 to 16 V DC power and you're off and running.
●
● 25
Chapter 2
Arduino Boards and Variants
Figure 2.3: The Mini Uno (photo courtesy David Mellis, via Wikimedia Commons).
Figure 2.4: The Arduino Pico.
Arduino for Radio Amateur Applications


Wearable Arduinos
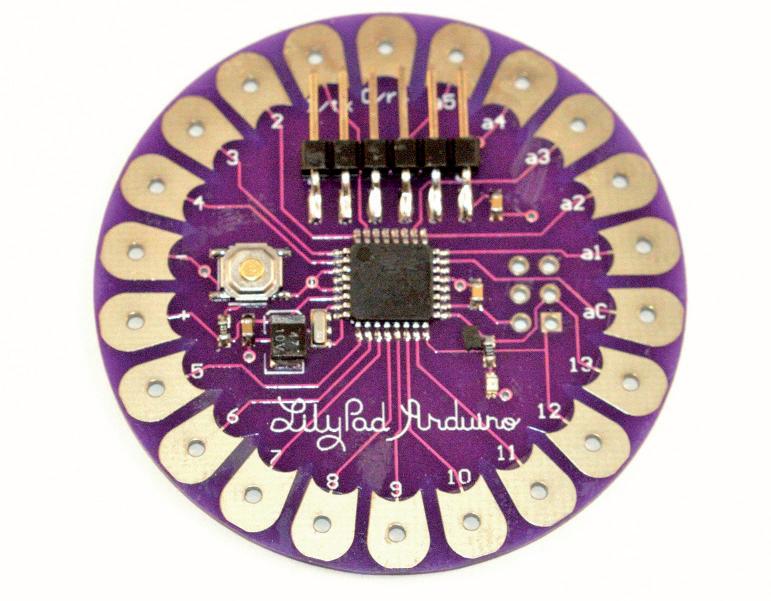
One of the newer applications for the Arduino is in the area of wearable electronics. While you may not immediately think that wearable electronics projects have a place in ham radio, their small size lends themselves to small projects, and things such as electronic name badges, and other interesting ham "wearables". Through the use of conductive thread, these wearable Arduinos can even be sewn into clothing and powered by small rechargeable Lithium-polymer (LiPo) batteries. While the Arduino Gemma (Figure 2.7) is based on the ATtiny85, most of the boards in this category, including the original Lilypad Arduino (Figure 2.8), are based on the ATmega328, with the major differences between them being size, available I/O pins, and type of power/battery and programming connections. These boards are programmed using the FTDI interface adapter or via an onboard micro-USB connector. The FTDI (Future Technology Devices International) adapter is a module that converts the USB connector from your workstation to a 6-pin DuPont-type header. A typical FTDI adapter is shown in Figure 2.9. The Lilypad Arduino SimpleSnap (Figure 2.10) is unique in that it has an onboard LiPo battery charging circuit, and is designed using conductive snap connectors, allowing you to remove the board from the project itself for washing or use in other projects.
● 26
Figure 2.5: The SparkFun Microview.
Figure 2.6: The SparkFun Microview USB Adapter.


● Arduino
Variants ● 27
Chapter 2
Boards and
Figure 2.7: The Arduino Gemma (photo courtesy Arduino.cc).
Figure 2.8: The Arduino Lilypad.
Figure 2.9: A typical FTDI adapter module.

The ATmega32u4

Beginning with the Arduino Leonardo (Figure 2.11), the ATmega328 processor was replaced with the ATmega32u4. While nearly identical in functionality with the ATmega328, the ATmega32u4 eliminates the need for the UNO's ATmega16u2 external USB interface chip and allows the Leonardo to appear to a connected computer as a mouse and/or keyboard. The Leonardo and others in this class also feature 20 digital I/O pins instead of the UNO's 14, twelve analog input pins versus the six on the UNO, and seven of the digital I/O pins support PWM instead of the UNO's six. The ATmega32u4 also includes 2.5KB of SRAM, 512 bytes more than that of the ATmega328-series.
● 28
Arduino for Radio Amateur Applications
Figure 2.10: The Arduino SimpleSnap Gemma (photo courtesy Arduino.cc).
Series
Figure 2.11: The Arduino Leonardo.

The Arduino Micro (Figure 2.12) brings the same functionality of the Leonardo to the smaller footprint of the Nano and Mini, while the Arduino Lilypad USB (Figure 2.13) is an ATmega32u4 version of the Lilypad often used in wearable Arduino projects.

The Arduino Mega Series

The Arduino Mega series offers substantially more memory and I/O along with other features. Based on the 16 MHz ATmega2560 processor, the Mega 2560 (Figure 2.14) packs a punch with 54 digital I/O pins, sixteen 10-bit analog inputs, and four hardware serial ports
Chapter 2 ● Arduino Boards and Variants ● 29
Figure 2.12: The Arduino Micro (photo courtesy Geek3, via Wikimedia Commons).
Figure 2.13: The Arduino Lilypad USB (photo courtesy Aduino.cc).
Figure 2.14: The Arduino Mega 2560.
Arduino for Radio Amateur Applications
on a larger 4 x 2.1-inch (101.6 mm x 53.3 mm) footprint. Six of the digital I/O pins can be configured for external hardware interrupts, and 15 of the digital I/O pins can provide PWM output. The I/O headers are compatible with most of the shields designed for the UNO and similar Arduinos, although care must be taken to ensure that the desired shield pin utilization matches the Mega I/O pin layout. The Mega2560 ups the Flash memory to 256 KB, the SRAM to 8 KB, and the EEPROM to 4KB. A smaller version of the Mega 2560 is now available, known as the Mega Mini (Figure 2.15). The Mega Mini is functionally identical to the Mega 2560 with a much smaller footprint.

More Powerful Boards
Moving beyond the somewhat limited processor and memory capability of the ATmega328, newer Arduinos are incorporating more powerful processors, with more memory and other features. One of the nice things with these newer boards is that the Arduino IDE now has the capability of installing software "plug-ins" in order to support these newer processors. This means that you can create your sketch for one type of processor, and with a simple change in your IDE settings, you can compile the same sketch for another processor type without having to modify your sketch, other than to possibly take advantage of features inherent in the new board type. The first in this group of new Arduinos we will take a quick look at are the ones based on the ARM Cortex-M0+ processor. Care must be taken when working with these processors, as the ARM Cortex M0+ runs at 3.3 Volts and the I/O pins are generally not 5 Volt tolerant, meaning you can burn out your board if you apply 5 Volts on any of the I/O pins.
The Arduino Zero

● 30
Figure 2.15: The Mega Mini.
Figure 2.16: The Arduino Zero (photo courtesy Aduino.cc).
Index ● 247 Index 1-Wire 49 1-Wire Bus 99 4x4 (16 key) Membrane keypad 62 4x4 Analog Keypad 63 9-Degree of Freedom Sensor 59 A accelerometer 59 ACS712 Hall-Effect Current Sensor Module 59 ACS712 Hall-Effect sensor 220 AD623 Instrumentation Amplifier 233 AD8307 Logarithmic Amplifier 133, 134 AD9833 53, 160 AD9850 53, 160 AD9850 DDS module 53 Adafruit 4x4 Elastomer Keypad 63 Adafruit ST7735 library 115 Analog Input 97 Analog Output 97 anemometer 51 APRS 182 ArduGraph 108 Arduino Gemma 26 Arduino Integrated Development Environment 67 Arduino Leonardo 28 Arduino Libraries 76 Arduino Lilypad USB 29 Arduino Micro 29 Arduino Nano 24 Arduino Nano 33BLE 35 Arduino Nano ESP32 36 Arduino Nano RP2040 Connect 37 Arduino Pico 25 Arduino Pro Mini 104 Arduino R4 35 Arduino R4 WiFi 105 Arduino Shields 38 Arduino SimpleSnap Gemma 28 Arduino UNO 23 Arduino UNO R3 35 Arduino Zero 31 ARM Cortex-M0+ 30, 31, 36 ARM Cortex M-3 34 ARM Cortex-M7 32 ARM Cortex-M CPU 34 AS3935 52 ASAIR 120 ATmega32u4 28 ATmega328 23 ATmega2560 29 Autodesk Eagle 70 B BASIC 36, 242, 245 block diagram 122 Blue Pill 34 Bluetooth 35, 47, 101, 200, 242 Bluetooth module 47 BME280 50, 121 BMP085 Barometric Pressure Sensor 120 BMP280 50, 121, 122, 124, 125, 128 Board Manager 72 breadboard 90 C CAN Bus shield 105 CAN-BUS shield 42 CAN (Controller Area Network) Bus 105 C/C++ 36 C/C++ comp 242 CircuitPython 36, 245 Color TFT Display Shield 39 Computer Aided Transceiver (CAT) control 107 Controller Area Network (CAN) 35 Creative Commons License 21 D DDS 165 Debugging 81 DFRobot Gravity 55, 244 DHT20 49, 122, 124, 125, 128, 129 DHT20 Relative Humidity and Temperature Sensor 126 Direct Digital Synthesizer 160 Dr.Duino 92
● 248 Dr.Duino Explorer Edition 93 Dr.Duino Pioneer Edition 92 DS18B20 Temperature Sensor 49 DS3231 48, 220 DS3231 RTC 221 E eBay 140 eInk/ePaper displays 65 ENC28J60 Ethernet Module 52 enclosure 117, 129, 134, 140, 141, 142, 220 ESP32 105, 241 ESP8266 33 Espressif ESP32 32, 94 Ethernet 52, 131 Ethernet shield 42 F Ferroelectric RAM memory module 60 FTDI 26, 98 G GNU GPL 20 GPS module 48 GR10-30 Gesture Sensor 57 GY-906 50 GY-906 Infrared Temperature Sensor 50 gyroscope 59 H HC-05 47, 93 HC-05 Bluetooth module 101, 201 HID (Human Interface Device) 203 Holtek 9200B DTMF (Dual Tone Multi-Frequency) Generator 139 HT9200 144, 147 Human Interface Devices (HID) 102 I I²C 32 IDE 67 IMU 59 Industrial/Scientific/Medical (ISM) 34 Inertial Measurement Unit 59 Installing Libraries 76 Inter-IC (I2S) 32 Internet of Things 42, 105, 245 interrupts 24, 105 ISD1820 56 K KiCad Electronics Design Automation Suite 71 L LCD display module 43 LCD display shield 39 Lesser Gnu General Public License (LGPL) 20 level shifter module 47 libraries 39, 97, 114, 123, 142, 147 library 39, 121, 124, 136, 140, 143, 144 Library Manager 72, 76, 78 Lightning Detector 82 Lightning Detector module 52 Lilypad Arduino 26 Lilypad Arduino SimpleSnap 26 LM386 Audio Amplifier 140, 165 LM4862 140 logic analyzer 90 LoRa 34 M magnetometer 59 MCP4725 58, 164 Mega Mini 30 MicroPython 36, 245 Mini Uno 25 MIT License 21 MKR 1000 WiFi 31 MKR Zero 31 Morse library 112 MOVI™ Shield 40 MP3 player module 56 MT8870 149, 151, 155 N NE555 160 NeoPixel 64, 136 Network Time Protocol (NTP) 52 Nokia 5110 Display 44 Non-Invasive AC Current Sensor 60
Arduino for Radio Amateur Applications
Index ● 249 O OLED 94 OLED display 45 Organic LED (OLED) 25 oscilloscope 89 P Picoballoon 246 PowerBoost 500 Shield 41 Processing 107 PROGMEM 24, 81 Pulse Width Modulation 23, 97, 136 PWM 97 Python 242, 245 R R4 WiFi 35 Rain and Water Sensor 51, 130 Raspberry Pi Pico 36, 104, 242, 245 Real-Time Clock 35, 131 real-time clock (RTC) module 48 Renesas RA4M1 35 RP2040 36, 37 RTTY 61 S SC16IS750 UART Module 61 schematic 117, 122, 129, 133, 140 Serial Monitor 73, 81 Serial Plotter 73 Serial Port Profile (SPP) 102 Si4707 Weather Band FM receiver 245 Si5351 54 SparkFun Microview 25 Speech Synthesis 55 SPI 32 STM32 34 STM32 "Blue Pill" 241 T Teensy 4.1 32 Tensilica LX6 33 text to speech 131 text-to-speech module 230 TFT displays 46 TXB0108 Level Shifter 166 U UART 61 UNO R4 Minima 35 USB Host module 62 USB Host shield 41 V VFO 164 Voice recognition 55, 244 W Wearable Arduinos 26 WiFi 35 Wind Sensor 120 Wind Speed Sensor 51, 121, 124, 126, 128, 129 WS2812-type RGB LED stick 132 Z ZS-040 47
booksbooks
Arduino for Radio
Amateur Applications
Program and build Arduino-based ham station utilities, tools, and instruments
In addition to a detailed introduction to the exciting world of the Arduino microcontroller and its many variants, this book introduces you to the shields, modules, and components you can connect to the Arduino. Many of these components are discussed in detail and used in the projects included in this book to help you understand how these components can be incorporated into your own Arduino projects. Emphasis has been placed on designing and creating a wide range of amateur radio-related projects that can easily be built in just a few days.
This book is written for ham radio operators and Arduino enthusiasts of all skill levels, and includes discussions about the tools, construction methods, and troubleshooting techniques used in creating amateur radio-related Arduino projects. This book teaches you how to create feature-rich Arduino-based projects, with the goal of helping you to advance beyond this book, and design and build your own ham radio Arduino projects.
In addition, this book describes in detail the design, construction, programming, and operation of the following projects:
> CW Beacon and Foxhunt Keyer
> Mini Weather Station
> RF Probe with LED Bar Graph
> DTMF Tone Encoder
> DTMF Tone Decoder
> Waveform Generator
> Auto Power On/O
> Bluetooth CW Keyer
> Station Power Monitor
> AC Current Monitor
This book assumes a basic knowledge of electronics and circuit construction. Basic knowledge of how to program the Arduino using its IDE will also be beneficial.
The full program listings of the projects in this book can be downloaded free of charge from www.kw5gp.com/Elektor.

Glen Popiel, KW5GP, is a retired network engineer and technology consultant and the author of the ARRL’s Arduino for Ham Radio series of books, High Speed Multimedia for Amateur Radio, and numerous magazine articles and product reviews. He is also a regular on W5KUB.com’s Amateur Radio Roundtable weekly webcast. Over his 50-year career, he has worked for various aerospace and computer manufacturers on radio and military turbojet research data acquisition and control systems, as well as hospital data systems, large-scale governmental agency networks, and utility company data networks.
Elektor International Media
www.elektor.com