6 minute read
4.2. Using Android Studio for Java Coding


programming language. After learning Java, we‟ll use Android SDK libraries with Java and develop Android apps.
We can use standalone Java compilers or Java-specific IDEs for learning Java. However it is also possible to try Java code in Android Studio with a simple trick. Since we already set up Android Studio, we will use it for Java coding here.
Advertisement
4.2. Using Android Studio for Java Coding
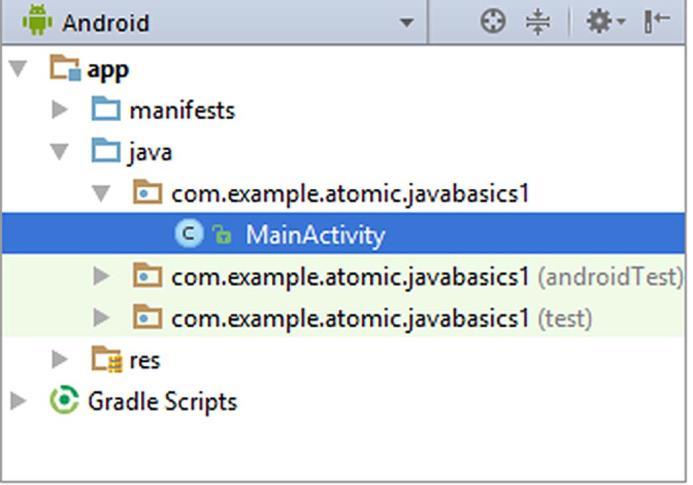
First of all, we need to launch Android Studio and create an Android project as we did in the previous chapter. We can name the project as we want and select any Android version and any screen layout for now. When the project loads, the project files and folders will be like the following in the left pane of Android Studio:
Figure 4.1. Default file structure of a new Android Studio project
We‟ll create a new Java file in order to try Java codes. For this, right click on one of the java folders such as com.example.atomic.javabasics1 in the above figure (or another Java folder in the project you created, your folder names will be different because your project name is different) and then select New Java Class as shown in Figure 4.2.
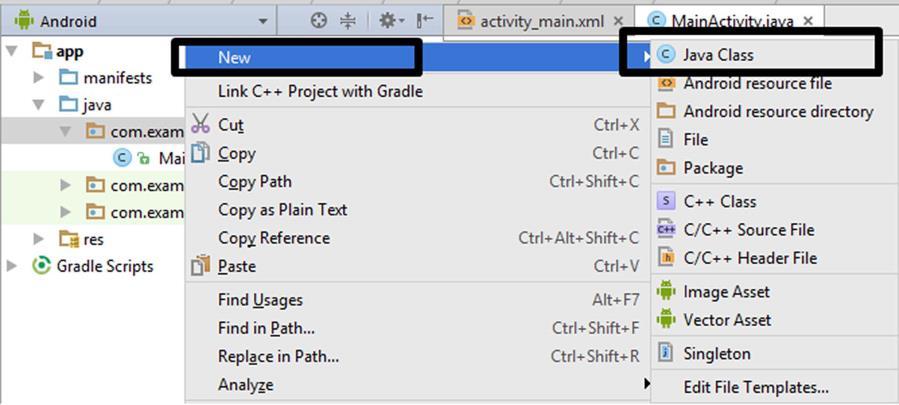
Figure 4.2. Creating a new Java Class
In Java, all programs are classes therefore we create a new Java Class. (We‟ll learn classes later in this chapter.) Please name the new class without any spaces and special characters (I named it as JavaBasics) and then click “OK” as shown below:
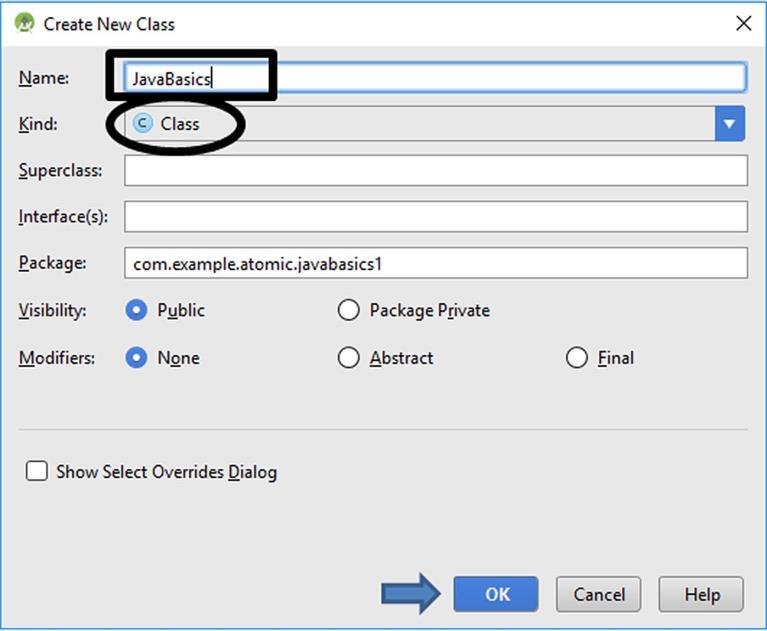
Figure 4.3. Creating a new Java file (Java class)
It is worth noting that the file kind is class as shown inside the ellipse in Figure 4.3. After clicking “OK”, Android Studio will create the new Java file called JavaBasics.java and show it in the middle pane as shown in Figure 4.4.
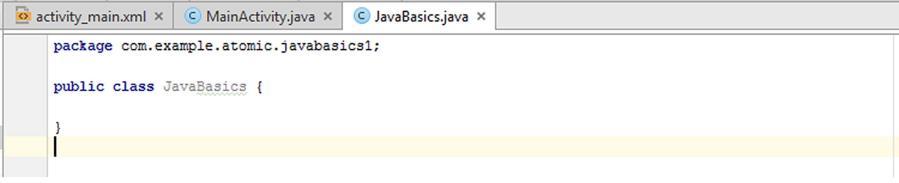
Figure 4.4. The contents of the new Java file
The new Java file has the following default lines of code:
package com.example.atomic.javabasics1;
public class JavaBasics {
}
Code 4.1
The first line defines a package that contains our new Java class. Java classes are organized in packages. Packages are like folders on your computer that hold several files inside.
The second line is the main class definition. All programs are classes in Java hence all Java files (programs) should have a class definition for compilation. Please always remember that the class definition should match the name of the Java file (in our case the filename is JavaBasics.java and the class name is JavaBasics).
The contents of the programs are written inside the curly brackets opened just after the class name definition in the second line and closed in the third line in Code 4.1.
Our Java file only has basic package and class definitions by default. The body of the Java class is empty thus this Java program does not do anything at all when it is compiled and run.
The source files of Java programs have .java extension. The Java compiler generates a .class file from .java file. This .class file is then executed on a Java Virtual Machine. This flow is shown below:
Figure 4.5. Compilation and execution of a Java program
Anyway, let‟s see how we can make a “Hello World” program from our JavaBasics.java file. In a Java source file, the following code line prints a text in the terminal window:
System.out.println("the text to be printed");
Code 4.2
In this code line, System.out means that Java will output something and println() method outputs the text written inside it. It is worth noting that texts are written inside double quotation marks (“…”) so that the Java system knows that the programmer refers to a text. Therefore, by placing “Hello World” inside the function shown in Code 4.2, we can print “Hello World” text on the screen in Java using the code below:
System.out.println("Hello World");
Code 4.3
So, where will we place this line in our java file? We learned that the Java code should be between the curly brackets of the class definition. Hence, we may try to obtain our Java “Hello World” program by placing Code 4.3 into Code 4.1 as follows:
package com.example.atomic.javabasics1;
public class JavaBasics {
System.out.println("Hello World");
}
Code 4.4
If we try to compile and run this code, the compiler gives an error and doesn‟t run our program. It is because all Java programs should have a main method. The main method indicates the starting point of a Java program which will be executed firstly when the program is run. Adding the main function, we obtain a correct “Hello World” program in Java as follows:
package com.example.atomic.javabasics1;
public class JavaBasics {
public static void main(String args[]) {
System.out.println("Hello World"); }
}
Code 4.5
The main function is defined in line 3 above: public static void main(String args[]). In general, the main method is not explained at this stage and the tutors say “just accept the main method as it is for now, we‟ll learn more about it later”. However, I‟d like to point out the general structure of the main method:
This method has three keywords in the front: public, static and void. Their meanings can be summarized as follows:
1. public: the main method will be accessible from anywhere,
2. static: the main method doesn‟t belong to a specific object and
3. void: the main method will not return a value.
These will be clearer when we learn classes in the last subsection of this chapter.
The main method also has arguments which are the inputs to this method in the form of String args[].These mean that the main method can have several inputs (arguments) in text form. These will be understood better when we dive deep on functions and their arguments later.
Please don’t panic and don’t be put off at this point. I know these may be confusing and you might say “Writing just a Hello World program takes ages with Java and it is confusing.” Java codes are generally longer compared to other programming languages. However, this is also a strong side of Java. This is because Java is a very organized and structured language that provides the developer with increased number of possibilities with lower error-prone coding.
After inserting Code 4.5 to our JavaBasics.java file, we are now ready to run our Java “Hello World” program. For this, find the JavaBasics.java from your file explorer in Android Studio, right-click on it and then select Run „JavaBasics.main()‟ as shown below:
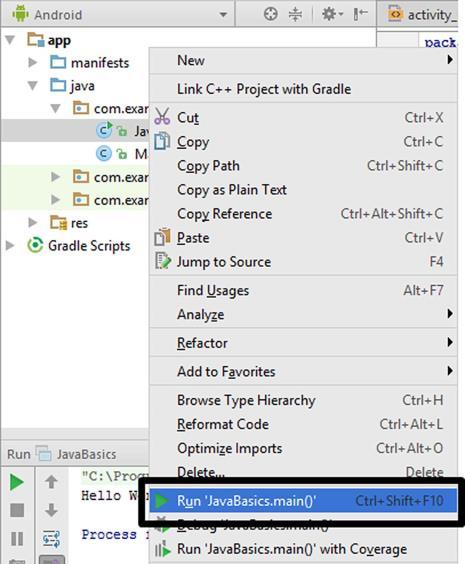
Figure 4.6. Running our Java program in Android Studio
Android Studio will compile our JavaBasics.java file and then run it. This takes a while. After then, the output of the program will be displayed in the Terminal window at the bottom pane of Android Studio as shown in Figure 4.7.
We have now written, compiled and run our first Java application in Android Studio without the need of using any other development