
4 minute read
3ds Max Sticky Fluids

from June2007
by Hiba Dweib

Sticky Fluids
In this tutorial we will create a sticky fluids effect using glu3d and later explain the same thing with pflow. This is not a step by step tutorial, little knowledge about the glu3d fluid system is necessary but we try to explain as much as we can. So, let’s start by importing a 3ds model in max.
Advertisement
Step 1: Go into the Create > Glu3d pouring system > glu3d. After pressing the glu3d button - floor, glu3d particles and glu3d icon will be created in the viewport.
Step 2: Now select the glu3d particles and rotate, move as per the requirement and change the paramaters as shown in the below image. The main parameter in this is Thickness parameter. This is a kind of viscosity parameter for the liquid. It makes particles keep together. It gives a certain resistance to flow to the liquid. Higher the value less particles will spread out. And we are creating a fluid something like honey, so must be thick.
Step 3: Select the object and in the glu3d parameters change the value of CollisonGap, Bounce to 0. Change the Friction to 100 and Adherence to 0.05. Adherence controls the particles glueness to object surface when collision occurs. And friction parameter controls the object friction with glu3D particles. Particles lose their energy when are in contact with colliding objects. Higher the value particles loss the energy soon.
Step 4: Press H and select glu3D_01, here you can set how the particles will react in a scene like at which gravity, scale, flicking of particles on the surface. And what will be the drop size, melting threshold… these all settings depends on the scene scale, object, effect and that’s why presets also can’t be created.
Step 5: Now Press the go button and check “Show Particles” is checked, so you can watch the simulated particles frames. You can stop the simulation at anytime and without flushing full simulation you can only flush the simulation from frame you don’t like by putting the frame number in “Keep until frame” in dynamic params box.
Step 6: When particle simulation is complete and you are happy with the output then press the “Build Surface” button for building the fluids surface.
Step 7: Light and texture the scene and render your fluids.
Now if you like to create a sticky particles through pflow then create a simple setup like below.
Step 1: Create a sphere, pflow above the sphere, gravity, deflector on the ground, UDeflector in the scene.
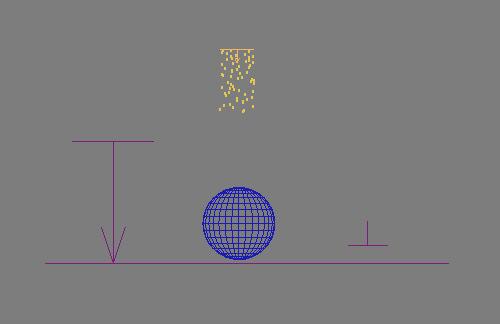
Step 2: In UDeflector pick object the Sphere.
Step 3: Press 6 to open the particle view and select “Birth” and change the “Emit Stop” value to 50 and amount to 2000
Step 4: Add a “Force” from the depot and add “Gravity” in the list.
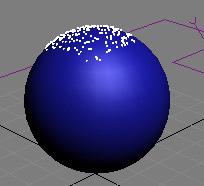
Step 5: Add “Collision test” from depot and add both the deflectors in the list. Change the “Test True value of Collides “speed” to Stop. You will notice that now particles are start sticking to the sphere and not even slide.
Step 6: Create a new “Speed by surface” event and link to collision test. Change the speed to around 50 and in drop down select “Control Speed Continuously” and change direction to “Parallel to surface”. Now you will see particles not only sticking but also sliding on the sphere.
Step 7: Now the main problem is particles not leaving the sphere when reached the end of the sphere and continue to slide from bottom to top. So, the solution is simple, add an “Age test” event and enter the frame number in the test value.
Step 8: Now create another “Force event”, add gravity in the list and link to the “Age Test” so particles start dropping on the defined frame. Check out the sceenshot for whole scene particle view.
And if you like to add a power of glu3d with pflow then add a glu3dsource from depot and Converts the PFlow particles to a Glu3D source file format that you can use to run a fluid simulation. Once you have your setup click the play button and the PFlow particles will be saved to a cache file sequence readable by Glu3D.


In March 07, your mission was to create a 2D or 3D image on “Nightmare” theme and sponsored by Corel, Pixologic, Realviz, Skymatter, Hyperfocal Design, 3d.sk, ambientLight, Zoo Publishing, Strata, Vertus, TheBest 3D, Kurv Studios, Daz 3D, Environment-Textures.com, Female-anatomy-for-artist. com, human-anatomy-for-artist.com and ITs Art Magazine.
Following are the winners in 3D category
First Prize
Maciej Kotlinski, Poland budcai@gmail.com


Second Prize
Stoffel Gaetan, Vietnam lesaumon@msn.com
Harold Francisco, Philippines hbdin@yahoo.com
Third Prize
2D Category Winner George Evangelista, Australia george@vshengraphics.com


