
7 minute read
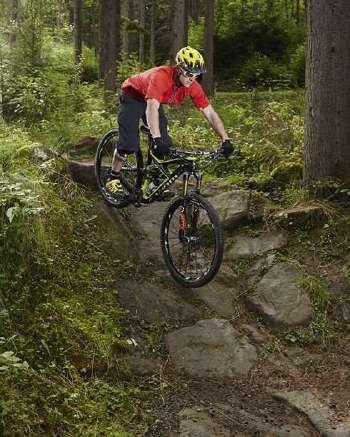
Rock gardens


PICK LINES IN ROCK GARDENS
Rock gardens add both fun and fear to the trail. If you get them wrong, you’re in for a wild ride, but when you get them right, you can carry your flow and keep on smiling as you go. Here are our top tips for choosing the best way to negotiate them in safety and style.
THE SMOOTH LINE
This is the path of least resistance, which avoids the biggest holes and rocks. Body position is key here, so that you can adjust your direction as you go. Lean too far back and you won’t be able to steer accurately. Balance too far forward and you’ll get caught by a bump. So find a centred position and use your eyes to guide you through, always looking ahead. Stay relaxed and keep your feet level.
THE DIRECT LINE
This is as straight as possible, regardless of the obstacles. Momentum is your friend, to help carry you over holes and rocks. Adopt a centred position on the bike, with your heels down and elbows up – you’re going to need your arms and legs to act as extra suspension to smooth out the trail. Spot your exit and aim for it. Keep relaxed so you can maintain balance.
LOOK BEFORE YOU LEAP It’s always best to inspect a rock garden before you attempt to ride it. Choose a line that suits your ability and build up to hitting it faster and faster. 1
VISION Potentially the most important tip for all mountain biking, and a necessity here. Keep your eyes looking where you want to go, not at the obstacles you’re riding over. This will help keep you in balance and on-line. 2
BODY POSITION It’s important to find a central position on the bike and use the flex in your arms and legs to smooth out the rocks and holes as best you can. 3
GET AIRBORNE
For experts, the smoothest way over a rock garden is often to jump the whole thing – providing it’s not too long, or at least the gnarliest section isn’t. You’ll need to have picked out a precise line and exit before attempting this. Body position is crucial - if you land into more rocks and are too far forward, you may get slammed into the handlebar.
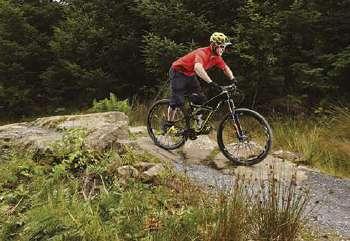
FEET LEVEL Striking your pedals on rocks is asking for trouble. Keeping your feet level helps avoid the rocks and will also keep you in balance and let you move around on the bike as needed. 4
SPEED IS YOUR FRIEND Carrying speed can help smooth a rock garden out, because your wheels won’t fall into every hole. But only go as fast as your skill level allows. Gradually build up to pushing yourself faster. 5
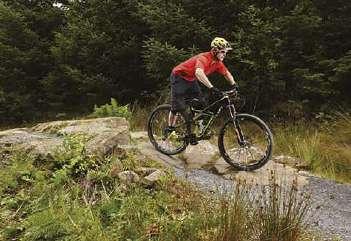
STAY LIGHT ON THE BIKE In small rock gardens, you can preload your suspension just before you enter and use the rebound to help unweight the bike as you hit the rocks. Get this right and you’ll glide over the top. 6
ROCK STEPS
Steep rock slabs and roll-ins are common on many red trails. They’re generally found on slower, more technical trails rather than fast, flowing ones, and most of the time there’ll be an option to duck round them – a lot of riders fear going over the handlebar, especially on big drops.
Controlling your speed and adjusting your body position correctly will keep you safe and make the transition from flat to steep smooth and balanced, meaning you’ll be able to maintain control. Momentum can help if you become unbalanced, but we recommend starting at a slow pace so you can feel your balance on the bike before progressing to bigger rock slabs.
PROGRESSION If you feel like your body weight is being thrown forwards while tackling a slab, you’re doing something wrong – and you should look to correct it before moving on to bigger features. It may be that you’re not letting the bike pitch forwards on the transition or that you have too much weight on your hands when the bike changes angle.

1 STAY LOW ON APPROACH Look for a straight, clean line and control your entry speed so you’re approaching the slab with enough pace to remain in balance. Stand up on the pedals and get a little bit lower on the bike by lowering your chest toward the bar.
ROCK FEATURES USE THE ROCKS Use sloping rocks or ledges to help you get your front wheel up more easily or to hop higher. Hone your technique by hopping a single rock.

Rocky features on manmade trails are placed so as to challenge a rider’s technical ability and give routes a more natural feel. In this case we’re looking at negotiating a rocky outcrop on a flat trail just before a corner, which means you want to carry as much speed as you can. This means choosing a line that avoids your wheels directly hitting any speed-sapping square edges – or hopping them if you can. To keep your flow you’ll need to choose the technique that best matches your speed. There’s no point hopping if you can only clear a couple of the rocks.
APPROACH Approach in your neutral position, arms and legs flexed and looking forwards. You’ll have looked at the feature already so you know what to expect. If you’re travelling fast enough to clear it, you can try hopping it. If not, you’re better off rolling it.

2 TRANSITION TO STEEP As the front wheel transitions from flat to steep, allow your arms to extend and bend your knees so the bike can change angle while your upper body remains at the same angle. The bike will effectively pivot underneath you.

ROLL IT
3 WEIGHT OVER BB Keep your body weight supported by pushing your heels down, and look up. If your weight is over the bottom bracket then you’re in a safe place. The bike should be in front of you and the saddle will have moved forwards between your legs.
1 GET UP Pop your front wheel on to the first rock with a small manual. Compress your fork, then push the bike forward to unweight the front, then the rear by easing up on the pedals.

JUMP IT
1 POP Manual to get your front wheel up then drive your hips upwards by standing tall, pushing down with your feet and pulling on the bar to get your body as high as you can – the bike will follow. You can use a sloped rock for extra height.
2 STAY LOOSE Hold the line you’ve chosen and relax so the bike can move underneath you. Focus on keeping your weight over the bottom bracket. You may have to unweight the front and rear wheels while you’re on top.

2 LEVEL OUT Push the bar forward to level the bike out and stay relaxed while you’re in the air. Your aim is to land smoothly, so when approaching you should’ve judged your speed and pop to make sure you clear any square edges or rough rocks.

4 TRANSITION TO FLAT Allow the bike to level out by extending your legs and letting your arms bend so you return to your neutral position. If there’s enough grip, you can drag the brakes evenly from start to finish to control your speed.
3 ROLL OUT Allow the bike to pitch away from you by keeping your weight over the bottom bracket and letting your arms extend, meaning you can maintain your neutral position on the downward-sloping rocks.

3 LAND SOFTLY Get the bike to match the landing angle and aim to land with your arms and legs extended to absorb as much of the impact as possible. Aim to soak up most of it through your legs.


