
Jim Zuckerman’s
P

April 2025
The Two Subject Focus Rule
A Folder of Skies
Can a Blurred Photo be Saved
Photography Quiz
Photo Tours
Ask Jim Student Showcase
Back issues


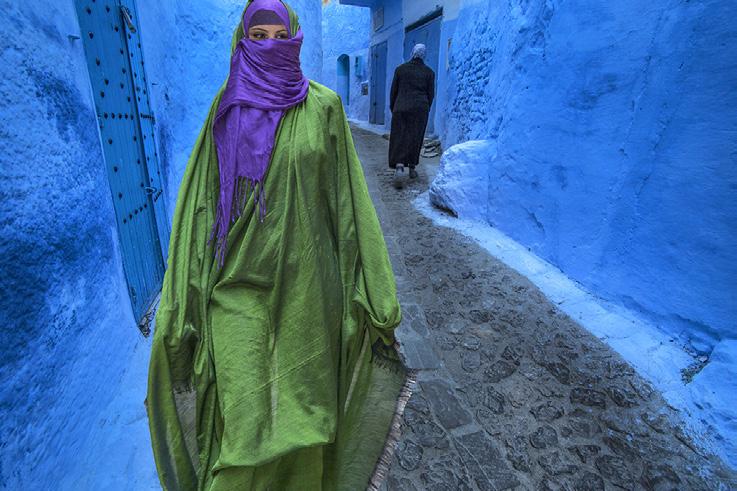
Many photographers who travel, espeically in Third World countries, balk at the idea of paying people to take their picture. I think these photographers feel like it taints the 'pure' experience of travel photography, and the introduction of commercialism in the transaction somehow makes the feeling of being in these various countries and societies less authentic.
Virtually all of the subjects we take pictures of in Third World countries have no concept of travel. Because they rarely leave their homes and villages, they have no idea why we want to photograph them, and most of them had no idea what a camera was until large numbers of tourists starting showing up and sticking cameras in their faces. Only in the last 20 years when they saw likenesses of themselves on the LCD screens on the back of digital cameras did they really get it.
What they do understand, though, is barter, money, and trade. If they give us some thing we want -- photographs and their time -- then it only makes sense to these people (and to anyone who has a sense of fairness and appreciation) that we give them something in return. That's how the world works, everywhere, and for everyone. Before money, we give them food, or metal knives, or a horse. Today, the few dollars we give is a very small price to pay for the great pictures we take and for the induring memories of being in such exotic and captiving places in the world. Compared to the money spent in traveling to these wonderful destinations, the price for modeling is completely insignificant.
Jim Zuckerman photos@jimzuckerman.com www.jimzuckerman.com
The Two Subject Focus Rule
Some photographic 'rules' are more suggestions rather than hard and fast rules. Using the Rule of Thirds, for example, always makes a composition look good, but it can be broken as often as it's used. A person, a bird, or pretty much anything else looks good when positioned in the center of the frame. This is a violation of the Rule of Thirds. In many camera club competitions, a subject's central placement in
the frame is usually regarded as less than ideal.
Another rule in photography --my rule -- isn't so flexible. The 'Two Subject Focus Rule"' states that when there are two subjects in a composition, both of them should be sharp. Even if one of them is almost sharp, that's not good enough. The soft element is distracting, visually annoying, and in my opinion, significantly degrades the image.

Study the two versions of a shot I took in Ethiopia on page 4 and below. If you look closely, the original version of the portrait on page 4 shows the girl on the left (yes, these are girls) to be not quite in focus, while the girl on the right is sharp. In the image below, both faces are sharp.
The discrepancy in focus with the original occurred because: 1) The two girls were not on the same plane and the girl on the left was about 8 to 10 inches closer to the camera; 2) I used a 200mm focal length with it's inherent shallow depth of field; 3) I was relatively close to the subjects -- about 7 feet; and 4) the f/11 aperture I used would have provided enough depth field for both subjects to be sharp had I been using a shorter focal length lens like 50 to 100mm.
If you are aware of the problem as you're setting up a picture like this, you can solve the focus is-
sue by doing one of six things.
Solution 1: Ask the two people to reposition themselves so they are equidistant to the camera and, therefore, on the same plane of focus.
Solution 2: Use a shorter focal length to gain depth of field and, if necessary in post-processing, crop the image per your artistic judgement.
Solution 3: Use a smaller lens aperture like f/22 or f/32 if you have enough light.
Solution 4: Move away from the subjects and refocus on them. The greater distance increases depth of field.
Solution 5: You can use more than one of these solutions in combination. For example,

take two steps back, zoom out from 200mm to 160mm, and use a lens aperture of f/16 instead of f/11.
Solution 6: This is the solution I used. Had I adjusted the camera settings or repostioned myself, I felt I might lose the perfect juxtaposition of the two girls. So, I took two quick shots in succession. First, I focused on one girl, took the shot, and then I focused on the second girl and took that picture.
Once I had the two subjects in focus, albeit on two separate frames, I knew I could create a single frame with what appears to be complete depth of field. In post-processing, I simply selected the sharp image from one frame and pasted it onto the second picture.
Before Photoshop, I photographed the black-
tailed deer fawns in a park near Vancouver, British Columbia. At the time I was using a medium format film camera, the Mamiya RZ 67, and the depth of field on this camera was significantly less than 35mm cameras. My film was Fujichrome Provia 100 -- 100 ISO -- and this meant I didn't have the luxury of closing the lens down for depth of field because there simply wasn't enough light.
The only thing I could do was hope at some point the two fawns would stand next to each other, even for a second or two, so I could quickly grab the picture with both of them on the same plane of focus. It turned out I got lucky. I got the two seconds allowing me to take the perfect shot. Had one of the animals been less than sharp, it wouldn't have been acceptable to me and, probably not been publishable either.


Macro photography is a particular challenge in rendering two subjects sharply because depth of field is reduced with greater magnification. That means if you 're composing a picture with two subjects, they need to be equidistant to the lens or very close to it. Sometimes it's just not possible to find a composition like this. In that case, the only option is to find a single subject and focus on it.
In the photo above of ladyslipper flowers in Michigan, I wanted to photograph more than one flower. It took me about a half hour to find two flowers that were virtually on the same plane. Even so, I used f/32 to insure all of the beautiful structures were tack sharp so we could appreciate all that detail.
In a shot like the costumed couple shot in Venice,
one of them is closer to the camera and that makes complete focus on them challenging. There are still two subjects, though.. Both must be sharp.
Check out the before and after images of two cheetahs on the next page. I used
solution 6 to create complete depth of field. Again, it's the difference between a good and bad image.


This image is a failure due to the shallow depth of field. The cheetah on the left is blurred.

Using solution 6 described on page 6, two sharp pictures were merged into one sharp image. §
A FOLDER of SKIES
Bhackgrounds are just as important as subjects in making an image successful. This is dramatically obvious when considering the sky. A boring sky usually hurts an image, while a beautiful, complementary sky will turn a good picture into a great one.
There are endless types of skies just as there are endless kinds of photographs that need a sky replacement. That's why I have a folder consisting of hundreds of pictures representing many different kinds of sky images: white clouds on a blue sky, storm clouds, rainbows, sunrises, sunsets, lightning, and even nondescript skies that are no particularly beauti-

ful like the one above. You never know when a sky like this could be exactly what's needed to make a good picture better.
For example, the shot of the tall ship below was taken around 10am against a very boring

Iceland Drone Tour
August 24 - September 2, 2026


sky. The image image looks good as is, but when I added the soft, gray sky with the sun trying to peak through, all of the rigging remained visible and the picture now has more dynamism and interest.
Using the sky replacement feature in Photoshop (Edit > Sky Replacement) sometimes obscures or eliminates fine detail in the background image like the rigging on this tall ship. Skies that are amorphous, i.e. without defined form, are better at retaining most or all of the definition in the subject as you can see in the above composite.
When you purchase a subscription to Photoshop, Adobe gives you a dozen or so skies from their 'Adobe stock' collection. These are other people's pictures. Since I never use other photographers' images in my composites, I first trash those images and then add my own. If you feel as I do, you can do that in the sky replacement dialog box (seen at right) by first


clicking in the top image (red arrow), and that opens a submenu with a list of all the skies in the folder. To eliminate any or all the Adobe skies, drag each one to the tiny trash can (blue arrow).
To add your own sky images, they can be full resolution and either horizontal or vertical, and the formats of tif, jpg, or psd. Click on the tiny plus icon (green arrow) and then navigate to your sky images, select them, and then click 'open' in the dialog box. The images will automatically load and will then be available.
The two images on this page show another type of composite in which the original image was a silhouette. The sky needed for this type of shot had to have a bright sky in the background. It didn't have have a bright sun -- although it could have used that kind of sky -- but instead I chose a sky in which the sun was going to show itself

from behind the clouds soon. Since the new sky was very warm toned, yet the original was quite bluish, I used Image > adjustments > color balance to change the color of the water to be more appropriate given the composite. Compositing pictures taken with different focal lengths is fine, but it's really important that the colors in the two images make sense. §t
Switzerland Photo Tour
Sept. 23 - Oct. 2, 2025


Can a Blurred Photo be Saved?
Yes, up to a point. If an image is too blurred, nothing in a photographer's gear bag, including Photoshop and all the plug-ins on the market, can save it. But let's look the picture below.
Recently I was woken up by flock of wild turkeys. It was just after dawn and the light level was extremely low. When I grabbed my camera and went out on the back porch, the light reading I got was disappointing: 1/160 at f/10, and 10,000 ISO. I was shooting with a 100-500mm Canon zoom and a 1.4x teleconverter, giving me 700mm of focal length. I took a few shots but I knew better than to hand-hold a long lens using a shutter speed
this slow. I could see on the ground glass the images weren't sharp, so I increased the shutter to 1/200. I didn't want to go higher than 10,000 ISO because there were too many dark shadows. I feared the noise would be a problem.
When I looked at the images on my computer, the shots taken at 1/160 were really bad. The photos exposed at 1/200 were better but still not even close to sharp. Study the image below by enlarging this page on your device and you'll see what I'm talking about. This was one of the shots taken at 1/200.
The best sharpening tool I know is Topaz

Exotic Birds of Colombia
Sept. 23 to Oct. 3, 2026


Sharpen AI, so I applied this plug-in twice. The first time I used the option 'Motion blur -- very blurry', and the second time I used 'Out of focus -- very blurry.' These two applications made a big difference as you can see in the above image and also in the two comparison pictures below. Again, enlarge this page on your device 2 or 3 times to clearly see the difference.

The images I took at 1/160 were too blurred to save. I thought it was interesting that a relatively small difference is shutter speeds made such a difference. The speed of the shutter with a telephoto, for guaranteed sharpness, should be the reciprocal of the focal length. In other words, if the lens is 700mm, the shutter should be 1/700 or faster. In this case, I was significantly below that -- hence the problem. §

Pantanal Photo Tour, Brazil
Jaguars in the wild, birds in flight, caiman, otters and more
Dec. 1 - 9, 2025


Photography Quiz
1. The typical light loss when using a 2x teleconverter is:
a. 1 f/stop
b. 2 f/stops
c. 2.5 f/stops
d. 3 f/stops
2. The minimum focusing distance of any lens can be reduced by using a (an):
a. Teleconverter
b. Extension tube
c. Polarizing filter
d. An L-bracket
3. Which exposure mode should you use when photographing lightning at night?
a. Program
b. Aperture priority
c. Shutter priority
d. Manual
4. Your pictures have unwanted vignetting in the corners. The cause is most likely:
a. Using an aperture smaller than f/22
b. Lens flare
c. A wide angle lens plus a small lens aperture plus a polarizing filter
d. A macro lens plus any filter
5. Back in the day when we used darkrooms, a photogram meant:
a. Objects were laid on photographic paper and the paper was exposed to light
b. A non-negative, such as a dragonfly wing, was put in the enlarger instead of a negative
c A sheet of copper covered with a photo resist was exposed by a high contrast negative and then etched with acid
6. In photographic lingo, a 'dupe' refers to a duplicate image:
a. True
b. False
7. When the lens aperture opens 4 f/stops, say from f/16 to 5.6, the amount of light increased is:
a. Two times
b. Four times
c. Eight times
d. Sixteen times
8. Shooting into the sun with a 14mm lens will hurt your eyes:
a. True
b. False
9. The worst thing exposing your camera to is:
a. Rain
b. Dust
c. High wind
d. Salt water
10. When shooting into the sun with a telephoto lens, a lens hood will prevent lens flare:a
a. True
b False
UPCOMING PHOTO WORKSHOPS


TEXAS BIRDS WORKSHOP
Shooting from a blind, you'll get frame-filling shots of many species of birds in flight including red cardinals, crested caracara, green jays, greater kiskadees, and painted buntings. Jim shares with you the best camera settings for ultra sharp images. Based in south Texas.
May 14 - 17, 2025
FROG & REPTILE WORKSHOP in Kansas City
This is an exciting macro workshop in which you will be able to photograph about 40 species of colorful dart frogs and exotic reptiles. Held in a hotel conference room, Jim sets up natural backgrounds for outstanding photos. The photo at left shows a Jackson chameleon with the background replaced in Photoshop.
June 14 - 15, 2025
CARNIVAL in VENICE
Photograph amazing costumes in a Medieval environment. We shoot inside a 16th century palace, in an iconic gondola, in a stunning bedroom with traditional Venetian decor, and at other great locations. The photography as well as the experience is phenomenal.
February 7 - 13, 2026


Abandoned in Georgia
April 21 - 27, 2025


What's Wrong with this Picture?

Iwas thrilled to get a picture of this capped heron in the Pantanal region of Brazil, but I wasn't so excited about the background. The bird had just taken flight from the plant on the right, and it was a few feet from the branches in the background. It was optically impossible to throw the trees in the background out of focus. This is not the worst background I've ever seen, but it's nothing to write home about, either. My eye keeps looking at all those tangled branches, and that's not how a successful picture is supposed to work. The attention should primarily stay on the subject.
I had two choices. I could leave the picture as is and never be happy with it, or I could replace the background. I chose the latter.

To replace the background, first I had to make a precise selection around the heron. The only tool in Photoshop's arsenal capable of that is the pen tool. It is the only tool capable of making a perfect selection around the bird including those two long, slender feathers emanating from the back of the head. It took about 15 minutes to complete the selection.
I then chose Select < modify > contract. In the dialog box, I chose 1 pixel. This contracted the selection by just one pixel to eliminate any telltale colors from the original background. Then I used Select > modify > feather. This softened the edge of the selection slightly so the heron would blend perfectly with the new environment.
Finally, I chose a new background. With Edit > copy, I copied the bird to the clipboard, Photoshop's temporary holding place for a picture or part of a picture, and then I used Edit > paste to place the heron in the new background. With the move tool, I moved it into place. Now the bird stands out beautifully without anything distracting our attention from it. §
On Safari: Kenya
March 22 - 31, 2026


SHORT AND SWEET
1. To freeze animals running, the shutter speed I feel confident with in making sure everything is tack sharp -- including feet and legs -- is 1/1250. This does not apply to birds. If you have enough light, feel comfortable in using a faster speed, but below 1/1250 you'll start to see blurred elements in the images.

3. S-curves are the most sought-after graphic elements because they are so attractive. Keep a vigilant eye wherever you're shooting. This classic cypresslined driveway is in Tuscany. You'll find S-curves in rivers, architecture, staircases, in a classic pose by an animal, and even drone perspectives.

2. I photograph birds all over the world, and it can be tough identifying them. The best app for this is Merlin. You simply upload your photo into the app, input the location and the date, and Merlin gives you the identification of the bird. This is a red and yellow barbet I captured in Ethiopia.

4. Twilight is the most beautiful time to shoot cities, large and small. The 'blue hour' happens twice a day -- at dawn and dusk -- but the best time to photograph cityscapes and architecture is at twilight because most of the buildings still have their lights on. In the early morning, buildings are largely dark. §

Vietnam Photo Tour
October 13 - 23, 2025


ASK JIM
Every month, Jim answers a question from his online students, from people who participate in his tours and workshops, or from subscribers to this magazine. If you have a question you’d like Jim to answer, please drop him a note at photos@jimzuckerman.com.
Q: Jim . . . Do you use auto ISO?
Mark Averett, Jensen Beach, Florida
A:
I used to use auto ISO all the time until I got a mirrorless camera. Because we can see the exposure in our pictures in the viewfinder in real time, I now use manual exposure mode all the time. I vary the exposure with the rear wheel on my Canon R5 which is programmed to change the ISO. In the past, when digital cameras were not as good as they are today, I watched how high my ISO was all the time. My first digital camera in 2005 was so noisy that 3200 ISO was unusable. Now, I shoot at 12,800 ISO without worrying about it. That means when I vary the exposure with the ISO wheel, I pay attention to my subject instead of worrying about how high the ISO is getting -- within reason, of course. §

Red cheeked cordon bleu, Ethiopia
Partial List of Photography Tours
2025 - 2026
Apr 2025

Oct 2025

Aug 2025

Sept 2025

Nov 2025


Sept/Oct 2026 PANTANAL Dec 2025


Armenia & Georgia
October 26 - November 8, 2026


STUDENT SHOWCASE
Each month, Jim features one student who took beautiful and inspiring images on one or more of his photography tours or workshops. It’s really fascinating how photographers see and compose such different images even though we may go to the same places. Everyone takes great photographs on Jim’s trips.
Barb Earles, Urbandale, Iowa Abandoned in Georgia photo tour, England and Wales photo tour, Holland and Belgium photo tour


© Barb Earles
Student Showcase,


© Barb Earles
Student Showcase,


© Barb Earles
Student Showcase,


© Robert Dominis
© Barb Earles
PHOTO TOUR to CHINA
January 3 - 14, 2026


Harbin Snow & Ice Festival
Rainbow Moutains
Indonesia Photo Tour
August 6 - 19, 2025


T O I N S I G H T S you would like to read. Jul. ‘19 Jan. ‘20


Subject index for past Photo Insight issues
1/3 focus law Jul. ‘15
3D sphere Mar. ‘16
90 degree finder Mar. ‘13
Abstracts in soap Feb. ‘15
Abstracts, Shooting Mar ‘19
Aerial photography Jun. ‘13
Aerial photography Jan. ‘21
African safari May ‘16
AI plus Photograpjhy Oct. ‘23
AI, Photos-to-AI Oct. '24
Airplane windows Mar. ‘16
Alien landscapes Jan. ‘13
Anatomy of 8 photographs Jan. ‘16
Anatomy of an Action Shot Feb. ‘24
Angled perspectives Jan. ‘19
Aperture vs. shutter speed May ‘14
Aperture priority Sept. ‘14
Aperture priority and other modes Jul. ‘24
Aurora Borealis Apr. ‘17
Auto white balance Dec. ‘13
Autofocus, when it fails Apr. ‘15
Autofocus failure Aug. ‘15
Autofocus failure Jan. ‘17
Autofocus challenges Apr. ‘18
Auto ISO Nov ‘17
Auto White Balance Mar’ ‘21
Autumn Foliage Sep. ‘18
Autumn Color Sep. ‘20
Autumn foliage photography Oct. ‘21
AWB versus Daylight WB May ‘24
t Back button focus Oct. ‘18
Backgrounds, wild Nov. ‘12
Backgrounds, busy Apr. ‘13
Backlighting Apr. ‘16
Backlighting Oct. ‘22
Birds in flight Aug. ‘13
Birds in flight Jan. ‘14
Birefringence May ‘18
Birefringence Dec. 24
Birds in flight Mar. ‘16
Birds in flight, camera settings Jan. ‘23
Birds in flight, camera settings Dec. '24
Bird Photography Jun ‘19
Black backgrounds Aug. ‘23
Blacklight photography Feb. ‘21
Black velvet Mar. ‘14
Black and white conversions Mar. ‘17
Black and white infrared Apr. ‘24
Black and white solarization Sep. ‘17
Black and white with color Jan. ‘20
Black and white plus color Mar. ‘23
Blown highlights Feb. ‘18
Blue monochromes Jan. ‘22
Black Plexy Aug. ‘22
Blur, field Nov. ‘18
Blur technique Oct. ‘17
Bokeh Jun. ‘15
Botanical gardens, shooting Apr. ‘22
Butterfly photography Jul. ‘14
Buying nature Jul. ‘24
Camera buying guidelines Dec. 21
Camera settings for landscapes Feb. ‘23
Camera setting priorities Jun. ‘17
Canon R5 Mar. ‘21
Capturing lightning Jun. ‘13
Capturing lightning Jun. ‘24
Capturing what you don’t see May ‘21
Catchlights Jul. ‘16
Changing perspective May ‘21
Cheap flash stand Apr. ‘13
Children photography Jun. ‘14
Choosing a telephoto lens Dec. ‘20
Chromatic aberration May ‘13
Chrome Dec. ‘18
Cityscapes Aug. ‘14
Cityscapes May ‘16
Clone tool, fixing an issue Sep. ‘17
Clone tool technique Jul. ‘20
Color theory Nov. ‘23
Composites and Light Dec. ‘17
Composites, Secrets to perfect Jun. ‘24
Compositing images Apr. ‘19
Compositing, 7 steps Jan. 22
Composition, different approach Jan. ‘15
Content-aware, New Aug. ‘20
Content aware move tool Jan. ‘23
Contrast vs. exposure Jul. ‘15
Contrast, When it is good Sep. '24
Converting to black and white Mar. ‘22
Correcting keystoning Jun. ‘21
Creating a star field Jan. ‘14
Creating Art out of Motion May ‘22
Creating a Sketch Dec. ‘17
Creative blurs Jan. ‘14
Custom functions Jul. ‘23t
Dark backgrounds Nov. ‘19
Dawn photography Jan. ‘17
Dawn photography Feb. ‘17
Dead center Jan. ‘13
Dead center Oct. ‘23
Dealing with smog Oct. ‘16
Decay photography Sep. ‘15
Define Pattern Sep. ‘18
Define Pattern Sep. '24
Depth of field Aug. ‘16
Depth of field confusion Jan. ‘20
Depth of field and distance Dec. ‘18
Depth of field and obliqueness May ‘21
Depth of field, shallow Apr. ‘20
Depth of field vs. sharpness Nov. ‘20
Double takes Apr. ‘20
Drone photography Mar. ‘23
Drone, Lessons from a tour Oct. '24
Drop shadows Apr. ‘19
Dust, Minimizing Aug. ‘19
eBook, how to make Jan. ‘13
Elevated vantage points Aug. ‘23
Eliminating people from photos Jun. ‘22
Embedded in Ice Oct. 17
Energy saving bulbs Sep. ‘14
Equidistance and telephoto lenses Apri. ‘23
Exploring the power visuals of AI Mar. ‘23
Exposing for the sun Sep. ‘16
Exposure, the sun Jul. ‘13
Exposing for snow Dec. '24w
Exposure technique Sep. ‘13
Exposure, snow Jan. ‘14
Exposure triangle Nov. ‘14
Exposure, to the right Apr. ‘15
Subject index for past Photo Insight issues
Exposure compensation
Exposure compensation
Sep. ‘16
Mar. ‘21
Extension tubes Dec. ‘13
Extension tubes Jul. ‘23
Face sculpting Apr. ‘21
Face sculpting
Festival photography
Fill flash
Filter forge
Fireworks
Feb. ‘22
Sep. ‘20
Sep. ‘13
Feb. ‘13
Jul. ‘13
Fireworks, Compositing Jun ‘20
Fisheye lenses
Fisheye lenses
Fisheye fantasies
May ‘13
Feb. ‘15
Oct. 21
Fixing parallax Oct. '24
Flash backlighting May ‘15
Flash, balancing exposure Oct. ‘15
Flash, balancing off-camera Dec. ‘18
Flat art Sep. ‘16
Flexify 2 Mar. ‘20
Flood fixes problems Nov. ‘19
Floral Portraits, Indoors Aug. ‘21
Flowers May ‘15
Flower photography Apr ‘21
Flowers in harsh light
Focus on the eyes
Focus points
Focus points
Jul. ‘16
Dec. ‘20
Mar. ‘15
Sep. ‘20
Focus stacking Mar. ‘17
Focus stacking Aug. ‘19
Focusing in the dark Oct. ‘16
Foreign Dancers, Photographing Nov’ 17
Foreign models Jun. ‘13
Fractals, generating Sep. ‘13
Fractals
Framing
Framing
Freezing ultra action
Jul. ‘19
May ‘17
Jan. ‘24
May ‘17
From Terrible to Beautiful Aug. ‘19
Fun with paint
Oct. ‘16
Fundamental ingredients Apr. ‘13
Fundamentals That Make Great Photos Jan. ‘19
Fun With Christmas Lights Jan. ‘21
Fun with Food
Graphic Design Jul. ‘20
Garish imagery Dec. ‘15
Generative fill Jun. ‘23
Getting money for used gear Jan.’ 22
Getting the blues out Dec. ‘23
Great subjects Apr. ‘15
Great ceilings & HDR Panos Jul. ‘19
Green screen Mar. ‘13
Ground level shooting Oct. ‘22
Grunge technique Feb. ‘13
Harsh light, the problem of Apr. ‘24
Heavy Lens Debate, The Feb. ‘23
Helicopters, Shooting from Mar. '25
HDR, one photo Apr. ‘13
HDR at twilight May ‘13
HDR, realistic Jun. ‘15
HDR, hand held Dec. ‘16
HDR, hand held Nov ‘17
HDR, hand held Jul. ‘18
HDR panoramas Jun. ‘16
HDR, choosing the number of frames Jun. ‘22
High wind Apr. ‘17
Highlights Apr. ‘14
Highlights, overexposed Feb. ‘15
Histograms, Why I Don’t Use Jun ‘19
Histogram problems Apr. ‘20
Home nature projects Jun. ‘23
Hotels with a view Mar. ‘20
Humidity Oct. ‘13
Hummingbird photography Apr. ‘13
Hyperfocal distance Jul. ‘13
Image resizing Aug. ‘18
Implying motion Sept.‘14
Impossible DOF Feb. ‘16
Impossible DOF Jan. ‘17
Indestructible camera bag Dec. ‘14
Infrared photography Jul. ‘14
Insane ISO settings Dec. ‘22
Interiors Oct. ‘15
iPad: Loading photos Aug.‘17
iPhone photography, pros and cons Apr. ‘22
Jungle photography Dec. ‘14
Kaleidoscopic images Jan. ‘15
Kaleidoscopis images Aug. ‘20
Keystoning Nov. ‘23t
Keystoning, correcting Aug. ‘15
L Bracket Feb. ‘18
L Bracket Feb. ‘21
Landscape photography Dec. ‘12
Landscape photography Apr. ‘14
Landscape photography Nov. ‘16
Layer Masks, The Power of Feb. ‘22
Leading Lines Aug. '24
Lessons Learned from Extreme Cold Feb. ‘24
Light fall-off Feb. ‘14
Light painting Dec. ‘21
Lighting a face Oct. ‘13
Lightning photography May ‘20
Liquify Feb. ‘18
Liquify Distortions Sept/Oct. ‘19
Lenses, Essential Aug. ‘23
Long lens portraits Oct. ‘18
Long Lenses for Flowers Jul. ‘20
Low light photography May ‘15
Luminar 4 Jan. ‘20
Macro flash Nov. ‘12
Macro flash Sep. ‘14
Macro flash Aug. ‘15
Macro flash Aug. ‘22
Macro flash advantage Feb. '25
Macro photography and DOF Feb. ‘22
Macro trick May ‘19
Managing soft focus Jul. ‘21
Mannequin heads Apr. ‘16
Metering modes Nov. ‘16
Meters, How They Work Jul. ‘18
Meters, when they fail Dec. ‘16
Metering situations, Impossible Jul. ‘19
Middle gray Nov. ‘15
Midday sunlight, The Challenge of Feb. '25
Milky Way, Shooting the
Minimizing dust on the sensor Nov. ‘21
Subject index for past Photo Insight issues
Optical infinity
Mirrors
Mirror images
Model shoot
Moon glow
Mosaics
Mundane to Ideal
Museum photography
Jun. ‘16
Jan. ‘19
May ‘23
Jan. ‘17
Oct. ‘16
Jun. ‘17
Nov. ‘19
Mar. ‘13
Natural Light Portraits Aug. ‘21
Negative space
Jan. ‘16
Neon edges on black Aug. ‘14
Neutral Density filters Jun. ‘18
New depth of field preview Mar. ‘24
New shooting style Mar. ‘24
Neutral Density filters and water Mar. ‘22
Night photography Feb. ‘14
Night Safaris Jun. ‘18
Night to Twilight Dec. ‘17
Noise reduction Feb. ‘17
Off-camera flash Jan. ‘24
Oil and water May ‘20
Online Nature Mar. '25
Organization of photos Mar. ‘18
Out of focus foregrounds Jan. ‘20
Paint abstracts May ‘13
Paint abstracts Aug. ‘21
Painting with light Sep. ‘15
Pan-blurs Sep. '24
Panning motion Dec. ‘16
Pano-Mirrors with a twist Jan. ‘18
Parades Sep. ‘13
Parallelism Nov. ‘19
Parallelism and DOF Feb. ‘21
Perspective, Super Exaggeration of Dec. ‘21
Photo shsaring Apr. ‘23
Photo terms Nov. ‘22
Photographing Christmas Dec. ‘23
Photography to Art Dec. ‘17
Photography solutions Jan. ‘18
Photoshop, content Aware Nov. ‘12
Photoshop, sketch technique Apr. ‘13
Photoshop, replace background Apr. ‘13
Photoshop, actions palette Dec. ‘13
Photoshop, layer masks Feb. ‘13
Photoshop, the clone tool May ‘13
Photoshop, soft foliage Oct. ‘13
Photoshop, mixer brush tool Sept. ‘14
Photoshop, b & w with color Jun. ‘14
Photoshop, drop shadows Jul. ‘14
Photoshop, creating texture Feb. ‘14
Photoshop, face mirrors Feb. ‘14
Photoshop, liquify Mar. ‘14
Photoshop, face mirrors Aug. ‘14
Photoshop, digital spotlight Sep. ‘14
Photoshop, enlarge eyes Nov. ‘14
Photoshop, darken the periphery Dec. ‘14
Photoshop, mirror images Dec. ‘14
Photoshop, beam of light Apr. ‘15
Photoshop, polar coordinates Mar. ‘15
Photoshop, chrome May ‘15
Photoshop, actions palette Nov. ‘15
Photoshop, cut and paste Nov. ‘15
Photoshop, geometrics Oct. ‘15
Photoshop, plugins Oct. ‘15
Photoshop, multiple selections Apr. ‘16
Photoshop, sharpening Apr. ‘16
Photoshop, Flood plugin Apr. ‘16
Photoshop, Desaturation Aug. ‘16
Photoshop, making a composite Aug. ‘16
Photoshop new tool May ‘20
Photoshop, place one element behind Aug. ‘18
Photoshop, the pen tool Feb. ‘16
Photoshop, canvas size Jan. ‘16
Photoshop, using the earth Jun. ‘16
Photoshop, define patterns May ‘16
Photoshop, paste into Nov. ‘16
Photoshop, b & w with color Feb. ‘17
Photoshop, open a closed door Apr. ‘17
Photoshop, palettes May ‘17
Photoshop, My favorite plugins Jan. ‘20
Portrait options Jan. ‘19
Portrait techniques Nov. ‘15
Portraits Mar. ‘13
Portraits, mixed lighting Aug. ‘14
Portrait Professional Nov. ‘19
Portraits, Lens choice Sept/Oct. ‘19
Portraits, side lighting Sep. ‘17
Portraits, window light Mar. ‘15
Portraits, outdoors May ‘17
Post-processing checklist Dec. ‘13
Post-processing: Contrast Aug. ’17
Practicing graphic design, Part I Dec. ‘22
Practicing graphic design, Park II Jan. ‘23
Practicing graphic design, Part III Feb. ‘23
Pre-capturing technology May ‘23
Predictive Focus Sep. ‘18
Problem/solution Apr. ‘17
Problem Solving in Photoshop May ‘22
Problem with cruises Jan. ‘18
Protecting extremeities from the cold Dec. ‘22
Protecting highlights Dec. ‘12
Puppies Jan. ‘15
Puppy photography Feb. ’18
Rays of Light Mar. '25
Reflections Feb. ‘13
Reshaping faces Oct. ‘22
Restoring old photos Jun ‘20
Ring flash, advantages Jul. ‘21
Ring flash versatility Oct. ‘21
Rule of Odds May ‘22
S-curves Aug. '24
Safari May ‘13
Safari strategies Jul. ‘15
Seeing as the lens does Nov. ‘14
Seeking Cool Snow Photos Jan. ‘21
Selective filtering Mar. ‘18
Selective focus Jun. ‘15
Self-critiques Jul. ‘13
Self-critiques Oct. ‘13
Self-critiques Nov. ‘20
Sensor cleaning Jun. ‘18
Subject index for past Photo Insight issues
Sepia and dark contrast Jun. ‘15
Sepia, Traditional look of
Shade May ‘14
Shady side Jun. ‘18
Shadows define the shot Dec. ‘23
Shadows, Paying Attention to Mar. ‘18
Sharp, 6 reasons why photos are not Apr. ‘24
Sharpness problems Mar. ‘14
Shooting in Inclement Weather Nov. ‘22
Shooting thru glass May ‘24
Shooting through textured glass May ‘23
Shooting through wire mesh Sept. ‘14
Shooting into the light Jun ‘20
Side lighting Jan. ‘24
Silhouettes Jun. ‘13
Silhouettes, How to make Apr. ‘22
Silhouettes, Exposing for Sept/Oct. ‘19
Silvered landscapes Mar. ‘20
Sketch, How to Make Jun ‘19
Skies make or break a picture Aug. ‘21
Sky replacement Nov. ‘20
Sky replacement strategies Aug. ‘22
Snow exposure Nov ‘17
Snow exposure Nov. ‘19
Soap abstracts Aug. ‘23
Soft light Jan. ‘13
Smart phone photography May ‘19
Stained glass Mar. ‘17
Star photography and noise Jan. ‘18
Stock photography Sep. ‘14
Sunrise & sunset Jan. ‘19
Symmetry Aug. '24
Tamron 150-600mm Apr. ‘14
Ten reasons photos are not sharp Jan. ‘19
Texture, Adding Mar ‘19
Texture Mapping in 3D Jul. ‘21
Too much lens Jul. ‘24
Topaz AI Gigapixel Mar ‘19
Topaz glow Jan. ‘15
Topaz glow Sep. ‘17
Topaz Impression Sep. ‘15
Topaz Remask 5 Oct. ‘17
Topaz Simplify 4 Dec. ‘12
Topaz simplify 4 Jun. ‘14
Topaz Studio Apr. ‘18
Total solar eclipse, How to shoot Mar. ‘24
Translucency & backlighting Nov. ‘18
Travel photography Feb. ‘ 13
Travel portraits Mar. ‘14
Travel tips Apr. ‘14
Travel photographer’s guide Jun. ‘17
Tripods, not allowed Jun. ‘24
Tweaking exposure on the fly Apr. ‘23
Twilight photography in the rain Apr. ‘19
Twilight, Creating Oct. ‘23
Tripods Mar. ‘18
Two subject sharp rule May ‘14
Two subject focus rule Jan. ‘20
Two subject focus rule Jun. ‘21
Quiz answers
1. b 2. b 3. d 4. c 5. a 6. a 7. d 8. b 9. d 10. b Your score 90% - 100%: You could have been a pro 80% - 89%: Your glasses probably need a new prescription 70% - 79%: Just don’t quit your day job < 70%: You should really be using an iPhone
Subject index for past Photo Insight issues
Urban heights
Ultra distortion
Unusual Panos
Jun. ‘21
May ‘18
Nov. ‘22
Upside Down Reflections Aug. ‘21
Warm fingers in winter
Water drop collisions
What NOT to do in photography
Nov. ‘15
May ‘18
Apr. ‘18
When You Needed a Zoom Aug. ‘21
White on White
White on White
White vignette
White balance
Dec. ‘20
Nov. ‘23
Aug. ‘15
Feb. ‘15
White balance, custom Mar. ‘16
White balance, What Jun. ‘23
Wide angle conundrum
May ‘19
Wide angle distortion, correcting May ‘24
Wide angle lenses Mar. ‘13
Wide angle portraits Nov. ‘14
Wide angle lenses Jun. ‘17
Wide angle lenses: Outside the Box Jun. ‘22w
Wide angle keystoning Nov ‘17
Wildlife photos with wide angles Mar. ‘15
Window light Dec. ‘15
Window light portraits Aug. ‘18
Window light portraits
Window frames
Winter photography
Winter bones
Winter photography
Winter photography
Feb. ‘24
Feb. ‘16
Dec. ‘12
May ‘13
Dec. ‘15
Nov. ‘18
Wire Mesh, Shooting Through Jul. ‘18
Workflow
May ‘13

A waterfall inside a mountain, Lauterbrunan, Switzerland.