3 minute read
One-Point Perspective: Drawing a Room


ONE-POINT PERSPECTIVE
Drawing a Room
Advertisement
Until artists figured out perspective, there was no accurate system for drawing architecture or other geometric space. In fact, linear perspective was only discovered about 500 years ago, long after humans had figured out algebra and geometry. Drawing in one-point perspective is one of those things that seems complicated if you’ve never done it before, but if you follow a set of simple rules, it’s actually quite easy.
Perspective drawing comes in a few different flavors, with one-, two- and three-point being the most common. However, the principles are essentially the same. All perspective drawings utilize the horizon line (HL) and the vanishing point (VP). The horizon line is a horizontal line that not only represents the horizon, but also the viewer’s eye level. No matter where it is placed on the page, anything above the HL is also above the viewer’s eye level, and anything below the HL is below the viewer’s eye level. A rule of thumb in one-point perspective is that straight lines will usually either be vertical, horizontal or recede toward the vanishing point. The vanishing point is a point on the horizon line where lines that are parallel to the viewer’s line of sight appear to meet. In other words, any set of lines that is going the same direction as the viewer is looking will meet at the VP. These receding lines are called orthogonal lines.
Seem confusing? Don’t worry, it will make sense soon. With the terminology out of the way, here’s how to draw a simple room in one-point perspective.
Step 1 Draw your HL first, anywhere on the page, though closer to middle works best for this exercise. Don’t establish a VP just yet. Now, draw the back wall of your room, using only horizontal and vertical lines, making sure at least part of it overlaps the HL. Add any elements you choose — a door and a window should work just fine. The back wall can be square or rectangular, but keep it small enough that you will have room on the page later to add side walls, floor and ceiling.

Step 2 Now comes the fun part. You can add your vanishing point anywhere inside the room along the HL. The VP will represent the viewer’s point of view. From the VP, draw your orthogonal lines out, making sure they go through the corners of the room. Don’t worry that this is not a perfect X — that would only happen if your back wall was a perfect square and the VP sat directly in the center of it.
Step 3 At an arbitrary point along one of the orthogonals, draw a new box, using only vertical and HLs that intersect at each orthogonal. You’ve already created a room in one-point perspective! At this point you can erase the HL inside your room, making sure to leave the VP.


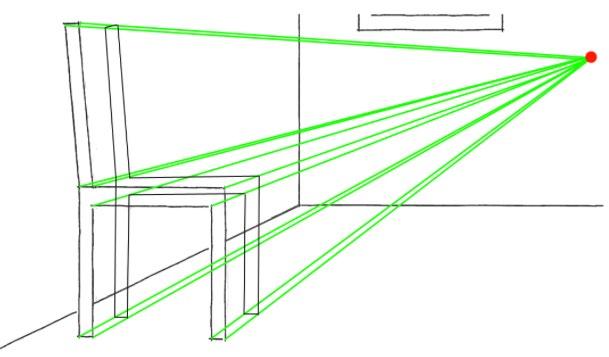

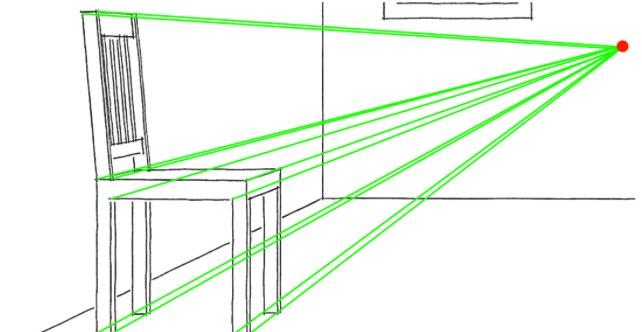
Step 4 Of course, a room needs furniture, so you can use the same principles to add them to the room. This time you will work from the front back toward the VP. Draw the front face of the furniture first, then add orthogonal lines back to the VP from every corner.
Step 5 Set the depth of your chair by choosing a point along an orthogonal line (closer to the chair than the VP is best). Work your way around all the orthogonal lines, making sure each line is perfectly parallel to its corresponding line on the front face of the chair. You have now drawn the back face of your chair. Now add the lines across. You can also use this method to set the depths of the individual legs, etc.
Step 6 Do the same for any other piece of furniture you’d like to add. Windows are even easier: just draw a set of vertical lines connected by orthogonals to make a rectangle in one-point perspective on the wall. When you’re done, erase the orthogonal lines and VP and there you have it. A perfect one-point perspective room!