2 minute read
11 Remote Control Unit
from Jva Z14
Remote Control Unit
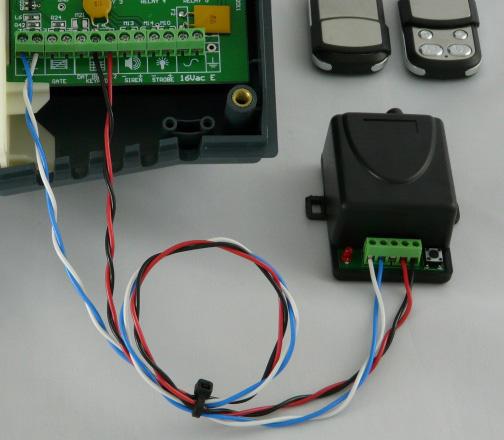
The Remote Control Unit provides the Z14/R with the ability to arm or disarm the energiser via a compact key chain fob remote control. Two remote controls are provided, and are uniquely coupled to the receiver using a rolling code algorithm to ensure security. Should one or both remote controls lose synchronisation with the receiver, it is a simple procedure to re-associate the remotes. The receiver controls the energiser by IN1 and receives power from the Keypad bus. The output of the remote control receiver is a normally open (NO) contact. The remote controls have a range of up to 100 metres. They come fitted with a LR27A 12V battery that will provide up to 2 years service. To get some auditory feedback as to whether you have armed or disarmed the fence you can install a siren into the siren output of the Z14/R. Then, using your Z-Series keypad, enter programming mode and set combined option 2 to 01. This will make your siren chirp once for armed and twice for disarmed. For more information see “8.5.14 Combined Options 2 (Option 18)” on page 50.
Advertisement
Remote Control Unit Receiver
• Enables arm / disarm of the energiser, or a single zone, by key chain fob remote control
• 2 remote controls included
• Uses digital rolling-code algorithm to uniquely and securely couple to remote controls
• Operates between 315 – 433.92MHz • 100 metres range • Easily connected and configured • Wire to keypad bus (for power) and input (usually IN1) 11.2 INSTALLATION
The Remote control receiver unit requires 12V and 0V (GND) from the keypad bus, and its output is shown wired to IN1. Mount the receiver on the right hand side of the Z14/R energiser. Connect +12V and 0V (GND) from the KEYPAD terminals on the energiser to the right-most terminals of the receiver, as per the diagram above. Connect the IN1 terminals to the left-most terminals of the receiver. Keep all connections away from any high voltage wiring, specifically the Fence Feed connections coming from the left side of the energiser.

Remote Control Receiver Wiring Diagram
Remote Control Unit
The remote controls come pre-configured to work with the receiver. Simply press the LOCK key to arm the energiser. Press the UNLOCK key to disarm.
Should a remote control become lost or stolen, it is possible to disassociate the receiver with all remote controls. To do this, press the button on the bottom right corner of the receiver unit and hold for approximately 10 seconds. When the red light goes off the receiver has wiped all associated remote controls from its memory. To associate a remote control, press the same button on the receiver once. The light will come on momentarily. Next, press a button on the desired remote control. The receiver light will begin flashing. Press the same button on the receiver once more and the light will stop flashing. Test the remote control by pressing a button. The receiver light will flash, indicating it has successfully associated with the remote control. Repeat these steps for any remaining remote controls that require (re)association.


