
Add Elements to Pages
Text Box, Embellishments, Frames and Shapes
Overview
On Page Builder, you have the capability to add different elements to your Yearbook from text box, embellishments, single image and page layout.
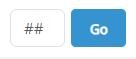
1. From the Home, hover over Book Builder and select Ladder Diagram or you can enter the specific page number in the ## field and click Go.

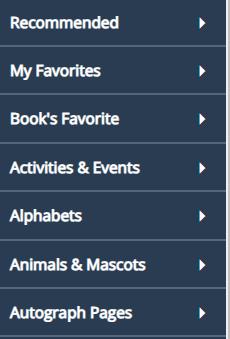
2. Once your page is loaded, you’ll navigate to the left navigation panel and select one of the options/actions you want to take:
o Text-Used to create a text box on your page
o Embellishments-Are colorful images and words to be used on your yearbook pages.
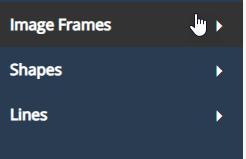
o Frames & Shapes-Has selections for Image Frames, Shapes and Lines that can be added to page.
3. Select the action that you want to take. Clicking on your option will open additional options to select from.
o Text-Drag to Add Text Box will appear, and you’ll just need to drag it on your page.


o Embellishments-Click on the option to have a wider selection to choose from.

o Frames and Shapes-Click on the option that you want to select to have on your page. You’ll drag and drop each selected element onto your page.


Text
Adding a text box, you’ll want to drag the box to add the text.
1. To adjust the text box, you can move the boxes on the outline to make the text box the size needed.
a. To make edits within the box, double click in the box. It will enlarge the text box and you’ll be able to make any necessary text edits.
2. To make additional adjustments within the text box click on the wheel (gear icon). Several options will be populated.


• Styles-Selecting the specific style you would like displayed on your page this includes headlines, sub headlines.
• Font & Size-Adjust font type, font size and adds bold, italics and underlining.
• Font Color-Adjust the font to a new color. Using the Color Picker can give a more customized look based on the vision of creativity.
• Spacing & Adjustment-Adjust the alignment (left, right, center, justified), spacing before and after texts.
• Text Wrap-Avoids long lines, making it easier to read. Ensures that all text flows around the image, preventing the image from disrupting line spacing.
• Special Characters-Includes the most used special characters.
• Size & Position-Allows you to fix the size and position of the text box on the page. Options include width, height, X position and Y position.
• Drop Shadow-Visual effect that makes an object appear to be raised above its background by adding a shadow behind it.
• Drop Shadow Color-Select the color to highlight the text. It will have a shadow effect.
• Tag Students for Indexing-Allows you to tag students in the image to use with the indexing functionality. Enter a name, select the appropriate student from the autofill options and click Add.
• Clear Contents-Deletes all current text but leaves the text box placeholder.
3. Click Save at the top of the page to save all your work.
Adding Additional Fonts
1. On your Dashboard click on Book Builder
2. Select Contract and Book Settings
3. Scroll to the center of the page and look for the section called Fonts.
4. Click on Add Fonts
5. Scroll to the bottom section called Available Fonts
6. Scroll through the available fonts and click on the box to select which font you want to add.
7. Click on Add Selected Fonts when you have made your selections.
8. The new font has been added to list of fonts for the Yearbook.
Embellishments
1. On the left-hand navigation side select Embellishments.
2. Select a category to expand the category to view all options available.
3. Scroll to find the desired image.
4. Drag and drop the embellishment image to approximately where you would like it to appear on the page.
5. To make adjustment to the embellishment the Tools menu and Trash icon appear.
a. 3 options to adjust:
• Double Arrows-can swap the image with another image this placed on the page


• Settings Wheel (Tool Menu)-provides variable options to make changes to the image.

Border & Shape Options-Select the transparency, border style, border thickness and shape around the image.
Border Color-Select the color around the boarder from the popular colors, theme colors, custom color or color picker. Tint of the color can be adjusted as well.
Drop Shadow-Visual effect that makes an object appear to be raised above its background by adding a shadow behind it.
Drop Shadow Color-Select the color to highlight the text. It will have a shadow effect.
Pan & Zoom Image-Capability to zoom in and out to have the image selected to the desired size.
Clear Contents-Clears the embellishment selected.
Trash Can-clicking the trash can will delete the specific content.
6. Click Save at the top of the page to save your work.
Frames and Shapes
1. On the left-hand navigation side select Embellishments.
2. Select a category to expand the category to view all options available.
a. Image Frames-Image frames should be used when you want to add a picture to a particular shape.
b. Shapes-No image can be added to the shape. Used to add keywords by adding a text box on top of the shape.
c. Lines-Used to add dimension or break out sections on a particular page.
3. Drag and drop the selected frame or shape approximately where you would like it to appear on the page.
a. Image Frames


1. Go to My Images
2. Drag and drop the image into the shape. The photo will fill the shape.
3. Adjust the Image Shape:
a. Drag the outside of the box to the desired size of image shape.
i. You may have to resize your photo by clicking on the wheel (settingstool menu to appear).
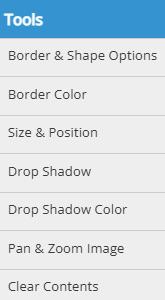
4. Tools Menu:
Border & Shape Options-Select the transparency, border style, border thickness and shape around the image
Border Color-Select the color around the boarder from the popular colors, theme colors,custom color or color picker. Tint of the color can be adjusted as well.
Size & Position-Capability to adjust the width, height, X position & Y position.
Drop Shadow-Visual effect that makes an object appear to be raised above its background by adding a shadow behind it.
Drop Shadow Color-Select the color to highlight the text. It will have a shadow effect.
Pan & Zoom Image-Capability to zoom in and out to have the image selected to the desired size.
Image Effects-Can add image filters, rotate image, adjust transparency, brightness, contract, and tint.
Edit (in Image Editor)-Additional options to edit the image from basic image effects (black and white, sepia, antique, and vintage), fun effects (half tone highlights, invert) and rotate & flip image.
Tag Students for Indexing-Allows you to tag students in the image to use with the indexing functionality. Enter a name, select the appropriate student from the autofill options and click Add.
Clear Contents-Deletes all current text but leaves the text box placeholder
4. Click Save at the top of the page to save your work.