
• Headline, related photos, alternative copy (quote area, photos with expanded captions, numbered lists functioning as copy, etc.)
Choose from this list or create modules that help you tell the story and add depth to the coverage.
Designing with thein mind It starts with a plan
• Lists • Informational graphics • Quote areas • Question/answer modules • Profiles • How-to modules • Step-by-step modules • Photo series with names and identifications relating to topic on spread • Mini-features • Anecdotes • Tests or quizzes • Timelines • Factoids • Bulleted points • Interactive response modules • QR codes or Aurasma connections to videos Book • 25 Designing the
Big picture
• Story, headline, photo support with captions
Secondary coverage modules: Below are ideas for secondary coverage modules.
Before creating a double-page spread, plan the content first because content dictates design. Using the bubble sheet method, first list the topic to be covered in the center of the circle. (See example on page 26). Next, create a unique angle for the main story. In this example, the story angle is that we develop loving relationships with our pets. Good ideas come from brainstorming Continue to brainstorm for secondary modules that will help you tell the story. The advancd design on page 34 provides several possible modules: a student who owns a service animal, students who train service dogs, students who learn from their pets and how students care for their pets. Ultimately, those ideas will become your secondary coverage modules. (See bubble planning sheet in the back portion of this section). Expand your plan To take the topic and modules to a deeper level, see the expanded plan in the back portion of this section). As a section team, brainstorm for photo ideas. List your secondary coverage modules in the second column. Write a headline that will tie the spread together and make a verbal-visual connection with the dominant photo idea, the topic and the story. In the fourth column, add all the people you might want to interview for the story and modules. Ways to cover topics Main topic:

PlannerSheetBubbleSample
Topic: Service animal and owner How to cover it: Cutout with quote from owner
Design
Plan begins with a Below is an example of the bubble planning sheet. The designer first listed the topic to be covered in the center of the circle. Next, the designer created a unique angle for the main story. In this example, the story angle is the loving relationships we develop with our pets. For topics covered annually, the angle should be different from year to year.
Book • 26
Designing the
Topic: Student who raises horses How to cover it: Photo of girl who raises horses inset into copy with caption
Topic: Students and their pets Angle: Our relationships with our pets How to cover it: Photos, captions and headline with four pictures of students with their pets and expanded quotes about their unique relationships with their beloved “fur babies.”
The section team continued to brainstorm for secondary modules that helped them tell the story. In this instance, there were several possible modules: a student who owns a service animal, students who train service dogs, students who learn from their pets and how students care for their pets.
Topic: Students who train dogs How to cover it: Small cutout with quote from a student who trains dogs as service animals
Topic: What we learn from our pets How to cover it: Module with candid photos, names of students and their comments
Spread Planner
Plan Expand your Expanded Spread Planner Topic: Students and their pets Angle: Relationships between students and their pets Photo ideas Secondary coverage Headline Story sources On-location pictures of students interacting with their Picturespetsof students caring for their pets and performing duties associated with them Close-ups of students hugging their animals, showing an emotional relationship with Studentthemwith service animal Students training service animals Featured quote and cutout of student with service animal Featured quote and cutout of students training service animals Candid photo series of students; include their names and words describing what they learn from their Modulepetsof students with their pets with names of students and descriptions of what they learn from their pets Primary headlne: The Power of Love Secondary headline: From horses to goats, students build relationships with their best ‘fur friends’ Students who have or train service Studentsanimalswhoraise pets for Studentsfun who have deep relationships with their Studentspets who have unusual Studentspets who raise pets for projects (FFA members) PlannerSpreadCoverageExpanded Create an in-depth plan For greater coverage, expand your plan: Column 1: As a section team, brainstorm for photo ideas. Column 2: List your secondary coverage modules in the second column. Column 3: Write a headline that ties the spread together and makes a verbal-vsiual connection with the dominant photo idea, the topic and story. Column 4: In the fourth column, list everyone you might want to interview for the story and modules. Column 1: Column 2: Column 3: Column 4: Book • 27 Designing the
Centered images lead to static design and are seldom
Plan Execute your Book • 28
note the five parts of the spread you’ve planned on the bubble sheet. Work with your photogaphers and writers to assign each part of the Next, begin to create the design. Choose a picture that best represents the topic you’re covering on the double-page spread. This will become your dominant correct size to be featured in that position. The photo’s resolution should be a minimum of 300 dots/pixels per inch (See photo section for more information).
Study the step-by-step advanced design on pages 29-34 based on the bubble sheet and expanded plans on pages 26 and 27.
Implement the plan After creating the plan, implement it in your design.First,
Designing the
Begin to form your eyeline
Place the dominant photo near the center of the spread with a large part of the photo on one side of the spread or the other. This practice links the two facing pages. Avoid placing the photo in dead center.
Place the dominant photo on the eyeline, the imaginary one-pica horizontal white space that leads the reader’s eye in a subtle manner across the spread. Use the lines in the dominant photo to guide readers toward the headline rather than taking their eyes off theDeterminepage. where the action falls in the photo and avoid placing the action or faces in the gutter, the space between pages where the book is bound. Placing faces in the gutter distorts them. Next, place the smaller photos related to the dominant near the large photo, maintaining the internal margins and aligning elements, as you did in the basic design. Design from the inside to the outside Avoid building pages from the outside to the inside, as this practice causes designers to trap space, creating “holes” in the design.
Remember to place heavy elements near the center and place lighter elements to the outside. Readers will enter pages through dominant photos and view the spread in either a clockwise or counter clockwise manner, depending on the directional lines within the dominant photos.

Advanced design Creating an Step One: Place the dominant photo first. Cross the gutter with the dominant to link facing pages. Be mindful of the gutter Avoid placing faces or type in the gutter, the space where the book is bound. Book • 29 Designing the

Step Two: Place smaller pictures so they contrast with the dominant photo in size and shape. Add identifications in small type. Place a caption for the dominant picture on a semi-transparent block. Using one-point borders around photos helps readers differentiate one picture from the next. Book • 30 Designing the

Step Three: Add the cut-out-background photo of the student and her service animal mentioned in the bubble sheet plan. Include a featured quote initalic12-pointtype.
Step Three: Design(Continued)aheadline, keeping contrast in size and weight in mind.
Step Three: Add(Continued)fourphotos of students interacting with their pets. Include expanded quotes regarding the students’ lasting relationships with their pets. • 31 Designing the
Book

Step Four: Design a secondary module with photos, identifications and a small headline to help readers understand students’ comments within the module. Step Four: 12-pointatrainphotoAdd(Continued)acut-out-backgroundofstudentswhoservicedogs.Includefeaturedquotesetinitalictype. Book • 32 Designing the
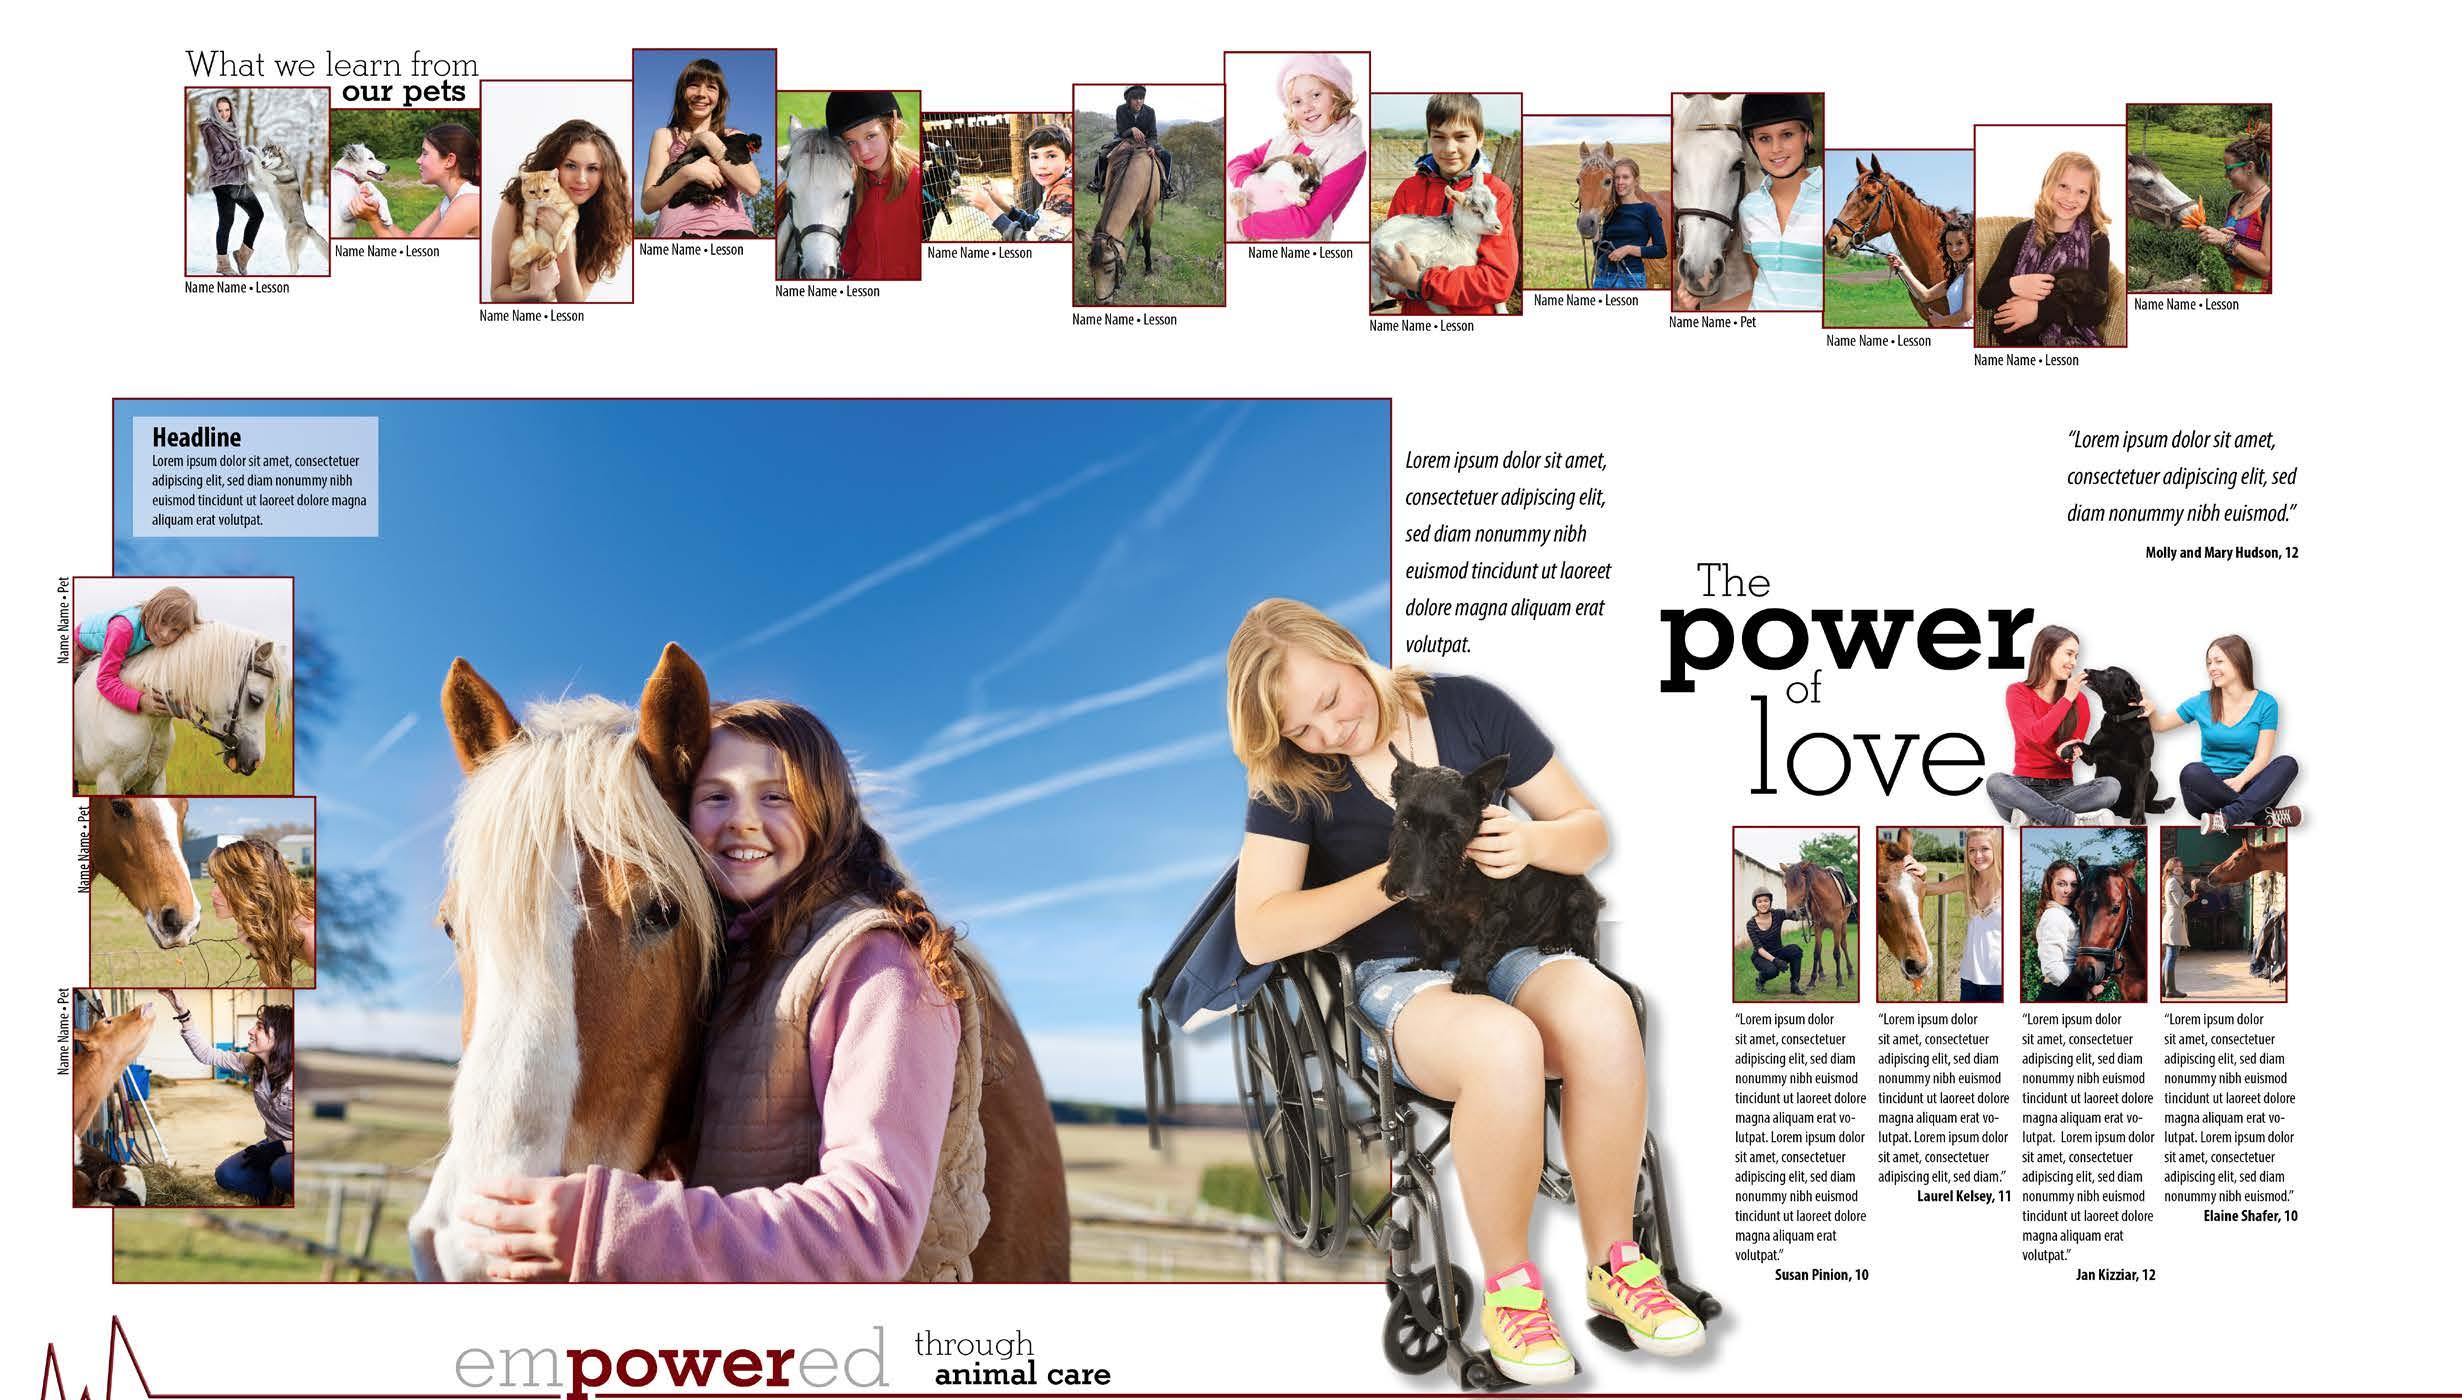
Step Five: Add a secondary module describing what students learn by caring for their animals. Add students’ names and one or two-word descriptions, placing them at 90-degree angles beside the candid photos.
Remember... Use expanded horizontal space to create the eyeline. Note how the expanded space showcases the secondary module at the bottom of the spread. Remember... It’s visually interesting to invade an expanded space with a cutout. Anchor cutouts to an object to avoid “floating cutouts.”
Remember... Use expanded space to create an eyeline. Note how the expanded space showcases the secondary module. Book • 33 Designing the

Step Six: Step back and look at your design. • Have you followed your bubble sheet plan? • Have you used tight inner spacing to show relationships between elements? • Have you used expanded internal spacing to highlight or showcase parts of the design? • Are elements aligned where necessary? • Have you designed an interesting headline that connects to your dominant photo? • Are your pictures cropped to the center of visual interest? • Have you maintained an eye-pleasing external framing margin? • Is the design inviting to the reader? • Does the design make sense to the reader? If your answer to each question is “Yes,” you have an excellent advanced design. Book • 34 Designing the