27 minute read
Profiling������������������������������������������������������������������������������������������������������������������������


Chapter 12 ■ testing and paCkage CheCking
expect_error(rectangle(width = 0, height = 4)) expect_error(rectangle(width = 2, height = 0)) expect_error(rectangle(width = 0, height = 0)) })
Advertisement
When you are developing your code and corresponding unit tests, it is always a good idea to think a little bit about what the special cases could be and make sure that you have tests for how you choose to handle them.
Using Random Numbers in Tests
Another good approach to testing is to use random data. With tests we manually set up, we have a tendency to avoid pathological cases because we simply cannot think them up. Random data doesn’t have this problem. Using random data in tests can, therefore, be more efficient, but of course, it makes the tests non-reproducible which makes debugging extremely hard.
You can, of course, set the random number generator seed. That makes the test deterministic and reproducible, but defeats the purpose of having random tests to begin with.
I don’t really have a good solution to this, but I sometimes use this trick: I pick a random seed and remember it and set the seed. Since I now know what the random seed was, I can set it again if the test fails and debug from there.
You can save the seed by putting it in the name of the test. Then if the test fails, you can get the seed from the error message.
seed <- as.integer(1000 * rnorm(1)) test_that(paste("The test works with seed", seed), { set.seed(seed) # test code that uses random numbers })
Testing Random Results
Another issue that pops up when we are working with random numbers is what the expected value that a function returns should be. If the function is not deterministic but depends on random numbers, we don’t necessarily have an expected output.
If all we can do to test the result in such cases is statistical, then that is what we must do. If a function is doing something useful, it probably isn’t completely random and that means that we can do some testing on it, even if that test can sometimes fail.
As a toy example, we can consider estimating the mean of a set of data by sampling from it. It is a silly example since it is probably much faster to just compute the mean in the first place in this example, but let’s consider it for fun anyway.
If we sample n elements, the standard error of the mean should be s n / , where s is the sample standard error. This means that the difference between the true mean and the sample mean should be distributed as N s n0, / ( ) .
285
Chapter 12 ■ testing and paCkage CheCking
In the following code, I normalize the distance between the two means by dividing it with s n / , which should make it distributed as Z∼N(0,1). I then pick a threshold for significance that should only be reached one time in a thousand. I actually pick one that is only reached one in two thousand, but I am only testing the positive value for Z, so there is another implicit one in two thousand at the negative end of the distribution.
seed <- as.integer(1000 * rnorm(1)) test_that(paste("Sample mean is close to true, seed", seed), { set.seed(seed)
data <- rnorm(10000) sample_size <- 100 samples <- sample(data, size = sample_size, replace = TRUE)
true_mean <- mean(data) sample_mean <- mean(samples)
standard_error <- sd(samples) / sqrt(sample_size) Z <- (true_mean - sample_mean) / standard_error threshold <- qnorm(1 - 1/2000)
expect_less_than(abs(Z), threshold) })
This test is expected to fail one time in a thousand, but we cannot get absolute certainty when the results are actually random. If this test failed a single time, I wouldn’t worry about it, but if I see it fail a couple of times, it becomes less likely that it is just a fluke, so then I would explore what is going on.
Checking a Package for Consistency
The package check you can do by clicking Check in the Build tab on the right in RStudio, or the Check Package in the Build menu, runs your unit tests and does a whole lot more.
It calls a script that runs a large number of consistency checks to make sure that your package is in tiptop shape. It verifies that all your functions are documented, that your code follows certain standards, that your files are in the right directories (and that there aren’t files where there shouldn’t be2), that all the necessary meta-information is provided, and many many more things. You can check for a longer list of the tests done when a package is being checked at http://r-pkgs.had.co.nz/check.html.
You should try to run a check for your packages. It will write a lot of output and, in the end, it will inform you about how many errors, warnings, and notes it found.
In the output, every test that isn’t declared to be OK is something you should look into. It might not be an error, but if the check raises any flags, you will not be allowed to put it on CRAN. At least not without a very good excuse.
Exercise
You have written two packages—for shapes and for polynomials—and your exercise now is to write unit tests for these and get them to a point where they can pass a package check.
2If there are, you should have a look at .Rbuildignore. If you have a file just the place you want it but the check is complaining, you can just add the filename to .Rbuildignore and it will stop complaining. If you have a README.Rmd file, for example, it will probably complain, but then you can add a line to .Rbuildignore that says ^README.Rmd$.
286
CHAPTER 13
Version Control
Version control, in its simplest form, is used to track changes to your software. It is also an efficient way of collaborating on software development since it allows several developers to make changes to the software and merge them with changes from other developers. RStudio supports two version control systems, Subversion and git. Of these, git is the most widely used, and although these things are very subjective of course, I think that it is also the better system. It is certainly the system we use here.
Version Control and Repositories
There are two main purposes of using a version control system when you develop software. One is simply to keep track of changes, so that you can later check when which modifications were made to your source code, and if you discover that they were in error, revert to earlier versions to try a different approach. It provides a log for your software development that allows you to go back in time and try again when you find that what you have done so far leads to some place you don’t want to go.
The other job a version control system typically does is that it makes it easier for you to collaborate with others. Here the idea is that you share some global repository of all code and code changes—the log that the version control system keeps of all changes—and each developer works on a copy when modifying the code and submits that code to the repository when he or she is done changing the code. In early version control systems, it was necessary to lock files when you wanted to modify them to prevent conflicts with other developers who might also be editing the same files. These days, version control systems are more lenient when it comes to the concurrent editing of the same files, and they will typically just merge changes as long as there are not changes in overlapping lines (in which case you will have to resolve conflicts manually).
With this type of version control, different developers can work concurrently on different parts of the code without worrying about conflicts. Should there be conflicts, these will be recognized when you attempt to push changes to the global repository, and you will be told to resolve the conflicts.
The version control system git allows even more concurrent and independent development than this, by not even having a single global repository as such. At least in theory. In practice, having a global repository for the official version of your software is a good idea, and people do have that. The system just doesn’t enforce a single global repository, but instead, is built around having many repositories that can communicate changes to each other.
Whenever you are working with git, you will have a local repository together with your source code. You can use this repository as the log system or create branches for different features or releases, as you will see later. You make changes to your source code like normal and can then commit them to your local repository without any conflict with other people’s changes. However, you can’t see their changes and they can’t see yours because you are working on different local repositories. To make changes to another repository, you have to push your changes there and to get changes from another repository, you have to pull them from there.
Chapter 13 ■ Version Control
This is where you typically use a global repository. You make changes to your local repository while developing a feature but when you are done you push those changes to the global repository. Or if you do not have permission to make changes to the global repository—perhaps because you cloned someone else’s code and made changes to that—ask someone who does have permission to pull your changes into the repository. This is known as a “pull request”.
Using git in RStudio
This is all very theoretical and, if it is hard for me to write, it is probably also hard for you to understand. Instead, let’s see git in practice.
RStudio has some rudimentary tools for interacting with git: it lets you create repositories, commit to them, and push changes to other repositories. It does not support the full range of what you can do with git— for that, you need other tools or to use the command-line version of git—but for day-to-day version control, it suffices for most tasks.
Installing git
If you haven’t installed git already on your computer, you can download it from http://git-scm.com. There should be versions for Windows, OS X, and Linux, although your platform might have better ways of installing it. For example, on a Debian/Ubuntu system, you should be able to use the following:
sudo apt-get install git-core
On a Red Hat/Fedora system, you should be able to use the following:
sudo yum install git-core
You have to Google around to check how best to install git on other systems.
Once git is installed, you want to tell it who you are. It needs this to be able to tag changes to your code with your name. It isn’t frightfully important if you are the only one working on the code, but if more people are collaborating on the software development, it is necessary to identify who made which changes. You tell git who you are by running the following commands in a terminal1:
git config --global user.name "YOUR FULL NAME" git config --global user.email "YOUR EMAIL ADDRESS"
You also might have to tell RStudio where the git command you installed can be found. You do that by choosing Tools ➤ Global Options. In the window that pops up you should find, on the icons on the left, a panel with Git/SVN and in there you can tell RStudio where the git command can be found.
The git you have installed is a command-line tool. RStudio has some GUI to work with git, but you can’t do everything from the GUI. There are a few GUI tools that allow you to do a lot more with git than RStudio, and I recommend getting one of those. I find it easier using them than the command lines myself since I am getting old and forget the exact commands.
1Not the R terminal. You need to run this in an actual shell terminal for it to work. How you open a terminal depends on your platform. I can’t help you there. If you don’t know how to, it is time to fire up Google once again.
288
Chapter 13 ■ Version Control
Some good choices are: • SourceTree (https://www.sourcetreeapp.com), for Windows and OS X • GitHub Desktop (https://desktop.github.com), for Linux, Windows, and OS X (for working with GitHub repositories) • GitG (https://wiki.gnome.org/Apps/Gitg/), for Linux
Sometimes, though, you do need to use the command-line version. There is a very nice interactive web tutorial for the command-line git program here: try.github.io.
Making Changes to Files, Staging Files, and Committing Changes
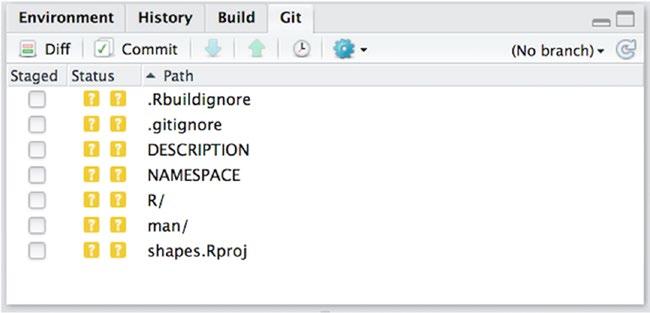
If you checked that your project should use git when you created your package, you should have a Git tab on the top-right of RStudio, next to the Build tab (see Figure 13-1). Click on it.
In the main part of this panel, there is a list of files. There are three columns—Staged, Status, and Path— the latter contains the names of modified files (or directories).
Figure 13-1. Git panel showing modified files
If this is the first time you have accessed this panel, the status will contain a yellow question mark for all files you have modified since you created the object (including files that RStudio made during the package creation). This status means that git doesn’t know about these files yet. It can see that the files are there, but you have never told it what to do about them. We will do something about that now.
The Staged column has check boxes for all the files. If you click one, the status for that file changes to a green “A”. This means that you have staged the file to be added to the git repository. Do this for all of the files. When you do it for a directory, all the files in that directory will also be staged for adding. This is also what we want for now.
The process of committing changes to git involves staging changes to be committed before we actually commit them. What we just did was tell git that next time we commit changes, we want these files added. Generally, committing will only affect changes we have staged. This lets you commit only some of the changes you have made to your source code, which can be helpful at times. You might have made several changes to many files but at some point, you only want to commit a particular bug fix and not changes for a new feature that you are not quite done with yet. Staging only the changes you want to commit allows for this.
289
Chapter 13 ■ Version Control
Anyway, we have staged everything and to commit the changes you now have to click the Commit button in the toolbar. This opens a new window that shows you the changes you are about to commit and lets you write a commit message (on the upper right). This message is what goes into the change log. Give a short and meaningful description of your changes here. You will want it if you need to find the changes in your log at some later time. Then click Commit and close the window. The Git panel should now be empty. This is because there are no more changes since the last commit, and the panel only shows the files that have changed between your current version of your software and the version that is committed to git.
To do what you just did in the terminal instead, you would stage files using the git add command as follows:
git add filename
You would then commit staged changes using the git commit command:
git commit -m "message"
Now try modifying a file. After you have done that, you should see the file displayed in the Git panel again, but this time with a status that is a blue M, as shown in Figure 13-2. This, not surprisingly, stands for modified.
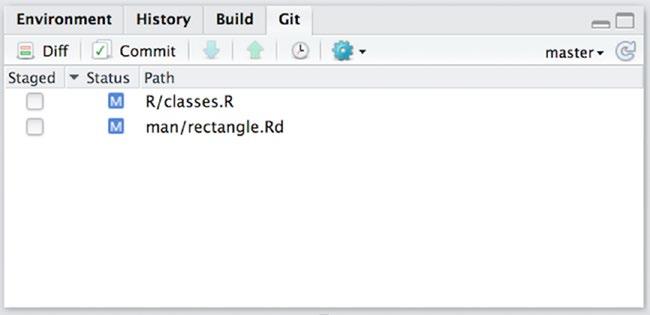
Figure 13-2. Modified files in the Git panel
If you stage a file for commit here, the status is still M, but RStudio indicates that it is now staged by moving the M to the left a little (see Figure 13-3). Not that you really need that feedback, because you can also see that it is staged from the checked staged button of course.
290
Chapter 13 ■ Version Control
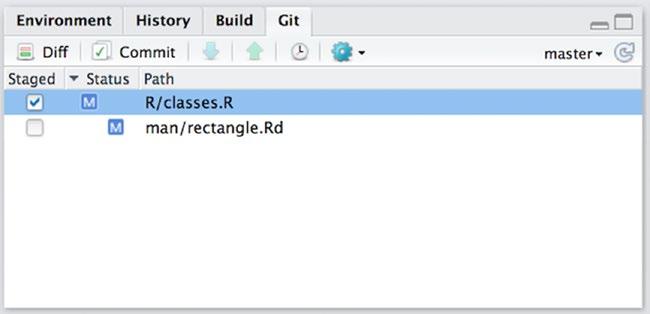
Figure 13-3. Modified files with one file staged for commit
Committing modified files works exactly like committing added files.
In the terminal, you use git add for staging modified files as well. You don’t have a separate command for staging adding new files and staging modified files. It is git add for both.
Adding git to an Existing Project
If you didn’t create your project with a git repository associated with it—and you have just learned about git now, so unless you have always just clicked the git button when creating projects you probably have many projects without git associated—you can still set up git for an existing directory. Simply choose Build ➤ Configure Build Tools and then click the Git/SVN option in the dialog box. If you choose Git as the version control, RStudio will configure git for you.
You can also do this from the command line. Go to the directory where the project is and run this command:
git init
This sets up an empty repository. You can then add the files already in the directory, just as you saw previously.
Bare Repositories and Cloning Repositories
Most of the material in this section is not something you will ever have to worry about if you use a repository server such as GitHub. There, creating a repository and interacting with it is handled through a web interface and you won’t have to worry about the details, except for “cloning” a repository. We will create a so-called “bare” repository manually here and see how we can communicate changes in different local repositories through this.
The repositories we made when we created R projects or used git init in a directory are used for version control of the source code in the project directory. They are not really set up for collaboration between developers. While it is technically possible to merge changes in one repository to another, it is a bit cumbersome and not something you want to deal with on a daily basis.
To synchronize changes between different repositories, we want a bare repository. This is a repository that doesn’t include the local source code; it isn’t really special, but it prevents you from making local changes to it. You can only update it with changes from other repositories.
291
Chapter 13 ■ Version Control
To create a bare repository, you need to use the command-line version of git. Create a directory where you want the repository, and then go in there and type:
git --bare init
The repository now contains the various files that git needs to work with. Your local repositories also include these files; they are just hidden in a subdirectory called .git/ when you have the local source code as well.
We are not going to do anything with this repository directly. We just need it to see how we work with other repositories connected to it.
Go to a directory where you want the working source code version of the repository and make a copy of the bare repository by writing the following:
git clone /path/to/bare/repository
You will get a warning that you have cloned an empty repository. We already know that so don’t worry about it. We are going to add to it soon.
To see how to communicate between repositories, though, you need to make another working copy. You can either go to another directory and repeat the clone command or clone the repository with another name, as follows:
git clone /path/to/bare/repository name
You now have two clones of the bare repository. You’ll see how to push changes from a clone to the cloned repository and how to pull updates in the cloned repository into the clone.
As mentioned, going through a bare repository is not the only way to move changes from one repository to another, but it is the easiest way to work with git and the one you will be using if you use a server such as GitHub. If you do, and you’ll see later how to do this, then GitHub will make the bare repository for you. You’ll just need to clone it somewhere on your own computer to work with it.
Pushing Local Changes and Fetching and Pulling Remote Changes
Go into one of the clones you just made. It will look like an empty directory because you haven’t made any changes to it yet. In fact, it does contain a hidden directory, .git/, where git keeps its magic, but you do not need to know about that.
Try to make some files, add them to git, and commit the changes.
touch foo bar git add foo bar git commit -m "added foo and bar"
If you now check the log as follows:
git log
You will see that you have made changes. If you look in the other clone of the bare repository, though, you don’t see those changes.
There are two reasons for this: 1) we have only made changes to the cloned repository but never pushed them to the bare repository the two clones are connected to, and 2) even if we had done that, we haven’t pulled the changes down into the other clone.
292
Chapter 13 ■ Version Control
The first of these operations is done using git push. This will push the changes you made in your local repository up to the repository you cloned it from.2
git push
You don’t need to push changes up to the global (bare) repository after each commit; you probably don’t want to do that, in fact. The idea with this workflow is that you make frequent commits to your local code to make the version control fine grained, but you push these changes up when you have finished a feature—or at least gotten it to a stage where it is meaningful for others to work on your code. It isn’t a major issue if you commit code that doesn’t quite work to your local repository—although generally, you would want to avoid that—but it will not be popular if you push code that doesn’t work onto others.
After pushing the changes in the first cloned repository, they are still not visible in the second repository. You need to pull them down.
The following command makes changes to the global repository and makes it possible for you to check them out before merging them with your own code:
git fetch
This can be useful because you can then check out the changes and make sure they aren’t breaking anything before you merge them with your code. After running the fetch command, you can check out branches from the global repository, make changes there, and merge them into your own code using the branching mechanism described next. In most cases, however, you just want to merge the changes made to the global repository into your current code, and you don’t really want to modify it before you do so. In that case, this command is sufficient:
git pull
It will both fetch the latest changes and merge them into your local repository in a single operation. This is by far the most common operation for merging changes others have made and pushed to the global repository with your own changes.
Go to the repository clone without the changes and run the command. Check that you now have the changes there.
The general workflow for collaborating with others on a project is to make changes and commit them to your own repository. You use this repository to make changes you are not ready to share yet, and you are the only one who can see them. Then, when you are ready to share with your collaborators, you can push the changes to the shared repository, and when you need changes others have made, you can pull them.
If you try to push to the global repository, and someone else has pushed changes that you haven’t pulled yet, you will get an error. Don’t worry about that. Just pull the changes; after that, you can push your changes.
If you pull changes into your repository, and you have committed changes there that haven’t been pushed yet, it becomes a merge operation, which requires a commit message. There is a default message for this that you can use.
You have your two repositories to experiment with, so try to make variations of pushing and pulling and pulling changes into a repository where you have committed changes. This explanation will hopefully make a lot more sense after you have experimented a bit on your own.
RStudio has some basic support for pushing and pulling. If you make a new RStudio project and choose to put it in an existing directory, you can try to make one that sits in your cloned repositories. If you do this, you will find that the Git panel now has two new buttons: Push and Pull.
2If you didn’t have a bare repository, you could still have connected the clones to see changes made to them, but pushing changes would be much more complicated. With a bare repository that both are cloned from, pushing changes upward is as easy as git push.
293
Chapter 13 ■ Version Control
Handling Conflicts
If it happens that someone has pushed changes to the global repository that overlaps lines that you have been editing in your local repository, you will get a so-called conflict when you pull changes. git will inform you about this, whether you pull from RStudio or use the command line. It will tell you which files are involved, and if you open a file with a conflict, you will see that git has marked the conflict with text that looks like this:
<<<<<<< HEAD your version of the code ======= the remote version of the code >>>>>>> 9a0e21ccd38f7598c05fe1e21e2b32091bb0839b
It shows you the version of the changes you have made and the version of the changes that are in the global repository. Because there are changes both places, git doesn’t know how to merge the remote repository into your repository in the pull command.
You have to go into the file and edit it so it contains the version you want, which could be a merge of the two revisions. Get rid of the <<<</====/>>>> markup lines when you are done making the changes.
Once you have edited the file with conflicts, you need to stage it—by running the git add filename on the command line or clicking the file in the Staged column in the Git panel in RStudio—and commit it. This tells git that you handled the conflict and will let you push your own changes if you want to do this.
Working with Branches
Branches are a feature of most version control systems, which allow you to work on different versions of your code at the same time. A typical example is having a branch for developing new features and another branch for the stable version of your software. When you are working on implementing new features, the code is in a state of flux, the implementation of the new feature might be buggy, and the interface could be changing between different designs. You don’t your users to use such a version of your software—at least not without being aware that the package they are using is unstable and that the interface could change at a moment’s notice. So you want the development code to be separate from the released code.
If you just made releases at certain times and then implemented new features between making releases that wouldn’t be much of an issue. People should be using the version you have released and not the commits that fall between released versions. But the world is not that simple if you make a release with a bug in it—and let’s face it, that is not impossible—and you want to fix that bug when it is discovered. You probably don’t want to wait with fixing the bug until you are done with all the new features you are working. So you want to make changes to the code in the release. If there are more bugs, you will commit more bug fixes onto the release code. And all this while you are still making changes to your development code. Of course, those bug fixes you make to the released code will also need to be merged into the development code. After all, you don’t want the next release to reintroduce bugs you already fixed.
This is where branches come in. RStudio has very limited support for branches, and it doesn’t help you create them.3 For that, you need to use the command line.
To create a branch, you use the git branch name command. To create a development branch called develop, for lack of imagination, you would use this command:
git branch develop
3Some of the other GUIs that work with git have excellent support for working with branches. You should check them out.
294
Chapter 13 ■ Version Control
This simply creates the branch. You are not magically moved to the branch or anything. It just tells git that you have a new branch (and it branches off your current position in the list of commits done to the repository).
In RStudio, you can see which branch you are on in the Git panel. In the project you have experimented on so far—and any project you made where you created a git repository with git init or clicked the git selection in the dialog box when you created the project—you will be on the master branch (see Figure 13-4). This is the default branch and is typically used for released versions.
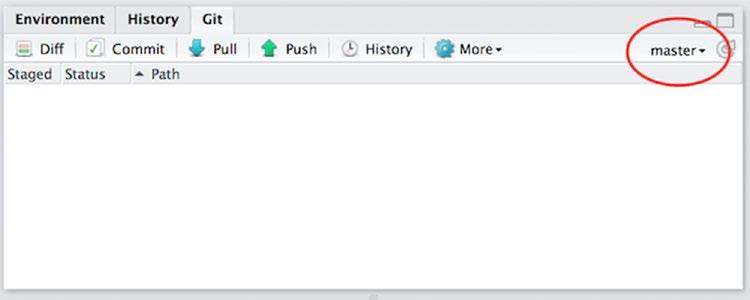
Figure 13-4. Git panel when the code is on the master branch
If you click on the branch drop-down in the Git panel, you get a list of the branches in your repository, as shown in Figure 13-5. You will have a branch called origin/master. This is the master branch on the central repository and the one you merge with when pulling data. Ignore it, it is not important here. If you ran the git branch develop command, you should also have a develop branch (see Figure 13-6). If you select it, you move to that branch.
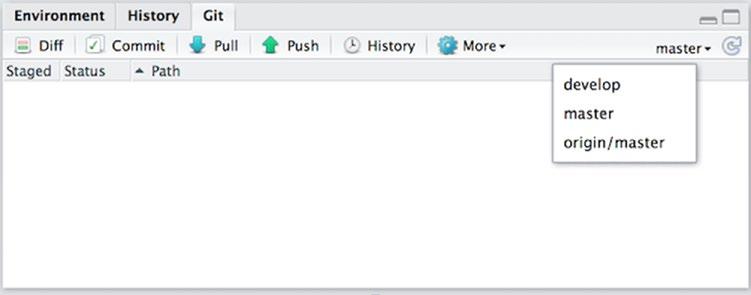
Figure 13-5. Selecting a branch to switch to
295
Chapter 13 ■ Version Control
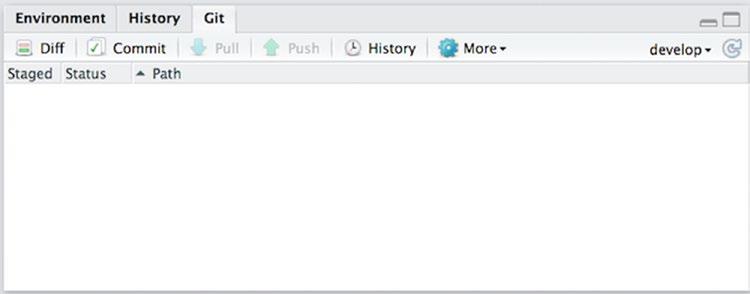
Figure 13-6. After switching to the develop branch
You can also get a list of branches on the command line with the following:
git branch
You can also switch to a branch using this command4:
git checkout branchname
If you switch to the develop branch, you will see that the Pull and Push buttons are greyed out. You can make changes to your code and commit them when you’re on a given branch, but you cannot (yet) push and pull. We will get to that shortly.
If you make some changes to your code and commit it while on the develop branch and then switch to the master branch, you will see that those changes are not there. You can see both by looking at the files and by looking at the git history (using git log or clicking the History button in the Git panel). Similarly, changes you make in master will not show up in develop. This is exactly what you want. The two branches are independent, and you can switch between working on the development branch and the release version of your software by switching branches.
When you make changes to one branch and you want those changes to be added to another, you need to merge branches. Actually, you need to merge one branch into another, it is not a symmetric operation. To do this, check out the branch you want to modify and run this command to merge the changes in otherbranch with the current branch:
git merge otherbranch
So for example, if you fix a bug in the master branch and want to merge it into the develop branch, you would use this command:
git checkout develop git merge master
If a merge causes conflicts, you resolve them the same was as if a pull causes conflicts. Not surprisingly since a pull command is actually just a shortcut for fetching and merging.
4You can also combine creating and checking out a branch using git checkout -b branchname if you want. That command creates the branch first and then checks it out. To change between branches later, though, use the checkout command without the -b option. 296


