GLOBAL BAR
48 cm / 52 cm

48 cm / 52 cm
Congratulations: you’ve just chosen to purchase a bar with all the latest features and special RRD design. Before using this bar for the first time, please read the users manual carefully.
This manual is intended to educate you about your new RRD bar and provide you with information for the correct set-up, tuning, maintenance and care of the bar and its components.

Wind conversion table 20 Un-twisting power lines
21 Adjusting the power of your kite with the clam cleat with closed velcro loop
23 How to lock the chicken loop into your harness hook 24 Release of power / Quick release safety system 26 Reassembling the chicken loop 27 Safety leash 28 Releasing the safety leash
29 Reassembling the safety leash 30 Relaunching the kite
31 Tip: steps to check the flying lines alignment
32 The RRD “Rigid thread lines”
Assignment of responsability, rejection of claims and awareness in acceptance of risks.
First of all to follow carefully terms and conditions set forth below, and second of all require anyone using this product to be bound by such terms. If you are unwilling to be bound by these terms, return this product (before use) for a full refund. A full refund will only be applied if this product has never been used.
Use of this product and any of its components involves certain inherent risks, dangers and hazards, which can result in serious personal injury and death. In using this product you freely agree to assume and accept any and all known and unknown risks of injury while using this equipment. The risks inherent in the sport can be greatly reduced by abiding by the Warnings and Guidelines listed in this Userís Guide and by using common sense.
The use of this RRD Product and any of its components involves certain inherent risks, dangers, and hazards, ineluctable and unpredictable, which can result in serious personal injury and death to both the user and to non user third parties.
In using this RRD Product, you freely agree to assume and accept any and all known and unknown risks of injury to you and to third parties while using this equipment.
Kiteboarding is a dangerous sport and the use of kiteboarding equipment can result in serious personal injury and death to both the user and to non user third parties.
The risks inherent in this sport can be greatly reduced by abiding by the warning guidelines listed in this owner manual and by using common sense.
In consideration of the purchase of this RRD product, you hereby fully agree to the following derogation of the existing law:
• To waive any and all claims that you have or may in the future have against Ricci International Srl, or its agents and all related parties resulting from use of this Product and any of its components.
• Under no circumstances Ricci International Srl or/and any of its agents and all related parties can be responsible for any and all liability for any loss, damage, circumstantial, consequent, against the regulations or exemplary, or rather contractual, for injury or expense that you or any users of your RRD Product may suffer, or that your next of kind may suffer, as a result of the use of the RRD Product, due to any cause whatsoever, including negligence or breach of contract on the part of RRD and all related parties in the design or manufacture of the RRD Product and any of its components. In the event of your death or incapacity, all provisions contained herein shall be effective and binding upon your heirs, next of kind, executors, administrators, assigns, and representatives. RRD-related parties have not made and expressly deny any oral or written representations other than what is set forth herein and the RRD Product User’s Manual.
Purchasing and using this RRD product(s), you hereby fully agree to the following details:
• Explicit waiver of any and all claims that you have or could have in the future against Ricci International Srl, for any and all damages incurred as a result from use of this RRD Product and any of its components.
• Under no circumstances Ricci International Srl can be responsible for any and all liability for any loss, damage, injury or expense that you or any users of your RRD Product may suffer, as a result of the use of the RRD Product, and any of its related components. Due to any cause whatsoever, including negligence or breach of contract on the part of RRD and all related parties in the design or manufacture of the RRD Product and any of its components. In the event of your death or incapacity to understand and will, all provisions contained herein shall be effective.
Warnings:
• Kite flying can be dangerous.
• Always use extreme caution when using this product.
• Misuse of this product can cause serious injury or death.
• Only use this product if you are in good physical health.
• Never act in a careless manner when using this product (such as jumping in the air, or tying yourself down to objects or structures).
You are responsible for your own safety, and the safety of others around you when using this product.
• Always wear a Coast Guard approved personal flotation device when using this product in or near the water.
• Always have a partner when launching and landing your kite.
• Always learn to use a small two-line stunt kite before attempting to use this product.
• Never allow anyone who is not familiar with traction kiting to use this product without experienced assistance.
• Never use this product without a leash system. A loose kite is extremely dangerous to everyone down wind.
• The leash system is not a permanent attachment to this product. Never permanently attach yourself to the kite or any of its components.
• Always wear a helmet, gloves, shoes, and protective eyewear when using this product.
• Always use a high quality, kite specific harness.
• Before using this product take lessons from a reputable school. Do not attempt to fly a kite without being trained by a kite instructor.
• Get yourself used to the way your Quick Release devices work by testing them often in a non emergency situation.
• After every session rinse these devices in fresh water: 1) quick release; 2) de-power trim loop; 3) safety leash; 4) leash system.
Quick Release devices have a limited lifetime, must be checked at the end of each session and changed as soon as first signals of wear and tear become evident, in order to always guarantee the best efficiency.
• The Quick Release, the Trim Loop and your leash equipped with a quick release must be changed after 250 hours of kiting. Change them before if you see any sign of wear. The wearing of your Quick Release devices is not considered a warranty issue.
• Never learn to use this product in more than 10 knots of wind.
• Never use this product in high or gusty winds.
• Never use this product in thunderstorm and lightning conditions.
• Only use this product when you can remain in a standing position.
• Never use this product in wind conditions that are beyond your ability level.
• Never use this product near or on the water in offshore wind conditions.
Choose a safe location.
• Always observe local rules and regulations when using this product.
• Never use this product near power lines, telephone poles, trees, bushes, roads, automobiles, or airports.
• Only use this product when you have 100 meters of clear space downwind, and on both sides of your launching position. The power of the kite can pull you downwind unexpectedly and with great force.
• Do not fly your kite over other people or pets. Spectators should remain upwind of you when using this product.
• Never use this product on crowded beaches or fields.
• Never use this product near the water unless you know how to swim and are in good physical health.
• Practice launching and landing procedures, and self rescue techniques before using this product near the water.
Use caution with the flying lines.
• Never touch the flying lines when the kite is in use. Flying lines are extremely dangerous while under tension and can cause serious injury or death.
• Never use this product with worn lines. A line that breaks while under tension can cause serious injury or death.
• Always check your flying lines for knots before each use. Knots greatly reduce the strength of the lines.
• Stay away from tangled flying lines unless the kite is secured to the ground. An unsecured kite can self launch unexpectedly, and can cause serious injury or death.
• Never allow yourself, or anyone else, to get between the control bar and the kite when using this product(s).
Please note, that you should check the bar, and maintenance it at least after every 250 hours of use, or after six months. This is in order to check if the lines are still in good condition and if all the parts of the bar are subject to wear and need to be serviced.
The parts to be kept in observation and that need to be checked are:
• The kite bar is aviable in two different sizes 48cm and 52cm. The 48cm bar is equiped with 21mt spectra lines, the 52cm is equiped with 23 mt spectra lines.
• The kite bar spectra lines, which should always be washed with fresh water after usage. It should be free of abrasions or lacerations that can occur after collisions or because of sharp rocky surroundings for example. Please note that in case of any abnormality, it is recommended to replace them.
• The back kite bar lines are black in both sizes.
• The Spectra grey depowercord is difficult to break, even though it is subject to wear due to the continuous work to power and depower the kite, it is recommended to replace it after at least 600 hours of sailing or 2 after years.
• Check the condition of the black double chamber tube, this part is very important because it prevents wear of the 4mm spectra safety line that is connected to the kite.
• All the parts of the Chicken Loop must always be washed after each usage, and it is advisable to regularly check if it opens easily, in order to check and have the know-how about the actual functionality
READ CAREFULLY THIS USER GUIDE BEFORE USING YOUR KITE AND KEEP IT STORED FOR FUTURE READING.
Using a kite involves inherent risks and can cause severe injuries or, sometimes fatal accidents, if misused. RRD therefore strongly recommends to follow kiting lessons in a specialized school before using a kitesurfing kite for the first time. To find your nearest school, please check our website at www.robertoriccidesigns.com , under the tab «find a dealer». When kitesurfing, you agree to take full responsibility for your own safety and those of others, which includes informing subsequent users/owners of your equipment of the risks and responsibilities involved. Before practicing, make sure that you are properly covered by an insurance for any damage or injuries caused to third parties while practicing kiting sports. Please refer to your national kitesurfing body or federation to get more information on insurance and responsibilities.
A few safety tips to know and follow:
Specialized equipment contributes to your own safety but constant care and caution remains the best way to avoid any problem. Please keep in mind that wind and weather can be unpredictable and that no-one can be in full control of the kite all the time.
Never ever tie yourself permanently to a kite without a quick-release device. You should always be able to release the kite from you rapidly in case of emergency (tangled lines, strong gusts of wind, injury...). You should therefore rinse your gear as often as possible and perform regular checks of the wear of your release system and all other components.
All RRD kite bars are fitted with a quick release enabling you to fully depower your kite and safety leash which can be released to let go the kite completely. You should never attempt to grab a kite by its lines as they can cause severe cuts under tensions.
A kite is neither a flying device (such as a paraglide) nor a floating device and should not be used as such.
You should never go riding alone. It is strongly recommended to practice in the company of others users who could eventually call for assistance or help in case of emergency
Helmet:
It is strongly recommended to wear a helmet to protect you from your board in case of a fall or any other unexpected situations and especially when launching and landing the kite from the ground.
Wetsuit:
Choose a full-length wetsuit (water T° <19°C) or a shorty (water T°>19°C) depending on the water temperature. Be aware that you will use more energy when you are cold.
Life vest:
The life vest can help you with the water-start and the relaunch of your kite. It might also be welcome when falling hard from your first jumps and will become your new best mate if you ever have to swim back to the shore.
Harness:
Your harness must be comfortable but strong as it is the link between you and the kite. Seat or waist harnesses can both be used, however seat harnesses are more appropriate for beginners. Indeed, seat harnesses do not move upward as much when keeping the kite right above you which beginners tend to do more. A few useful accessories for your harness: - a line cutter
- a loop to attach your board or kite leash.
Choose your spot according to your level
The choice of a good spot is a prerogative for a safe learning. The best spot is not necessarily the spot where you find the most kites. If you just started or if you do not control your kite properly, the best spot is often the least crowded one. The water and wind conditions also vary, advanced kitesurfers often look for strong wind and good waves where beginners should be looking for calm waters and softer winds. When first starting out it is recommended to look for a place with fairly shallow waters.
Choose an obstacle free area
Check that the space on your sides and downwind from you is free of obstacle: no houses, no trees, no cars or jetties.
Under no circumstances should you be riding near electrical posts and wires, or near an airfield or even near a harbor.
Never ride in strong offshore wind. The wind can die at any moment or a line can break. In offshore wind it is harder to swim back to shore, the wind and the current pushing away from the beach.
It is not recommended to ride when the wind is on- shore especially for beginners as the wind pushes directly onto the beach. This will make your learning harder: you will not be able to do good runs and go up wind, and you will end up on the sand very quickly. This will also be more risky as any gust could send you onto the sand and your kite may fall violently onto the sand.
Therefore always ride while the wind is side or side- on, this will let you go downwind while keeping a safe position in case of an emergency.
Be cautious and check that there are no obstacles going down wind. You should always consider room for error. Keep in mind that the risk is to go down wind, beginner or not.
There is always a risk of breaking a line, losing your board, or breaking your harness... therefore the beach down the wind should always be accessible. Think that you may have to walk back alongside the beach (check that there are no rocks, cliffs, fences, or jetties blocking your way).
If you are just starting out or if you cannot entirely control your kite, be careful as to where you stand on the spot: if the spot is big enough, it is better to stand upwind from other kites to avoid crossing your lines with theirs. It is less tricky for you and them, this will allow you to concentrate on your flying and less on others.
• Do not use your kite without a safety system. There are 2 safety systems: the main release system = Quick Release, which instantly reduces the power of the kite, and the disconnecting release system = Safety Leash, which allows you to separate completely from the kite. Indeed, once the main release is activated, the Leash still connects you to your kite, thanks to a safety line.
• Familiarize yourself with the correct use of your safety systems. Pick a clear spot to practice releasing the kite.
• Regularly check the correct functioning of the safety systems: activate each release device at least once before and after each use.
• Rinse your safety systems with fresh water after each use, while operating the release handles, to remove any sand or obstructions that may have been stuck inside.
• Regularly inspect your safety systems to check that each part is still in good condition. If any doubt, replace the safety system or contact your local dealer.
• Kitesurfing safety systems are verified by ISO 21853.
• The manufacturer: RICCI INTERNATIONAL SRL VIA RUBINO 15 Grosseto Italy ,58100 confirms that its security systems comply with the ISO 21853: 2020 standard.
•RRD safety systems didn’t realise the cold and wet test from the ISO norm 21853:2020.
•RRD safety system could be potentially damaged by winter condition, we do not recommend to use the RRD safety system in those conditions (≤ 0°C).
•Under no circumstances can safety procedures be discovered during an emergency. The use of safety systems requires training form, a certified instructor or kite school.
•Mechanical testing is carried out considering a user’s maximum weight of 120kg. While there is no minimum required weight for a user to safely practice kiting and testing the safety systems, it is recommended for any user under 35kg to not engage with said kiting activities
•RRD safety systems are compatible with most harnesses on the market. In particular: systems comprising an open hook, systems comprising a non-deformable circular ring with an internal diameter of 24.5 mm minimum, systems comprising a rope or strap, if its length is suitable, i.e. is not too tight so that the chicken loop is not pressed against the harness; but enough not to twist around the Chicken Loop.
• WARNING : it can be extremely dangerous to use RRD safety systems in a different manner than intended. Contact your local dealer in any doubt.
Ricci International Srl warrants this product to be free of major defects in material or workmanship to the original purchaser, for a period of twelve (12) months (24 EU) from the date of purchase.
This warranty is subject to the following limitations.
The warranty is valid only if you keep the sales invoice or ticket showing clearly the date of purchase.
The warranty is valid only when the product is used for kiteboarding on water, and does not cover products used in rental or teaching operations.
Ricci International Srl will make the final warranty determination.
Ricci International Srl demand the following information to process the warranty request:
• Photo of the damaged area.
• Copy of the selling invoice or ticket. Please provide the above information to your dealer who will forward it to Ricci International or fill in this form online
Products can be returned only if a return authorization number (RA) is given by the Ricci International Srl Distributor in advance. The RA number must be clearly labeled on the outside of the package, or will be refused.
If a product is deemed to be defective by Ricci International Srl, the warranty covers the repair or replacement of the defective product only. Ricci International Srl will not be responsible for any costs, losses, or damages incurred as a result of loss of use of this product.
This warranty does not cover damage caused by misuse, abuse, neglect or normal wear and tear including,
but not limited to, punctures, rigging with other than Ricci International Srl components, damage due to excessive sun exposure, or damage due to over inflation of the bladders, damage caused by improper handling and storage, damage caused by use in waves or shore break, and damage caused by anything other than defects in material and workmanship.
This warranty is voided if any unauthorized repair, change or modification has been made to any part of the equipment. The warranty for any repaired or replaced equipment is good from the date of original purchase only. The original purchase receipt must accompany all warranty claims. The name of the retailer and date of purchase must be clear and legible. There are no warranties, which extend beyond the warranty specified here in.
Warranty claims must be processed and be issued a return authorization prior to shipping to RRD International Srl.
Please call or write for claims processing to the national Ricci International Srl distributor or and than forward to Ricci International Srl.
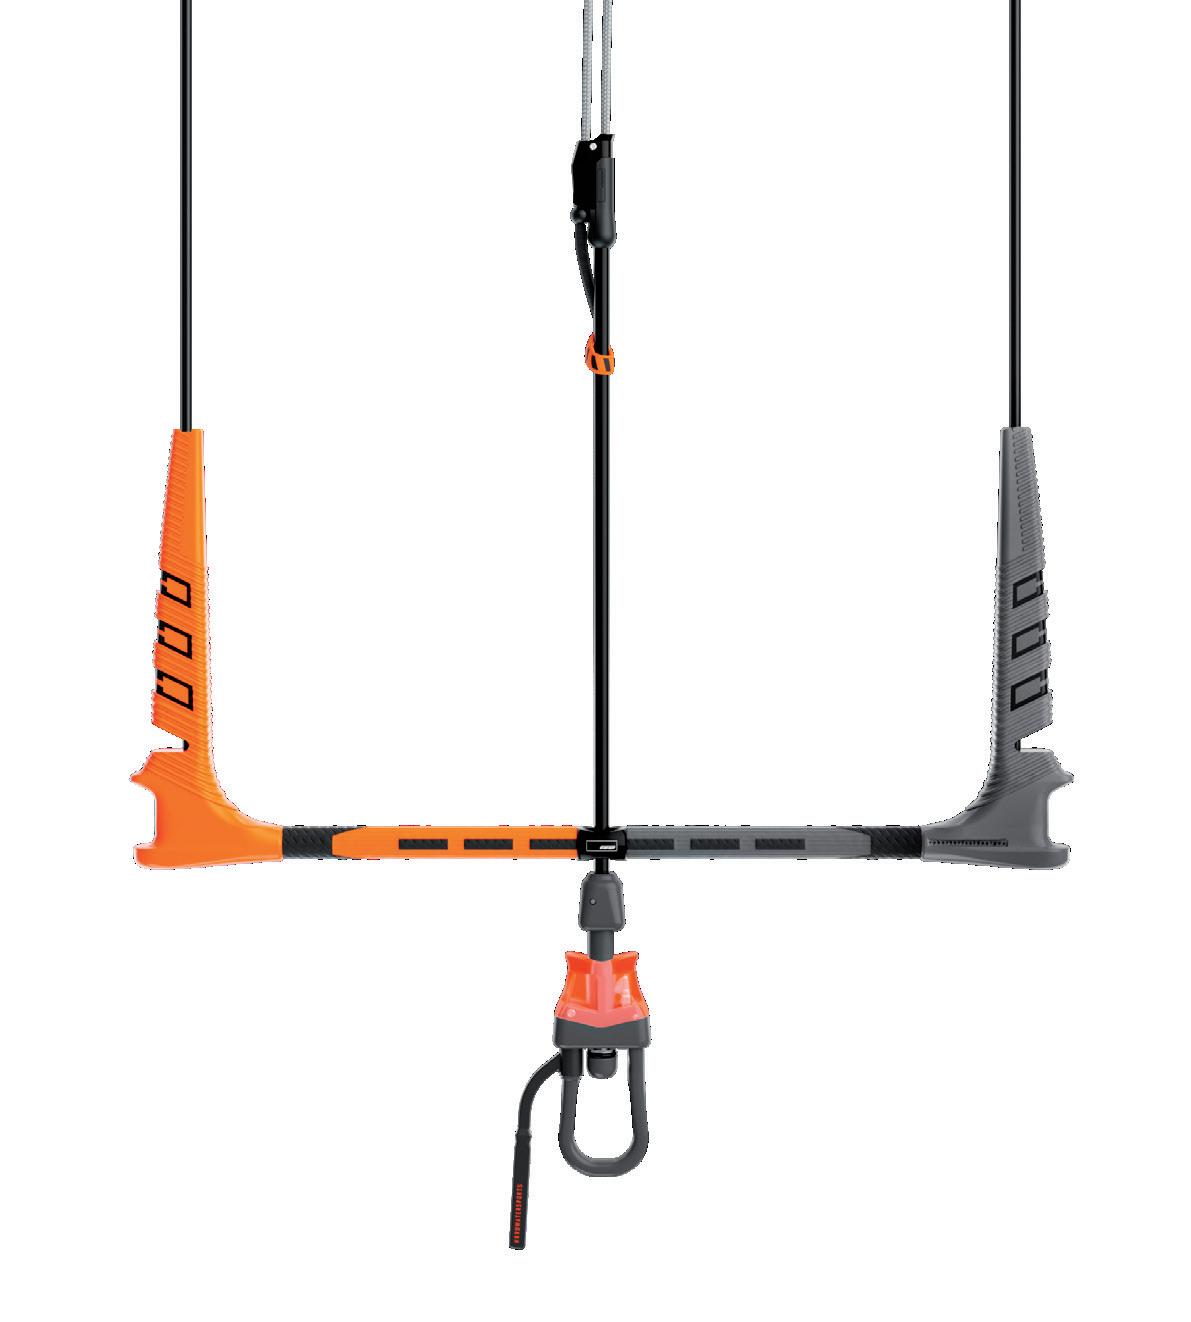
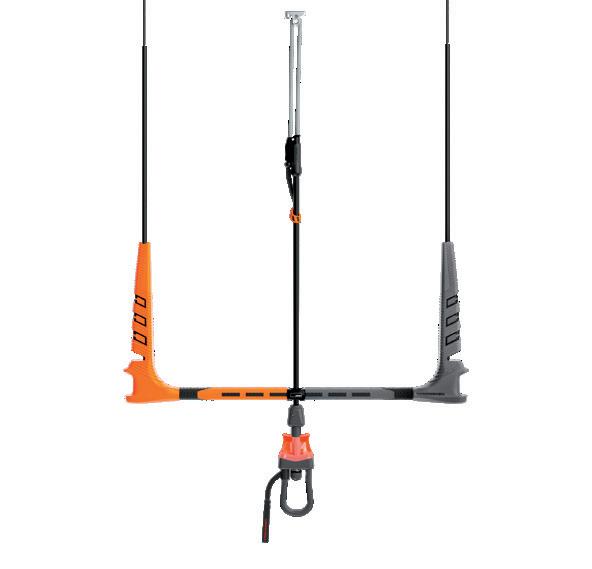
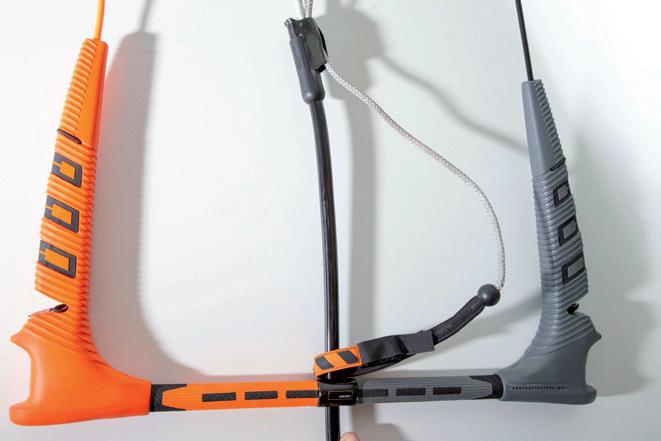
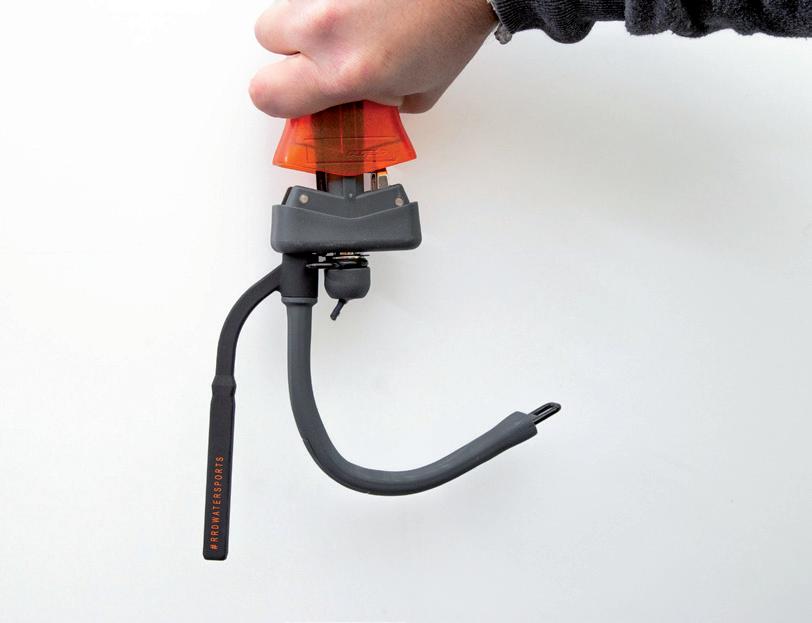
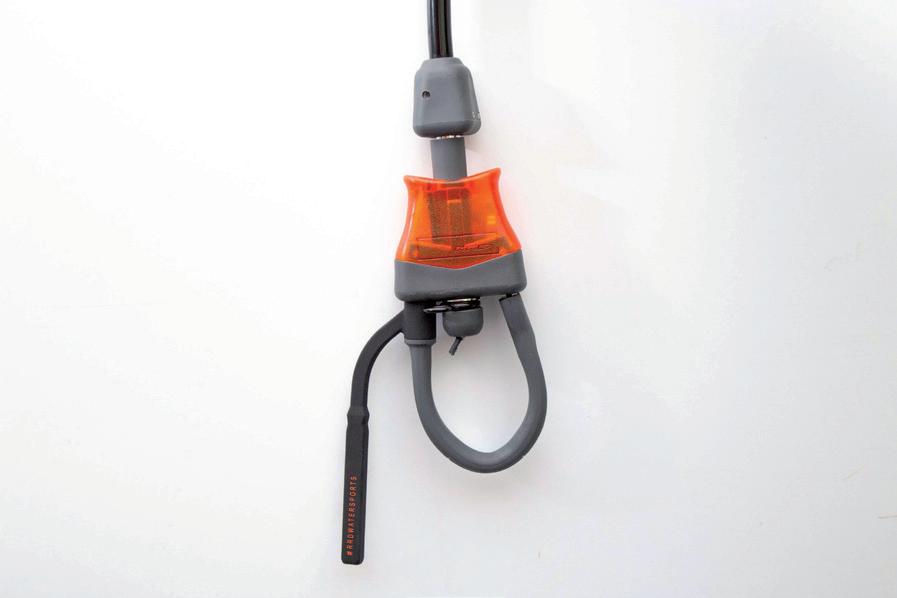
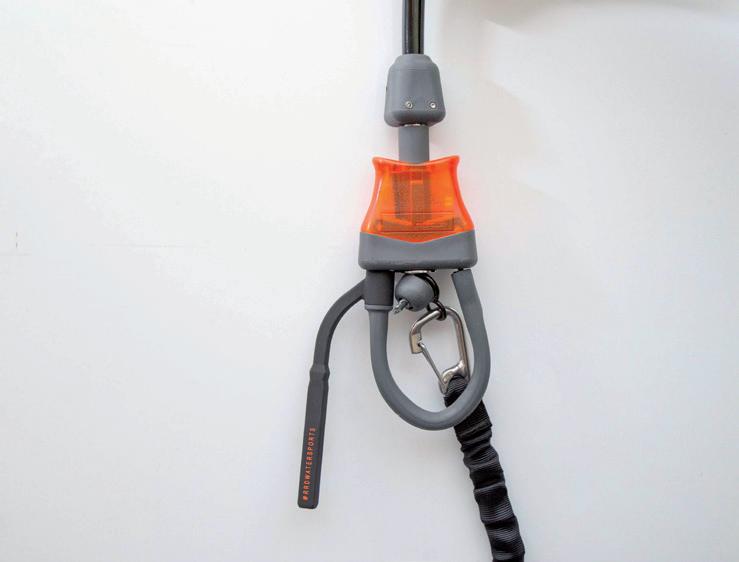
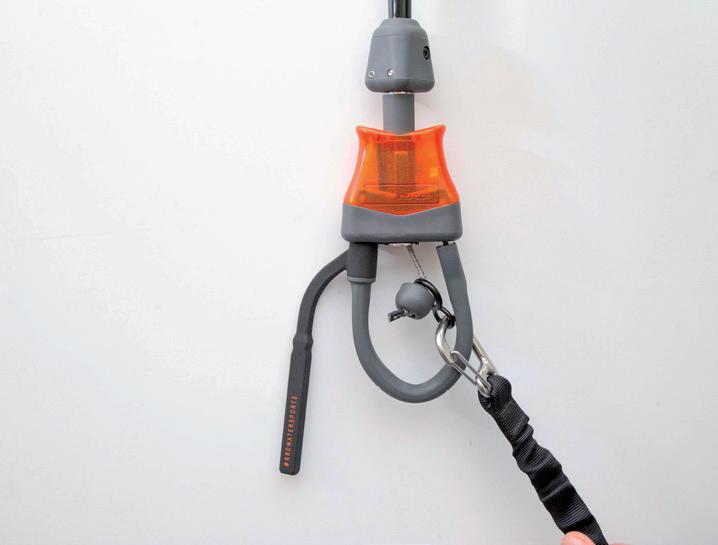
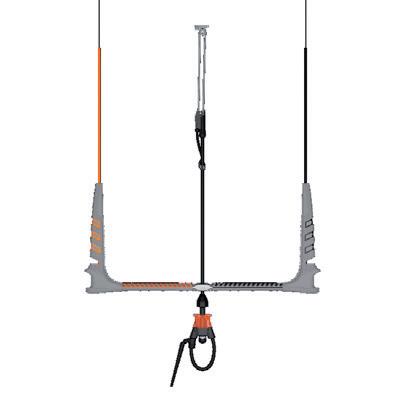
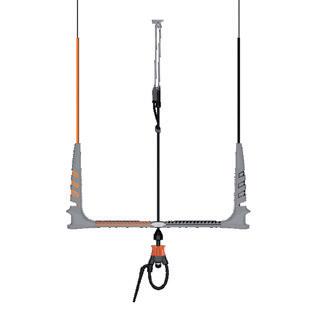
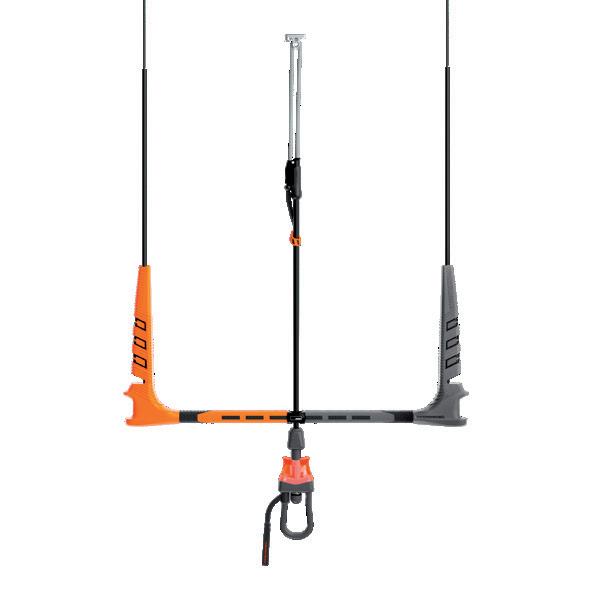
The Global Bar is ready to use. See the diagram for its components and parts.
Moulded chicken loop finger with multiple pre set positions rotor head.
Chicken loop safety release system with oversized handle and increased sliding potential of all components to secure an effective functionality over the years which is approved according to the french norm. This is the safety release system in the market with the least amount of steel components, meaning longer lifetime and less maintenance.
Moulded stainless steel safety leash double ring, angled to a position that facilitates safety leash attachment.
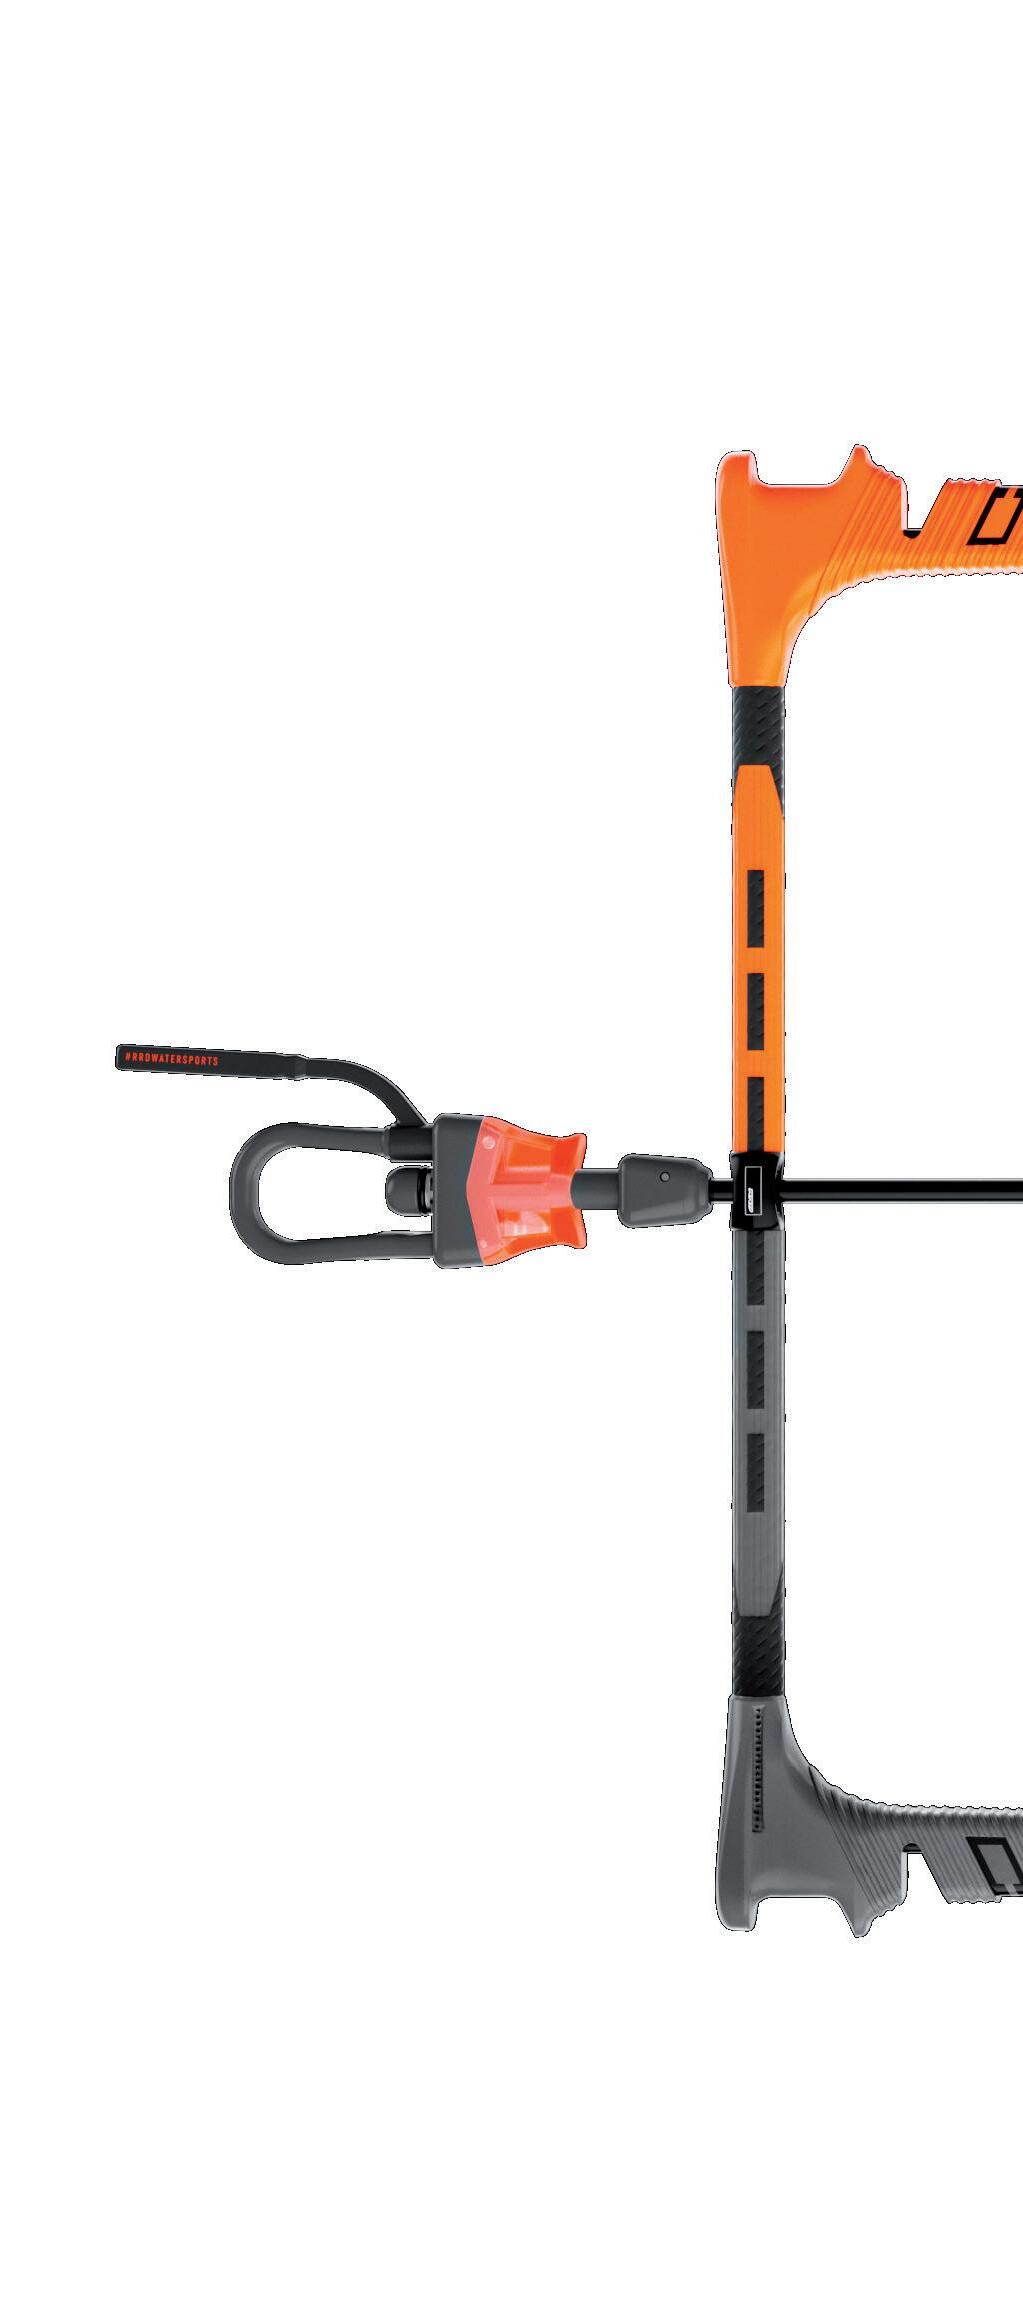
CNC milled and anodized aluminium central bar with oversized oval recesses to improve depower tube sliding.
Moulded floating side caps injected with high memory EVA facilitates a better bar grip and increased safety.
Left orange back line
Right black back line
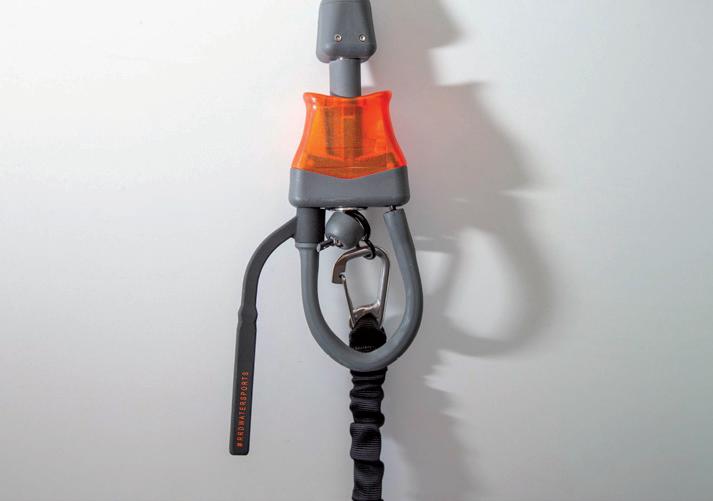
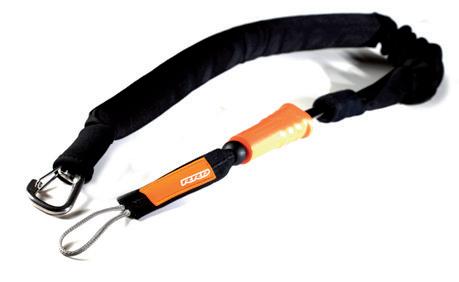
Chicken loop safety release system
Safety line stopper
New de-power stopper EVA float: by simply pushing up or down the EVA float you can trim the de-power rope length according to your height or depending on the conditions you are kiting in.
Customized stainless steel depower rope cleat designed around the double chamber tube, allowing the security line to slide freely even after multiple front line twists.
De-power stopper
Side floaters
Alu tube 20mm
Power trim with clam cleat
Black back kite bar lines
Double chamber hollow tube for de-power rope and safety line. Made in Italy with hi quality polyurethane.
Oversized color coded side floaters guarantee the floatation of the bar and easy rolling of the flying lines and their locking system.
3
Fresh breeze 6
Strong breeze 7
Strong gale
The Global Bar Bar is ready to be used as it comes from the bag with your new kite. The bar is equipped with the new “Rigid Thread” flying lines , specifically developed in order to limit as much as possible their possible stretching.
Preparation:
• Unroll the lines upwind from the kite;
• Place the orange side of the bar on the left side when you are looking down wind towards the kite;
• Make sure the lines are straight and not twisted, knotted or tangled in any way.
• Move the steering lines outside of the kite and attach the orange and white steering lines to the back line bridle attachments using the larks head;
• Attach the front lines to the front line bridle attachments using the larks head on the front lines. Make sure to keep the left and right front line on the correct side, without any twists. Make sure that all bridle lines are clear and free of tangles. Make sure there are no knots in any of the flying or bridle lines.
Make sure the pulleys of the bridle system are turning freely.
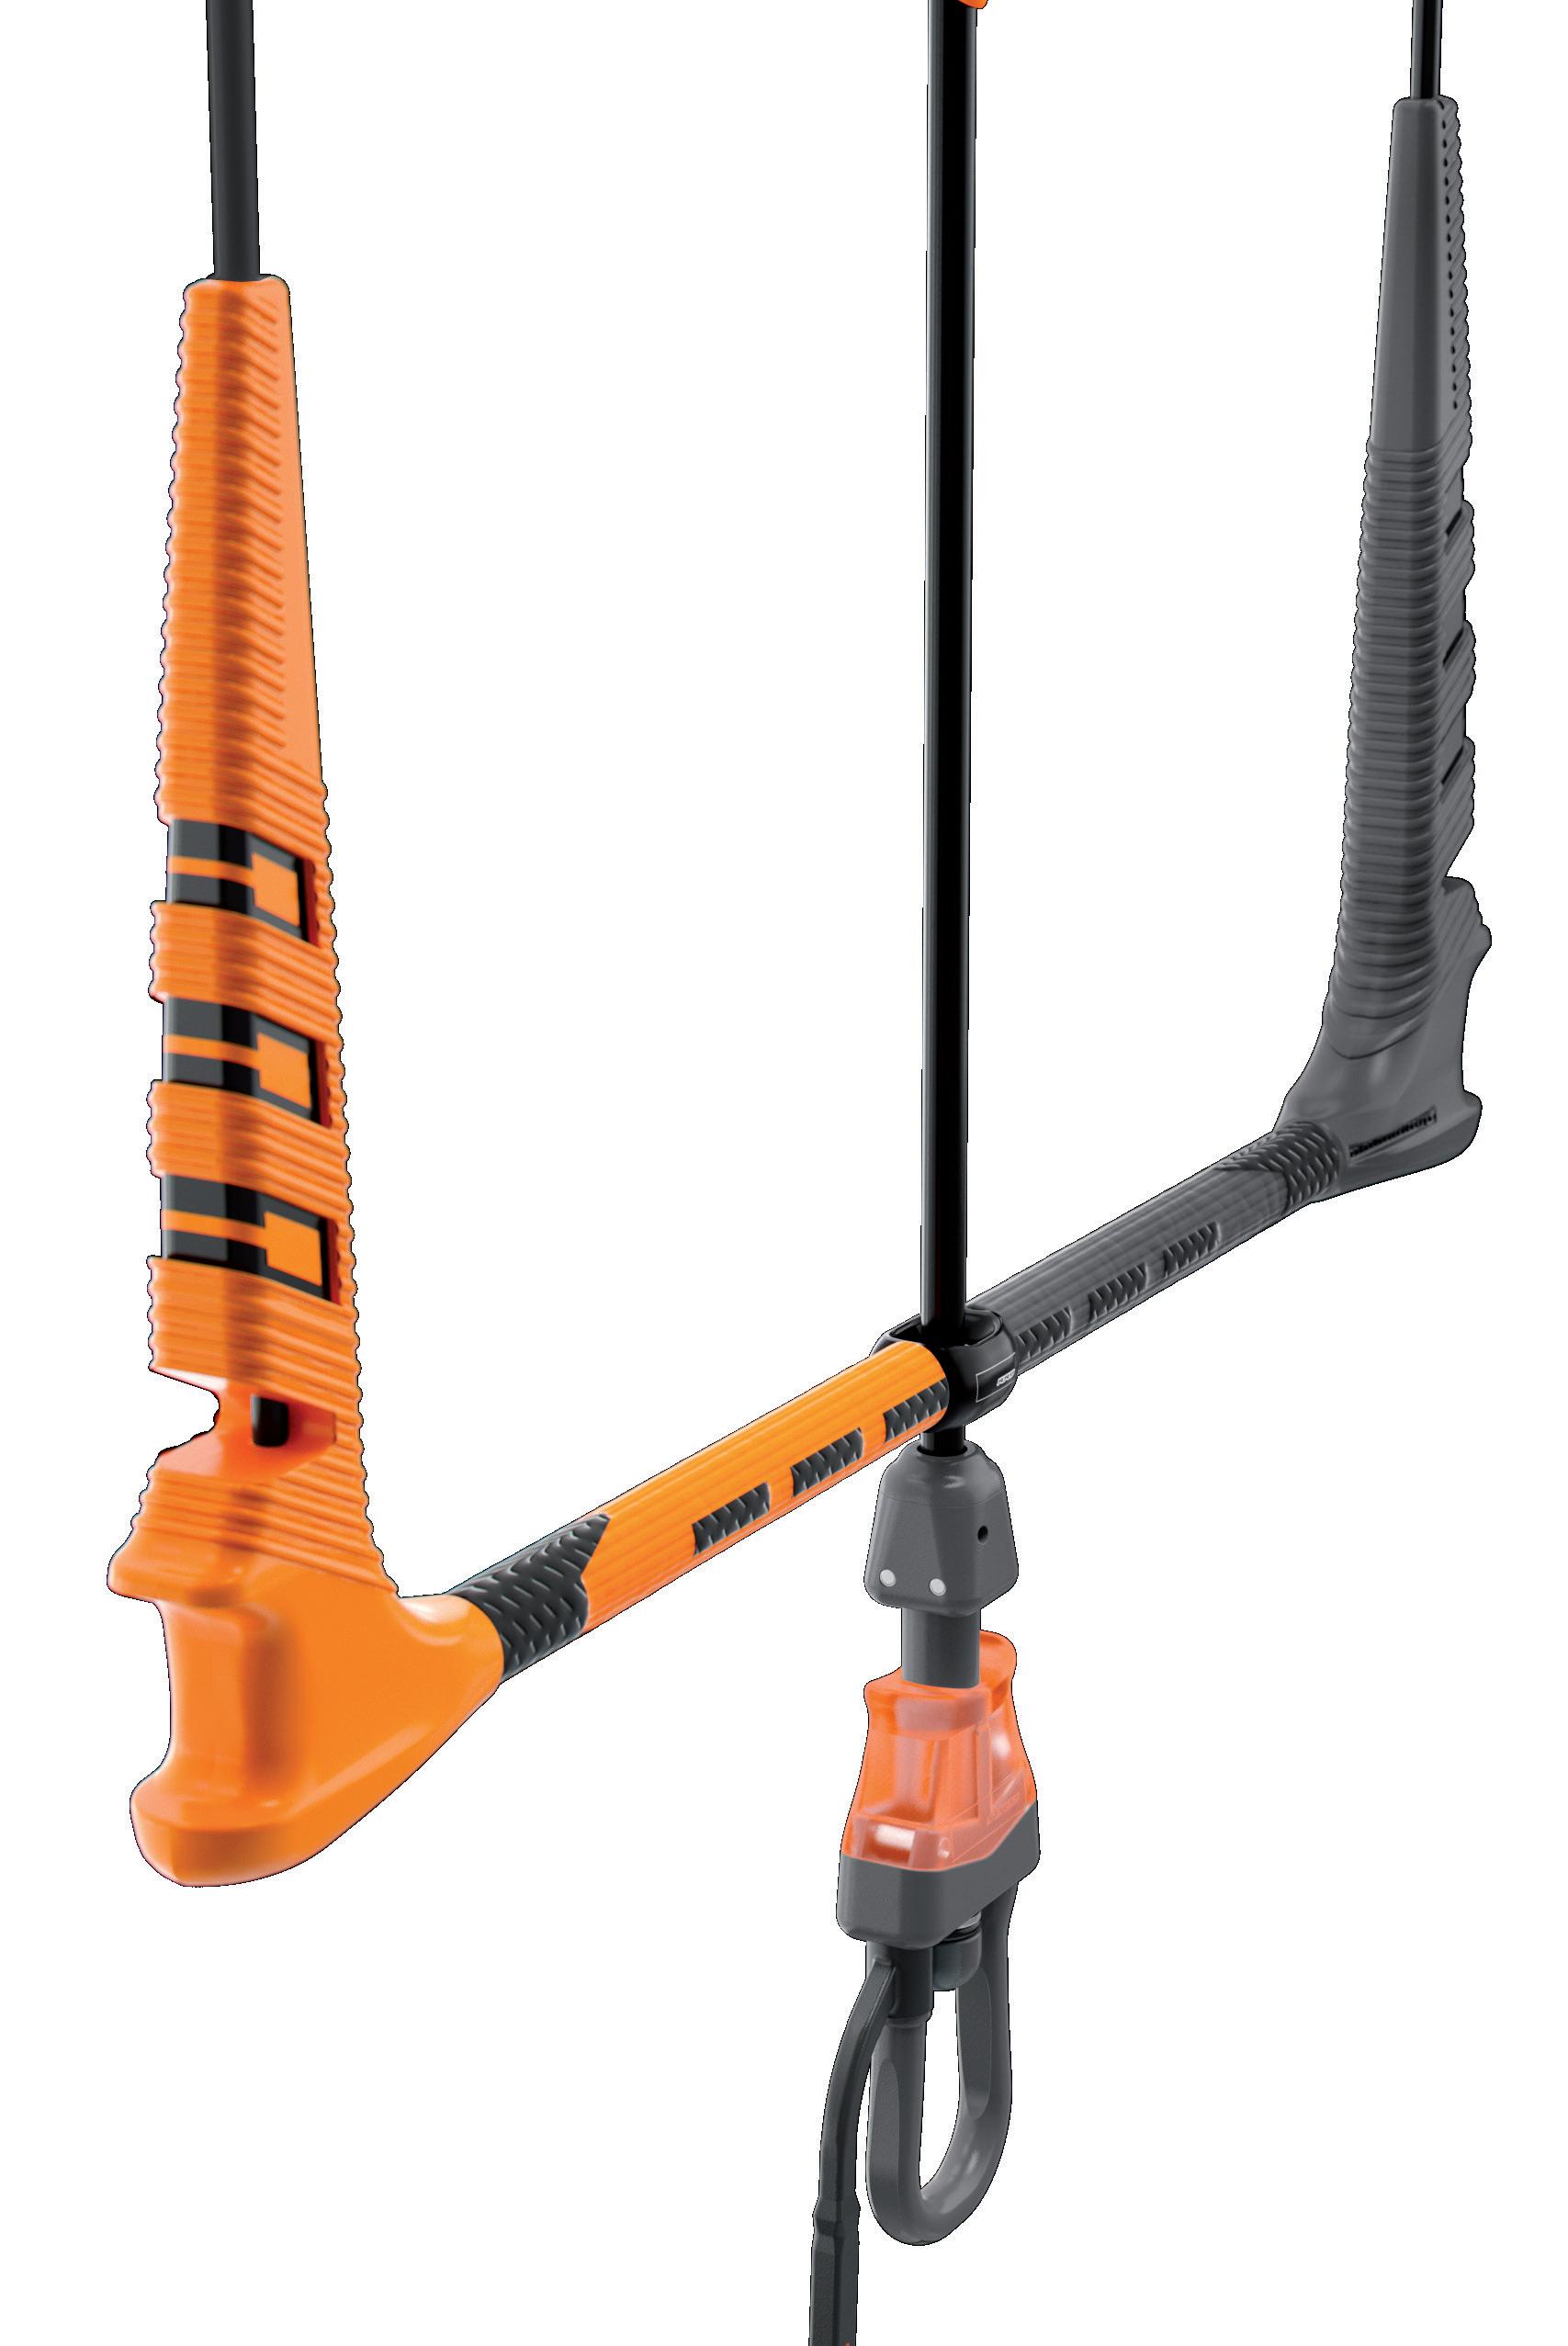
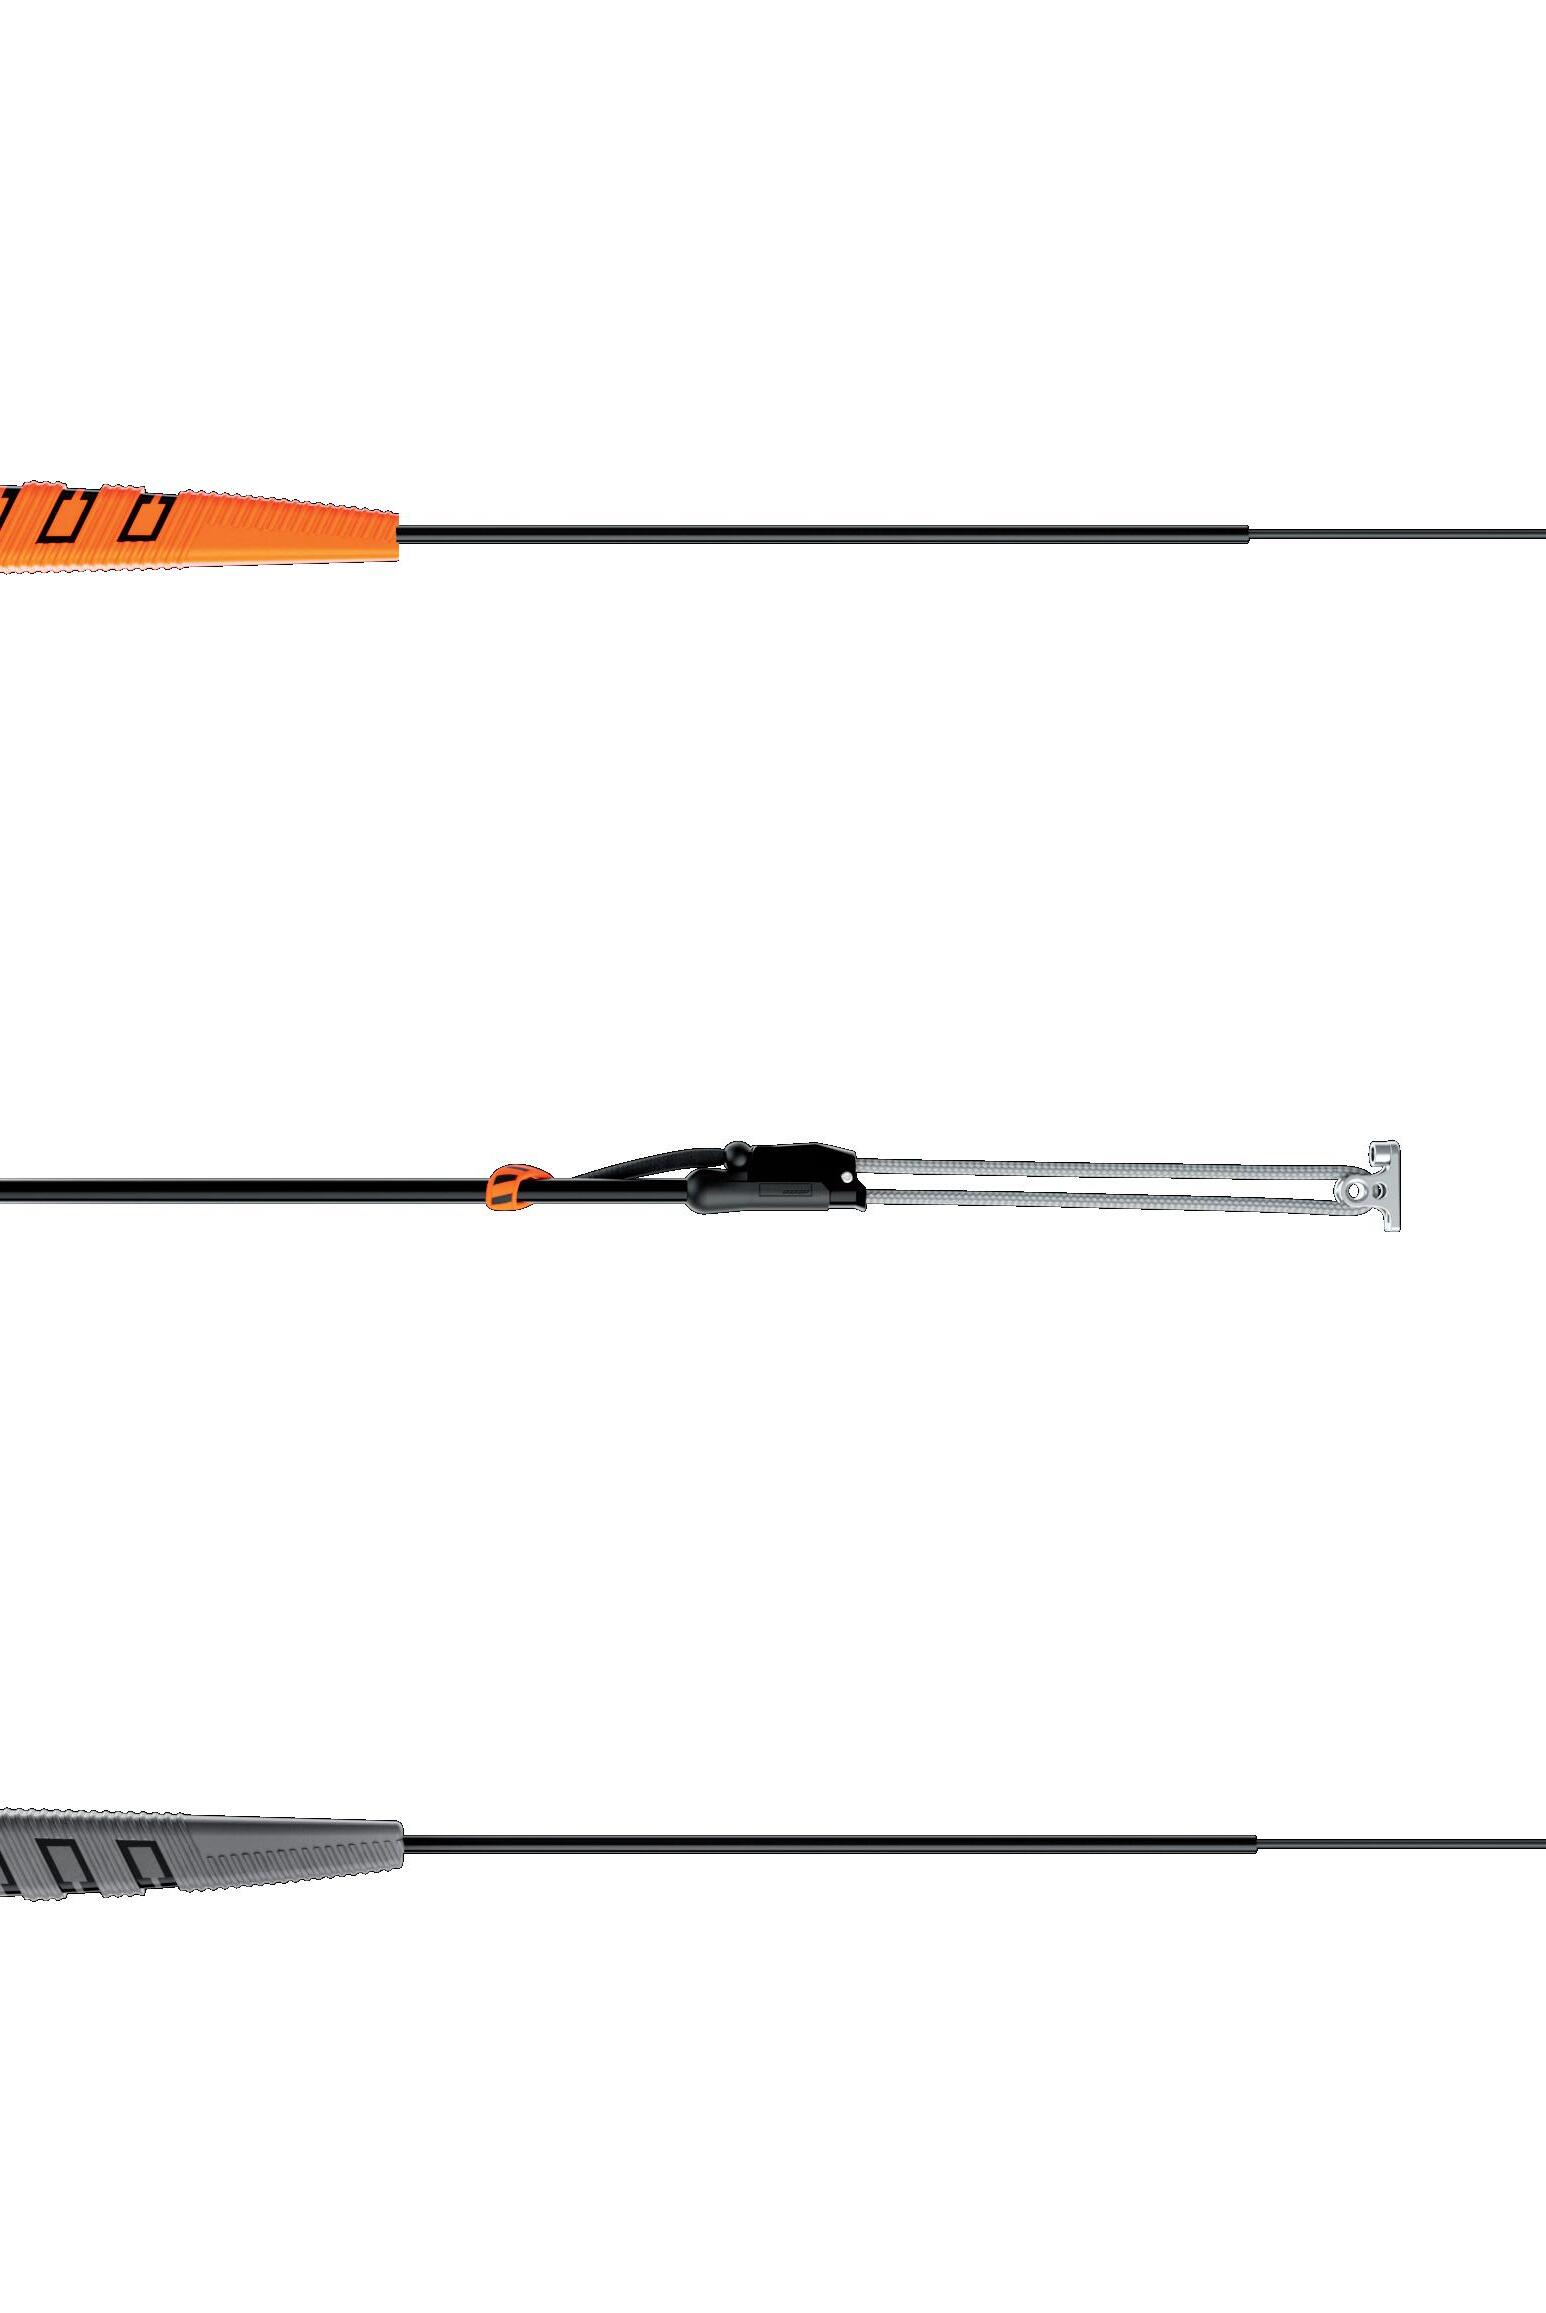
A - Left orange Steering line
B - Front line attachment points with black ends
C - Right white Steering line
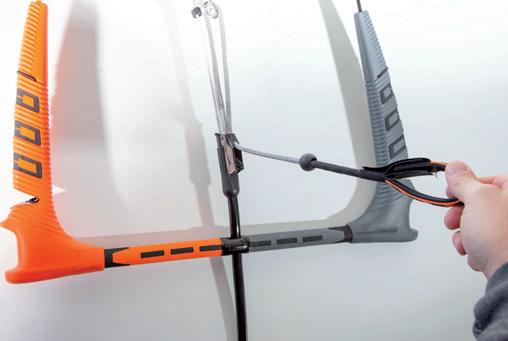
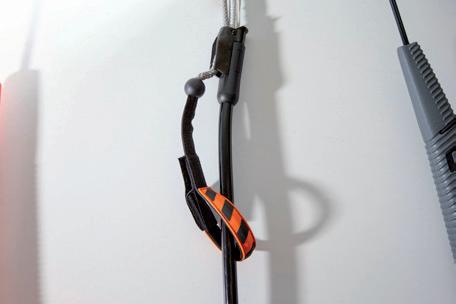
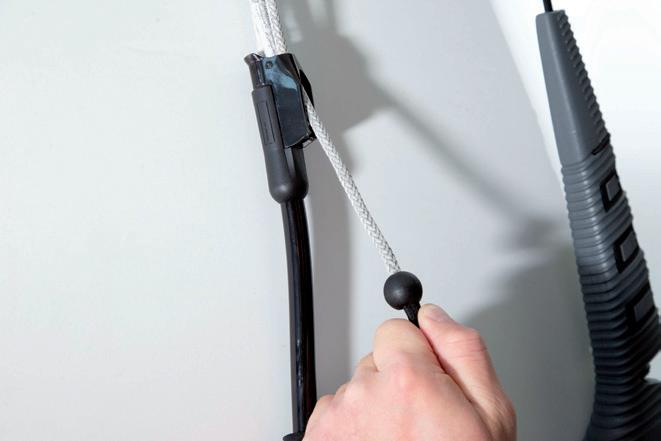
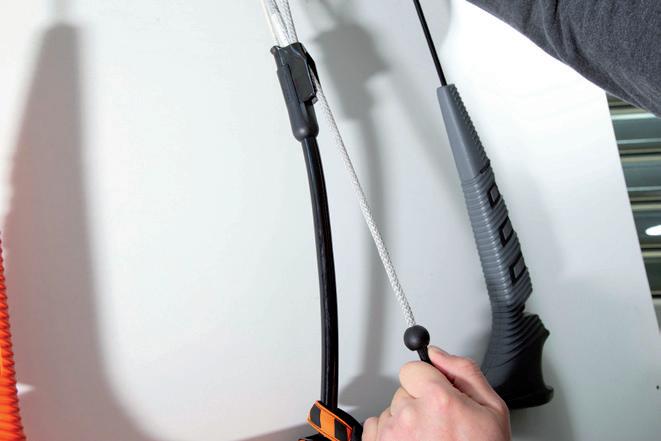
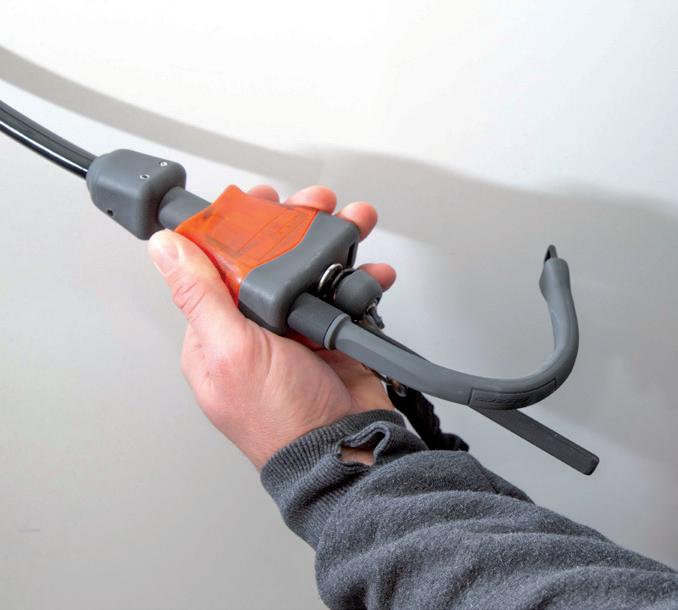
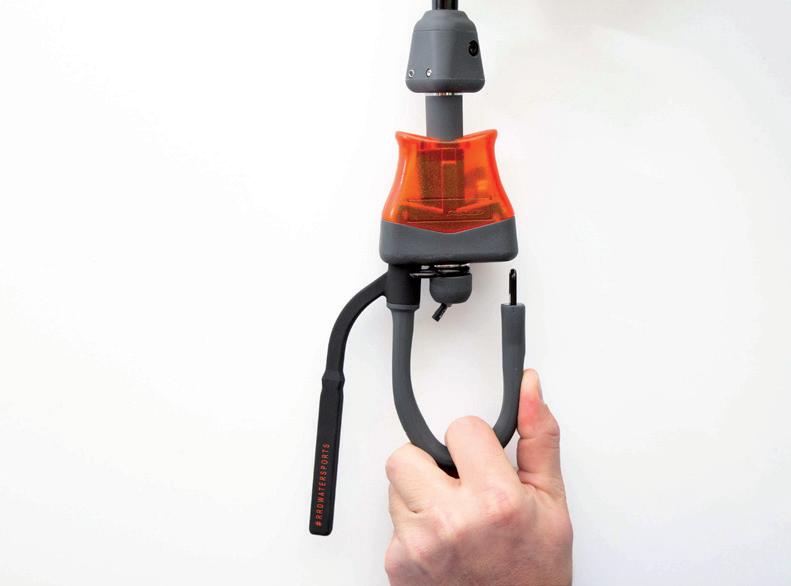
To untwist the power lines while flying the kite, you can just spin the rotating gray part on top of your chicken loop in the opposite direction (see pic).
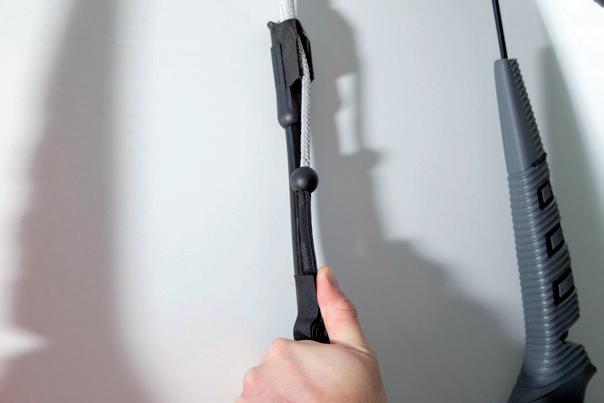
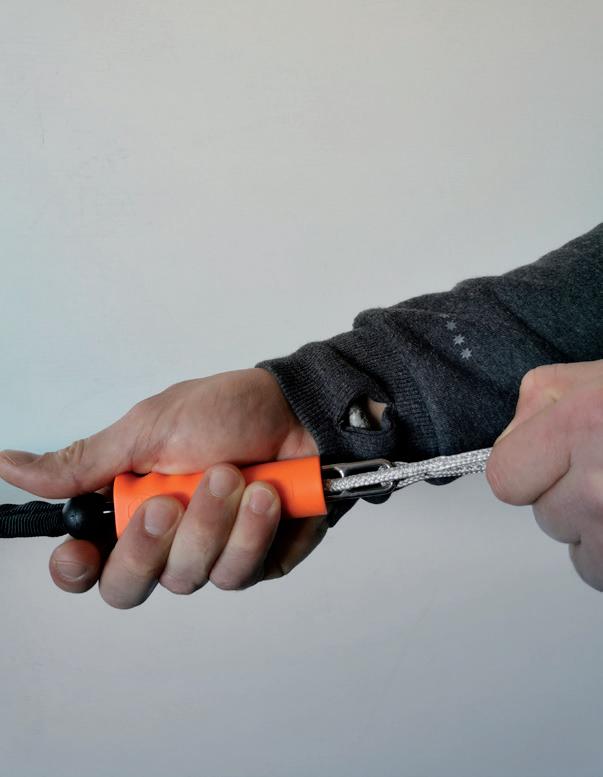
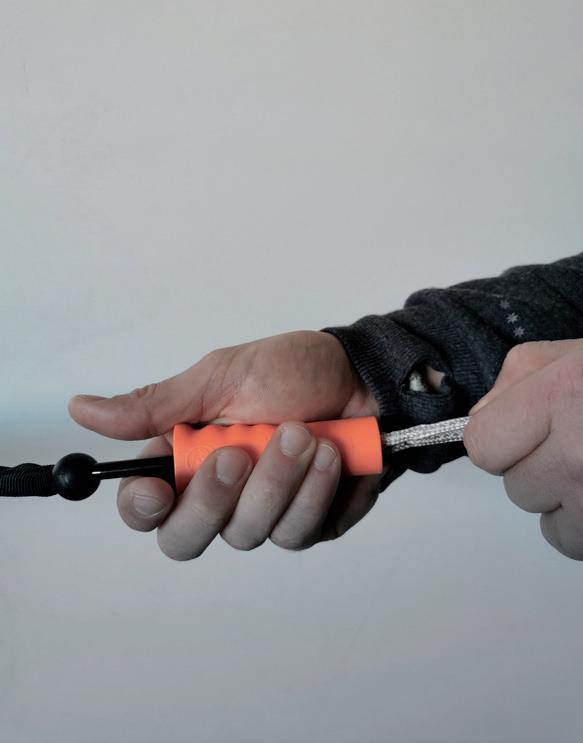
Pulling on the black handle will shorten your front lines and the kite will have less power. First pull it a short distance towards you to release it from the cleat, move the adjuster away from the cleat at the same time and let the line slide to adjust to the desired power. Let go of the adjuster and the line will be locked between the teeth of the cleat. Releasing the black handle will give you more power.
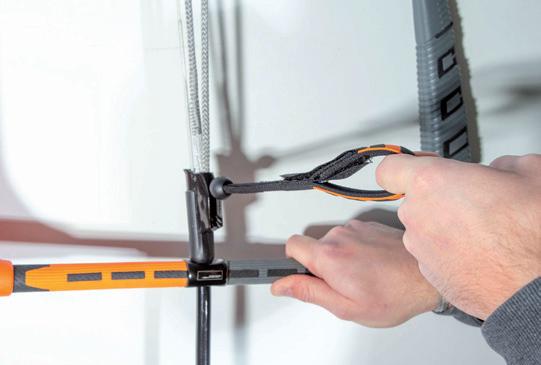
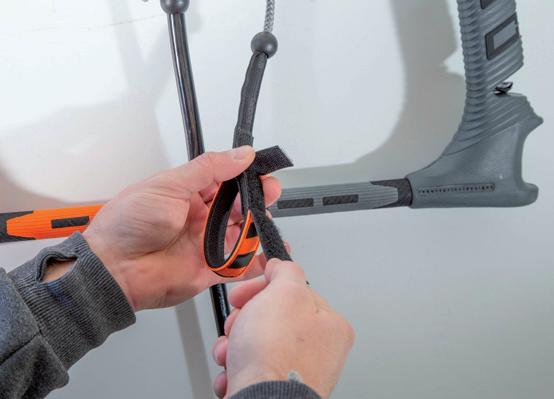
You have the option to use the Velcro loop on the de-power cord to prevent the cord from flapping around or getting tangled, this is especially handy when the kite is fully depowered.
2 1 4 3
5 2 1 4 3
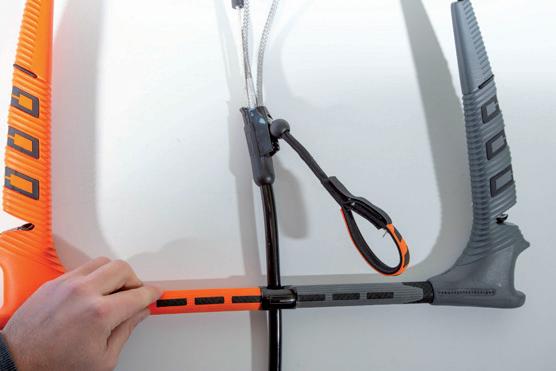
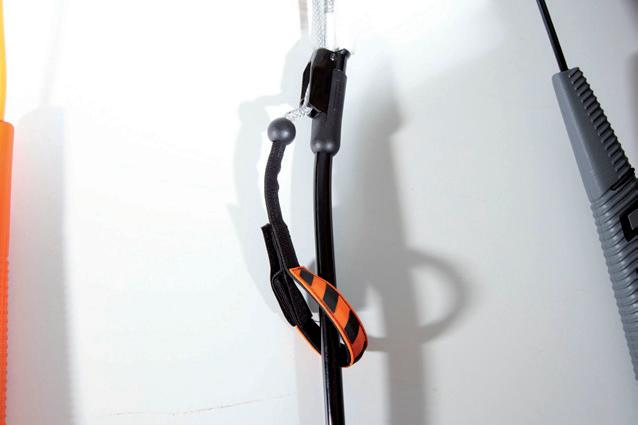
The same procedure of power /de-power you kite can be used with the CLOSED velcro loop around the de-power cord. Since this operation will be slightly more difficult than when having an open velcro loop outside the de power cord, we recommend to get familiar with this option and practice de-power release before going in the water.
2 1
3
4
5
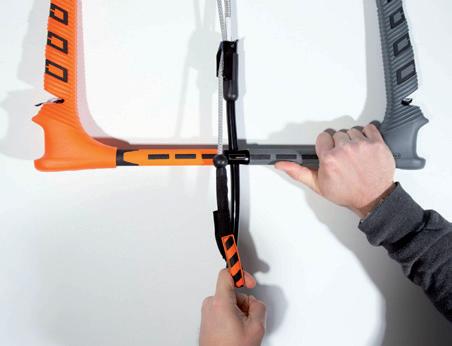
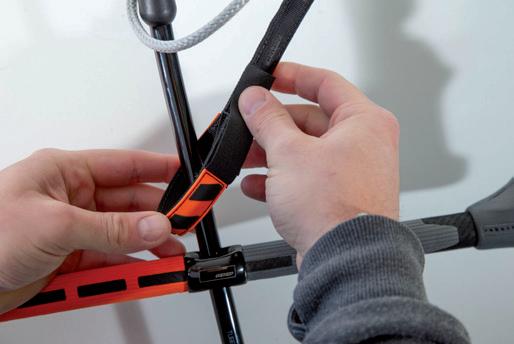
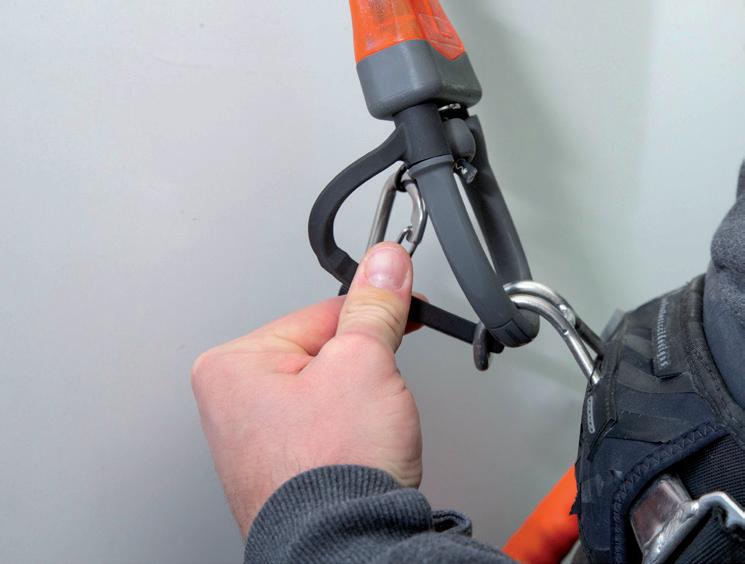
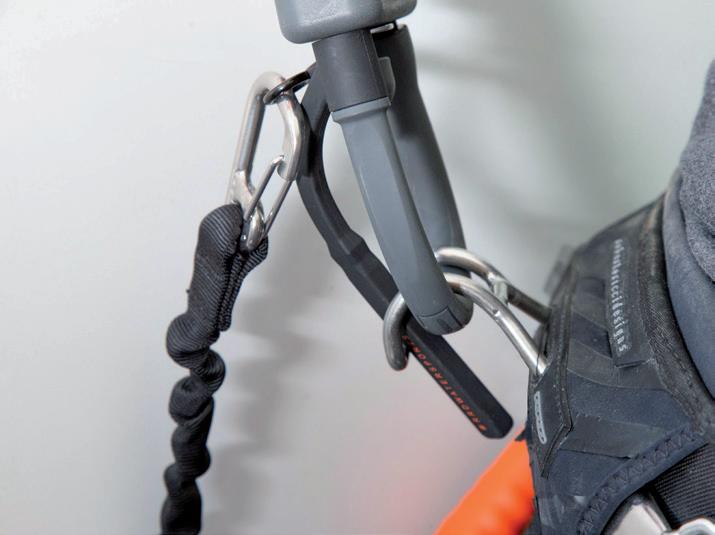
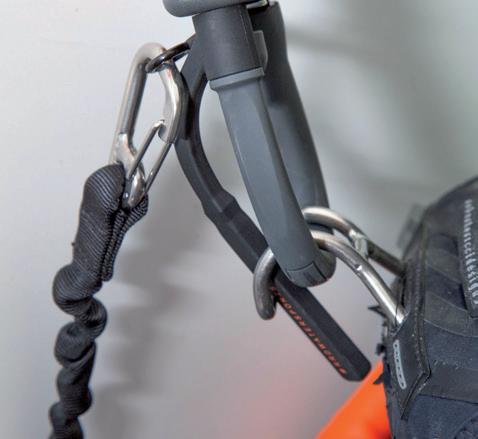
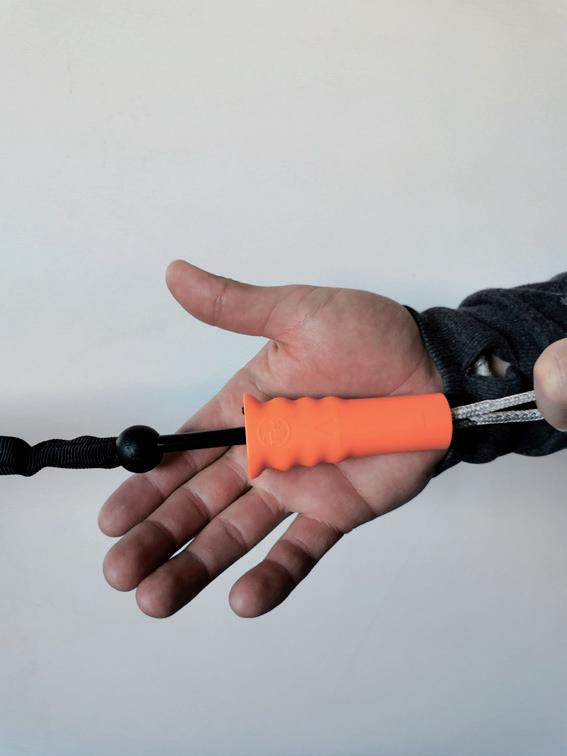
The chicken loop is designed with a new moulded multiple pre-set posi tions rotor head chicken loop finger to help you stay locked into your quick release. Before you hook in and con nect the finger to your harness hook: make sure that your safety release is attached and that your lines are set up properly without any tangles or twists.

1) First hook into the loop;
2) Next, push the finger into the cen ter of the harness hook;
3) Make sure that it is below the trim loop and that the Chicken Finger gets all the way in and is straight.
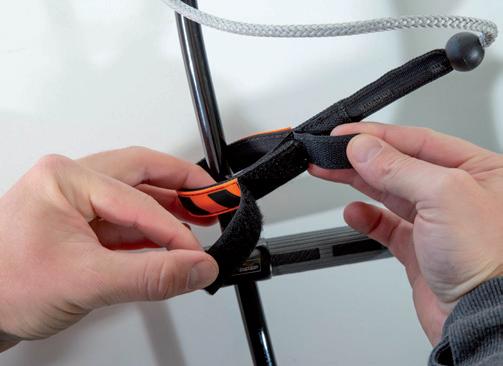
If you don’t use the chicken loop fin ger, simply rotate the finger to the external positions. (Only for experts that want to unhook for advanced freestyle tricks (see picture under neath).
1
2
The new one-line safety system makes the kite de-power 100% in case you need it. You connect the kite leash to only one line, which makes the kite loose all its power. On top of the power lines we specify which line you can choose that makes the kite go to the left or right when you pull your safety. Because of this option, you can choose what is the safest setting for you, depending on your surroundings.
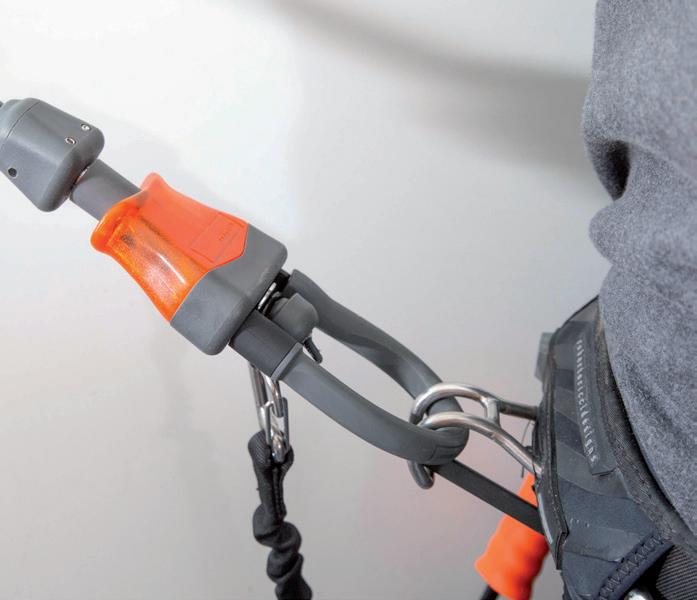
If the wind picks up dramatically the first thing you should do is push your bar far from your body. If it isn’t enough pull the small black velcro loop on the clam cleat achieving more depower. If you need to release the power fully from your kite, pull the orange quick release on the Chicken loop.
Remember to always connect the safety leash to prevent losing the kite, which can create dangerous situations as well. The safety leash will keep you attached to your kite after releasing, and the kite should have no power. In case the kite is still powered up after releasing the quick release (can happen when for example the kite flies into another moving object like another kite or boat), then also release your safety leash which will make the kite be de-attached from you and fully lose all its power. (With the risk of damaging or losing the kite or creating dangerous situations for others).
Remember: you should know how all of your safety releases work, make sure to keep them in good working order, and practice the use of them out of the water by testing them.
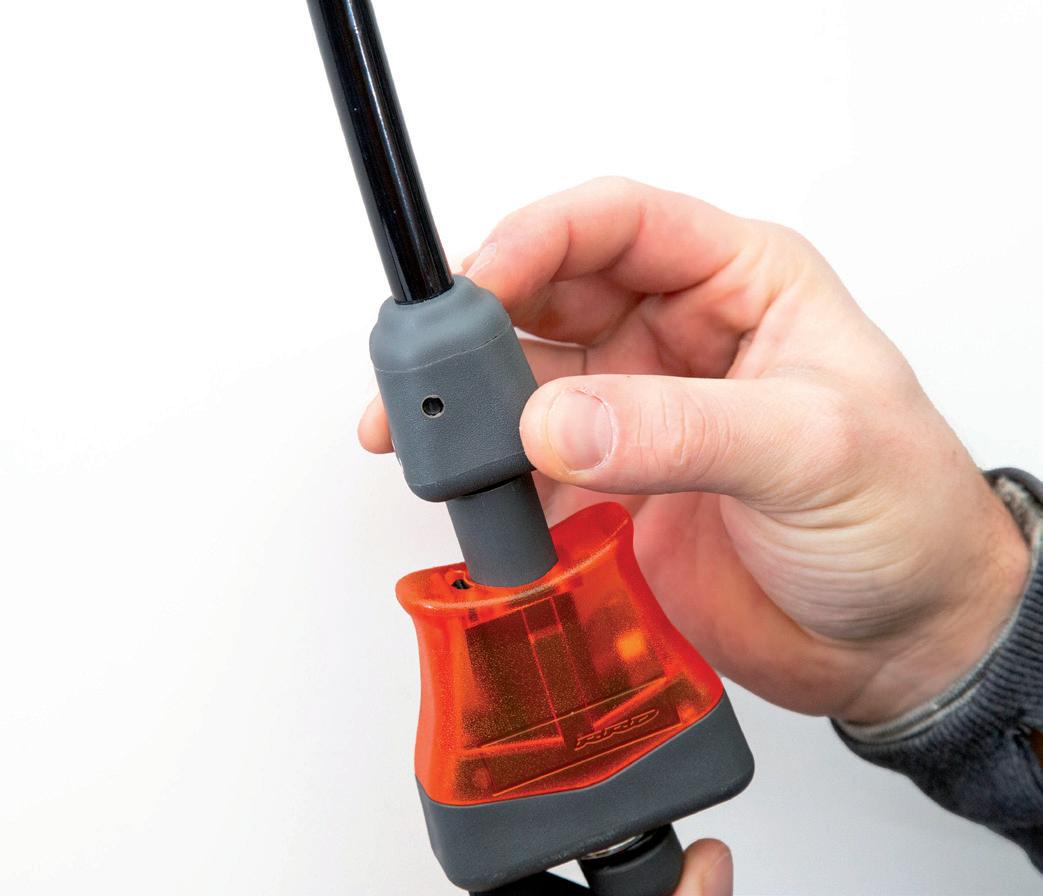
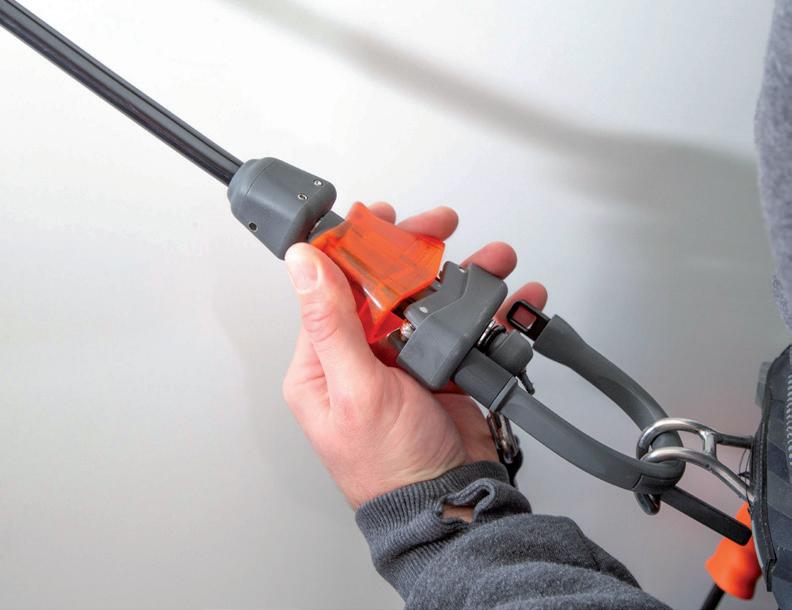
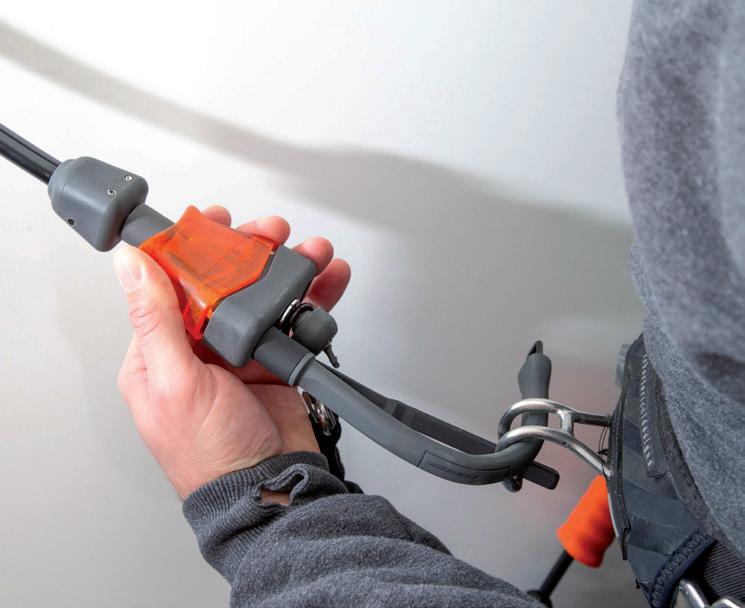
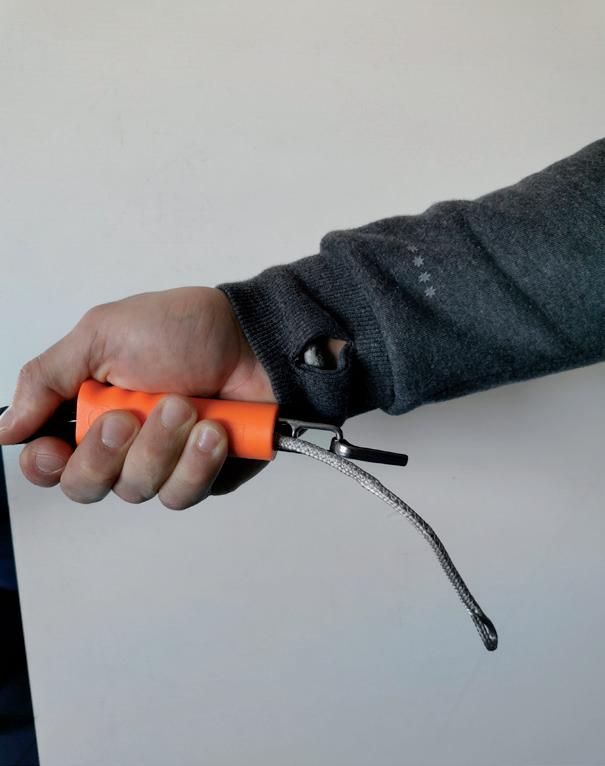
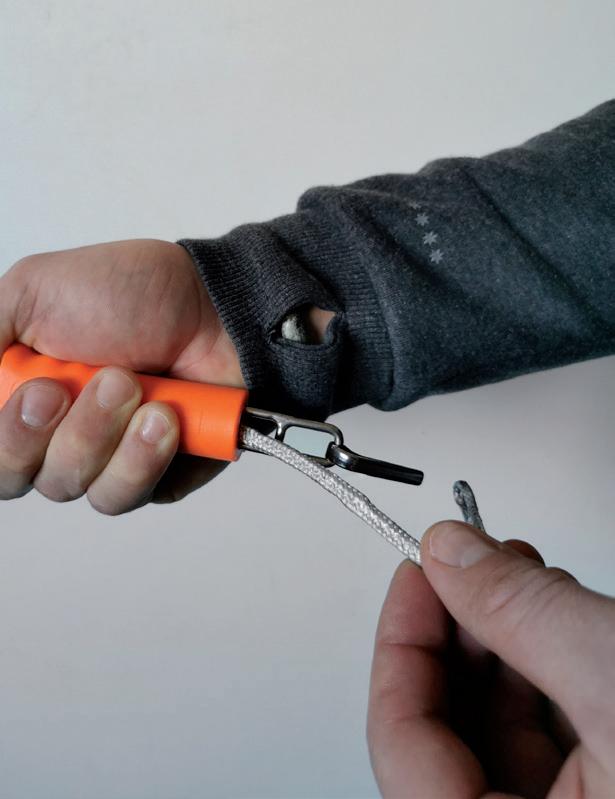
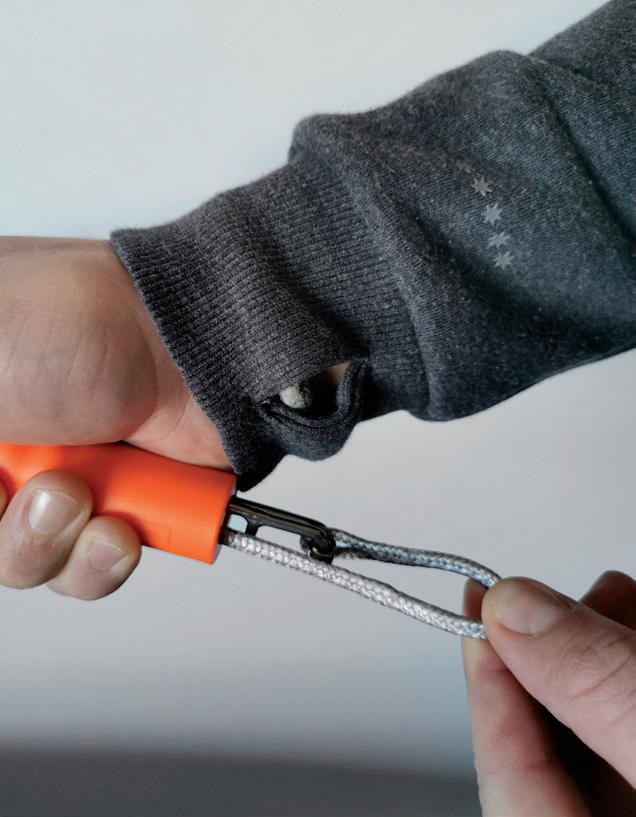
Grab the orange quick release trim Loop and force it up away from your body (photo).
It is your responsibility to maintain the proper working order of the quick release mechanism. Always inspect this piece prior to launching your kite. Make sure the trigger mechanism is properly seated before you ride, and occasionally check it while on the water.
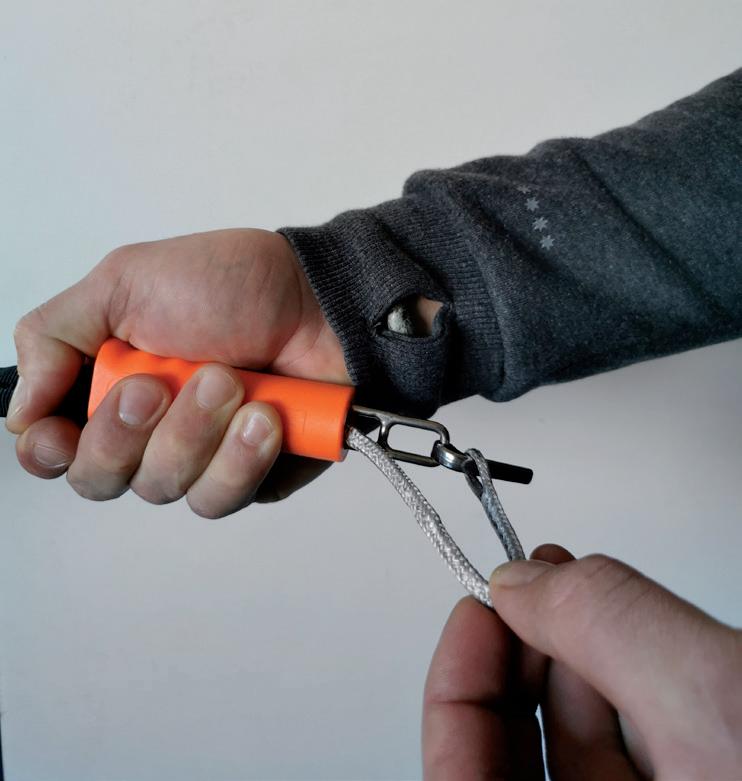
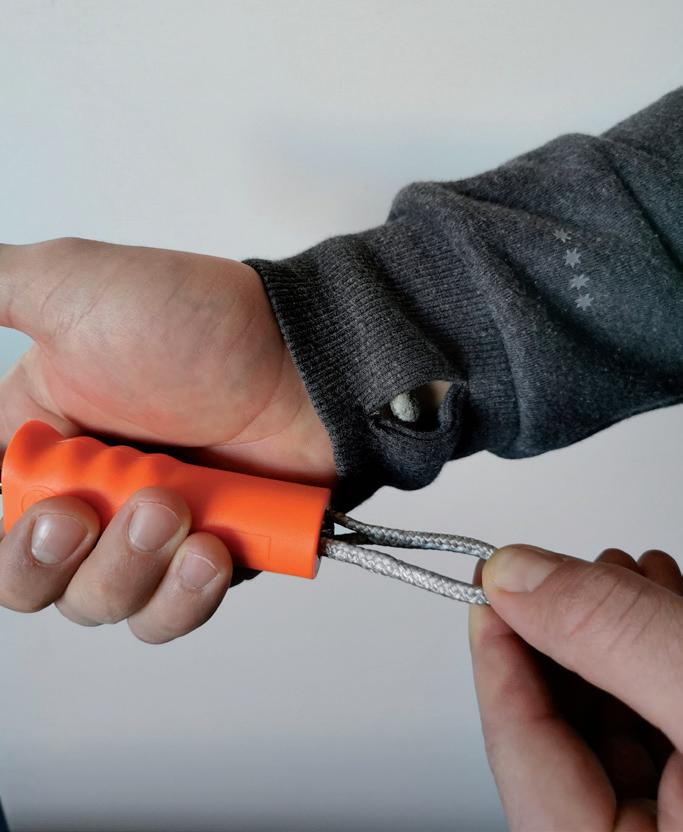
Therearetwowaystodothis:
1) Grasp the handle and pull it towards your body;
2) Briefly unhook from the loop, and then hook back in.
You must test your Quick Releases before every session in order to get used to the way they work. This is the only way for you to be able to use them fast enough in case of emergency. Remember that the Quick Release devices have a limited lifetime and you must change them after 250 hours of kiting. Our Quick Releases are developed and designed to be used by a rider of minimum 35 Kgs, maximum 120 kgs.
3 2 4
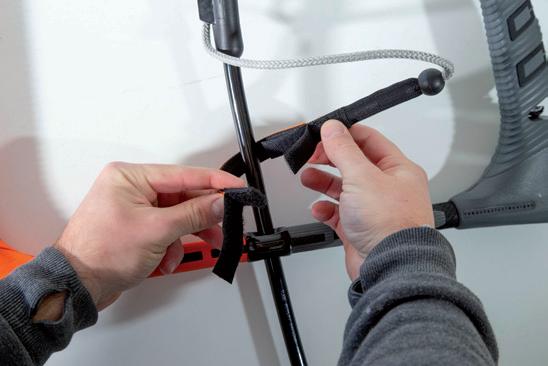
Follow the steps described in these pictures. Keep in mind that you only reassemble your chicken loop again when the kite is secured, so it can’t suddenly power up again.
1 2
3
The safety leash must be tied to the ‘ring’ on your harness on the one side and one the ‘ring’ on your chicken loop on the other side before you launch the kite. Always remember that your safety leash is the last connection between you and your kite.
You can set up the leash attachment according to your ability and style in two different settings:
1) By attaching the Safety Leash to the “safety release system”, when you release you will achieve a total power loss of 100% (RRD recommends only using this mode).
2) “Suicide mode” By attaching the lea sh both on the ring and the black chicken loop tube.
In this case, when kiting un-hooked, if you let go the bar you will have a 50% de-power of the kite.
In case of opening the safety system you will have a 100% de-power of the kite.
Our V8 bar is standard equipped with a short leash (approx. 50cm) to attach on the front of your harness.
*Optional: thicker and longer leash specifically for the handle passing riders.
RRD doesn’t recommend using the suicide mode at any time. It may only be used by very experienced riders that should be aware of the consequences and bear responsibility for all resulting damages! Note: if you let
1
“Suicide mode” Recommended
2
Always remember that your safety leash is the last connection between you and your kite. Only release it in case of extreme emergency and remember that an uncontrolled kite is a great danger for other individuals on land and on the water. If your kite keeps pulling you for any reason after releasing your safety on the chicken loop, you can release yourself from your leash with the quick release at the bottom of the leash. Follow the steps described in these pictures. 1 3 2 4
Follow the steps described in these pictures.
Keep in mind that you only reassemble your safety leash again when the kite is secured, so it can’t suddenly power up again.
1 3 2 4
If the kite is straight downwind of you, with the leading edge on the water, you can simply pull on one of the back leader lines to relaunch the kite.
As you pull the leader line in, the kite will roll on its side and work its way to the edge of the window. From there it will relaunch easily.
Make sure that you never wrap the line around your hand. Be careful not to become entangled in any slack line.
2

1
3
The flying lines should not or hardly stretch with the exclusive RRD Rigid Thread lines, but follow these steps in the rare case that they did stretch a bit:
1) Unroll your kite lines from the bar and lay your bar down; From the bar, walk down the lines and remove any twists starting with your outside lines;
2) Connect the line ends to a rope or something strong that won’t move under heavy pressure;
3) Grab the bar, release the depower cleat to maximum power. The line lengths have to be the same for all 4 lines.
4) Adjust your line length if this isn’t the case.
No need to ‘change any game’ while bringing out our latest version of the RRD Global Bar with a great history of performance; we stick to all the great features of simplicity and reliability of the previous versions and go a step forward with new components and redesigned parts. We keep out any unnecessary items instead of adding them, to make every component more functional. Simply said :”you cannot break what does not exist”.
But what we definitely didn’t want and/or need to change are the lines. In addition to the new systems, the ‘RRD Global Bar’ is still equipped with special lines called “RIGID THREADLINES”. These are used exclusively on the RRD bars with great success for over 6 years. A product that’s now widely tested around the world, but there is little known about the details by kiteboarders.
All our lines are produced and developed in Italy, with a worldwide patent granted only to RRD.
The “Rigid Thread Lines” are the result of the collaboration with an Italian manufacturing company that has more than fifty years of experience in the processing of textile fibers, using the most recent and innovative exotic fibers, combined with an intimate knowledge of the physical and mechanical properties of Dyneema.
The differences with our lines is that conventional Dyneema kite line has excellent characteristics of load as well, but suffers from the high temperatures that the horizontal and vertical pull both create, which will make the lifespan of the lines significantly shorter because of wear and tear, while our lines don’t have this problem and have a better resistance to friction. It is also much easier to get knots and/or ‘spaghetti’ in standard kite lines while the ‘Rigid Thread Lines’ are easier to untwist. Last, but not least: the ‘Rigid Thread Lines’ have a great structural memory after tension, so they won’t stretch!
This all derives from its molecular structure as well as the gel spinning process, combined with the production process of the fiber.
During the development of the “Rigid Thread Lines” we have plotted a new path to take full advantage of the properties of this fiber. The result is a product composed of a soul parallel (unidirectional) and tensioned resin, covered with extremely compacted Dyneema braided fibers.
Imagine by comparison the “Rigid Thread Lines” like a widely used electric cable. Core copper wires are covered with a plastic protection sock. In the ‘Rigid Thread Lines’ copper is replaced by unidirectional Dyneema tensioned fibers plus resin, and covered ( the plastic part on the electic cable) with a very thin braided sock with a super fine textured Dyneema.
This allows to create an absolutely direct connection between the bar and the kite, since what connects them is uninterrupted, without having any braided structural fibers , which is a classic solution found on all other lines existing on the market.
The “pop-effect” is drastically increased when you use “Rigid Thread Lines”, considerably improving the performance of the kite during wakestyle manoeuvers.
The “Rigid Thread Lines” of RRD Kites will never be subject to adjustment , since they won’t even stretch
under stress-related moves, for example by extreme loops or other radical manoeuvers, and consequently it is impossible to end up with stretched lines and/or of a different length and therefore the trim of the kite remains unchanged through the years.
The “Rigid Thread Lines” will always be visually, technically and feeling compact and rigid throughout the course of their lives, maintaining all its physical and technical characteristics unaltered over the time.
The standard braided kite line has more stretch, which results in different line lengths, power absorption and reduction of performance, especially at the moment where you change the direction of the kite, where the load of the lines reaches its peaks.
Another weakness of the standard braided line that ‘Rigid Thread Lines’ have turned into a strength are unchanged compactness of the line.
Any new conventional line, has a rigid and compact character because of the resin (generally polyurethane-based) that encompasses it. This resin has a very short life and after only a few sessions, the touch of the product is softer.
This translates into a series of annoying consequences such as:
• The softened lines are more subject to unwanted knots.
• The protection of the line is reduced after each session.
• The braid tends to open and it becomes more fragile, allowing the entry of water which will create small salt crystals inside in case you kite in salt water, which can impair the bearing structure of the line.