2 minute read
N L7 GW BINDINGS


TO BE MOUNTED BY A SALOMON AUTHORIZED DEALER ONLY.
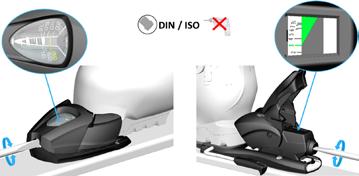
BINDINGS INTENDED TO BE USED ONLY WITH ALPINE BOOTS COMPLIANT WITH ISO 5355 STANDARD AND SKI BOOTS EQUIPPED WITH « GRIPWALK » LABELLED KIT OF WALKING SOLES
Advertisement
✖ ✖
ISO 5355 WTR ISO 9523

WARNING
THESE ALPINE BINDINGS ARE INTENDED TO BE USED ONLY WITH THE FOLLOWING SKI BOOTS:
> Alpine ski boots compliant with ISO 5355 standard. > Ski boots equipped with « GripWalk » labelled kit of walking soles WITHOUT metal inserts
Any use with other ski boots could cause the ski-binding-boot system to be faulty and affect release characteristics, which would increase the risk of serious injury while skiing. Therefore, skiers are warned not to use this product with any ski boots other than those meeting the standards indicated above. Skiers are advised to consult the dealer where this product was purchased, or an equipment specialist at any SALOMON authorized ski dealer of this product, for further information regarding which ski boots meet the standards listed above.
ALPINE SKI BOOTS (ISO 5355) GRIPWALK BOOTS
(ISO 9523) NO NORM
TYPE A (Adult)
TYPE C (Children) TYPE A (Adult)
TYPE C (Children)
MOUNTING & ADJUSTING
1. For mounting N L7 GW binding on skis, holes have to be drilled with the Salomon mounting jig (ref L0011570001 or L0011560001) to ensure a proper alignment of the binding.

2. Screw the holder screw, taking care to hold it so that it does not rotate.Then slide the toe until it comes into contact with the holder screw and tighten the 2 screws. at 3 N.m

2
3. Mount the heel taking care that the filter is well assembled and taking care to tighten the 4 screws in the order indicated below at 3 N.m.

3
4. Mount the brake on the heel, taking care that the 2 brake lugs are correctly engaged in the 2 housings of the heel base.

4
5. Step-in the boot and check the forward pressure.
5
In case the forward pressure is not good, move the heel by the lever with the help of a screwdriver as explained in the images below (a).


6. Select and adjust the setting release values for toe and heel pieces.