11 minute read
AMATETJR ATRCRAFT CONSTUCTORS' GUTDE


by Arthur W. J. G. Ord-Hume Part VI
The second type of, joint in aircraft carpentry is the butt joint, several combinations or types of which are used in aircraft construction.
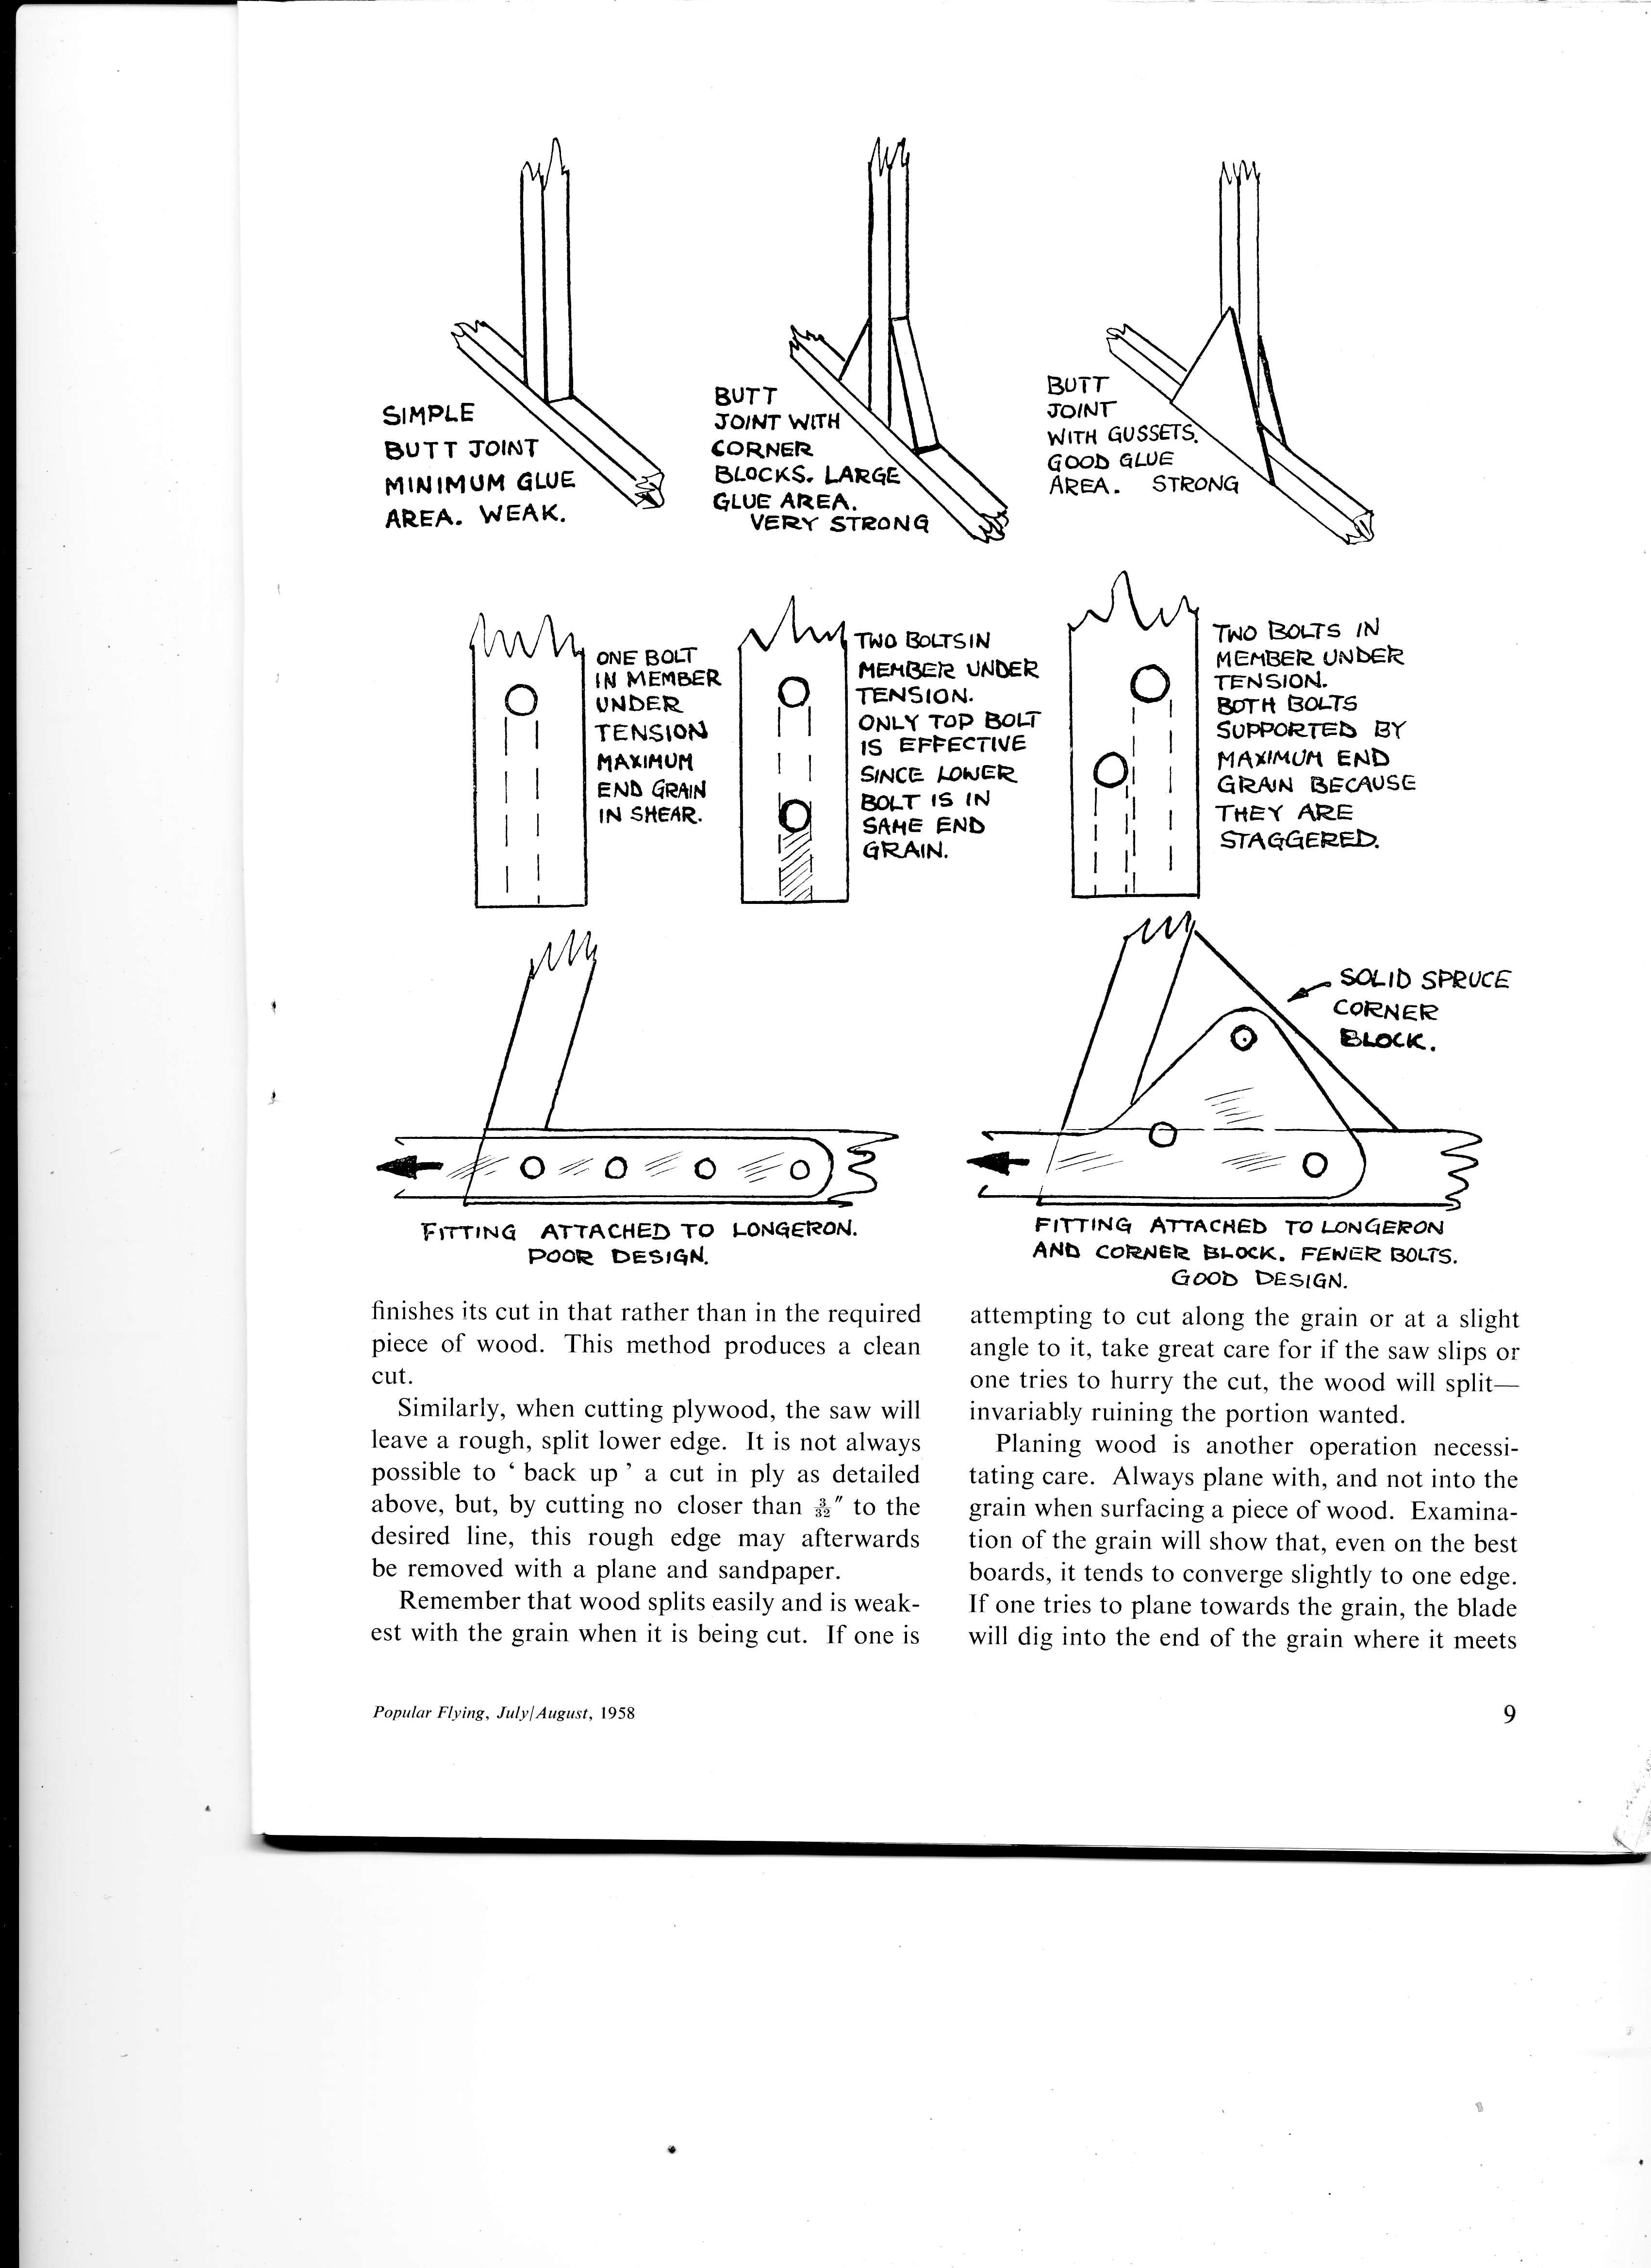
A butt joint itself is not strong. It presents the smallest possible glue surface. However, it is often the only method of joining a strut to a longeron or a rib vertical member to a capstrip. The butt joint alone, therefore, is of little strength and other means must be resorted to to enable it to develop strength. These may be corner blocks or plywood gussets which will increase the glue area and provide positive results from what is essentially a weak joint on its own.
The butt joint is most commonly used by the designer to resist only compressive loads. In such cases there is little or no additional force at work on the joint likely to cause displacement, and it will suffice to hold the member in place by means of small plywood gussets.
Where the plywood skin of a structure is employed to withstand shear loads, the cross member once agatn has only to resist compression. However, in this case, it is attached along its length to the ply skin. This not only serves to stiffen the structure but also reduces the area of unsupported thin plywood which would otherwise bulge. The designer evolves the minimum size of an unsupported panel which he can utilise and he will assume attachment to the cross members.
When other forces are at work on a joint, the designer will make use of solid corner packing blocks to increase the cross-section of the members at that point for gluing. He may also use gussets or a combination of corner blocks and gussets. In some cases, he may resort to a metal fitting, bolted to each member in the joint, to take the load. In this last case, it is assumed that the joint is ' dry ' or unglued although in practice it will of course be glued.
Where a member has to take a direct tension load which has to be absorbed into a transverse member (..g., a wing pylon attachment to a top longeron), it is uneconomic and impractical to develop strength by gussets since they would require to be excessively large. In this case, the member is attached by a metal fltting. To reduce the possibility of the bolts tearing out of the member under load due to the shearing of the end grain, the bolts may be staggered so that each bolt is supported by the maximum possible unbroken length of grain. An additional or alternative method of stabilising the end grain against shear is to face the member on both sides with plywood, thus allowing the bolts to pass through the ply as well as the actual member.
The drilling of a hole in wood is a particularly important operation demanding the utmost care and accuracy. Careless drilling can produce a weak and often dangerous structure. Each flbre in a strip of wood has a job to do and the designer has calculated just how much of the wood may be removed by drilling a hole without affecting the strength of the structure. If the hole is made oversize, not only has too much wood been removed, but the bolt or fitting which passes through the hole will not be supported evenly by the timber. A bolt in particular depends on the bearing surface of the wood through which it passes to enable it to resist the loads upon it.
Basically, to drill wood, the drill must be held rock-steady at the precise angle to the wood that is required. If it is attempted to drill a hole half-way from each side, the chances are that the two holes will not meet dead in the centre. If the hole is reamed out to fit a bolt, the hole would be barrel-shaped. The bolt would only be supported at its extremities and, when any load was applied during service, the bolt would very rapidly elongate the hole and work loose.
The correct method is to drill the hole entirely from one side. If the drill is slightly crooked, the hole will not mate up with the fitting the other side. Any attempt to rectify the matter by reaming or redrilling from the other side will be useless since the lack of bearing surface for the bolt will allow the fitting to be pulled out of place.
Should there be any doubt whatever as to the accurate placing of a hole, drill a small pilot hole first to check with.
A hole is an extremely deceptive thing. Whilst its outward appearance may seem satisfactory, it is often impossible (except with large holes) to inspect its inner surface to verify whether or not it has been properly drilled. It rests largely with the constructor to exercise extreme caution and patience over this operation. For general purpose work, a satisf,actory drilling jig may be made by boring a block of steel or iron about 2" x3" x2" on a proper pedestal drilling machine with a hole the size required. It is a sound scheme to drill the block with four holes, quite closely spaced near the centre, of diameters fr", +' +' and $", thereby enabling the jig to be used for a variety of holes. The local garage will in all probability drill the block on a proper machine for the 'odd bob'.
In use, draw the centre lines locating the hole on the wood, place the jig over this mark, sight down through the jig to double check the accuracy and then lightly clamp it into place with G clamps to prevent it moving.
It is recommended that drilling should be carried out with an electric drill but, should a wheel brace have to be used, use one with a breast plate as it is easier to hold steady. Drill smoothly and slowly and avoid 'waggling' the drill in the hole. Always rest the work on a solid block of wood so that the drill passes through into it after boring the job. This is to prevent the splitting
Popular Flying, JulylAugust, 1958 of the surface grain on the other side. Alternatively, clamp or press the block by hand to the other side, taking care to keep the fingers clear of the drill tip if it breaks through the block.
Sometimes it is not possible to drill through a jig as detailed above. In such cases, the help of one, preferably two assistants will be needed. Obtain two engineers set squares, the larger the better (about six or eight inches high is ideal), and stand these up near the hole to be drilled at right angles to each other. Hold the drill approximately vertical with the point on the centre spot of the hole. The assistants may now sight whether the drill is truly vertical by lining up against the vertical arm of each square. When both are satisfied that the alignment is correct, proceed slowly to bore the hole, pausing frequently to recheck with the assistants.
In aircraft construction, it is often required to bend wood to a curve. There are two methods of forming wood to a bow-one is by bending and the other is by laminating several thin strips of wood together in a jig.
Both spruce and ash bend readily to a certain degree. Any bend in excess of this amount will result in the fracture of the fibres. Also, when bent, the wood is sufficiently elastic to cause it to spring straight again. By softening the wood, however, not only will the timber remain bent, but it will be possible to increase considerably the sale radius of the bend.
Wood may be softened in two ways-water softening, which may be done either hot or cold, and by steaming. This latter is the most effective, but, since it usually necessitates the use of a steam box if the piece is long, it'is more usual to plasticise the wood by saturation in water.
Soak the portion to be bent in water for up to two hours until it is soft enough. Bend it very slowly to the shape required, working the bend in with the fingers to prevent sudden stretch of the fibres.
The process is speeded up by immersing the piece in boiling water or, if the piece is small enough, actually boiling it in a pan of water for a few minutes. Remove the wood with gloves and again bend it slowly. If the bend is acute or the material thick, repeat the boiling treatment until the bend is completed. ln steaming the wood to be bent, the effect on the wood is similar to that when the wood is treated as above. The fibres soften readily without any loss of strength upon drying. If only a small area of wood of thin section has to be treated, it can be done in the steam from the spout of a kettle. However, for larger pieces, a steam box must be resorted to. This consists of a long metal box or large-diameter tube (of sufficient size to accommodate the wood to be steamed), sealed at one end and with a sealable door at the other. The box or tube is connected viaapipe to a water boiler heated by a gas burner. As the water boils, the steam is forced under pressure into the box containing the timber. A suitable safety valve must be incorporated in the boiler. Great care must be exercised when exhausting the steam from the box-a scald from steam is a most serious and painful thing.
It will be found that upon drying there is a tendency for the wood to spring slightly out of the bend. To counteract this, increase the bend from 15 per cent to 20 per cent more than is required so that the wood, when dry, will adopt a ' set ' just about at the bend required.
Timber in a steam box should be left from one to two hours before removing. Subjection to longer periods of steaming results in the destruction of the suppleness of the wood when dried.
Before gluing any wood which has been steamed or wetted in any way, always let the piece dry thoroughly in air. On no account try to accelerate the drying by artificial methods. Air drying will preserve the correct moisture content of the timber.
Plywood may be bent in the same manner. It is easiest to bend ply with boiling water saturation. Bend the ply as far as it will safely go and, whilst stilt holding the bend, get an assistant to pour boiling water from a kettle over the outside of the radius. Immediately the ply will soften and start to fold tighter. Do not hurry the process, for the wood may yet split. By repeated application of boiling water, gradually work the ply to the curve required and then clamp it between two boards to dry overnight.
Where it is desired to make a large curve of accurate dimensions with a comparatively thick cross section, the designer will usually call for the piece to be laminated. Formers, wing tip bows, keel members and similar pieces call for lamination.
A jig must be made to locate the strips for gluing.' Obtain alarge flat board of commercial wood sufficiently large to take the curve of the member to be made plus a margin of several inches. For very large members, a wooden floor may be used. Using a hard pencil, mark out the curve. Now cut wooden blocks about l" x2" x3" and glue and screw these to the inner edge of the curve allowing a spacing of one every two to three inches. If the curve is sharp, these blocks will need shaping.
To prevent the adhesion of the glue to the jig, paint the jig with two coats of hot paraffin and allow it to dry.
Cut the strips to be laminated and allow several inches more in length than is actually required-the excess may be removed later.
Glue up the laminations separately on a flat surface, shuffiing each strip to the next to exclude air. When the desired number of pieces have been glued up, place the bundle into position on the jig board. On the outside of the bundle, opposite each block, place a piece of scrap wood as a clamping block. As an alternative, a strip of steel may be bent into place on the outside (rather like an additional lamination) to take the pressure of the clamps.
Clamp up to each block with G clamps and leave it for twenty-four hours to dry. After removal and cleaning up, examine carefully for any signs of delamination caused by inadequate gluing. If there is any gap, run a mixture of glue and hardener in, working it well in with a thin strip of metal such as a feeler gauge, and reclamp.
In sawing aircraft timber, support it adequately to prevent it splitting when the saw approaches the other side. Where possible clamp a piece of scrap wood to the underside so that the saw
Popular Flying, Iuly August, 1958 str{PLE BUT T TOINT M IN IM UM GLUE AR.EA. WEAK.
BUTT JO'NT WITH coRxen 6LocKS, LqRqA qLuE AREA. VERY sreoNQ
BUTT f,o,Nr Wtrt{ GU Goob G.LuE AREA. STRONq
ONF BOIT tN MEMBER. UNbER TENSlotl llArtHUrt ENb Geftr| IN SHEAR.
Ti^lO BoLTSIN HEHBETe UNbER, TENSION. ONLY TOP BOEI' IS EFFECTIVE s,NcE lorueP BOLT 15 lhJ SAHE ENb 6RAIN.
Tnro Eot-ts ,N I,IEHBETE UNb€R TE-NSION. B,Tft BO'Js supp6a3t=a BY HAXIMC,fT ENb GRN'P BECAUSC THEY AR.C STAqGEPED. 7O,7O4O finishes its cut in that rather than in the required piece of wood. This method produces a clean cut.
Frrrrr.rc ATTAcHED ro LoNq€RoN. PooE oeslqrl.
Similarly, when cutting plywood, the saw will leave a rough, split lower edge. It is not always possible to 'back up' a cut in ply as detailed above, but, by cutting no closer than &" to the desired line, this rough edge may afterwards be removed with a plane and sandpaper.
Remember that wood splits easily and is weakest with the grain when it is being cut. If one is
Popular Flying, JulylAugust, 1958 attempting to cut along the grain or at a slight angle to it, take great care for if the saw slips or one tries to hurry the cut, the wood will splitinvariably ruining the portion wanted.
F,fTlNq AlrAcHEb fo ITNGEF,N ANb coRN"EjlT;#[u* Bot-rs.
Planing wood is another operation necessitating care. Always plane with, and not into the grain when surfacing a piece of wood. Examination of the grain will show that, even on the best boards, it tends to converge slightly to one edge. If one tries to plane towards the grain, the blade will dig into the end of the grain where it meets the surface. Run the plane so that it slices the grain from behind.
Should it be necessary to plane the end of a plank or piece of wood so that the plane is cutting at right angles to the grain, the plane blade must be very sharp and set so as to remove the smallest thickness of wood at a time, otherwise it will dig in. The forward edge of the piece of timber should be backed up with a piece of scrap wood so that the plane continues its slice into this. This is to prevent the edge being split by the plane blade.
The plane may be used for the shaping of a curved member if it is an outside curve. However, it is more usual to make use of the spokeshave with which one may also plane an inside curve. It should be held firmly in both hands and drawn firmly towards the operator. Templates may be made out of scrap plywood to check the shape of work as one proceeds.
To smooth wood or to remove glue that has dried, do not use a joiner's rasp or dreadnoughtThis will tear the grain. A rough, flat file may be used to advantage, although it will clog quickly. The file should be used to smooth off wing tips and so forth in conjunction with the sandpaper block. Clean it frequently with a file scratch card. Should the file become clogged with glue, immerse the file in boiling water for a few minutes and then clean in the normal waY.
Store aircraft timber on a rack or shelf away from draughts, dampness or heat. Never keep wood on a concrete floor. Avoid contaminating wood with oil, dirt or grease during storage and work. If it is necessary to store incomplete or uncovered components for a while, protect them from dust by means of dust sheets.
The essence of good aircraft carpentry is careful workmanship, the accurate following of the drawings and, until experience is gained, an unhurried approach. The best instructor in the world cannot supply the most vital thing. That is experience. Both carpentry and metalwork are subjects which demand practice and experience to gain proflciency. That goal may be reached with patience and care.
Remember that sound work is a sure step towards success.


