Made By Robots - SUM 21 Shubbaam Rathi 1134046
Design Journal 10/03/2021
R_Lab
Made By Robots - SUM 21 Contents 1.0 Introduction 2.0 Task 1 : Vessels 3.0 Task 2 : Architectural Components 4.0 Task 3 : Final Project 5.0 Precedents 6.0 Conclusion
Table of contents
R_Lab 03 06 14 35 80 98
2
Made By Robots - SUM 21
The Experimental Design Lab is an investigation into material and process driven design. It suggests an alternative, “bottom-up” approach to the conceptual process where playful experimentation with materials and hacking of both traditional craft methodologies and contemporary digital fabrication equipment leads ultimately to the design of a functional item of furniture. Risk is encouraged, and hard-earned failure is rewarded in parallel to successes. Physical experimentation lies at the core of the ExLaB pedagogy. Designers are encouraged to get out of sketchbooks and get their hands dirty. The process becomes as important as the final outcome and provides a glimpse of the breakthroughs, the heartbreaks, the red herrings and the intense amount of labor that goes into the ExLaB process.
(1) (1) Fabrication Lab
1.0
R_Lab
Introduction
3
Made By Robots - SUM 21
R_Lab
FabLab Access Students will have access to operate and/or supervise machinery in the FabLab if appropriate safety inductions have been completed. There are 3 levels of safety induction in the FabLab. (Visit Training Centre Website for more info) lv 01 - General FabLab Safety Induction General introduction to workshop safety principles and procedures assessed via online multiple choice assessment. Assessment must be completed to gain access to any space in Fabrication Workshop. lv 02 - Machine Workshop Safety induction In person familiarization and introduction to the machine workshop and technical staff. An induction session will be arranged for all ExLaB students during class time. This must be completed for students to gain access to any equipment beyond G12, the Forbo Model Making Space. lv 03 - Specific Machine training and certification In person training on specific workshop machinery. Refresher is training required each semester. If students wish to use any machinery in the Machine Workshop this certification must be completed.
1.0
Introduction
4
Made By Robots - SUM 21
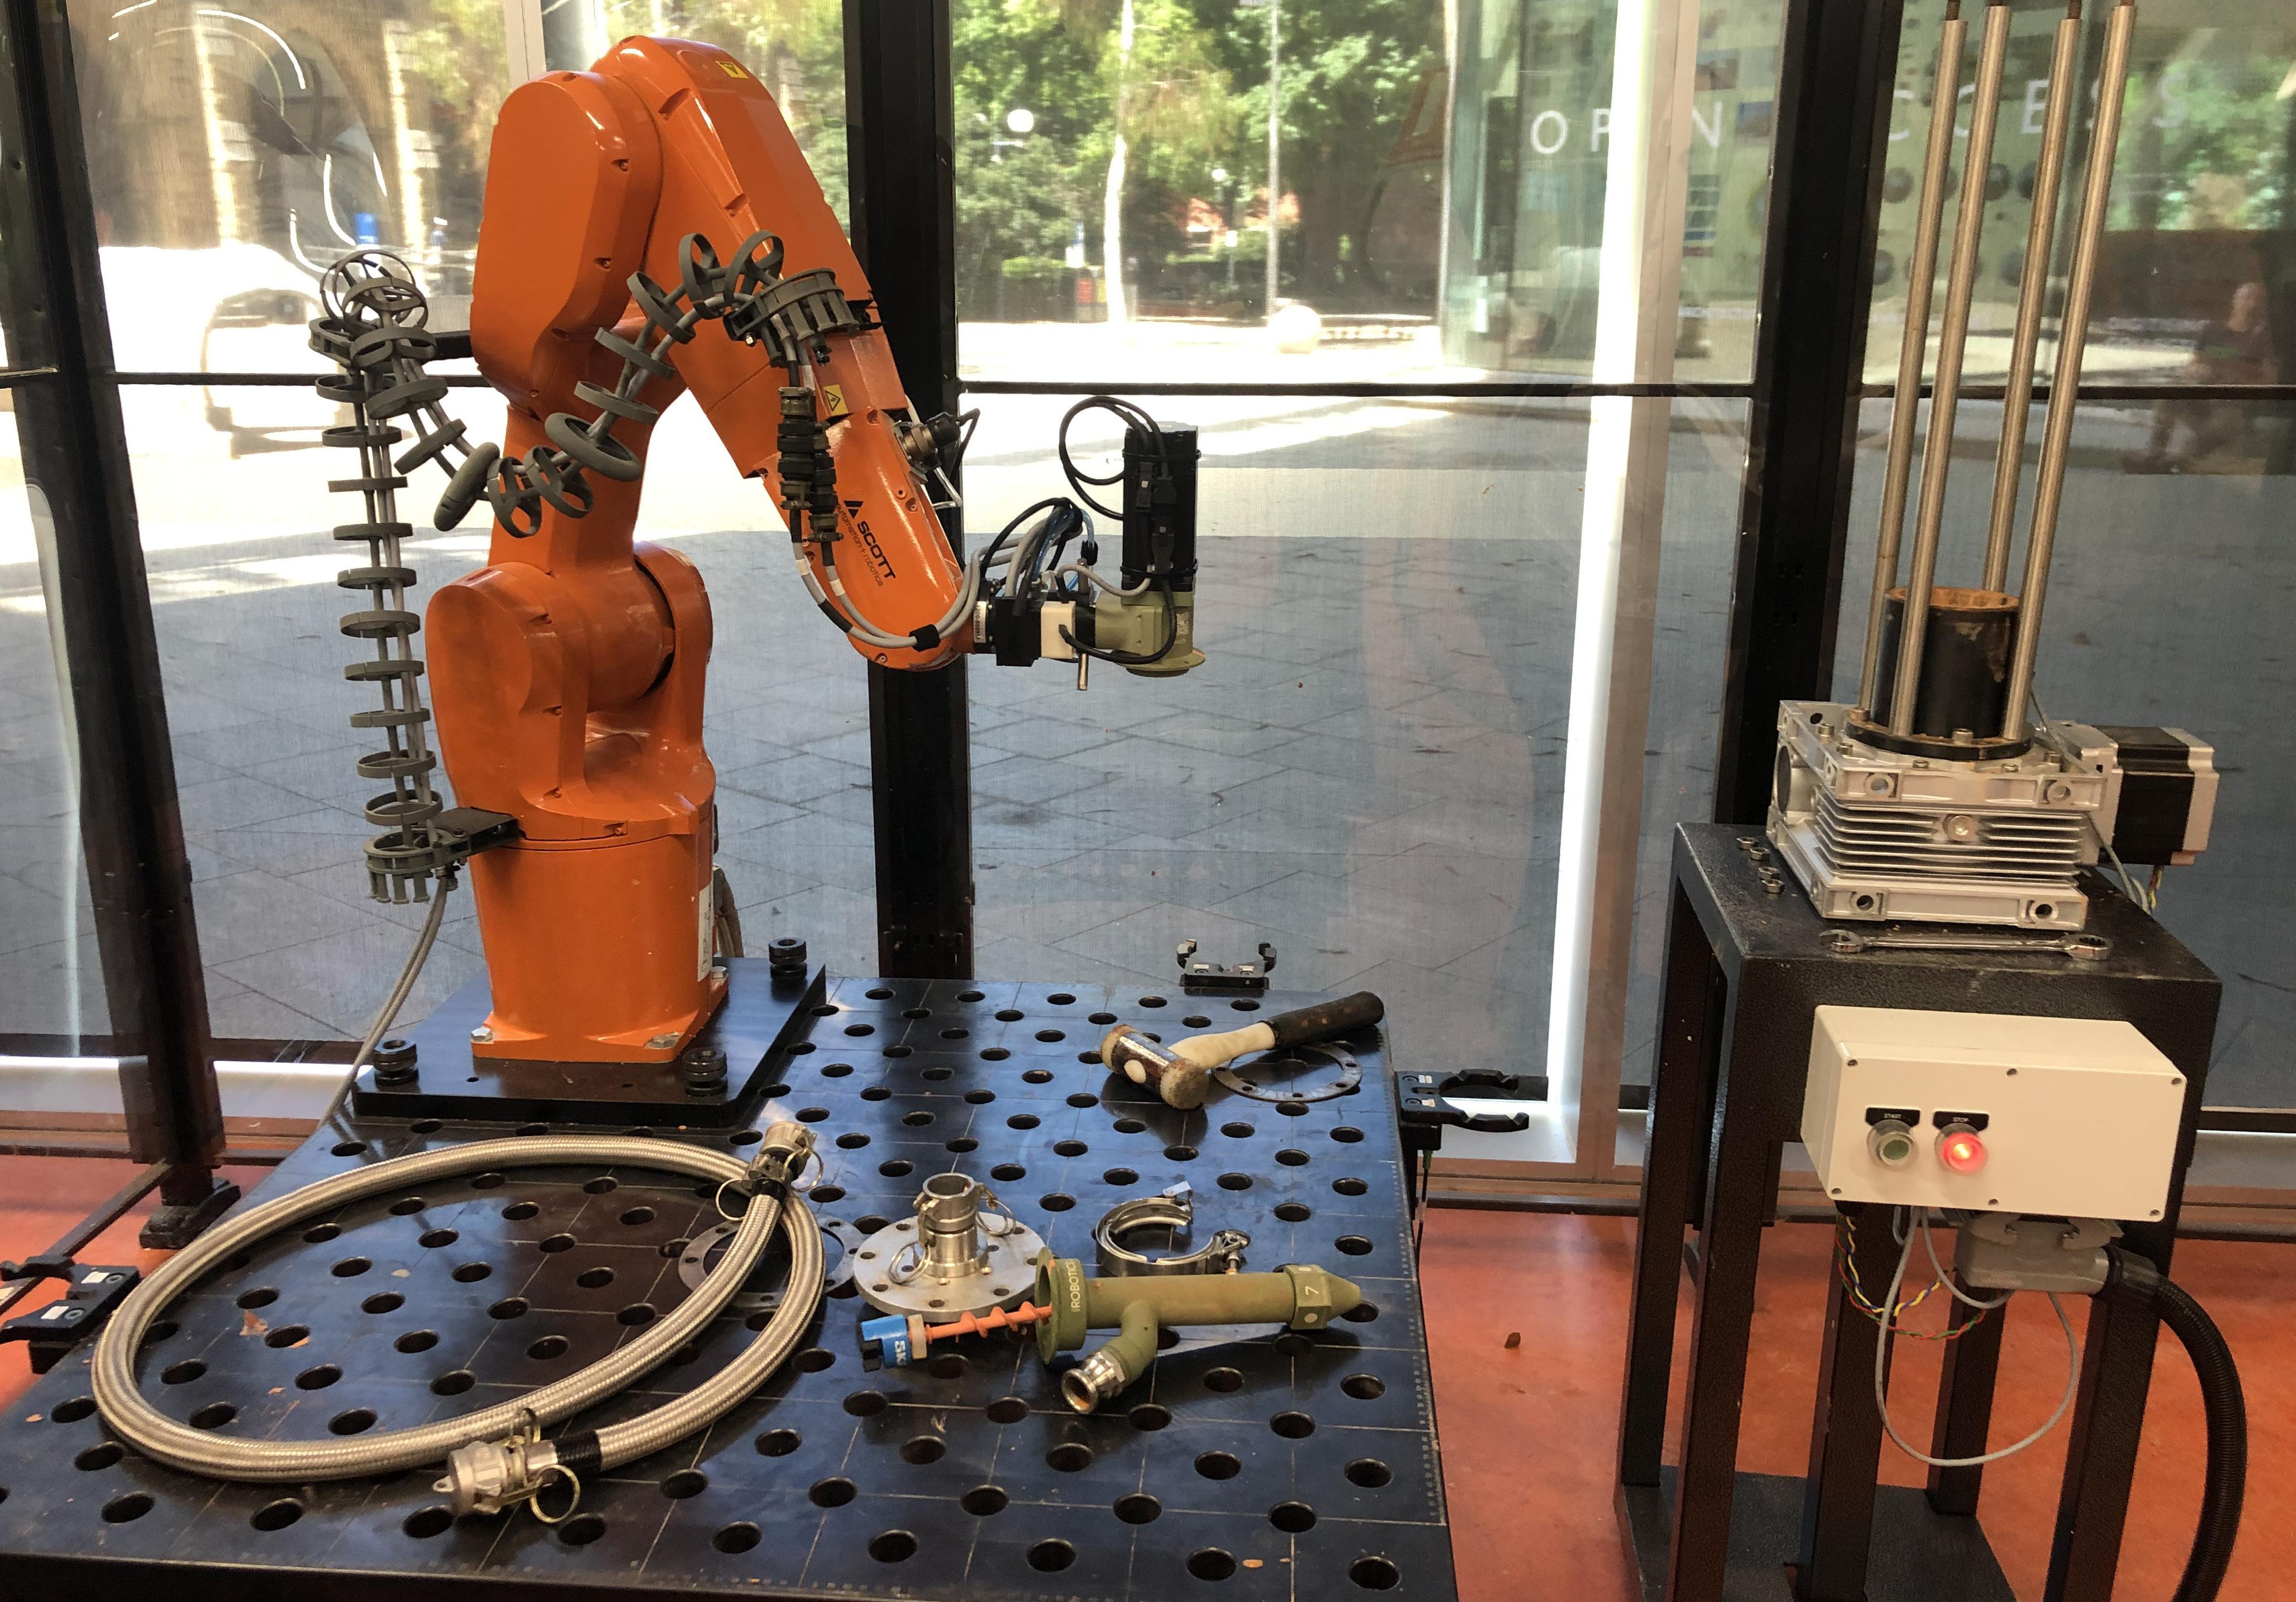
R_Lab SETTING UP THE ROBOT The main switch and the robotic monitor is to be turned on. The scripts to be printed can then be loaded in the computer. (5)
(1)
(3)
(6)
(2)
(4)
(7)
Note that all the parts should be thoroughly cleaned before and after the use. It is very important to purge the clay tube before printing so as to prevent air bubbles from disrupting the printing.
(1) Fix the nozzle with the auger inside and tighten it with steel clip, (2) Apply silicon gel on the rim, (3) Installing the clay tube, (4) Putting the metal ring through the four steel supports, (5) Apply silicon gel on the rim of the top, (6) Fixing the top inside the top mouth of tube through the four steel rods (7) Tightening the screws using spanner.
1.0
Introduction
5
Made By Robots - SUM 21
2.0
Vessels
R_Lab
6
Made By Robots - SUM 21
R_Lab VESSEL 1 Exploration Twisting the object while keeping the number of sides same. Base - Wide Middle - Narrow Top - Wide Attempt 1 Base of the vessel was distrupted due to change in base height and the air pressure was too high.
(1)
(2)
(3)
(4)
Reflection Adjusting the nozzle height in the script if the base height changes and controlling the air pressure manually.
(1) Top View, (2) Front View, (3) View, (4) Wire Mesh
2.0
Vessels : Task 1
7
Made By Robots - SUM 21
R_Lab VESSEL 2 Exploration To create an object like a twisting onion dome. Base - Narrow Middle - Wide Top - Narrow
(1)
(2)
Attempt 1 The speed of the robot was 75%-80% which was too high and hence the object collapsed midway. Reflection The object was printed smoothly when the robot speed was decreased to 25% because the clay layer below got more time to settle.
(3)
(4)
(1) Top View, (2) Front View, (3) View, (4) Wire Mesh
2.0
Vessels : Task 1
8
Made By Robots - SUM 21
R_Lab VESSEL 3 Exploration A simple twisted doubly curved vessel with four curved faces. Base - Wide Middle - Narrow Top - Wide Attempt 1 Printed perfectly.
(1)
(2)
(3)
(4)
Reflection The speed of the robot could be increased to 50%-75% as the shape is very simple with less weaves.
(1) Top View, (2) Front View, (3) View, (4) Wire Mesh
2.0
Vessels : Task 1
9
Made By Robots - SUM 21
R_Lab VESSEL 4 Exploration A cup with multiple smooth twisting flutes. Base - Narrow Middle - Wide Top - Wider Attempt 1 Printed perfectly at the start but ran out of clay halfway.
(1)
(2)
(3)
(4)
Reflection When the object is narrow at base and very wide at the top the object can be printed upside down as it is easier to print with a wider base. Always have a look at the amount of clay before printing.
(1) Top View, (2) Front View, (3) View, (4) Wire Mesh
2.0
Vessels : Task 1
10
Made By Robots - SUM 21
R_Lab FACTORS AFFECTING PRINTING ACCURACY Nozzle (Extrusion Width): The nozzle should be cut accurately both horizontally straight along the hole as well as in height. If the nozzle width is too small, the layer of clay is very thin and the object deforms by self weight.
(1)
(2)
(3)
(4)
(1) Defect due to high robot speed, (2) Defect due to small nozzle width, (3) Defect due to change in base height, (4) Defect due to change in pressure
2.0
Vessels : Task 1
Clay: It is important to ensure that there is no air bubbles in the clay tube and enough clay to print entire object as, if the tube runs out of clay the air pressure deforms the model. Layer Height: Consistent layer height is very important factor of clay printing. If the layer height is too less the nozzle drags the clay of the layer beneath and defroms the object and if the layer height is too high the precision of the printed object is affected.
11
Made By Robots - SUM 21
R_Lab FACTORS AFFECTING PRINTING ACCURACY Air Pressure: Air pressure must be accurately set as less air pressure and high speed of printing may create inconsistency in the printing. Robot Speed: The speed of the movement of robotic arm affects the printing. Objects with too many dense weaves or the ones with a greater overhang need to be printed at a slow speed. Reflection: All the factors are related to each other in some or the other way. Key point is to change one factor at a time rather than all of them.
(5) Diagram explaining relationship between different factors.
2.0
Vessels : Task 1
12
Made By Robots - SUM 21
R_Lab CREATING A CUSTOM OBJECT Step 1 Make object in rhino or make the object in grasshopper and bake it. Step 2 Draw two spirals (0.8 to 1.2 mm depending on the layer height), one inside the object and one outside the object.
(1)
(2)
Step 3 Loft the two spirals or use sweep 2 to create surface. Step 4 Use intersect command and intersect the lofted spiral and the object. The intersection can be imported in grasshopper script to be printed.
(3)
(4)
(1) Step1 - Designing object using Rhino, (2) Creating two spiral one side and one outside the object, (3) Step 3 - Joining them using Sweep2, (4) Step 4 - Intersecting sweeped form with the object
2.0
Vessels : Task 1
13
Made By Robots - SUM 21
3.0
Architectural Components : Task 2
R_Lab
14
Made By Robots - SUM 21
R_Lab HOTEL LOBBY Hotel lobbies are grand and always comprise of amazing lighting. Lighting constitutes as an important part of the entire setting. The most striking features of the hotel lobby is the reception wall (feature wall), a sculpture, or the backdrop of the sculpture itself.
(1)
Concept “Find beauty in not only the thing itself but in the pattern of the shadows, the light and the dark that thing provides.”
(2)
-Junichiro Tanizaki Ideation The attempt was to integrate an organic form exploring potential of computational tools, understanding clay as a material (its strengths, weaknesses, textures etc.) and the light itself. (3)
(4)
(1)-(5) Hotel Lobby - Reference Images
3.0
Architectural Components : Task 2
(5)
“We perceive the nature of light from the surface that receives it.”
15
Made By Robots - SUM 21
R_Lab PREPARATION OF CLAY Step 1 Arranging a beaker/jug for measuring water, a metal wire to cut the clay in pieces and one bag of clay that weighs around 12.5 kgs, a bucket to mix clay, electronic mixer and a fastening belt. Step 2 Tying up the bucket to a stable support using fastening belt.
(1)
(2) Step 3 Cutting the block of clay in small chunks of clay and adding 500ml of water to the clay for mixing. Step 4 Mixing the clay using the electronic mixer until a homogenous mixture of clay is formed. Step 5 Filling up tubes of clay for printing.
(3)
(4)
(5)
(1) Material and Equipments, (2) Clay cut in small chunks, (3) Using fastening belt, (4) Mixing the clay, (5) Filling up tube with clay
3.0
Architectural Components : Task 2
16
Made By Robots - SUM 21
R_Lab DESIGN DEVELOPMENT 1 The idea was to create a backdrop for a reception area in a hotel lobby. Discussion with Ryan and Lewis Though the walls would create shadow patterns, the idea of using light was with an external source which was not in accordance to the initial conceptual idea. (2) Breaking down in parts
(1) Design Development : Concept 1
3.0
Architectural Components : Task 2
(3) Creating individual bricks
The form or the pattern of the wall was something that could be achieved using Wood and CNC machines. So what is the real need of it being 3D printed? Always think whether, there any other options that could be cheaper and question the need of being 3D printed. Reflections While designing we should take into consideration the real need of the object being 3D printed. The real power of 3D printing is to explore and create objects that are complex and which really need 3D printing technology for creation.
17
Made By Robots - SUM 21
R_Lab DESIGN DEVELOPMENT 2 The idea was to create a backdrop wall for a reception area or a feature wall in a hotel lobby. Discussion with Ryan and Lewis The wall served the purpose of being a light feature as a strong idea, but was too modular. It is like two types of bricks and multiple replications. (2) Modular Brick : Type 1
But the real strength of 3D printing can be explored using digital computational tools like grasshopper where each brick can be unique and less modular. Reflections A non-modular form can be created by printing unique bricks but having the same idea. The real power of 3D printing is to explore and create objects that are complex and which really need 3D printing technology for creation.
(1) Design Development 2
3.0
Architectural Components : Task 2
(3) Modular Brick : Type 2
18
Made By Robots - SUM 21
R_Lab BRICK TEST - 1 The brick printed well at first but then it collapsed by self weight. The bottom layer was disrupted because the height was not set up properly in grasshopper script.
(1)
(2)
(3)
(4)
Reflection The brick needs internal supports to hold the curved surface intact. It is important to check the height from which robot starts printing on the pad. Its important to also consider the change in thickness of the surface on which the brick is printed. Such disrupted layer may create defects or cracking while firing or it way affect the joinery of bricks.
(1) Designed brick, (2) Printed Brick, (3)-(4) Brick collapsed while shifting.
3.0
Architectural Components : Task 2
19
Made By Robots - SUM 21
R_Lab BRICK TEST - 2 Step 1 Designing the object in rhino. Step 2 Converting the object into a continuous surface with 5mm gap between adjacent sides. (The gap will change depending on the extrusion width)
(1)
(2)
Step 3 Input the surface in to grasshopper script and change the settings to Continuous and Surface/Mesh (Refer Fig 3). Step 4 Continuous spiral printing file is ready to be loaded in the robot to be printed.
(3)
(4)
(1) Designed brick with supports, (2) Creating continuous single surface, (3) Step 3 - Upload the geometry curve in grasshopper script, (4) Script - Enable
3.0
Architectural Components : Task 2
20
Made By Robots - SUM 21
R_Lab DESIGN DEVELOPMENT 2 The idea was to create a backdrop wall for a reception area or a feature wall in a hotel lobby. Discussion with Ryan and Lewis The wall served the purpose of being a light feature as a strong idea, but was too modular. It is like two types of bricks and multiple replications. (2) Modular Brick : Type 1
But the real strength of 3D printing can be explored using digital computational tools like grasshopper where each brick can be unique and less modular. Reflections A non-modular form can be created by printing unique bricks but having the same idea. The real power of 3D printing is to explore and create objects that are complex and which really need 3D printing technology for creation.
(1) Design Development 2
3.0
Architectural Components : Task 2
(3) Modular Brick : Type 2
21
Made By Robots - SUM 21
(1) Design Development 3
3.0
Architectural Components : Task 2
R_Lab
(2) Side Elevation
22
Made By Robots - SUM 21
R_Lab
PARAMETRIC WORKFLOW Step 1: Grasshopper script used to create the base parametric surface of the wall
3.0
Architectural Components : Task 2
23
Made By Robots - SUM 21
R_Lab
PARAMETRIC WORKFLOW Step 2: Grasshopper script used to create the base parametric surface of the wall
3.0
Architectural Components : Task 2
24
Made By Robots - SUM 21
R_Lab
PARAMETRIC WORKFLOW Step3: Merging the base surface and the convex surfaces together
3.0
Architectural Components : Task 2
25
Made By Robots - SUM 21
R_Lab
PARAMETRIC WORKFLOW Step 4: Creating bricks by developing the sides and flat rear surface
3.0
Architectural Components : Task 2
26
Made By Robots - SUM 21
R_Lab
PARAMETRIC WORKFLOW Step 5: Final bricks labelled and ready to be printed
3.0
Architectural Components : Task 2
27
Made By Robots - SUM 21
R_Lab BRICK TEST PRINTING During the print process, we encountered some problems. The first problem was deriving the relation between the speed of auger, speed of ram and printing speed to a best suitable level to print the bricks.
(1)
(2)
(3)
(4)
(1) Test 1, (2) Test 2, (3) Test 3, (4) Test 4
Various tests were done by changing the values of the above parameters. We observed that some parameters caused each layer be too thick(slow robot speed), and some parameters will cause broken lines (high speed and low auger speed) and discontinuities in the last few layers of clay. The robotic script had a prior setting of increasing the printing speed as it printed from bottom to top. Hence the bottom layers were printed precisely but the top layer got disrupted. This problem were altered befored printing the final bricks.
Image Source: Xiong and Shubbaam
3.0
Architectural Components : Task 2
28
Made By Robots - SUM 21
R_Lab BRICK TEST PRINTING The layer heights is one of the important parameters in printing.
(1)
(2)
If the layer height is too high, the successive layers do not get a base support of the layer beneath as the clay layer settles down after printing. This causes irregularities in the print. Even if the brick gets printed, the clay layers that are not stacked and settled eventually crack after drying. If the layer height is too low the nozzle drags the clay of the subsequent layers causing deformities. It also creates blobs of extra clay on the surface which distort the brick face. The blob of clay may also be a result of some extra points overlapping in the script which can be changed manually in rhino and grasshopper. (Refer Image 3 and 4).
(3)
(4)
(1)-(2) Test 5, (3)-(4) Test 6
For printing the final bricks we used 5mm layer height.
Image Source: Shubbaam
3.0
Architectural Components : Task 2
29
Made By Robots - SUM 21
R_Lab BRICK TEST PRINTING We used manual control mode for printing the bricks. If the stop button was not pushed on time, the clay would overfloe and may cause. It was important to keep an eye on the print so that we could turn of the clay supply as soon as brick is printed to prevent excess clay damaging the brick. In the first version script, we did not separate the convex surface from the concave surface.The junction between them would appear very crowded and unsightly. So we modified the script a bit by leaving a 5mm gap between the concave and convex surfaces. This prevented the overlap and the extra clay deposit at the junction.
(1) Small size module brick test Image Source: Xiong
3.0
Architectural Components : Task 2
30
Made By Robots - SUM 21
R_Lab BRICK TEST PRINTING We also realized that the brick was too small and the curved surfaces were too narrow to accommodate light fitting inside. So we increased the size of bricks and openings. Following the changes and printing the bricks we observed that the width of each brick was too large, which led to the collapse of curved surfaces. In the subsequent design, we reduced the width of each brick so that the curved surfaces could support themselves.
(1) Bigger size module brick test Image Source: Xiong
3.0
Architectural Components : Task 2
31
Made By Robots - SUM 21
R_Lab
(1)
(6)
(2)
(4)
(3)
(5)
(8)
(9)
(7)
Some of the final printed bricks Image Source: Xiong
3.0
Architectural Components : Task 2
32
Made By Robots - SUM 21
(1) Stacked bricks with LED lights creating a play of light and shadows Image Source: Xiong
3.0
Architectural Components : Task 2
R_Lab
(2) Light emitting out from the weaved pattern at the back of the brick Image Source: Xiong
33
Made By Robots - SUM 21
R_Lab
(1) Brick wall
Image Source : Xiong
3.0
Architectural Components : Task 2
34
Made By Robots - SUM 21
4.0
Final Project : Task 3
R_Lab
35
Made By Robots - SUM 21
R_Lab
Design for Aesthetics
Design for Purpose
Our Proposal
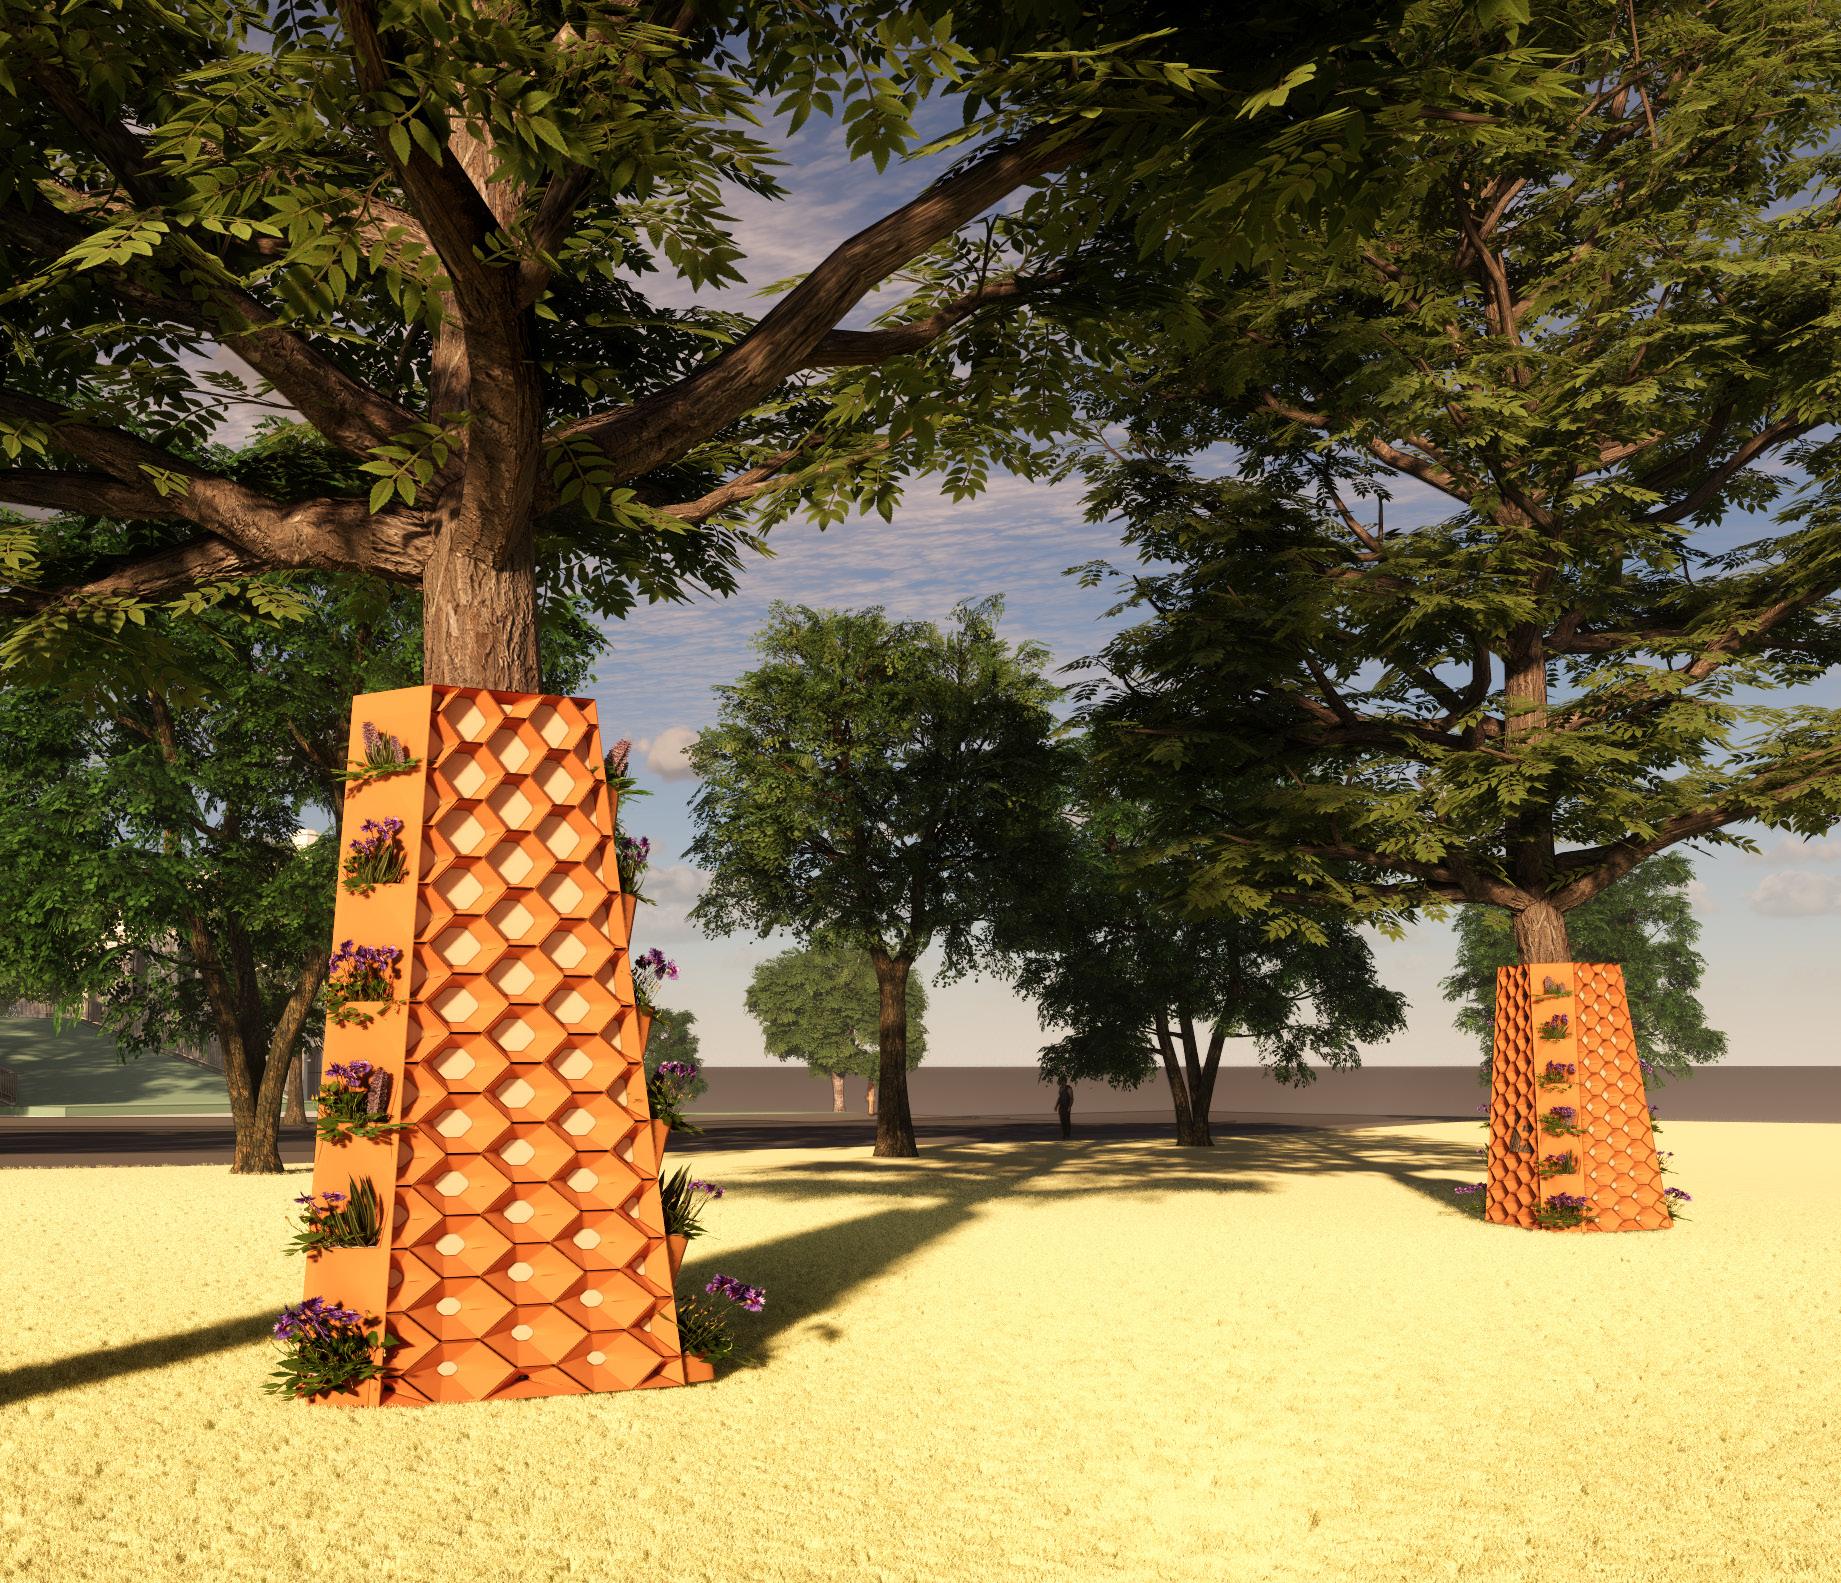
3D Robotic Printing focused towards creating Aesthetic Columns.
Design Intent: To focus on using 3D Robotic printing to create a structure that is dynamic and which has a purpose of nurturing the flora and fauna.
Anthill : A natural column built by ants, made up of clay as a shelter
ECO-COLUMN
4.0
Final Project : Task 3
36
Made By Robots - SUM 21
R_Lab
CONTEXT | SITE CONSIDERATIONS
N AT U R A L T Y P O G R A P H Y
URBAN CITY GRID
Habitat Loss
Less pesticide within CBD
Cohabilitation
Nested within urban green spaces
bee sanctuaries within the Melbourne CITY parklands + Garden Patches
City sprawl with fragrance of wilderness
4.0
Final Project : Task 3
37
Made By Robots - SUM 21
R_Lab
URBAN CHALLENGE | THE PROBLEM
1.
Native Australian Bees are one of the most important pollinating species in the ecosystem. Pollination is the process of flowering plants transferring pollen grain to one another.
2.
3.
Bees are vital in the preservation of ecological balance and maintaining biodiversity within our ecosystems. Making food production possible.
4.
Vital in foraging the crops used to feed our livestock and many staple crops we consume. Nearly twothirds of Australia’s agricultural production benefits from bee pollination.
NU TS BERRIES SEEDS FRUITS COFFEE...
It isnt just all the fruits and vegetables that we all love to eat, but even the meat in our burgers and our barbies (BBQ).
38
Made By Robots - SUM 21
CONCEPT
R_Lab
S E T PA R A M E T E R S H E LT E R R E F U G E
PRECEDENTS
BEE HOTELS + HO MES • • • •
Z
X
E X P L O R AT I O N
DISCOVERY
C O N T R O L VA L U E 1 SIZE OF MODULE XY
MATERIALS INFILL SOFT CLAY HARDWOOD TIMBER BAMBOO 3-10MM DIA
PROPOSAL
D E S I G N I T E R AT I O N S
Z
Y X
I D E AT I O N
PLANTERS PO LLINATERS • • • •
C O N T R O L VA L U E 2 SIZE OF OPE N INGS
3D PROTOTYPES
AUSTRALIAN NATIVE FLORA POLLINATING SPECIFIC ALL SEASONS IN A YEAR PLANTER DEPTH FUTURE PROOFING
Z
X
FA B R I C AT I O N
WAT E R C O L L E C T I O N WATER + FOO D • • •
Y
Y
C O N T R O L VA L U E 3 CON N ECT ION DE TAILS
WATER SOURCES SELF-SUSTAINING CLOSED-LOOP Z
X
Y
C O N T R O L VA L U E 4 SUPPORT ING ST RUCT URE
Z
X
4.0
Final Project : Task 3
Y
39
Made By Robots - SUM 21
R_Lab NATIVE BEES Australia has over 1,700 species of native bees. They come in a startling array of colours and range from 2 to 26 mm in size. Nearly all of Australia’s native bee species are solitary. Most of native bees are tiny, fragile, almost inconspicuous creatures and such bees would have great difficulty competing with the highly efficient commercial bees we have introduced from Europe.
(1)
POLLINATING PLANTS Plants on biological column provide food for local native bees, and set up Bee Hotels to supply them with nest sites.
(3)
(2) (1) Bee Pollination stations
Source: https://www.aussiebee.com.au/faq.html
4.0
Final Project : Task 3
SHELTER/REFUGEE Bee Hotels can provide valuable nest sites for native bees. Bamboo canes, blocks of wood drilled with holes or clay soil will be filled in the void of the column as the shelter for native bees.
40
Made By Robots - SUM 21
R_Lab REFUGIO - SOLITARY BEE SHELTER A series of three structures for solitatry bees within built up urban environments. Exploring three aspects of basic needs for bees, these include: - Shelter - Waterer - Feeder
(1)
(2)
(3)
(4)
(1) Refugio Shelter, (2) Feeder , (3) Water collector, (4) Material Pallette
Source: https://www.dezeen.com/2018/10/30/maliarts-refugio-shelters-bees-design/
4.0
Final Project : Task 3
41
Made By Robots - SUM 21
R_Lab THE INSECT HOTEL, ARUP ASSOCIATES Luxury bug hotels in london, components based voronoi patternation, which is derived from the dragonflys wing and closely resembles the honeycomb. It is infilled with different materials like wood, bamboo, clay etc.
(1)
(2)
(3)
(4)
(1)-(4) The insect hotel, Arup Associates
Source : https://www.designboom.com/architecture/arup-associates-insect-hotel/
4.0
Final Project : Task 3
42
Made By Robots - SUM 21
R_Lab DESIGN ITERATION-1 - Idea od the eco-column is to maintain our ecological plant diversity through polination stations designed for various native species - native bees, etc. - The purpose is to provide pollinating species such as native bees with water, food and shelter all-in-one. - Designed as a small scale intervention within the context of Melbourne city gardens and parklands.
(2)
(1) (1) Conceptual Column, (2) Reference | Gabrielle Baecile. 2010 Modeled by Shubbaam
4.0
Final Project : Task 3
43
Made By Robots - SUM 21
R_Lab DESIGN ITERATION-2 - Building upon previous ideas on clay crackling, thought of dividing bricks into a more modular but still interesting form to be fabricated. - Issue 1: Due to the way the bricks would fit together, it makes it difficult to design for features within the column i.e planters & water collection feature. Idea of designing via “modules” would not work. - Issue 2: Fabrication of each brick would be complicated on a curved surface.
(2)
(1) (1) Cairo Pattern on column face, (2) Cairo Pattern Modeled by Lynn
4.0
Final Project : Task 3
44
Made By Robots - SUM 21
R_Lab DESIGN ITERATION-3 - Drawing from ideas from Task 1. - Utilizing twisting forms to create column form then dividing them into individual building blocks for fabrication. - Bricks are then staggered to create vertical openings. (2)
(3)
(1)
(1)-(3) Rhino Modeling of column, (2) Planter brick: Johnny assignment 2 Modeled by Johnny
4.0
Final Project : Task 3
45
Made By Robots - SUM 21
R_Lab FINAL DESIGN ITERATION-01 - Circular column utilizing varying opening sizes from bottom to top. - Function (planter, bee hotel, water collection feature) to be split from bottom-up. - Issues: Fabricate bricks with a curved face would be tough to engineer in a week’s time. (2)
(3)
(1) (1)-(3) Final Design Iteration - 1 Modeled by Lynn
4.0
Final Project : Task 3
46
Made By Robots - SUM 21
R_Lab FINAL DESIGN ITERATION-02 - Similar concept to iteration 1 except in trianguar form. - Moves away from “Teraplanter” aesthetic - Individual bricks are fabricatable. - Issues: Brick extrusion, corner connection details.
(2)
(1) (1)-(2) Final Design Iteration - 2 Modeled by Lynn
4.0
Final Project : Task 3
47
Made By Robots - SUM 21
R_Lab FINAL DESIGN ITERATION-03 - Final deign for planter. Opted for a triangular form due to fabrication issues with the curved form. - Planters designed into the corner pieces. Packing entire planter/ corner pieces with soil will allow for stability in the structural connection to the SHS supports. - Issue: Total brick count: 228.
(3)
(1) (1)-(3) Final Design Iteration - 3 Modeled by Lynn
4.0
Final Project : Task 3
48
Made By Robots - SUM 21
R_Lab PROTOTYPING The brick size was too large and could not be printed in one entire tube. We figured that we need to scale down the brick size and increase the number of bricks to make it printable in one clay tube.
(1)
(2)
(3) (1) 3D printed brick, (2) Rhino model of the brick, (3) Arrangement of the bricks Modeled and printed : Shubbaam, Image Source : Ningning
4.0
Final Project : Task 3
49
Made By Robots - SUM 21
R_Lab PROTOTYPING The supports were designed at the centre of each face rather than the corners. Hence the corners started to stoop down by self weight and eventually cracked after drying as the adjacent layers could not support each other.
(1)
(2)
(3)
(4)
(1)-(3) Rhino model of the brick, (2)-(4) 3D printed brick
Modeled and printed : Shubbaam, Image Source : Ningning
4.0
Final Project : Task 3
50
Made By Robots - SUM 21
R_Lab PROTOTYPING The form helps to save up some material and supports the structure as a buttress. The edges are well supported and are printed smoothly without deforming. The only problem that we faced was to design an interlocking joinery with the bricks.
(1)
(2)
(3)
(4)
(1)-(3) Rhino model of the brick, (2)-(4) 3D printed brick
Modeled and printed : Shubbaam, Image Source : Ningning
4.0
Final Project : Task 3
51
Made By Robots - SUM 21
R_Lab PROTOTYPING The brick failed to print properly because the angle of the curve was to steep. We also observed that the water content in the clay mixture also affects its strength. As we reused some of the used clay, the water content in some mixture varied a bit. While printing few bricks with a steep curve using the clay mixture with more water content , the layers stooped downwards creating some irregularities in the print.
(1) (1) 3D printed brick-For Planter
Modeled and printed : Jia, Image Source : Ningning
4.0
Final Project : Task 3
52
Made By Robots - SUM 21
R_Lab PROTOTYPING After a lot of iterations we figured out that this curved interlocking joinery works efficiently. The curve structure supports the internal structure and we could get rid of some internal additional supports, eventually saving a lot of material. We also tried to explore the same kind of joinery detail with the adjacent brick, but after printing and stacking the bricks we realized there is no need to develop an extra joinery detail as the structure was well supported by its own self weight and downward load transfer.
(1)
(2)
(1) Rhino model of the brick, (2) 3D printed brick-For polination Modeled, printed and Image Source : Ningning
4.0
Final Project : Task 3
53
Made By Robots - SUM 21
R_Lab
(1) Brick module - Front
Image Source : Ningning
4.0
Final Project : Task 3
54
Made By Robots - SUM 21
R_Lab
(1) Brick module - Back
Image Source : Ningning
4.0
Final Project : Task 3
55
Made By Robots - SUM 21
R_Lab
(1) Brick module - Joinery Detail Image Source : Ningning
4.0
Final Project : Task 3
56
Made By Robots - SUM 21
R_Lab
(1) Planter module - Front Image Source : Ningning
4.0
Final Project : Task 3
57
Made By Robots - SUM 21
R_Lab
(1) Planter module 2
Image Source : Ningning
4.0
Final Project : Task 3
58
Made By Robots - SUM 21
R_Lab
(1) Planter Module stacked on top of each other which will be filled with soil Image Source : Ningning
4.0
Final Project : Task 3
59
Made By Robots - SUM 21
R_Lab
(1) Half corner brick module - Front Image Source : Ningning
4.0
Final Project : Task 3
60
Made By Robots - SUM 21
R_Lab
(1) Column corner detail
Image Source : Ningning
4.0
Final Project : Task 3
61
Made By Robots - SUM 21
R_Lab
(1) Column corner detail
Image Source : Ningning
4.0
Final Project : Task 3
62
Made By Robots - SUM 21
R_Lab
(1) Column corner detail
Image Source : Ningning
4.0
Final Project : Task 3
63
Made By Robots - SUM 21
R_Lab
(1) Column corner detail
Image Source : Ningning
4.0
Final Project : Task 3
64
Made By Robots - SUM 21
R_Lab
(1) Column stacking up
Image Source : Ningning
4.0
Final Project : Task 3
65
Made By Robots - SUM 21
R_Lab
(1) Column stacking up
Image Source : Ningning
4.0
Final Project : Task 3
66
Made By Robots - SUM 21
R_Lab
(1) Column stacking up
Image Source : Ningning
4.0
Final Project : Task 3
67
Made By Robots - SUM 21
R_Lab
(1) Column stacking up
Image Source : Ningning
4.0
Final Project : Task 3
68
Made By Robots - SUM 21
R_Lab
Assembly of bricks | Model by Lynn and Jia
(1) Assembly of bricks
Modeled by Lynn and Jia
4.0
Final Project : Task 3
69
Made By Robots - SUM 21 DELIVERABLES
R_Lab WHEN
Y/N
COMPLETED BY COMMENTS
0. Functions - Water, Shelter, Planter (shape and how they work?)
Y
JX
0. Water - Corner Piece?
Y
SR
0. Shelter - Material Infill - test?
Y
TZ
0. Planter - how big are the opening does it work?
Y
JX
1. Size UV Value as Overall - aesthetics + time to print one and how much clay
Y
LC
2. Size of Openings
Y
SR, TZ
3. Joinery Connection Details X3
Y
TZ YC
4. Support Design? Infill
Y
TZ
5. Material Sourcing - Bamboo, Pine, Cork, Soft Clay
Y
JX
6. Refinement of Design for Rendering
Y
LC
7. Corner Pieces - Water Collection + Column
Y
SR
8. Finalise the Design Script ready for Render/ Production
Y
TZ LC SR
Feedback 22/02 - Ryan/ Lewis i. Reduce Material in Cell Design
N
SR
ii. Scaling the Cell from Top to Bottom
Y
LC
iii. Non-Planar Layer Scripts - Tapering Effect
N
JX
iv. Resolve the Corner Piece
Y
LC SR JX
v. Connection Joining Details
Y
TZ
vi. Changing the Size of the Brick
Y
TZ
vii. Sort out the Cycle Time of Prints - Excel
Y
JX
viii. Print Volume and Time - Excel
Y
JX
x. production timelines and schedules.
Y
JX
Corner Brick - Resolve & Test
Y
SR
Grasshopper - Connection Detail
Y
TZ
Non-Planar Tests
N
LC
Join Test - Sikaflex
N
Material Reduction ended up the same Don't need it. Group decision
Feedback 25/02 - Ryan/ Lewis
Render Column
Y
LC
Planter - Shape & Connections
Y
SR
Don't need it. Group decision
SUBMISSION - DELIVERABLES Video Process Production
YC
Presentation Slides (Story, Idea, Concept, Development, Challenges, Refinement, Future)
Y
LC SR JX
1. Renders (Context, Site, Details, Perspectives)
Y
LC JX
2. Process Images
Y
TZ YC
3. Context - Site
N
4. Idea Concept
Y
JX
5. Diagrams of Tests
Y
LC JX
1:1 Fired Modules with Material Infill (Soft Clay, Bamboo, Pine)
Y
JX
Production of the 1:1 Model (1.5m)
Y
LC SR JX TZ YC
Production Timelines and Schedules
Y
LC JX
Tests, failed pieces, sketches, etc
Y
LC SR JX TZ YC
Prototypes
Y
LC SR JX TZ YC
(1) Production Derliverables Managed by : Jia (Johnny)
4.0
Final Project : Task 3
70
Made By Robots - SUM 21
R_Lab
PROJECT TIMELINE GANT CHART GROUP 01_COL Year Date
2021 8-Feb
10-Feb
Stage Duration
11-Feb
12-Feb
13-Feb
14-Feb
15-Feb
16-Feb
17-Feb
W1
Week Mon Day Project Day 1
Stage Description
9-Feb
8
14-Feb
02_Prototyping
4
18-Feb
19-Feb
20-Feb
21-Feb
22-Feb
23-Feb
24-Feb
W2
25-Feb
27-Feb
28-Feb
1-Mar
2-Mar
3-Mar
Thurs
Fri
Sat
Sun
Mon
Tues
Wed
Thurs
Fri
Sat
Sun
Mon
Tues
Wed
Thurs
Fri
Sat
Sun
Mon
Tues
Wed
Thurs
Fri
3
4
5
6
7
8
9
10
11
12
13
14
15
16
17
18
19
20
21
22
23
24
25
26
Robot Booked 5pm
Robot Booked 9am 5pm
Robot Booked 9am 5pm
Robot Booked 1pm 9pm
Robot Booked 9am 9pm
Robot Booked 9am 5pm IDEATION DEVELOPMENT
Robot Booked 1pm
Robot Booked 1pm
Robot Booked 9am
COVID CIRCUIT BREAKER PROTOTYPING X X
X X
2C_Prototype 03 - Material Reduction
X
2D_Prototype 04 - Edge Corner Detail
X
2E_Prototype 05 - Planter Modules
X REFINEMENT
20-Feb
X
3A_Connection Details
PRODUCTION
3B_Assembly + Production 3C_Production Percentage
7%
35%
8
11 Fire
3D_Hours Logged (hrs) 04_Production
3
24-Feb
05_Assembly
1
24-Feb
06_Renders
5
07_Presentation
5
Fire
Processing Time
85%
99%
11 5 Processing Time
40_Drying Time + Print Times 4A_Time vs Clay Volume + Tube Max 4B_Cycle Time to Print ASSEMBLY RENDERS PRESENTATION WIP
(1) Timeline
Managed by : Jia (Johnny)
4.0
5-Mar
W4
Wed
2B_Prototype 02 - Connection + Joinery
4
4-Mar
2
2A_Prototype 01 - Shape + Size of OpeningsShelter Modules
03_Refinement
26-Feb
W3
Tues
End Date
01_Ideation
18-Feb
TASK 03 DUE - PRESENTATION 2-5PM
8-Feb 25-Feb 3.43
Project Start Date: Project End Date: Project Duration Weeks:
Final Project : Task 3
71
Made By Robots - SUM 21
209
01/03
COMPLETE
PRINTED
01/03
DRY
PRINTED
03/03
WET
PRINTED
03/03
WET
LC YES
210
01/03
COMPLETE
PRINTED
01/03
DRY
PRINTED
01/03
DRY
PRINTED
01/03
DRY
LC YES
211
01/03
COMPLETE
PRINTED
01/03
DRY
PRINTED
01/03
DRY
PRINTED
01/03
DRY
TZ YES
212
01/03
COMPLETE
PRINTED
01/03
DRY
PRINTED
01/03
DRY
PRINTED
01/03
DRY
TZ YES
213
01/03
COMPLETE
PRINTED
01/03
DRY
PRINTED
01/03
DRY
PRINTED
01/03
DRY
TZ YES
12
COL_01 28/02
COMPLETE
PRINTED
28/02
DRY PRINTED
28/02
DRY PRINTED
28/02
DRY YC
01/03
COMPLETE
PRINTED
01/03
DRY PRINTED
01/03
DRY PRINTED
28/02
DRY TZ
103
01/03
COMPLETE
PRINTED
01/03
DRY PRINTED
01/03
DRY PRINTED
01/03
DRY TZ
YES
COMPLETE
PRINTED
02/03
DRY PRINTED
02/03
DRY PRINTED
02/03
DRY TZ
YES
105
02/03
COMPLETE
PRINTED
01/03
DRY PRINTED
02/03
DRY PRINTED
02/03
DRY TZ
YES
106
02/03
COMPLETE
PRINTED
01/03
DRY PRINTED
02/03
DRY PRINTED
02/03
DRY TZ
YES
107
COMPLETE
PRINTED
02/03
DRY PRINTED
02/03
DRY PRINTED
02/03
DRY TZ
YES
108
COMPLETE
PRINTED
02/03
DRY PRINTED
02/03
WET PRINTED
02/03
WET TZ
YES
109
COMPLETE
PRINTED
28/02
DRY PRINTED
28/02
WET PRINTED
02/03
WET TZ
YES
110
COMPLETE
PRINTED
01/03
DRY PRINTED
02/03
WET PRINTED
02/03
WET TZ
YES
111
COMPLETE
PRINTED
02/03
WET PRINTED
02/03
WET PRINTED
02/03
WET TZ
YES
112
COMPLETE
PRINTED
02/03
DRY PRINTED
02/03
DRY PRINTED
02/03
WET TZ
YES
COL_01
301
28/2
COMPLETE
PRINTED
28/02
DRY PRINTED
03/03
WET PRINTED
03/03
WET YC
YES
302
01/03
COMPLETE
PRINTED
01/03
DRY PRINTED
01/03
DRY PRINTED
01/03
DRY YC
YES
COMPLETE
PRINTED
02/03
DRY PRINTED
02/03
DRY PRINTED
02/03
DRY TZ
YES
COMPLETE
PRINTED
02/03
DRY PRINTED
02/03
DRY PRINTED
02/03
WET TZ
YES
COMPLETE
PRINTED
02/03
DRY PRINTED
02/03
DRY PRINTED
02/03
DRY TZ
YES
306
COMPLETE
PRINTED
02/03
DRY PRINTED
02/03
WET MAYBE
02/03
WET TZ
MAYBE
307
COMPLETE
PRINTED
02/03
02/03
WET PRINTED
02/03
WET TZ
YES
COMPLETE Overall Status COMPLETE
PRINTED
02/03
WET PRINTED Status WET PRINTED
02/03
WET PRINTED
02/03
MAYBE
Face A02/03
WET PRINTED
Face B02/03
WET PRINTED
Face C02/03
Quality
COMPLETE
MAYBE
02/03
02/03
WET PRINTED
02/03
COMPLETE Overall Status COMPLETE
PRINTED
02/03
WET PRINTED Status WET PRINTED
WET TZ YES File SetWET TZ up YES WET TZ YES
02/03
WET PRINTED
02/03
WET PRINTED
02/03
WET PRINTED
WET TZ File Set- YES WET TZ up YES
Quality
02/03
304
Status Production Date
Overall Status
Face A
Face B
File Setup
Face C
Quality
Brick Module
Production Date
Overall Status
Face A
COLUMN 02
Face B STATUS
DATE
305
Brick 308 Module 309
02/03
Production Date
310
Status
STATUS
DATE
File Setup
Face C
Quality
Brick 311 Module 312
Production Date
PRINTED
CORNER COLUMN 02
STATUS
DATE
YES
02/03
303
Brick Module
MAYBE
104
12
Total Maybe (/228) 10
R_Lab
101 102
Face A
STATUS
DATE
Face B
STATUS
DATE
02/03
Face C
02/03
Total Maybe (/228) 10
STATUS
DATE
201
01/03
COMPLETE
PRINTED
03/03
WET
PRINTED
28/02
DRY
PRINTED
28/02
DRY
TZ YES
d1 201
01/03
COMPLETE
PRINTED PRINTED
02/03 03/03
DRY MAYBEPRINTED WET
02/03 28/02
WET DRY PRINTED PRINTED
02/03 28/02
WET DRY SR
TZ MAYBE YES
202
01/03
COMPLETE
PRINTED
28/02
DRY
PRINTED
28/02
DRY
PRINTED
28/02
DRY
TZ YES
d2 202
01/03
COMPLETE
PRINTED PRINTED
02/03 28/02
WET DRY PRINTED PRINTED
02/03 28/02
WET DRY PRINTED PRINTED
02/03 28/02
WET DRY SR
TZ YES YES
203
01/03
COMPLETE
PRINTED
28/02
DRY
PRINTED
01/03
DRY
PRINTED
01/03
DRY
TZ YES
d3 203
01/03
PRINTED PRINTED
28/02
PRINTED
01/03
DRY
PRINTED
01/03
DRY
PRINTED
01/03
DRY
LC YES
d4 204
01/03
PRINTED PRINTED
28/02 01/03
WET DRY SR WET DRY SR
TZ MAYBE YES
COMPLETE
205
01/03
COMPLETE
PRINTED
01/03
DRY
PRINTED
01/03
DRY
PRINTED
01/03
DRY
LC YES
d5 205
01/03
PRINTED PRINTED
02/03 01/03
01/03
COMPLETE
PRINTED
03/03
WET
PRINTED
01/03
DRY
PRINTED
01/03
DRY
LC YES
d6 206
01/03
PRINTED PRINTED
02/03 03/03
02/03 01/03
01/03
COMPLETE
PRINTED
01/03
DRY
PRINTED
01/03
DRY
PRINTED
03/03
WET
LC YES
d7 207
01/03
PRINTED PRINTED
02/03 01/03
01/03
COMPLETE
PRINTED
01/03
DRY
PRINTED
01/03
DRY
PRINTED
03/03
WET
LC YES
d8 208
01/03
PRINTED PRINTED
02/03 01/03
WET SR WET SR
LC YES
208
COMPLETE COMPLETE
WET DRY PRINTED PRINTED WET DRY PRINTED PRINTED WET DRY PRINTED PRINTED
02/03 01/03
207
WET PRINTED PRINTED WET DRY PRINTED PRINTED WET DRY PRINTED PRINTED
WET DRY SR WET DRY SR
LC YES
206
COMPLETE COMPLETE
WET DRY MAYBEPRINTED WET DRY PRINTED PRINTED WET DRY PRINTED PRINTED
02/03 01/03
01/03
WET DRY MAYBEPRINTED WET DRY PRINTED PRINTED WET DRY PRINTED PRINTED
28/02 01/03
204
COMPLETE COMPLETE
209
01/03
COMPLETE
PRINTED
01/03
DRY
PRINTED
03/03
WET
PRINTED
03/03
WET
LC YES
d9 209
01/03
PRINTED PRINTED
02/03 01/03
COMPLETE
PRINTED
01/03
DRY
PRINTED
01/03
DRY
PRINTED
01/03
DRY
LC YES
d10 210
01/03
PRINTED PRINTED
02/03 01/03
211
01/03
COMPLETE
PRINTED
01/03
DRY
PRINTED
01/03
DRY
PRINTED
01/03
DRY
TZ YES
d11 211
01/03
PRINTED PRINTED
02/03 01/03
01/03
COMPLETE
PRINTED
01/03
DRY
PRINTED
01/03
DRY
PRINTED
01/03
DRY
TZ YES
d12 212
01/03
PRINTED PRINTED
02/03 01/03
02/03 01/03
01/03
COMPLETE
PRINTED
01/03
DRY
PRINTED
01/03
DRY
PRINTED
01/03
DRY
TZ YES
d13 213
01/03
COMPLETE
PRINTED PRINTED
02/03 01/03
WET DRY PRINTED PRINTED DRY PRINTED PRINTED
02/03 01/03
213
WET DRY PRINTED PRINTED DRY PRINTED PRINTED
WET DRY SR WET DRY SR
TZ YES
212
COMPLETE COMPLETE
WET PRINTED PRINTED WET DRY PRINTED PRINTED WET DRY PRINTED PRINTED
02/03 03/03
01/03
WET DRY PRINTED PRINTED WET DRY PRINTED PRINTED WET DRY PRINTED PRINTED
02/03 03/03
210
COMPLETE COMPLETE
02/03 01/03
DRY SR
TZ YES
COMPLETE COMPLETE
PRINTED
01/03 28/02
WET DRY PRINTED WET DRY PRINTED
03/03 28/02
WET DRY LC YC WET DRY LC TZ
MAYBE
01/03
WET DRY PRINTED DRY PRINTED
02/03 28/02
PRINTED
COMPLETE COMPLETE
PRINTED
02/03 01/03
03/03 01/03
WET DRY LC TZ WET DRY LC TZ
YES
03/03 02/03
WET DRY PRINTED WET DRY PRINTED
03/03 01/03
PRINTED
WET DRY PRINTED WET DRY PRINTED
COMPLETE COMPLETE
PRINTED
03/03 01/03
03/03 02/03
WET DRY LC TZ WET DRY LC TZ
YES
03/03 01/03
WET DRY PRINTED WET DRY PRINTED
03/03 02/03
PRINTED
WET DRY PRINTED WET DRY PRINTED
COMPLETE COMPLETE
PRINTED
01/03 02/03
01/03 02/03
WET DRY LC TZ WET LC TZ
YES
03/03 02/03
DRY PRINTED WET PRINTED
02/03
PRINTED
DRY PRINTED WET DRY PRINTED
COMPLETE COMPLETE
PRINTED
03/03 28/02
03/03 28/02
WET LC TZ WET LC TZ
YES
03/03 01/03
WET PRINTED WET PRINTED
03/03 02/03
PRINTED
DRY PRINTED WET DRY PRINTED
COMPLETE COMPLETE
PRINTED
03/03 02/03
03/03 02/03 03/03 02/03
03/03 02/03
WET LC TZ WET LC TZ
YES
03/03 02/03
WET PRINTED WET DRY PRINTED
03/03 02/03
PRINTED
WET PRINTED WET DRY PRINTED
COMPLETE
PRINTED
01/03
DRY PRINTED
01/03
DRY PRINTED
02/03
WET LC
PRINTED
28/02
01/03
WET PRINTED DRY PRINTED
03/03
01/03
02/03 01/03
WET YC DRY LC YC
PRINTED
01/03 02/03
DRY PRINTED DRY PRINTED DRY MAYBE PRINTED
03/03
PRINTED
02/03
COMPLETE COMPLETE COMPLETE
PRINTED
01/03 02/03
02/03
COMPLETE COMPLETE
PRINTED
01/03 02/03
COMPLETE COMPLETE
PRINTED
01/03 02/03
PRINTED
01/04 02/03
COMPLETE COMPLETE
PRINTED
01/05 02/03
PRINTED MAYBE
01/06 02/03
COMPLETE COMPLETE
PRINTED MAYBE
01/07 02/03
PRINTED
01/08 02/03
COMPLETE COMPLETE
PRINTED
02/03
MAYBE
12
12
COL_01
101
28/02
COMPLETE
PRINTED
28/02
DRY PRINTED
28/02
DRY PRINTED
28/02
DRY YC
MAYBE
L01 101
28/02
01/03
COMPLETE
PRINTED
01/03
DRY PRINTED
01/03
DRY PRINTED
28/02
DRY TZ
YES
L02 102
01/03
103
01/03
COMPLETE
PRINTED
01/03
DRY PRINTED
01/03
DRY PRINTED
01/03
DRY TZ
YES
L03 103
01/03
104
02/03
COMPLETE
PRINTED
02/03
DRY PRINTED
02/03
DRY PRINTED
02/03
DRY TZ
YES
L04 104
02/03
105
02/03
COMPLETE
PRINTED
01/03
DRY PRINTED
02/03
DRY PRINTED
02/03
DRY TZ
YES
L05 105
02/03
106
02/03
COMPLETE
PRINTED
01/03
DRY PRINTED
02/03
DRY PRINTED
02/03
DRY TZ
YES
L06 106
02/03
107
COMPLETE
PRINTED
02/03
DRY PRINTED
02/03
DRY PRINTED
02/03
DRY TZ
YES
L07 107
108
COMPLETE
PRINTED
02/03
DRY PRINTED
02/03
WET PRINTED
02/03
WET TZ
YES
L08 108
109
COMPLETE
PRINTED
28/02
DRY PRINTED
28/02
WET PRINTED
02/03
WET TZ
YES
L09 109
110
COMPLETE
PRINTED
01/03
DRY PRINTED
02/03
WET PRINTED
02/03
WET TZ
YES
L10 110
111
COMPLETE
PRINTED
02/03
WET PRINTED
02/03
WET PRINTED
02/03
WET TZ
YES
L11 111
112
COMPLETE
PRINTED
02/03
DRY PRINTED
02/03
DRY PRINTED
02/03
WET TZ
YES
L12 112 L13 12
COL_01
301
28/2
COMPLETE
PRINTED
28/02
DRY PRINTED
03/03
WET PRINTED
03/03
WET YC
YES
301
302
01/03
COMPLETE
PRINTED
01/03
DRY PRINTED
01/03
DRY PRINTED
01/03
DRY YC
YES
R01 302
COMPLETE
PRINTED
02/03
DRY PRINTED
02/03
DRY PRINTED
02/03
DRY TZ
YES
R02 303
COMPLETE
PRINTED
02/03
DRY PRINTED
02/03
DRY PRINTED
02/03
WET TZ
YES
R03 304
COMPLETE
PRINTED
02/03
DRY PRINTED
02/03
DRY PRINTED
02/03
DRY TZ
YES
R04 305
306
COMPLETE
PRINTED
02/03
DRY PRINTED
02/03
WET MAYBE
02/03
WET TZ
MAYBE
R05 306
307
COMPLETE
PRINTED
02/03
WET PRINTED
02/03
WET PRINTED
02/03
WET TZ
YES
R06 307
308
COMPLETE
PRINTED
02/03
WET PRINTED
02/03
WET PRINTED
02/03
WET TZ
YES
R07 308
309
COMPLETE
MAYBE
02/03
WET PRINTED
02/03
WET PRINTED
02/03
WET TZ
YES
R08 309
310
COMPLETE
MAYBE
02/03
WET PRINTED
02/03
WET PRINTED
02/03
WET TZ
YES
R09 310
311
COMPLETE
PRINTED
02/03
WET PRINTED
02/03
WET PRINTED
02/03
WET TZ
YES
R10 311
312
COMPLETE
PRINTED
02/03
WET PRINTED
02/03
WET PRINTED
02/03
WET TZ
YES
R11 312
303
02/03
304 305
02/03
R12
CORNER
02/03 01/03 02/03 01/03 02/03 01/03 02/03 01/03 02/03 01/03 02/03 01/03
02/03 01/03 02/03 01/03 02/03 03/03 02/03 03/03 02/03 01/03 02/03 01/03
WET SR WET DRY SR
LC YES LC YES LC YES LC YES LC YES TZ YES
Edge Pieces (Left) COL_01
102
12
28/02 01/03
COL_01 Edge Pieces (Right) 28/2 01/03
CORNER
02/03 01/03 03/03 02/03 03/03 02/03 03/03 02/03 03/03 02/03
03/03 28/02 03/03 02/03 03/03 02/03 03/03 02/03 03/03 02/03
DRY PRINTED DRY PRINTED
28/02 02/03
DRY PRINTED DRY PRINTED WET MAYBE
02/03
DRY PRINTED WET DRY PRINTED WET
02/03
DRY PRINTED WET DRY MAYBE WET PRINTED
02/03 02/03
02/03
DRY PRINTED WET DRY PRINTED WET
02/03
01/03 02/03
DRY PRINTED DRY PRINTED
02/03
DRY PRINTED DRY PRINTED WET
01/03 02/03
DRY PRINTED WET DRY PRINTED WET
01/05 02/03
DRY PRINTED WET DRY PRINTED WET
01/07 02/03
02/03
DRY PRINTED WET DRY PRINTED
02/03 01/04 02/03 01/06 02/03 01/08 02/03
YES YES YES YES YES YES YES YES
WET DRY LC TZ DRY LC WET TZ
MAYBE YES
WET DRY LC TZ DRY LC WET TZ
YES
WET LC TZ WET LC TZ
YES
WET LC TZ DRY LC WET TZ
YES YES
02/03
WET LC TZ WET LC TZ
DRY PRINTED
02/03
WET LC
YES
02/03 02/03 02/03 02/03
YES YES MAYBE YES MAYBE YES YES
d1
COMPLETE
PRINTED
02/03
DRY MAYBE
02/03
WET PRINTED
02/03
WET SR
MAYBE
R13 d1
COMPLETE
PRINTED
01/03 02/03
DRY PRINTED MAYBE
01/03 02/03
DRY MAYBE WET PRINTED
02/03
DRY LC WET SR
MAYBE
d2
COMPLETE
PRINTED
02/03
WET PRINTED
02/03
WET PRINTED
02/03
WET SR
YES
d2
COMPLETE
PRINTED
02/03
WET PRINTED
02/03
WET PRINTED
02/03
WET SR
YES
d3
COMPLETE
PRINTED
28/02
WET MAYBE
28/02
WET MAYBE
02/03
WET SR
MAYBE
d3
COMPLETE
PRINTED
28/02
WET MAYBE
28/02
WET MAYBE
02/03
WET SR
MAYBE
d4
COMPLETE
PRINTED
28/02
WET PRINTED
28/02
WET PRINTED
02/03
WET SR
YES
d4
COMPLETE
PRINTED
28/02
WET PRINTED
28/02
WET PRINTED
02/03
WET SR
YES
d5
COMPLETE
PRINTED
02/03
WET PRINTED
02/03
WET PRINTED
02/03
WET SR
YES
d5
COMPLETE
PRINTED
02/03
WET PRINTED
02/03
WET PRINTED
02/03
WET SR
YES
d6
COMPLETE
PRINTED
02/03
WET PRINTED
02/03
WET PRINTED
02/03
WET SR
YES
d6
COMPLETE
PRINTED
02/03
WET PRINTED
02/03
WET PRINTED
02/03
WET SR
YES
d7
COMPLETE
PRINTED
02/03
WET PRINTED
02/03
WET PRINTED
02/03
WET SR
YES
d7
COMPLETE
PRINTED
02/03
WET PRINTED
02/03
WET PRINTED
02/03
WET SR
YES
d8
COMPLETE
PRINTED
02/03
WET PRINTED
02/03
WET PRINTED
02/03
WET SR
YES
d8
COMPLETE
PRINTED
02/03
WET PRINTED
02/03
WET PRINTED
02/03
WET SR
YES
d9
COMPLETE
PRINTED
02/03
WET PRINTED
02/03
WET PRINTED
02/03
WET SR
YES
d9
COMPLETE
PRINTED
02/03
WET PRINTED
02/03
WET PRINTED
02/03
WET SR
YES
d10
COMPLETE
PRINTED
02/03
WET PRINTED
02/03
WET PRINTED
02/03
WET SR
YES
d10
COMPLETE
PRINTED
02/03
WET PRINTED
02/03
WET PRINTED
02/03
WET SR
YES
d11
COMPLETE
PRINTED
02/03
WET PRINTED
02/03
WET PRINTED
02/03
WET SR
YES
d11
COMPLETE
PRINTED
02/03
WET PRINTED
02/03
WET PRINTED
02/03
WET SR
YES
d12
COMPLETE
PRINTED
02/03
WET PRINTED
02/03
WET PRINTED
02/03
WET SR
YES
d12
COMPLETE
PRINTED
02/03
WET PRINTED
02/03
WET PRINTED
02/03
WET SR
YES
d13
COMPLETE
PRINTED
02/03
DRY PRINTED
02/03
DRY PRINTED
02/03
DRY SR
YES
d13
COMPLETE
PRINTED
02/03
DRY PRINTED
02/03
DRY PRINTED
02/03
DRY SR
YES
(1) Production Timeline
Edge Pieces (Left)
Edge Pieces (Left)
01/03
WET PRINTED
02/03
WET PRINTED
03/03
WET LC
L01
COMPLETE
PRINTED
01/03
WET PRINTED
02/03
WET PRINTED
03/03
WET LC
L02
COMPLETE
PRINTED
01/03
DRY PRINTED
02/03
WET PRINTED
03/03
WET LC
L02
COMPLETE
PRINTED
01/03
DRY PRINTED
02/03
WET PRINTED
03/03
WET LC
L03
COMPLETE
PRINTED
02/03
WET PRINTED
03/03
WET PRINTED
03/03
WET LC
L03
COMPLETE
PRINTED
02/03
WET PRINTED
03/03
WET PRINTED
03/03
WET LC
L04
COMPLETE
PRINTED
03/03
WET PRINTED
03/03
WET PRINTED
03/03
WET LC
L04
COMPLETE
PRINTED
03/03
WET PRINTED
03/03
WET PRINTED
03/03
WET LC
L05
COMPLETE
PRINTED
03/03
WET PRINTED
03/03
WET PRINTED
03/03
WET LC
L05
COMPLETE
PRINTED
03/03
WET PRINTED
03/03
WET PRINTED
03/03
WET LC
L06
COMPLETE
PRINTED
03/03
WET PRINTED
03/03
WET PRINTED
03/03
WET LC
L06
COMPLETE
PRINTED
03/03
WET PRINTED
03/03
WET PRINTED
03/03
WET LC
L07
COMPLETE
PRINTED
01/03
DRY PRINTED
01/03
DRY PRINTED
02/03
WET LC
L07
COMPLETE
PRINTED
01/03
DRY PRINTED
01/03
DRY PRINTED
02/03
WET LC
L08
COMPLETE
PRINTED
03/03
WET PRINTED
03/03
WET PRINTED
03/03
WET LC
L08
COMPLETE
PRINTED
03/03
WET PRINTED
03/03
WET PRINTED
03/03
WET LC
L09
COMPLETE
PRINTED
03/03
DRY PRINTED
03/03
WET PRINTED
03/03
WET LC
L09
COMPLETE
PRINTED
03/03
DRY PRINTED
03/03
WET PRINTED
03/03
WET LC
L10
COMPLETE
PRINTED
03/03
WET PRINTED
03/03
WET PRINTED
03/03
WET LC
L10
COMPLETE
PRINTED
03/03
WET PRINTED
03/03
WET PRINTED
03/03
WET LC
L11
COMPLETE
PRINTED
03/03
WET PRINTED
03/03
WET PRINTED
03/03
WET LC
L11
COMPLETE
PRINTED
03/03
WET PRINTED
03/03
WET PRINTED
03/03
WET LC
L12
COMPLETE
PRINTED
03/03
WET PRINTED
03/03
WET PRINTED
03/03
WET LC
L12
COMPLETE
PRINTED
03/03
WET PRINTED
03/03
WET PRINTED
03/03
WET LC
COMPLETE
PRINTED
01/03
DRY PRINTED
01/03
DRY PRINTED
02/03
WET LC
L13
COMPLETE
PRINTED
01/03
DRY PRINTED
01/03
DRY PRINTED
02/03
WET LC
COMPLETE
L01
PRINTED
Managed by : Lynn and Ningning
4.0
Final Project : Task 3
L13
Edge Pieces (Right)
Edge Pieces (Right)
72
Made By Robots - SUM 21
R_Lab
PRODUCTION SCHEDULE CHART GROUP 01_COL Clay Usage Estimate Calculator Printed Module
Clay Tube 673835
Volume cubic millimeters (mm3) Contour Layer Height (mm)
5
Pipe Diameter (mm)/ Sweep1
Volume (mm3)
7
mm3 to kg
- Minus Minimum End (%)
1000000
- Est Non-Printable Volume (mm3)
2.5
Clay Density (kg) Total Kilograms (kg/mm3)
Brick Number
Weight (kg)
Total Printable Volume (mm3) No. of Prints in One Tube
1.685
Kilograms (kg/mm3)
Volume
To print with
Comments
No. of tubes per face 4.8
11
1920000 0.1 192000
Each tube 2-5 bricks
1728000 2.6
Calc (excess)
0.754
301480.99 R1, R07, R13
R02
0.981
392212.09
R03
0.989
395701.81 R03, R11 + R4, R10 R03, R11, R05, R09
R04
0.977
390760.02
4,10
R05
0.924
369773.26
5,9
R06
0.924
369696.96
6,8
R07
0.925
369875.97
R08
0.925
370026.07
R09
0.925
369958.80
R10
0.924
R11
All to be printed on one board
List to Print
1728000
R01
Notes
Tube no.
Brick no. (Estimate)
Tube 1
209, 210, R01, L01
209, 210, R01
R01 - same board as R07, R13
Tube 2
208 x3
208, 208
^ There is alr a board with R07 on it & another with R13
Tube 3
205, 213, R02, R06
205, 213, R02, R06
R13 - same board as R07 & R01 above.
Tube 4
R05, R07, R08, R09, R13 R08, R05, R09, R07
102, 103
65130.73
209, 210, R01
2, 12 202745.20 3,11
R10, L07, L13, R13
Brick no. (Actual)
L07, L13 - same board as L01.
Tube 5
209, 210
Last of each brick
Tube 6
R03, R04, L02
R03 - Same board as R11
Tube 7
R04 - same board as R10
Tube 8
R10, R11, L07, L09, L13
R10, L07, L13, L09, R13
205, 206
Tube 9
102, 103
102, 103
369454.32
203, 204
Tube 10
102, 102
102, 102
0.923
369338.65
206, 207, 213
Tube 11
209, 210, R01
R01, 209, 210
R12
0.902
360981.94
203, 204
Tube 12
R10, L07, L13, L09, R13
R13, R10, L07, L13
R13
0.596
238318.28
203, 204, R4
Tube 13
102, 102, 110
102, 102
207, 207
Tube 14
L01
0.754
301480.99
103, 103
Tube 15
209, 210, R01
209, 210
L02
0.981
392212.09
211, 211, 211, 212
207, 209
Tube 16
221, R03, R04, L02
R03, R04, L02
L03
0.989
395701.81
Tube 17
205, 206, 213
205, 206
L04
0.977
390760.02
113 not possible to print
Tube 18
203, 204
204, 203
1, 7, 13
Start here --->
105, 105 106, 106
R06, 205, 213, R02 R07, R05, R09, R08
110
L05
0.924
369773.26
104, 104
113 not possible to print
Tube 19
206, 207, 213
206, 207, 213
0.924
369696.96
104, 104
113 not possible to print
Tube 20
203, 204, R04
203, 204, R04
R03, R11 + R4
R03, R11 - one board (already nested)
Tube 21
203, 204
203, 204
^ R4 + R10 - one board (already nested)
Tube 22
207, 207
207, 207
L07
0.925
369875.97
L08
0.925
370026.07
L09
0.925
369958.80
104, 104, D13, D13
113 not possible to print
Tube 23
103, 103
103, 103
R03, R11 + R05, R09
R03, R11 - one board (already nested)
Tube 24
211, 211, 2111, 212
211, 211, 2111, 212
103, 107, D13
Tube 9
211, R03, R04, L02
105, 105, R13
Tube 7
202,203, L03
L10
0.924
369454.32
0.923
369338.65
L12
0.902
360981.94
L13
0.596
238318.28
x2 x2
206, 208, L01
206, 208, 212
L06
L11
10 min
^ R05 + R09 - one board (already nested) D1, D2
715165.36
201
1.478
591379.66
105, 106
Tube 8
207, L04, L05, L08
202
1.685
673835.00
106, 106, R12
Tube 11
204, L12, ++
203
1.645
658190.60
107, 107, R4
Tube x
102, 203, L3
204
1.630
651852.70
Tube 6
R12, L06, L10, L11
203, 204
417956.70
107, 107, 112
205
1.525
610028.30
205, 206, 213
170109.99
108, 108, R10
206
1.492
596735.20
206, 207, 213
194422.19
108, 108, R12
207
1.464
585716.10
108, 102, R02
208
1.439
575565.80
109, 109, 109
209
1.409
563677.30
109, 109, 109
210
1.379
551714.40
109, 110, 110, 112
D4, D3
211
1.362
544875.10
D6, D6
D3, D2
212
1.333
533331.40
D6, D7, L01
D1, D2, R01
213
0.878
351126.51
D7, D7, L01
D1, D6, D05
D8, D8
D05, D05, 112
D8, D8 (reprint)
D9, D9, R07
101
1.478
591379.66
102
1.685
673835.00
177118.21
D09, D10, D10
103
1.645
658190.60
484093.30
D10, D11, D11
104
1.630
651852.70 104, 104, 113
424294.60
L13
105
1.525
610028.30
106
1.492
596735.20 106, 106, 113
534529.60
107
1.464
585716.10
556567.80
108
1.439
575565.80 108, 108, R10
31993.30
109
1.409
563677.30
36968.10
110
1.379
551714.40
R6, R8
111
1.362
544875.10
R1, R7, R13 + R2, R12
112
1.333
533331.40
301
1.478
591379.66
R10 - same board as R4
D11, D12, D12
1727789 175958.08
R1, R7, R13 - All on one board (already nested, hole on window side) ^ R2, R12 - also on one board, hole on window side
(1) Production and Print optimization. Calculated how much clay needed per print + which bricks to print together in order to maximize clay & print time. 302
1.685
673835.00
303
1.645
658190.60
304
1.630
651852.70
305
1.525
610028.30
306
1.492
596735.20
307
1.464
585716.10
308
1.439
575565.80
309
1.409
563677.30
310
1.379
551714.40
311
1.362
544875.10
312
1.333
533331.40
Managed by : Lynn
4.0 D01 D02
Final Project : Task 3
73
Made By Robots - SUM 21
R_Lab
Final Renders of the Column
4.0
Final Project : Task 3
74
Made By Robots - SUM 21
R_Lab
Final Renders of the Column
4.0
Final Project : Task 3
75
Made By Robots - SUM 21
R_Lab
Final Renders of the Column
4.0
Final Project : Task 3
76
Made By Robots - SUM 21
R_Lab
Final Renders of the Column
4.0
Final Project : Task 3
77
Made By Robots - SUM 21
R_Lab
Final Renders of the Column
4.0
Final Project : Task 3
78
Made By Robots - SUM 21
5.0
Precedents
R_Lab
79
Made By Robots - SUM 21
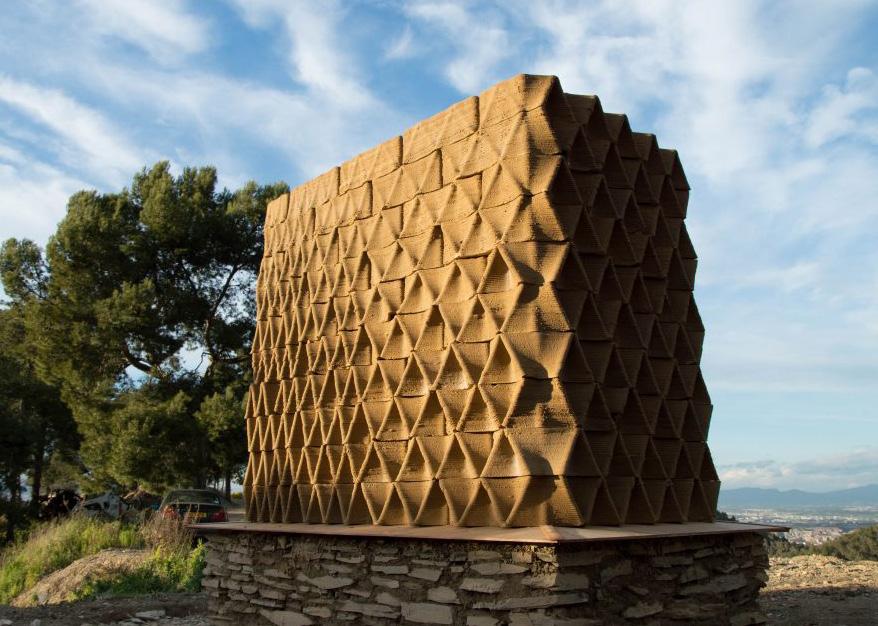
R_Lab TERRAPERFORMA Terraperforma is a project by IAAC developed at an open thesis fabrication in 2017. The project combines Robotic fabrication, OnSite Printing and Printing with Clay. CRITICAL ANALYSIS Form The projections cast shadows on the niches thus lowering the heat gain by the wall and the internal waffles create air gaps to reduce heat gain. Function A series of physical tests and digital simulations were carried out for wall prototype with respect to solar radiation; day-light; thermal conductivity, convection & mass; and Structural Behavior.
(1) TerraPerforma, Needlab, 2017
Source: https://www.needlab.org/terraperforma
5.0
Precedent - 1
Material A perfect ratio ofmaterial such as hexametaphosphate,water and gelatin were added to clay to make a composite mixture. This added strength and reduced the drying period of the mixture.
80
Made By Robots - SUM 21
R_Lab Tools and Digital Softwares RHINO CFD, Ladybug, Karamba Softwares were used to simulate wind, sun and structural behaviour. The team also developed machines, such as Hygrothermal Monitoring Apparatus and the Load Machine, to pursue further studies. Structure The form of the bricks create an interlocking structure, and the internal ribs in the bricks add to its strength. Hence no additional reinforcements are required as supports. The structure is load bearing and self supported.
(2) TerraPerforma, Needlab, 2017
Source: https://www.needlab.org/terraperforma
5.0
Precedent - 1
Innovation/Exploration A series of physical tests and digital simulations were carried out for wall prototype with respect to solar radiation; day-light; thermal conductivity, convection & mass; and Structural Behavior. These tests helped to understand the potentials of clay as a material and its properties under varied conditions.
81
Made By Robots - SUM 21
R_Lab Printing Perforation Microperformations are created through a continuous line through the infill layer print, which at one point in the trajectory gets deviated thus creating an opening (Fig 3).
(3)
(4)
(5)
(6)
Limitations/ Future Opportunity Something to rethink is that, can a composite brick be created using the voids inside the brick to infill with insulating materials, thus reducing the thickness of the bricks.
(3) Brick structure, (4) Manufacturing and Assembly of bricks, (5) Perforations in brick, (6) Dried bricks Source: https://www.needlab.org/terraperforma
5.0
Precedent - 1
82
Made By Robots - SUM 21
R_Lab TRIPLE ‘S’ Siam Research and Innovation Company (SRI) is a Thailand-based cement manufacturer that has been developing innovations to push the limits of 3D printing in architecture. Their project ‘Triple S’ was developed in the year 2017. CRITICAL ANALYSIS Form The form was based on traditional Thai craftsmanship to generate idea for surface and structure together. It was a fusion of design and structure carefully thought through exploring potentials of 3D printing. Function The structure was not designed just to explore the aesthetical artistic feature but to also serves the function of a shelter.
Triple S , Siam Research and Innovation Company (SRI), 2017 Source: https://www.archdaily.com/887403/3d-printing-fuses-thai-craftsmanship-to-create-habitable-concretestructures
5.0
Precedent - 2
Material A mixture of concrete was used print the entire structure.
83
Made By Robots - SUM 21
R_Lab Innovation/Exploration The complexity of cementitious material technology is applied allowing for less weight compared to a traditional fabrication unit such as precast. This will reduce the use of material and makes it a more sustainble technique.
(1)
(2)
(4)
(3)
(1) Concept Derivation, (2) 3D robotic printing using concrete, (3) Concrete panels joint together, (4) Entire structure
assembled together. Source: https://www.archdaily.com/887403/3d-printing-fuses-thai-craftsmanship-to-createhabitable-concrete-structures
5.0
Precedent - 2
Structure The inner truss is designed for structural purpose in order to withstand the load. After printing, the 3D printing concrete panel is fabricated with the pattern and serves as a structure for holding its weight. After fabrication, the weaving pattern of final module acts as a truss for structural purposes. The hollow parts can house the conduits and piping needed for the shelter. Limitations/Future Opportunity As concrete is a fast setting and non reuseable material, there is no scope for errors and reprinting. Could these forms and patterns be achieved in more natural materials like clay could be the next challenge.
84
Made By Robots - SUM 21
R_Lab SALTYGLOO Created by Emerging Objects founders, Ronald Rael and Virginia San Fratello, the Saltygloo is an artistic experiment in using 3D printing technology and additive manufacturing techniques to turn local materials into resilient structures. CRITICAL ANALYSIS Form The doubly curved form of the Saltygloo is drawn from the forms found in the Inuit igloos. Function It looks like a pavilion or can be used as a partition wall that is translucent and the modularity gives the ease of form.
Saltygloo, Emerging Objects,2013 Source: http://emergingobjects.com/project/saltygloo/
5.0
Precedent - 3
Material The Saltygloo is made of a combination of salt harvested from the San Francisco Bay and glue, a “salty glue”. It is an ideal 3D printing material, as it is strong, waterproof, lightweight, translucent and inexpensive.
85
Made By Robots - SUM 21
R_Lab Innovation/Exploration The makers tried to explore the translucent qualities of the material (a product of the fabrication process and the properties of natural salt). This allows natural light to penetrate in the internal space, which highlights the assembly and structure.
(1)
(2)
Structure The panels are connected together to form a rigid shell, further supported with lightweight aluminium rods flexed in tension. Limitations The scaling up of the module can be challenging considering the brittle properties of salt.
(4)
(3)
(1) Translucent light penetrating inside, (2) Alunimium rods for support , (3)-(4) Saltygloo modular panel
Source: http://emergingobjects.com/project/saltygloo/
5.0
Precedent - 3
86
Made By Robots - SUM 21
R_Lab GAIA HOUSE WASP, a 3D printing studio based out of Italy, have produced a fullscale residential prototype project, named Gaia House made up of natural ans waste materials. CRITICAL ANALYSIS Form The printing of material based on raw earth, straw and rice husk is controlled through articulated weaves able to confer at the same time construction stability and geometric pattern variation along the entire wall development. Function The project aims to create a template for mass-produced biodegradable, sustainable, cost effective and structurally efficient structures.
Gaia House, Wasp, 2018 Source: https://www.3dwasp.com/en/3d-printed-house-gaia/
5.0
Precedent - 4
Material Natural waste materials such as vegetable fibers compiled of 25% local soil, 40% straw chopped rice, 25% rice husk, and 10% hydraulic lime, made workable through the use of a wet pan mill.
87
Made By Robots - SUM 21
R_Lab Innovation/Exploration It has been designed with the aim of integrating natural ventilation systems and thermo-acoustic insulation systems in one solution. The voids on the outer surface (Fig 2) provides moment of air to reduce heat gain and rise husks were poured into the cavities to insulate the structure.
(1)
(2)
(4)
(3)
(1) 3D visualization explaining the structural behaviour, (2) Wall detail(Plan), (3) Crane and truss installation for printing, (4) Rice husk poured in cavity as insulation
Structure The walls are 435 mm thick with cavity created with weaved structure that add to the support. The complete structure is load bearing with wooden frame as support for roof. Wooden sill and lintels are installed for doors and window openings. Limitations A big crane and support are needed for construction and it to be difficult to fabricated indoors. A continuous supply of material is required to print. Special care to be taken about climatic conditions as it might affect the strength of the clay mixture.
Source: https://www.3dwasp.com/en/3d-printed-house-gaia/
5.0
Precedent - 4
88
Made By Robots - SUM 21
R_Lab BUILDING BYTES Brian Peters, (co-founder of Amsterdam-based Design Lab Workshop) research examined the process of creating “ceramics at the scale of architecture” while working with fixed limitations such as storage systems and the size of a desktop 3D printer. CRITICAL ANALYSIS Form The advantage of the form is that the bricks can be stacked vertically to create a solid wall, or can be stacked horizontally to create a porosity like a partition wall. Function Peters testing of fabrication process was focused on the uniformity of bricks printed multiple times and variations in relation to a specific form (such as a dome).
Building Bytes, Design Lab Workshop Source: https://architizer.com/blog/practice/materials/another-rapid-prototyping-feat-ceramic-bricks-made-with-3dprinters/
5.0
Precedent - 5
Material The material used for printing is the liquid earthenware recipe, normally used in mould-making, to create a series of ceramic bricks.
89
Made By Robots - SUM 21
R_Lab Innovation/Exploration The focus of the workshop was to explore different kinds of bricks, that would help create different kinds of form, even with the modular rigidity they possess.
(1)
(2)
(4)
(3)
Structure The brick modules can be stacked in a vertical and horizontal position and can also be staggereged to reduce continuous vertical joints. The wall made using these bricks can be load bearing and can stand unsupported without reinforcement. The interlocking of the bricks provide stability against any lateral forces on the wall. Limitations As the bricks are modular and repetitive, it is a constant form the can be generated. The full potential of 3D printing could be further explored using advanced computational parametric tools to generate a less monotonous form having the same function.
(1) Brick explorations, (3) Verical and horizontal brick stacking, (3) Interlocking brick type A , (4) Interlocking brick type B.
Source: https://architizer.com/blog/practice/materials/another-rapid-prototyping-feat-ceramic-bricks-made-with-3dprinters/
5.0
Precedent - 5
90
Made By Robots - SUM 21
R_Lab QUAKE COLUMN Brian Peters, (co-founder of Amsterdam-based Design Lab Workshop) research examined the process of creating “ceramics at the scale of architecture” while working with fixed limitations such as storage systems and the size of a desktop 3D printer. CRITICAL ANALYSIS Form The advantage of the form is that the bricks can be stacked vertically to create a solid wall, or can be stacked horizontally to create a porosity like a partition wall. Function Peters testing of fabrication process was focused on the uniformity of bricks printed multiple times and variations in relation to a specific form (such as a dome).
Quake Column, Emerging Objects Source: http://emergingobjects.com/project/quake-column/
5.0
Precedent - 6
Material The material used for printing is the liquid earthenware recipe, normally used in mould-making, to create a series of ceramic bricks.
91
Made By Robots - SUM 21
R_Lab Innovation/Exploration The focus of the workshop was to explore different kinds of bricks, that would help create different kinds of form, even with the modular rigidity they possess.
(1)
(2)
(3)
(5)
(4)
Structure The brick modules can be stacked in a vertical and horizontal position and can also be staggereged to reduce continuous vertical joints. The wall made using these bricks can be load bearing and can stand unsupported without reinforcement. The interlocking of the bricks provide stability against any lateral forces on the wall. Limitations As the bricks are modular and repetitive, it is a constant form the can be generated. The full potential of 3D printing could be further explored using advanced computational parametric tools to generate a less monotonous form having the same function.
(1) Brick explorations, (2)-(4) Verical and horizontal brick stacking, (4) Brick numbering, (5) Brick interlocking joints
Source: http://emergingobjects.com/project/quake-column/
5.0
Precedent - 6
92
Made By Robots - SUM 21
R_Lab CABIN OF CURIOSITIES The 3D printed cabin brings many of ‘Emerging Objects’ material, software, and hardware experiments together to demonstrate the architectural potential of manufacturing a weather tight structurally sound building. CRITICAL ANALYSIS Form Designed in a shape of a simple house this cabin house has a green planter wall and shingle like printed modules on the top and sides to make the structure weather tight. Function Emerging Objects used the relaxed codes of Oakland government for experimenting backyard cottages towards addressing housing problems at a micro scale.
Cabin of 3D Printed Curiosities, Emerging Objects, 2018 Source: http://emergingobjects.com/project/cabin-of-3d-printed-curiosities/
5.0
Precedent - 7
Material Several different materials are used, including shades of portland cement, sawdust, chardonnay pomace, and combinations thereof.
93
Made By Robots - SUM 21
R_Lab Innovation/Exploration This is one of a kind of structure that uses different kinds of modular pieces whose form serve the purpose. Each tile is unique as a product of fabrication, during which the tiles wave back and forth creating loops which produce a distinct machine-made texture that is different every time.
(1)
(2)
(4)
(3)
(1) Succulent Wall, (2) 3D Printed ceramic tiles on roof and facade, (3) Seed Stitch pattern on tile , (4) Internal chroma curl
wall. Source: http://emergingobjects.com/project/cabin-of-3d-printed-curiosities/
5.0
Precedent - 7
Structure The roof and contiguous facades to the gable are clad in a 3D printed ceramic rain screen of seed stitch tiles which are mounted on a series of battens. Its a framed structure with 3D printed components as cladding. The interior is clad with the Chroma Curl Wall which illuminates the interiors and exterior. Limitations/Future Opportunity The explorations can extend to house native plants with a deeper understanding of plants which could help the animal species as well. A irrigation system could be incorporated in design to water the plants automatically.
94
Made By Robots - SUM 21
R_Lab ARTIFICIAL REEF STRUCTURES The project was commissioned by the Department of Agriculture, Fisheries, and Conservation (AFCD), and is part of coral restoration project in the Hoi Ha Wan Marine Park in Hong Kong. CRITICAL ANALYSIS Form A tailored algorithm was used to print the biomimicry patterns integrated with spaces for securing coral fragments. Function The project team from HKU used 3D printing technology to engineer structures that can be customized for specific locations with different environmental challenges, thus enhancing the success of the ecological restoration.
Artificial Reef Structures, University of Hong Kong Swire Institute of Marine Science, 2020 Source: https://www.archdaily.com/947495/rethinking-artificial-reef-structures-through-3d-clay-printing
5.0
Precedent - 8
Material Terracotta was used to print the 3D printed coral reef as it is a natural material which helps organisms to grow on surface. It was fired at 1125 degrees Celsius.
95
Made By Robots - SUM 21
R_Lab Innovation/Exploration The team of marine biologists and architects had developed a series of 3D printed terracotta reef structures to assist in coral restoration, providing structurally complex substrates in a degraded area thus helping the aquatic species.
(1)
(2)
(4)
(3)
Structure The structure was printed in two parts to make the base porous making it easy for the reef to grow and to avoid sedimentation built up. The first layer of triangulation pattern acts as a base surface for the artificial coral reef bed. Column like supports are created to act as footing for the artificial coral reefs. Future Opportunity These ideas can be explored in various parts of natural settings and climatic conditions which could help protect and preserve the rare plant and animal species.
(1) 3D visualization in Rhino , (2) Visualization of coral cluster, (3) Stages of 3D printing , (4) A cluster of printed coral reef.
Source: https://www.archdaily.com/947495/rethinking-artificial-reef-structures-through-3d-clay-printing
5.0
Precedent - 8
96
Made By Robots - SUM 21
R_Lab REFELCTION AND INSPIRATION The potentials and applications of 3D printing are vast and a lot of research and development is carried out for its uses in various industries.
(1)
(2)
(4)
(3)
3D printed bricks allow flexibilty of form and paramteric forms can be printed using computational means. This helps generate a nonmonontonous surfaces which can be used for a specific function or aesthetical beauty. (Assignment 2 explores these factors of clay printing). The potentials of 3D printing can be explored using different types of materials, but clay is a environmentally sustainable option. As clay is a natural material, it blends with nature and can be used to create structures that can help the ecosystem. (Assignment 3 takes inspiration from ideas that can create a symbiotic environment for the flora and fauna).
(1) Project: Terraperforma , (2) Project: Triple S , (3) Project: Cabin of Curiosities , (4) Project: Artificial Reef Structures
5.0
Precedent
97
Made By Robots - SUM 21
R_Lab CONCLUSION In conclusion, it has been a rewarding journey to design and construct a self supporting column that fuses aesthetics and purpose. It not only uses the digital tools to the best of their potential but also help to create a natural ecosystem. Through weeks of prototyping and testing, we have come a long, pushing the boundaries of 3D Printing using robotics and clay and have learnt immensely about the properties of material and the potentials of using digital tools and robotics in architecture. I would like to thank my tutors, Ryan Pennings and Lewis Edwards for their continuous support. Their insights have really helped us shape our ideas into reality. I would also like to thank my group mates, Xiong and Andy (Task 2) and Lynn, Johnny, Tammy and Yichen (Task 3). It was a pleasure to work with all of them and great way to learn new ideas, strategies and teamwork.
98