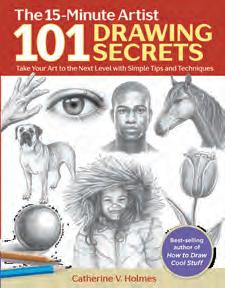
The Quick and Easy Way to Draw Faces, Figures, and More

The Quick and Easy Way to Draw Faces, Figures, and More


Get Creative 6
An imprint of Mixed Media Resources, LLC
19 W 21st St, Suite 601, New York, NY 10010
Editors
RACHEL CHLEBOWSKI
GLENI BARTELS
Creative Director
IRENE LEDWITH
Art Director
FRANCESCA PACCHINI
Chief Executive Officer
CAROLINE KILMER
President
ART JOINNIDES
Chairman JAY STEIN
Copyright © 2024 by Catherine V. Holmes
All rights reserved. No part of this publication may be reproduced or used in any form or by any means—graphic, electronic, or mechanical, including photocopying, recording, or information storage-and-retrieval systems—without permission of the publisher.
The written instructions, photographs, designs, projects, and patterns are intended for the personal, noncommercial use of the retail purchaser and are under federal copyright laws; they are not to be reproduced in any form for commercial use. Permission is granted to photocopy for the personal use of the retail purchaser.
ISBN: 978-1-68462-085-2
Library of Congress Cataloging-in-Publication Data has been applied for.
in China
Thank you to Soho Publishing for making this vision come to life!
I have always believed there was a need for a book on drawing diversity and this is a great beginning. I would also like to extend my gratitude to Usher Morgan and Library Tales for providing a platform to showcase my art to the world. It is through such collaborations and partnerships that artists are able to reach a wider audience and make a meaningful impact.
I have been fortunate to have the guidance and support of my amazing family, including Virginia Thayer and Ken Holmes who have always encouraged me to create. Thank you to Rich Monsini (my reluctant muse) whose presence has been truly inspiring to me. To everyone who picks up this book, I want to extend my heartfelt gratitude. Drawing People has been a labor of love, a journey of self-discovery, and a testament to the power of art to connect us.
Welcome to the newest addition to the 15-Minute Artist series! Whether you’re a seasoned artist or new to the world of drawing, this book can help you create expressive, lifelike drawings of friends, family, and anyone you’d like.
Drawing people might seem complex or daunting, but fear not—this comprehensive guide will walk you through the steps, providing techniques and tips to bring your sketches to life.
Even for experienced artists, creating realistic portraits can be intimidating, but The 15-Minute Artist: Drawing People will demystify the creative process by transforming the human body into manageable building blocks. With easy-tofollow step-by-step illustrations for each example, you’ll learn how to turn simple shapes and sketches into detailed drawings and portraits.
This book is designed for everyone, regardless of your prior experience. Whether you’re familiar with the “15-Minute Method”
or not, it covers all the essential skills you’ll need to make drawing people accessible and enjoyable. First, we’ll start with the basics of drawing. From there, we’ll explore the different facets of drawing people: their bodies, faces, expressions, hairstyles, clothing, and movements.
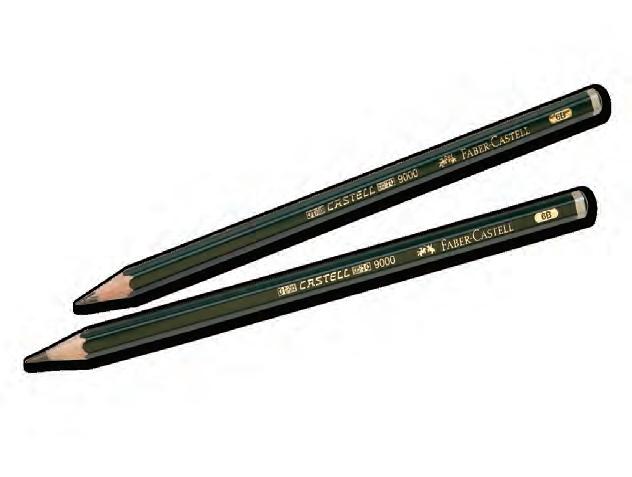
While it’s tempting to just jump right in, don’t skip the rest of this section! It serves as your foundation, detailing the necessary tools and materials, drawing fundamentals, and specialized techniques specifically useful to drawing people.
Drawing, like any skill, takes practice. So don’t be discouraged if it takes a couple of tries to get the results you want. Consistent practice is the key to improvement, and with each exercise, you’ll notice your artistry evolving. By the book’s end, my hope is that you’ll not only have learned to sketch the examples in this book, but also that you’ll have gained skills so that you can embark on your own people-drawing adventures.
So let’s get started!
This is the typical process I use with most drawings, including those I demonstrate in this book.
1. Break it down into simple shapes.
2. Connect the shapes.
3. Add details.
4. Erase the initial guidelines.
5. Shade the entire object with a medium tone.
6. Darken the darkest areas.
7. Erase areas to create highlights.
This section explains the techniques and vocabulary that will be used throughout the book. I suggest placing a bookmark here so you can flip back to it for reference. If you have the other books in this series, you’re already one step ahead, because most of this information will be familiar.
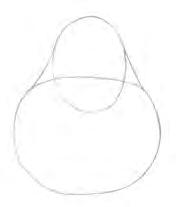
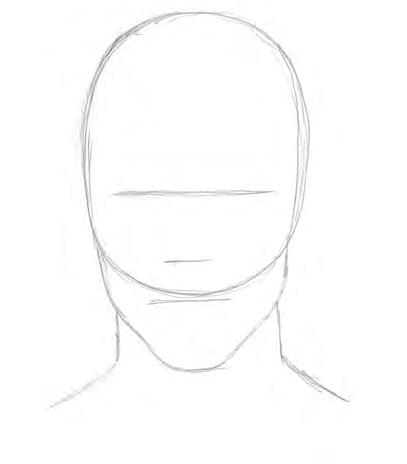
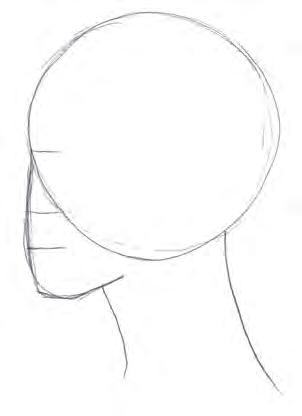
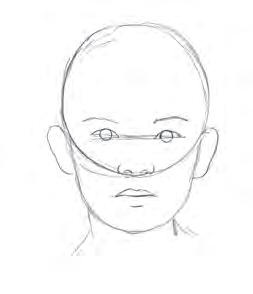
The first step in the drawing process is to use simple shapes as a framework to build upon. The lines you use to draw these shapes are called “guidelines” because they guide what you draw next. Guidelines don’t have to be precise. They should give you a decent idea of where to draw or mark the boundaries of a shape or its approximate center. Sketch your guidelines lightly, because they’ll eventually be erased.
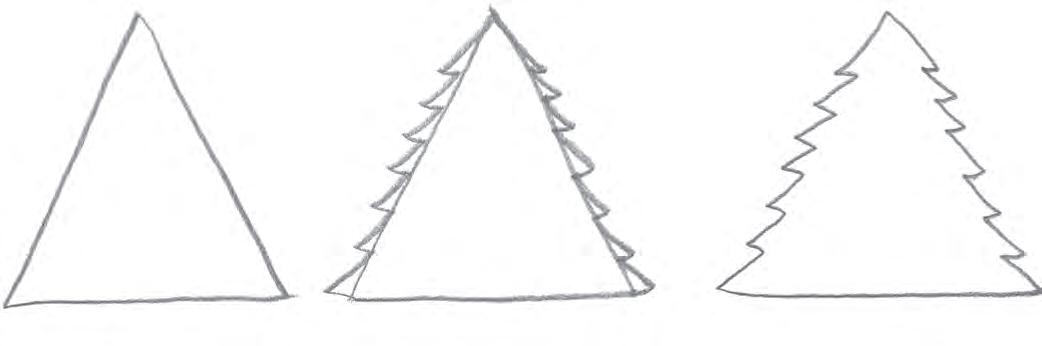
This very simplified example shows how a triangle is used as a guideline for an evergreen tree.

We’ll start our people-drawing journey by breaking down the human form into its separate building blocks. Using the 15-minute method, you’ll learn how to draw everything from the head to the feet. Each demonstration is also filled with helpful tips and tricks to help you master each body part, which will be necessary for the more complicated step-by-steps in later chapters.
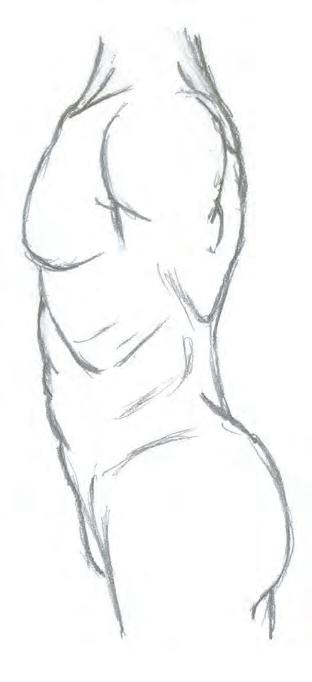
As humans move, so do their muscles, skin, and bones, depending on the pose. Having some familiarity with or basic knowledge of underlying muscles can help when drawing a torso.
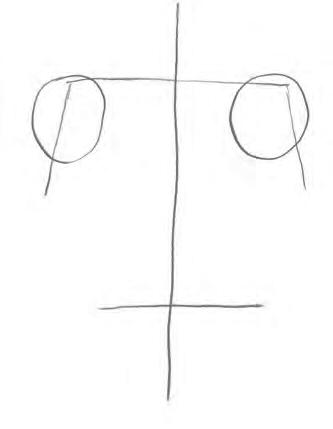
1. Draw a vertical line for the spine. Draw a horizontal line for the top of the chest and one for the pelvis. Draw two circles for the shoulders and two more lines to start the arms.
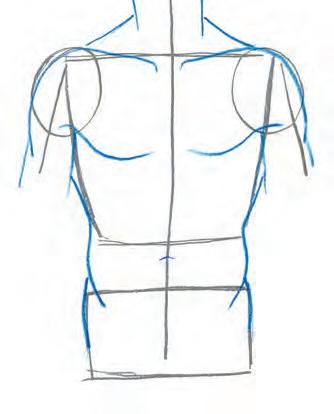
3. Draw the clavicle bones and add lines for the neck and shoulders. Add lines to connect the rib cage and hips.
Clavicles are the bones that stick out at the top of the chest. Male clavicles go from shoulder to shoulder, while female clavicles form a V shape.
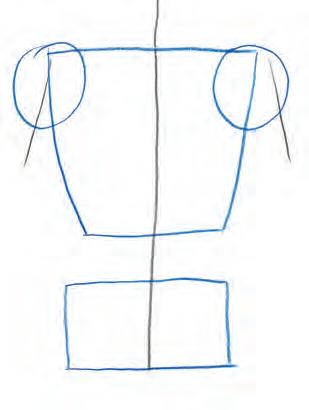
2. Draw the torso and pelvis using simple geometric shapes. Later they can be shaped and built up to be more representational.
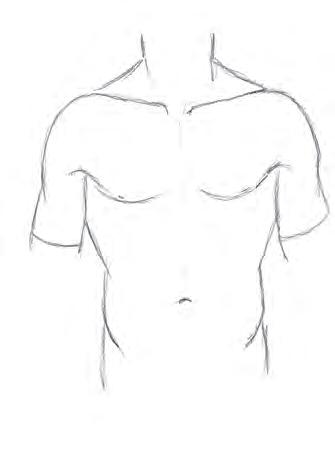
4. Erase all unnecessary guidelines.

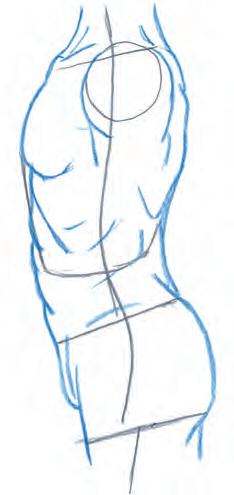
1. Draw a line for the spine that has a slight curve at the middle and toward the bottom. The top curve is for the stomach and the bottom is for the buttock. Add guidelines for the top of the shoulders and one for the hips. Draw a circle for the shoulder socket.

2. Draw the basic shapes. Here, I use a rounded shape for the chest and rib cage and a box for the hips. Focus not so much on the proportion but the angle. Draw guidelines for the shoulder.
3. Connect the torso and pelvis with curved lines, adding some underlying muscle definition.
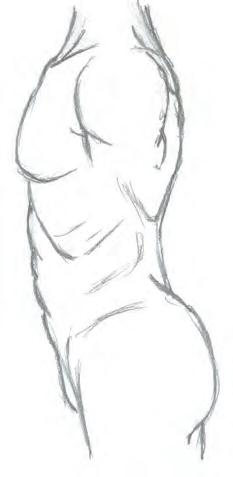
4. Erase the unnecessary guidelines.
Masculine: The shoulders are usually the widest point. There are sharp angles for the upper torso and a boxy shape for the pelvis.
Feminine: The pelvis is usually the widest point and is rounder. Feminine bodies have a narrower rib cage and waistline. The lower abdomen may protrude a bit more, and the curve of the waist is emphasized. The bone and muscle structures are finer, so they tend to be smaller. They have a higher percentage
of body fat, so they should be drawn with round, smooth lines, not angles.
Child: The torso is shorter and the pelvis and shoulders are similar in width. The rib cage is about the same size as the head, and it’s a small egg-like shape.
Weight: For a heavier person use soft, rounded corners. For a thinner person, show more muscle definition and use angular shapes.
Chapter 2
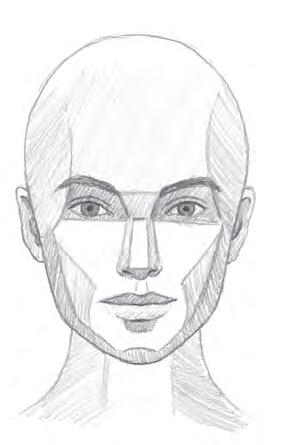
Even though they are all made up of the same features—the eyes, nose, and mouth—everyone’s face is unique to them, due to genetics and personal preferences.
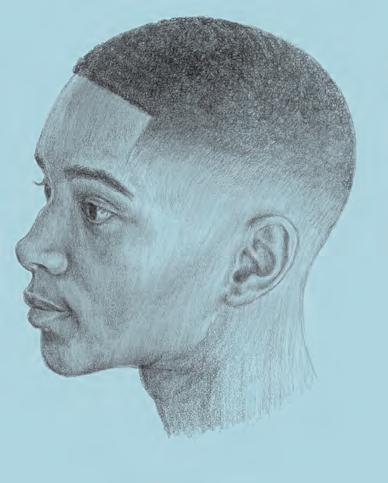
In this chapter, we’ll practice putting the basic features together to draw different faces in a variety of views. While we will draw the hair in these portraits, our primary focus is on the facial features. (We’ll go more in-depth about drawing hairstyles in Chapter 4.)
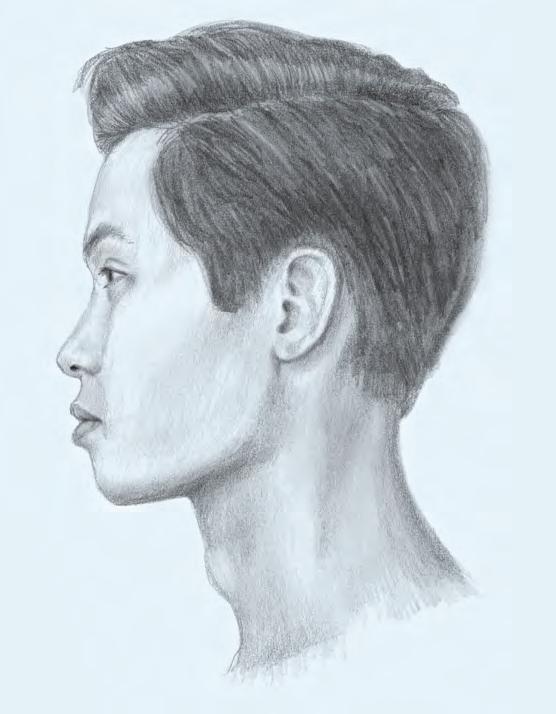
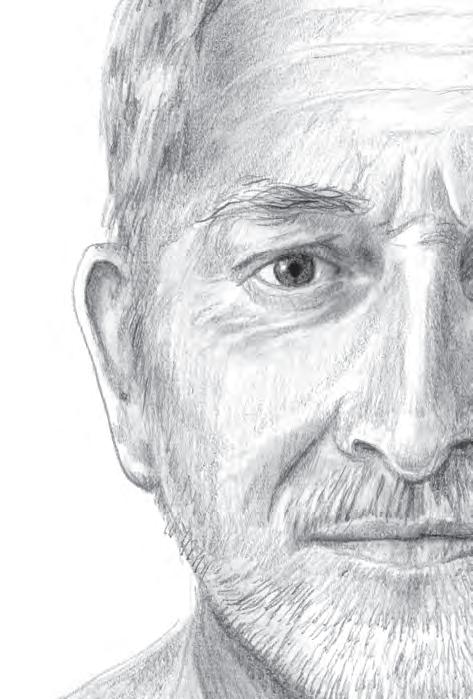
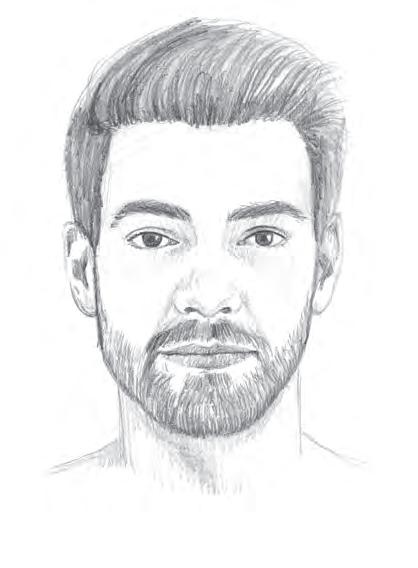
In more masculine faces, the neck is usually shorter, thicker, and features an Adam’s apple. The jawline and chin are prominent, and the eyebrows are thick with rough edges.
Draw the Basics
Angular jawline
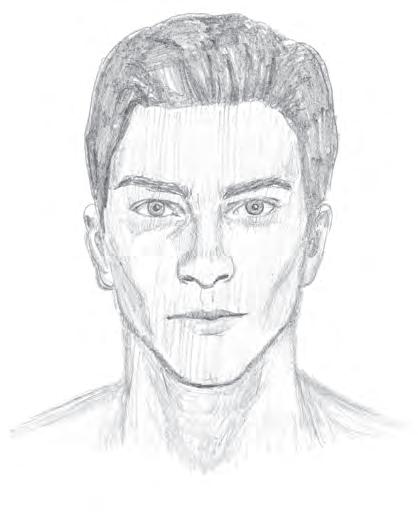
1. Draw a head following the steps on page 38. Include all necessary guidelines for the eyes, mouth, and nose. For a masculine face, the chin and jawline should be angular. Sketch the neck and the tops of the shoulders.
Add Details
TIP
The centerline is helpful to separate the sides of the face, but you may leave it out for one less guideline to erase.
apple
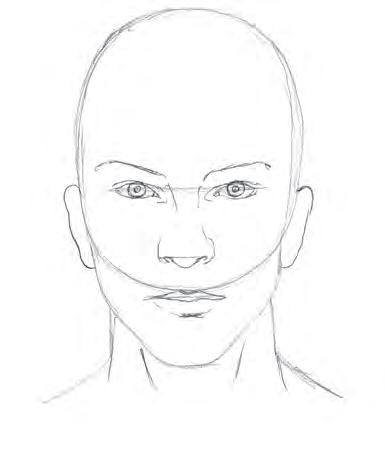
2. Using the guidelines, draw the eyeballs, including the irises and pupils. Draw a guideline for the eyebrows. Sketch the nose, nostrils, and mouth. Draw the ears. Begin to refine all the features: add eyelids and the Adam’s apple.

Thick, angular eyebrows
3. Add more details to the features. Thicken the eyebrows. Add contours to the ears, cheeks, nose, and chin.
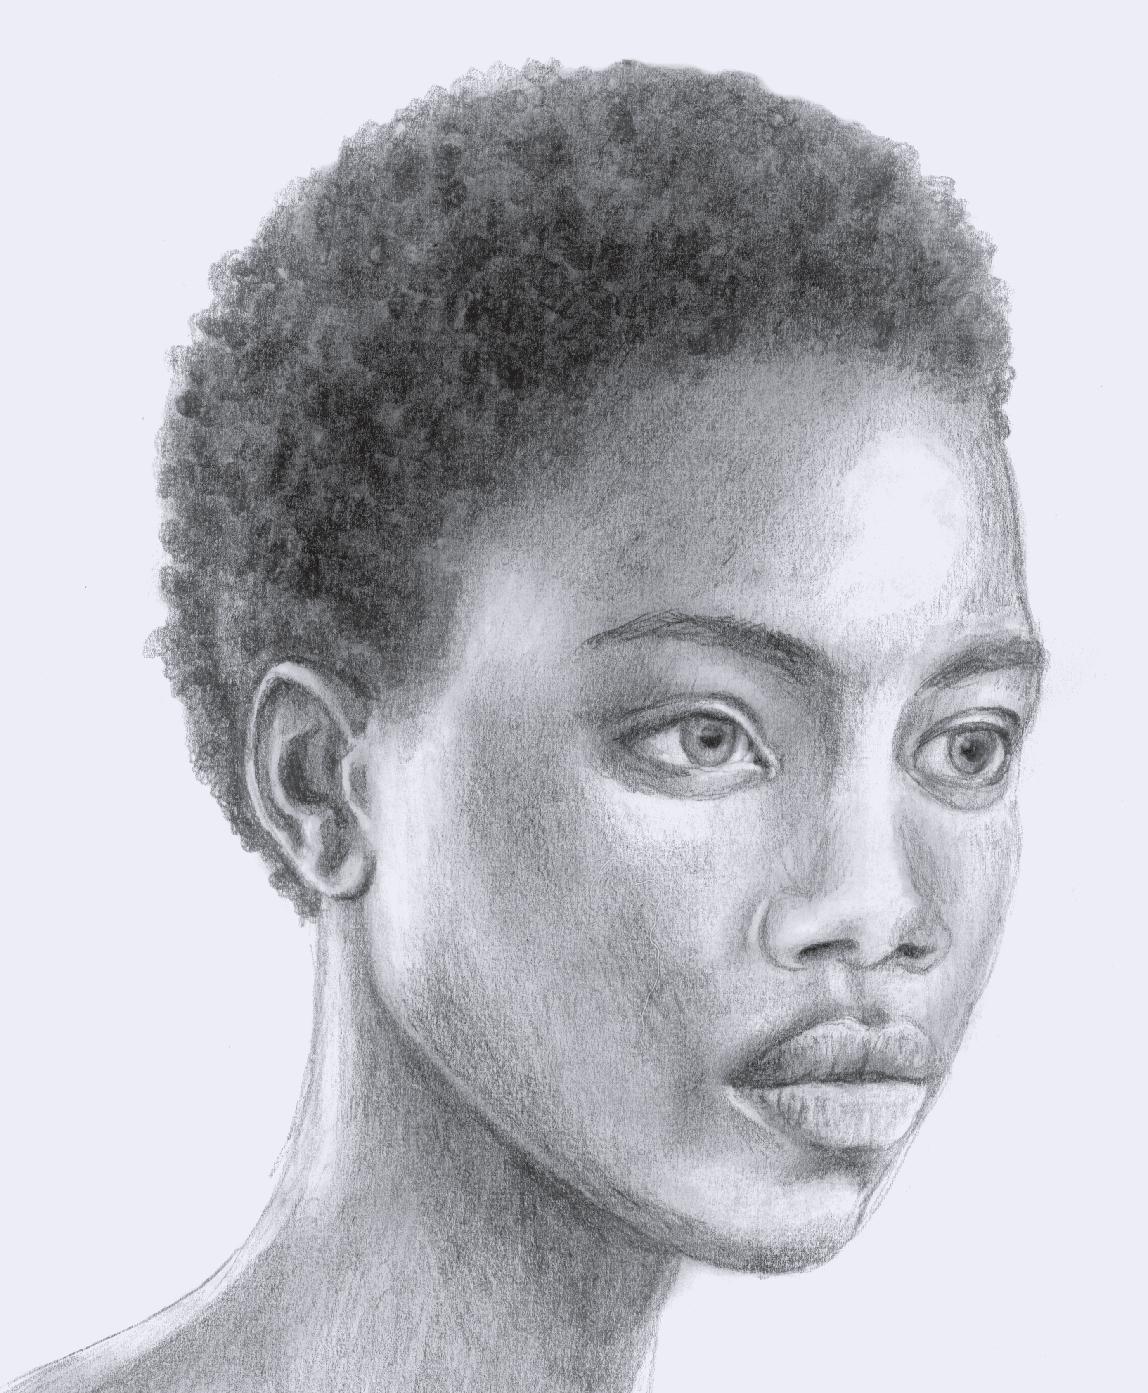
4. Erase the guidelines. Add a light layer of tone to the face. Define the cheekbones, neck, ears, and eye area with shadows. The hair, eyebrows, irises, pupils, upper lip, and nostrils should be the darkest tones.
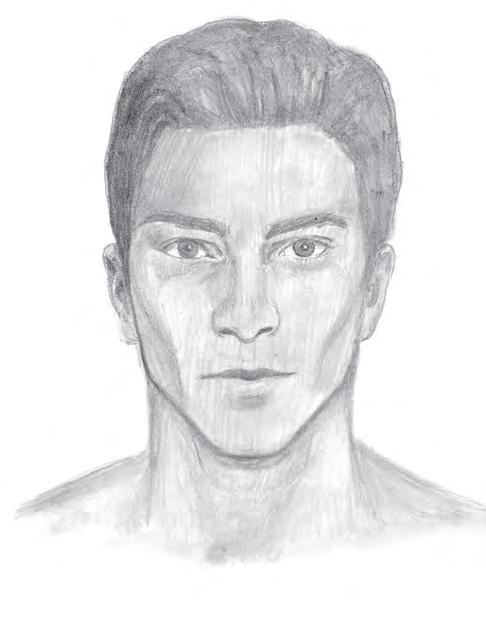
5. Smooth the tones using a tissue on larger areas and a blending tool on the smaller areas.
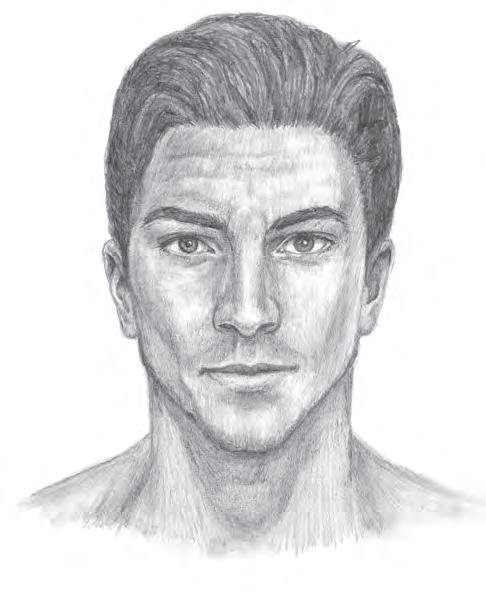
7. Smooth and blend tones further. Use a kneaded eraser to accentuate the highlighted areas.
Contrast
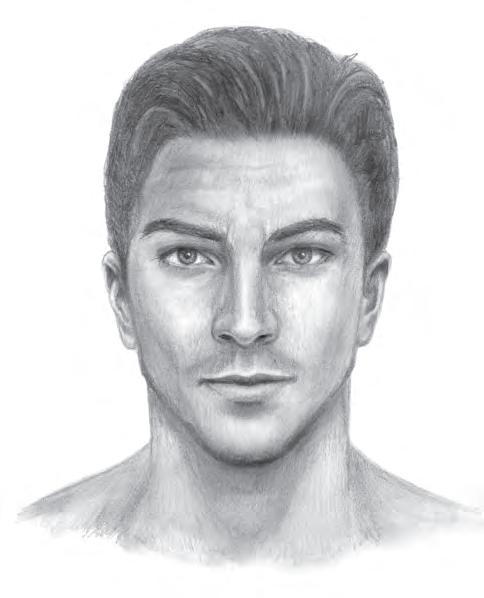
6. Add another layer of tone, concentrating on contrast. Deepen shading and lines on the face, giving each shadow sharp, angular edges. Pay attention to where there should be highlights and keep those areas light. Use short strokes to define the hair and eyebrows. Keep the eyelashes very short.
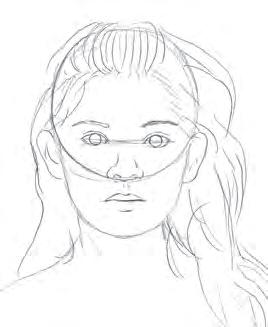
No two hairlines are alike! They’ll vary in shape and position, depending on your subject, so observe reference images or your own hairline for guidance. Practice sketching different hairlines from various angles to develop a better understanding of their positioning in relation to the rest of the face.
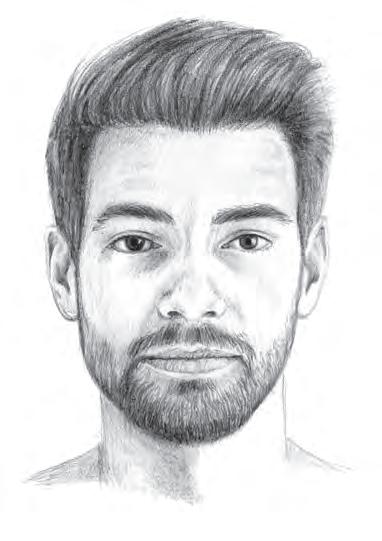
On feminine faces, there often isn’t a strong line that defines the chin and jaw but rather subtle shading. Don’t use a heavy pencil line to define it.
Draw the Basics
1. Draw a head following the steps on page 40. Include all necessary guidelines for the eyes, mouth, and nose. For a feminine face, the chin and jawline should be softer and more rounded. Sketch the neck and shoulders.
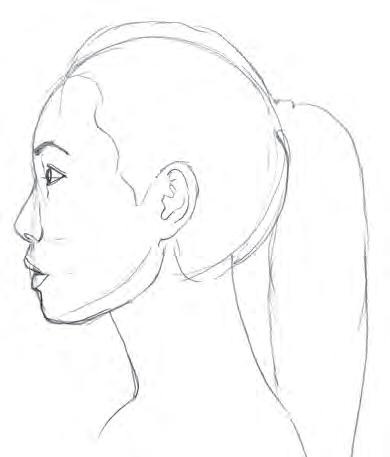
Refine the Features
Organic, curved lines
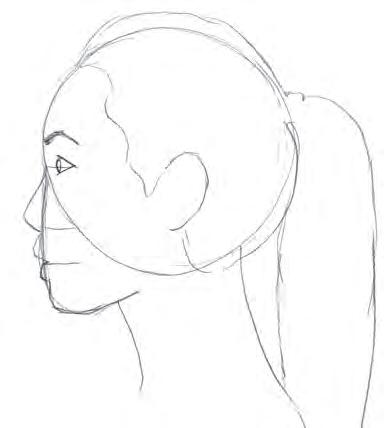
2. Draw a sideways triangle for the eye and add a narrow oval for the pupil. Using the guidelines, sketch the outline of the nose, lips, and chin. Add the eyebrow and the ear. Sketch the shape of the hair.
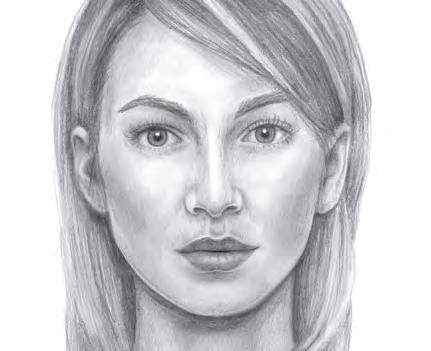
3. Erase the guidelines no longer needed. Refine the features, including the shape of the forehead, lips, jawline, and neck. Thicken the eyebrows. Add details to the ears, eye area, and nose. Delineate a shadow area under the chin, which should follow the jawline up to the ear.
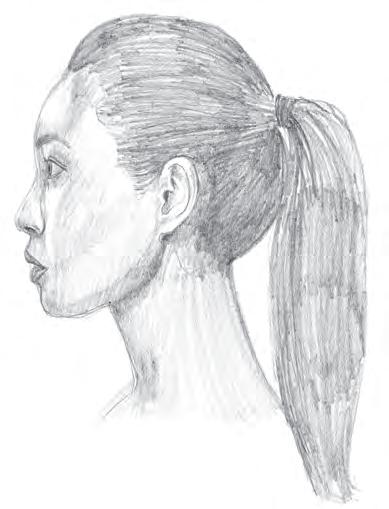
4. Erase the remaining guidelines. Add a light layer of tone to the face. Define the area under the chin, around the eye, inside the ear, the nose, and the lips with shading. Darken the hair, eyebrow, and pupil.
5. Smooth tones with a tissue on the larger areas and use a blending tool on smaller areas.
7. Smooth and blend tones further. Use a kneaded eraser to accentuate the highlighted areas.
6. Add another layer of tone, concentrating on contrast. Deepen shading and lines on the face, giving each shadow sharp, angular edges. Pay attention to where there should be highlights and keep those areas light. Use short strokes to define the eyebrows, and add texture to the hair. Draw the eyelashes.
You will generally see deeper shadows around the eye since it sits within the eye socket.
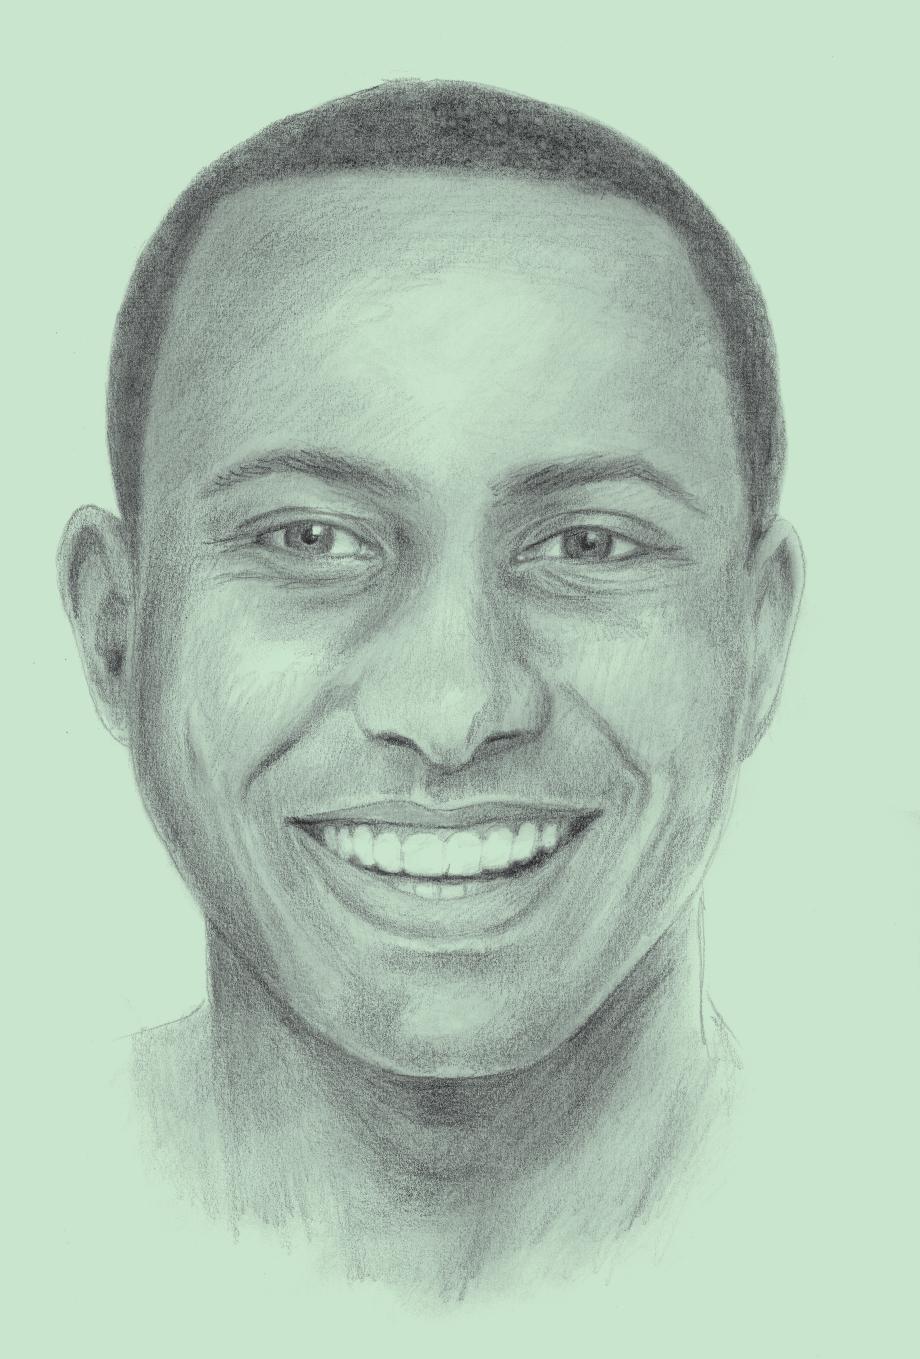
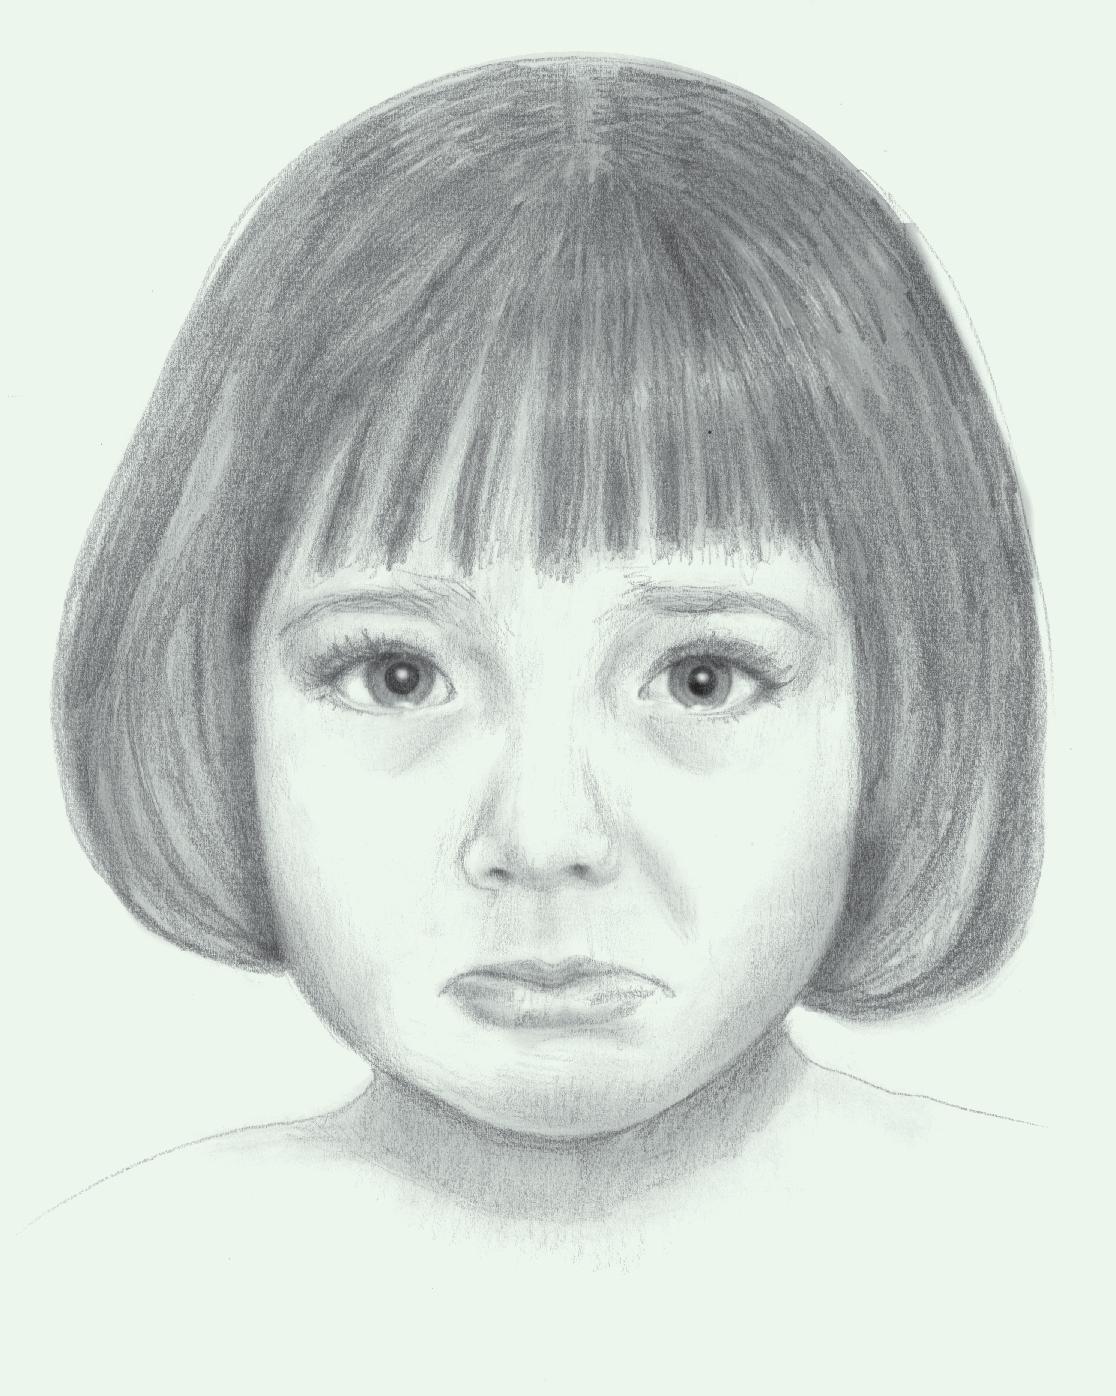
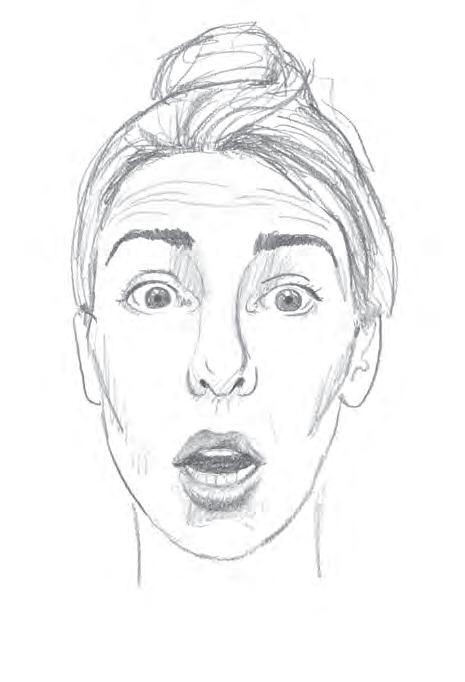
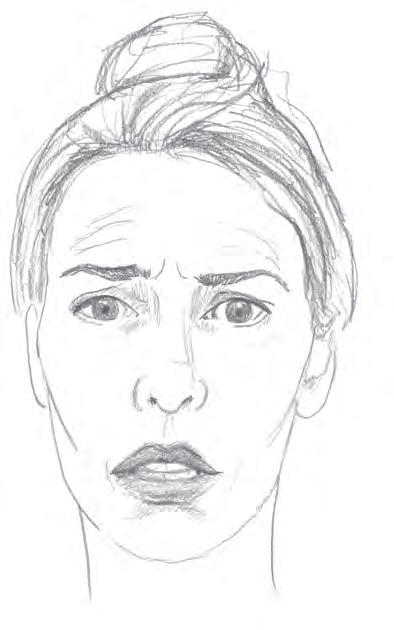
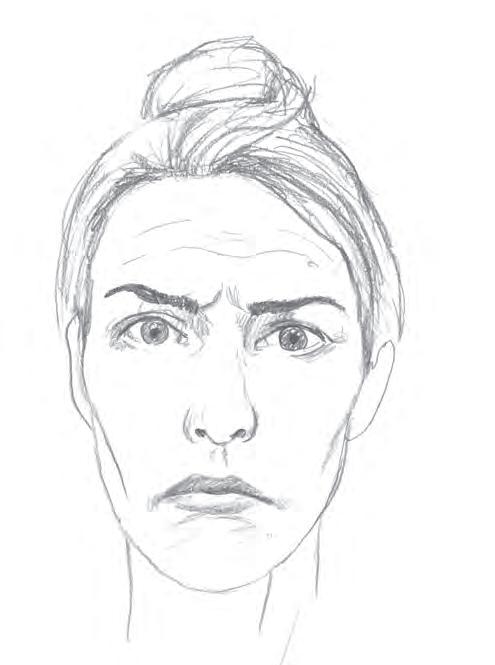
Different emotions can completely change the way a face looks because of the array of muscle movements involved. The cheeks, brows, eyes, nostrils, and mouth will all move in some manner to convey what a person is feeling.
In this chapter, I’ll give a quick overview of what this idea looks like before we dive into the stepby-step demonstrations. These tutorials build on skills learned in the previous chapters and focus on the specifics of drawing emotions and expressions, not just faces.
One of the many challenging aspects of drawing human faces is that it’s not really just one expression you need to grasp, but many. And one of the best ways to learn how to draw expressions is to make faces in the mirror and observe what happens to different features and muscles. You can even take a selfie to
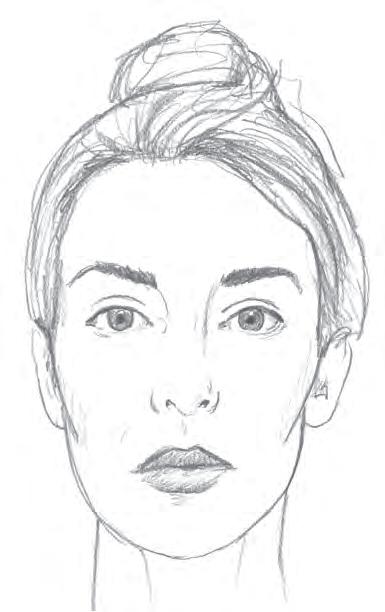
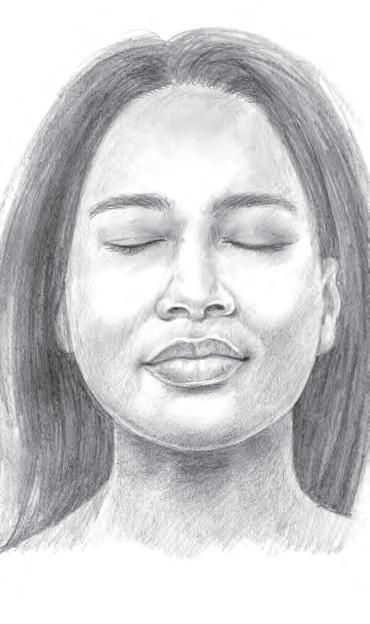
There are no discernible facial muscle contractions and the face is relaxed. Use this expression to compare the actions and movements of other expressions.
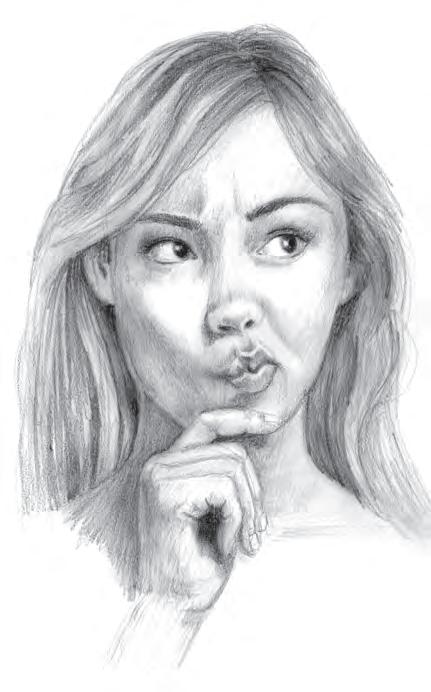
The chin is brought down and is more pronounced.
study, or a short video and then review it frame by frame to see the subtle changes. Here are a bunch of self-portraits I drew that capture different emotions, and the main takeaways from each that may be helpful when trying to capture emotions through drawing.
The forehead wrinkles.
The eyelids and eyebrows raise and the eyebrows draw together.
The corners of the mouth turn downward.
The lower lip protrudes and causes shadows below it.
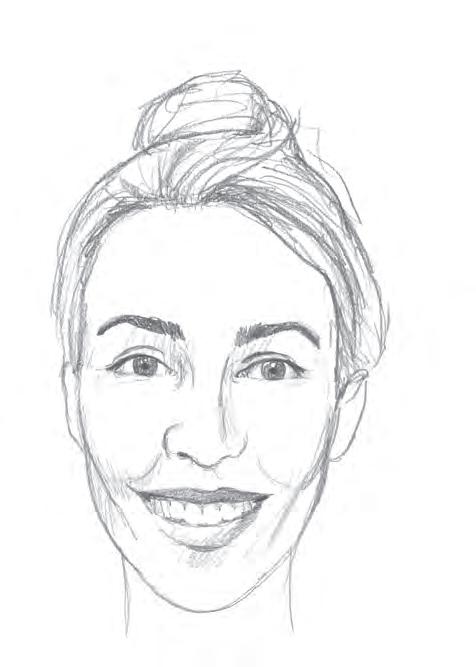
EXPRESSION
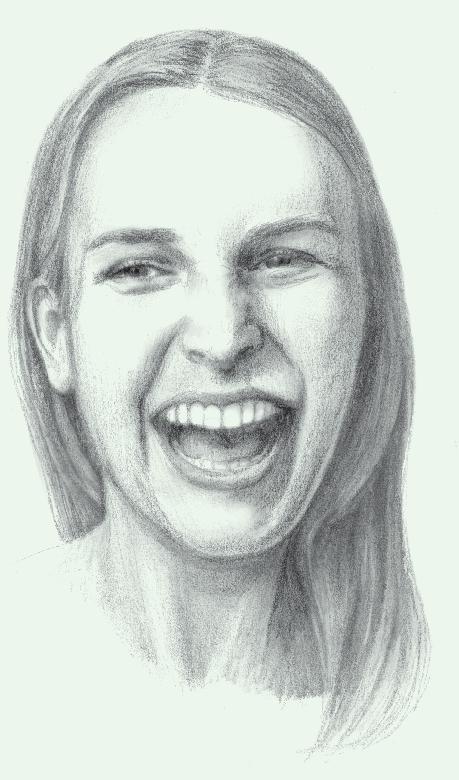
The apples of the cheeks become fuller and higher. The eyes narrow.
The corners of the mouth lift up.
The lines at the sides of the mouth deepen.
The face lengthens.
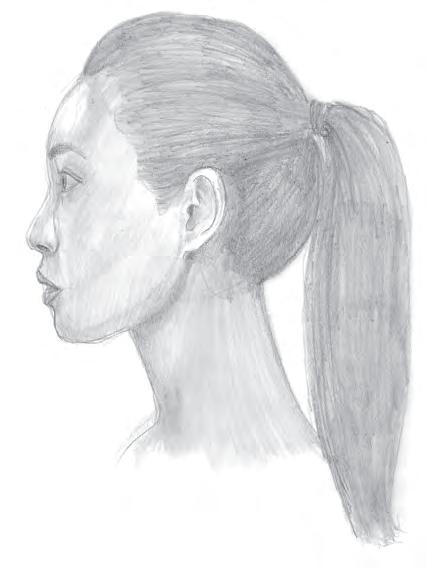
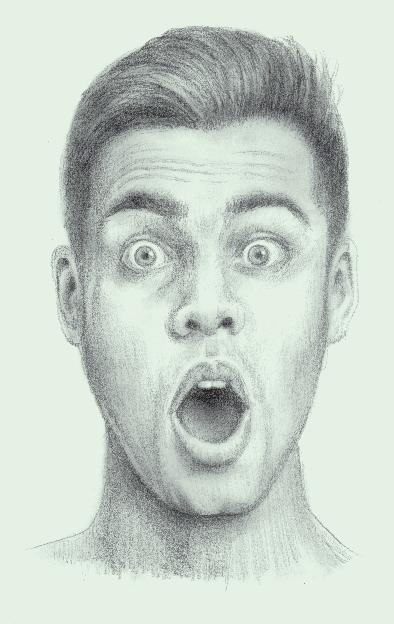
The eyebrows arch, wrinkling the forehead.
The upper eyelids curve upward. The eyes widen so that the whites are visible above the iris.
The jaw drops, opening the mouth and relaxing the lips.
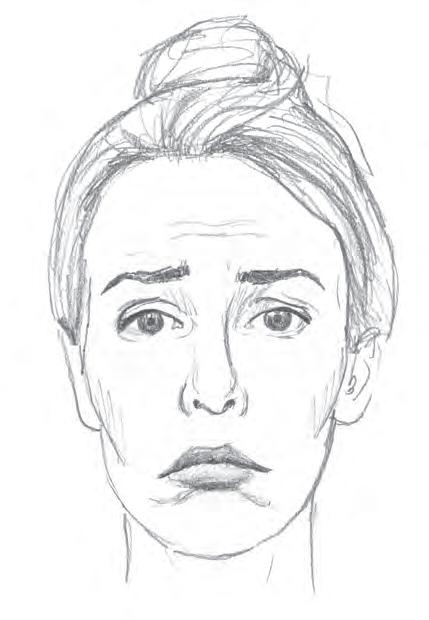
Deep lines appear on the forehead.
The eyebrows are pulled down and drawn together.
The nostrils flare.
Lines appear across the forehead and between the brows.
The lids rise toward the center of the face.
The eyebrows draw together.
The mouth tightens, making the lips thinner.
The eyes turn down at the corners.
The lips part slightly, and the lower lip protrudes.
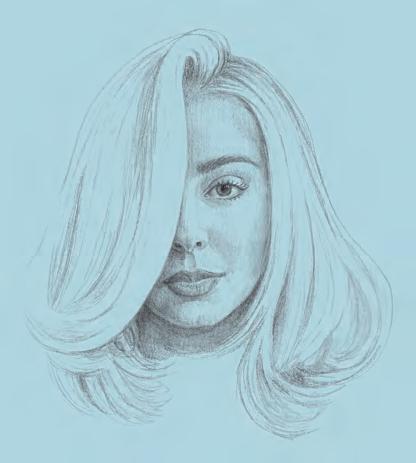
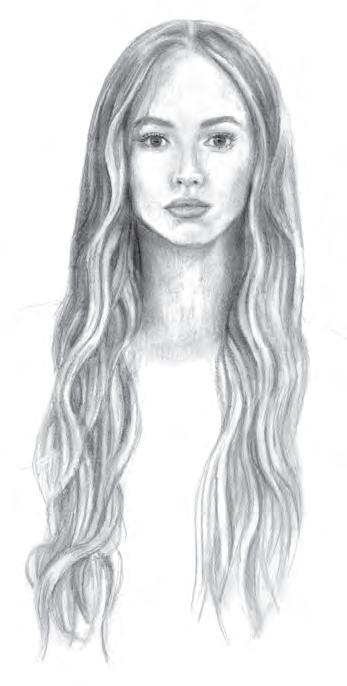

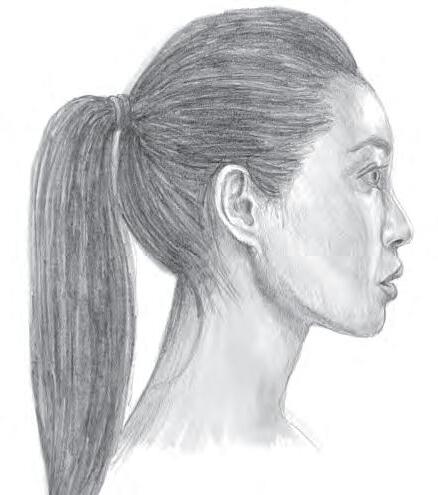
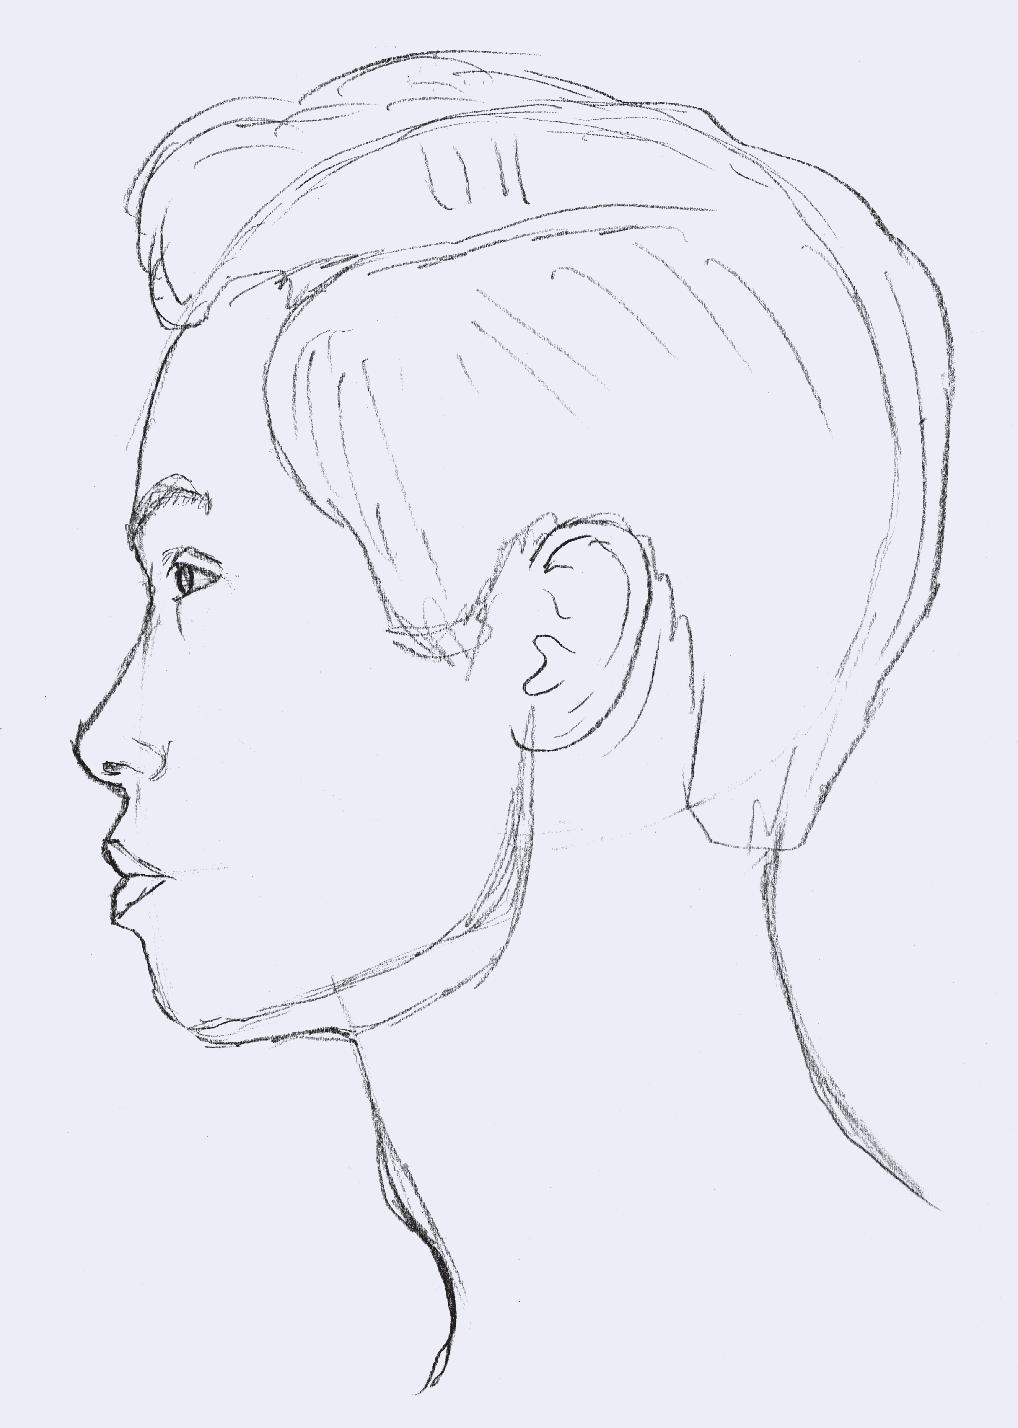
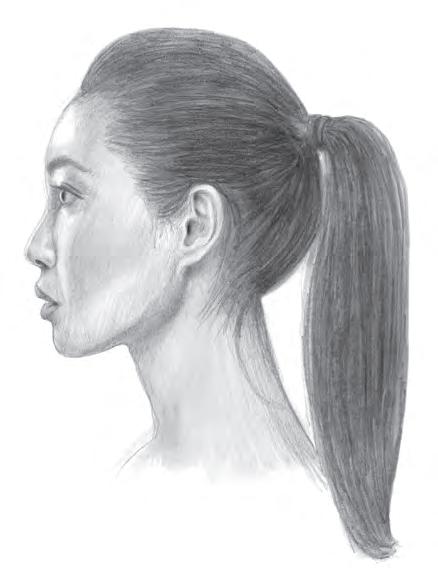
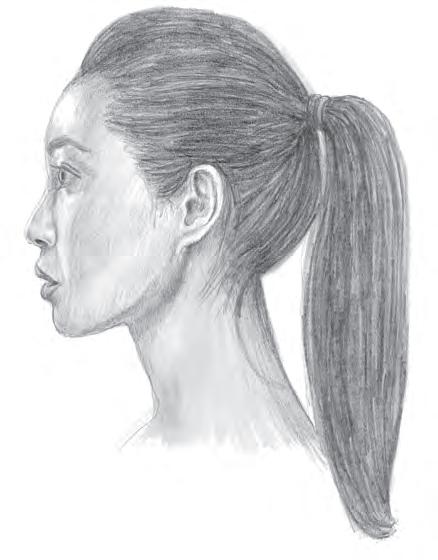
In this chapter, we’re diving into the art of drawing various hairstyles, whether you’re sketching flowing locks, intricate braids, or shorter styles. Just as a haircut can transform a person, your hair drawing will breathe life into your characters, giving them a unique identity.
The main focus of these portraits is the steps that are used to draw the hair, so you’ll want to turn back to chapters 2 and 3 if you need more guidance for drawing faces and features.
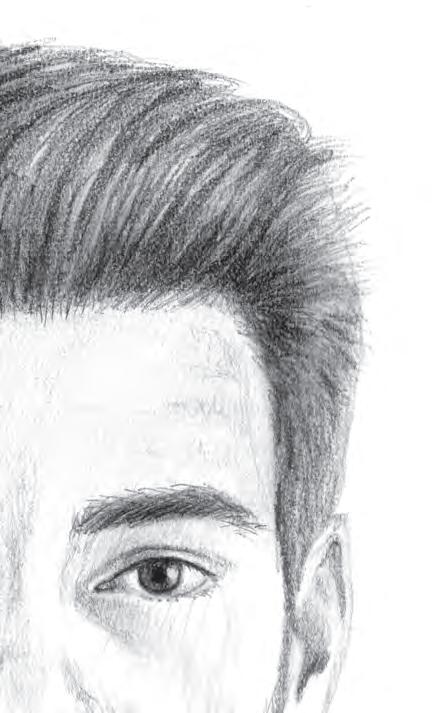
Paying attention to the direction the strands of hair are growing or styled in helps give a short hairstyle volume and movement and makes it look realistic.
Draw the Basics
1. Draw a head following the steps on pages 38–39. Include all necessary guidelines for the eyes, mouth, and nose. Draw the basic features, referring back to pages 42–47 for guidance. Begin the hairline slightly higher than halfway between the brow line and the top of the head. Outline the hairstyle and begin sketching strands.


2. Add more lines to fill in the hair, paying attention to the direction of each section to create a style and provide movement.
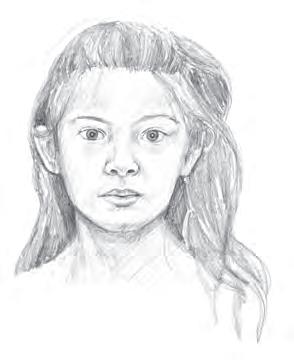
Blend & Smooth
3. Add a layer of tone to the drawing. Use a blending tool to smooth the lines of individual hairs so that each one does not stand out too much.
4. Identify the dark areas, midtones, and highlights, and add tone to reflect them. As the hair darkens, the shadows on the face should be darkened according to where the light is coming from.
Refine the Drawing
6. Add more contrast for interest and depth. Deepen the tones in the hair. Use a kneaded eraser to remove pigment from the hairs that are highlighted.
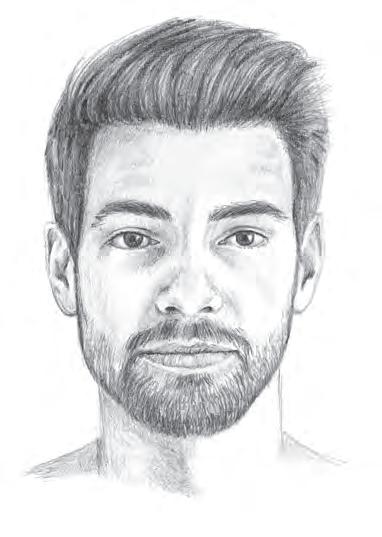
5. Add a few short strands at the hairline to make it look more realistic. It is not necessary to draw every single hair. Take artistic license and simplify!
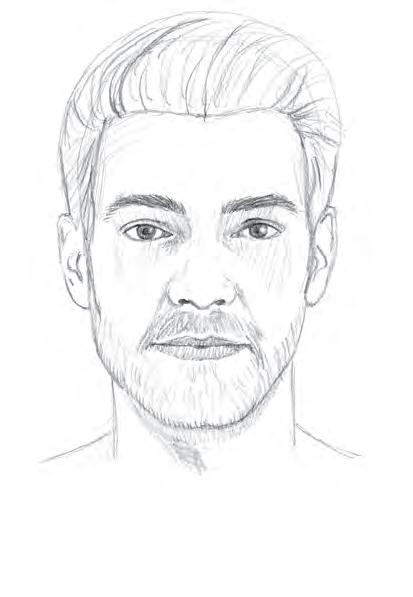
When drawing facial hair in portraits, consider its texture and shape. Start by lightly sketching the overall outline of the beard or mustache. Pay attention to the direction of hair growth and use short, flicking strokes to mimic its appearance. For a fuller beard, draw denser clusters of hair, leaving small gaps for realism. Add highlights and shadows to create depth and dimension, emphasizing areas where light hits and casting shadows where hair overlaps or recedes. Remember that facial hair varies greatly between individuals, so observe reference photos closely.
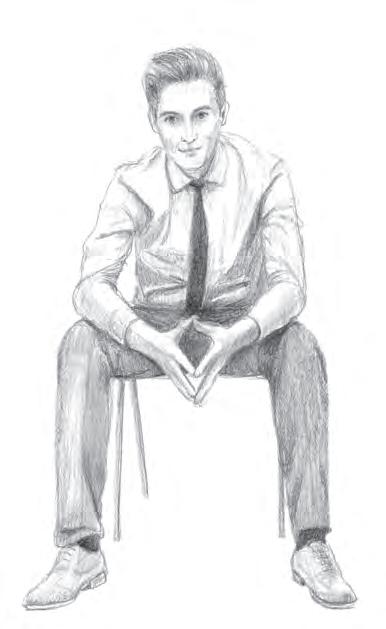
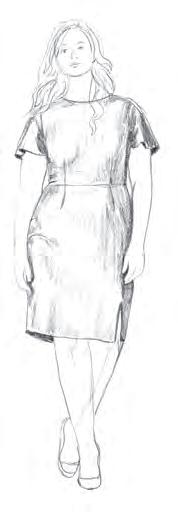
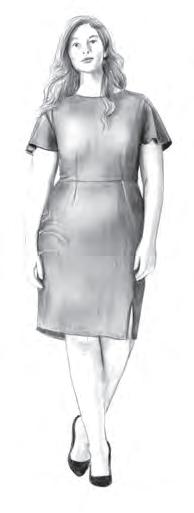
In this chapter, we’ll explore how to draw various clothing items and accessories—from everyday staples like jeans and T-shirts to elegant dresses and stylish sneakers. Throughout the tutorials, you’ll discover tips and tricks for drawing textures, folds, and other details that will make your portraits feel more realistic and lifelike with just a pencil and paper.
The main focus of the instructions will be the clothing and accessories, with the other features of the portrait only explained in relation to them as needed. Chapter 5
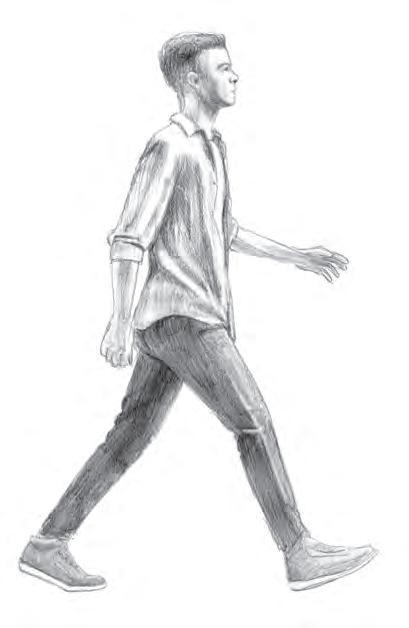
To help your drawing be more accurate, take a walk and pay attention to how your arms, legs, feet, and torso move, and make note of what happens to your clothing as you go.
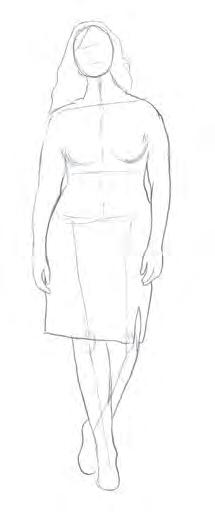
Draw the Basics
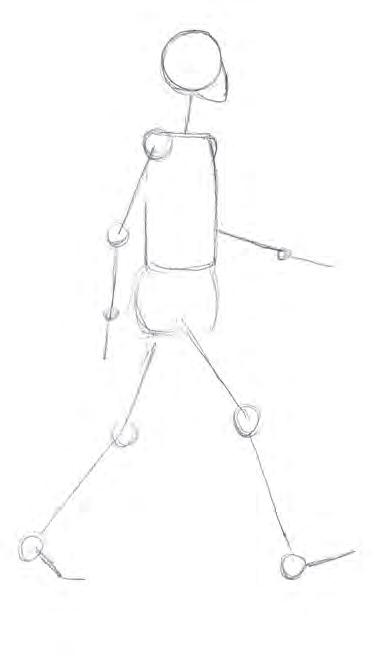
1. Using basic shapes, draw a head and a body in profile, referring to chapters 1 and 2 for guidance as needed. Draw circles for the joints, including the shoulder, elbow, wrists, knees, and ankles. Capture the pose by using lines to connect the basic shapes.
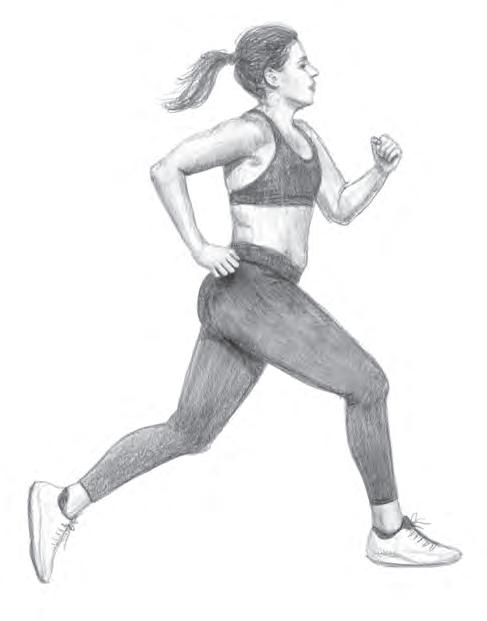
Add Details
Notice how neither foot is flat on the ground. This gives the impression of motion.
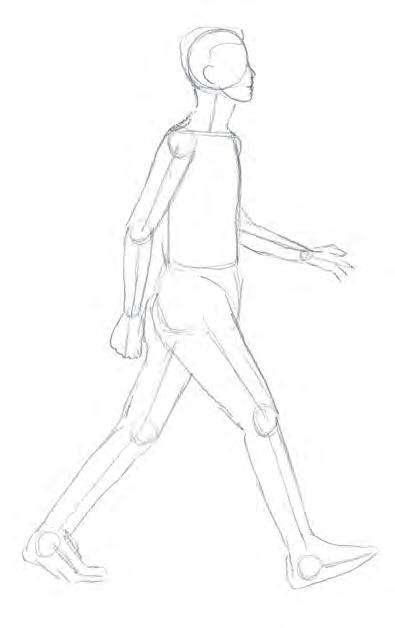
2. Use this form as a guide to draw the outline of the body. Keep in mind that things like clothing, weight, musculature, age, and the pose will affect the shape of the outline.
3. Add details to the drawing, including the outline of the clothing. Draw the lines in the clothing where the body bends when walking, such as at the waist, knees, and elbows. Begin to define the features.
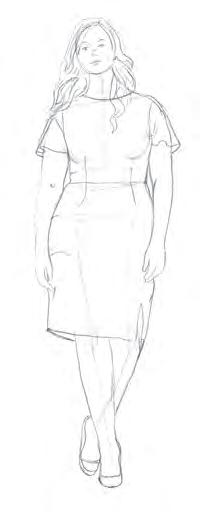
Highlight

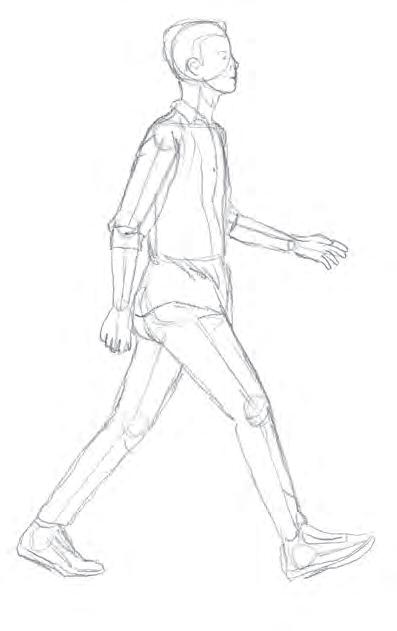
When drawing a side view of someone walking, the leg farther from the viewer will be in shadow.
4. Erase any guidelines no longer needed. Add a light layer of tone to the entire drawing, leaving highlighted areas lighter. Then add more tone to darken the shadowed areas. Continue to refine the features of your subject. Because this light source is coming from the upper right, the highlights are focused around the face and shoulders.
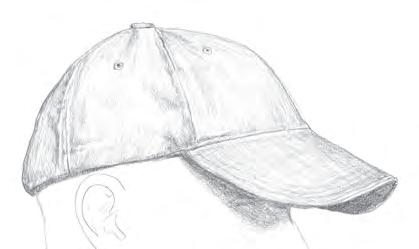
• Profile View (page 22)
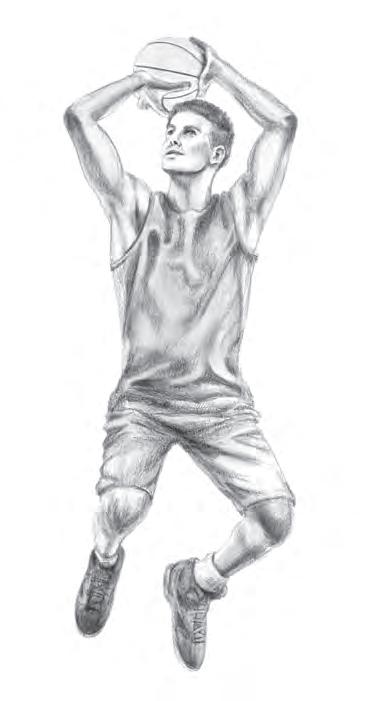
• Short Hair (page 92)
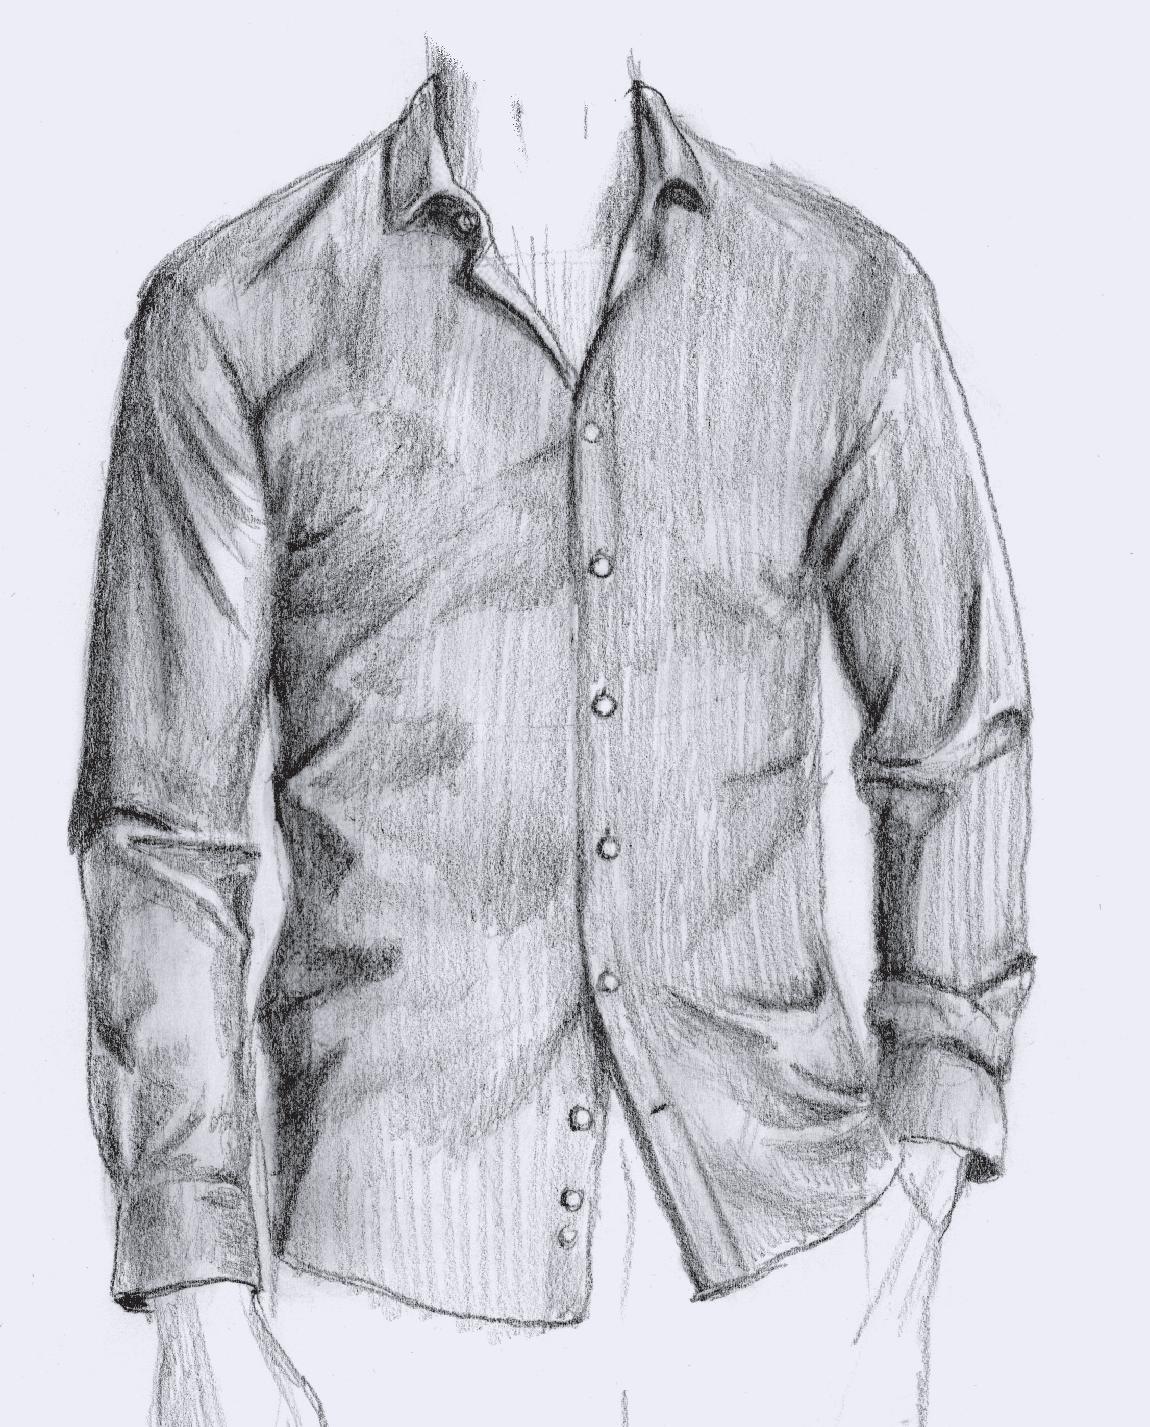
• Button-Down (page 118)
• The Leg (page 32)
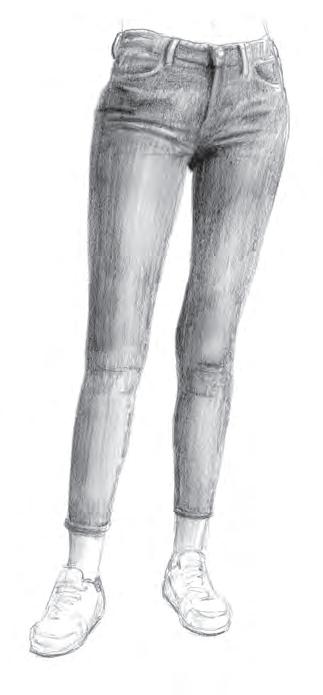
• Slim Pants (page 112)
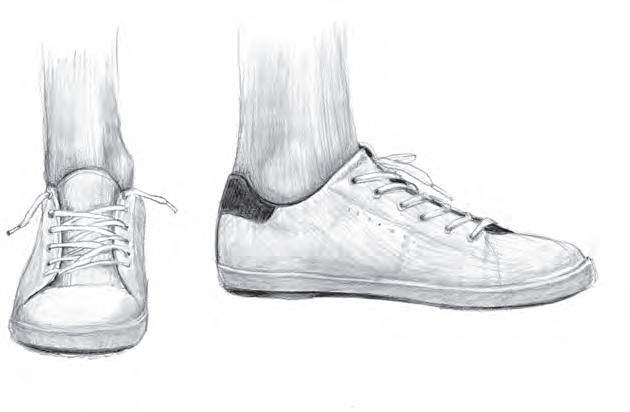
• Shoes (page 128)
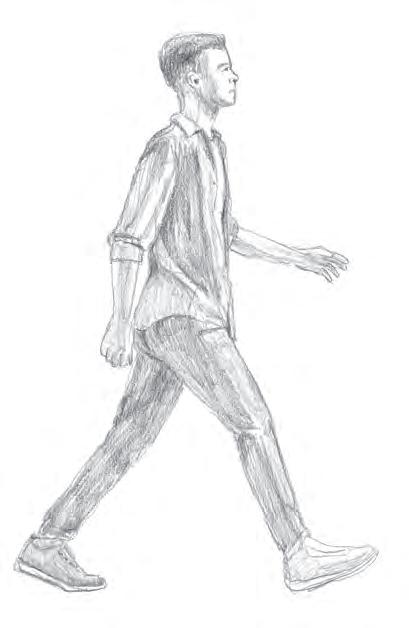
5. Add more tone to create contrast and make the drawing feel more realistic. Continue to refine the features of your subject.
6. Blend using a blending tool to smooth the tones. Add more tone to deepen shadows, and use a kneaded eraser or stick eraser to create highlights.
Focusing on simple shapes and proportions when drawing a human figure can help beginners break down the complex form into manageable parts. By using basic shapes like circles, ovals, and rectangles as a foundation, artists can establish the correct proportions of the body parts. This approach can make the figure more visually appealing and realistic, even for those who are new to drawing human forms.
This book aims to provide a wide range of faces, facial features, and expressions for drawing practice. The variety ensures artists can explore different characteristics and styles. This exposure to various faces can help enhance drawing skills and creativity. We tried to incorporate diverse representations, but including every race and body type in a book can be challenging due to limitations in space and time. We want to acknowledge the importance and value of diversity and inclusion in art while recognizing the constraints that may have influenced the final choices.
Drawing People is a valuable resource for improving your artistic skills. By practicing the techniques offered, you can enhance your ability to capture the human form accurately and expressively. With practice and dedication, you can use this book on your journey towards becoming a skilled artist adept at portraying people in your artwork.
afraid expression 71 age in faces 62–63 in hands 31 angry expression 71, 86–87 arms 30 asymmetry 36
B
baby faces 34, 66–67 backlighting 73 ball caps 126–127 blending 12 blending tools 17, 142 blouses 122–123 bob haircut 96–97 bodies arms 30 faces 34–41 feet 32 front views 21, 24–25, 27 hands 31 heads 34, 38–41 legs 32 proportions 20, 150 side views 22–23, 26–27 torsos 28–29 bored expression 74–75 bows 123 braids 105 button-down shirts 118–119 buttons 119 buzz cut 94–95
C
calves 32 caps 126–127 cast shadows 11 centerlines 50 cheekbones 61 child’s bodies faces 34–35, 64–65 hands 31 legs and feet 33 proportions 27, 34–35 torsos 29
clavicles 28 clothing 112–125 composition 13 concentrating expression 82–83 contrast 10 core shadows 11 cornrows 104–105 cross-hatching 11 curly hair 100–101
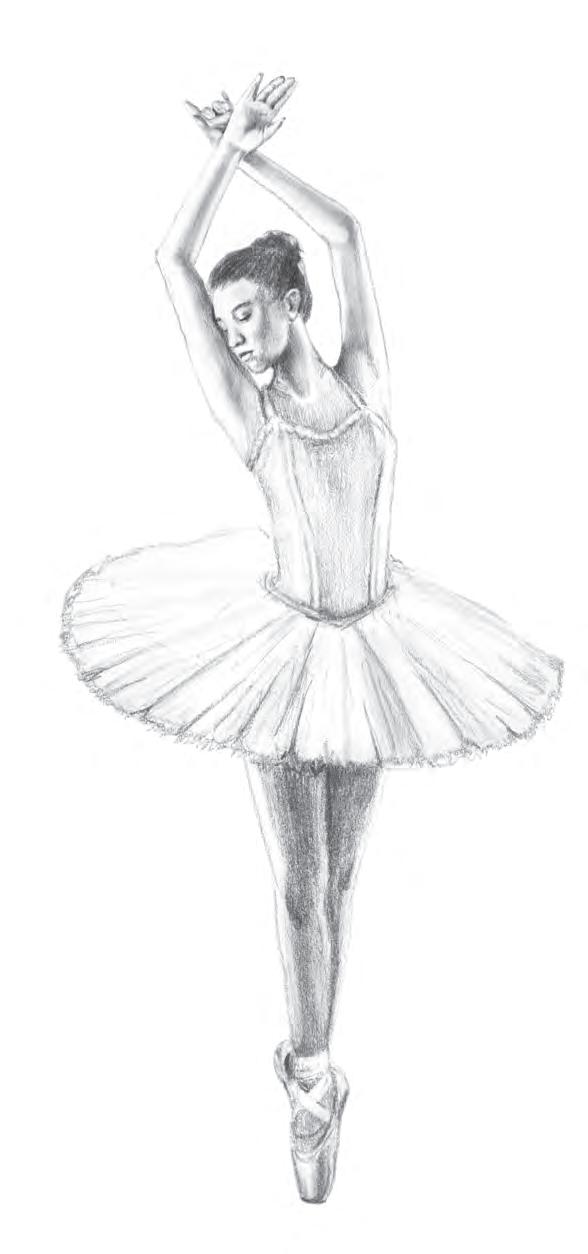
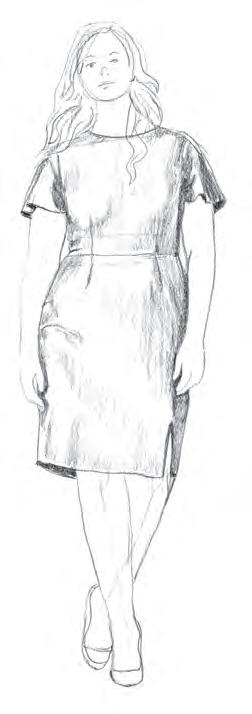
dancing 148–149 designs on clothing 125 dresses 124–125
E ears 44 erasers 17
eyebrows 43 eyes 37, 38, 39, 41, 42–43, 79
F faces
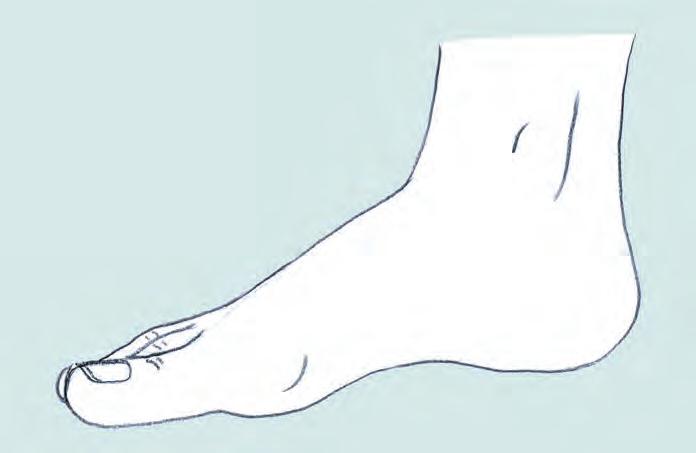
asymmetry 36 baby 34, 66–67 expressions 70–89 eyebrows 43 eyes 37, 38, 39, 41, 42–43 feminine 56–61 masculine 50–55 mouths 38, 39, 46–47 noses 37, 38, 39, 41, 44 older 62–63 placement of features 38–41 planes of 37 proportions 34–35 younger 34–35, 64–65 facial hair 93 feet 33
feminine bodies button-down shirts on 119 faces 56–61 front view 24–25 hands 31 legs and feet 33 proportions 21 side view 27
torsos 29 15-minute method 9 framework 9
gesture drawings 14, 15 grayscale 10 guidelines 9, 38, 40–41
H
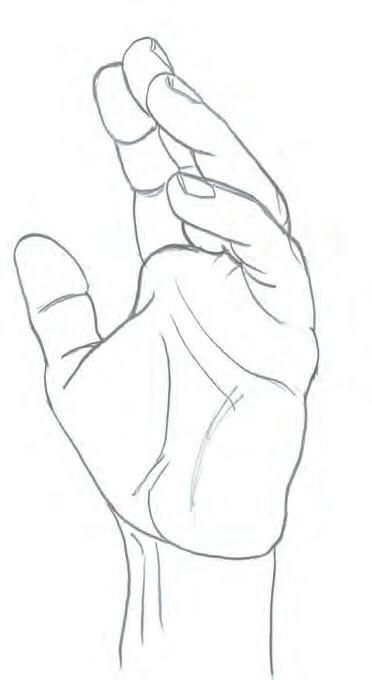
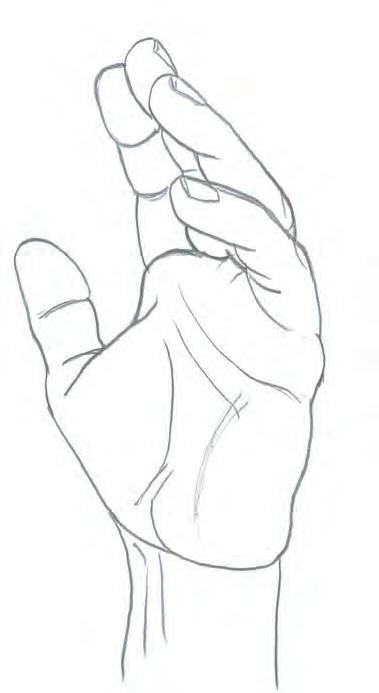
hairlines 51, 62 hairstyles 92–103 hands 31
happy expression 70 hatching 11 heads ears 44 front view 38 profile view 40 proportions 34 sides of 37 3/4 view 41 heels 130–131 hidden features 98 highlights 10, 11, 146
jackets 120–121 jaws 37 jumping 146–147
K
kneaded erasers 17
L laughing 78–79 legs 32
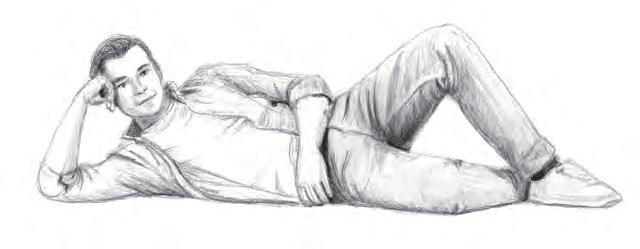
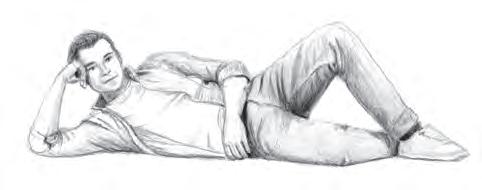
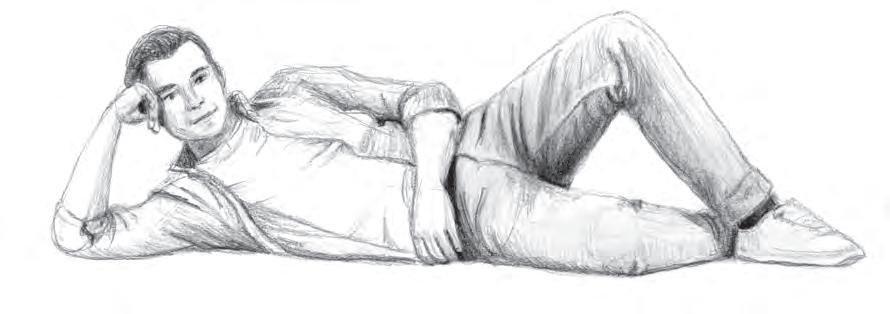
legs crossed 142–143 lettering on clothing 125 light sources 11, 73 lips 37, 46 long hair 102–103 lying down 134–135
M
masculine bodies
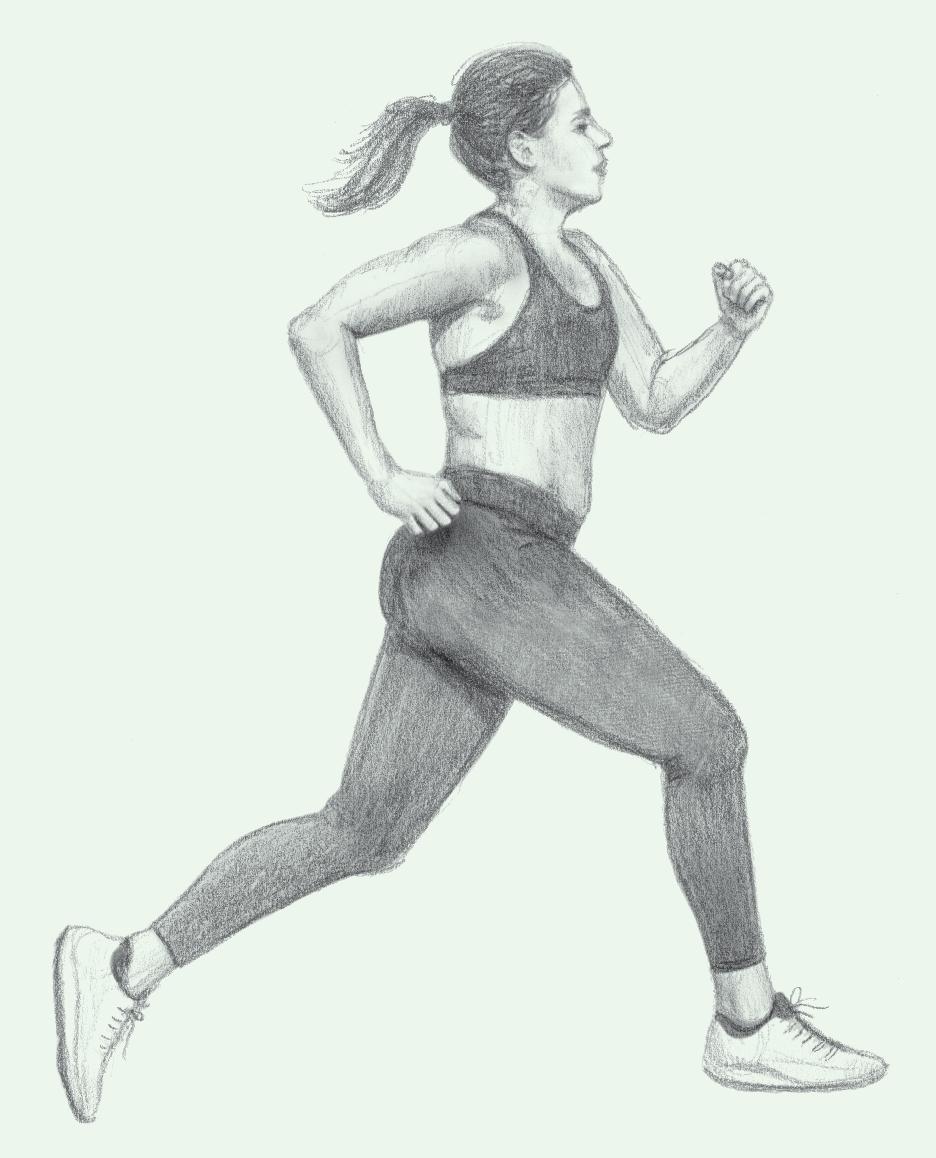
faces 50–55 front view 21 hands 31 proportions 20 side view 22–23 torsos 29 midtones 10, 11 mood enhancement 73 motion 14–15, 136–141, 146–149 mouths 38, 39, 46, 79
N
neutral expression 70 noses 37, 38, 39, 41, 45
O observation 14 occlusion shadows 11
P pants 112–115 paper 17 pencils 17 perspective 12–13 ponytails 108–109 proportions bodies 20–21, 150 faces 34–35 heads 34
Rreference images 16 relaxed expression 72–73 ringlets 101 rule of thirds 13 running 138–139
S
sad expression 70, 84–85 scared expression 88–89 scumbling 11, 61, 95 shading 11 shadows 10, 11, 146 shirts
blouses 122–123 button-down 118–119 T-shirts 116–117 shoes 128–131 short hair 92–93 shoulder-length hair 98–99 side lighting 73 sitting 140–141 slim pants 112–113 smiling 76–77 stick erasers 17 stippling 11 surprised expression 71, 80–81 symmetry 36
T teeth 47 tone 10 torsos front views 28 side views 29 tortillons 17 tracing 16 T-shirts 116–117
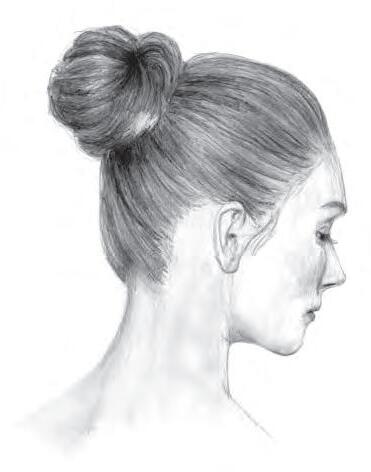
U updos 106–107
V value 10
W walking 136–137 weight in arms 30 in hands 31 in legs and feet 33 in torsos 29 wrinkles 63, 79
Y yoga 144–145
CATHERINE V. HOLMES returns to her 15-Minute Artist series to teach you how to draw realistic portraits in just 15 minutes. Bring your sketches to life with easy-to-follow building blocks that take you from simple shapes to detailed drawings. Drawing People features lessons on how to draw bodies, faces, expressions, hairstyles, clothing, positions, and movements, along with drawing fundamentals for artists of all skill levels and experiences. Each project breaks the process down step by step to help you achieve gratifying results while improving your art skills. What are you waiting for? Let’s draw!
Also available from Catherine V. Holmes: