5 minute read
Add a second screen to your Mac or MacBook


If you’re working from home, hooking up a second monitor to your Mac is one of the best ways to go about it. Leif Johnson reports
If you’re looking to expand your digital workspace, hooking up an external monitor to your workstation can drastically improve your productivity. An
Advertisement
HDMI-compatible TV should do the trick if you don’t have an extra monitor sitting around, but the pixel density and refresh rates likely won’t be as satisfying.
First off – here’s the bad news. It’s usually a lot easier to hook up an external monitor to a PC rather than a Mac, as you can usually just use any old HDMI cable. You’re almost certainly going to need some kind
of a dongle with a contemporary Mac. On the other hand, the Apple ecosystem now lets you easily use newer iPads as secondary monitors within seconds, so it does bring clear advantages. Below, we’ll walk you through the most common options.
USE THE PROPER DONGLE OR CABLE
The easiest way to hook up an external monitor or a TV to your MacBook would be to run an HDMI cable from either a monitor or TV directly to your Mac, but that’s usually only an option on the 2011 and 2019 Mac Pros, the Mac mini or MacBook Pros from 2012 to 2015. If you have one of those models, congratulations.
For everything else, you’re going to need a dongle or a specialized cable. And if you just want a specialized cable for a USB-C compatible MacBook, we recommend Apple’s own USB-C/Thunderbolt 3 cable (£39 from fave.co/39NZrnj) if you have a Thunderbolt 3-compatible monitor. If you have a standard HDMIcompatible monitor, we recommend a USB-C/Thunderbolt 3 to HDMI cable from Uni (£17 from fave.co/3m2OzYg).
As for dongles – while not exhaustive, the options below should help with most contemporary USB-C/ Thunderbolt 3 Macs. Let’s start with Apple’s own options for HDMI and VGA, which are outrageously expensive for what you’re getting, as you might expect.

• Apple USB-C to HDMI Multiport
Adapter (£69 from fave.co/3CTniOU) • Apple USB-C to VGA Multiport
Adapter (£75 from fave.co/3ikuETL)
ARRANGE YOUR DISPLAYS IN SETTINGS
Once you’ve managed to hook up your second display, you’ll need to arrange the two displays so you can intuitively drag windows and files from one display to the other. Apple makes this easy.
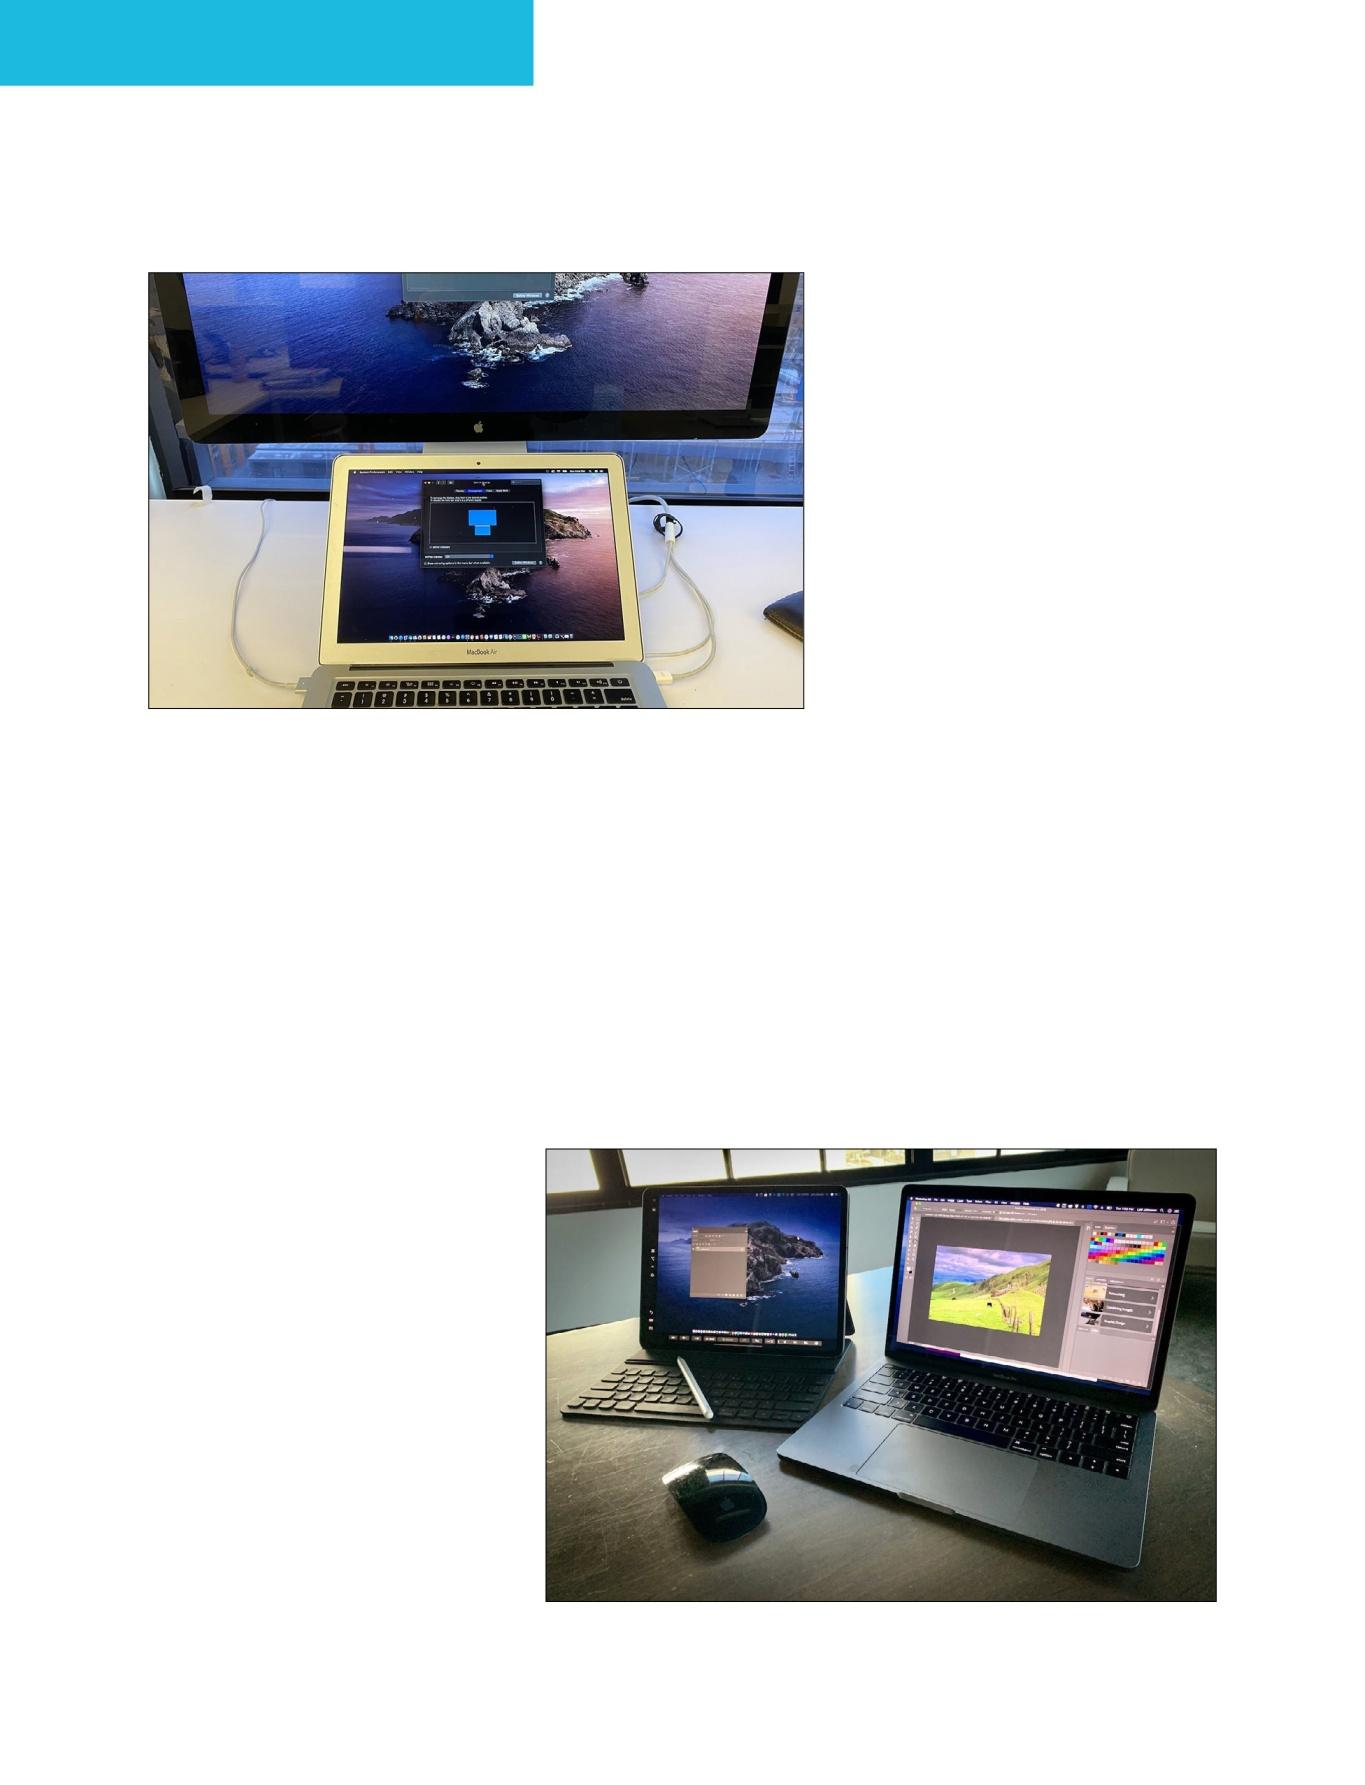
Go to System Preferences in your Mac, then click Displays and then Arrangement. If everything is set up properly, you should see two blue rectangles representing the displays, with the host Mac showing a white bar across the top.
From here, simply align the monitors the way they are in real life. So if you put your secondary monitor above your MacBook (as I have in the photo above), make sure you orient the second monitor’s blue rectangle so it’s on top of the blue rectangle representing the MacBook.
USE YOUR iPAD AS A SECONDARY DISPLAY
After that, you may want to move your macOS dock to the secondary screen if you’ll be looking at it more often. To do this, move your mouse pointer up to the desktop of the secondary monitor and click anywhere. Then makes two swift downward strokes along the bottom of the display where you would like for the dock to appear. The dock should then switch over – although keep in mind that it may take some practice. (If you have your monitors set up the way I do, make sure you make these downward strokes in a corner of the
display that doesn’t overlap with the main MacBook display. Otherwise, your mouse pointer will simply go down to the bottom screen.) If you don’t happen to have a second monitor or an Now that I’ve arranged the displays this way, I can extra TV sitting around, move my mouse pointer to the second monitor just an iPad now works as a by moving it up. The transition is instant. secondary monitor for your Mac as well. Just keep in mind, of course, that you’ll be working with a smaller screen. There is a bonus, though: if you’ve already set up a proper secondary monitor, this set-up lets you use your iPad as a third display. You can hook up multiple iPads this way.
First, make sure the Mac is running at least macOS Catalina and your iPad is running at least iOS 13. More specifically, you’ll need at least a 5th-generation iPad, an iPad Air 2, and iPad mini 4, or any iPad Pro. You’ll also need a MacBook or MacBook Pro that was made in 2016 or later, a 2015 27in iMac 5K, or any 2016 iMac or later (including the Pro), a 2018 Mac mini, or the 2011 or 2019 Mac Pros.
Now that that’s out of the way, make sure your iPad is turned on and near your Mac. On your Mac, click the AirPlay button on your Mac’s menu bar, which looks like a rectangle with a solid triangle pointing upward from the bottom. Find the iPad you want to use as a secondary monitor from the resulting drop-down menu and select it. It should immediately start working, and you don’t even need to unlock the iPad.
USE AN OLD iMAC AS A SECONDARY DISPLAY
Got an old iMac? You can use it as a secondary monitor for your Mac with Apple’s Target Display Mode – but the host Mac needs to be pretty old too.
Truth be told, we’re at the point where this is no longer as viable an option as it once was because it demands some really precise conditions. The feature isn’t supported on iMacs with the Retina display, and it specifically only works with the following models: 27in iMac (late 2009 or mid-2010) or iMacs from mid-2011 to mid-2014.
If you want to try it out, Apple maintains a dedicated Target Display Mode support page (fave. co/3kUe7aV) that should address any questions you might have. Aside from the iMacs themselves, you’ll really only need a Thunderbolt cable.
We’d like to believe that it’d be possible for Apple to implement a feature like this for modern Macs that’s similar to what it uses for Sidecar with iPads, but right now, we’ve got no such luck.