


WWW.EASYDIY.CO.ZA UPDATE YOUR INTERIORS FROM DRAB TO FAB IN NO TIME WALLPAPER FOUR WAYS ISSUE 47 • 2022 R40 incl VAT 9772221941042 23047 9772221941042 23047 SUMMER 2022/2023 WORKSHOP ■ UPDATE ■ MAINTAIN ■ LIVING POWERASETOFTOOLS PAGE 12 WIN DIY 101: CREATING PRIVACY AROUND YOUR POOL • A SPACE-SAVING BIKE RACK • CREATING SOLAR-POWERED WATER FEATURES


TRENDS AND BUSTING MYTHS Our experts share great tips to increase your home’s resale value, and we announce the winners of the Makita competition. BITS
‘N’ BOB

If you’re planning to take on anything more ambitious than raking up leaves, there are some steps you should take to minimise health and safety risks.
Win with Makita.
Colour advice from Plascon


The three main questions you should be asking yourself when deciding whether an open or closed kitchen is right for you, your home, and your lifestyle.
Tackling some home improvement myths to help you before embarking on your home remodelling project.

Top bathroom trends that will add value to your home and please potential buyers. DIY 101
Creating privacy around your pool.

A step-by-step guide to creating a space-saving bike rack.
A quick wallpaper update on your interiors will take your renovation from drab to fab in no time.
GUIDE TO
Creating solar-powered water features in your garden.

Making a “C” table, which fits neatly over the arm of your sofa.
EasyDIY SUMMER 2022 3 CONTENTS SUMMER 2022/2023 32 31 27 35 8 22
27
31
32
35
39
39
4
7
8
10
12
13
19
WORKSHOP
REGULARS
TIPS,
Subscribe to EasyDIY.
Product roundup.
FEATURES 15
Published by:
Trends, tips and BUSTING MYTHS
It’s been a long demanding year with soaring costs all around, so any tips, tricks and trends that help your DIY projects run smoothly and, probably most importantly, to budget are always welcomed. So in this issue, we asked the experts to share their tips, trend ideas and myth-busting knowledge to make your at-home projects simpler, smarter and money-wise.
We asked Caroline Ras from Plascon to share her advice for keeping your home walls attractive and on-trend to help your home’s resale value. Grant Smee from One Realty Group shares the best way to ensure added value to your home. Orlando Luis from Brights Hardware tackles 10 myths about your home renovation project.
And if you’re up for some great tips and tricks on how to turn your kitchen and bathroom into your home’s trendiest rooms, our interior design and home experts share their expertise on how to stay on-trend and create super luxurious spaces on a tight budget.
For smaller DIY projects, we share creative ideas for storing your bicycles, creating privacy around your swimming pool and wall art that turns any space into a work of art. And, of course, we round up the best tools to have in your work room and Geoff Hollingdale takes you on another great workshop working with wood and wood joints.
If you’ve embarked on any of your own DIY projects that you would like to share with us, please send us your ideas, stories or tips and tricks.

RainaJulies CONGRATULATIONS
Picasso Headline, a proud division of Arena Holdings (Pty) Ltd
Hill on Empire, 16 Empire Road (cnr Hillside Road), Parktown, Johannesburg, 2193
Postal Address: PO Box 12500, Mill Street, Cape Town, 8010 easydiy.co.za businessmediamags.co.za


EDITORIAL
Content Manager Raina Julies rainaj@picasso.co.za
Contributors Trevor Brewer, Brenda Bryden, Geoff Hollingdale, Orlando Luis, Erin Michael, Vanessa Nouwens, Cobus Odendaal, Caroline Ras, Grant Smee, Kim Williams, Rostislav Zeman
Copy Editor Brenda Bryden Content Co-ordinator Vanessa Payne
ART
Head of Design Studio Jayne Macé-Ferguson
Senior Designer Mfundo Archie Ndzo
Advert Designer Bulelwa Sotashe
Cover Image Wendy Fenwick, aremediasyndication.com.au/ magazinefeatures.co.za
SALES
Project Manager Gavin Payne gavinp@picasso.co.za +27 21 469 2477 I +27 74 031 9774
Sales Consultants Jacqueline Bezuidenhout, Natalie Sanders
PRODUCTION
Production Editor Shamiela Brenner
Advertising Co-ordinator Johan Labuschagne
Subscriptions and Distribution Fatima Dramat fatimad@picasso.co.za
Distribution On the Dot
Printing CTP Printers, Cape Town
MANAGEMENT
Management Accountant Deidre Musha
Business Manager Lodewyk van der Walt General Manager, Magazines Jocelyne Bayer
Copyright: Picasso Headline. No part of this publication may be reproduced in any form without written permission from the publisher. The publisher is not responsible for unsolicited material. EasyDIY is published by Picasso Headline. The opinions expressed are not necessarily those of Picasso Headline. All advertisements/advertorials and promotions have been paid for and therefore do not carry any endorsement by the publisher.
4 EasyDIY SUMMER 2022 EDITORIAL COMMENTARY
TO OUR WINNER FROM ISSUE 46 – SPRING 2022
IMAGES: SUPPLIED WWW.EASYDIY.CO.ZA WORKSHOP ■ UPDATE ■ MAINTAIN ■ LIVING
SELLO MOTLOUNG is the winner of a Makita MT Power Tool set (comprising a M9203B Finishing Sander, M9507B Angle Grinder and

1 year of EasyDIY, 4 issues to enjoy for R130 (incl VAT) CALL 0860 52 52 00 Make sure you have your bank details handy when you call. Lines are open Monday to Friday, 8am-4pm TERMS & CONDITIONS n Offer valid for SA residents only. n Subscription activation is subject to payment confirmation. SUBSCRIBE EMAIL Feedback@arena.africa ONLINE AT https://subs.arena.africa 1 CALL NOW (Call with your credit card details or to arrange a debit order) 0860 52 52 00 SMS 'subs EDIY' to 43331 (standard rates apply) EFT OR DIRECT DEPOSIT Payable to: Arena Holdings - Media Circulation Subs Bank: FNB Branch code: 255-005 Account number: 62793068034 Reference: Your name, surname and cellphone/subscription number Email your proof of payment to: Feedback@arena.africa 5 E ASY WAYS TO SUBSCRIBE 2 3 4 5 20SAVE %
Must-have products FOR EVERY LEVEL DIYER
ANTI-CUT GLOVES
Tork Craft recently introduced two levels of multipurpose professional cut-resistant gloves.
The A5 and A8 units have a synthetic leather palm with soft padding, full glove lining, birds eye mesh fabric, TPR knuckle protection and a touchscreen feature on the thumb and index fingertips.
Cut-resistant gloves form part of personal protective equipment (PPE) specifically designed to protect hands from cuts and lacerations due to contact with cutting equipment, machines, tools, or sharp-edged items such as knives, blades, metals, glass, and ceramics. Both versions of the glove offer the same features; the only difference is that the
A8 offers a higher cut resistance. The A5 and A8 gloves are easily distinguishable by colour, with the A5 in lime green and the A8 in blue. They come in all the popular sizes – small medium, large, X-large, and 2X-large.
To view these new gloves, go to www.torkcraft.com

THE NEW 2022 600M RANGEFINDER
Ideal for construction, building, architects, conveyors, landscapers, outdoor TV production, sport, defence, hunting, outdoor adventurers, and mariners, the new 2022 Tork Craft Rangefinder is packed with features:

• It has a range of up to 600m;
• Dioptre of about 5D with an accuracy of approximately 0.5m;
• Offers functions such as target lock, continuous measurement, and a full LCD display;
The Festool TPC 18/4 basic QUADRIVE is a powerful, versatile compact unit with four gears for every application. It has an axial impact feature that can be switched on for working on wood, metal, or masonry. The TPC is extremely durable, thanks to its brushless EC-TEC motor, which has extreme resilience and endurance. It comes with several attachments and perfectly matched accessories, which makes the QUADRIVE a good percussion drill best used for:

• Production of wooden substructures and frame structures;
• Installation of doors and windows;
• Drilling and driving screws into wood, metal, and plastic;
• Driving screws into wood up to 10x300 mm;
• Drilling in wood up to 70mm with Forstner drill bits; and
• Drilling with impact in brickwork or masonry. It is available as a basic model or you can opt for the full set.
For more information, visit www.vermontsales.co.za
• The new model has an external on/off button slope feature, lens zoom magnification of six times fixed focal length range and a seven-degree view angle; and
• A handy, nonvisible, built-in magnetic strip has been added to the side for better support stability.
The new model Rangefinder, which replaces the previous model, comes with a 16mm diameter eyepiece lens, a 22mm diameter objective lens, a laser-receiving lens, and an ultra-quick measure mode unit change with on/off measure key. The target lock eliminates interference and locks target ranging. The trajectory compensation calculates about 20 degrees between distance and vertical angle.
The unit is USB with a built-in rechargeable lithium battery and comes with a free handy zip pouch.
For more info, go to www.vermontsales.co.za or www.torkcraft.co.za
PRODUCT ROUNDUP Bits ‘n’ Bobs 8 EasyDIY SUMMER 2022
Whether you need a new sander, drill, blades or pressure washer, we’ve got the heads-up on all the new gadgets for the discerning DIYer
CORDLESS PERCUSSION DRILL
FACE OFF DISCS
The Tork Craft multipurpose 115mm TCFA0702B-1 and 100mm TCFA0702C-1 Face

Off Discs are the answer to stripping paint from metal or wood surfaces, cleaning work surfaces, all types of restoration work, the removal of rust, cleaning welds, smoothing all metal surfaces, and removal of graffiti.
The 115mm x M14 discs fit all power tool angle grinders – electric and cordless – with a max rpm of 13 300. The 100mm disc is fitted with a 6mm mandrel 4 500 rpm for all electric and cordless drills. The discs have an extra-coarse abrasive surface and are made from silicon carbide and nylon, which is resistant to moisture and water. They have an open-weave finish to prevent clogging and clean all surfaces without damaging the material you are working on.
The 100mm disc’s features are identical to the 115mm product and does the same all-round job, the only difference is the 115mm fits a grinder, and the 100mm fits a drill. Other models are also available in the range.
To view these discs and the full range, go to www.torkcraft.com

CUTTERS
Olfa recently introduced its 100% recycled green range safety cutter, which boasts a solid 17.3mm blade to open cartons and boxes while reducing the chance of skin and body cuts. The handle and all plastic parts are made from recycled materials. Its special design is for both right-and left-handed users and has an auto-retracting safety blade feature.


The Olfa CTR SK7 GREEN is similar in function, however, it comes with a 12mm blade in a slim handle specially designed to fit smaller hands. The CTR L1 GREEN option is for heavy-duty use with a large snap-off 18mm knife blade and locking wheel. The L1 shape is Olfa’s most recognised and most loved cutting knife.
Joining this green range is the ES-1/GREEN with blade auto-lock. This is a standard heavy-duty model with a pocket clip that doubles as a blade snapper. It is designed with a solid internal metal sheath for durability. When its life is over, the steel and plastic can be separated to ensure recycling again.

Blade replacement is simple with Olfa replacement blades, as no tools are required for blade replacement in any of these models. The new cutters have an ECO MARK, which shows these products are accredited by the Japan Environmental Association.

For more information, go to www.vermontsales.co.za P

EasyDIY SUMMER 2022 9 IMAGES: SUPPLIED
MAKE HEDGE-TRIMMING EASIER
INGCO is a leading tool brand offering a diverse range of innovative, effective and quality products at low prices.


INGCO’s 20V Cordless Hedge Trimmer (CSTL!2001) is here to make your gardening even better and easier. The cordless hedge trimmer means you can reach the top of the hedge without stretching, or having to use a ladder
Prune and cut out old and bare branches damaged during the winter season to encourage and allow new, healthy growth in your garden.
The INGCO 20V Cordless Hedge Trimmer will help you accomplish gardening task with ease, giving you neat, clean and powerful cuts.
For most garden lovers, a cordless hedge trimmer is always the preferred choice. They are lightweight and

comfortable, making them easier to use. The cordless feature eliminates the resistance, dragging and tangling of an extension cord, giving you maximum freedom to trim.
The INGCO Cordless Hedge Trimmer Comes with a 20 Volt Lithium Ion Battery and a Laser Cut Blade with a maximum speed of 1200rpm. The blade is made from SK5 material, which means it is a tough, high-quality blade with a cutting width of 200mm and 8mm teeth, ensuring accurate and consistent cutting performance.


The unit has a double-action blade that reduces vibration and noise. It has a double switch for safety, and the blade can be removed without removing the housing, allowing for safe maintenance of your INGCO product.


With a 2.0Ah battery, the maximum working time is three hours, and with a 4Ah battery, the maximum working time can be up to five hours, making it one of the most efficient and competitive tools for gardening.
Many people turn to their gardens to find balance and solace, and being in this environment boosts both mental and physical wellbeing. Invest in yourself by investing in the INGCO 20V Hedge Trimmer and the many other INGCO gardening tools and personal protective equipment in our gardening category. P
Scan this QR code to go directly to the INGCO website.

For more information
LIKE OUR FACEBOOK PAGE ingcosouthafrica www.ingco.co.za


ADVERTORIAL 10 EasyDIY SUMMER 2022 IMAGES: SUPPLIED
FIVE TOP TIPS for safe DIY


If you’re planning to take on anything more ambitious than raking up leaves, there are some steps you should take to minimise health and safety risks, shares Trevor Brewer, director of Solenco
There’s certainly no shortage of inspiration available for DIYers … Instagram, Pinterest, and even hardware stores have endless ideas for turning awkward corners into coffee bars, installing doggie-friendly showers, and even tackling full-on bathroom and kitchen makeovers. What there does seem to be a shortage of, however, is solid safety advice. Here are the top five safety tips for anyone planning a DIY project of any kind:
1
IT’S ALL ABOUT PLANNING
One of the reasons professionals can work so efficiently is that they research the work to be done and buy the tools and materials they’ll need in advance. Anyone who’s ever tried to unscrew something using a butter knife instead of an actual screwdriver knows the frustration of not having the right tools for the job. Painting is another good example: the right-size brush or roller can save hours of manual labour and help to prevent runs and streaks. While it’s essential to have good ventilation when painting indoors, investing in a dehumidifier will drastically reduce the time it takes the paint to dry, delivering two important benefits – a smoother, streak-free finish and less inhalation of fumes.
SAFETY FIRST (AND LAST)
It’s common sense that electrical jobs are dangerous and require certain safety precautions. But it’s not only projects involving power that have the potential to be very dangerous; there are also invisible health hazards inherent to DIY work. Paint chemicals, fine matter from building materials, and dust particles often fly under the radar, but can result in allergy flare-ups, asthma, and other more serious respiratory conditions. Apart from using the appropriate personal protection gear for the job, getting an air purifier will keep you safer by filtering out air-borne hazards as you work.
CHEAP REALLY IS NASTY
There’s no point in having the right tools and grand plans if you buy cheap materials. As part of your planning, keep an eye out for specials and sales. Budget to buy top-class materials over a few months if you need to, but don’t fall into the trap of buying knock-offs because you need them now. Chances are, if you DIY with doubtful materials, you’ll end up doubling your efforts and doing the same job twice, which will cost you more anyway. You’ll also be exposing yourself and your loved ones to harmful chemicals that are more prevalent in cheaper paints and sealants, for example.
4 5
MEASURE TWICE, CUT ONCE
Talking about doubling up on your efforts … The only time this is a good thing is when you’re measuring. Take your time and do it two or three times, whether it’s measuring the space to work out the materials you’ll need, or measuring the materials before you start cutting and drilling. In the long run, it’ll save you time and money.
WORK IN THE RIGHT SPACE
Are you planning to paint shelves in the window-less pantry, or glue glass panels together in the stuffy greenhouse? Think carefully! Will the paint dry before it streaks and bubbles? Is there sufficient ventilation to offset glue fumes? Where you’re DIY-ing is as important as what you’re DIY-ing. The moisture levels in a workspace can work against you if you don’t have a dehumidifier working alongside you. A dehumidifier will remove any excess moisture from the air, allowing your work to dry and cure efficiently. If you haven’t properly considered where you’re working and start building bedroom cupboards on the driveway, you may find out later that you can’t fit them through the bedroom door. P
DID YOU KNOW?
Several Solenco products have been given the seal of approval by the Allergy Foundation of South Africa (AFSA), with a selection having NAPPI (or recognised medical aid product) codes. Solenco has also been recognised as the best-selling brand on Clicks Online.
SAFETY Bits ‘n’ Bobs EasyDIY SUMMER 2022 11
IMAGES: DEMAERRE/ISTOCKPHOTO.COM, RAWF8/ISTOCKPHOTO.COM, ANDREYGONCHAR/ISTOCKPHOTO.COM, JOVANMANDIC/ISTOCKPHOTO.COM, SUPPLIED
2
3
Makita MT M9203B Finishing Sander

The Makita MT M9203B Finishing Sander is compact, lightweight, easy to handle and your perfect partner for all those hard-to-reach corners – this is where a sheet sander comes into its own. The one-third sheet sandpaper is quick and simple to install and remove using the paper clamp with rolled clamper edge. Its features include a sturdy motor housing; high dust extraction for a cleaner working environment; and a rigid aluminium foot with a sponge sleeve that provides high durability and effective vibration-absorbing performance. This 190W model weighs 1.5kg and is supplied with abrasive paper, a punch plate, a dust bag and a 2m long supply cord. An optional hose attachment is available to connect directly to a dust extraction system.
Makita MT M9507B Angle Grinder


The Makita MT Angle Grinder M9507B is a 115mm model offering high performance and durability. It is ideally suited for the user who requires an angle grinder that gets the job done. Built with simple, solid power, the M9507B doesn’t play around – its 720W motor produces a maximum no-load speed of 11 000 r/min. Operator comfort and safety have not been overlooked. The ergonomically designed slim motor housing and body shape make for a comfortable fit and the side grip is positioned at a 20-degree angle to the gear housing, providing easier and more comfortable handling. Measuring 261mm in length and weighing 1.9kg, the M9507B is fitted with a 2m supply cord and supplied with a lock nut wrench and a side handle. Grinding and cutting discs must be purchased separately.

Makita MT M8101B 13mm Impact Drill

The Makita MT M8101B 13mm Impact Drill has a powerful 710W motor and features a keyless chuck and a variable speed trigger that provides the user with maximum control over the drill speed via the trigger with forward and reverse change. The handy lock-on-button locks the trigger switch in place for ease of use in continuous drilling applications. The M8101B has a capacity of 16mm in concrete, 13mm in steel and 30mm in wood, delivering up to 48 000 impacts per minute. This impact drill has a no-load speed of 0–3 200 r/min, measures 296mm in length and weighs 2.1kg. The impact drill has an extra rigid cylindrical housing and comes standard with a side grip, depth gauge and a 2m power supply cord.
To enter and be included in our Business Media Mags newsletter database, SMS EASYDIY 47 MAKITA 1 followed by your full name, email and physical address to 33089. SMSes cost R1.50 each.


To enter without inclusion in the newsletter, SMS EASYDIY 47 MAKITA 2. SMS errors are billed; free SMSes do not apply. For full terms and conditions, visit easyDIY.co.za. Competition ends 15 February 2023.

range of standard duty industrial power tools provides the quality you expect from Makita at an affordable price. One lucky reader can win a Makita MT Power Tools set (comprising M9203B Finishing Sander, M9507B Angle Grinder and M8101B Impact Drill) WIN with Makita
Makita’s
12 EasyDIY SUMMER 2022
The best colour palette TO ATTRACT BUYERS
While most estates have recommended colour codes with regard to exterior colour choices, for the most part, these tend to sit within the neutral spectrum. The options present as either a choice of a few related colours or one dominant colour for walls, with a matching accent colour for trimmings. There are many reasons for this, such as consistency of aesthetics across the development, but one main consideration is the potential resale value.
While one individual might value shocking pink walls, it is not a commonly loved choice. It is safer and more practical to choose paint colours that will be most effective in attracting the widest range of buyers and won’t present them with the added cost of repainting if they don’t like that bright pink, for example.
NEUTRAL DELIVERS NUANCE
You may look at the word “neutral” and think it is limited to white, white and more white, but neutrals are much more nuanced than that. Apart from white, which is still an incredibly popular choice due to its heat-reflecting ability and appearance of cleanliness, there are off-whites, beiges, greys and “greiges” (a mix of grey and beige) in a vast array of tones and hues. The great thing about all these colours is that they go with each other and with everything else – whatever the landscape and the choice of neutral paint on neighbouring homes.
If your estate is a new development that has yet to choose its colour palette, or if you’re an existing estate that wants to change its colour direction, then warm whites, beiges and greys are undoubtedly the best options for
painting exteriors to attract potential buyers. The Architectural Greys range from Plascon has a wonderful selection of grey hues, such as GR-Y06 Orchid Bay, GR-Y04 Mandarin Tusk and GR-Y05 Antique Petal, that will create a sophisticated yet subtle appearance. In the Essential Collection, you’ll find a range of beiges and off-whites, like 4 Salt Pebble, 7 Frothy Milk, 1 Evening Mist and 13 Alpaca, that provide warmth and make spaces feel welcoming.
MAKING SPACES APPEAR BIGGER, BRIGHTER AND CALMER

Picking neutral colours is about more than just creating a blank canvas for potential buyers – they help make small spaces look bigger and dark spaces brighter.
For south-facing estates or those placed in the shadow of a mountain, and where the homes are on the smaller side, white is a perfect choice of paint colour. White doesn’t absorb any light
or warmth, but reflects light that comes its way to create the illusion of a bigger space. We recommend using Plascon’s standard white to achieve a crisp white look, or picking more subtle off-white colours such as Ray of Light 07-A2-3 or GR-Y05 Antique Petal. Black obviously does the complete opposite, absorbing light and making spaces look smaller, which is why we recommend steering away from darker charcoal and greys unless they are used in small doses.
“Natural” is another word we like to use when looking at the paint colours that best attract new buyers. They can be incredibly effective in creating a calm atmosphere, which can help potential buyers feel welcome on their first viewing. There are definitely benefits to bringing in subtle touches of colour, such as 84 Light Sage, 92 Nutter Butter, G2-E2-1 Briar Green, and O6-E1-3 Maple Tree, to create depth and counteract the starkness of whites and greys.
In short, neutrals are the key to attracting the largest possible pool of buyers, instead of trying to appeal to a select few. By opening up estates to a bigger potential market, they help fuel demand and ensure appreciation in value. P
COLOUR ADVICE Bits ‘n’ Bobs EasyDIY SUMMER 2022 13
IMAGES: SUPPLIED
Caroline Ras of Plascon shares why keeping it neutral will help your home’s resale value
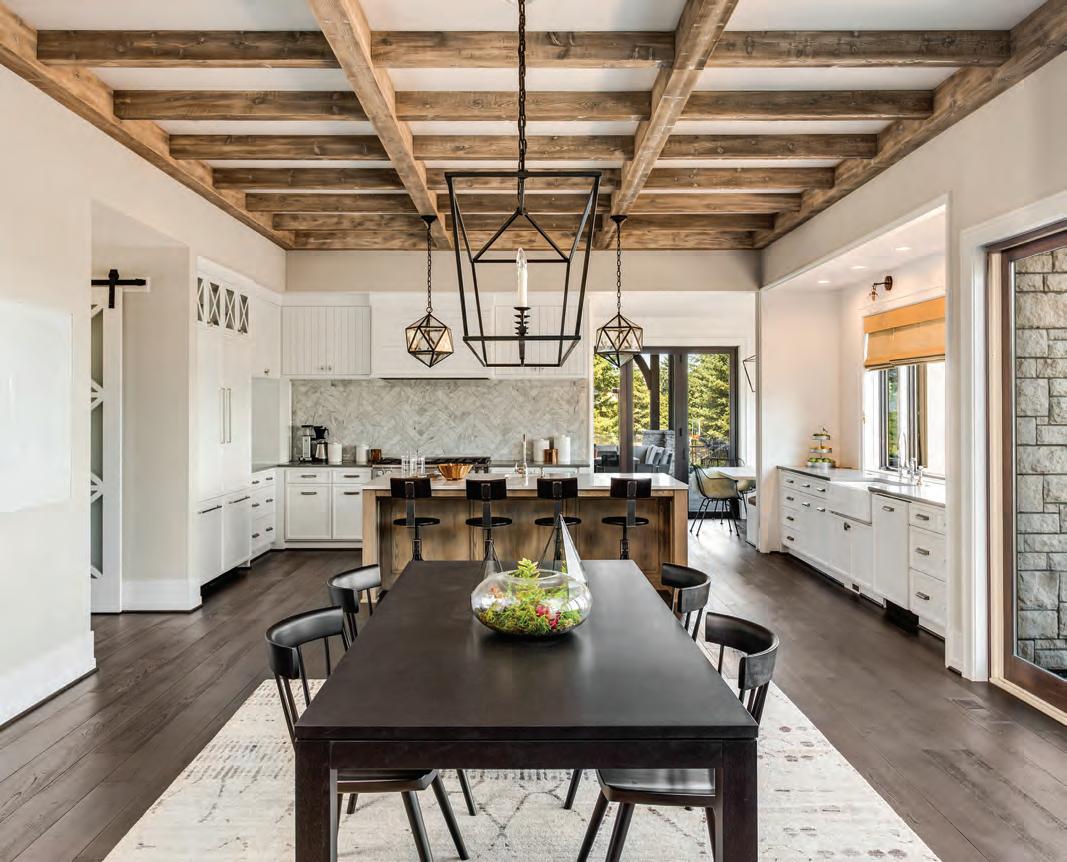
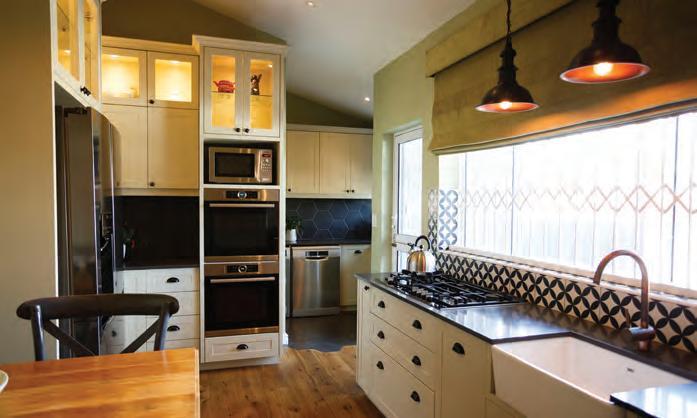
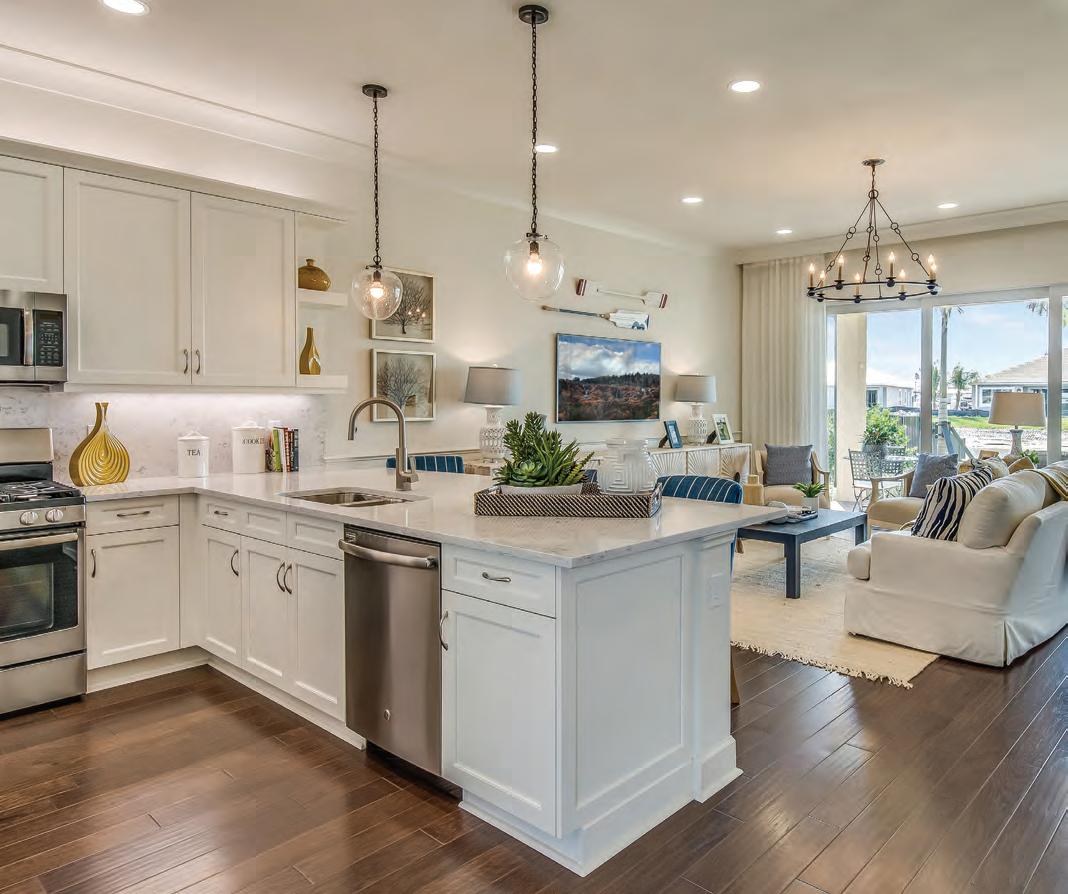
THE OPEN-PLAN KITCHEN is evolving
South Africans love their space, and over the last few years, so many of us have embraced the trendy open-plan floor layout. Tearing down dividing walls between the kitchen, dining area, and living room was the perfect way of fashioning out expansive open space at the heart of the home and bringing everyone together for casual living and entertaining. Then came a global pandemic and suddenly, the way we live, work, and use our
homes changed considerably. We are spending more time indoors now, and as a result, space is becoming a premium. The dining room table is especially taking a hit – not just being used to eat, but also doubling up as a school desk and makeshift home office.
Combining open-plan living with the work-from-home lifestyle is proving quite a challenge, with many of us now longing for clearly divided spaces that allow for privacy and flexibility.
OPEN-PLAN KITCHEN Feature EasyDIY SUMMER 2022 15
Kim Williams, interior designer and creative behaviour strategist, reveals the three main questions you should be asking yourself when deciding whether an open or closed kitchen is right for you, your home, and your lifestyle
WHAT KIND OF HOST ARE YOU?
The kitchen has always been a place where people come together, so a good starting point is to think of how your kitchen will work during family dinner times or a social event such as a party or casual weekend braai.
Spend time thinking about how you, as the cook and host, would like to connect to your guests and other people in your home. If you want to keep the conversation flowing outside of the living or garden area and enjoy turning a task into a social
event, then an open-plan layout will work best. Remember though, that with the good comes the not-so-good – while an open plan layout will allow others to join in and help you prepare, it also means they will observe everything you do, even when things go wrong.
If a closed kitchen appeals to you more, then bear in mind that even though you’ll be isolated from your family and guests, they will still feel obligated to assist you. This means that your guests (or children) are likely to land up in the kitchen anyway.
HOW DO YOU FEEL ABOUT CLUTTER?
A functional kitchen is one where there is plenty of storage and place, or where space is clearly identified for everything, including appliances and cleaning products. I always think a broom cupboard should be a non-negotiable in any kitchen, as it allows you to tidy up quickly and keeps those pesky items hidden when not in use.
Your view and relationship with mess will be a good indication of what type of kitchen layout is right for you, as this will naturally always be visible to others in an open-plan kitchen. Think about your everyday routine here. If you will
OPEN-PLAN KITCHEN Feature 16 EasyDIY SUMMER 2022
be using the same space to work from home, then consider what may or not be visible during a Zoom call.
If the thought of having dirty pots and pans on display is off-putting, then consider cordoning off some space from
the main area for a scullery. Not only will this give you more storage, but you can also stash unwanted and unsightly things away from prying eyes.
If you really want clearly demarcated spaces, then separating the living and
cooking area will improve your layout and flow. This option will also give you more wall space to work which, in turn, provides more functional opportunities and allows for more cupboards for storage.
WHAT DOES THE REST OF THE HOUSE LOOK LIKE?
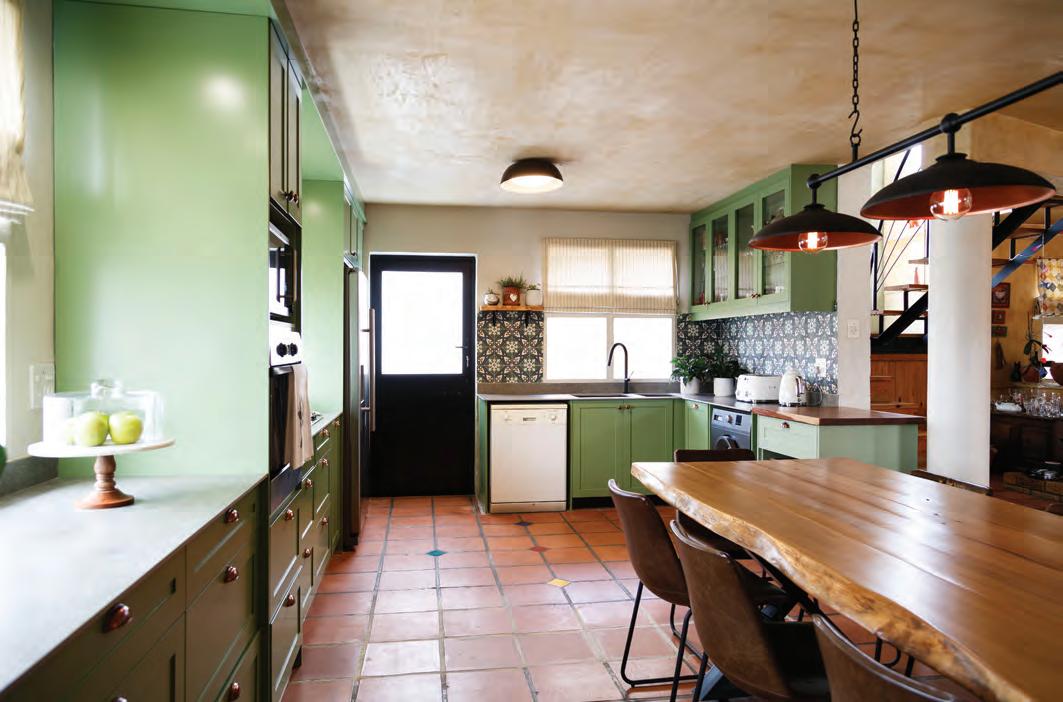
Kitchens are forming part of people’s lifestyles and becoming a place of expression, so it is important that the space reflects not just how you want it to function, but also your personal aesthetic. Closing off the kitchen can take away valuable and sometimes unnecessary space, but separating it from the rest of the house can make it difficult to keep the interior decor theme flowing.
Even in an open-play kitchen area, the kitchen should not just look good, but also integrate well with the surrounding living space. Don’t be afraid to add texture in the form of wallpaper and colour if this is happening in the living and dining area.
I absolutely love bringing life and joy to a kitchen by adding coloured cabinetry and then complementing this with stunning tiles, soft lighting and some intricate stonework around the sink and stove. Soft closing drawers are another non-negotiable for me, as it means cabinet doors close softly and automatically, causing less disturbance to those in other parts of the home.
The choice to open your kitchen to the rest of the house is a personal one, but extending your space and enhancing the layout of your home shouldn’t come at the expense of your lifestyle and everyday routine. P
EasyDIY SUMMER 2022 17
PC
SUPPLIED
IMAGES: HIKESTERSON/ISTOCKPHOTO.COM,
PHOTOGRAPHY/ISTOCKPHOTO.COM,

(DUST) BUSTING 101 DIY and home renovation myths
 Orlando Luis, CEO of Brights Hardware, tackles some home improvement myths to help you before embarking on your home remodelling project
Myth 1 – All the money spent on upgrades will be recouped when you sell
There’s a common misconception among homeowners that they can add the full cost of any improvements made to the price tag of their home when it’s time to sell. Unfortunately, this is not always the case. If you overcapitalise your home renovations, you run the risk of either overpricing your house when you do decide to sell, causing it to sit on the market for too long, or you risk losing money.
Bear in mind that everyone has different tastes. If, for example, you decide to build an elaborate home gym that takes up a huge amount of space, you may find that buyers view this as an imperfection rather than a selling point. Rather focus on spaces or features that matter – such as converting to energy-efficient solutions, bringing in more natural light, and enhancing your home with durable yet easy-to-maintain finishes that allow for easy customisation.
Myth 2 – Building/planning permission is optional

Permission from your local municipality to do building work and renovations on your home may seem like a massive pain, but it is essential. If you skip the permission step and you’re found out (or your neighbour reports you), beware! You’ll face fines and maybe even be forced to undo the work altogether.
So, however seemingly small the scale of a project, always reach out to your local building department to find out if the work needs permits. Remember, if you sell, buyers will also want to know that a completed project was compliant. Unpermitted work can be an expensive deal breaker.
BUSTING MYTHS Feature EasyDIY SUMMER 2022 19
Myth 3 – Repairs are cheaper than replacement
Sometimes repairing or patching a job with a temporary fix will often cost you more in the long run. This is especially true when repairing won’t fix the whole problem and could lead to further damage and endless costs.

For example, perhaps the water pipes in your home are ageing, or the electrical wiring is showing signs of wear and tear. If something goes wrong, such as a major leak inside the roof or walls, or an electrical fire, you are looking at damage that will amount to far more than getting the problem repaired correctly in the beginning.
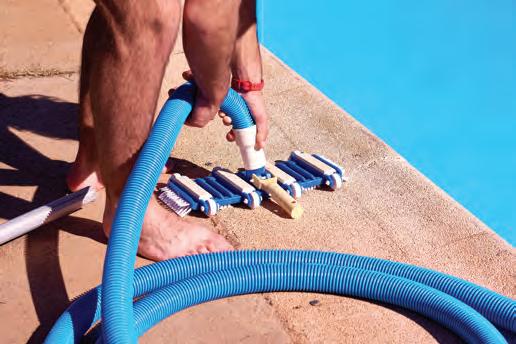
Myth 4 – Pools are guaranteed to add value
This myth can sometimes be true, but also consider that adding a pool may overcapitalise the home, plus you need planning permission to add a pool. Swimming pools also require a lot more time and maintenance than most people think, and when you decide to sell one day, you may find that potential buyers do not want the hassle of a swimming pool.
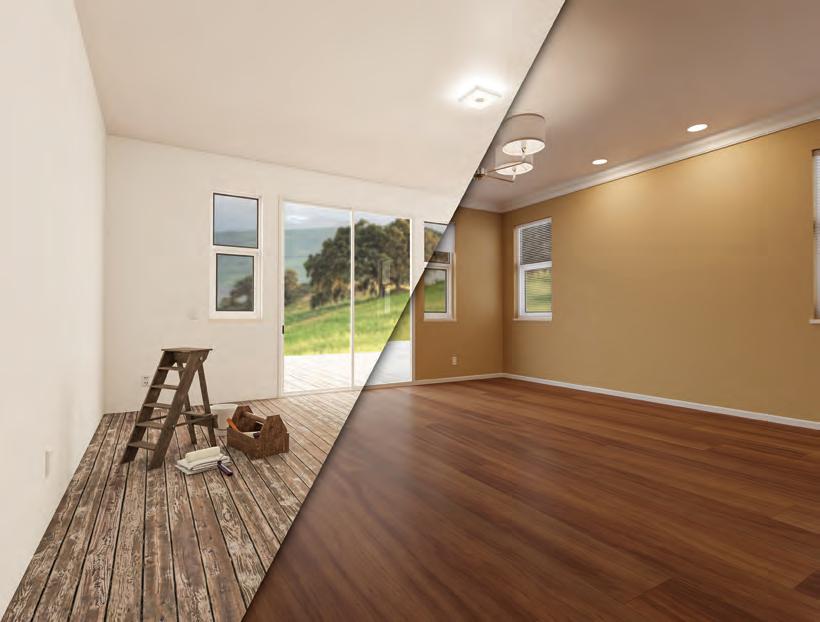
Myth 5 – It’s important to have a home that follows design trends
It’s tempting to take the latest Pinterest home trends and the current colour forecasts and incorporate them into your home by repainting and redecorating. Just be aware that trends come and go, and you may soon be bored with your new look. Plus, when you want to sell, buyers may not be keen on your tastes. Rather make inexpensive changes – such as new cushion covers and area rugs – that are easy to change back if you want.
Myth 6 – If you have cracks, there must be structural issues with the house
Cracks in the walls aren’t always a big issue. Most are just the result of seasonal expansion and contractions and can be repaired and painted over with ease. If the house has very large cracks, it is best to call a structural engineer to check it out.

BUSTING MYTHS Feature 20 EasyDIY SUMMER 2022
Myth 7 – Going green means high expense
It’s true that some “green” home improvement products can be more expensive than their traditional counterparts, but it’s not always true. In the long run, going green will save you money on heating, cooling, and electrical bills and make your home a very attractive option for potential home buyers.

Myth 8 – Cheap is cheerful
Sometimes this is true. Perhaps you can get away with a cheaper countertop in the kitchen or a cheaper tile on the floors, but be careful when using cheaper items such as plumbing and electrical supplies and building
materials. Bottom-of-the-range items can be poorly made, and you may be in line for costly repairs or replacements down the line. Take time to review the related warranties and guarantees of the products before you purchase.


Myth 9 – DIY always saves money
DIY is wonderful, but sometimes you should not tackle a project yourself! Undertakings such as major roofing projects, certain electrical repairs and upgrades, and structural work may need the expertise of a professional. If you make a mistake, it could come back to haunt you down the line, with expensive repairs needed or the compromised safety of your household.
TOP TIP
All Brights Hardware stores have on-site experts to provide advice and guidance on building and renovating.
Myth 10 – Home renovations and upgrades always cost a fortune

Many home improvements and renovations can be done on a shoestring budget. Clever products such as vinyl stick-on tiles and paint that covers melamine, for example, make it possible to change your home without spending a fortune. New handles on kitchen cabinets, new taps, and some new lighting are further ideas of changes that can be made at a lower cost yet have big impact. P

EasyDIY SUMMER 2022 21
FEVERPITCHED/ISTOCKPHOTO.COM, KEMALTANER/ISTOCKPHOTO.COM, RAWPIXEL/ISTOCKPHOTO.COM, MONKEYBUSINESSIMAGES/ISTOCKPHOTO.COM, SIMPSON33/ISTOCKPHOTO.COM, JUAN CLAUDIO
FOLLOWTHEFLOW/ISTOCKPHOTO.COM, SUPPLIED
IMAGES:
PEREZ/ISTOCKPHOTO.COM,
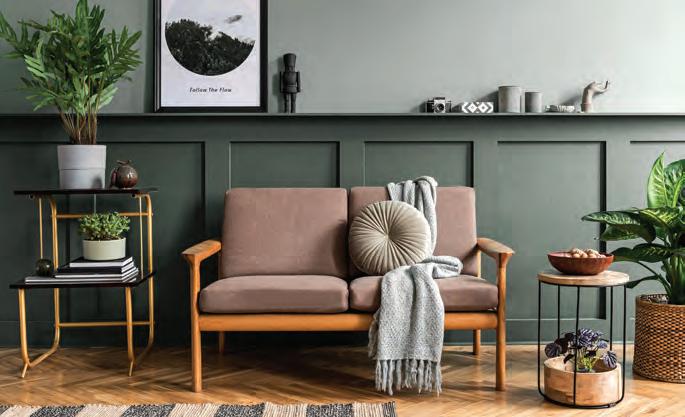
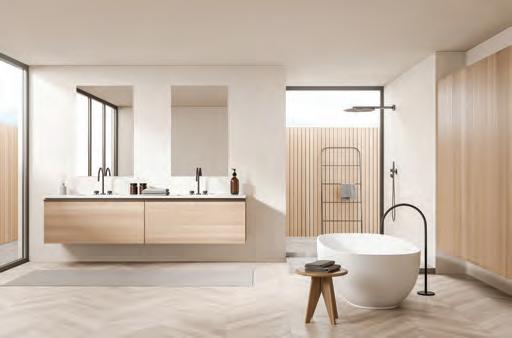
TOP 9 BATHROOM TRENDS for 2022/23
Cobus Odendaal, CEO of Lew Geffen Sotheby’s International Realty in Johannesburg and Randburg, shares the top bathroom trends that will add value to your home and please potential buyers
It’s no secret that keeping a home up to date can make it more lucrative and help to sell it quicker when the time comes, but not all upgrades are equal. The bathroom is a vital space in your family’s home, but it’s more than that – it’s also one of the main rooms that can be a deciding factor for potential
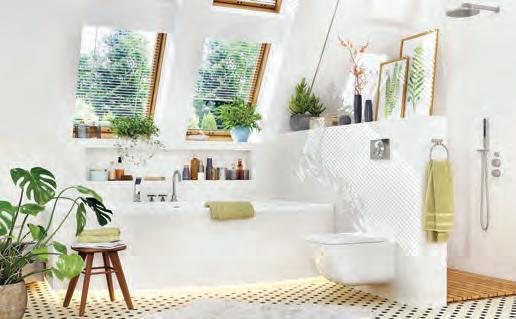
INTRODUCE NATURE
buyers. A bathroom upgrade will not only make your life more comfortable and luxurious, but also add significant value to your home.
Most buyers love the allure of a fresh, attractive bathroom that reminds them of luxury hotels. Most importantly, buyers want to envision themselves enjoying this luxury every day in their
new home. When home buyers come view your home, they will scrutinise the bathroom more closely than any other room, so if you want to capture their attention, this is the space you should focus on.
Whether you’re looking to make a minor upgrade or a complete overhaul, consider the following options and trends:
Biophilia – a love of life or living things – is a bathroom interior design trend that will continue to grow. Including plants in your bathroom’s decor will not only add a touch of greenery, but also improve the air quality. However, bear in mind that not all plants enjoy high humidity, and bathrooms often don’t have much natural light, so not all plants are suitable. The best options include orchids, ferns, bamboo, begonias, Chinese evergreen and gardenias.
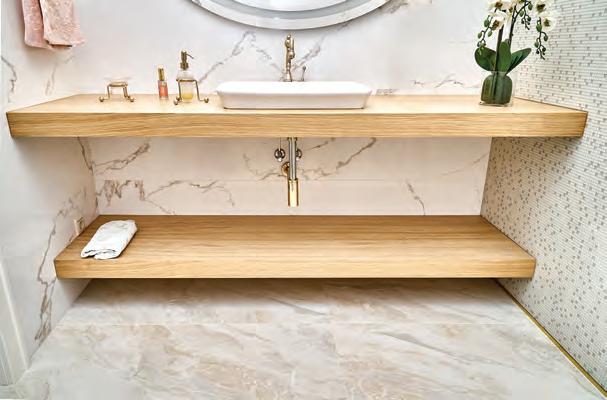
3COMPACT STORAGE SPACES
The bathroom is one room that seldom has enough storage space, and cabinet tops are usually crammed and easily become untidy. Consider installing floating shelves and swapping out the existing vanity for one that has larger cabinets.
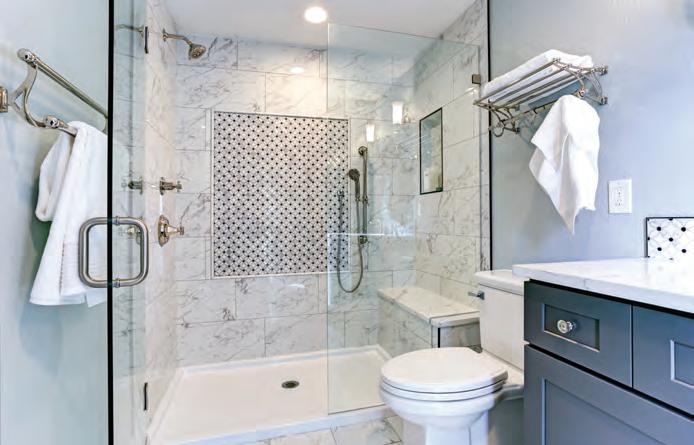
SPA-LIKE FEATURES
A growing number of people want their bathrooms to feel like a spa retreat, so if your budget runs to it, this is a winning upgrade. Consider luxurious finishes such as elaborate mosaic-tiled shower pans, euro-style shower doors with thicker glass, minimal framing, and attractive hardware that includes shower heads that offer a soothing downpour rather than a trickle.
BATHROOM TRENDS Feature 22 EasyDIY SUMMER 2022
2 1
WOOD ACCENTS ARE BACK
Natural materials and warmer tones and accents are making a comeback. Whether you opt for full wood panelling and wooden cabinets or merely accessorise your existing decor with wood elements, you’ll be bang on-trend.
WET ROOMS AND WALK-IN SHOWERS
Traditional small shower cubicles are giving way to considerably larger and more spacious enclosures to allow for a more luxurious experience. Add a built-in bench for convenience.

FEATURE WALLS
Bathrooms are no longer restricted to sterile all-white walls or monotone colour schemes. A statement wall with a colourful mural or dramatic mosaic tile patterning will add a “wow” factor and ensure your bathroom is attractively unique.
MIXING OLD AND NEW
These days, people are clear about what they like and want to create genuinely distinctive rooms and the bathroom is no exception. Consider a traditional bath with a sleek and modern faucet or a period faucet with a contemporary sink.


MIXING TEXTURES
We’ve seen minimalist and monolithic tones in bathrooms for a number of years now, but this is changing. Use your creative flair and opt for a fun balance of wood, glass, metal, ceramic, and whatever else catches your eye and imagination, and give your bathroom a whole new aesthetic.

BATHROOMS OF THE FUTURE
The smart home trend has grown exponentially in recent years and this now includes the bathroom. Features include toilet seat warmers, automatic lid openers, adjustable air dryers, built-in deodorisers and automatic sinks. Another increasingly common trend is the built-in Bluetooth speaker system that you can sing along to in the shower. P

EasyDIY SUMMER 2022 23
IMAGES: SL-F/ISTOCKPHOTO.COM, ALABN/ISTOCKPHOTO.COM, TIMLTV/ISTOCKPHOTO.COM, SMAGILOV/ISTOCKPHOTO.COM, FABIAN19/ISTOCKPHOTO.COM, BRISTOLDEN/ISTOCKPHOTO.COM, ARCHIDEAPHOTO/ISTOCKPHOTO.COM, ISMAGILOV/ISTOCKPHOTO.COM, ZHUDIFENG/ISTOCKPHOTO.COM
6
4 7 5 8
9
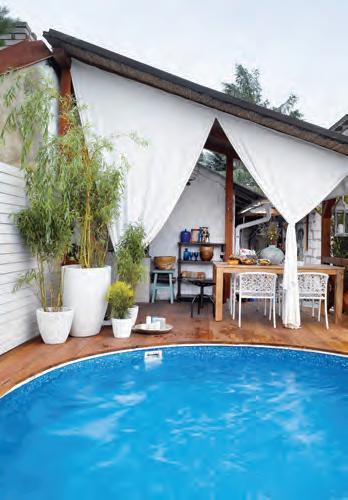
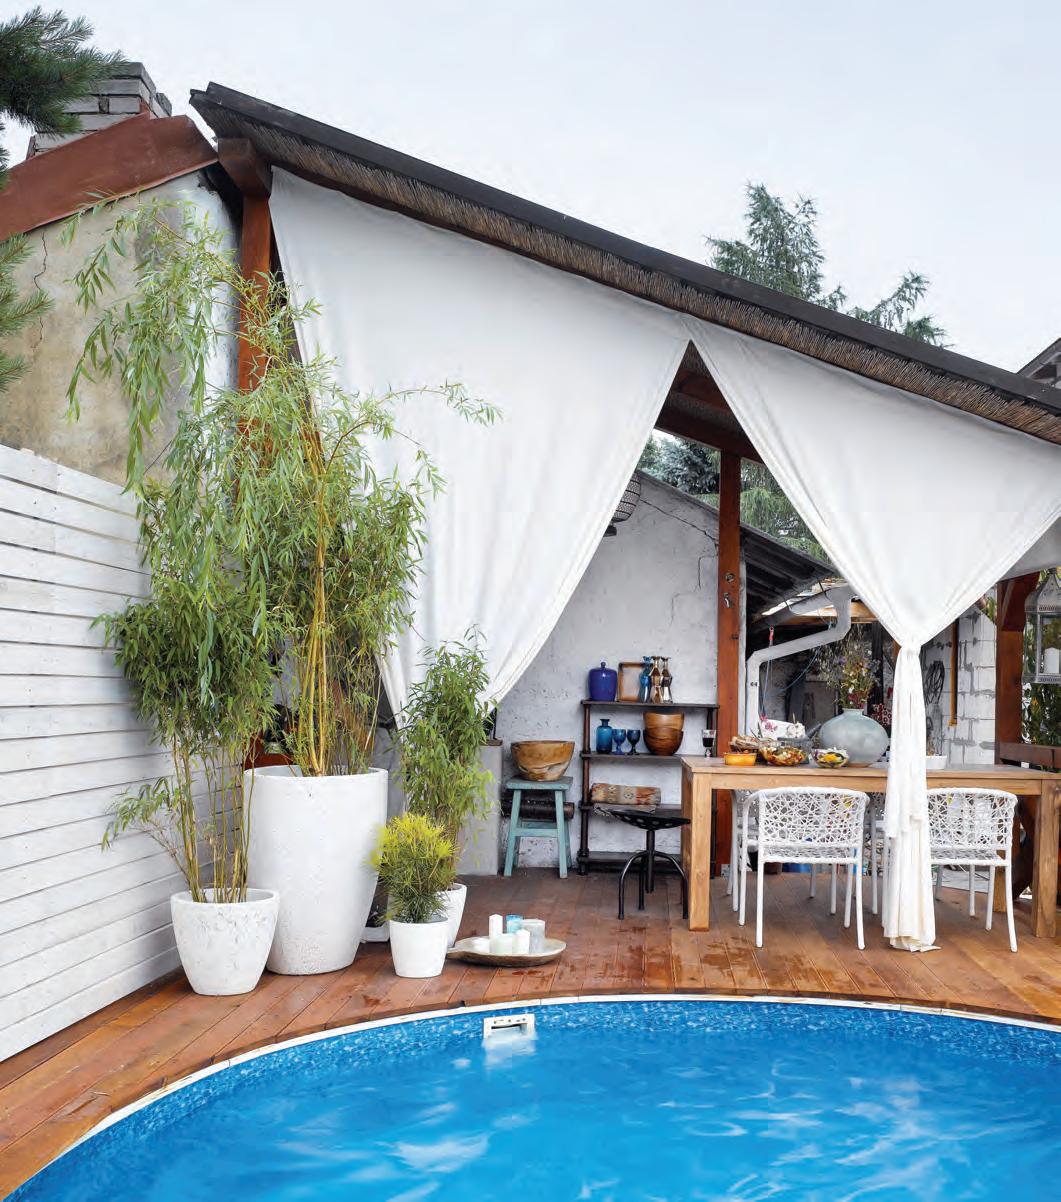
Create privacy around YOUR POOL AREA


A poolside transformation project to make outdoor living that much more enjoyable.
 By Rostislav Zeman
EasyDIY SUMMER 2022 27 POOL PRIVACY DIY 101
ALL ABOUT THE SPACE
The pool with the pergola is in the corner of the garden on the border of the neighbour’s land. The wire fence has been covered with a reed mat. The concrete surfaces next to the pool had limited dimensions, and the space under the pergola made of spruce wood has an area of 5×4m.

THE PROBLEM
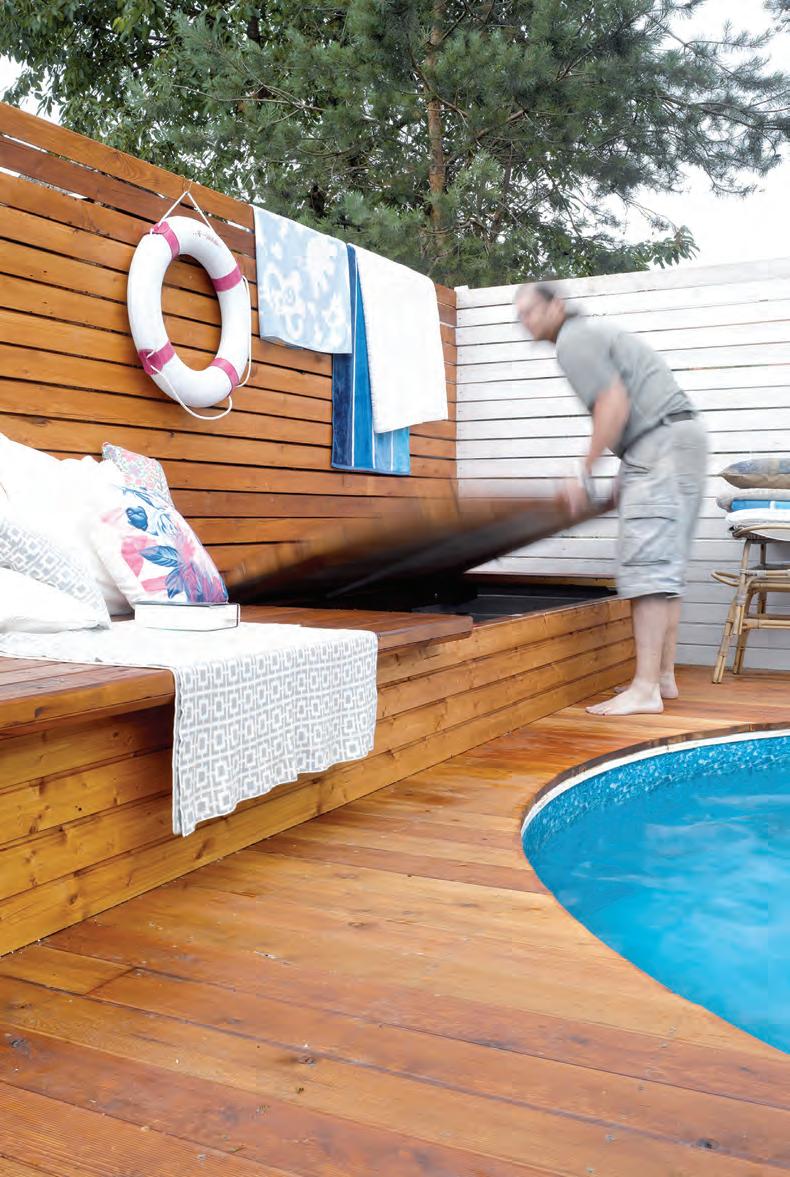
The concrete paving by the pool was made of painted bricks. In the heat, the surface burned your feet and the paint was peeling. If you passed along the fence, you were at risk of falling into the pool. The filtration located next to the pergola made an annoying noise. It was cold under the pergola – there was no heat source or storage area. You could only grill on a portable grill. The railing at the pergola around the pool prevented free movement, there was no lighting, and the entire space around it the pool looked uninvitingly cool and grey.
THE SOLUTION
A new surface for the paving and the fence, remove the railings, move the filtration, install a new fireplace, and brighten and retrofit the pergola.
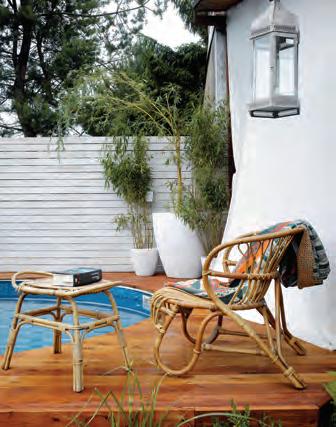
THE RESULT
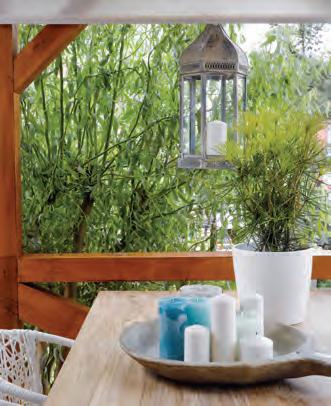
You can now walk around the pool on a pleasant surface that works well even at a glance. You can comfortably prepare food in the fireplace in the pergola. The pergola is better lit in the evening and has blinds to help protect against the sun. The relocated filtration next to the pergola creates storage space.
28 EasyDIY SUMMER 2022 POOL PRIVACY DIY 101
PRIVACY CURTAIN
HERE’S HOW

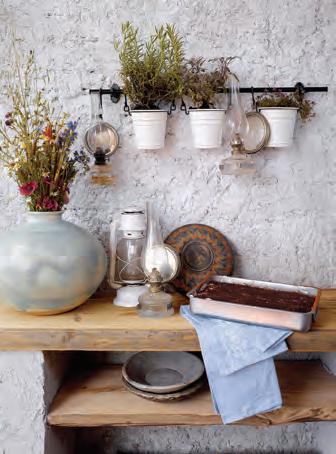
If you want space under the pergola, choose wood instead of concrete. If you are concerned that it’ll be too much wood for a small space, paint part of it – you can do that anyway even with concrete. White works well to give it a Mediterranean feel.
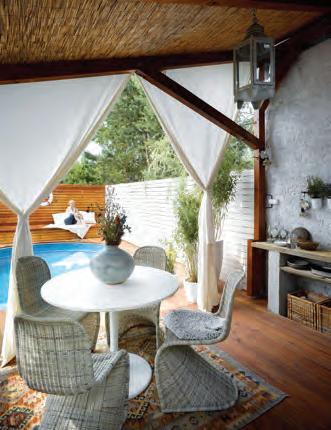
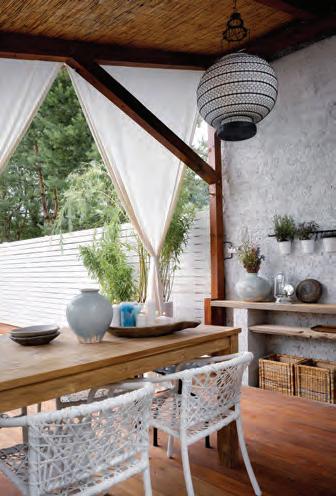

For a warm home atmosphere, you don’t want to have to carry around mobile grills, so a brick fireplace looks and works better. For a relaxing holiday feel, you can create an atmosphere with accessories in an ethnic style. Use an outdoor carpet, a massive table of exotic wood, or metal lanterns.


TOP TIP


You can easily create a curtain from cheap outdoor fabric.
TABLE AND CHAIRS
The designer created two seating options – a small and intimate area for sitting with coffee or snacks and a larger area for which the designer chose white chairs and artificial rattan. It is pleasant and creates an almost seaside atmosphere. At the same time, it is light and durable against the weather’s effects and does not require excessive maintenance. Both selected chair variants are stackable. P
EasyDIY SUMMER 2022 29 IMAGES: FILIP ŠLAPAL/SUNRAY PHOTOS/MAGAZINEFEATURES.CO.ZA
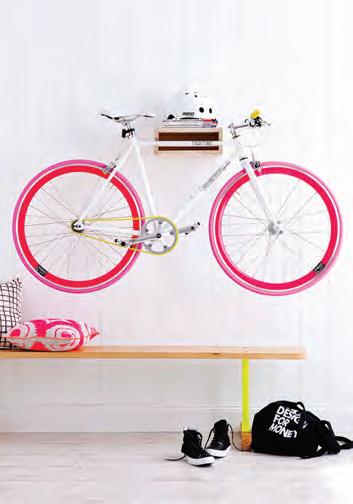
Create a bike rack STORAGE SHELF
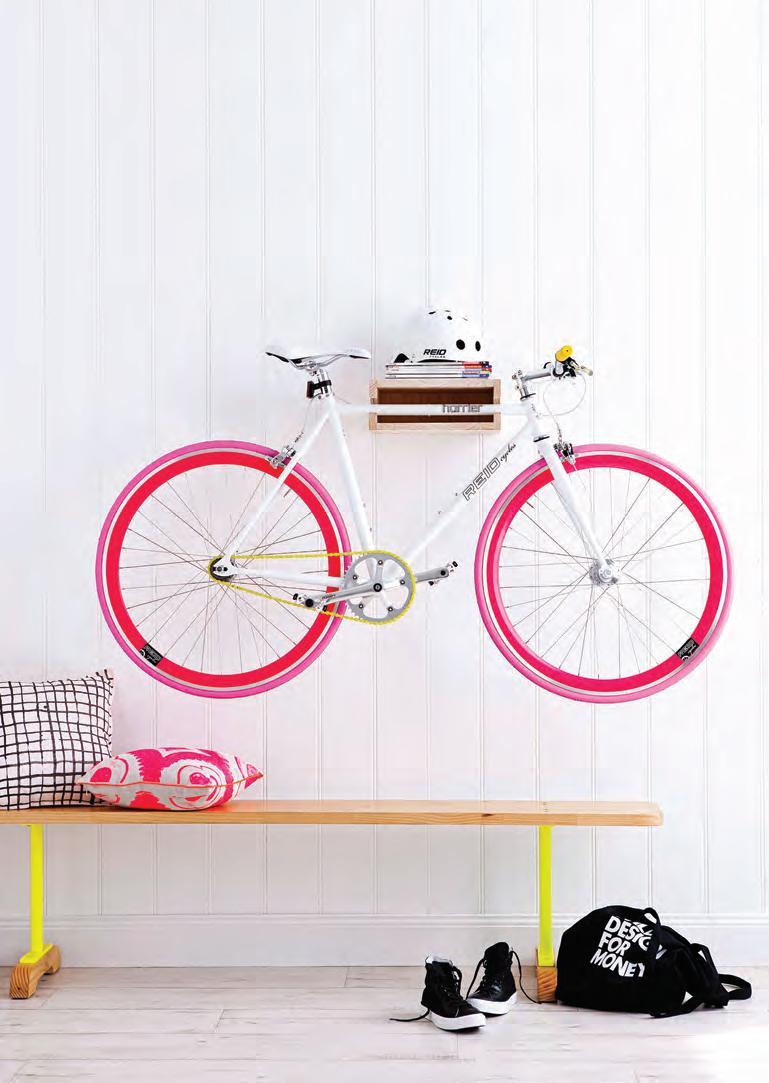
A step-by-step guide to creating a space-saving bike rack.
By Erin Michael
YOU WILL NEED:
•
• Tape measure and pencil
• Handsaw or drop saw

• Holesaw – we used a 51mm holesaw
• Drill and 1mm drill bit
• Fine sandpaper (150 grit)


• Liquid Nails
• 32mm long screws
• Spirit level
• Dynabolt or suitable fixture.
HERE’S HOW:
RSTEP 1
You will need five timber panels to create your bike rack.
Your panel sizes will depend on the size of your bike frame. See “You will need” for our dimensions. Measure and cut timber to size. You could do this yourself or ask your local hardware store to cut it for you.
STEP 2
Use a holesaw to cut a hole (larger than the diameter of your bike frame) 5cm from the edge of each of the two side panels. Cut two straight lines, 4cm apart, from the edge of each panel into the hole to create a mushroom shape – this is where your bike will be supported. Lightly sand edges.
STEP 3
Drill three pilot holes along the top and bottom edges of the side and back panels. These holes will act as a guide for the screws.
STEP 4
Assemble the box rack, glueing panels together using liquid nails. When the glue is dry, drill the screws into the pre-drilled holes to ensure the box is sturdy.
STEP 5
Step 1 Step 2 Step 3 Step 4 Step 5
Mark the desired position of the rack on your wall, then mark and drill four holes in the back of the box and into the wall. Insert Dynabolt or suitable fixture and tighten to secure the rack to the wall. (Note: the fixing method will depend on your wall type.)
STEP 6
Step 6
Mount your bike and store your helmet and fave mags on top. P
BIKE RACK DIY 101 EasyDIY SUMMER 2022 31
Timber panels – we used 1 x pine finger-jointed panel 1.8mx30cmx18mm cut into 5 pieces – top and bottom panels: 30x33.8cm; side panels: 13x33.8cm; back panel: 30.2x9.4cm
IMAGES: MAREE HOMER/AREMEDIASYNDICATION.COM.AU/MAGAZINEFEATURES.CO.ZA
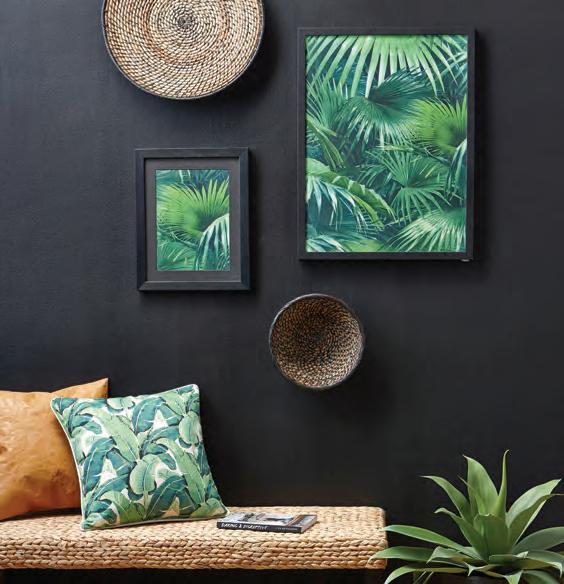
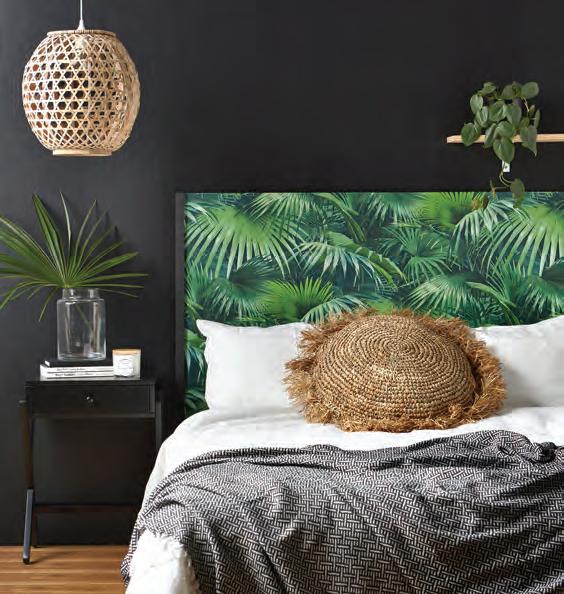
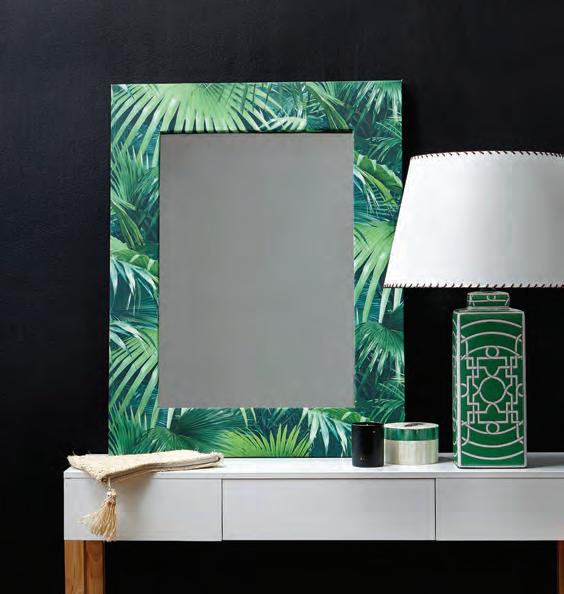
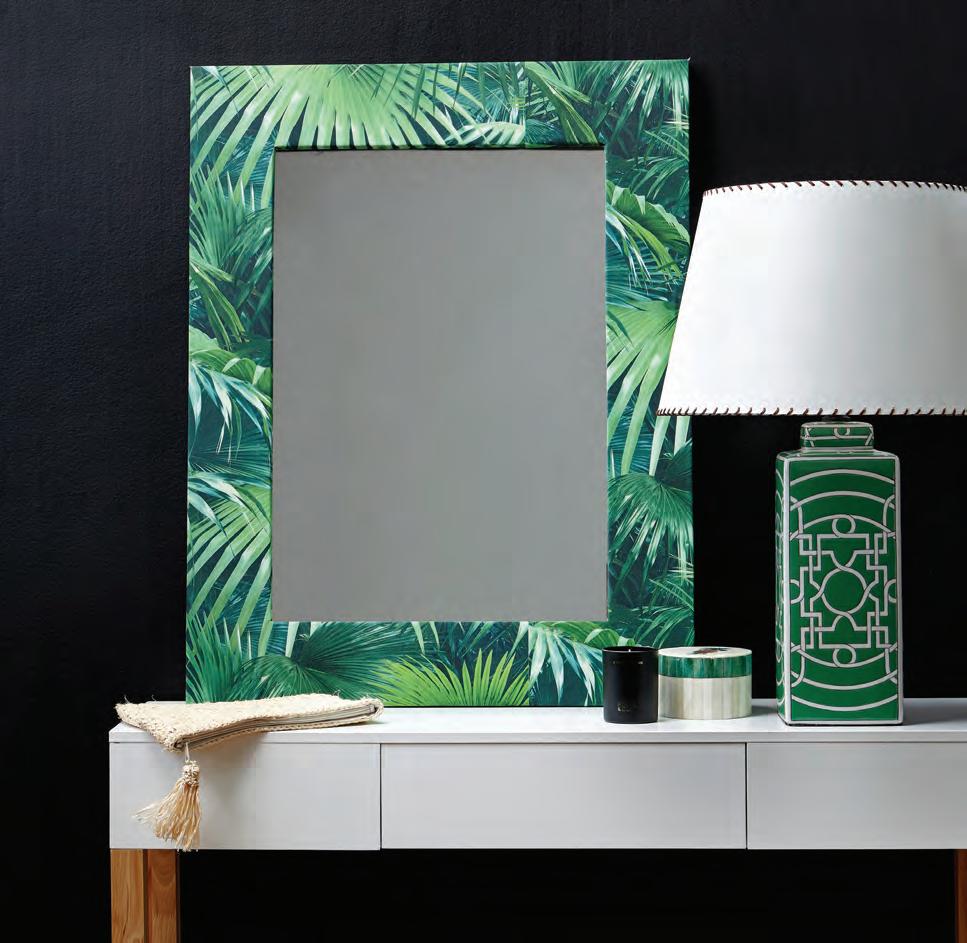
Four ways with WALLPAPER
A quick wallpaper update on your interiors will take your renovation from drab to fab in no time. By
MIRROR

Create a statement mirror by revamping an old one. Remove the mirror from the frame. Cut wallpaper and wrap around the frame, making sure to match the pattern at any joins (position joins as unobtrusively as possible). Cut slits so the
wallpaper can fold around the corners neatly. Stick wallpaper to the back of the frame with clear craft glue. If the mirror is going in a wet area (or for extra longevity), seal with a coat of clear varnish. Once dry, pop the mirror back into the frame.
WALLPAPER DIY 101 32 EasyDIY SUMMER 2022
Vanessa Nouwens
1
1
HEADBOARD


To make a headboard for a queen bed, you’ll need a 12mm-thick piece of MDF 80x167 cm (or cut it to the width of your bed plus 14cm). Cut wallpaper to cover the MDF allowing an extra 10cm at the top and bottom, ensuring you match the pattern all the way across. Apply clear craft glue over the entire back of the wallpaper and then stick to the MDF, wrapping ends over the top and bottom of the MDF. Let it dry. To make a trim for the sides, cut 2 strips of MDF 3x80cm and paint in your desired colour (we used a black testpot). When dry, use Liquid Nails glue strips to the front of the headboard, down each side; this creates a nice trim and covers the edges of the paper. When completely dry, attach heavy-duty mirror-hanging hooks to the back and hang on the wall.

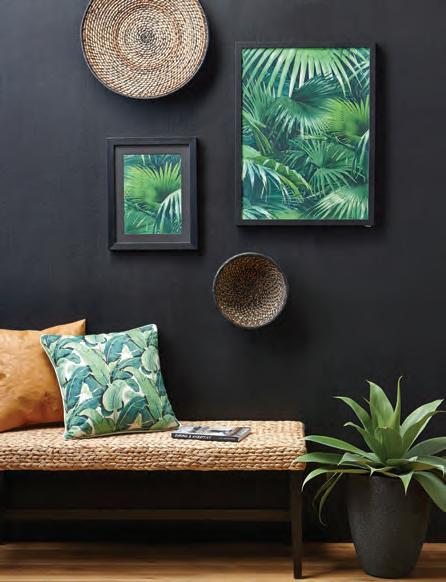
FRAME IT

Wallpaper looks great when framed so reuse an old frame (or buy a new one), pop in some wallpaper and hang.
TRAY


Give a tray a new look by lining it with an offcut of striking wallpaper. Cut the wallpaper to fit the base and glue it down with clear craft glue. When dry, seal with a coat of clear varnish. P


DIY 101 EasyDIY SUMMER 2022 33
AREMEDIASYNDICATION.COM.AU/MAGAZINEFEATURES.CO.ZA
IMAGES: WENDY FENWICK,
3 4 2 2 3 4
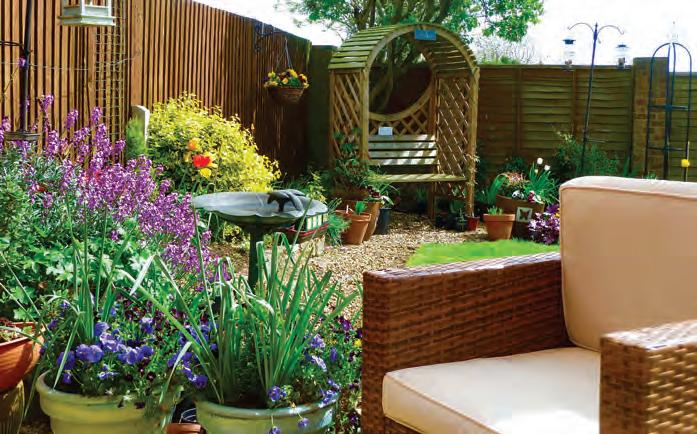
Creating SOLAR-POWERED WATER FEATURES


Time to break free from the grips of Eskom, but you can still enjoy having water features in your garden, simply solar power them. By Brenda Bryden
SOLAR FOUNTAIN Guide to EasyDIY SUMMER 2022 35
The sweet sound of gently bubbling water is soothing to the soul and connects us to nature. However, with the cost of electricity and ongoing load shedding, electrically-powered garden fountains are no longer practical. Besides, you need to have an outdoor electrical connection and run cords, so why not make these simple, cost-effective, solar-powered water feature options? Adding just one to your outdoor environment will make a big difference aesthetically, but why not tackle both and double up on the beauty and benefits?
OUTDOOR SOLAR FOUNTAIN/POND

This is simple to build and maintain and, once filled with plants, will make a beautiful addition to your garden or patio. All you need is a solar fountain pump, available from most leading nurseries, hardware stores and online suppliers, and an old galvanized tub or bucket (you can even use an old tin bath).

TOP TIP
If there is a choice of pumps, go for the one that is the more powerful. This will allow you to adjust the pump’s flow rate at will, and if you operate below the maximum rate it will keep the fountain running a little longer.
STEP 1: Choose your location. This solar-powered fountain/pond needs direct sunlight to power the pump, but may work intermittently on a cloudy day.
STEP 2: Make sure there are no holes in your container of choice. Place a brick or two in the bottom and then fit the water pump on top of that. Most solar pumps come with several nozzles –bubblers or sprayers – so select one.
STEP 3: Fill the container with water halfway, add aquatic plants and ferns in their pots and place strategically around the sprayer. Then add a few river rocks or stones to prevent the soil from travelling to the surface of the water. Once satisfied with your arrangement, fill the pond to the level of the sprayer.
STEP 4: Sit back and be soothed by the sound of gently falling water and the sight of greenery and the colourful flowers in your fountain/pond.
DID YOU KNOW?
Adding plants not only beautifies your water feature, but the plant roots also help keep the water clean and algae-free.
TOP TIP
When potting plants to add to your tub, avoid soil with manure content as it might affect the ph level of the water and could make the water smelly. Clay soil is the best as potting soil may contain wood chips that could float on the water.
MAINTAIN YOUR WATER FEATURES


Regularly check the water levels and top up when necessary to ensure the pump is submerged in water. If not, it may burn out.
Pumps will need to be cleaned from time to time as water contains fine particles of dirt, plus there may be sediment from the plants and other debris that lands in the water, especially if the wind blows.
Regularly clean the filter that comes fitted with the pump. If the pump becomes blocked, you may need to clean the impeller. Don’t stress, it’s quite simple –there aren’t many parts inside the pump (usually only an impeller and an axle). Remove the housing and using a piece of string or a pump cleaning brush, floss out the algae and built-up dirt. You can also smear a drop of WD40 on the impeller and axle to improve performance. Reassemble and let the water flow.

SOLAR FOUNTAIN Guide to 36 EasyDIY SUMMER 2022
CONVERT YOUR BIRD BATH INTO A BUBBLER
Share the joy of peaceful, bubbling water with the local birds by converting your concrete bird bath into a solar-powered bubbling bird bath. The birds will come flocking to your garden. And depending on the surrounding environment, you may even find a squirrel or two coming to visit.
The added benefit of a bubbling bird bath is that when operating, the water will circulate and aerate.


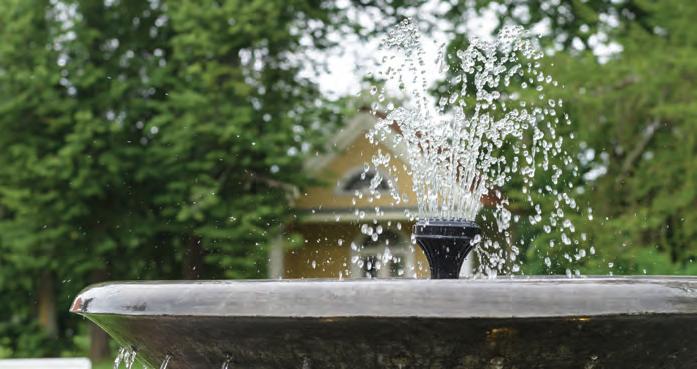
This is a very simple project. First clean your existing bird bath well to remove any algae or dirt. Fill with fresh water. Purchase a round, floating solar fountain bird-bath insert (available from top garden nurseries, selected hardware stores and online retailers). Submerge it slowly and gently into the bird bath to allow any air to bubble out.
TOP TIP
Check the water level daily and top up so the pump doesn’t run dry. Evaporation from a bird bath occurs more quickly when a pump is added.
It will begin operating once exposed to sunlight. Just remember, this does not produce the same effect as a fountain; it is more of a bubbler, but makes an attractive garden feature nonetheless.
Regular maintenance is required to keep your water bubbling and your birds happy. I suggest you clean it every three days as the pump filter gets clogged quickly once the birds come in their droves – remember they’re using the bird bath to drink and bathe.
To clean the pump, simply remove it from the bird bath, follow the manufacturer’s cleaning instructions or rinse it off well with a hose to dislodge any gunk. Then give it a gentle scrub with a 9:1 water and vinegar solution and leave to dry. Add it to the bird bath, remember to submerge it gently to eliminate air bubbles.
You also need to empty and scrub out the bird bath thoroughly, then refill with fresh water weekly. P
HEIDI
LESKAS/ISTOCKPHOTO.COM, NANCYAYUMI/ISTOCKPHOTO.COM EasyDIY SUMMER 2022 37
IMAGES: BULLPENAL/ISTOCKPHOTO.COM, DAVID MILLER/ISTOCKPHOTO.COM, DAVID MILLER/ISTOCKPHOTO.COM,
PATRICOLA/ISTOCKPHOTO.COM, TAMPATRA/ISTOCKPHOTO.COM, WICHITS/ISTOCKPHOTO.COM,
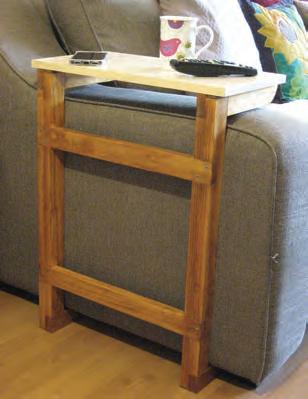
“C”
Now that you’ve mastered some of the basics of woodworking, you can try making a “C” table, which fits neatly over the arm of your sofa. Geoff Hollingdale takes you through the process
This side table is perfect for holding your coffee and cake, cellphone and the remote control while watching TV. The “C” table can be made easily with a minimum of material, hand tools, and a few power tools.
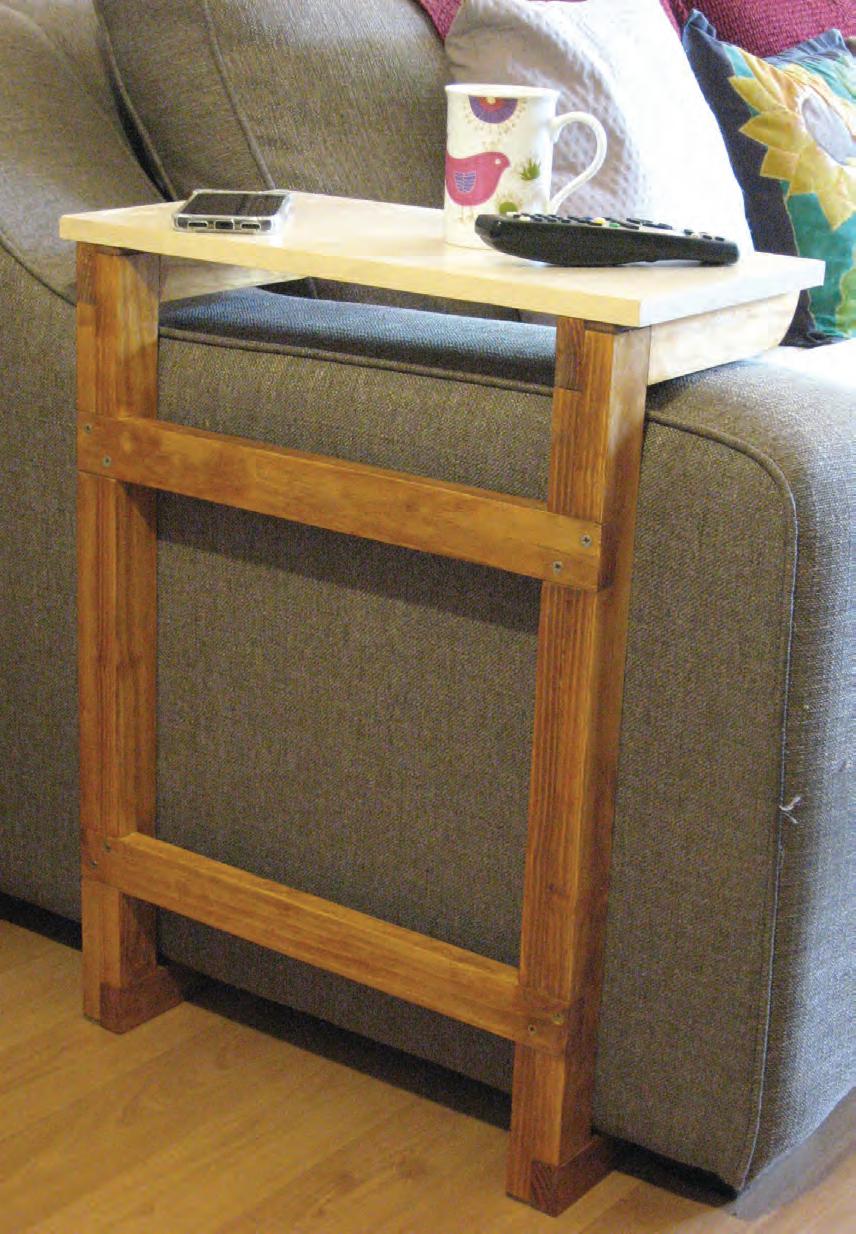
SOFA ARM TABLE Workshop EasyDIY SUMMER 2022 39
THE TABLE?
YOU WILL NEED: • 3 x 1.8mx44x22mm pinepar timber –see Fig. 1A for the cutting list • Paintbrush • Pencil • Wood glue • Wood stain • Wood sealer • 4 x 40x4mm cut screws • 120-grit sandpaper • Wood finish products • 1” masking tape. TOOLS: • Cordless drill • Various wood drills • Cordless screwdriver • Tape measure • Steel rule • Fine-toothed handsaw • Adjustable square • Depth marking gauge • 12 and 18mm chisels • Wood rasp (medium cut) • Rubber mallet • 4 x wood clamps • Sander
Fig. 1A. Cutting Guide.
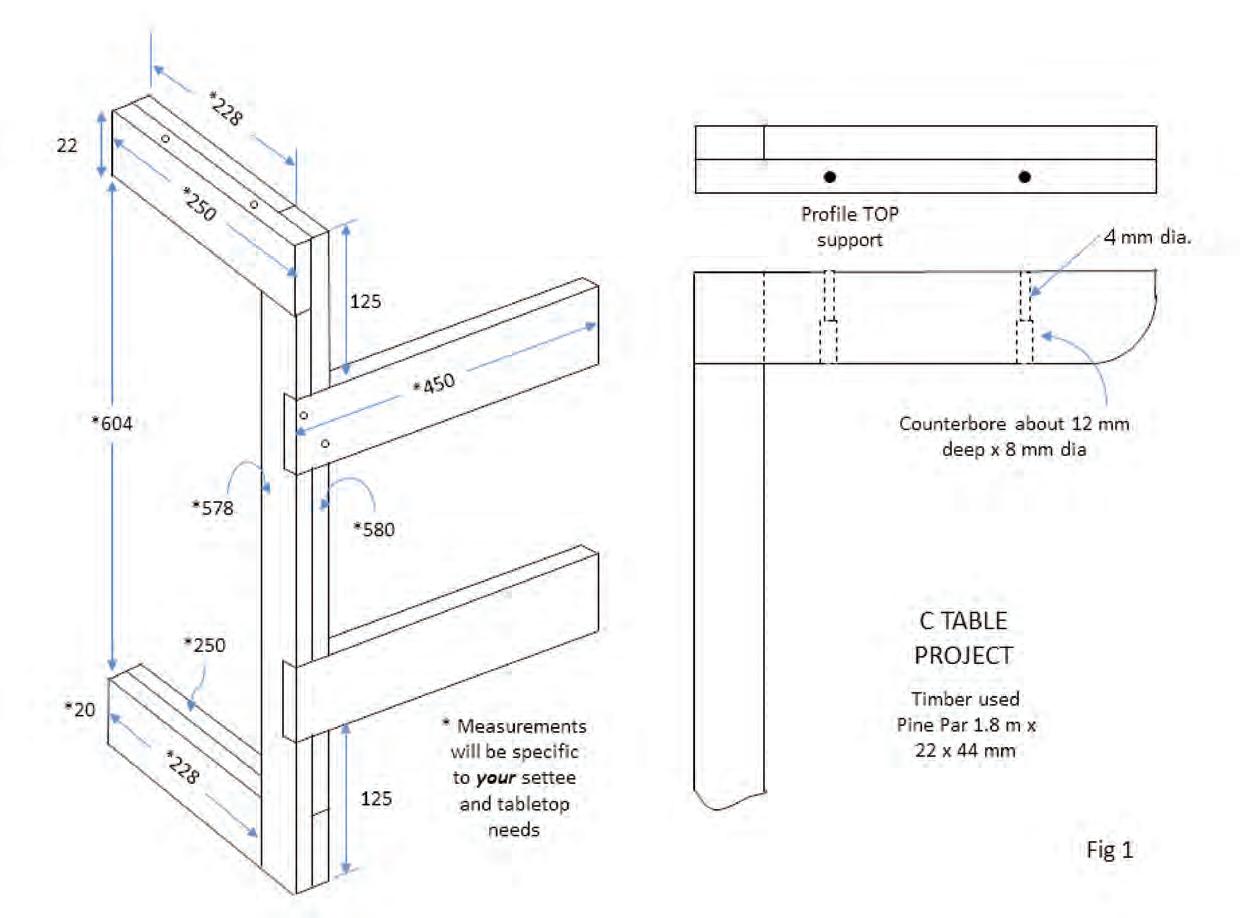
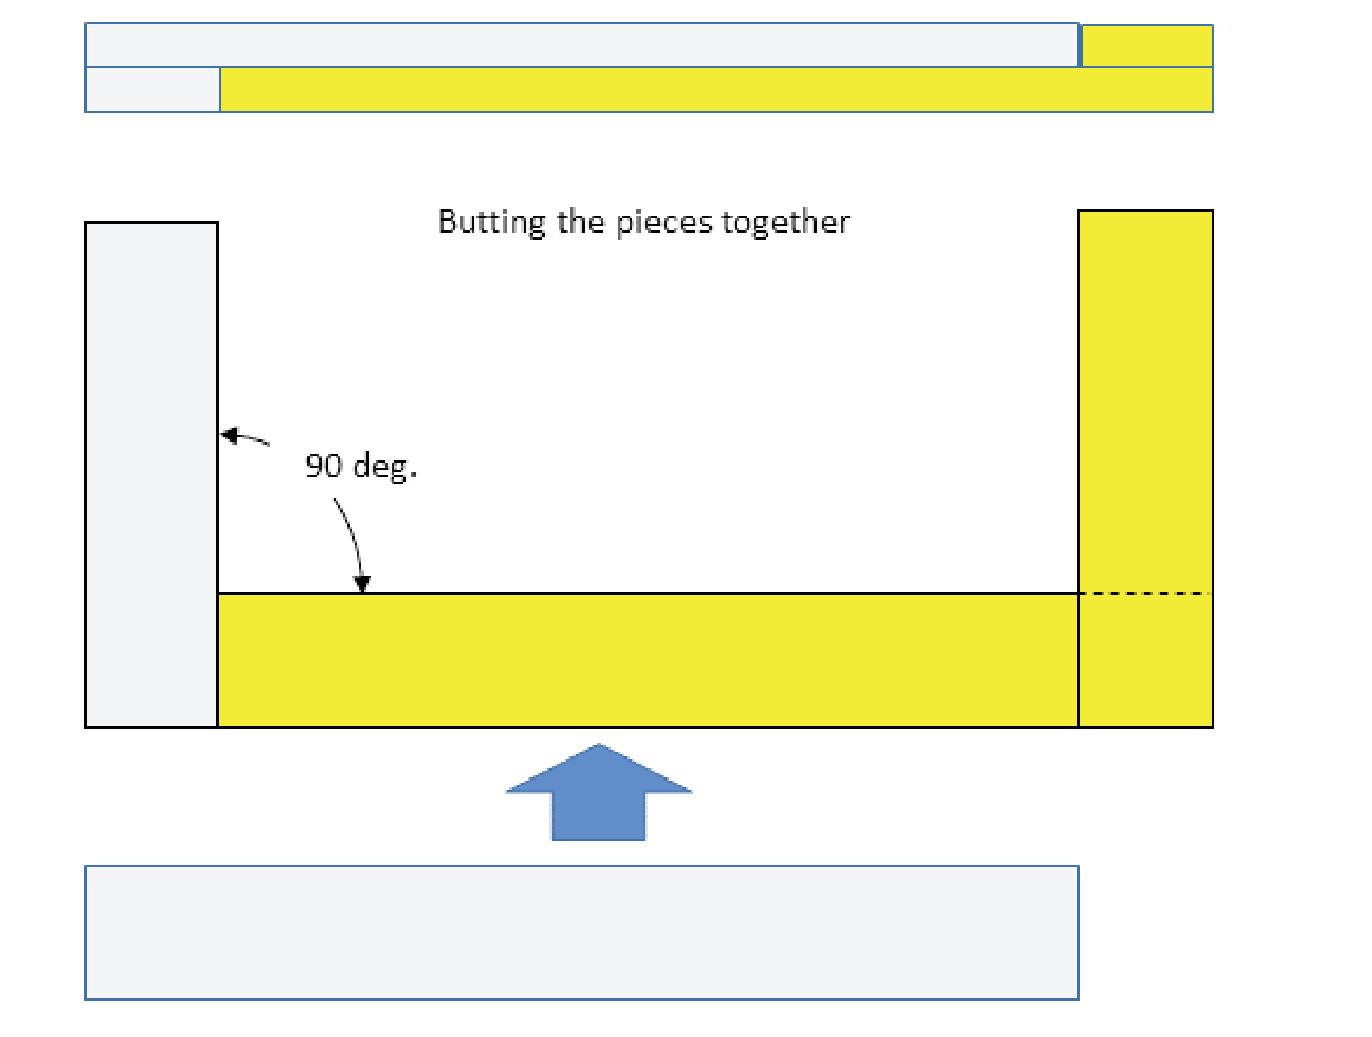
Fig. 1B. Joining.


SOFA ARM TABLE Workshop 40 EasyDIY SUMMER 2022
HERE’S HOW:
Step 1
On your sofa or armchair, measure the gap between the bottom and the floor and the clearance needed between the bottom of the sofa/ armchair and the arms. In my instance, I needed a 20mm gap at the bottom with a little over 600mm for the side arms. The tabletop doesn’t need to be very big, just enough for a coffee cup/wine glass, a small plate and your phone or TV remote. I had a piece of Formicatopped shelving measuring 250x480 mm. The table frame is made of standard pine par 1.8mx22x44 or 1.8mx20x45. Because I had the 22mm format, I had to get a metre of it shaved down to 20mm. Depending upon your measurements (see Fig. 1A) cut the timber to the lengths you need. Remember the golden rule: “measure twice, cut once”. Before cutting, mark out the cut line with an adjustable square so that if you’re using a handsaw you don’t cut at an angle that is not a right angle, and you remember to allow for the thickness of the saw cut. Or, of course, you can get the guy at the timber shop to cut everything to length on the table saw.
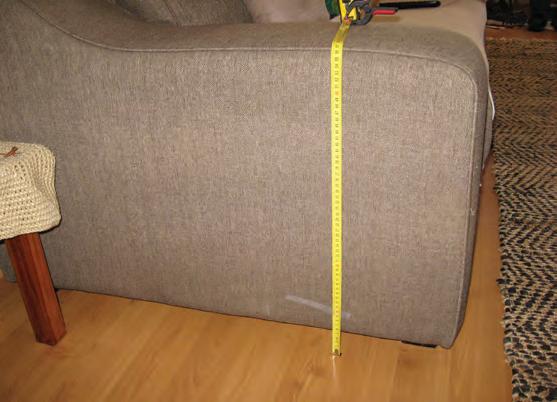
Fig. 2. Measure the gap at the base and the height of the arm.
Step 2
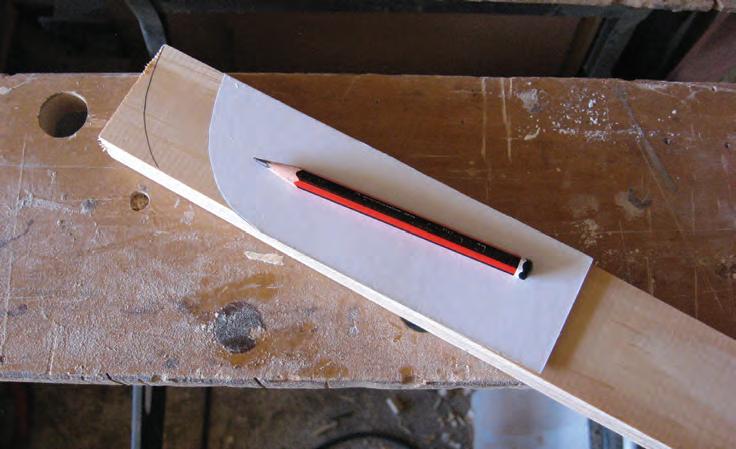
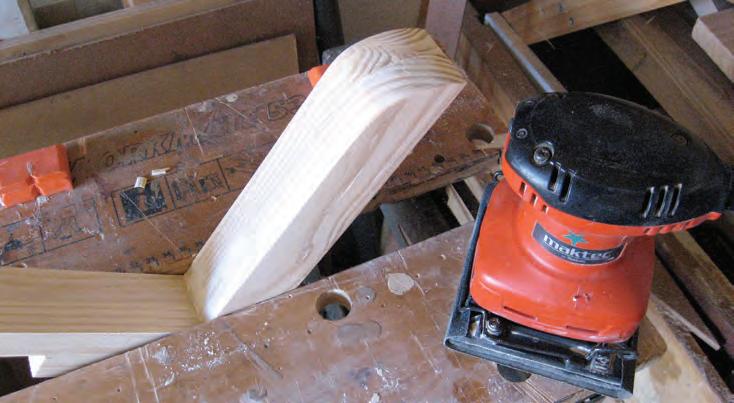
Mark out and cut the profile for the eight pieces used to support the top and those used for the feet. For the curves, a template can be made from cardboard trimmed to shape. Mark the profile on each piece of timber with a sharp pencil. I used a handsaw to cut the corners off of the workpiece and then a wood rasp. You could also use a jigsaw to do the job.
Fig. 3. Making a template for the foot curves.
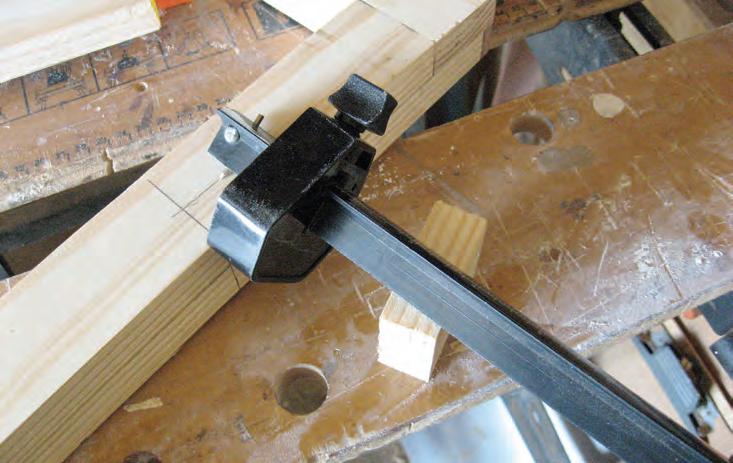
To complete the shaping, clamp a set of top support pieces/foot pieces together. Then use a medium-cut wood rasp/ sander with 120-grit sandpaper to finish until the shape is the same profile. Now you need to drill and counterbore the top supports to be able to attach the tabletop. Drill the 4mm holes first. If you’ve got one, an attachment that keeps the drill at 90 ° is handy; if not “eyeball” the power drill to keep it “square” as you drill. The counterbore with an 8mm drill is easy to do if you use a “drill-stop” as a depth setting. Otherwise, wrap a piece of masking tape around the drill shaft to act as a visual guide.
Fig. 4. Shaping curves.
EasyDIY SUMMER 2022 41
Step 3
It’s glue-up time. Ideally, you need about four wood clamps. Position the pieces so you can apply an evenly spaced series of glue blobs down one side of each length and on the ends butted together (see Fig. 1B).
Using a small paintbrush dipped in water, evenly paste the glue down each length and the ends. Avoid over-glueing as it will “squish out” when clamping, and you’ll have to spend time later cleaning off excess glue. Double clamp the pieces together – checking with a square that the short pieces are at right angles to the long pieces. The way each piece is sandwiched together provides a strong assembly that won’t need screws or dowels to hold it together. Leave the pieces clamped together for at least four hours.
Once one side’s support assembly is set, you can glue and clamp the other side assembly.
Step 4
Before moving on to the next step, check the fit of the assembly.
If it does “rub” in places, you can use a wood rasp and sandpaper to flatten out where it is catching. You don’t want the unit to wear away your sofa arm!

Step 5
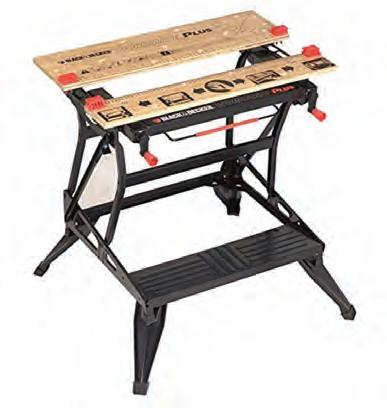
Clamp a side support onto a workbench or clamp it in a vice (I borrowed a WorkMate) to try it out before buying to see how practical it was to mark out and cut out the slots for the cross-support pieces.
The “jaws” can be independently altered; work can be clamped at angles to suit. Before making the cross-slots, examine the pieces for any knot holes and saw marks. Use a hand rasp to remove any cutting marks and fill the knot holes with pine filler. Start sanding the side supports and cross-supports with 120-grit paper using a hand sander. Once the filler has set and dried, sand off the excess.
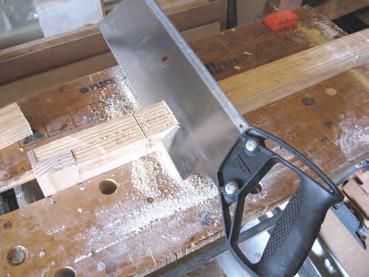
Again, as we have done in all our projects, take care with the marking out to get the right position and width. The depth of the cut can be best marked with a marking gauge, should you have this useful tool to hand. Otherwise, use a sharp pencil and the adjustable square. Use the handsaw to cut slightly inside the marked pencil lines rather than outside.
You can easily open the slot you’ve cut – it’s not good if you cut too wide because then you’ll end up with a sloppy fit of the cross-support.
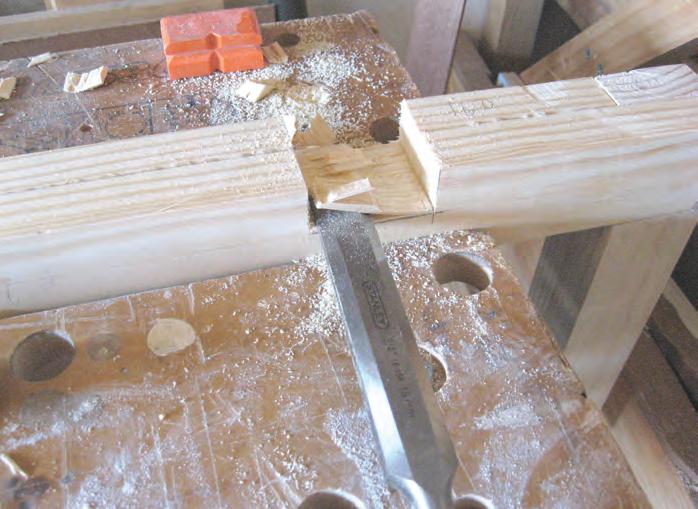
Use the handsaw to cut at about 45 ° to remove some of the waste. The remainder is cut away using 12mm and 18mm chisels.
SOFA ARM TABLE Workshop 42 EasyDIY SUMMER 2022
Fig. 5. Checking the fit.
Fig. 8. Cutting cross-slots.
Fig. 6. A WorkMate universal bench ©.
Fig. 7. Marking the slots.
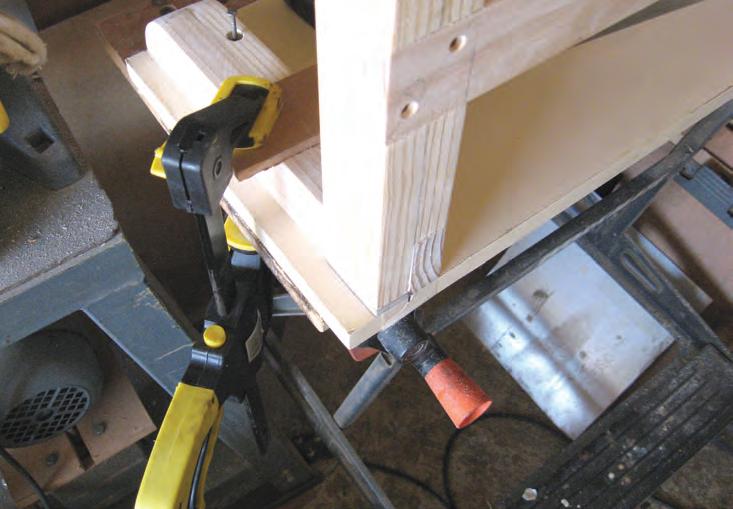
Step 6
We’re now ready to glue the cross-supports to the side supports. Make some space where you are working and “dry fit” the pieces together. Make any fine adjustments needed and lightly pencil “A, B, C, D” on the pieces to identify which pieces go with each other. I was going to use screws to secure the cross-supports, so I drilled 2 holes 3.5mm dia. at each point where the cross-support met the side support. However, the fit was good, and the glue joined well, so the screws are really not necessary. But we learn as we go.
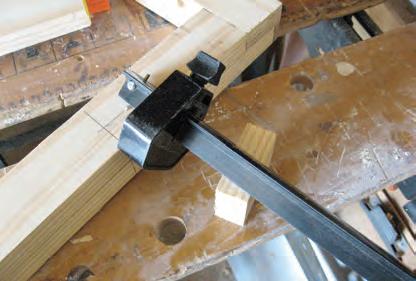
Have the clamps ready. As before, lightly apply wood glue to each slot. Lightly clamp together. Note: Check the measurement from the corner of one side support to its opposite support. Now check the other side – the measurement should be the same. Lightly tap at the corners with the rubber mallet to “square up” the assembly. Fully tighten the clamps.
You’ll see in the photo that besides the basic clamp, which we’ve mentioned before, two light-duty corner clamps are being demonstrated. This type of clamp has been designed for clamping objects at a 90 ° angle and is used for clamping corners or creating mitre joints. These clamps are also known
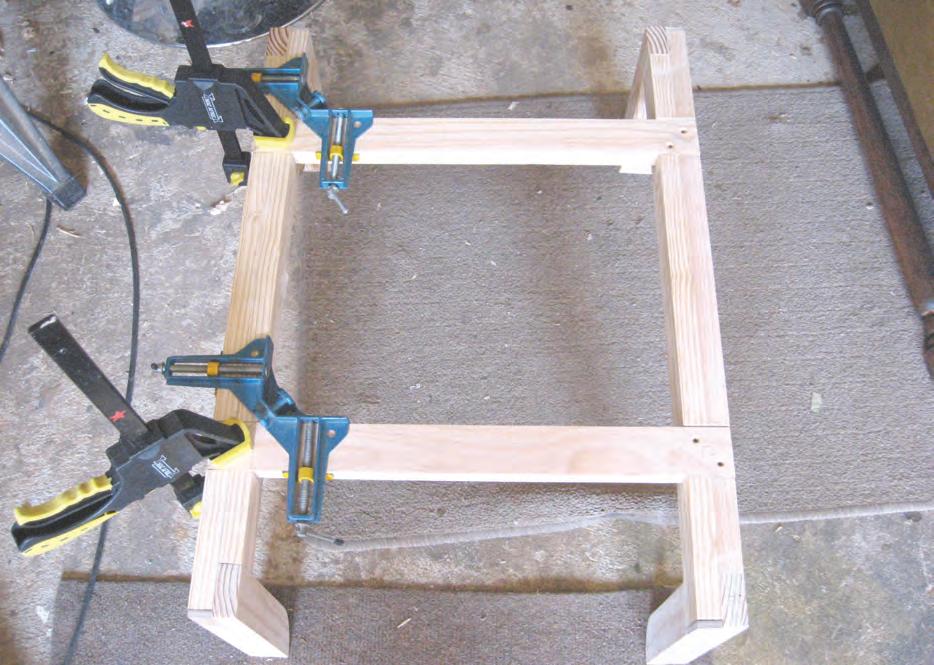
as angle clamps and can be used to hold workpieces such as wood, metal and plastic of varying thickness while creating straight joints.
The two items can be of different widths and the clamp will still hold the two at a 90 ° angle. This clamp has two screws that control the movement of the jaws separately, which means the user can adjust one jaw at a time. This type of clamp has a 75mm width and 15mm depth clamping capacity.
EasyDIY SUMMER 2022 43
Fig. 9. Shaping the cross-slots.
Fig. 10. Clamping cross-supports.
Step 7
Now it’s time to start marking up the position of the top fixing holes to enable the drilling of the four pilot holes.
Place the top face down onto the work surface. Set the support assembly on top and align the back edge of the support assembly with the edge of the top piece. Move the assembly to the left or right until the side spacing is the same. Make a pencil line on either side.
Remove the top and lay a strip of 25mm masking tape along the middle of where the centre points of the top support have been made. Position the support assembly to the left and right edges you marked and line it up with the edge.
Clamp the support assembly to the top piece to keep it steady while you mark the hole positions.
I had to find a means of marking the points where the pilot holes for the fixing screws needed to be. I used a long roofing nail, filing the tip to a fine point, then I slowly wrapped a few turns of masking tape around the nail to give it a snug fit in the 4mm hole, then gave it a sharp tap with a hammer at each fixing point.
Removing the support assembly, I could clearly see where to drill the four pilot holes.
Use a small pilot hole drill of 3mm to drill the top mounting point screw holes.


Screw in the four 40x4mm cut screws to fix the top.
Step 8
We’re now ready to complete the project. Run over the surface of all the parts of the support assembly with 120-grit sandpaper. As a finish, I used Spraymate 2542 stain. Follow the instructions on the can to avoid streaks and blobs. Once the stain has dried, rub down lightly with the 120-grit sandpaper and apply a wood seal, for example, Woodoc 5.
Position the screws for fixing the tabletop. Align it by setting two opposite corner pilot holes with the fixing screws. Screw the tabletop to the support assembly.
Take the table and position it on your sofa/armchair, brew a nice cup of coffee and settle down to enjoy some TV viewing. P
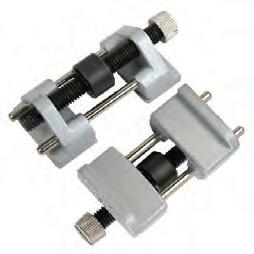
A WORD ABOUT CHISELS


It’s worth buying a decent set of chisels as a set, typically three of four chisels, often supplied with a sharpening stone. You should also purchase a chisel honing guide jig to set the desired angle of 30 ° . Usually, chisels are ground at the factory to 25 ° , and this is fine for most work, but the edge will last longer if you add a 5 ° micro-bevel to make a 30 ° cutting angle.
this is 5 safety cutting
It’s essential for both safety and ease of cutting to keep your chisels, and, of course, any cutting tools sharp. Blunt tools don’t work well and will reduce work safety because of the force needed to drive blunt-edged tools into the timber.


A chisel honing guide (left) and chisels.
SOFA ARM TABLE Workshop 44 EasyDIY SUMMER 2022
Fig. 11. Marking the position of the top.
Fig.12. Locating the top position.
IMAGES:
SUPPLIED