3 minute read
The Follow Me Tool


These new components can be edited without affecting the original component type (Fig. 8-6). Make Unique is not available if there is only one copy of a component in a model. SketchUp automatically renames components after Make Unique is used. It adds a version number such as (1) to the end of the original component name.
Fig. 8-6: The Made Unique component is edited, but it does not affect other components. It is now its own component.
Advertisement
The Follow Me tool is a versatile tool that allows you to create complex geometric forms with relative ease. It is used extensively in the chapter tutorials.
Example 1:
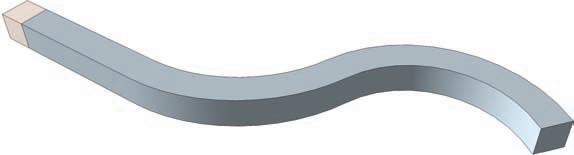
1. Create a cube 10´ × 10´ × 10´ (Fig. 8-7). At the bottom corner of the cube, draft an edge 50´ in length with the Line tool. Draw the edge so it aligns with either the green or red inference axis (Fig. 8-8). 2. At the end of the edge, draft two arcs. Try to make the arcs tangent to the edge and to each other. Place the arcs so that they form a smoother, continuous path (Fig. 8-8). 3. Make sure that the edge and two arcs are “flat” and not at all vertical.

Fig. 8-7: Draft a 10´ × 10´ × 10´ cube.

Fig. 8-8: Starting at the cube, draft a 50´-long edge and two arcs as indicated.
4. Select the edge and the two arcs. With all three selected, activate Follow Me (View >
Toolbars > Modification > Follow Me) and then select the face on the cube that is perpendicular to the edge and arcs (Fig. 8-9). The face of the cube will Push/Pull along the selected edges (Fig. 8-10).

Fig. 8-9: Select the edge and two arcs. Activate Follow Me and select the indicated face on the cube.
Fig. 8-10: Follow Me will Push/Pull the cube face following the path of the selected edges.
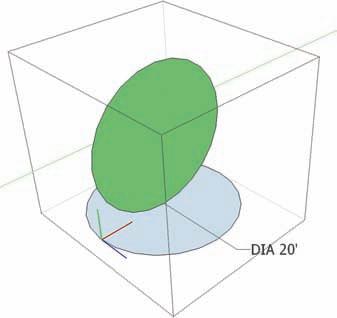
Example 2: This example includes steps that are common to most of the tutorials in this chapter. 1. Using the Circle tool, draft a 20´-diameter circle face on the ground. Select the face and edges of the circle, right-click, and convert the geometry into a component (call it Sphere) (Fig. 8-11).
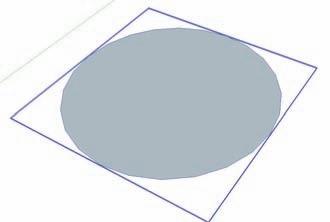
Fig. 8-11: Draft a 20´-diameter circle. Convert the circle face into a component.
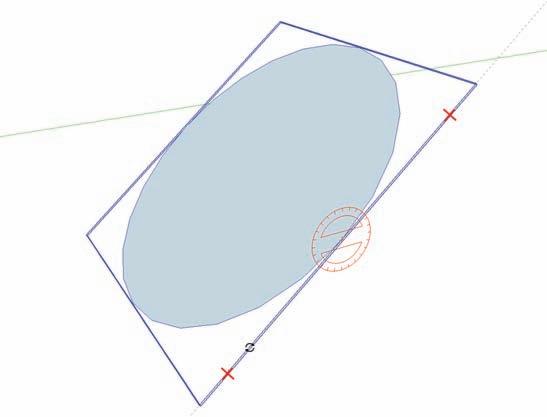
2. Use the Move/Copy tool to rotate the circle to the vertical position. While you are hovering the cursor over the component with the Move/Copy tool, notice the little red crosshairs that appear. 3. Hover/Snap the Move/Copy tool to one of the crosshairs. At the center of the component, a rotation circle will appear. Selecting the crosshair will allow Move/Copy to rotate the component. You can do this for both the horizontal and vertical side of the component.
4. In this case, the vertical side of the component is paper thin because it does not have any volume. Hover the Move/Copy tool over the thin-edge sides of the component and snap to the crosshairs that appear (Fig. 8-12). This should allow you to rotate the component vertically. This is a useful skill to practice, and you’ll need to be able to do it to successfully complete the tutorials. 5. Rotate the circle component so that is standing directly vertical (Fig. 8-13).
Crosshair Fig. 8-12: Use the Move/Copy tool to rotate the component to stand vertically. Use the small red crosshairs on the side of the component to complete the rotation. (The Crosshair size is exaggerated in this diagram.)
Crosshair
6. Enter the component instance of the circle.
At the bottom-most edge of the circle, draft another 20´-diameter circle. Make sure the circle is horizontal (Fig. 8-14). Learning to align with the Circle tool can be tricky, but have the patience to orient the new circle to the horizontal plane. 7. With the bottom circle in place, while still in the component instance, select the edge of the horizontal circle, activate the Follow Me tool, and select the face of the vertical circle (Fig. 8-15). 8. The vertical circle’s face will “follow” the selected edge of the horizontal circle and create a sphere (Fig. 8-16).
Fig. 8-13: Rotate the component to stand vertically.
Fig. 8-14: Enter the circle component instance and draft another, horizontal circle at the base of the vertical circle.