2 minute read
Producing a Movie with Lumion
by TD Garden
The motion blur effect
To take a photograph, you need to expose the film or the sensor of the camera to light. When shooting a movie, there will always be some amount of motion blur caused by objects that are moving and because of the exposure settings. Although in most situations, this motion blur is very subtle and it is essential that we add motion blur to the movie; otherwise our brain notices there is something missing.
Advertisement
This is one of the easiest effects to add because unless you want something very extreme, the default values will be enough for the animation. A good practice is adding this effect not to each clip individually but instead to the entire movie.
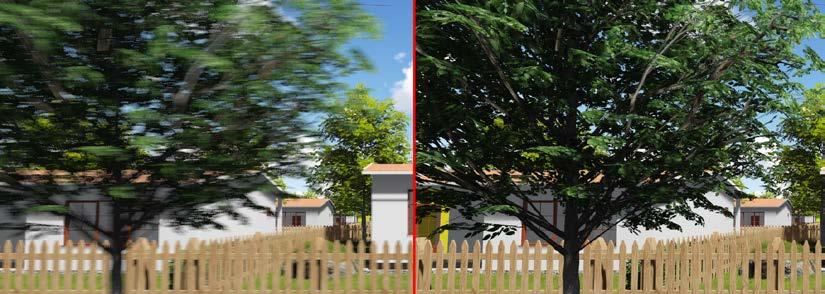
This effect is extremely clever because the amount of motion blur is proportional to the camera speed. So, if the camera is static or there aren't any moving objects, the amount of blur will be close to none and this avoids the effect having to be animated. This is shown in the following screenshot:
On the left-hand side the camera is moving and, for that reason, the Motion blur effect does a good job of adding a realistic motion blur effect to the video. On the other hand, with regard to the image on the right hand side, the camera is not moving at all and for that reason no motion blur is visible, which makes sense since this effect only occurs with moving objects or cameras.
Extra detail with sound effects
Sound is almost essential in any movie you create; even the silent movies had someone playing a piano. Sound brings life to the movie and can play with viewers' emotions. In line with this, Lumion provides the opportunity to add sounds to the scene that are played while moving around. The process to add and tweak these sounds is very simple, as shown in the following screenshot:
After placing the sound, you can use the Sound Properties effect to tweak the areas that this sound affects. But sometimes the Max distance value may be too big for your scene. A good way to solve this is by scaling down the sound like you would do to another object.
Back in Movie mode, you can import an audio file (WAV format only) using the Sound effect. However, you can only find this effect under the Objects tab if the Entire Movie button is pressed.

Producing a Movie with Lumion
Creating a presentation with Titles
If your main goal for the animation is to provide a project presentation, you may want to have a look at the Titles effect. This effect lets you add text to the movie and create professional presentations. The main options of this effect are shown in the following screenshot:
You need to press the Titles button in order to access these options:
• Adding a logo to the presentation (refer to image 1)
• Choosing the text's style presented on the screen (refer to image 2)

• Choosing the text's location on the screen (refer to image 3)
• You can select one of the twelve text fonts available, or press the Custom button to select another font installed on your system (refer to image 4)
• Select the text's color that is presented (refer to image 5)
However, instead of doing this for every single clip in the movie, don't forget to use the copy and paste functions available in each effect.


