10 minute read
The different file formats to export from Lumion

by TD Garden

Starting with the Photo mode, technically you are constrained to four sizes, as shown in the following screenshot:
What if you need a different image size? The only option is to render a bigger image and then resize it.
Advertisement
Resizing the image will also contribute to creating a sharper image.
The only downside is that if you want to do some color correction and other adjustments, you only can export an 8 bit image (which doesn't give you much room for tweaking colors) and use these formats:
• Joint Photographic Experts Group: *.jpg
• Bitmap: *.bmp
• DirectDraw Surface: *.dds
• Portable Network Graphics: *.png
• Truevision Graphics Adapter: *.tga
As mentioned before, this is one option to export a still image and although the Photo mode provides a friendly interface, there is a better option that makes all the processes easier.
Using the Movie mode to export still images
The question is: is it possible for you to use the Movie mode to export still images? Not only can you do this but also the entire workflow is even better because instead of having to export one image at time, it is possible to export as many images as you want. Still, the question is: how?
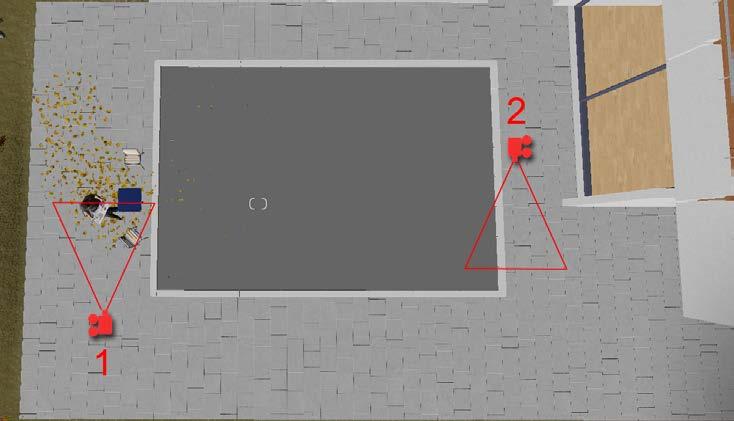
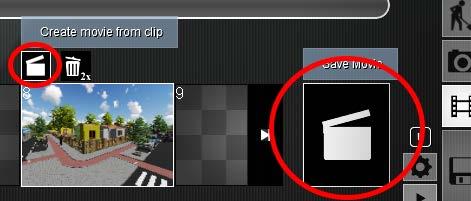
Let's start by opening the Movie mode and for this exercise, creating a clip with 4 photos (or more if you want to). When you take photos the goal here is not to create a camera path. Instead, see each photo as the camera viewpoint you want to export as a still image. Then, select the Save Movie button and the following options appear:
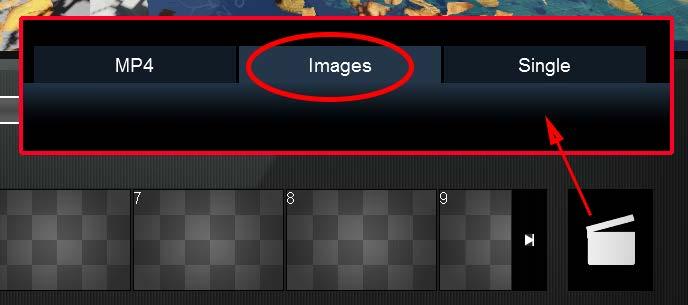
You need to select the Images tab and then you are presented with several options to export images, as shown in the following screenshot:
In this instance, you only need to worry about the Final output quality and the Choose resolution options. Now, pay attention to the Frame range option and if, in your case, it says Auto click on the button until it appears as the option shown in the preceding screenshot–Shots
One downside of this option is that the biggest image you can save is only 2560x1440 pixels. In the Photo mode, the biggest image size is 7680x4320 pixels.
If you noticed from the previous screenshot above, the Shots option says that this option exports the camera keyframes or, in other words, it is only going to export the photos you used to create the camera path. So, if you only used four photos, it is only going to export four photos. This is one of the best practices when exporting still images because if the project has several still images, it can be tedious and timeconsuming exporting every individual image. This is like doing a batch render.
One word of caution: if you use the option Create movie from clip, the photos exported are only the ones used for that particular clip but if you use the main button called Save Movie, the photos exported are from all the clips in the movie.
Rendering using the Movie mode
Before we go even further, there is another good practice you should take into consideration. The reality is that you can watch a movie over and over on the viewport but it is only when you export a movie that you can perceive some errors and mistakes. For that reason, it is time-saving exporting a movie with draft quality but with a relatively good resolution. Initially, this may sound counter-productive, but it helps you in checking if there is a need for any further adjustment at the same time, it is something you can send to the client to receive the final approval.
Exporting and Post Production
We covered still images but what about exporting a movie? The first decision you need to make is how you are going to export the movie, and the following screenshot shows the two possibilities you have in doing so:
The Save Movie button assembles all the clips into a big movie and this may be something you want when working with small animations. However, when you have a movie around 5 minutes long, using the Create a movie from a clip option is a better solution. Why? It gives you flexibility and more control over the movie.
If you export an entire movie and Lumion crashes, you have to start all over again. If you export an entire movie and there is something wrong that needs to be corrected, you know what is going to happen? Yes, you will have to render the whole movie again. And we could carry on with even more problems that really happen in a production environment that force you to render the entire movie again, which is time-consuming and not practical at all.
So, saving individual clips may not be that practical because you have to export it one by one, but it allows you a safety net that can save time and resources. Why? Because if something is wrong, you just need to render one clip again and not the entire movie. Now that you have decided how to export the movie, the next question is: how?
Rendering an image sequence
When clicking on the Save Movie button, the initial option available is the MP4 tab and the options to export are very simple: select the FPS desired, then the quality, and finally the image size and after a couple hours you have the mp4 file ready to go.
Although there is nothing wrong with this option, you can export a sequence of images instead of an mp4 file. An mp4 file is only useful if you are planning to do some post production using the render passes available. When exporting the clip or the movie, the tab you want to use is the Images tab that you used before to export a set of images. Do you still remember the Frame range setting with the Shots option? If you press again on that button a new option appears, as shown in the following screenshot:
The Range option lets you specify which frames you want to export and if you place the mouse over the two text boxes, a small preview appears of each frame, which is useful when rendering specific sections of the movie or clip.
After this, you only have to click on the Start movie export button to select a location and start rendering the movie. Keep in mind that you will be rendering 25 or 30 images for each second, and that means you need loads of space to save all those images. However, what is the point of all this work? As mentioned, we need to make some adjustments using the render passes.

What is a render pass?
As previously discussed, a benefit of exporting a range of frames is that you can later tweak Lumion's output and perform color correction and other adjustments. To make your life easier, Lumion allows you to export along with a range of frames some render passes, as shown in the following screenshot:
The Custom output is where you can find all the render passes available. Each letter corresponds to a render pass that is explained in the following list:
• Depthmap (D): This is a grayscale map with information regarding the distance of the 3D models from the camera.
• Normalmap (N): This is similar to the one used to create bumps in the materials, but this render pass doesn't have many useful applications.
• SpecularReflection map (S): This render pass stores information regarding the surface highlights and reflections.
• Lighting map (L): This render pass stores light and brightness information for each surface in the scene.
• SkyAlpha map (A): This is a black-and-white image that works as a mask and can be used to replace the sky with a different one or control the sky without affecting the rest of the image.
• Material ID (M): A color or ID is assigned to each material used in the scene. This render pass is used to isolate areas and tweak the colors in the image.
This information is great but how can you use it in a practical way? Well, before we move to a more complex subject you need to keep in mind that:
• Firstly, some of the techniques presented here are not the final word on this topic which means you are free to explore the use of render passes in other ways.
• Secondly, you better have a big hard drive to accommodate all the images generated by Lumion. If the animation is comprised of 3000 frames, multiply that by the number of render passes you selected to give you the final amount of images you will have. To give you an idea, if you have 3000 frames and if you use all six render passes you will end up with 18000 images.
Practical ways to use the render passes
Before we even start, the question that arises is: what do you need to work with render passes? If you are working with still images, an image editor like Photoshop or GIMP is more than enough to handle this task. But when working with all those frames, you need a way to transform and convert them into a video.
A good solution is using the amazingly powerful Fusion7 developed by Blackmagic Design. This is a very robust and professional application that is free to use.
Blackmagic design provides two versions. The free version is called Fusion 7. The paid version is called Fusion 7 Studio and contains a few more features that are not that necessary for this kind of work. You can find more information here: https://www.blackmagicdesign.com
However, we will try to keep these next sections software agnostic in order to suit everyone. The concept is explained here and certainly by knowing the tools provided you can easily achieve the same result.
Using the SkyAlpha render pass

The SkyAlpha render pass only has two colors (black and white) and you can use these colors to create masks that are extremely useful in adjusting specific areas in the image, as shown in the following screenshot:
In this situation, the SkyAlpha render pass was used to replace Lumion's sky with another one. But the use of this render pass doesn't stop here because you can use it to adjust the vegetation without affecting the sky. And if you want to go even further, you can hide all the geometry except for the plants, render a frame with the SkyAlpha as custom output, and then you will have a proper mask to work on and adjust all the plants in the scene. Nevertheless, you may be asking: is that not the purpose of the Material ID render pass?
Material ID – do's and don'ts
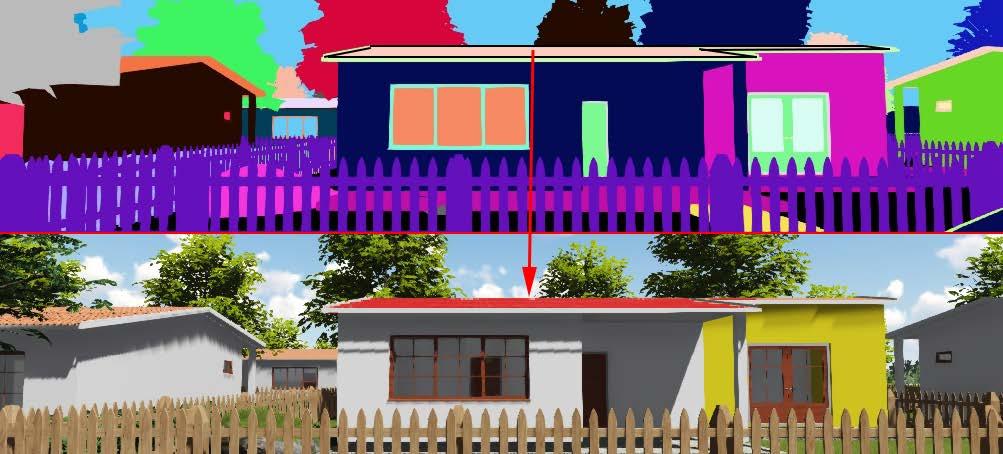
The Material ID render pass assigns a color to each 3D model present in the scene and this is extremely useful to again tweak certain areas of the image without affecting the whole image. Have a look at the following screenshot to see how you can use this render pass:
For this example, the roof's color was changed to a very bright red to exemplify how easy it is to isolate certain areas and tweak them without affecting the rest of the image.
Although you'll want to use this technique to work and adjust areas in the image, you definitely should not use this render pass to tweak any plants present in the scene. If you look closely at the trees in the Material ID render pass, notice that instead of a well-defined leaf you have a plane, and this makes the Material ID useless in tweaking any vegetation. Instead, you need to use the SkyAlpha technique mentioned in the previous section.
Adjusting reflections and lighting
The next render pass that can be used to drastically improve the image's look is the SpecularReflection and Lighting render passes. Both of these render passes can only be used with the aid of blending modes that are available in most image editors. There isn't any secret formula to working with these render passes because Soft light blending mode may work for one image but, for others, you might find that Screen blending mode does a better job.
However, you need to use both of these render passes in small amounts and don't forget that the main goal is to correct areas that don't look that good, not to redo an entire image. In other words, if you are happy with the reflections, don't change them. The last render pass that is extremely useful is the depthmap render pass.
Faking depth of field
The depthmap render pass is a time-saver. Using the depth of field effect sometimes can be a challenge to get right and it also increases the render time. With the depthmap render pass, you can add depth of field in the post production process, which in turn provides you more flexibility over the final result. How can you do that? This is something that depends on the application you are using and you must understand that we simply cannot cover every single application.
For example, in Photoshop there is a filter called Lens Blur that can use this depthmap render pass to create a realistic depth of field. But the key point of this topic is that you can fake depth of field with this render pass, and it is worth exploring how you can do this with your favorite application.
While exploring how to create depth of field, please keep in mind that in some applications, the depthmap is also called Z-depth map.
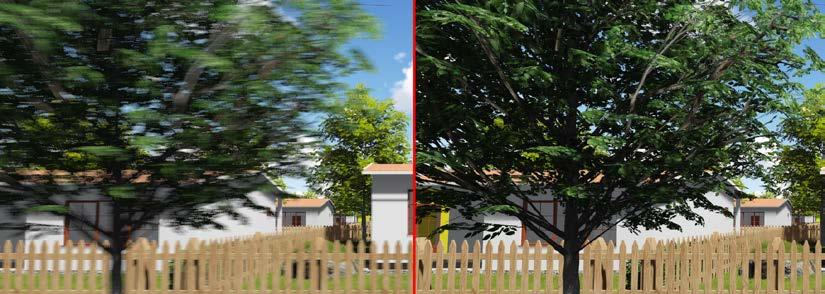
But the use for the depthmap doesn't end here because in addition, you can add haze or fog to the render. This technique again saves you the hassle of using Lumion's fog to achieve the same effect and adds some realism to the render. How can you do that? This technique is easier to explain because the majority of the image editor has blending modes for the layers.
The simplest way to use it is by inverting the depthmap and then using the Soft light blending mode to create the haze effect. Don't forget that you need to always adjust the opacity or intensity of these effects and even sometimes use a mask to hide the effect in certain areas. If you are using Photoshop, there is an additional technique in which you may be interested.
To create a blend between layers, Photoshop has an option called Blend that can be found under the Layer Style window. This is an advanced method that blends one layer into another based on the content of either of the two layers. You can use this feature to tweak where the haze or fog starts and even create a nice transition. Have a closer look at the following screenshot:
In this instance, the depthmap render pass is placed over the normal image without the Soft Light blending mode applied so it can be easier to perceive what is happening. For this image, we didn't want the fog to start right in front of the camera because this haze or fog effect usually happens at a certain distance from the camera. It's true that you can tackle this issue by using a mask and hiding the effect in certain areas but by using Blend you can adjust where this effect starts.