Teacher Manual
Grade 3

NEP 2020 aligned Digital coding platform included


Note: Use the following points to prepare for the session beforehand. Avoid reading the points in the class.
● Junior robot Mel and junior wizard Conji are friends and live in a land named Avora.
● Lord Ero, a wizard, cast a magic spell on Mel and Conji to get the weapon.
● The spell caused Mel and Conji to land in the “Time Palace”.
● Mr. Time, the head of the Time Palace, tried to send them back to their home.
● But something terrible happened, and they ended up in Robotland.
● Conji helped the robots complete a task they were stuck on.
● The robots helped Mel and Conji to go home.
● Mel and Conji are returning to Avora from the Memory Palace.
● Their spaceship lands in a strange place, surrounded by factories and warehouses.
● They start looking around and discover a machine.
● They eventually realise they have landed in ancient Avora.
The content covered in this chapter is aligned with the following CSTA Standard
● 1B-CS-02 - Computer Systems - Hardware & Software
This chapter is divided into the following classroom sessions
1. Hardware and its Types
2. Introduction to Input Devices
3. Introduction to Output Devices
4. Storage Devices and its Types
In this session, students will learn about –

● A Computer
● Hardware
● Types of Hardware
Keywords
● A computer: A machine or electronic device that takes data and instructions as input, processes them, and returns an output
● Hardware: The physical parts of a computer that can be seen and touched
● Types of Hardware Devices: There are three types of hardware devices: Input, Output, and Storage devices
Revise the story
Read the next story aloud
Discuss computer and hardware Fill Up – Q1, 5 Find the Truth – Q1 Answer in One Line – Q3 Tick the Correct Answer – Q1
Action Plan
● Recap the background story.
● Introduce Mel and Conji to the students.
Conclude the concepts Assign homework
5 min
● Read the story aloud from page 2 to panel 1 of page 5, up to Mel’s words “Storage.........information”.
● Say: Let me explain hardware and its types.
CS Concepts Explain Hardware
Identify hardware devices
Types of Hardware
As given in Panel 3 on Page 4
By doing Spot me as given in Panel 4 on Page 4
As given in Panel 1 on Page 5
● List the devices: Monitor, Keyboard, Mouse, Printer, Speaker, Pen Drive on the board.
● Discuss:
■ How will you group the devices?
Possible Responses: Input, Output, and Storage.
■ What devices will you put in the Input Devices section?
Possible Responses: Mouse, keyboard
■ What devices will you put in the Output Devices section?
Possible Responses: Monitor, Speaker, Printer
■ What devices will you put in the Storage Devices section?
Possible Responses: Pen drive
● Conduct Fill Up on Page 11:
■ Say: Help Mel and Conji complete the sentences.
■ Read Fill Up – Q1 and 5 aloud, one by one.
■ Invite some students to share their responses.
■ Discuss and validate the answers with the whole class.
■ Instruct: Fill in the final answers in your books.
● Conduct Find the Truth on Page 11:
■ Say: Now, Elder Robot wants you to answer some questions.
■ Read Find the Truth – Q1 aloud. Ask if it is true or false.
10 min
■ Invite some students to share their answers and others to validate their peers’ answers.
■ Instruct: Write the correct answer in your books.
● Conduct Answer in one line on Page 12:
■ Say: It’s time to help Eva answer a question.
■ Read Q3 aloud.
■ Invite some students to share their answers and others to validate their peers’ answers.
■ Instruct: Write answers in your books.
● Conduct Tick the correct answer on Page 12:
■ Say: Elder Wizard wants you to help Mel and Conji answer a question.
■ Read Q1 aloud.
■ Invite some students to share their answers and others to validate their peers’ answers.
■ Instruct: Tick the correct answer in your books.
● If time permits, discuss the DIY section Fill Up – Q1, 2, and 5 or, assign it in the homework.
5 min
● Conclude: Today, we learned about computers, hardware and types of hardware.
● Ask the following probing questions:
■ Which type of hardware device will you use to listen to music?
Possible Responses: Output Device, Speaker
■ What type of hardware device will you use to give instruction to a computer?
Possible Responses: Input Device, Keyboard, Mouse
● Assign the following as homework:
■ DIY: Fill Up – Q1, 2, 5
In this session, students will learn about –
● Input Devices
● Types of Input Devices - Keyboard and Mouse
Keywords
● Input Devices: Hardware devices to take data and instructions as input
● Keyboard: An input device used to type letters, numbers and give commands to the computer
● Mouse: An input device used to move around the screen, point, and click
● Webcam: An input device to take pictures and make video calls
● Sensors: Input devices to take fingerprints or for face recognition
● Recap the story and revise the concepts covered in the previous chapter.
● Read the story aloud from panel 2 page 5 to panel 1 page 6 up to the information box on Trackpads
● Say: Let me explain input devices and their types.
Input Devices
Types of Input Devices
As given in Panel 1, 2 on Page 5
As given in the book from Panel 3 on Page 5 to Panel 4 on Page 6 (Keyboard, Mouse, Webcam, Trackpad, Sensors)
● Present the scenario: Consider you have a cousin who lives in another city. You want to send them a message to plan a picnic together.
● Discuss:
■ What device do you think you can use to send a message to your cousin?
Possible Responses: Smartphone; Mobile; Computer.
■ What Input device can you use to type and send your message on a computer?
Possible Responses: Keyboard; Touch screen.
● Present the scenario: Consider your school is being automated and your attendance will be tracked automatically.
● Discuss:
■ What device can be used to input your attendance?
Possible Responses: Sensors; Finger sensors; Face recognition.
● Conduct Fill Up on Page 11:
■ Say: Help Mel and Conji complete the sentences.
■ Read Q2, 3, 4, 5, aloud one by one.
■ Invite some students to share their answers and others to validate their peers’ answers.
■ Instruct: Fill in the final answers in your books.
● Conduct Find the Truth on Page 11:
■ Say: Now, Elder Robot wants you to answer some questions.
■ Read Q2 aloud. Ask if it is true or false.
■ Invite some students to share their answers and others to validate their peers’ answers.
■ Instruct: Write the correct answer in your books.
● Conduct Answer in one line on Page 12:
■ Say: It’s time to help Eva answer a question.
■ Read Q4 aloud.
■ Invite some students to share their responses.
■ Discuss and validate the answers with the whole class.
■ Instruct: Write the correct answers in your books.
Note
● If time permits, discuss the DIY section Fun Time – Input devices (MOUSE and KEYBOARD) or assign it as homework.
1. Ask students to identify the input devices given in the activity.
2. Fill in the letters from top to bottom to name them.
● Conclude: Today, we learned about input devices and two of their types: Keyboard and Mouse.
● Ask the following probing questions:
■ What can you do with a keyboard or a mouse on a computer?
Possible Responses: Type; Play video games; Open files; Scroll up and down; Drawing.
■ Where have you seen sensors being used?
Possible Responses: In Cars; Malls; Hospitals; Laptops; Smartphones.
● Assign the following from DIY as homework:
■ DIY: Fun Time - Input Devices (MOUSE and KEYBOARD)
In this session, students will learn about –
● Output devices and their types
● Output devices: A device that displays the result of the instruction given
● Monitor: An output device that displays our input and the result as well
● Printer: An output device that prints text or images on paper
● Speaker: An output device that is used to listen to music
● Headphones: A device that is used to listen to music and to speak
● Recap the story and revise the concepts covered in the previous chapter.
● Read the story aloud from panel 2 page 6 to panel 4 page 7 up to Conji’s words, “Similarly, ….devices too”
● Say: Let me explain output devices and their types.
CS Concepts Explain
Output devices
Types of output devices
As given in Panel 5 on Page 6
As given on Page 7
● Say: A headphone is both an input and an output device as we can listen to music and speak with it. Also, unlike a speaker, we can wear headphones.
● Present the scenario: Consider you need to prepare a project for a competition.
● Discuss:
■ What device will display the project-related information you’ve found?
Possible Responses; Monitor; Computer; Google.
■ What device will you use to listen to the videos to prepare for the project?
Possible Responses: Speaker; Headphones
■ What device will you use to print your project?
Possible Responses: Printer
● Conduct Find the Truth on Page 11:
■ Say: Now, Elder Robot wants you to answer some questions.
■ Read Q3, 4, and 5 aloud, one by one. Ask if they are true or false.
10 min
■ Invite some students to share their answers and others to validate their peers’ answers.
■ Instruct: Write the correct answers in your books.
● Conduct Tick the Correct answer on Page 12:
■ Say: Elder Wizard wants you to help Mel and Conji answer a question.
■ Read Q2 aloud.
■ Invite some students to share their answers and others to validate their peers’ answers.
■ Instruct: Write the correct answers in your books.
● Conduct Answer in one line on Page 12:
■ Say: It’s time to help Eva answer a question.
■ Read Q1 aloud.
■ Invite some students to share responses.
■ Discuss and validate the answers with the whole class.
■ Instruct: Write the correct answers in your books.
Note
● If time permits, discuss the remaining part of DIY: Fun Time activity or assign it as homework.
● Conclude: Today, we learned about output devices and their types: monitor, printer, speaker and headphones.
● Ask the following probing questions:
■ Where have you seen speakers being used?
Possible Responses: School Announcements; Birthday Parties; Cars.
■ Where have you seen people using printers?
Possible Responses: Computer Labs; Libraries; Homes; Shops; Offices.
● Assign the following from DIY as homework:
■ DIY: Fill Up - 3
■ DIY: Fun Time (Complete the activity)
In this session, students will learn about –
● Storage devices and their types
Keywords
● Storage Device: A device to store data and information
● Pen Drive: A device to store and transfer data from one computer to another
● Cloud Storage: Online storage to store data and information without using any hardware device
● Recap the story and revise the concepts covered in the previous chapter.
● Read the story aloud from panel 5 page 7 to 9 un to the end of the lesson.
● Say: Let me explain storage devices and their types.
Storage devices
Pen drives
Cloud storage
CS Concepts
As given in Panel 5 Page 7
As given in Panel 1 on Page 8
As given in Panel 2 on Page 8
● Present the scenario: Consider you are on a trip and your father wants to take a picture of you. But suddenly a notification pops up on his phone that says ‘your phone storage is full’.
● Discuss:
■ What will your father do?
Possible Responses: Delete some unwanted pictures to make space; Save pictures online and free up phone memory;
■ What storage hardware device can help your father save images to make space on his phone?
Possible Responses: Pen drive, Memory card
■ Which storage can help your father access the images anywhere on any device?
Possible Responses: Cloud Storage
■ What will be needed to access images stored in cloud storage?
Possible Responses: Internet
● Conduct Tick the Correct answer on Page 12:
■ Say: Elder Wizard wants you to help Mel and Conji answer a question.
■ Read Q3, 4 and 5 aloud, one by one.
min
■ Invite some students to share their answers and others to validate their peers’ answers.
■ Instruct: Write the correct answers in your books.
● Conduct Answer in one line on Page 12:
■ Say: It’s time to help Eva answer a question.
■ Read Q2, 5 aloud, one by one.
■ Invite some students to share their responses.
■ Discuss and validate the answers with the whole class.
■ Instruct: Write the correct answers in your books.
Note
● If time permits, discuss Match Me section or assign it as homework.
● Conclude: Today, we learned about storage devices and their types.
● Ask the following probing questions:
■ What type of storage do you think is better and why?
Possible Responses: pen drive, cloud storage
Note: Students respond with a reason they think is valid for their choice. Appreciate students’ responses.
■ In what situations would you use a pen drive?
Possible Responses: To transfer data from a device to another; To store important information
● Assign the following from DIY as homework:
■ DIY: Fill Up – 3
■ Brain Teaser: Match Me
Note: Use the following points to prepare for the session beforehand. Avoid reading the points in the class.
● Mel and Conji were on a journey back from the memory palace.
● Something went wrong, and their spaceship landed in the ancient city of Avora.
● They explored the place and met the first elder robot.
● Mel and Conji learn about the launch of a high-tech system.
● The system will help the robots build the new world.
● Suddenly, the system starts failing due to a lack of energy.
● Conji tries to help by using magic, but it needs more energy.
● The first elder wizard comes to the rescue.
The content covered in this chapter is aligned with the following CSTA Standard
● 1B-CS-02 - Computing Systems
This chapter is divided into the following classroom sessions
1. Types of Software
2. Application Software
3. Cloud Storage and Biometric Software
In this session, students will learn about –
● Software
● Types of Software
● Frequently Used Software
Keywords
● Software: A set of instructions that tell the computer what task to do and how to do it.
● System: A set of things working together to complete a complex task.
Revise the conceptshardware and storage devices
Read the story aloud
Discuss software and types of software
● Recap the story covered in the previous chapter.
Conclude the concepts Assign homework
● Instruct: Let’s learn how the story moves ahead. We will read from page 18 to 19 up to the text “performs a specific task for the user.”
● Read the story aloud OR invite 2 students to read the dialogue aloud.
● Say: Let me explain what software is and what the different types of software are.
CS Concepts Explain
Software
Types of software
Frequently used Software
As given in Panel 2 on Page 18
As given in Panel 1 on Page 19
As given in Panel 1 on Page 19
● Present the scenario: Consider that you want to view a video on YouTube on your computer, but the computer is switched off.
● Discuss:
■ What will you do as a first step?
Possible Responses: Switch on the computer.
Explanation: Yes, so that the system software can get ready to take commands.
■ How will you open YouTube?
Possible Responses: Using a browser, type YouTube in Google, type www.youtube.com, etc.
● Ask students to open at page 26.
● Conduct Fill Up section:
■ Say: “Help Conji fill in the blanks.”
■ Read Fill Up – Q1 and 2 aloud, one by one.
■ Invite some students to share their answers and others to validate their peers’ answers.
■ Instruct: Fill in the final answers in your books.
● Ask students to open at page 27.
● Conduct Tick the Answer section:
■ Say: “Let’s practise some more to revise what we have learned.”
■ Read Tick the Answer – Q1 and 2 sentences aloud with options one by one. Repeat the question and options. After each question, choose the correct option.
■ Invite some students to share their responses.
■ Discuss and validate the answers with the whole class.
Note
● If time permits, discuss the section Answer in One Line - Q3 or assign it as homework.
● Conclude: Today, we learned about software and types of software.
● Ask the following probing questions:
■ Why do we need software?
Possible Responses: To tell the computers to do a task, to run programs on them, to play songs, to play games, to write in a document.
● Assign the following from Brain Teaser as homework:
■ Answer in One Line - Q1, 2, 3
In this session, students will learn about –
● Application Software
● Types of Application Software
● Voice Recognition Technology
Keywords
● Photoshop: An image editing software.
Revise
● Say: Do you remember what we learned in the previous session?
● Invite responses from some students.
● Say: Let’s revise what we have learned.
● Instruct: Let’s read from page 19 to 20 up to the text “a computer can hear, understand and answer.”
● Read the story aloud OR invite 2 students to read the dialogue aloud.
● Say: Let me explain more about the application software and its types.
Voice
● Discuss:
■ Consider that your computer is under an attack by a virus, what type of software will protect your computer from the attack?
Possible Responses: Utility software, Anti-virus, McAfee, Norton etc.
Explanation: Utility software like anti-virus software helps maintain the system.
■ What type of software will you use for booking a movie ticket online?
Possible answers: bookmyshow, specific software, theatre websites.
● Ask students to open at page 26.
● Conduct Fill Up section:
■ Say: “Help Conji fill in the blanks.”
■ Read Fill Up – Q3 and 4 aloud, one by one.
■ Invite some students to share their answers and others to validate their peers’ answers.
■ Instruct: Fill in the final answers in your books.
● Conduct Find the Truth section:
■ Say: “Help Conji mark True (T) or False (F)
■ Read Find the Truth – Q1 and 2 sentences aloud, one by one. After each sentence, ask if it is true or false.
■ Invite some students to share responses.
■ Discuss and validate the answers with the whole class.
■ Instruct: Fill in the final answers in your books.
Note
● If time permits, discuss the section Tick the Correct Answer - Q3 or assign it as homework.
● Conclude: Today, we revised application software. We learned about types of application software and about voice recognition technology.
● Ask the following probing questions:
■ Name 2 voice assistants using voice recognition technology.
Possible Responses: SIRI, Alexa, Cortana, Google Assistant.
● Assign the following from Brain Teaser as homework:
■ Find the Truth – Q5
■ Answer in One Line – Q5
In this session, students will learn about –
● Cloud Storage
● Biometric Software
Keywords
● Characteristics: Special quality or features.
● Biometric: Recognition of people based on their physical characteristics such as fingerprint, face etc.
● Retina: A part of an eye.
● Say: Do you remember what we learned in the previous session?
● Invite responses from some students.
● Say: There are two new characters in this chapter.
● Introduce First Elder Robot and First Elder Wizard to the students.

● Instruct: Let’s read from page 20 to 24 up to the text, “I am a wizard too.”
● Read the story aloud OR invite 4 students to read the dialogue aloud.
● Say: Let me explain more about cloud storage and biometric software.
Scenarios
Cloud Storage
Biometric Software
CS Concepts
If you are teaching without a projector Explain
As given in Panel 1 on Page 21
As given in Panel 2 on Page 21
● Present the scenario: Consider that you have to work on the same google document with your 4 other friends.
● Discuss:
■ Where will you store this google document?
Possible Responses: cloud storage, my computer.
Explanation: cloud storage allows sharing files easily across the world.
■ Give one example of biometric software that you know.
Possible Responses: smartphone with face recognition, attendance marking systems, security in the banks for lockers – retina scan.
● Ask students to open at page 26.
● Conduct Fill Up section:
■ Say: “Help Conji fill in the blanks.”
■ Read Fill Up – Q5 aloud.
■ Invite some students to share their answers and others to validate their peers’ answers.
■ Instruct: Fill in the final answers in your books.
● Conduct Find the Truth section:
■ Say: “Help Conji mark True (T) or False (F)
■ Read Find the Truth – Q3 and 4 sentences aloud, one by one. After each sentence, ask if it is true or false.
■ Invite some students to share their responses.
■ Discuss and validate the answers with the whole class.
■ Instruct: Fill in the final answers in your books.
● If time permits, discuss the section Tick the Correct Answer - Q4 and Answer in One Line - Q4, or assign it as homework.
● Conclude: Today, we learned about cloud storage and biometric software.
● Ask the following probing questions:
■ Do we need the internet to access files from the cloud storage?
Possible Responses: Yes
■ Mention a few types of software that use cloud storage.
Possible Responses: Google Photos, DropBox, mailing software
● Assign the following from Brain Teaser as homework:
■ Match Me
Note: Use the following points to prepare for the session beforehand. Avoid reading the points in the class.
● Mel and Conji learned about the launch of a high-tech system.
● The system helped the robots build the new world.
● Suddenly, the system started failing due to a lack of energy.
● Conji tried to help by using magic, but it needed more energy.
● The first elder wizard came to the rescue.
● To help the robots start their new world, the First Elder Wizard asks the First Elder Robot to reset the system.
● When Conji asks, Mel explains the operating system and the GUI of the application.
● The First Elder Wizard successfully starts the system with the magic.
● The First Elder Robot offers the First Elder Wizard to expand Wizardkind on their planet.
The content covered in this chapter is aligned with the following CSTA Standard
● 1B-CS—02 Abstraction
This chapter is divided into the following classroom sessions
1. Operating System I
2. Operating System II
3. Operating System III
In this session, students will learn about –
● Operating system
● History of operating system
● Windows
● GUI
Keywords
● Operating system: Software that helps users, computer hardware, and software to communicate.
● GUI: It allows users to interact with their computer using a mouse and keyboard.
Read the story covered in the session aloud Revise the previous session concepts
Discuss operating system, history of operating system, different types of OS, Windows, and GUI
Fill Up – Q1, 2, 4, 5 Find the Truth – Q1, 2, 3 Tick the Correct Answer
● Say: Today, we will be learning the magic needed for the computer to work.
● Say: Let’s learn how the story moves ahead.
● Read the story aloud from Page 32 to Panel 1 on Page 34 up to Mel’s words “.... latest is windows 11”
● Discuss the operating system and its history while reading the story.
CS Concepts Explain
Operating System
As given in Panel 2 on Page 32
Screensaver As given in Panel 2 on Page 33
Types of OS
As given in Panel 2 on Page 33
GUI As given in Panel 3 on Page 33
● Present the scenario: You visit a village with your parents and meet a village boy who has never seen a computer, laptop or smartphone. The village boy sees you using your father’s laptop and wonders how that device works. He wants you to answer some questions.
● Discuss
■ What helps you use the laptop?
Possible Responses: Operating System, Keyboard, Laptop, Device.
■ What is an Operating System?
Possible Responses: Software that helps us communicate with computers
■ What is Software?
Possible Responses: Application, Program, etc.
■ What operating systems are there?
Possible Responses: Windows, Apple Mac, other laptop companies’ names.
● If time allows, discuss all four questions, or discuss the first two.
● Conduct Fill Up on Page 45:
■ Say: Let’s help Mel complete the sentences to reach and save them.
■ Read Q1, 2, 4 and 5 aloud, one by one.
■ Invite some students to share their answers and others to validate their peers’ answers.
■ Instruct: Fill in the final answers in your books.
● Conduct Find the Truth on Page 46:
■ Say: Let’s help Conji identify if these statements are true or false.
■ Read Q1, 2, 3 aloud, one by one.
■ Invite some students to share their responses.
■ Discuss and validate the answers with the whole class.
■ Instruct: Write the final answers in your books.
● Conduct Tick the Correct Answer on Page 46:
■ Say: Let’s help Mel tick the correct answers.
■ Read Q1, 2, 4, and 5 sentences aloud, one by one.
■ Invite some students to share their responses.
■ Discuss and validate the answers with the whole class.
■ Instruct: Tick the final answers in your books.
● Ask the following probing questions:
■ What devices do you see around you that work on an operating system?
Possible Responses: Smartphone, SmartTV, Smartwatch.
■ What can be used as an interface between the user and the computer?
Possible Responses: Keyboard, Mouse, Operating System, Software.
● Assign the following questions as Homework:
■ Q1, 2, and 5 of Answer in One Line from Brain Teasers on Page 47.
■ Q1 and 3 of Fill Up from DIY on Page 49
In this session, students will learn about –
● Desktop
● How to change the background image
Keywords
● Desktop: The main screen we see when the computer turns on
● Taskbar: It provides a quick and easy way for users to access and manage running applications
● Screensaver: It displays moving images or animations
Revise the previous session concepts Read the story covered in the session aloud
Discuss the desktop, changing the background image, screensaver
Fill Up – Q3 Find the Truth – Q4, 5 Tick the correct – Q3
Conclude the session Assign the homework
● Say: Today, we will be learning the magic of Desktop that helps to operate a computer.
● Read the story aloud from Panel 3 on Page 34 to Panel 2 on Page 37 up to the text “.... to the normal screen”.
● Discuss the following concepts while reading the story. CS
Desktop
How to change the background image
How to download the applications
Screensaver
As given in Panel 3 on Page 34
As given in Panel 3 on Page 35
As given in Panel 3 and 4 on Page 36
As given in Panel 3 on Page 37
● Present the scenario: You visit your cousin’s house with your parents. You start using your laptop to play games. Your cousin asks you how everything works and wants you to answer some questions.
● Discuss
■ What is a Desktop?
Possible Responses: Operating System, Keyboard, Laptop, Device.
■ What is a Taskbar?
Possible Responses: a bar on which we can decide to perform many tasks.
■ What is an Application?
Possible Responses: Windows, Apple Mac, Games, Computer.
■ What is a Screensaver?
Possible Responses: Application, Program, etc.
● If time allows, discuss all four questions or the first two.
● Conduct Fill Up on Page 45:
■ Say: Let’s help Mel complete the sentences to reach and save them.
■ Read Q3 aloud.
■ Invite some students to share their answers and others to validate their peers’ answers.
■ Instruct: Fill in the final answers in your books.
● Conduct Find the Truth on Page 46:
■ Say: Let’s help Conji identify if these statements are true or false.
■ Read Q4 and Q5 aloud, one by one.
■ Invite some students to share their responses.
■ Discuss and validate the answers with the whole class.
■ Instruct: Write the final answers in your books.
● Conduct Tick the Correct Answer on Page 46:
■ Say: Let’s help Mel tick the correct answers.
■ Read Q3 aloud.
■ Invite some students to share their responses.
■ Discuss and validate the answers with the whole class.
■ Instruct: Tick the final answers in your books.
● Ask the following probing questions:
■ What do we see when the Computer is turned on?
Possible Responses: Operating System, Image, Desktop
■ What types of applications do we have?
Possible Responses: Games, Images, Desktop, Free applications, Paid applications.
● Assign the following questions as Homework:
■ Q3 and 4 of Answer in One Line from Brain Teasers on Page 47.
■ Q1, 2, and 3 of Re-order from DIY on Page 48.
In this session, students will learn about –
● How to change the Screensaver
● Shapes of Mouse pointers
Keywords
● Mouse Pointer: It’s used to select or click on different objects on the screen, like buttons, icons, links, and menus
● Shut Down: It is a process of turning off all the hardware and software components of the computer system
Revise the previous session concepts Read the story covered in the session aloud
● Say: Today, we will be learning about Screensaver and the shapes of Mouse pointers in a Computer.
● Read the story aloud from Panel 3 on Page 37 to Page 39 up to the text “.... to shut down”.
● Discuss the following concepts while reading the story.
CS Concepts Explain
How to change the screensaver
Shapes of mouse pointers
Shut Down
As given in Panel 3 on Page 38
As shown in Panel 1 on Page 39
As shown in Panel 1 on Page 39
● Present the scenario: You visit your cousin’s house with your parents. You start using your laptop and play games. He asks you how everything is working and wants you to answer some questions.
● Discuss
■ What does a Double-headed arrow mean?
Possible Responses: Busy, Working in the background, Image is changing.
■ What is a Mouse Pointer?
Possible Responses: It helps to perform a different task.
■ What are the different shapes of Mouse Pointers?
Possible Responses: Arrow, Normal, Pointer.
● If time allows, discuss all four questions or the first two.
● Conduct Match Me on Page 45:
■ Say: Let’s help Mel complete the suitable options to save the Computer system.
■ Read all the options aloud, one by one.
■ Invite some students to share their answers and others to validate their peers’ answers.
■ Instruct: Match the correct answers in your books.
● Ask the following probing questions:
■ When the Computer is busy, what is the shape of the mouse?
Possible Responses: Working, Busy, We have to wait, Computer is busy.
■ When we see the Four-headed arrow, what does it mean?
Possible Responses: The mouse is busy, System is working, and We can move pictures.
● Assign the following questions as Homework:
■ Match Me from DIY on Page 49.
Note: Use the following points to prepare for the session beforehand. Avoid reading the points in the class.
● The First Elder Wizard asked the First Elder Robot to reset the system to power it up with magic to help the robots start their new world.
● When Conji asked, Mel explained to him about the operating system and, in addition, told him more about the GUI of the application.
● Mel also explained about the desktop and how to add a background image.
● The First Elder Wizard successfully started the system with his magic.
● The First Elder Robot offered the First Elder Wizard to expand Wizardkind on their planet.
● Conji misses the fun he and Mel used to have in Avora.
● Conji tries to make a potion called Lucy Luck which can fulfil any wish but sadly he is missing some ingredient.
● The First Elder Robot and First Elder Wizard ask them to be careful while using the internet.
● Finally, they get the recipe printed and head towards the potion lab. The
● 1B-NI–04 Networks & the Internet This
In this session, students will learn about –
● The Internet
● History of the Internet
● Internet: A network of connected computers that helps gather information and communicate with others
● Recap the story and revise the concepts covered in the previous chapter.
● Say: Today, we will be learning the magic of the Internet.
● Say: Let’s learn how the story moves ahead.
● Read the story aloud from Page 52 to Panel 1 on Page 55 up to Conji’s words “....remember better”.
● Discuss the Internet and its history while reading the story.
● Present the scenario: Consider your best friend is moving to another city as their father got orders from his office. You ask your friend to stay in touch using the Internet. But your friend has never heard of the internet.
● Discuss
■ What is the Internet?
Possible Responses: Software that helps us communicate with people.
■ What device does your friend need to use the internet?
Possible Responses: Laptop; Smartphone; Computer.
■ What applications can we use to share messages to stay connected?
Possible Responses: Email; Facebook; Instagram; Whatsapp.
■ What else can we do with the Internet?
Possible Responses: Play Games; Watch Videos; Run the computer.
● If time allows, discuss all four questions, or discuss the first two.
● Conduct Fill Up on Page 64:
■ Say: Let’s help Mel complete the sentences to reach and save them.
■ Read Q1, 2, and 3 aloud, one by one.
10 min
■ Invite some students to share their answers and others to validate their peers’ answers.
■ Instruct: Fill in the final answers in your books.
● Conduct Find the Truth on Page 64:
■ Say: Let’s help Conji identify if these statements are true or false.
■ Read Q1, 3 aloud, one by one.
■ Invite some students to share responses.
■ Discuss and validate the answers with the whole class.
■ Instruct: Write the final answers in your books.
● If time allows, discuss the following questions or assign them as homework.
■ With the help of the Internet we can share Information. (T/F)
■ It is safe to watch videos online using the Internet. (T/F)
● Conclude: Today, we learned about the Internet and its history.
● Ask the following probing questions:
■ What is used to connect multiple computers?
Possible Responses: Computer; Internet.
■ What devices can you use to connect to the Internet?
Possible Responses: Share information; Play games; Watch videos.
● Assign the following questions as Homework:
■ Q1, 2 of Answer in One Line from Brain Teasers on Page 65
■ Complete Q1 of Word Search from DIY on Page 66
In this session, students will learn about –
● Uses of the Internet
● Web Browser
Keywords
● Web Browser: An application to access information over the internet and stay connected with people who are far away.
Recap the story and revise the concepts covered in the previous session
Read the story to be covered in this session aloud
● Recap the story and revise the concepts covered in the previous session.
● Say: Let’s learn how the story moves ahead.
● Read the story aloud from Page 55 to Panel 2 Page 57 up to the words “....using a web browser…”.
● Say: Let me explain the magic of the Web Browser.
CS Concepts Explain
Uses of Internet
Web Browser
As given in Panel 2 on Page 55
As given in Panel 2 on Page 57
● Present the scenario: You visit your friend’s house at the weekend and see that his parents and your friend are playing computer games using Web Browser. You are curious and ask your friend how to play these games and he tells you about web browsers.
● Discuss:
■ What are the uses of Web Browsers?
Possible Responses: Internet; Website; Webpages.
■ What is used to play games and watch videos?
Possible Responses: Internet; Computer; Web browser.
■ You want to talk to your friend while sitting at home. What will you use?
Possible Responses: Internet; Software; Computer; Laptop.
Note
● If time allows, discuss all three questions, or discuss the first two.
● Conduct Fill Up on Page 64:
■ Say: Let’s help Conji fill in the blanks.
■ Read Q4 aloud.
min
■ Invite some students to share their answers and others to validate their peers’ answers.
■ Instruct: Fill in the final answers in your books.
● Conduct Find the Truth on Page 64:
■ Say: Let’s help Conji identify if these statements are true or false.
■ Read Q2 aloud.
■ Invite some students to share their responses.
■ Discuss and validate the answers with the whole class.
■ Instruct: Write the final answers in your books.
● Conduct Tick the Correct Answer on Page 64:
■ Say: Let’s help Mel tick the correct answers.
■ Read the Q1 sentence aloud.
■ Invite some students to share their responses.
■ Discuss and validate the answers with the whole class.
■ Instruct: Tick the final answers in your books.
● Conduct Match Me on Page 65:
■ Say: Let’s help Mel match the following.
■ Read the Match Me aloud.
■ Invite some students to share their responses.
■ Discuss and validate the answers with the whole class.
■ Instruct: Draw lines to connect the icons with their correct names in your books.
Note
● If time allows, discuss the following questions or assign them as homework.
■ It is safe to play games online using the Internet. (T/F)
■ Email is the safest mode to communicate and share information using the Internet. (T/F)
● Conclude: Today, we learned about uses of the internet and web browsers.
● Ask the following probing questions:
■ What is used to play games?
Possible Responses: Computer; Internet; Web Browser.
■ What are the uses of Web Browsers?
Possible Responses: To share information; Play games; Watch videos.
● Assign the following questions as Homework:
■ Q4 of Answer in One Line from Brain Teasers on Page 65
■ Complete Q3, 4 and 5 of Word Search from DIY on Page 66
Objectives
In this session, students will learn about:
● WWW
● How to open google chrome
● Website and Web page
Keywords
● WWW (World Wide Web): Interconnected network of web pages that can be accessed through internet
● Web Page: A single document on the web
● Website: Collection of web pages
Recap the story and revise the concepts covered in the previous session
Read the story to be covered in this session aloud
Discuss World Wide Web, Web Page and Website
Find the Truth – Q3 Tick the Correct Answer – Q3
Conclude the session Assign the homework
● Recap the story and revise the concepts covered in the previous session.
● Say: Today, we will be learning the magic of Web Browser, and Website.
● Say: Let’s learn how the story moves ahead.
● Read the story aloud from Page 58 to Page 59 up to Mel’s words “....smarter day by day…”
● Say: Let me explain the magic of the World Wide Web and Website.
Ifyouareteachingwithaprojector Open a google doc on your computer system
CS Concepts Explain Demonstrate
World Wide Web
Scenarios Ifyouareteaching withoutaprojector OR
As given in Panel 2 on Page 58
Opening Google Chrome As given in Panel 2 on Page 58
Website and Webpage
Run different commands on WWW.
How to open Google Chrome.
As given on Page 59 Open https://www.uolo.com/tekie.html on google chrome to explain the website and web page.
● Present the scenario: One day you come back from your school and see Father creating and designing something on the computer. You ask your Father what it is. He explains that he is designing a website and developing a website like Youtube, Wikipedia.
● Discuss:
■ What are the uses of a Website?
Possible Responses: Internet; We can share information; Web browser.
■ What is the full form of WWW?
Possible Responses: Website Web World; Wide World Web; World Wide Web.
■ What is Google Chrome?
Possible Responses: Internet; Computer; Web browser.
■ What is a collection of multiple web pages?
Possible Responses: Internet; Software; Website.
● If time allows, discuss all four questions, or discuss the first two.
● Conduct Find the Truth on Page 64:
■ Say: Let’s help Conji identify if these statements are true or false.
■ Read Q3 aloud.
■ Invite some students to share their responses.
■ Discuss and validate the answers with the whole class.
■ Instruct: Write the final answers in your books.
● Conduct Tick the Correct Answer on Page 64:
■ Say: Let’s help Mel tick the correct answers.
■ Read Q2 and 3 sentences aloud, one by one.
■ Invite some students to share their responses.
■ Discuss and validate the answers with the whole class.
■ Instruct: Tick the final answers in your books.
● If time allows, discuss the following questions or assign it as homework.
■ Google Chrome is a website. (T/F)
■ You can search for the Youtube website using Google Chrome. (T/F)
● Conclude: Today, we learned about WWW, opening google chrome, website and web page.
● Ask the following probing questions:
■ What is used to share information when connected to the Internet?
Possible Responses: Computer; Internet; Web Browser; Web.
■ Which is a single document on the Web?
Possible Responses: Website; Web; Webpage.
● Assign the following questions as Homework:
■ Q3 of Answer in One Line from Brain Teasers on Page 65
■ Complete Q2 of Word Search from DIY on Page 66
In this session, students will learn about –
● Cybercrimes
● Rules to Stay Safe
Keywords
● Cybercrime: Illegal act done using the internet such as bullying and hacking
● Password Security: A secret code used to keep your things safe on the computer or the internet
● Recap the story and revise the concepts covered in the previous session.
● Say: Today, we will be learning the black magic of Cybercrime.
● Say: Let’s learn how the story moves ahead.
● Read the story aloud from Page 60 to Page 62 up to the words “...to the potions lab…”.
● Say: Let me explain the black magic of Cybercrime and how to be safe from that.
Cybercrime
Password Security
CS Concepts Explain
As given in Panel 1 on Page 60
As given in Panel 1 on Page 60
● Present the scenario: Consider you are chatting with your friend online and someone sends you a message to become your online friend. You start chatting with the person.
● Discuss:
■ What will you do if the person asks you to share your password?
Possible Responses: I will not share; I will share.
■ Let’s say you gave that person your password; what do we call it if they misuse it?
Possible Responses: Cybercrime; Fraud.
■ What can we do to protect things on Computer while using the Internet?
Possible Responses: Do not use the Internet; Do not share information; Use a password.
■ What must you do when someone asks you to share information while using the Internet?
Possible Responses: Share the information; Do not share; Tell your parents.
Note
● If time allows, discuss all three questions, or discuss the first two.
● Conduct Where is it? on Page 67:
■ Say: Let’s help Mel with the Lab.
■ Invite some students to share responses.
■ Discuss and validate the answers with the whole class.
■ Instruct: Complete the Lab.
Note
● If time allows, discuss the following questions:
■ You can protect your information by adding a password. (T/F)
■ It is good to share your password with your friends. (T/F)
● Conclude: Today, we learned about cybercrime and rules to stay safe.
● Ask the following probing questions:
■ How can you keep your things safe on the Computer while using the Internet?
Possible Responses: Don’t share; Turn off the Internet; Use passwords.
■ If someone sends you mean or insulting messages what should we do?
Possible Responses: Delete the messages; Do not respond; Tell your parents.
Note: Use the following points to prepare for the session beforehand. Avoid reading the points in the class.
In the Previous Chapter…
● Conji missed the fun he and Mel used to have in Avora.
● Conji tried to make a potion called Lucy Luck which could fulfil any wish, but sadly he was missing some ingredient.
● First Elder Robot and First Elder Wizard asked them to be careful while using the internet.
● Finally, they got the recipe printed and headed towards the potion lab.
● Mel and Conji tell the First Elder Wizard and First Elder Robot about Avora.
● The Elders promise to make a spaceship to take the kids back to Avora.
● The kids talk about their favourite potion.
● They discuss mind maps and their uses, and they create a mind map for the potion.
● They also create a mind map for space programmes.
The content covered in this chapter is aligned with the following CSTA Standard
● 1B-AP–11 Modularity
This chapter is divided into the following classroom and lab sessions
1. Mind Maps I
2. Mind Maps II
3. Creating Mind Maps I
4. Creating Mind Maps II
5. Creating Mind Maps III
In this session, students will learn about –
● Introduction of Mind Maps
● How to create mind maps
● Mind maps: Are diagrams that help us put our ideas into pictures, symbols, numbers and words
Recap the story and the concepts covered in the previous chapter
Read the story to be covered in the current session aloud
Discuss Mind maps and their uses
Fill Up – Q1, 3 Answer in One Line – Q1 Conclude the session Assign the homework
● Recap the story and revise the concepts covered in the previous chapter.
● Say: Today, we will be learning about mind maps and their uses.
● Say: Let’s learn how the story moves ahead.
● Read the story aloud from Page 70 to Panel 4 on Page 72 up to First Elder Robot’s words “....help us do that”
● Say: Let me explain: CS
Introduction to Mind maps
How to create a mind map
As given in Panel 5 on Page 72
As given in Panel 4 on Page 73
● Present the scenario: You have to create a mind map on the topic “My Favourite Things”.
● Discuss:
■ What main branches will you create for the mind map?
Possible Responses: Food; Hobbies; Sports; Activities; Subjects
■ What sub branches can you create under the category sports?
Possible Responses: Indoor sports; Outdoor sports
■ How can you create mind maps?
Possible Responses: Using pen and paper; Using drawing tools; Using some online software
■ What are some of the ways to make your mind map attractive?
Possible Responses: By using different colours; By using different handwritings
● If time allows, discuss all four questions, or discuss the first two.
● Conduct Fill Up on Page 82:
■ Say: Let us help Mel to fill in the blanks.
■ Read Q1 and Q3 aloud, one by one.
■ Invite some students to share their answers and others to validate their peers’ answers.
■ Instruct students to write the final answers in their books.
● Conduct Answer in one line on Page 84:
■ Say: Let us help Conji answer the questions.
■ Read Q1 aloud.
■ Invite some students to share their answers and others to validate their peers’ answers.
■ Instruct students to write the final answers in their book.
● Ask the following probing questions:
■ Where can you use mind maps in your day-to-day life?
Possible Responses: Goal setting; Revising a concept; Visualising a story
■ How are mind maps helpful?
Possible Responses: To organise ideas; To engage in creativity; To remember easily; To solve a problem; To find a path
● Assign the following questions as homework:
■ Brain Teasers: Find the Truth – Q1 and Q2
In this session, students will learn about –
● Introduction of Mind maps
● How to create Mind maps
● Mind maps: Are diagrams that help us put our ideas into pictures, symbols, numbers and words
● Recap the story and revise the concepts covered in the previous session.
● Say: Today, we will be learning about mind maps.
● Say: Let me explain mind maps and creating mind maps.
Mind maps
Revise the concept from the previous class
Creating mind maps Revise the concept from the previous class
● Explain how to create mind maps in diagrams.net.
● Click on the practice button and open the assignment in the Tekie panel.
● Conduct Make Mind maps on Page 85:
■ Say: Let us help Conji to make a mind map about animals.
■ Invite some students to share how they will create their mind maps.
■ Discuss and validate the answers with the whole class.
■ Instruct: Complete the Lab.
● Conclude: Today, we learned about mind maps and creating them.
● Ask the following probing questions:
■ How can you create a mind map?
Possible Responses: To create a mind map, start with a central idea and then add related subtopics; Use colours, images, and shapes to make it visually interesting; Add branches and sub branches
■ How can you use a mind map to solve a problem?
Possible Responses: You can use a mind map to break down a problem into smaller subtopics and explore potential solutions. By considering all aspects of the problem, you can come up with a plan of action that addresses everything.
In this session, students will learn about –
● Creating a Mind map for “Space Programmes”
● Mind maps: Are diagrams that help us put our ideas into pictures, symbols, numbers and words
Recap the story and the concepts covered in the previous chapter Read the story to be covered in the current session aloud
Discuss creating a Mind map for “Space Programmes”
● Recap the story and revise the concepts covered in the previous session.
Conclude
session Assign the homework
● Say: Today, we will be learning about the mind map of space programmes.
● Say: Let me explain about the mind map for “Space Programmes”.
CS Concept Explain
Create mind map for “Space Programmes” As given in Panel 2 on Page 75 and on Page 76
Create sub branches
As given on Page 77 and 78
● Present the scenario: Consider you have to create a mind map on the topic “Types of fruit and vegetables”.
● Discuss:
■ What sub branches will you create for the Fruit branch in the mind map?
Possible Responses: Citrus fruits Melons; Tropical fruit; Berries; Stone fruit
■ What sub branches can you create under the category citrus fruit?
Possible Responses: Oranges; Lemons; Limes; Grapefruit
■ What sub branches will you create for the Vegetables branch in the mind map?
Possible Responses: Leafy greens; Root vegetables; Legumes; Nightshade vegetables
■ What sub branches and images can you add under the category Leafy greens?
Possible Responses: Spinach; Mint; Spring onion; Fenugreek; Parsley; lettuce Note
● If time allows, discuss all four questions, or discuss the first two.
● Conduct Fill Up on Page 82:
■ Say: Let us help Mel to fill in the blanks.
■ Read Q2, 4 and 5 aloud, one by one.
■ Invite some students to share their answers and others to validate their peers’ answers.
■ Instruct students to write the final answers in their book.
● Conduct Answer in one line on Page 84:
■ Say: Let us help Conji answer the questions.
■ Read Q2, Q3 and Q4 aloud, one by one.
■ Invite some students to share their answers and others to validate their peers’ answers.
■ Instruct students to write the final answers in their book.
● Ask the following probing questions:
■ What are some tips for making a good mind map?
Possible Responses: Using different colours; Drawing pictures; Using keywords; Making connections between ideas
■ How can a mind map help you remember things better?
Possible Responses: By organising your ideas; By making connections between ideas; By using the visual memory of the brain
● Assign the following questions as homework:
■ Brain Teasers: Find the Truth – Q3, 4 and 5
In this session, students will learn about –
● Creating Mind maps
● Mind maps: Are diagrams that help us put our ideas into pictures, symbols, numbers and words
● Recap the story and revise the concepts covered in the previous session.
● Say: Today, we will be learning about mind maps.
● Say: Let us try to create a mind map using diagrams.net.
● Instruct the students to click on the practice button and open the assignment in the Tekie panel.
● Explain how to start creating mind maps.
● Explain how to create mind maps in diagrams.net.
● Conduct Make Mind maps on Page 86:
■ Say: Let us help Conji to make a mind map about plants, their parts, needs and types.
■ Invite some students to share how they will create their mind maps.
■ Discuss and validate the answers with the whole class.
■ Instruct: Complete the Lab.
● Conclude: Today, we learned about mind maps and creating them.
● Ask the following probing questions:
■ Why do you think it is important to organise your ideas?
Possible Responses: It helps you think more clearly and makes it easier to communicate your thoughts with others; It helps you prioritise tasks.
■ How can you use a mind map to plan a project or essay?
Possible Responses: To brainstorm ideas; Organise your thoughts; Plan the structure of your project or essay.
In this session, students will learn about –
● Creating mind maps
Keywords
● Mind maps: Are diagrams that help us put our ideas into pictures, symbols, numbers and words
● Recap the story and revise the concepts covered in the previous session.
● Say: Today, we will be learning about mind maps.
● Say: Let us try to complete a mind map today.
● Instruct the students to click on the practice button and open the assignment in the Tekie panel.
● Explain how to create mind maps in diagrams.net.
● Conduct Fun Time on Page 87:
■ Say: Let us help Conji to complete a mind map.
■ Invite some students to share their responses.
■ Discuss and validate the answers with the whole class.
■ Instruct: Complete the Lab.
● Conclude: Today, we learned about creating mind maps.
● Ask the following probing questions:
■ How do you decide what to put in your mind map?
Possible Responses: By thinking about the main idea; Brainstorming related ideas and connections
■ How can you use a mind map to study for a test?
Possible Responses: To organise your notes and study materials; Make connections between different concepts to help you remember them better.
Note: Use the following points to prepare for the session beforehand. Avoid reading the points in the class.
● Mel and Conji had a conversation with Wizard and Robot.
● Mel and Conji, both missed the tech lab in Avora.
● Wizard asked Conji about her Magic potions.
● Conji replied to Wizard that he had been working on Rosey Dose, a dreaming potion.
● Mel asked Conji how to prepare it to which Conji replied that she wanted to prepare the list for that.
● In the flashback, Conji and Mel’s jet crashed and Conji saved Mel with a magic spell.
● Unfortunately, Mel lost her memory due to the crash.
● In the present, Conji realizes that the First Elder Wizard warned them of this risk.
● Conji and Mel go to the Memory palace to find Mr. Geebal.
● Conji asks Mr.Geebal to help him recover Mel’s memory.
● Mr. Geebal tells Conji that Mr. Time’s magic can help them get Mel’s memory back.
● Mr. Geebal helps them begin their journey to recover Mel’s memory.
The content covered in this chapter is aligned with the CSTA Standard
● 1B-DA-06
This chapter is divided into the following classroom and lab sessions
1. Text Formatting in Docs I
2. Text Formatting in Docs II
3. Ruler and Spacing I
4. Ruler and Spacing II
5. Activity – Add a Dialogue
In this session, students will learn about –
● Font
● How to change font
● How to highlight text
● How to find and replace text
● Font: It is a style of text.
Recap the story and the concepts covered in the previous session
Read or Invite the students to read the story aloud
Discuss font, how to change font, how to highlight text, how to find and replace text
Fill Up – Q1, 2, 3, 4 and 5 Find the Truth – Q1, 5 Tick the Correct Answer
● Recap the story and revise the concepts covered in the previous chapter.
● Say: Today, we will be learning the magic of text formatting in Google Docs to recover Mel’s memory.
● Say: Let us learn how the story moves ahead.
● Read or Invite 3 students to read the story aloud from Page 90 to Panel 6 on Page 95 up to the words “....replaced with”
● Say: We will be learning about Google Docs and text formatting while reading the story.
Font
How to change the font
How to highlight text
How to find text
How to replace text
As given in Panel 1 on Page 92
As given in Panel 1 on Page 93
As given in Panel 1 on Page 94
As given in Panel 2 on Page 94
As given in Panel 2 and Panel 3 on Page 95
● Present the scenario: Consider that you have created a document for your school project.
● Discuss:
■ If you want to edit the document, what can you use?
Possible Responses: Notepad, Word, Google Docs
■ If you want to highlight the text, what should you do first?
Possible Responses: Click on the text, Open the Google Docs, Select the text
■ What does the B stand for in Google Docs?
Possible Responses: Bold, Border
■ What option must we select to replace the text?
Possible Responses: Google Docs, Replace text
● If time allows, discuss all four questions, or discuss the first two.
● Conduct Fill Up on Page 100:
■ Say: Let us help Mel fill in the blanks.
■ Read Q1, 2, 3, 4, and 5 aloud.
min
■ Invite some students to share their answers and others to validate their peers’ answers.
■ Instruct: Fill in the final answers in your books.
● Conduct Find the Truth on Page 100:
■ Say: Let us help Conji mark these statements as true or false.
■ Read Q1 and 5 sentences aloud one by one.
■ Invite some students to share responses.
■ Discuss and validate the answers with the whole class.
■ Instruct: Mark the final answers in your books.
● Conduct Tick the Correct Answer on Page 101:
■ Say: Let us help Conji tick the correct answers.
■ Read the Q1, 3, 4 aloud.
■ Invite some students to share responses.
■ Discuss and validate the answers with the whole class.
■ Instruct: Tick the final answers in your books.
● Conduct Match Me on Page 102:
■ Say: Let us help Mel match the correct answers.
■ Read the Match Me aloud.
■ Invite some students to share their responses.
■ Discuss and validate the answers with the whole class.
■ Instruct: Tick the final answers in your books.
● Ask the following probing questions:
■ Which option can be used to highlight the text?
Possible Responses: Highlighter, Bold, Text highlight, Text highlight colour
■ What command should we use to replace the text?
Possible Responses: Replace font; Text change; Find and replace; Change text; Replace command
● Assign the following questions as homework:
■ Brain Teasers: Answer in One Line – Q1, 2, 3
■ Word Hunt: Q3, 5
2. Text Formatting in Docs II
In this session, we will apply the previous session concepts.
Keywords
● Font: It is a style of text.
Recap the story and the concepts covered in the previous session
Discuss font, how to change font, how to highlight text, how to find and replace text
● Recap the story and revise the concepts covered in the previous session.
● Say: Today, we will be learning the magic of Google Docs and text formatting.
● Say: We will be learning about Google Docs and text formatting in this Lab.
CS Concepts Explain
Font
How to change the font
How to highlight text
How to find text
How to replace text
As given in Panel 1 on Page 92
As given in Panel 1 on Page 93
As given in Panel 1 on Page 94
As given in Panel 2 on Page 94
As given in Panel 2 and Panel 3 on Page 95
● Present the scenario: You are asked by your friend to help him edit a document since you know how to format text.
● Discuss:
■ Which buttons are used to increase the text size?
Possible Responses: Up arrow, +(addition) button
■ Which buttons are used to decrease the text size?
Possible Responses: Down arrow, -(Subtraction) button
■ Which is the style of the text?
Possible Responses: Font, style
■ What do we use to underline a text in Google docs?
Possible Responses: U or Underline
● Conduct Game on as given on the panel:
■ Say: Let us create the Game on activity in the panel. (Ask the students to write about their favourite game. Explain the rules to someone who has never played it before).
■ Instruct: Click on the Practice button.
■ Instruct: Click on the Attempt / Go to Practice button to attempt the activity.
■ Walk around.
■ Instruct: Click on the Confirm button.
● Conduct School Favourites as given in the panel:
■ Say: Let us create the News Writing activity in the panel.
■ Ask the student what they think is the best subject at school. What makes it the best?
■ Instruct: Click on the Practice button.
■ Instruct: Click on the Attempt / Go to Practice button to attempt the activity.
■ Walk around.
■ Instruct: Click on the Confirm button.
Note
● If time allows, conduct the additional activity given in the panel.
● Conclude: Today, we learned about Google Docs and Text formatting.
● Ask the following probing questions:
■ Which tool is used for editing text online?
Possible Responses: Word, Google Docs, Document
■ Is it possible to highlight the text in Google Docs? (T/F)
Possible Responses: True, False
In this session, students will learn about –
● Indent
● Ruler
● Line spacing
● Paragraph spacing
Keywords
● Indent: Helps you distinguish between paragraphs in a document and makes it easier for you to follow instructions
● Line spacing: Helps you create a space between the lines in the document
● Paragraph spacing: Helps you create a space between the paragraphs in the document
Recap the story and the concepts covered in the previous session
Read or Invite the students to read the story aloud
● Recap the story and revise the concepts covered in the previous chapter.
● Say: Today, we will be learning the magic of Indent, Ruler, Line spacing, and Paragraph spacing in Google Docs.
● Say: Let us learn how the story moves ahead.
● Say: We will be learning about indents, rulers and spacing.
CS Concepts
Indent and How to indent
Ruler
Line spacing
Paragraph spacing
As given in Panel 1 on Page 96
As given in Panel 2 on Page 96
As given in Panel 1 on Page 97
As given in panel 3 on Page 97
● Present the scenario: Consider you visit your friend’s house and see him working on his homework. You wanted to know how your friend prepares a well-organised and easy-to-read document.
● Discuss:
■ What is used to distinguish between the paragraphs?
Possible Responses: Line spacing, Paragraph spacing, Indents
■ What has two Indent Markers?
Possible Responses: Indents, Line spacing, Ruler
■ What do we use to get the spacing between the lines?
Possible Responses: Indents, Paragraph spacing, Line spacing
■ What option must we select to insert space between the paragraphs?
Possible Responses: Line spacing, Indents, Paragraph spacing
Note
● If time allows, discuss all four questions, or discuss the first two.
● Conduct Find the Truth on Page 100:
■ Say: Let us help Conji mark these statements as true or false.
■ Read Q2, 3, and 4 aloud.
■ Invite some students to share their responses.
■ Discuss and validate the answers with the whole class.
■ Instruct: Write the final answers in your books.
● Conduct Tick the Correct Answer on Page 101:
■ Say: Let us help Conji tick the correct answers.
■ Read Q2, 5 aloud.
■ Invite some students to share their answers and others to validate their peers’ answers.
■ Instruct: Mark the final answers in your books.
● Conduct a Re-order on Page 103:
■ Say: Let us help Mel tick the correct answers.
■ Read Q2 aloud.
■ Invite some students to share their responses.
■ Discuss and validate the answers with the whole class.
■ Instruct: Reorder the final answers in your books.
● Ask the following probing questions:
■ Which option can be used to change the line spacing?
Possible Responses: Indent button, Paragraph button, Line spacing button
■ Which option can be used to change the paragraph spacing?
Possible Responses: Indent button, Paragraph button, Line spacing button
● Assign the following questions as homework:
■ Brain Teasers: Answer in One Line – Q4, 5
■ Word Hunt: Q1, 2, 3
■ DIY: Re-order – Q1
In this session, we will apply the previous session concepts.
● Indent: Helps you distinguish between paragraphs in a document and makes it easier for you to follow instructions
● Line spacing: Helps you create a space between the lines in the document
● Paragraph spacing: Helps you create a space between the paragraphs in the document
Recap the story and the concepts covered in the previous session
Read or Invite the students to read the story aloud
● Recap the story and revise the concepts covered in the previous chapter.
● Say: Today, we will be learning the magic of Indent, Ruler, Line spacing, and Paragraph spacing in Google Docs.
● Say: We will be learning about Indent, line spacing, ruler, and paragraph spacing while reading the story.
CS Concepts Explain
Indent and How to indent
As given in Panel 1 on Page 96
Ruler As given in Panel 2 on Page 96
Line spacing
Paragraph spacing
As given in Panel 1 on Page 97
As given in panel 3 on Page 97
● Present the scenario: Suppose you are exploring Google docs.
● Discuss:
■ What are the spaces between lines called?
Possible Responses: Line spacing, Paragraph spacing, Indents
■ Which method can be used for indentation?
Possible Responses: Indents, Line spacing, Ruler
■ Why do we use the Ruler?
Possible Responses: For indents, Line spacing, Align the text
■ What is the default font of the text in Google docs?
Possible Responses: Arial, Bold, Italics
Note
● If time allows, discuss all four questions, or discuss the first two.
● Conduct Choose Your Own Adventure as given in the panel:
■ Say: Let us create a document on your favourite Adventure. (In this activity students can create an interactive “Choose Your Own Adventure” story in Google Docs.)
■ Instruct: Click on the Practice button
■ Instruct: Click on the Attempt / Go to Practice button to attempt the activity.
■ Walk around.
■ Instruct: Click on the Confirm button.
● Conduct Real Superheroes as given in the panel:
■ Say: Let us create the News Writing activity in the panel. (Superheroes in movies and comics can do some pretty amazing things, but think of someone you consider to be a real-life hero. What do (or did) they do that makes them a hero?)
■ Instruct: Click on the Practice button.
■ Instruct: Click on the Attempt / Go to Practice button to attempt the activity.
■ Walk around.
■ Instruct: Click on the Confirm button.
Note
● If time allows, conduct the additional activity given in the panel.
min
● Conclude: Today, we learned about indents and spacing.
● Ask the following probing questions:
■ Which box is used to find the text?
Possible Responses: Replace box, Edit box, Find box
■ Which option is used to replace all the text?
Possible Responses: Replace, Replace all, Edit
In this session, we will apply the previous session’s concepts.
Keywords
● Font: It is a style of text.
Warm-Up Engage Build Sum-Up
Recap the story and the concepts covered in the previous session
Discuss font, how to change font, how to highlight text, how to find and replace text
Action
● Recap the story and revise the concepts covered in the previous session.
● Say: Today, we will be learning about the magic of Google Docs and Text formatting.
● Say: We will be learning about Google Docs and text formatting in this Lab.
CS Concepts Explain
Font
How to change the font
How to highlight text
How to find text
How to replace text
As given in Panel 1 on Page 92
As given in Panel 1 on Page 93
As given in Panel 1 on Page 94
As given in Panel 2 on Page 94
As given in Panel 2 and Panel 3 on Page 95
● Present the scenario: You are asked by your friend to help him edit a document since you know text formatting.
● Discuss:
■ Why do we use I in Google docs?
Possible Responses: To make text in bold; To make text in italics
■ Which option is used in the Edit menu to replace the text?
Possible Responses: Edit; Replace text; Find and replace
● Conduct Add a Dialogue as given in the panel (Page 105):
■ Say: Let us help Conji complete the activity on the panel.
■ Instruct: Click on the Practice button.
■ Instruct: Click on the Attempt / Go to Practice button to attempt the activity.
■ Walk around.
■ Instruct: Click on the Confirm button.
● Conduct News Writing as given in the panel:
■ Say: Let us create the News Writing activity in the panel. Ask the students to write about the latest news report they have read and edit it.
■ Instruct: Click on the Practise button
■ Instruct: Click on the Attempt / Go to Practice button to attempt the activity.
■ Walk around.
■ Instruct: Click on the Confirm button.
● If time allows, conduct the additional activity given in the panel.
● Conclude: Today, we learned about Google Docs and Text formatting.
● Ask the following probing questions:
■ What does U stand for in Google docs?
Possible Responses: Unit, Under, Underline
■ Which option is used to highlight the text in Google Docs?
Possible Responses: Highlighter, Bold, Text highlight color
Note: Use the following points to prepare for the session beforehand. Avoid reading the points in the class.
● Mel and Conji could not remember the Memory Palace they had arrived at.
● In the past, their jet had crashed and Mel had started falling.
● Conji used magic and saved Mel but unfortunately she lost her memory.
● They went to meet Mr. Geebal and asked for help in getting Mel’s memory back.
● Mr. Geebal took them into the log room where they learned to format text to get Mel’s memory back.
● Mr. Geebal and Mr. Time discusses Mel’s memory loss and the risk to the wizards’ and robots’ lives in Avora.
● Mr. Time tells Mr. Geebal that Mel and Conji are their only hope to save Avora.
● Conji tells Mr. Geebal that Mel is remembering a few things.
● Mr. Geebal tells Conji that they need Google Docs to bring her memory back completely.
● Conji learns lists and links in Google Docs to help Mr. Geebal bring Mel’s memory back.
The content covered in this chapter is aligned with the following CSTA Standard
● 1A-DA–05 Storage
This chapter is divided into the following classroom and lab sessions
1. Lists I
2. Lists II
3. Hyperlinks
4. Bookmarks
5. Master of Docs
In this session, students will learn about –
● Bulleted lists
● Numbered lists
● Checklists
Keywords
● Bulleted list: Has items marked with a bullet point
● Numbered list: Has items marked with numbers or letters
● Checklist: Has items marked with small checkboxes that can be ticked
Recap the story and CS concepts covered in the previous chapter
Read the story to be covered in the current session aloud
Discuss bulleted list, numbered list and checklist
Fill Up – Q1, 2, 3, 5 Answer in One Line – Q5
Conclude the session Assign the homework
Action
Plan
● Recap the story and concepts covered in the previous chapter.
● Read the story aloud from Page 108 to Panel 4 on Page 109 up to the text, “..her memory completely.”
● Say: Let me explain types of lists in Google Docs.
Bulleted List
Numbered List
Checklist
As given in Panel 6 on Page 109
As given in Panel 1 on Page 110
● Present the scenario: Consider that you go to do monthly grocery shopping with your parents and have a lot of things to buy.
● Discuss:
■ To make sure you do not forget anything, what should you do?
Possible Responses: Make a list; Write items down; Make a note
■ Which type of lists can you create if you are using Google Docs for your grocery list?
Possible Responses: Bulleted list; Numbered list; Checklist
■ Suppose you are using a checklist for your list, what can be done with the checklist?
Possible Responses: Tick; Check; Mark done
■ In what situation will a numbered list be more useful?
Possible Responses: Where a sequence or order needs to be followed.
● If time allows, discuss all four questions, or discuss the first two.
● Conduct Fill Up on Page 119:
■ Say: Help Mel to fill in the blanks.
■ Read Q1, 2, 3 and 5 aloud, one by one.
■ Invite some students to share their answers and others to validate their peers’ answers.
■ Instruct: Fill in the final answers in your books.
● Conduct Answer in One Line on Page 121:
■ Say: Help Conji to answer the following question.
■ Read Q5 aloud.
■ Invite some students to share their answers.
■ Discuss and Validate their answers.
■ Instruct: Write the final answer in your books.
Note
● If time permits, discuss the section Tick the Correct Answer – Q1 or assign it as homework.
● Conclude: Today, we learned about different types of lists in Google Docs.
● Ask the following probing questions:
■ You have to keep track of the number of students and their names in your class. Which list will be best suited for this task?
Possible Responses: Numbered list; Bulleted list; Checklist
■ In what possible scenarios can you use bulleted lists?
Possible Responses: List of games; List of toys; List of friends
● Assign the following as homework:
■ Match Me
■ Tick the Correct Answer – Q1 (if not covered in Build)
In this session, students will learn about –
● Applications of lists in Google Docs
● Bulleted list: Has items marked with a bullet point
● Numbered list: Has items marked with numbers or letters
● Checklist: Has items marked with small checkboxes that can be ticked
Recap the story covered in the previous session
Show the slides to recall the concepts covered in the current session
● Say: Do you remember what we learned in the previous session?
● Invite responses from some students.
● Say: Let us revise what we have learned.
● Instruct: Go to the Panel and open Lab on Lists II.
● Show slides one by one and discuss the concepts shown on the slide in the panel.
Use Bulleted List As given in Panel 3 to Panel 6 on Page 110
Use Numbered List As given in Panel 1 on Page 111
Use Checklist As given in Panel 2 on Page 111
● Discuss the following questions one by one to check students’ understanding:
■ Which list would be preferred if we don’t need the number of items in the list?
Possible Responses: Numbered list; Serialized list; Bulleted list
■ What are the possible uses for the checklist?
Possible Responses: Tracking tasks; Tracking shopping items
■ Does a bulleted list help to keep count of items?
Possible Responses: Yes; No; Maybe
■ In which places might people use numbered lists?
Possible Responses: In hospitals to count patients; In shopping marts to track items they have; In hotels to keep records of guests.
● Invite answers from as many students as possible.
● Address any other doubts students may have related to the concepts presented in the slides.
● Conduct Creating a List (List of Desserts) from Lab Time given in the Tekie panel (page 123):
■ Say: We know how to use various types of lists. Now, let us practise what we have learned. Click on the Practice button on the Assignment page to attempt the activity.
■ A new Google Docs document will open up.
■ Instruct: Rename the document with a name of your choice.
■ Instruct: Make a bulleted list of desserts as instructed on Page 123.
■ Walk around in the classroom and observe the activity done by the students. Guide if a student is struggling with the activity.
■ Instruct: Save and download the file to your computer. Browse or drag the file in the submission box in Tekie.
● Students need to create only a bulleted list of desserts. Hyperlinks will be added in the next session.
● If time permits, conduct the Create a Table from Lab Time (additional activity) given in the Tekie panel (page 123):
■ Say: Now, let us help Mel create a colourful timetable using a numbered list and different font styles.
■ Instruct: Click on the Practice button on the Assignment page to attempt the activity.
■ A new Google Docs document will open up.
■ Instruct: Rename the document with a name of your choice.
■ Instruct: Make a table as given on Page 123.
■ Instruct: Fill the timetable using bulleted lists in different rows.
Note
● Students need to create only a bulleted list of desserts. Hyperlinks will be added in the next session. Note
● Make the students practise the activity until they have mastered the concepts covered in the session.
● Walk around in the classroom and observe the activity done by the students. Guide if a student is struggling with the activity.
● Instruct: Save and download the file to your computer. Browse or drag the file in the submission box in Tekie.
● Conclude: Today, we have learned how to use different types of lists in Google Docs.
● If feasible, assign the following as homework:
■ Project: Ask your parent for help in making a list of your monthly groceries with 10 items.
In this session, students will learn about –
● Hyperlinks
Keywords
● Hyperlinks: Connect one document to another document or website
Recap the story and concepts covered in the previous session
Play the video to introduce the concepts to be covered in this session
● Say: Do you remember what we learned in the previous session?
● Invite responses from some students.
● Say: Let us revise what we have learned.
● Instruct: Go to the Panel and open the Lab on Hyperlinks
● Play the video to introduce the concept of hyperlinks.
● Show slides one by one and discuss the concepts shown on the slide in the Tekie panel. CS
Hyperlink
Edit Link
Insert Hyperlink
Remove Hyperlink
As given in Panel 1 on Page 112
As given in Panel 1 on Page 114
As given in Panel 2 and 3 on Page 112
As given in Panel 3 on Page 114
● Discuss the following questions one by one to check students’ understanding:
■ What makes the hyperlinks look different from the normal text?
Possible Responses: Colour; Underline; Pop-up link
■ What can you link using hyperlinks?
Possible Responses: Images; Websites; Youtube Videos

● Invite answers from as many students as possible.
● Address any doubts students may have related to the concepts presented in the slides.
● Conduct Creating a List (List of Desserts) from Lab Time given in the Tekie panel (page 123):
■ Instruct: Open the document with the list of desserts that we created in the previous session.
■ Instruct: Find images of desserts mentioned in the list on the internet.
■ Instruct: Copy the link of the images and hyperlink them in the list one by one.
● Make the students practise the activity until they have mastered the concepts covered in the session.
● Walk around in the classroom and observe the activity done by the students.
● Cheesecake
● Ice cream
● Instruct: Save and download the file to your computer. Browse or drag the file in the submission box in Tekie.
● Conduct Find the Truth on Page 119:
■ Say: Mark the statements as true or false.
■ Read Q1 and 2 aloud, one by one.
■ Invite some students to share their answers.
■ Discuss and Validate their answers.
■ Instruct: Mark the final answers in your books.
● Conduct Answer in One Line on Page 121:
■ Say: Help Conji to answer the following questions.
■ Read Q3 and 4 aloud
■ Invite some students to share their answers and others to validate their peers’ answers.
■ Instruct: Write the final answer in your books.
● Conclude: Today, we have learned how to use hyperlinks in Google Docs.
● Assign the following as homework:
■ Find the Truth – Q3, 4
■ Tick the Correct Answer – Q2, 3, 4
In this session, students will learn about –
● Applications of Bookmarks in Google Docs
● Bookmarks: Help in marking locations in a document
Recap the story and concepts covered in the previous session Play the video to introduce the concepts to be covered in this session
Discuss Bookmarks Activity given in the Tekie panel Fill Up – Q4 Answer in One Line – Q1, 2
Conclude the session Assign the homework
● Say: Do you remember what we learned in the previous session?
● Invite responses from some students.
● Say: Let us revise what we have learned.
● Instruct: Go to the Panel and open Lab on Bookmarks.
● Play the video to introduce the concept of hyperlinks.
● Show slides one by one and discuss the concepts shown on the slide in the Tekie panel.
CS Concept
Bookmark As given in Panel 1 on Page 115
Adding a Bookmark As given in Panel 3 on Page 115
Using a Bookmark As given in Panel 4 on Page 115
● Discuss the following questions one by one to check students’ understanding:
■ Can bookmarks be used in real life?
Possible Responses: Yes; No; Maybe
■ Where can you use bookmarks in a Google Doc?
Possible Responses: Starting; Ending; Anywhere
● Invite answers from as many students as possible.
● Address any other doubts students may have related to the concepts presented in the slides.
● Conduct the Activity given in the Tekie panel:
■ Say: Now, let us practise what we have learned.
■ Instruct: Click on the Practice button on the Assignment page to attempt the activity.
■ A new Google Doc will open up.
■ Rename the document as required.
■ Add the content as mentioned in the activity description.
■ Bookmark the listed items to their description in the document.
● Make the students practise the activity until they have mastered the concepts covered in the session.
■ Walk around in the classroom and observe the activity done by the students. Guide if a student is struggling with the activity.
■ Instruct: Save and download the file to your computer. Browse or drag the file in the submission box in Tekie.
● Conduct Fill Up on Page 119:
■ Say: Help Mel fill in the blank.
■ Read Q4 aloud
■ Invite some students to share their answers.
■ Discuss and Validate their answers.
■ Instruct: Fill in the final answer in your books.
● Conduct Answer in One Line on Page 121:
■ Say: Help Conji to answer the following questions.
■ Read Q1 and 2 aloud.
■ Invite some students to share their answers and others to validate their peers’ answers.
■ Instruct: Write the final answers in your books.
● Conclude: Today, we have learned how to use bookmarks in Google Docs.
● Assign the following as homework:
■ Find the Truth – Q5
In this session, students will revise –
● Lists
● Hyperlinks
● Bookmarks
Recap the story and concepts covered in the previous session
Show the slides one by one to recall the concepts of Lists, Hyperlinks and Bookmarks
Conduct the quiz given in the panel
● Say: Do you remember what we learned in the previous session?
● Invite responses from some students.
● Say: Let us revise what we have learned.
● Instruct: Go to the Panel and open the Lab on My Master Document.
● Show slides one by one to revisit the concepts shown on the slide in the Tekie panel.
● Conduct the quiz questions given in the panel.
● Discuss the following questions one by one to check students’ understanding:
■ Can bookmarks store image files?
Possible Responses: Yes; No; Maybe
■ Can a bulleted list be used to write an essay?
Possible Responses: Yes; No; Maybe
● Invite answers from as many students as possible.
● Address any doubts students may have related to the concepts presented in the slides.
● Conduct the Activity given in the Tekie panel:
■ Say: We know how to use lists, hyperlinks and bookmarks. Now, let us practise what we have learned.
■ Instruct: Click on the Practice button on the Assignment page to attempt the activity.
■ A new Google Doc will open up.
■ Instruct: Rename it with a name of your choice.
■ Ask students to add the following 3 items to a list on Page 1 of the Google Doc:
■ Favourite shows
■ Favourite Disney characters
■ Favourite superheroes
■ Instruct: Add 2 items for each category on a new page (Page 2 to 6).
■ Instruct: Add image or website hyperlinks to these items.
■ Instruct: Create bookmarks for item pages of each category in the category list added on Page 1.
● Make the students practise the activity until they have mastered the concepts covered in the session.
■ Walk around in the classroom and observe the activity done by the students.
● Conclude: Today, we have learned how to use advanced tools in Google Docs.
● If feasible, assign the following as homework:
■ Project: Add 2 more categories of favourite things in the doc created in the lab today. Add hyperlinks and bookmarks for them.
C Answer in Short
1. Output devices are used to display the result of instructions that we give to the computer.
2. We use cloud storage to store data online.

3. There are three types of hardware devices - input, output, and storage.
4. Input devices help us give instructions to the computer.
5. Storage devices help us store files and folders.
D Tick the Correct Answer
E Match Me
1. Application software is a program that performs a specific task for the user.
2. System software is a program that controls internal computer operations.

3. Software is a set of instructions that tells the computer what to do and how to do.

4. Biometric softwares helps us identify people based on their unique physical characteristics.
5. General purpose software helps us perform a variety of tasks, for example: Google docs, MS Word.
A Match Me Output Input Storage Does not belong
Earphone Microphone hardware Software
Monitor Webcam Pendrive iPad
Speaker Mouse cloud VR headset
Printer Fingerprint sensor CD Fax machine (both input / output) Touchpad
B Match Me
C Find the Truth
D Tick the Correct Answer
E Answer in One Line
1. An operating system or OS is software that helps the user, computer hardware and different software to communicate with each other.
2. GUI or Graphical User Interface is a user interface where users use icons to communicate with computers.
3. We have two types of apps.
a. Free Apps
b. Paid Apps
4. A screensaver is the image that the monitor displays when we have not been working on the computer for some time.
5. Microsoft Windows, MacOS, Linus are some examples of operating systems.
A Re-order 1. c. Right click on the application
a. Select more
b. Click on pin to Taskbar
2. a. Click the Start button
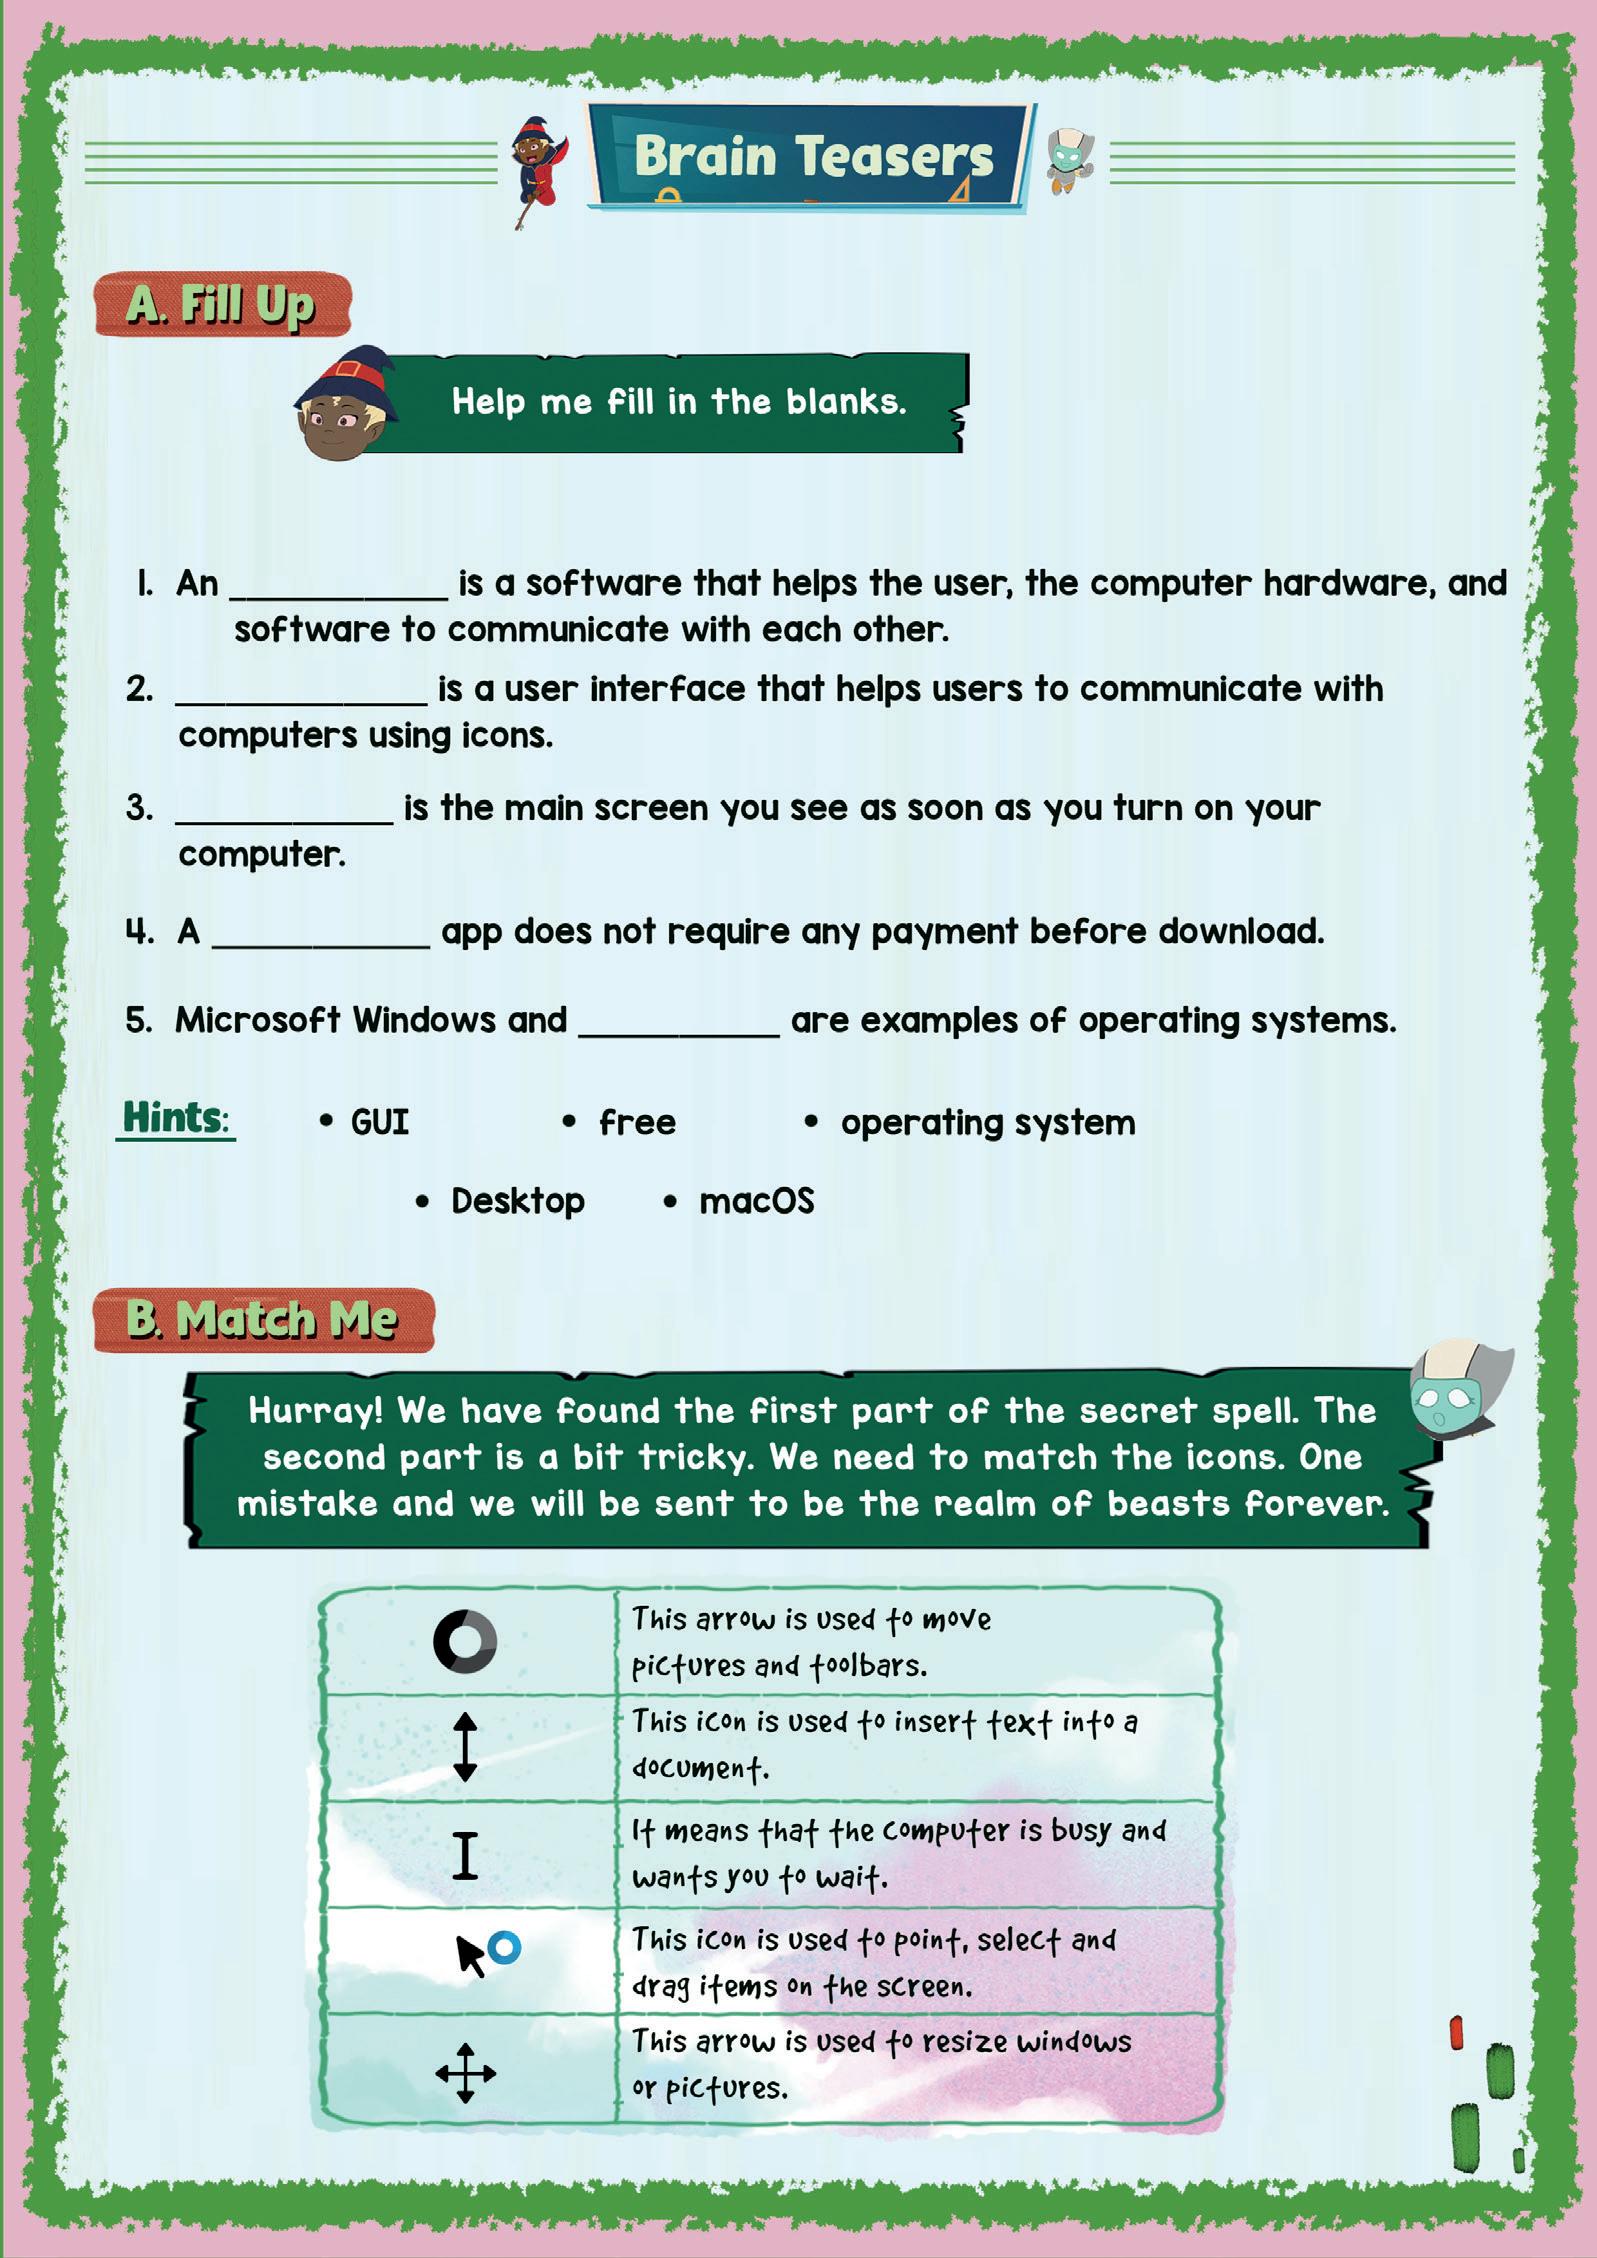
c. Choose Settings from the menu
d. Click Personalisation
b. Go to Background
e. Click on Browse
f. Select the image you want from your PC
2. a. Go to the Windows Store
c. Find an app
d. Check if it’s free or paid
b. To download a free app click on download
B Match Me Has OS:
1. Smartphones 2. PS5
3. Smartwatches 4. Computers of the 4th generation
Does not have OS:
1. Microwave 2. Laptop of the 1st generation
3. Refrigerator
Section
A Fill Up
B Find the Truth
Section Name
C Tick the Correct Answer
D Match Me
E Answer in One Line
1. The internet is a network of connected computers that helps gather information and communicate with others.
2. The internet is very useful. We can play games, and watch educational videos using the internet.

3. The full form of WWW is the World Wide Web and It was invented by Tim Berners Lee.
4. Web browser is an application used to access information over the internet and stay connected with people who are far away.
Section Section Name
A Word Search

D Tick the Correct Answer

E Answer in One Line
1. Mind map helps you to memorise the answers for your exam easily.
2. We add pictures to make the mind map easy to understand and remember.
3. We write only a few words while making mind maps to remember things easily.
4. Mind map helps us arrange and present the ideas in our mind.
1. We can use the + and - buttons to increase or decrease the font size of selected text.


2. Click the Find and Replace option in the Edit menu.
3. We use the Replace command to replace the text. It is present under the Find and Replace option on the Edit menu.
4. Click at the beginning of the line and press the tab key to indent a line.
5. Paragraph spacing is the space between two paragraphs.
B Find the Truth
C Match Me
D Tick the Correct Answer
E Answer in One Line
1. Conji will use the Edit button to modify a hyperlink.
2. Conji will use the Remove list button to remove a hyperlink.
3. Conji will use the Link button on the Insert tab to add a hyperlink.
4. The colour of the hyperlinks in Google Docs is blue.
5. The total number of lists available in Google Docs is three. These are:
a. Bulleted List
b. Numbered List
c. Checklist

1 To Create a list


The content covered in this chapter is aligned with the following CSTA Standard
● 1B - AP - 10 Control
This chapter is divided in the following lab sessions
1. Introduction to Coding
2. Commands
3. Sprites
4. Sequences and Algorithms
5. Scenes and Events
In this session, students will learn about –
● Coding
● Purpose of Learning to Code
● Block-based Coding
● Code.org
● Coding: Telling the computer what to do in a language the computer understands.
● Block-based coding: A drag-and-drop learning environment to code animated stories or games.
● Say: Today, we will learn about coding. What does the word “coding” mean?
● Invite 1 or 2 responses from the students, but don’t give the correct answer yet.
● Say: Let’s read the chapter story to understand in simple words and we will come up with a definition of “coding” afterwards.
● Read the text aloud on page 1.
● Say: Computers do not understand human languages. That is why we need to learn to code so that we can communicate with computers.
● Explain the following concepts –
Coding
Why should we learn to code?
Block-Based Coding
As given on Pages 1 and 2
As given on Page 3
As given on Page 4
Scenarios If you are teaching without a projector
If you are teaching with a projector
● Draw three rectangles of different sizes on the board.
● Present the scenario: Consider these rectangles as Lego blocks, You have arranged them in increasing order of their sizes.
1. Allow some time for kids to do this activity.
2. Once most of the students have arranged the rectangles, summarise the learning outcomes as follows -
■ Blocks in block-based coding are like the rectangles given to you.
■ Just as you have simply arranged them in increasing order, we have to arrange the blocks to make computers do a task. That is Block Coding.
■ Just like you have done this activity in your notebook, we will use Code.org to write the code.
● Conclude: Today, we learned about coding. We were introduced to a coding method called block-based coding. Additionally, we have learned about Code.org.
In this session, students will learn about –
● Drag and Drop
● Commands
Keywords
● Commands: Instructions given to the computer to do something
Revise the concepts form the previous coding class
● Say: Do you remember what we learned in the previous session?
● Invite responses from some students.
● Revise the concepts learned in the previous class.
● Say: Today we are going to learn about Commands.
● Instruct to open at page 13.
● Ask: What did I just do?
● Say: I just asked you to do something. I gave you an instruction to open at page 13. Similarly, a command is an instruction given to a computer to perform a task.
● Discuss the concepts of Commands from the book.
min
● Say: Let’s practise Drag and Drop on Code.org with the help of some activities.
● Help the students open the Drag-and-Drop activities given on pages 5 – 12, one by one.
● Discuss and Attempt each activity with students.
● Invite answers from as many students as possible.
● Walk around in the classroom and observe the activity done by the students.
2 min
● Conclude: Today, we have learned about Drag and Drop, and Commands.
In this session, students will learn about –
● Sprites
Keywords
● Sprites: Characters in coding
● Sprite lab: A section in Code.org where you can create your own stories and apps
● Say: Do you remember what we learned in the previous session?
● Invite responses from some students.
● Revise the topics learned in the previous class.
● Say: Today we are going to learn about Characters in coding called Sprites.
● Instruct: Open at page 14.
● Read the story aloud and discuss the characters with the students.
● Explain the concept of Sprite from the book.
● Instruct the students to open Code.org - Sprite Lab.
● Explain the sections of the Sprite lab.
● Say: Let’s learn to make a Sprite with the help of some activities.
● Help the students open the activities given on pages 17 – 21, one by one.
● Discuss and Attempt each activity with students.
● Invite answers from as many students as possible.
● Walk around in the classroom and observe the activity done by the students.
● Conclude: Today, we have learned about Sprites.
● Ask the following probing questions (Attempt these questions only if time permits):
■ Name your favourite cartoon characters that can be called Sprites.
Possible Responses: Snow White; Tom and Jerry; Oggy: Jack; Simba; Nala, etc.
■ What can you make with Sprite Lab?
Possible Responses: Apps, Games, Puzzles, Stories.
In this session, students will learn about –
● Sequences
● Algorithms
● Sequences: More than one command in an order
● Algorithm: A specific set of instructions given to do a particular task
Revise the concepts form the previous coding class
Discuss the key concepts covered Attempt the activities related to Sequences and Algorithms
Conclude the concepts
● Say: Do you remember what we learned in the previous session?
● Invite responses from some students.
● Revise the topics learned in the previous class.
● Say: Today we are going to learn about Sequences and Algorithms.
● Instruct: Open at the topic Sequence on Page 22.
● Discuss the concept of Sequence with the help of examples given from the book.
● Instruct: Open at the topic Algorithm on Page 32.
● Discuss the concept of an Algorithm with the help of examples given from the book.
● Explain the concepts up to the text “.......the process will continue.” on Page 35.
● Say: Let’s practise what we have learned with the help of some activities.
● Instruct the students to attempt the practice questions on Pages 23 and 24, one by one.
● Invite answers from as many students as possible.
● Validate the responses and instruct them to write the answers in their books.
● Help the students open the activities related to Sequence and Algorithms.
● Discuss and Attempt each activity with students.
● Invite answers from as many students as possible.
● Walk around in the classroom and observe the activity done by the students.
● Conclude: Today, we have learned about Sequences and Algorithms.
In this session, students will learn about –
● Creating a Scene on Sprite Lab
● Events
Keywords
● Scene: The characters in action build a scene
● Event: Brings about an action or a change
Revise the concept form the previous coding class
Discuss the key concepts convered
Attempt the activities related to Scenes and Events
Conclude the concepts
● Say: Do you remember what we learned in the previous session?
● Invite responses from some students.
● Revise the topics learned in the previous class.
● Help students to open Sprite Lab.
● Discuss Creating a Scene using the project – “Life Cycle of a Butterfly” as given in the book.
● Explain the following:
CS Concepts
Setting up a Scene
Creating an Event
How to set up a Scene on Sprite Lab.
How to create an Event on Sprite Lab.
● Discuss and Attempt the project - “Life Cycle of a Butterfly” with students in a step-by-step manner.
● Walk around in the classroom and observe the activity done by the students.
● Run the project and demonstrate the working of different blocks of code.
● Conclude: Today, we have learned about Scenes and Events.
The content covered in this chapter is aligned with the following CSTA Standards
● 1B-AP–10 Control
This chapter is divided into the following lab sessions
1. Repeat Loop
2. Variables
3. For Loop
4. Nested Loop
In this session, students will learn about –
● Loop
● Repeat Loop
● Loop: An action of doing something over and over again
● Repeat Loop: Is used when we want to repeat a task a certain number of times
Introduce students to the words “Loop” and “Repeat Loop”
Warm-Up
● Say: Today, we will learn about a loop. What does the word “loop” mean?
● Invite 1 or 2 responses from the students, but do not give the correct answer yet.
5 min
● Say: Let us read the chapter story to understand in simple words and we will define “loop” afterwards.
● Read the text aloud on page 51.
● Say: Now, we will learn about a repeat loop. What does the word “repeat” mean?
● Invite 1 or 2 responses from the students, but do not give the correct answer yet.
● Say: Let us read the chapter story to understand in simple words and we will define “ repeat loop” afterwards.
● Read the text aloud on page 53.
● Explain the following concepts –
CS Concepts Explain
Loop
Repeat Loop
As given on Page 51
As given on Page 53
Scenarios If you are teaching without a projector
If you are teaching with a projector Open Code.org on your computer system
CS Concepts Explain Demonstrate
OR
Code.org Help them open the link without signing up How to open the link without signing up
● Say: Let us practise what we have learned with the help of some activities.
● Help the students open the activities related to the Repeat Loop.
● Discuss and Attempt the activity on page 56 with students.
● Invite answers from as many students as possible.
● Walk around in the classroom and observe the activity done by the students.
● IF TIME PERMITS: Discuss and Attempt the example on page 54 with students.
● Walk around in the classroom and observe the activity done by the students.
● Instruct the students to attempt the practice questions on Page 60 (if time permits).
● Invite answers from as many students as possible.
Note
● Attempt only the link activity.
● Conclude: Today, we learned about loops. We were introduced to a new loop called repeat loop.
• Loops
In this session, students will learn about –
● Variables
● Rules of naming a variable
● Variables: Are like boxes in the computer memory to hold information
Revise the concepts from the previous coding class Discuss the key concepts covered Attempt the activities related
● Say: Do you remember what we learned in the previous session?
● Invite responses from some students.
● Revise the concepts learned in the previous class.
● Say: Today we are going to learn about Variables.
● Instruct: Let’s assume you have a bunch of pens.
● Ask: Where do you keep those pens?
● Say: You have answered that we will keep them in a pouch or a box. Similarly, a variable is a container in a computer that holds values.
● Instruct: Open page 57 to read the examples.
● Discuss the rules of naming variables from page 57 and page 58 in the book.
● Instruct: Now, let us practise our learning. Click on the Practice button on the Assignment page to attempt the activity from the Tekie app
● Open Code.org (Sprite Lab) on your computer.
● Conduct Touch the Ball Game on the panel.
■ Say: In this activity, we will create a game in which a dog chases a ball and scores a point every time it touches the ball. You have to touch the ball as many times as possible to get the highest score.
■ Walk around in the classroom and observe the activity done by the students.
■ Instruct: Click on Rename -> Save ->Share to save and share your work when you have finished the activity.

■ Find the location of the saved file and drag and drop the file in the panel.
○ Instruct: Click on Rename -> Save ->Share to save and share your work when you have finished the activity.
○ Find the location of the saved file and drag and drop the file in the panel
Sum-Up
● Conclude: Today, we have learned about variables and the rules to name them.
● Conclude: Today, we have learned about variables and the rules to name them.
2 min
Objectives
In this session, students will learn about –
● For Loop
Keywords
• Loops
● Loop: An action of doing something over and over again
● For Loop: A loop with a known beginning, end and inter val
In this session, students will learn about –
● For Loop
● Loop: An action of doing something over and over again
● For Loop: A loop with a known beginning, end and interval
● Say: Do you remember what we learned in the previous session?
● Invite responses from some students.
● Revise the topics learned in the previous class.
● Say: Today we are going to learn about For Loop.
● Instruct: Open page 58 from the booklet.
● Read the activity aloud and discuss Practice activity on page 56 with the students.
● Explain the concept of For Loop in the book.
● Say: Let us practise what we have learned with the help of some activities.
● Help the students open the activities related to For Loop.
● Discuss and Attempt activities with students.
● Walk around in the classroom and observe the activity done by the students.
● Instruct the students to attempt the practice questions on Page 60 if time permits.
● Invite answers from as many students as possible.
● Conclude: Today, we have learned about For Loop.
In this session, students will learn about –
● Nested Loop
● Loop: An action of doing something over and over again
● For Loop: A loop with a known beginning, end and interval
● Repeat Loop: Is used when we want to repeat a task a certain number of times
● Nested Loop: Is a loop inside another loop
Revise the concepts from the previous coding class Discuss the key concepts covered Attempt the activities related to Nested Loop
Conclude the concepts
● Say: Do you remember what we learned in the previous session?
● Invite responses from some students.
● Revise the topics learned in the previous class.
● Say: Today we are going to learn about Nested Loop.
● Ask: You have a Sack Race competition of 400 m and the track is only 200 m. How many rounds will you take to win the race?
● Say: You have answered correctly, it’s 2 rounds. We are taking 8 jumps in 1 round and we have a total of 2 rounds. In such cases, we use a Nested Loop. The outer loop for rounds and the inner loop for jumps.
● Instruct: Open the topic Nested Loop on Page 65.
● Discuss the concept of Nested Loop with the help of examples given from the book.
● Say: Let us practise what we have learned with the help of some activities.
● Help the students open the activities related to Nested Loop.
● Discuss and Attempt activities with students.
● Walk around in the classroom and observe the activity done by the students.
● Instruct the students to attempt the practice questions on Page 67 if time permits.
● Invite answers from as many students as possible.
● Conclude: Today, we have learned about Nested Loop.
The content covered in this chapter is aligned with the following CSTA Standard
● 1B-AP–10 Control
This chapter is divided into the following lab sessions
1. Conditional Statement I
2. Conditional Statement II
3. Adding Behaviour
4. Conditional Statement III
5. Multiple Conditions
In this session, students will learn about –
● If conditional statement
Keywords
● If conditional statement: Tells the computer what to do if a certain condition is true
● Say: Do you remember what we learned in the previous session?
● Invite responses from some students.
● Revise the topics learned in the previous class.
● Instruct: Go to the Panel and open the Lab on Conditional Statement I.
● Play the video given in the panel.
● Discuss the Quiz questions given in the Panel.
● Invite answers from as many students as possible.
● Instruct: Open the topic If statement on Page 73.
● Discuss the concept of the If statement with the help of examples given from the book.
● Conduct Number Activity given in the Panel:
■ Say: Make a variable number and set it to your favourite number. Check whether the number is greater than 0. If yes, then display “POSITIVE NUMBER” on the screen.
■ Instruct: Click on the Assignment section.
■ Instruct: Click the Go to Practise button to attempt the activity.
■ Walk around in the classroom and observe the activity done by the students.
■ Instruct: Click on the Yes button to submit the activity.
● If time permits, conduct the additional activity given in the panel.
● Ask the following probing questions:
■ When your parents ask you to study and put a condition. State the conditions put by them. Possible Responses: If you study you will get chocolate; If you study you will get a PlayStation; If you study you will get good marks; If you study your teachers will praise you.
■ During class at school, the teacher awards you stars and badges. When does it happen? Possible Responses: If you answer the question correctly; If you maintain silence; If you keep the class clean.
In this session, students will learn about –
● If-else conditional statement
● If-else conditional statement: In this statement the if block is executed if the condition is true and the else block is executed if the condition is false.
Recall the concepts covered in the previous coding session
Play the video given in the panel to introduce the concepts to be covered in this session
Discuss the if-else statement and application
Attempt the activities related to the Conditional statement II
Conclude the session Assign the homework
● Instruct: Go to the Panel and open the Lab on Conditional Statement II.
● Play the video given in the panel.
● Discuss the Quiz questions given in the Panel.
● Invite answers from as many students as possible.
● Instruct: Open the topic If-else statement on Page 76.
● Discuss the concept of the If-else statement with the help of examples given in the book.
● Conduct Creating a Game given on Page 79:
■ Say: Today we are going to create a Unicorn game where the Unicorn needs to eat candy and avoid monsters.
■ Instruct: Open Code.org’s Sprite Lab on your computer.
■ Instruct: Click the Go to Practise button to attempt the activity.
■ Guide and help students to complete the activity up to Page 86
■ Walk around in the classroom and observe the activity done by the students.
■ Instruct: Rename the activity with the Unicorn Game title and click on the Save button to save the activity.
● Instruct the students to attempt the practice question on Page 76 if time permits.
■ Invite answers from as many students as possible.
● If time permits, conduct the additional activity given on the panel. Please save the activity of the students as it will be continued in the next class.
min
● Ask the following probing questions:
■ Can we change the sprites just like the characters of a story?
Possible Responses: Yes; No; Maybe
■ In which locations can we place our sprite?
Possible Responses: Some location; Everywhere
In this session, students will learn about –
● Sprite Begins
● Sprite Stops
● Looping Behaviour
● Sprite Begins: Makes the sprite do the given task
● Sprite Stops: Makes the sprite stop doing the given task
● Looping Behaviour: Makes the sprite do the given task repeatedly
Recall the concepts covered in the previous coding session
Play the video given in the panel to introduce the concepts to be covered in this session
● Instruct: Go to the Panel and open the Lab on Adding Behaviours.
● Play the video given in the panel.
● Discuss the Quiz questions given in the Panel.
● Invite answers from as many students as possible.
● Instruct: Open the topic Moving West and Looping Behaviour on Page 87.
● Discuss the concept of Behaviours with the help of examples given from the book.
● Continue Creating a Game given on Page 87:
■ Say: Let us continue our Unicorn game.
■ Instruct: Open Code.org’s Sprite Lab on your computer.
■ Instruct: Click on the Sign in button that is in the top right-hand corner. Sign in to your account, and go to My Projects. Search and open the previously saved activity to attempt it.
■ Guide and help students to complete the activity up to page 95.
■ Walk around in the classroom and observe the activity done by the students.
■ Instruct: Click on the Save button to save the activity.
Note
● If time permits, conduct the additional activity given in the panel. Please save the activity of the students as it will be continued in the next class.
● Ask the following probing questions:
■ What do you do if you do not get your favourite game to play?
Possible Responses: Start crying; Get angry; Be quiet
■ Your art teacher has asked you to make five identical houses. How do you make them?
Possible Responses: Make 5 houses; Make 1 house and repeat the same step again.
In this session, students will learn about –
● If-else if conditional statement
● If - else if conditional statement: Is used whenever we have more than one condition
Recall the concepts covered in the previous coding session
Play the video given in the panel to introduce the concepts to be covered in this session
Discuss Conditional Statement III and its application
Attempt the activities related to Conditional Statement III
Conclude the session Assign the homework
● Instruct: Go to the Panel and open the Lab on Adding Behaviours.
● Play the video given in the panel.
● Discuss the Quiz questions given in the Panel.
● Invite answers from as many students as possible.
● Instruct: Open the topic If - else if on Page 96.
● Discuss the concept of If - else if with the help of examples given from the book.
● Continue Creating a Game given on Page 97:
■ Say: Let us continue our Unicorn game.
■ Instruct: Open Code.org’s Sprite Lab on your computer.
■ Instruct: Click on the Sign in button that is in the top right-side corner, Sign in to your account, and go to My Projects. Search and open the previously saved activity to attempt it.
■ Guide and help students to complete the activity up to Page 104
■ Walk around in the classroom and observe the activity done by the students.
■ Instruct: Click on the Save button to save the activity.
● If time permits, conduct the additional activity given in the panel. Please save the activity of the students as it will be continued in the next class.
Sum-Up
● Ask the following probing questions:
■ What conditional statements have you learnt so far?
Possible Responses: If-else; If; If-else-if
3 min
■ If there is a quiz competition, how many conditions do we check to find the winners of the quiz?
Possible Responses: Two; Three; Four; Five
In this session, students will learn about –
● If - else conditional statement
● If - else if conditional statement
Keywords
● If-else conditional statement: In this statement the if block is executed if the condition is true and the else block is executed if the condition is false.
● If - else if conditional statement: Is used whenever we have more than one condition
Recall the concepts covered in the previous coding session
Introduce the concepts to be covered in this session
Discuss Multiple Conditions and their application
Attempt the activities related to If - else, Ifelse if
Conclude the session Assign
● Instruct: Go to the Panel and open the Lab on Multiple Conditions.
● Discuss the slides given on the panel.
● Discuss the Quiz questions given in the Panel.
● Invite answers from as many students as possible.
● Instruct: Open the topic Change Levels on Page 104.
Build
● Continue Creating a Game given on Page 104:
■ Say: Let us continue our Unicorn game.
■ Instruct students to open Code.org’s Sprite Lab on the computer.
15 min
■ Instruct: Click on the Sign in button that is in the top right-hand corner. Sign in to your account, and go to My Projects. Search and open the previously saved activity to attempt it.
■ Guide and help students to complete the activity up to Page 112
■ Walk around in the classroom and observe the activity done by the students.
■ Instruct: Click on the Save button to save the activity.
● If time permits, conduct the additional activity given in the panel.
● Ask the following probing questions:
■ How will you decide what to say to greet your teacher depending upon the time of the day?
Possible Responses: If the time is before 12 pm, say good morning; If the time is between 12 pm and 4 pm, say good afternoon; If it is after 5 pm, say good evening.
■ How will you decide what clothes to wear depending on the weather outside?
Possible Responses: If it is cold outside, choose warm clothes; If it is hot outside, choose cotton clothes; If it is chilly outside, choose a thick woollen sweater.
The content covered in this chapter is aligned with the following CSTA Standard
● 1B-AP-10 Control
This chapter is divided into the following lab sessions
1. Loop inside a Conditional
2. Condition inside a Loop
In this session, students will learn about –
● Loop inside if
● Loop inside if: First we take an if condition and then place a loop like a repeat loop or for loop inside it
● Say: Do you remember what we learned in the previous session?
● Invite responses from some students.
● Revise the topics learned in the previous class.
● Instruct: Go to the Panel and open the Lab on Loop inside a Conditional.
● Show the slides to introduce the concept.
● Discuss the Quiz questions given in the Panel.
● Invite answers from as many students as possible.
● Instruct: Open the topic Loop inside a Conditional on Page 113.
● Discuss the concept of the “Loop inside if” with the help of examples given from the book.
min
● Conduct Find Star Shield given on Page 113:
■ Say: Today we are going to create a Find Star Shield game where Baby Joe is trying to find a star shield. If she finds the star shield, she will be rewarded with two magic carrots.
■ Instruct: Open Code.org’s Sprite Lab on your computer.
■ Instruct: Click the Go to Practice button to attempt the activity.
■ Guide and help students to complete the activity up to Page 114.
■ Walk around in the classroom and observe the activity done by the students.
■ Instruct: Rename the activity with the Find Star Shield title and click on the Save button to save the activity.
● If time permits, conduct the additional activity given in the panel.
3 min
● Ask the following probing questions:
■ Which subject’s class is repeated in a week?
Possible Responses: English; Maths; Science; Hindi
■ Which things are needed for a birthday party?
Possible Responses: Cake; Balloons; Candles; Gifts
In this session, students will learn about –
● If inside Loop
● If inside Loop: First we take a loop like a repeat loop or for loop and then place an if condition inside it
Recall the concepts covered in the previous coding session
Introduce the concepts to be covered in this session
Discuss If inside Loop statement Attempt the activities related to Condition inside a Loop
Conclude the session Assign the homework
● Instruct: Go to the Panel and open the Lab on Condition inside a Loop.
● Show the slides to introduce the concept.
● Discuss the Quiz questions given in the Panel.
● Invite answers from as many students as possible.
● Instruct: Open the topic “If inside Loop” statement on Page 115.
● Discuss the concept of the If inside Loop statement with the help of examples given from the book.
● Conduct Space Ninja given on Page 116:
■ Say: Today we are going to create Space Ninja Activity where Ben is an astronaut who has reached Mars to meet his friends called spacers.
■ Instruct: Open Code.org’s Sprite Lab on your computer.
■ Instruct: Click on the Go to Practice button to attempt the activity.
■ Guide and help students to complete the activity up to Page 121
■ Walk around in the classroom and observe the activity done by the students.
■ Instruct: Rename the activity with the Space Ninja title and click on the Save button to save the activity.
● If time permits, conduct the additional activity given in the panel.
● Ask the following probing questions:
■ How will you play a vegetable race in which you have to pick up only potatoes?
Possible Responses: Check potatoes and pick them up; Run then check potatoes and pick them up
■ How many months have 28 days?
Possible Responses: One; Twelve
● Assign the following project as homework:
■ Assign Practice Question from Page 121 as homework.
Note
● The project is optional. Assign it if feasible.
The content covered in this chapter is aligned with the following CSTA Standard
● 1B-CS–03 Troubleshooting
● 1B-AP–15 Program Development
This chapter is divided into the following lab sessions
1. Debugging
In this session, students will learn about –
● Debugging
Keywords
● Bug: Errors in the code
● Debugging: Is the process of finding and correcting bugs in the code
Recall the concepts covered in the previous coding session
Discuss
Attempt
min
Warm-Up
● Invite responses from some students.
● Revise the topics learned in the previous class.
● Instruct: Go to the Panel and open the Lab on Debugging.
● Play the video given on the panel.
5 min
● Discuss the Quiz questions given on the Panel.
● Invite answers from as many students as possible.
● Instruct: Open the topic Debugging on Page 123.
● Conduct Practice Question 1 given on Page 134:
■ Say: Today we are going to debug the blocks to make the honey bee vanish when we click on her.
■ Instruct: Open the link on your computer and click on the Remix option to make changes.
■ Instruct: Click on the Go to Practice button to attempt the activity.
■ Guide and help students to complete the activity.
■ Walk around in the classroom and observe the activity done by the students.
■ Instruct: Click on the Save button to save the activity.
● Conduct Example 2 given on Page 130:
■ Say: Now, let’s debug the blocks to make the Princess move left.
■ Instruct: Open the link on your computer and click on the Remix option to make changes.
■ Instruct: Click the Go to Practice button to attempt the activity.
■ Guide and help students to complete the activity.
■ Walk around in the classroom and observe the activity done by the students.
■ Instruct: Click on the Save button to save the activity.
● If time permits:
1. Conduct the additional activity given on the panel.
2. Conduct Puzzle 1 given on Page 125.
● Conclude: Today, we learned how to find code bugs and correct them. That is called debugging
● Assign the following project as homework:
■ Practice Question 2 on Page 135
■ Example 1 on Page 126
● The project is optional. Assign it if feasible.
This Teacher Manual has been designed to implement Tekie, the storytelling-based Coding and Computer Science program. The manual consists of lesson plans within each chapter that teachers transact within classrooms and computer labs. Each lesson is based on a research-based ‘WEBS’ framework that simplifies pedagogical practices for teachers and enables them to deliver effectively.
• Sharp Lesson Planning: Each lesson plan focuses on specific sub-learning outcomes within a chapter and are designed for delivery within the stipulated class or lab time.
• Real-life and Application-based Questions: Additional questions that link Computer Science to real-life contexts and assist teachers to develop learners’ conceptual understanding and application skills.
• Support and Detailed Solutions: In-depth solutions for in-class and post-class activities to reinforce learning.
Uolo partners with K12 schools to bring technology-based learning programs. We believe pedagogy and technology must come together to deliver scalable learning experiences that generate measurable outcomes. Uolo is trusted by over 8,000 schools with more than 3 million learners across India, South East Asia, and the Middle East.
hello@uolo.com
