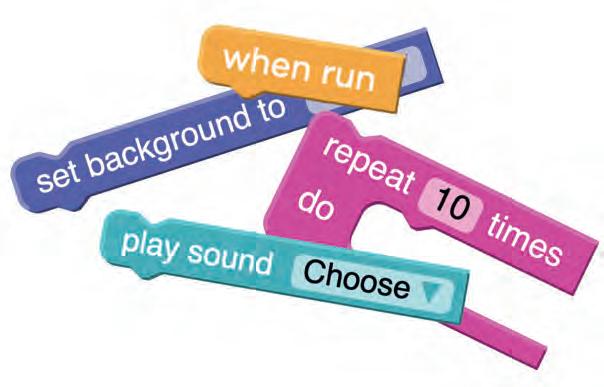
Block Coding ll

NEP 2020 aligned Digital coding platform included


Can you read the talk bubbles in the picture below?
Yes. That is because you know English.
Can you read the talk bubbles in this picture too?
No. That is because you do not know all these languages.
We must know the same language to communicate with each other.
As you know, a computer is a machine. A machine cannot understand our languages.
We must learn a language that computers can understand too. We can use that language to tell the computer its tasks. These languages are called computer languages.
Coding is telling the computer its task in a computer language.
With coding, we can make a computer do a task for us.
Additionally, learning coding helps us to:

1. Think and ask questions.
2. Understand problems.
3. Think of solutions.
4. Solve problems in many ways.
5. Break down a big problem into smaller parts to solve it easily.
6. Learn how to decide what to do in different situations.
7. Learn how to decide what to do and when.
We must start with block-based coding to learn how to code.
Using block-based coding, we can:
1. Easily remember the colour-coded code blocks.
2. Code with a simple drag-and-drop method.
3. Code without worrying about the rules of the language.
4. Be future-ready.
5. Learn to code while having fun.
6. Express ourselves by making digital cards or apps.
Block-based coding is visual programming.
In this, we use colourful blocks. These colourful blocks are the instructions.
We use them to make the computer do a task.
In 2003, MIT introduced the first block coding language.
In block-based coding, you join blocks just like Lego.

It’s time to start your coding journey.
We will be learning block-based coding on a platform called Code.org.
Code.org is an educational platform where we learn to code.
Let’s explore the platform.
Follow the steps given below to sign in to the platform.
1 Go to Code.org
Open Google Chrome.
Type in the link below in the address bar.
https://code.org/
2 Sign into Code.org
Click on Sign in button.
Sign in using an existing Gmail account or by creating a new one.
Note: You can also use your parent’s email ID. Ask your teacher or parent to help you sign in.
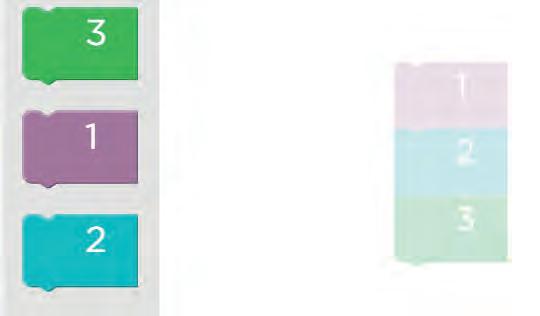
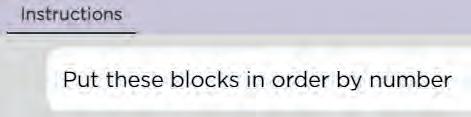
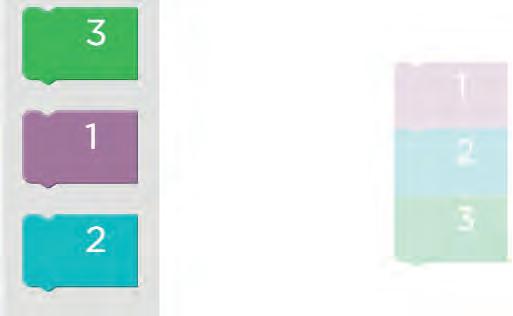
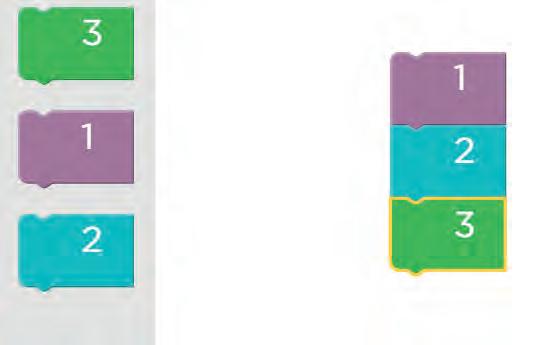
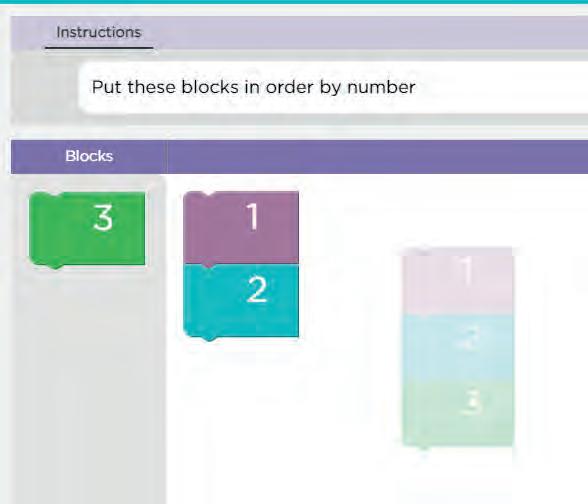
Puzzle
Place the blocks in order by number.
Open chrome. Type the link given below in the address bar.
https://bit.ly/num-n1
Ask your teacher or parent to help you.
1 Read the instruction
Observe the blocks to put them in order.
6 Block Coding II
4
Drag and Drop from the toolbox.
Drop and drop it in order.
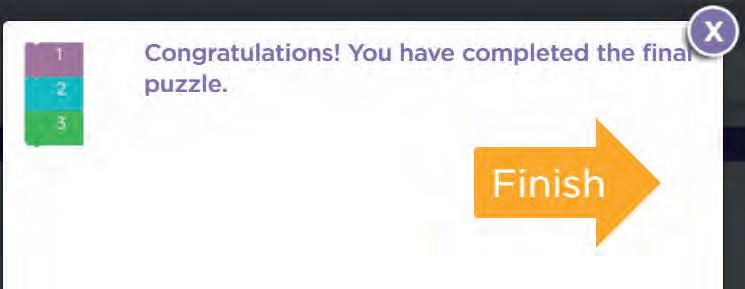
Once the puzzle is complete, a sound will be played. You will also see a message, as shown below.
Command is giving instructions to someone to do something.
Similarly, we can give commands to a computer to do a task.
In block-based programming, the blocks are the commands.
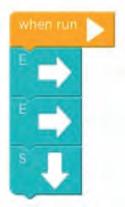
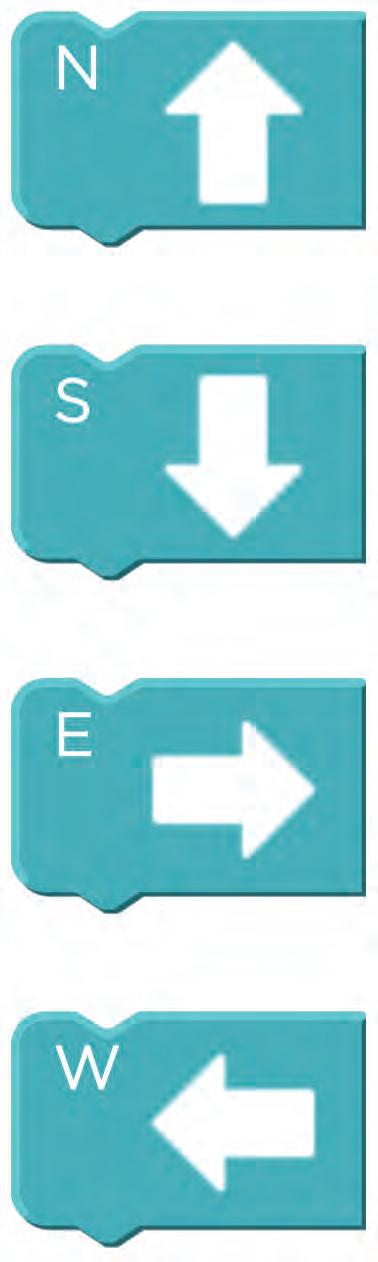
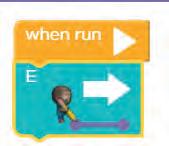
We use the code blocks to give commands to a computer. Commands to turn a computer character in different directions:
When we give more than one command in an order, it is called a Sequence.
2. Tick mark the correct set of sequence.


As you know, there is a sequence in every process happening around us.
Have you observed any sequence in your daily life?
a. b. c.Let’s think about how you get ready for school.
1. Wake up.
2. Get ready.
3. Have breakfast.
4. Ready for school.
This is the general sequence we follow to get ready for school.
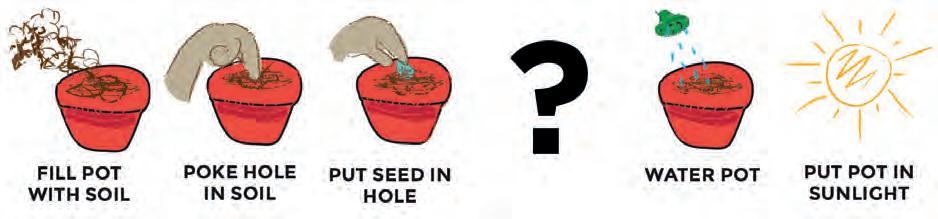
1. For the purpose of growing a plant, number the images correctly.
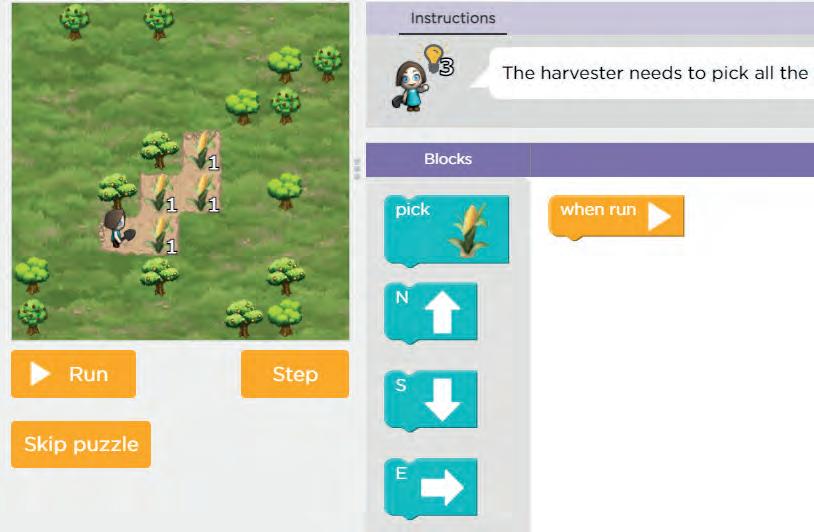
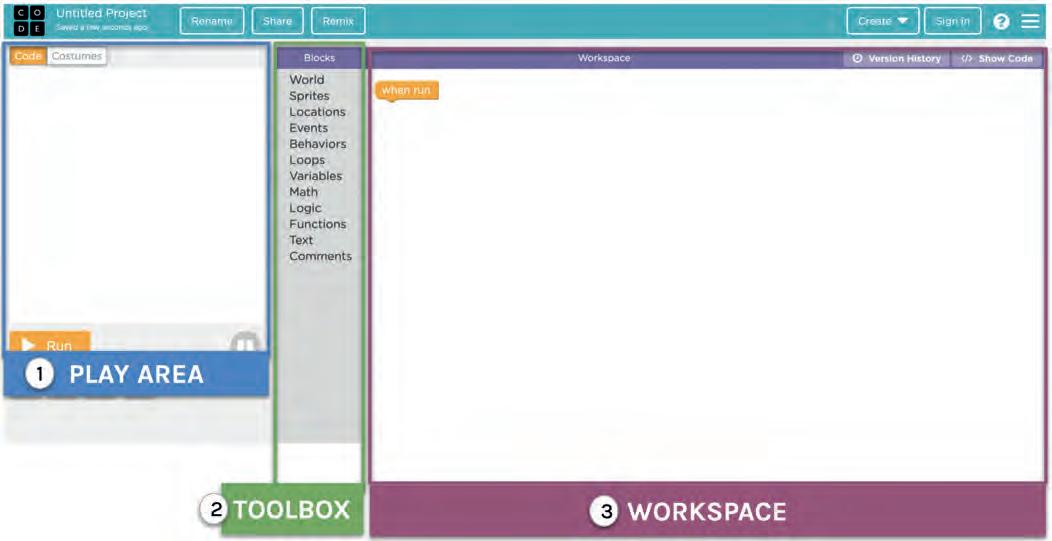
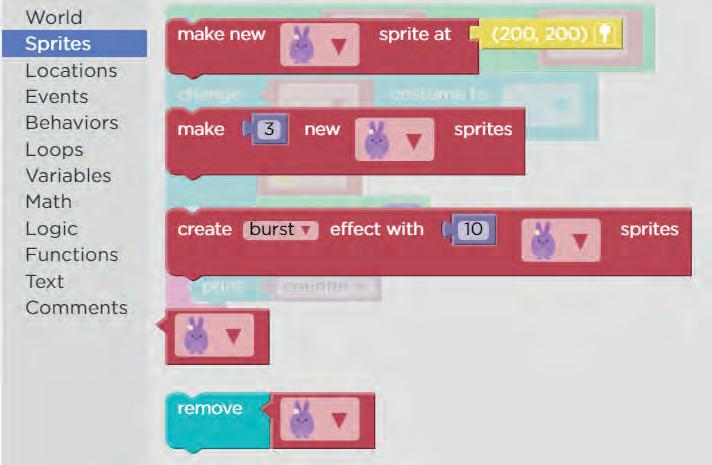
Let us first understand the Puzzle Code Studio.
The Puzzle Code Studio includes four main parts, as shown below in the picture.
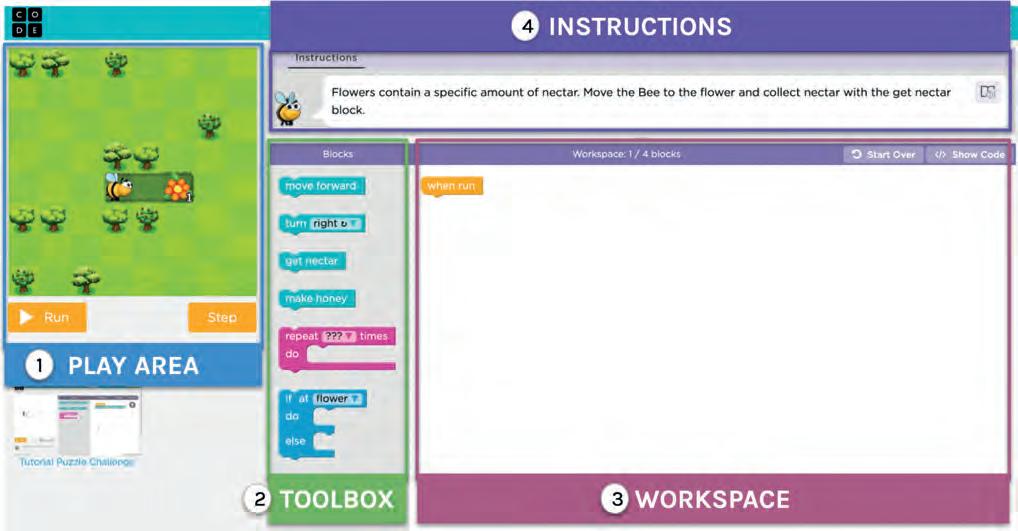
Play Area : Where the program will run.
Toolbox : Holds the blocks needed to solve the puzzle.
Workspace : Where you will drag the blocks from Toolbox to code.
Instructions : Step-by-step instructions to solve the puzzle.
We need a sequence of steps to do a task. But the sequence can be fixed or flexible.
Fixed sequence : There is only one way to do the task.
Flexible sequence : There can be more than one way to do the task.
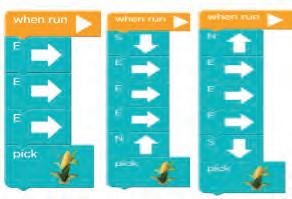
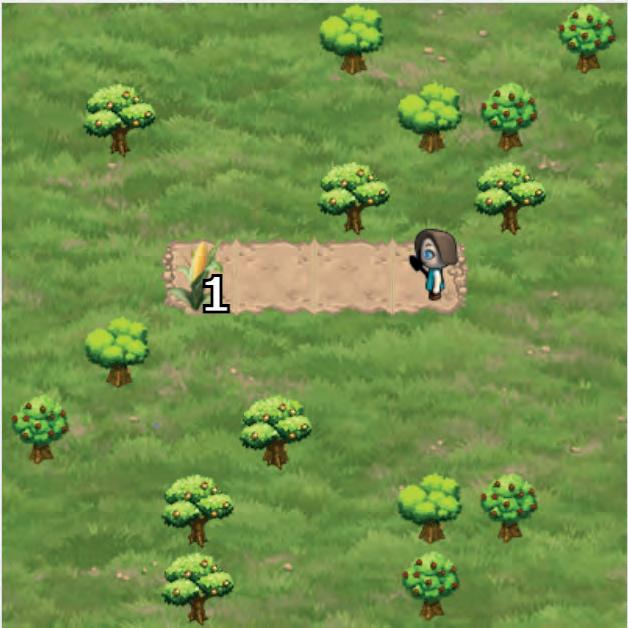
Observe the picture below.
Is there more than one way to pick the corn?
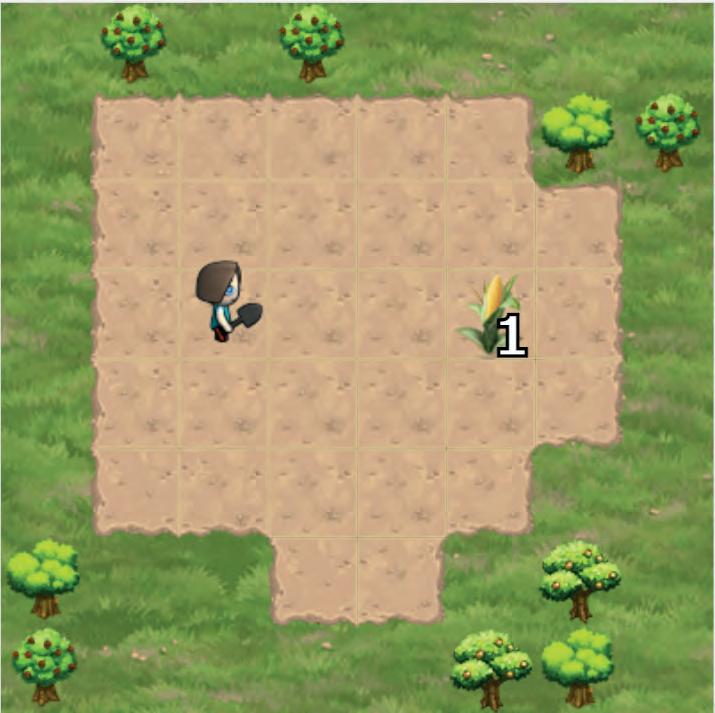
What type of sequence is this?
Solution
Flexible Sequence
As there is more than one way
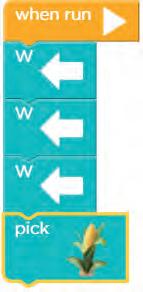
Observe the picture below.
How many ways are there to pick the corn?
What type of sequence is this?
Solution
Fixed sequence as there is only way to pick corn
Coding Challenge
What kind of a sequence is there in the below activity? Go get all the corn.
To open the activity
Open Google Chrome.
Type the link given below in the address bar.
https://bit.ly/corn-c
Ask your teacher or parent to help you.
We all follow a routine in daily life.
The picture below shows the steps to get ready for school in an order. Wake
In our daily lives, we all solve many problems.
A problem is the task to be done.
We can solve a problem if we know how to solve it. In the above picture, getting ready for school is the problem.
And the steps given in order are the solution.
The set of steps given in an order to solve a problem is called an Algorithm.
We must break down a big problem into smaller ones to make it easier to solve.
Tick (ü) the correct options for the missing steps in the pictures given below.


We know many stories by now. Do you want to know how a story is built?
Five main elements build a story. These are:
1. Characters : people, animals, or objects that appear in the story
2. Setting : the place where the story happens
3. Time : when the story takes place
4. Problem : the issue to be solved in the story
5. Solution : the action taken to solve the problem
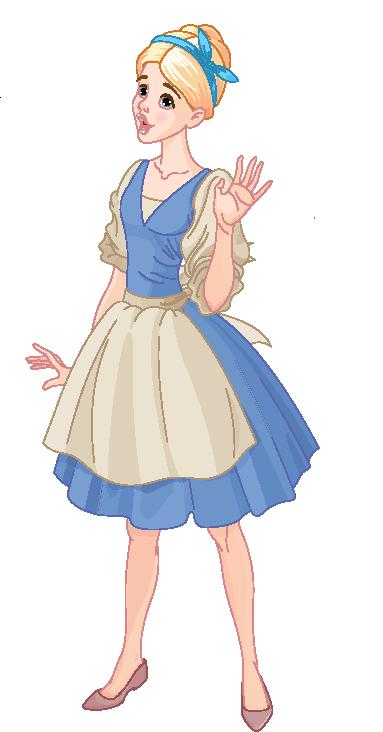
Can you guess who the girl character in the picture is?
Correct! This is Cinderella.
Do you remember what Cinderella wanted to be?
Yes! She wanted to look like a princess and meet the prince.
Name the characters in the picture below.
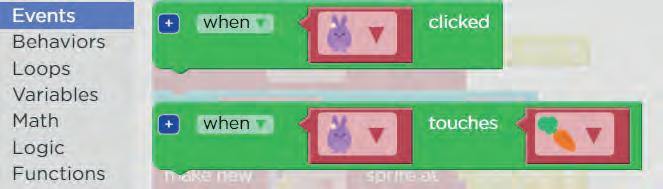
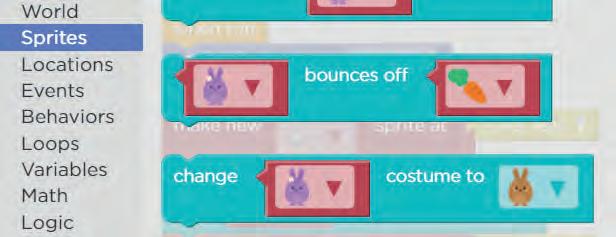
A character in coding is called a Sprite.
In the picture above, Santa and Elves are the sprites.

In coding, a sprite is the character that can interact with other sprites or users.
We can:
● Change the costume, location, or colour of a sprite.

● Add and control the behaviour of a sprite.


The behaviour is how a sprite interacts with other sprites or users.
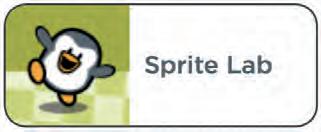
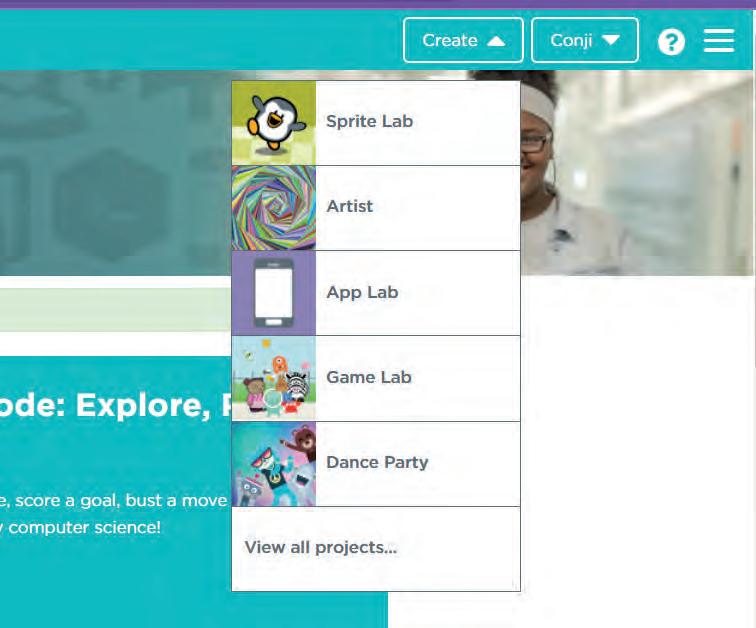
We will be using Sprite Lab to create amazing projects.
A Sprite Lab is where you can create your own stories and apps.
You can add sprites that can interact with you or each other.
Let us see how we can open the sprite lab in the code studio.
1 Go to Code.org
Open Google Chrome.
Type the link given below in the address bar.
https://bit.ly/sprite-s
Ask your teacher or parent to help you.
2 Sign into Code.org
Click on Remix button.
Play Area : Where the story will run.
Toolbox : Holds the blocks needed to create the project.
Workspace : Where you will drag the blocks from Toolbox to code.
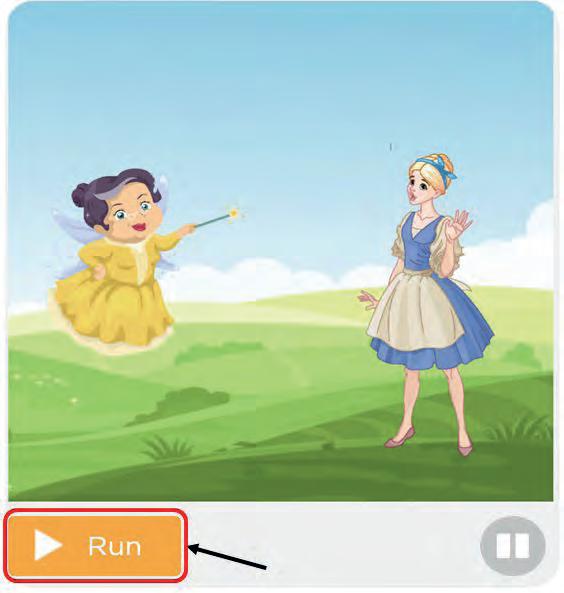
It is time to create a scene from a story in Sprite Lab.
Let us create a scene from the story of Cinderella.
Think of the scene where the Fairy Godmother helps her to become a princess.
First, you must think of the elements you need for the story.
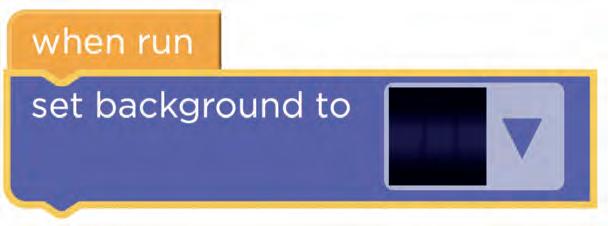
Setting: Background
Characters: Sprites
Now think about the following to create an algorithm:
● What do you need to do to set the scene?
● What happens in the scene?
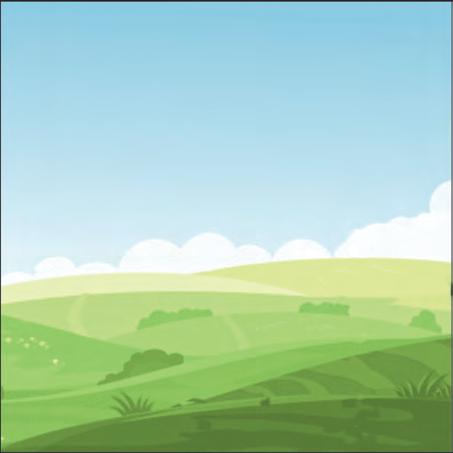
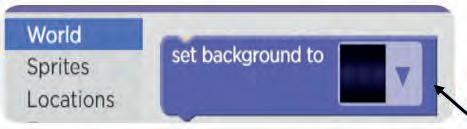
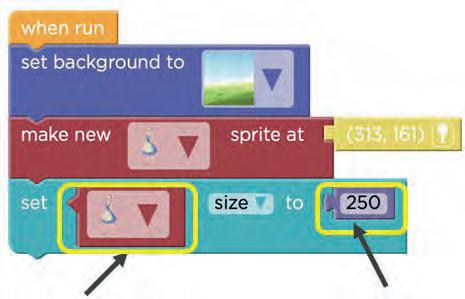
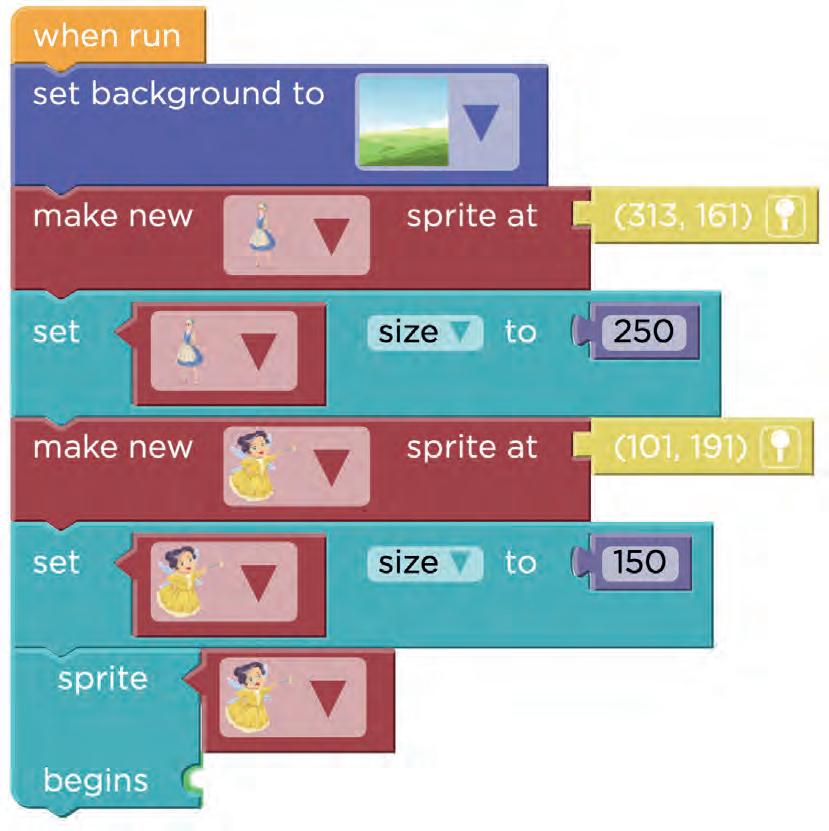
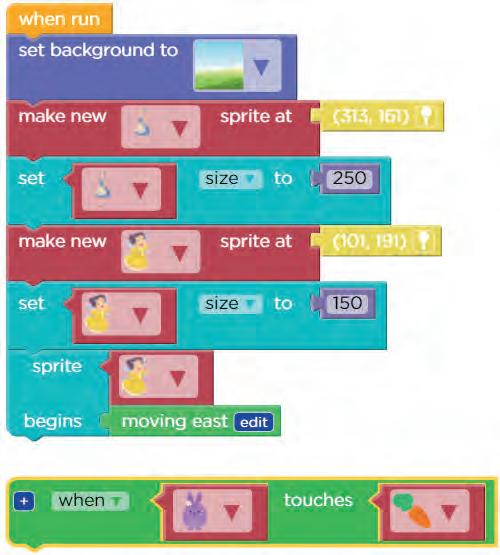
Let us first set up the scene.
SET
UP THE SCENE
Set the background to a park
Add Cinderella sprite
Set the size of Cinderella sprite
Add Godmother sprite

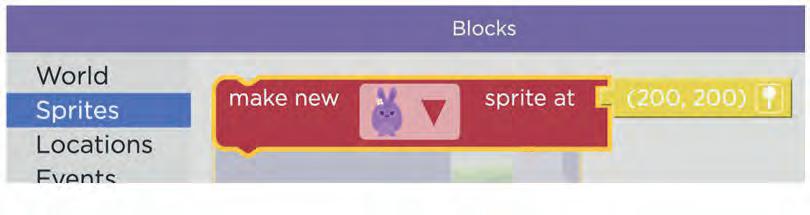
Click on the drop-down in the make new sprite code block.
Select Cinderella from the list of sprites.
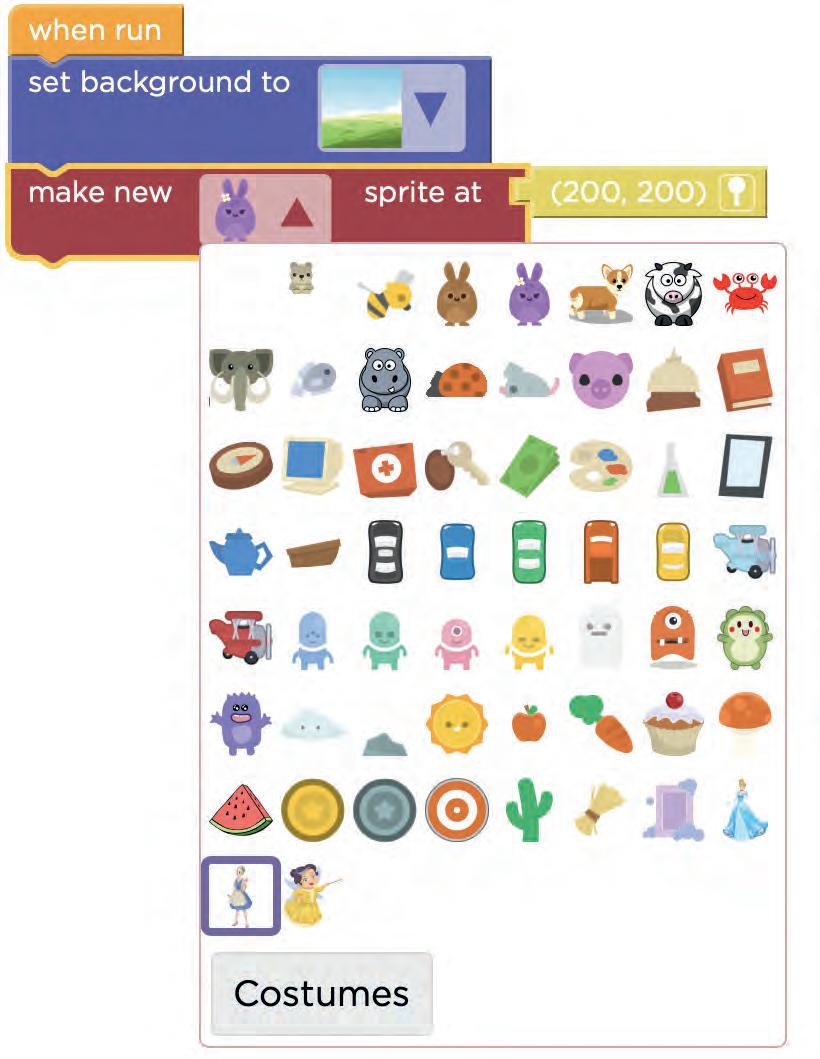
Move cursor on play area to change the location of sprite.
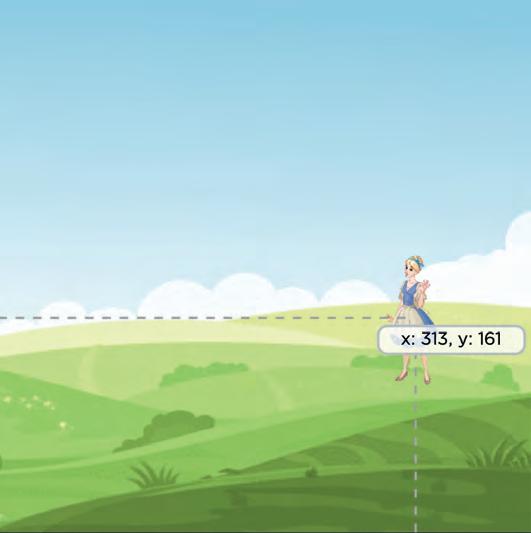
Click where you want to place the sprite.

Click on the drop-down and select Cinderella.
Change size to 250.
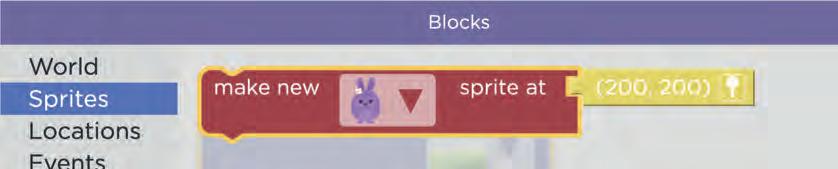
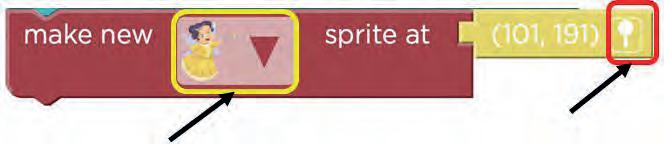
Get another make new sprite code block
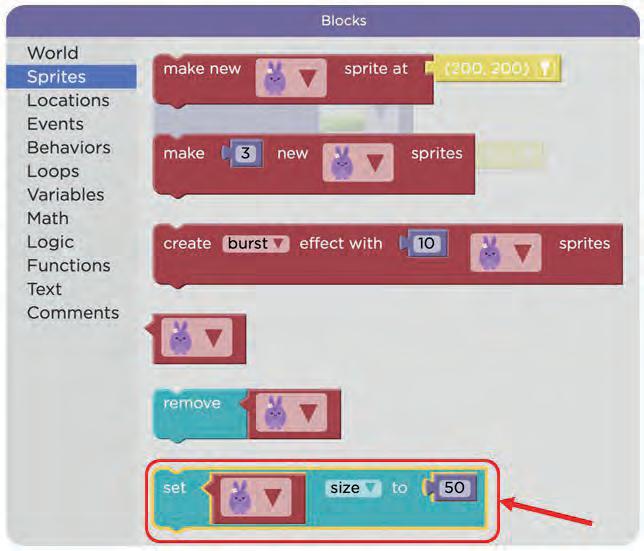
Go to Sprites in Toolbox.
Click and drag the make new sprite code block.
Add Fairy Godmother sprite
Click on the drop-down in the make new sprite code block.
Select Fairy Godmother from the list of sprites. Place Fairy Godmother where you want it.
Find set size to code block
Go to Sprites in Toolbox.
Click and drag the set size to code block.
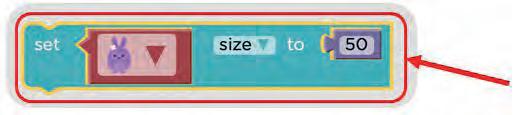
Set the size of Fairy Godmother sprite

Click on the drop-down and select Fairy Godmother.
Change size to 150.
With the above step, our scene set up is done.
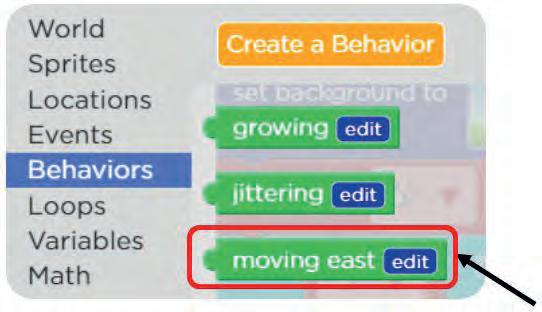
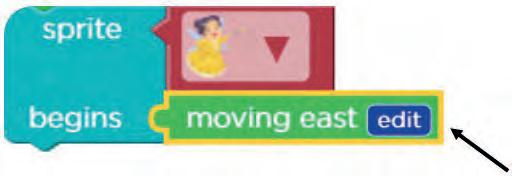
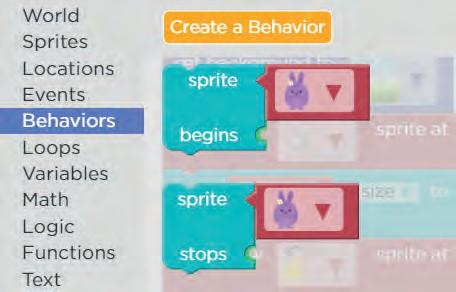
Now, let us add moving behaviour to the Fairy Godmother.
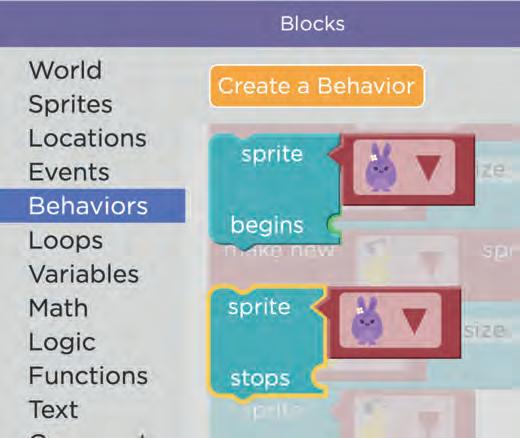
16 Find the sprite begins code block
Go to Behaviors.
Drag the sprite begins block.
17 Set the sprite begins code block
Drag the sprite begins code block.
Drop it below the set Fairy Godmother size block. Select Fairy Godmother sprite.
What happens when someone tickles you?
You laugh. Right!
Here, tickling is an event and laughing is an action.
An event tells you when an action will happen.
What will you do when you are hungry?
You will eat food.
Here, being hungry is an event and eating food is an action.
Events play an important role in programming, too.

Here, we can move the car using the left and right arrows.
Clicking on the arrows is the event.


When it takes place, it leads to an action to move the car.
Now it is time to complete our scene from the Cinderella story.
Do you remember what Cinderella wanted to be?
Yes! She wanted to look like a princess and meet the prince.
Now, we need to think about what should happen and when.
1. Cinderella must become a princess when the Fairy Godmother touches her.
2. The Fairy Godmother must stop moving on touching Cinderella.
We already are done with the scene set up.
Next, we will transform Cinderella into a princess when she touches the fairy godmother.
When Fairy Godmother touches the Cinderella
Change the costume of Cinderella into a Princess costume
Drag and drop the when touches event block in Workspace.

4 Set the sprites
Select Cinderella and Fairy Godmother as the sprite.
5 Find the change costume to block
Go to Sprites. Scroll down and select the change costume code block.
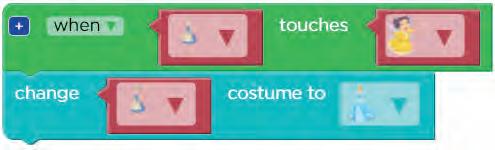
6 Set the change costume
Drag and drop it below the when touches Event block.
Find the sprite stops code block.
8 Add the sprite stops code block
Drag the sprite stops code block.
Drop it below the change costume code block.
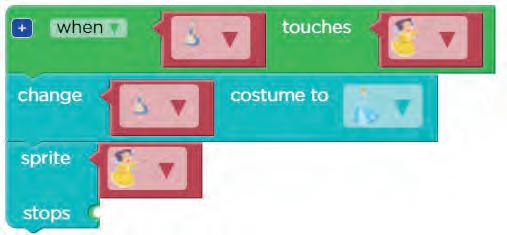
Our story is complete now.
Rename it
share it with your friends.
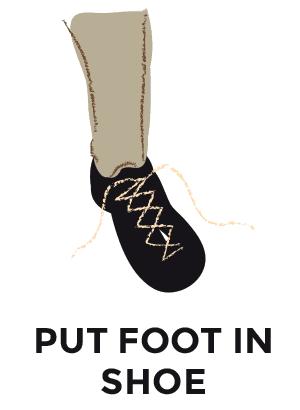
Consider the way you walk.
You move one foot forward and then the other. You continue walking in the same manner.
We can call this a loop.
A loop is an action of doing something over and over again.
What will happen if you never stop walking?
You will get very tired.
It is important to know when to stop doing something.
A loop is defined by two things:
1. Something to do over and over again.
2. Know when to stop.
Practice
Tick (ü) the picture that shows an example of a loop.
Pedalling
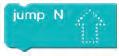
Can you jump four times?
What do you think?
What is simpler to say : Jump 4 times or Jump, jump, jump and jump?
Yes, you are right.
If we say jump, jump, jump and jump it will take more time and energy.
A good coder always tries to use the shortest path.
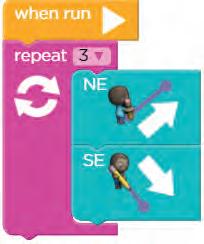
We can use a repeat loop here.
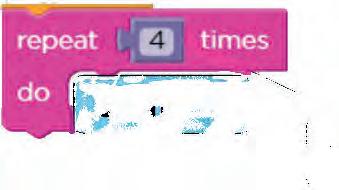
By using the repeat loop, our code has become shorter.
The repeat loop is used if we want to repeat a task specific number of times.
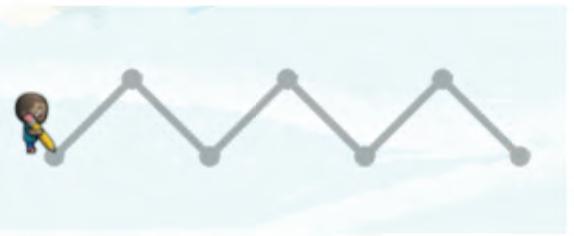
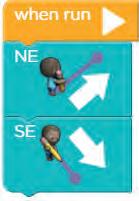
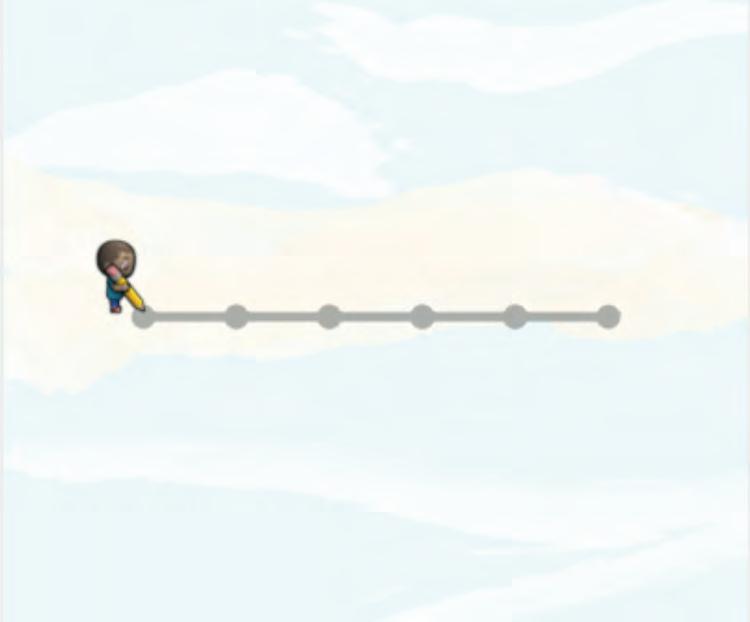
Commands to draw lines:
Block To turn a character in a direction
Draw a line in North or Up
Draw a line in South or Down
Draw a line in East or Right
Draw a line in West or Left
Draw a line in North-East
Draw a line in North-West

Draw a line in South-East

Draw a line in South-West

Jump blocks means we will only jump in respective direction without making a line.


We need to draw lines. 1 Read
To
open the activity Solution

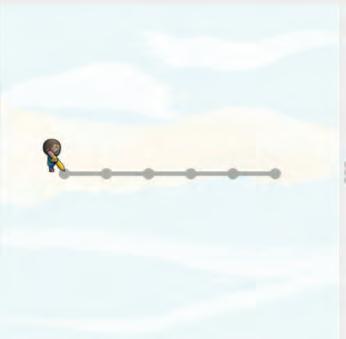
Observe the image and think in which direction and how many times we need to go.
3 Draw lines
Everytime we need to Draw lines in east direction.
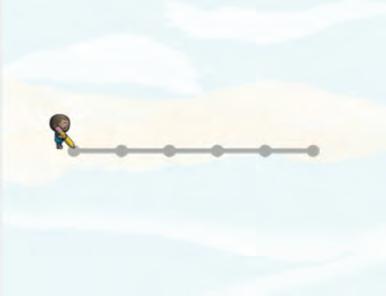
We need to draw lines in east direction 5 times.
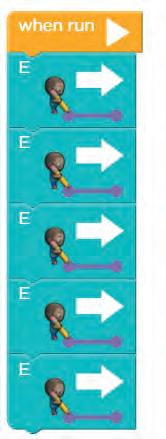
We can use repeat block to make the code shorter.
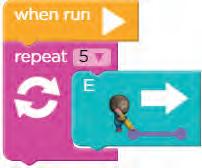
There are two ways we can draw the lines: by using the same blocks again and again or by using a repeat loop.
A good programmer always tries to use a loop to make their code as short as possible.
Let us see another example.
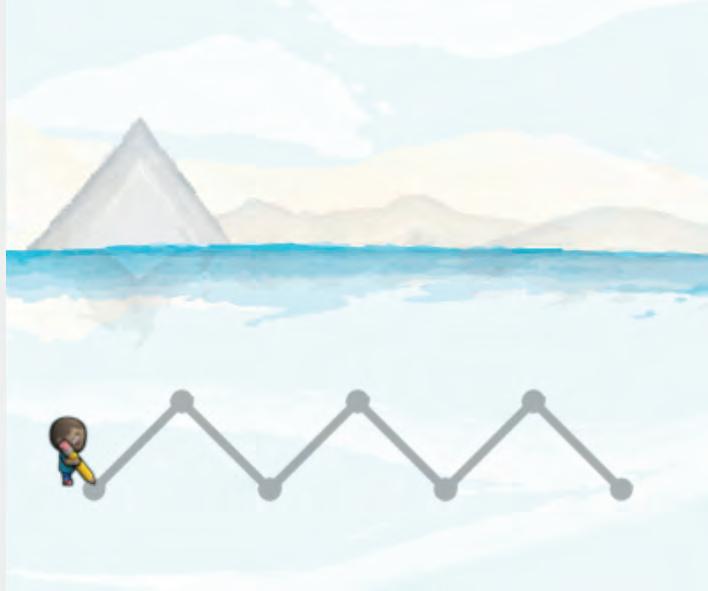
Let’s draw waves now.
To open the activity

Open Google Chrome. Type the link given below in the address bar. https://bit.ly/line-l2
Ask your teacher or parent to help you.
2 Observe the image
Observe the image and think of the directions you need to move to draw one wave.

Now let’s practice some questions:
To open the activity
1. Observe the image and program to draw all the lines. Open Google Chrome.
Type the link given below in the address bar. https://bit.ly/line-l3
Ask your teacher or parent to help you.
2. Observe the image and program to draw the stairs.
Open Google Chrome.

Type the link given below in the address bar.
https://bit.ly/line-l4
Ask your teacher or parent to help you.
Let’s start skipping. You have to skip 10 times.
The first time you skip, count 1, the second time you skip, count 2, and so on.. Do this 10 times.
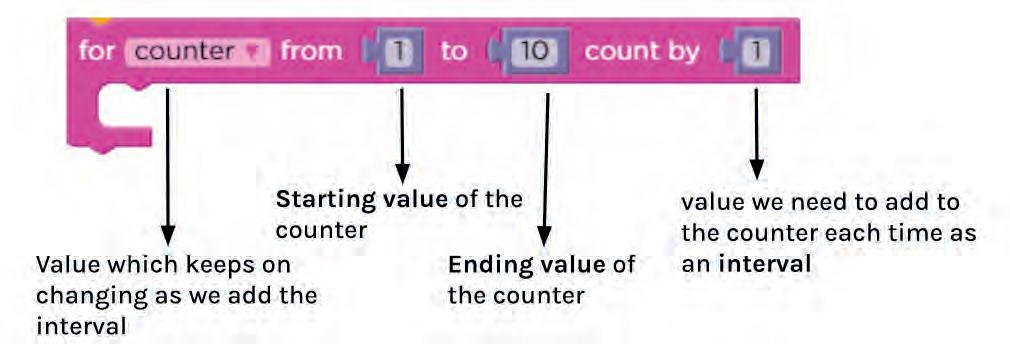
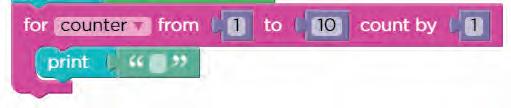
This is exactly how a for loop works.
There is an interval in every for loop.
In our case, interval = 1, as every time we skip, our count increases.
A for loop is a loop with a already known beginning, end, and Interval.
Let us see one more example of a for loop: Example
Look at the circle numbers and find the interval between them.
Starting value: 2Ending value: 10Interval: ?
Here we can see that the circle numbers are 2, 4, 6, 8 and 10.
To find the interval, we can subtract consecutive circled numbers.
Here, 4 -2 = 2 , 6-4 = 2 and 8-6 = 2.
So, the interval is 2.
Starting value: 2Ending value: 10Interval: 2
A for loop has three parameters:
1. Start
2. End
3. Interval
The for loop has all the 3 parameters in a single line of code. Practice
1. Find the Interval by looking at the circle numbers.
Starting value: 1Ending value: 19Interval: ?
2. Find the Ending value and the Interval.
Starting value: 1Ending value: ?Interval: ?
As we already know, it is important to know when to end a loop.
A for loop tells us from the beginning only where to start, where to end and how much to change the value every time.
The counter is like a score in game; it keeps changing as you score.
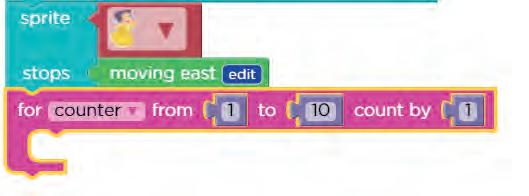
In the Cinderella story, we are done with the part where Cinderella turns into the princess.
Now let us start the timer, where, after the count of 10, the background will change into a castle.
Now, we need to think about what should happen and when.
1. A for loop should start counting up to 10.
2. The background will change into a castle.
3. We will make a new sprite of cinderella as the earlier sprite will get hide by background.
4. We will make a new sprite of prince.
We have already set up the scene and transformed Cinderella into a princess.
Next, we will change the background to a castle.
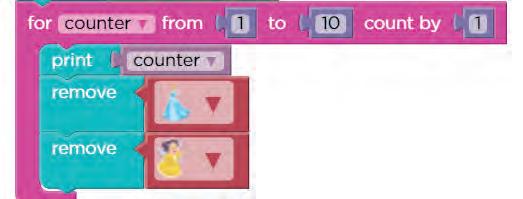
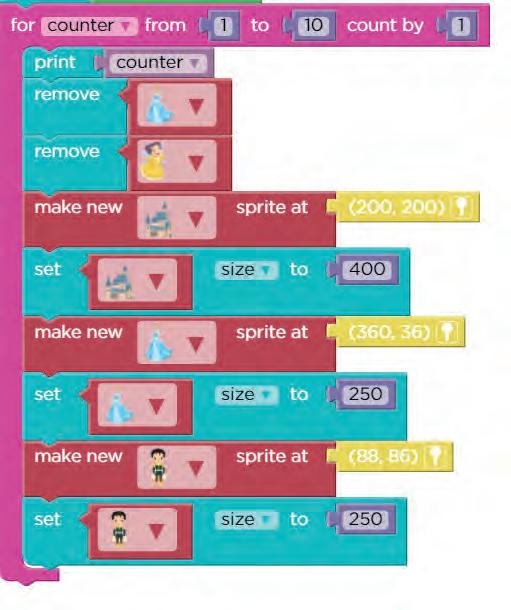
To check for loop, we need to use print command.
4 Set the counter
To check that the for loop is counting from 1 to 10, let’s print the value of the counter.

Place the print block inside the for loop. Drag and remove this.
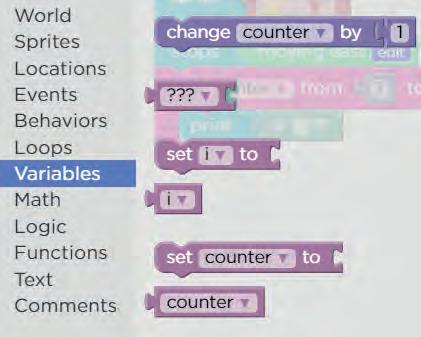
Take the counter block from the Variables section.
We won’t be able to see Cinderella and the fairy sprites when we create the new castle background, we will remove them.

7
Join the remove block two times in side the for loop. Change the sprite images.
8
We will make a castle by making new sprite and set its size as 400 so it can cover the whole screen.
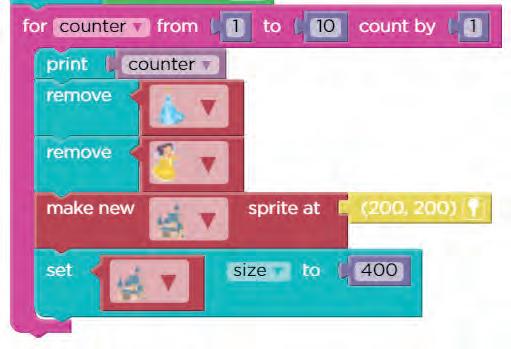 Set the remove block
We will make new sprites of Cinderella and the prince and set their sizes so that they appear on front of the castle background.
Our story is complete now. Rename it and share it.
No, right?
Every once in a while, you may fall, but you get up and keep cycling.
Similarly, it may happen that you don’t get the code right the first time. You may have to try many times until you get the code right.
We can relate everything that happens in our daily life to coding. In coding, we make mistakes and then correct them.
Let’s find at least 5 mistakes or differences between the two images.
You found the mistakes in the image. In coding, these are called bugs.
Bugs are the errors in the code.
Let us see one more scenario.
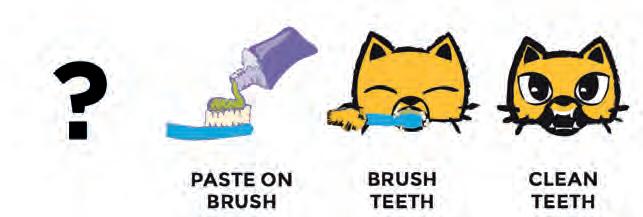
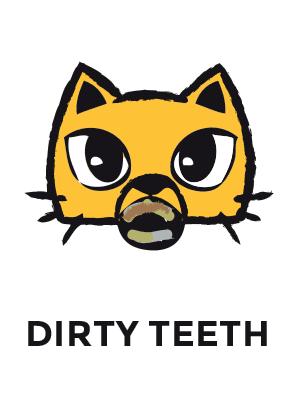
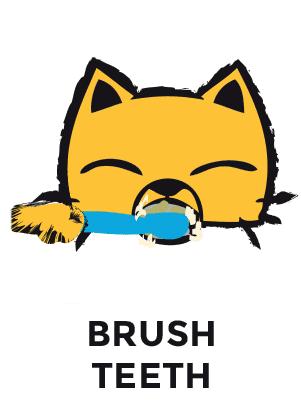
Let us look at the sequence of steps to complete the task of brushing teeth.
1. Fetch toothbrush.
2. Fetch toothpaste.
3. Put the toothbrush in your mouth.
4. Wet toothbrush.
5. Rinse your mouth and spit.
6. Brush your teeth.
7. Put toothpaste on the toothbrush.
Are all the steps in the correct order?
Step 3 cannot happen before Step 4, right? Similarly, 5 cannot happen before 6 and 7. The steps are in the wrong order.
We found the bugs, and we can correct them by writing the steps in the correct sequence.
The process of finding and correcting bugs in the code is known as DEBUGGING.
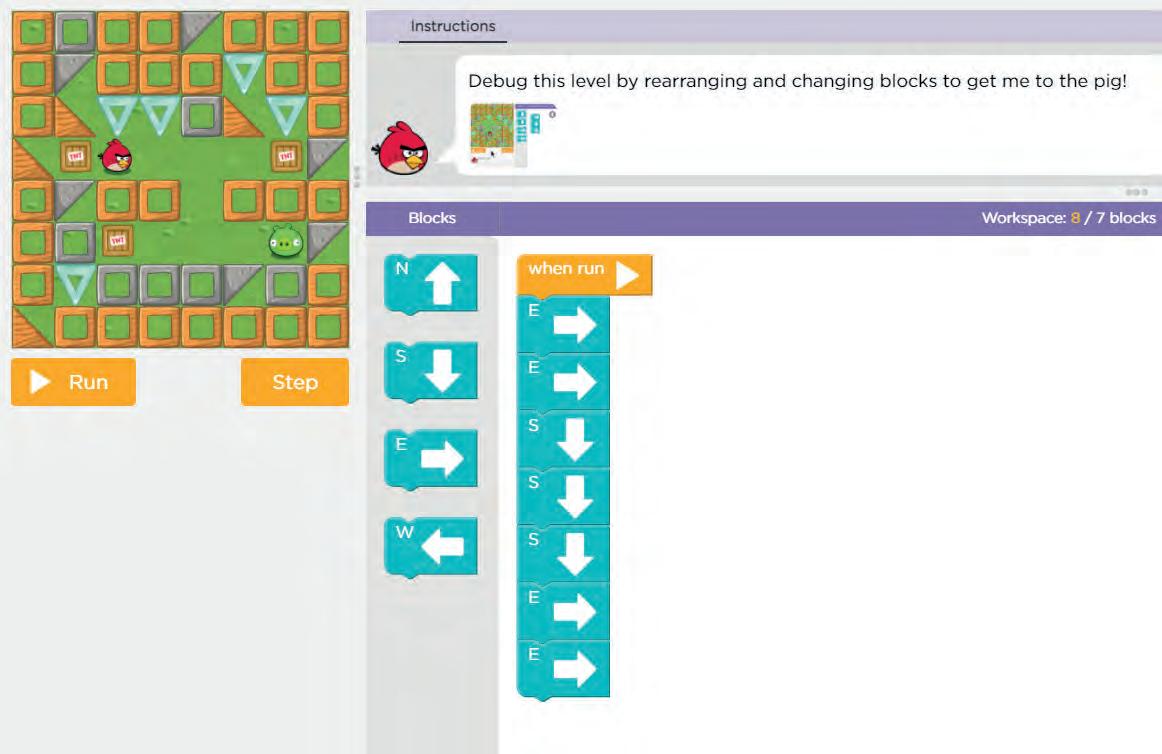
Observe the code and debug it.
open
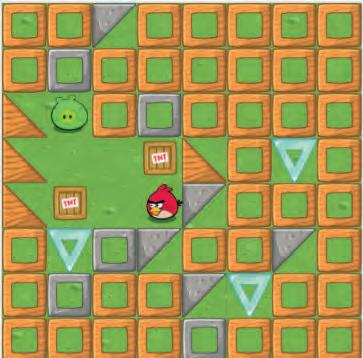
Open Google Chrome. Type the link given below in the address bar. https://bit.ly/bird-b Ask your teacher or parent to help you.
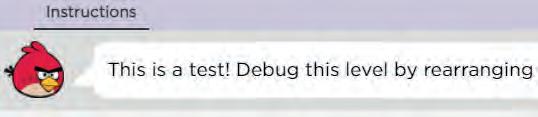
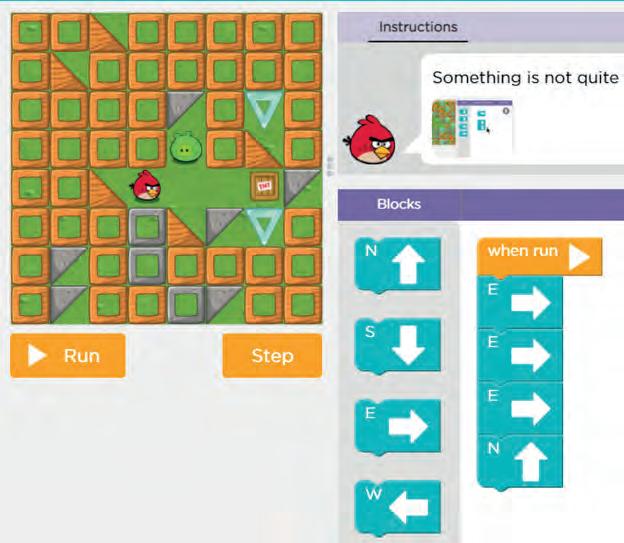
Debug this level by rearranging and changing blocks to get me to the pig!

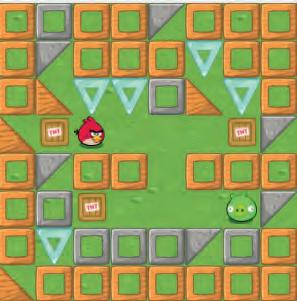
Bird
needs to go two times east, south and west.
Here we can see that two times east is right but we need to go south 2 times instead of 3.
We need to delete one extra south block by dragging and dropping it on the toolbox.
Put the east blocks aside on the workspace area so we can use them later.
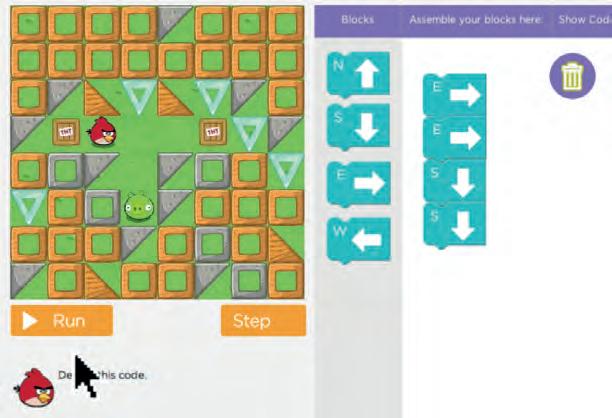
To open the activity
Ask your teacher or parent to help you.
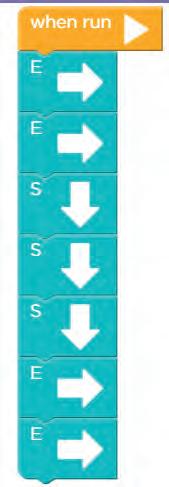
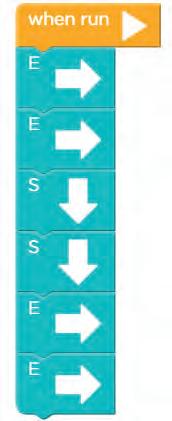
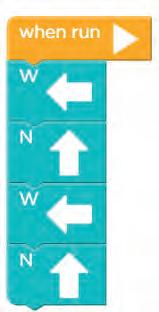
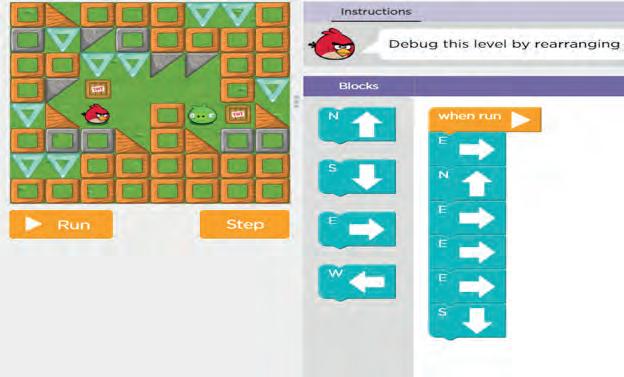
Let’s click on step by step to find the bug.
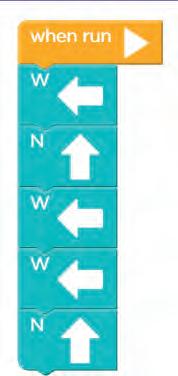
There is one extra west block.
Delete the one extra west block by dragging and dropping it in toolbox area.
Now let’s practise some questions.
2. Find the bug and then debug the code.
To open the activity
Open Google Chrome. Type the link given below in the address bar.
https://bit.ly/bird-b4
Ask your teacher or parent to help you.
Create a “Mission to Mars” project on Sprite Lab.
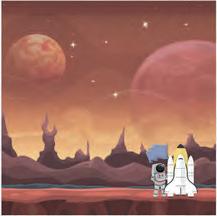
In this project, you need to make an astronaut travel to Mars.
Follow the steps below:
1. Open Google Chrome.
2. Type the link given below in the address bar.
https://bit.ly/mission-mars-sa
3. Set a field background.
4. Make an astronaut sprite.
5. Make a sprite of the rocket.
6. Add behaviour to the astronaut to reach the rocket.
7. Add an event when the astronaut touches the rocket.
a. First, change the background to Mars.
b. Then, change the costume of the astronaut to astronaut with the flag in his hand.
c. Finally, stop the behavior of the astronaut.
8. Rename the project as “Mission to Mars”.
Hint: You can add sprites and the background of your choice.
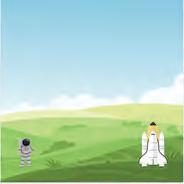
The scene set-up may look like this.
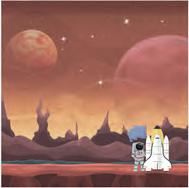
The final result may look like this.
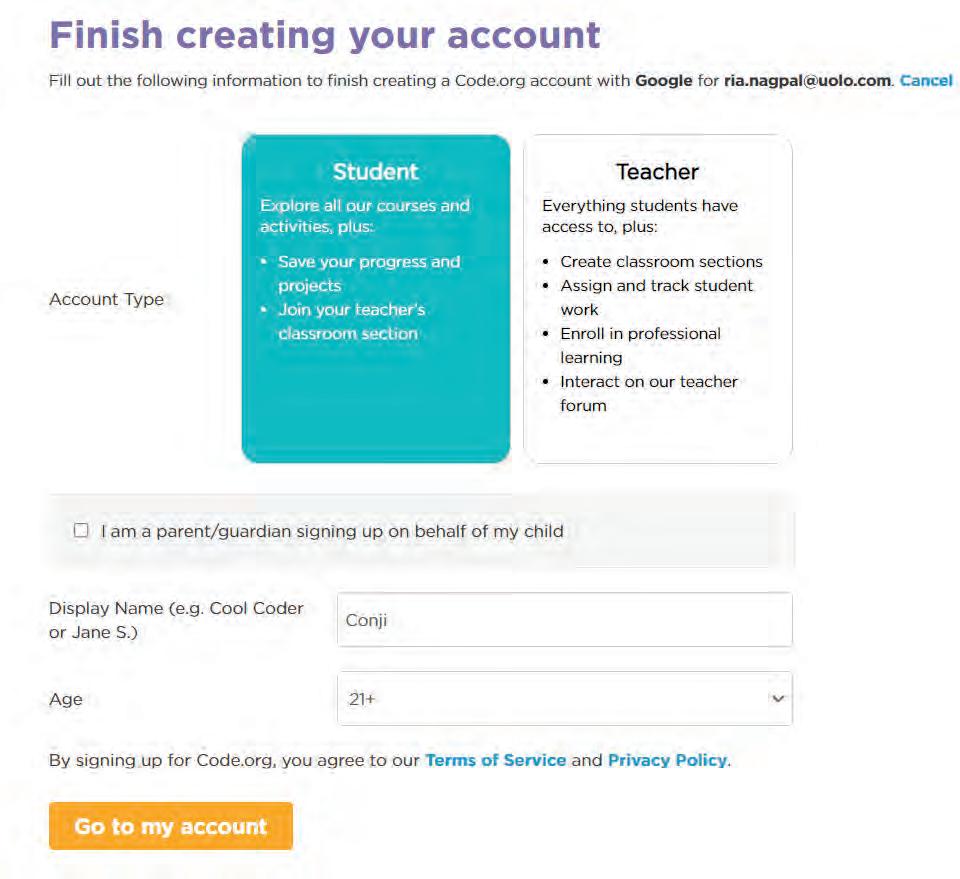
1. Open the browser and type the link code.org.
2. Click on “sign in.”

3. Sign up either using an existing Gmail account or by creating a new one.
(You can use your parents’ email ID.)

4. It will ask you for details like, “Are you a student or a teacher”?
Fill in your details there.
NOTE: Always enter an age of 18 or older; otherwise, you will be unable to access all of the activities.
5. After you sign up, you will see your dashboard. On top, click on “Course Catalog.”
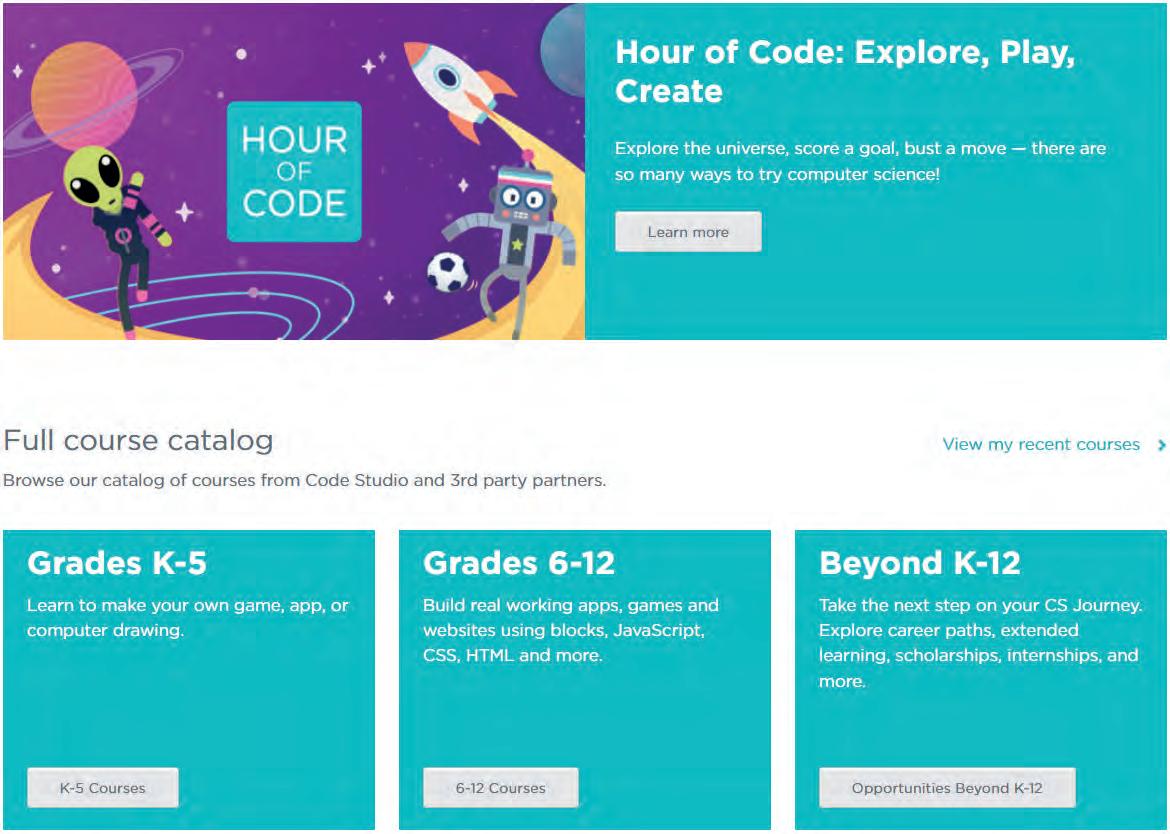
 6. Scroll down a little in Grades K–5 and select “K–5 Courses.”
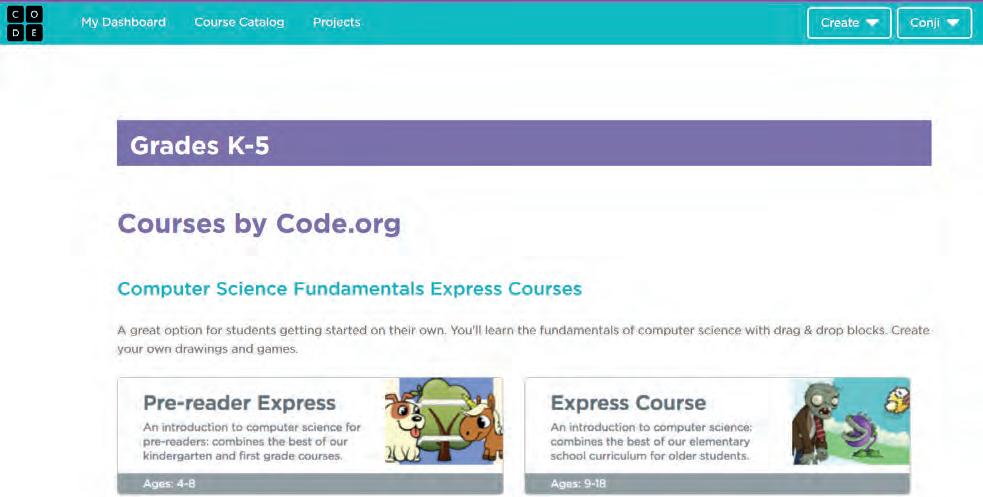
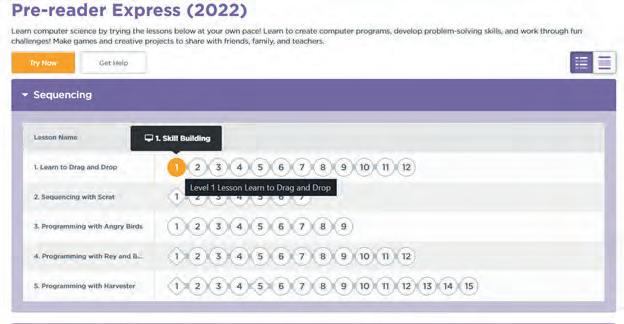
8. Select the first activity, “Learn to Drag and Drop”, and start doing the activities.
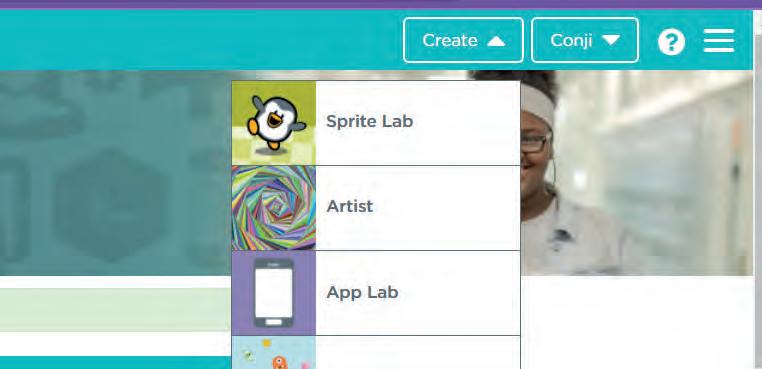
1. Type this link on the address bar http://code.org and sign in.
2. Once you are logged in, click on the Create button.

1. Rename the story
a. Click on Rename.


b. Write the name of your project.
c. Save it.
2. Share your story
a. Click on “Share.”
b. Click on the Copy link to copy the project link.
You can paste it anywhere and share it.
c. You can also publish it on code.org.
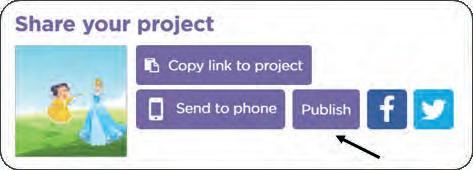
So that everyone who uses the site can see it.

About this book
This coding book is supplementary to the main “Mel n Conji” content book. This book represents a 21st-century approach to learning coding concepts and developing computational thinking and problem-solving skills. To prepare students for the digital age, the curriculum is interwoven with well-thought-out concept graduation with real-life examples and practice problems.
• Illustrative approach: Concepts in coding and computer science are delivered through pictorial representations and learner-friendly approaches.
• Learning through real-life examples: Age-appropriate examples that enable learners to relate to the concept and learn about the unknown from the known.
• Extensive practice: Multiple practice scenarios to reinforce learnings.
• Coding Challenges: Includes projects through which learners can demonstrate their learning outcomes in coding and computer science.
About Uolo Explore more
UOLO partners with K12 schools to bring technology-based learning programs. We believe pedagogy and technology must come together to deliver scalable learning experiences that generate measurable outcomes. UOLO is trusted by over 8,000 schools with more than 3 million learners across India, South East Asia, and the Middle East.
hello@uolo.com