Block Coding lll


Can you read the talk bubbles in the picture below?
Yes. That is because you know English.
Can you read the talk bubbles in this picture too?
No. This is because you do not know all these languages.
We must know the same language to communicate with each other.
As you know, a computer is a machine. A machine cannot understand our languages.
We must learn a language that computers can understand too. We can use that language to tell the computer its tasks. These languages are called computer languages.
Coding is telling the computer its task in a computer language.
With coding, we can make a computer do a task for us.
Additionally, learning coding helps us to:
1. Think and ask questions.
2. Understand problems.
3. Think of solutions.
4. Solve problems in many ways.
5. Break down a big problem into smaller parts to solve it easily.
6. Learn how to decide what to do in different situations.
7. Learn how to decide what to do and when.
We must start with block-based coding to learn how to code.
Using block-based coding, we can:
1. Easily remember the colour-coded code blocks.
2. Code with a simple drag-and-drop method.
3. Code without worrying about the rules of the language.

4. Be future-ready.
5. Learn to code while having fun.
6. Express ourselves by making digital cards or apps.
Block-based coding is visual programming.
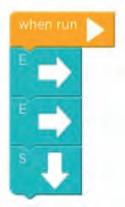
In this, we use colourful blocks. These colourful blocks are the instructions.
We use them to make the computer do a task.
In 2003, MIT introduced the first block coding language.
In block-based coding, you join blocks just like Lego.

Exploring Code.org
It’s time to start your coding journey.
You will be learning block-based coding on a platform called Code.org.
Code.org is an educational platform where we learn to code.
Let’s explore the platform.
Follow the steps given below to sign in to the platform.
1 Go to Code.org
Open Google Chrome.
Type in the link below in the address bar.
https://code.org/
2 Sign into Code.org
Click on Sign in button.
Sign in using an existing Gmail account or by creating a new one.
Note: You can also use your parent’s email ID.
Ask your teacher or parent to help you sign in.
Let us explore a few activities:
Practice 1
To open the activity
Open Google Chrome.
Type the following link in the address bar.
http://bit.ly/3QS5fAJ
Ask your teacher or parent to help you.
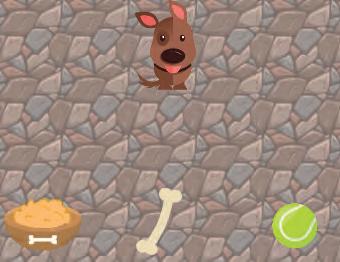
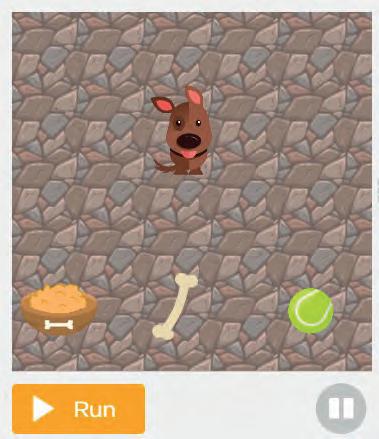
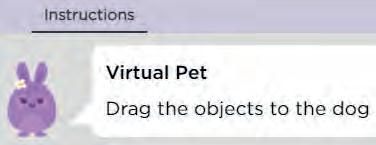
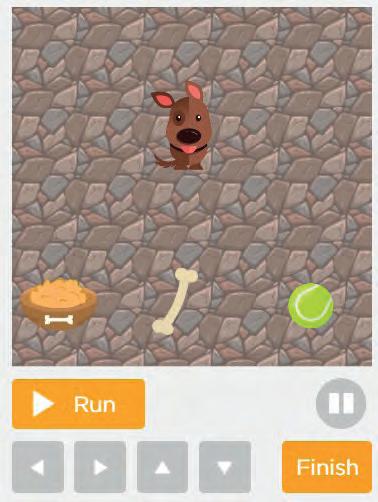
Drag and drop the objects on the dog to see how it reacts.
3 Click on Run
Click on Run to drag the objects.
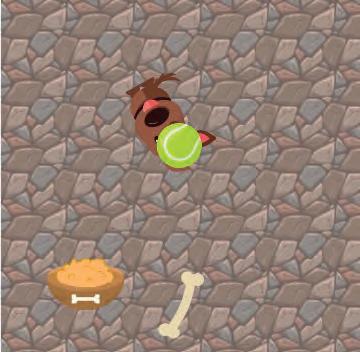
Drag and drop the objects to the dog one by one to see how he reacts.
5 Click on Finish
Once done, click on Finish.
You will now see a message, as shown below. Click on Finish.
Practice 2
Collect all the objects.
To open the activity

Open Google Chrome.
Type the link given below in the address bar.
https://bit.ly/collectorgame
Ask your teacher or parent to help you.
1
Read the instruction
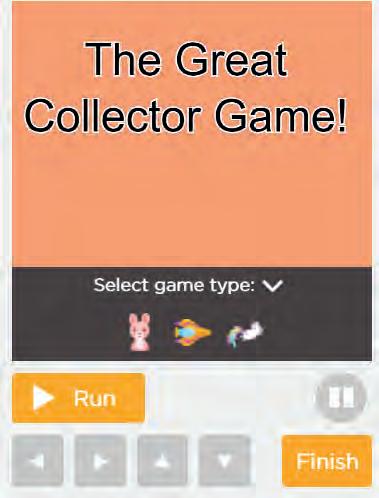
This is three games in one!

3 Select the game type
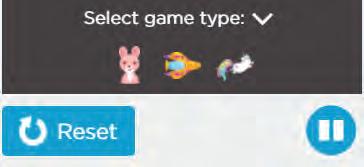
Choose the game type you want by clicking on it.
4 Collect the objects
Collect all the objects by using the arrow keys on your keyboard.
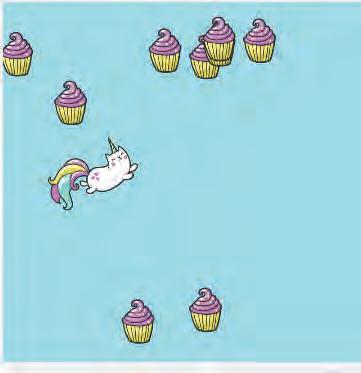
Once done, click on Finish.
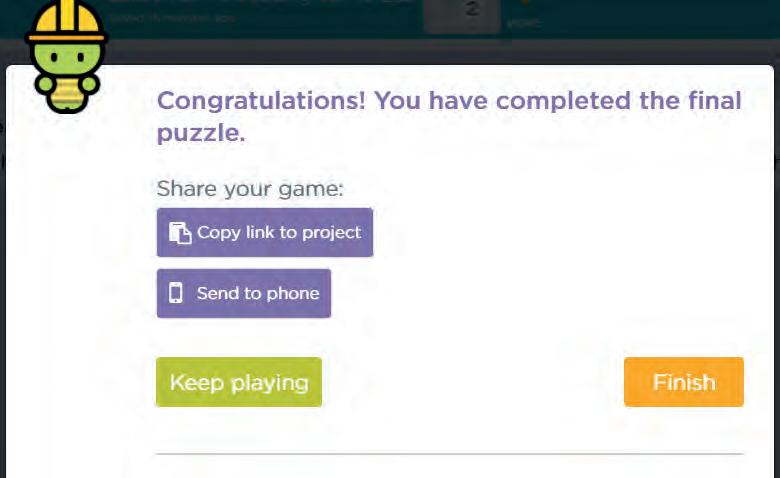
You will see a message, as shown below.
Connect all the parts of the computer by dragging and dropping them.
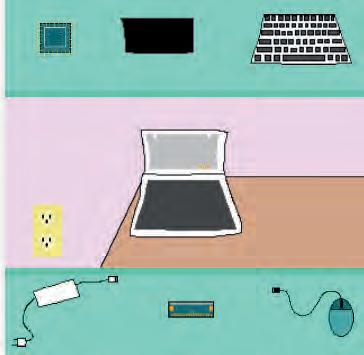
To open the activity
Open Google Chrome. Type the link given below in the address bar.
bit.ly/3WoFZn5
Ask your teacher or parent to help you.
Command A Command is an instruction to the computer to do something.
See the picture below. What instruction is the woman giving to her dog?
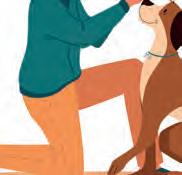
Right! The woman is instructing the dog to sit.
Similarly, we can give commands to a computer to do a task.
In block-based programming, the blocks are the commands. We use the code blocks to give commands to a computer.


Let’s take the example of stories.
Do you know how stories are made?
The five main elements that make up a story are:
1. Characters : people, animals, or objects that appear in the story

2. Setting : the place where the story happens
3. Time : when the story takes place
4. Problem : the issue to be solved in the story
5. Solution : the action taken to solve the problem

Can you guess who the character in the picture is?


Correct! Humpty-Dumpty.
Do you remember what happened to Humpty-Dumpty?
Yes! He had a great fall.
Name the characters in the picture below.

A character in coding is called a Sprite.

In the picture above, Santa and the elves are the sprites.
In coding, a sprite is a character that can interact with other sprites or with the user.
We can:
● Change the costume, location, or colour of a sprite.
● Add and control the behaviour of a sprite.

The behaviour is how a sprite interacts with other sprites or with the user.

We are first going to see how to give commands to make a sprite.
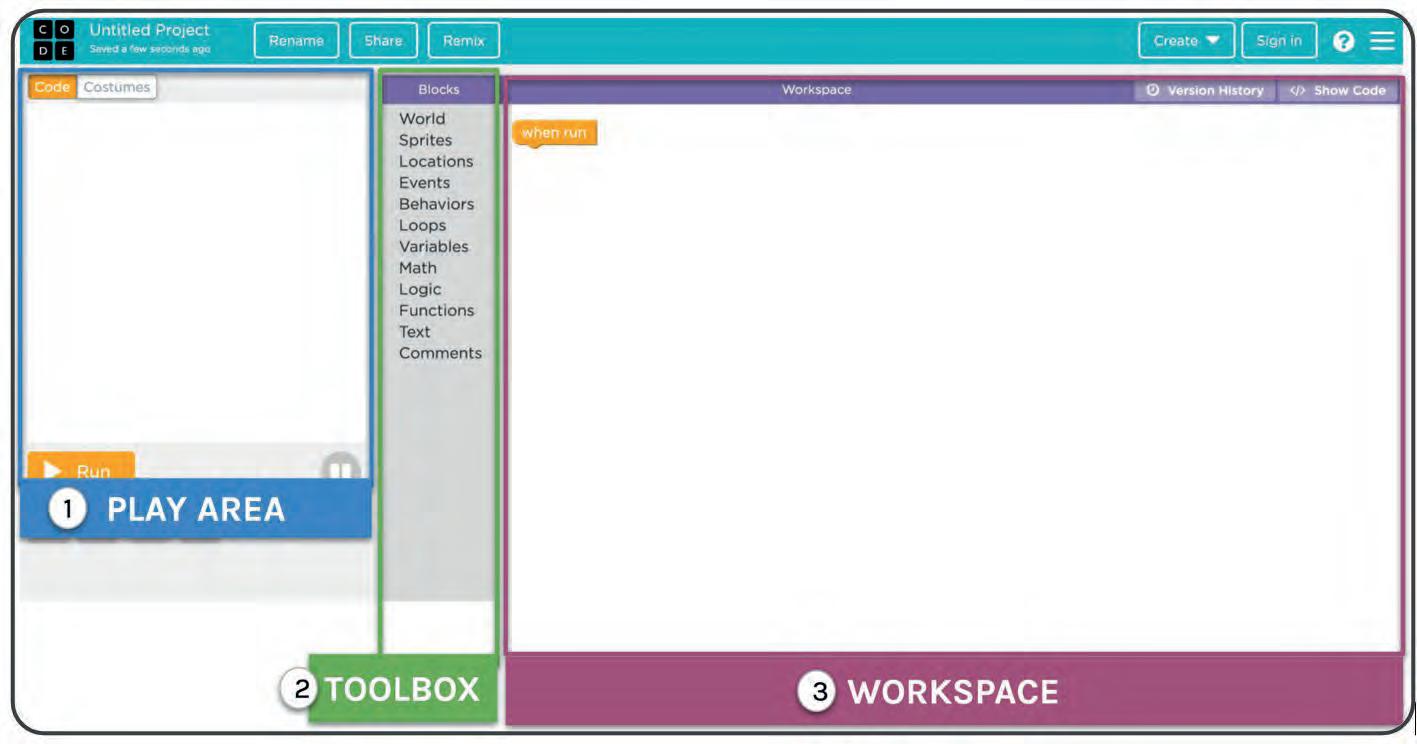
Sprite Lab is where you can create your own stories and apps. You can add sprites that can interact with you or with each other.
Play Area : Where the story will run.
Toolbox : Holds the blocks needed to create the project.
Workspace : Where you will code by dragging the blocks from Toolbox.
Let’s make a sprite now.
Puzzle 1
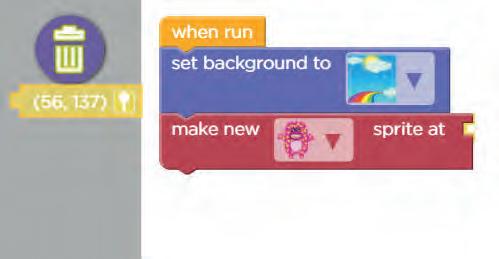
Make a sprite.
To open the activity
Open Google Chrome. Type the link given below in the address bar.
http://bit.ly/3RoFR5V
Ask your teacher or parent to help you.
1
Read the instruction
2 Go to Sprites
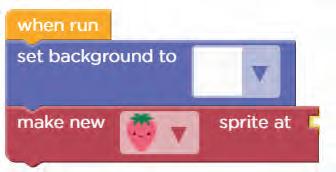
Go to Sprites and select make new sprite.


Drag and Drop it below the background block.
4 Choose a Sprite
From the dropdown choose the sprite of your choice.
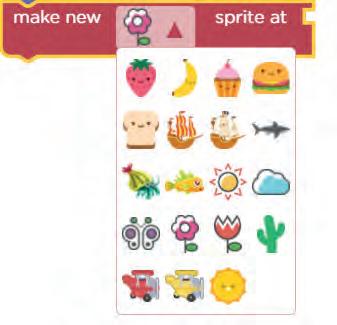
You will hear a sound when you join the make new sprite block below the background block.
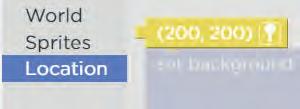
To set a location, go to locations and select a pointer block.

3 Set the Location of a Sprite
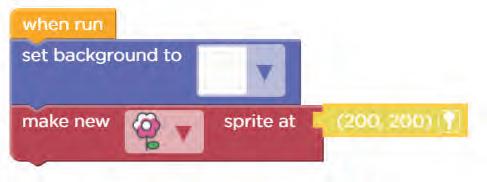

To set a location of sprite join the location block with make new sprite block by dragging and dropping.
4 Choose location
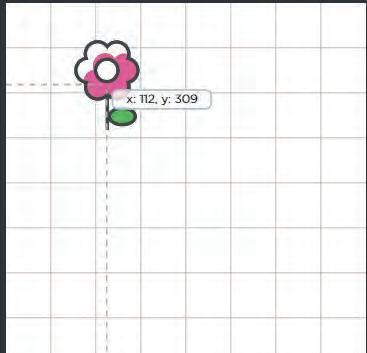
To choose a location click on pointer.
Pointer
5 Set location
To set location drag the sprite in play area.
To open the activity
Open Google Chrome. Type the link given below in the address bar.
http://bit.ly/3iJKfQl
Ask your teacher or parent to help you.
1. Make a Desert Scene.
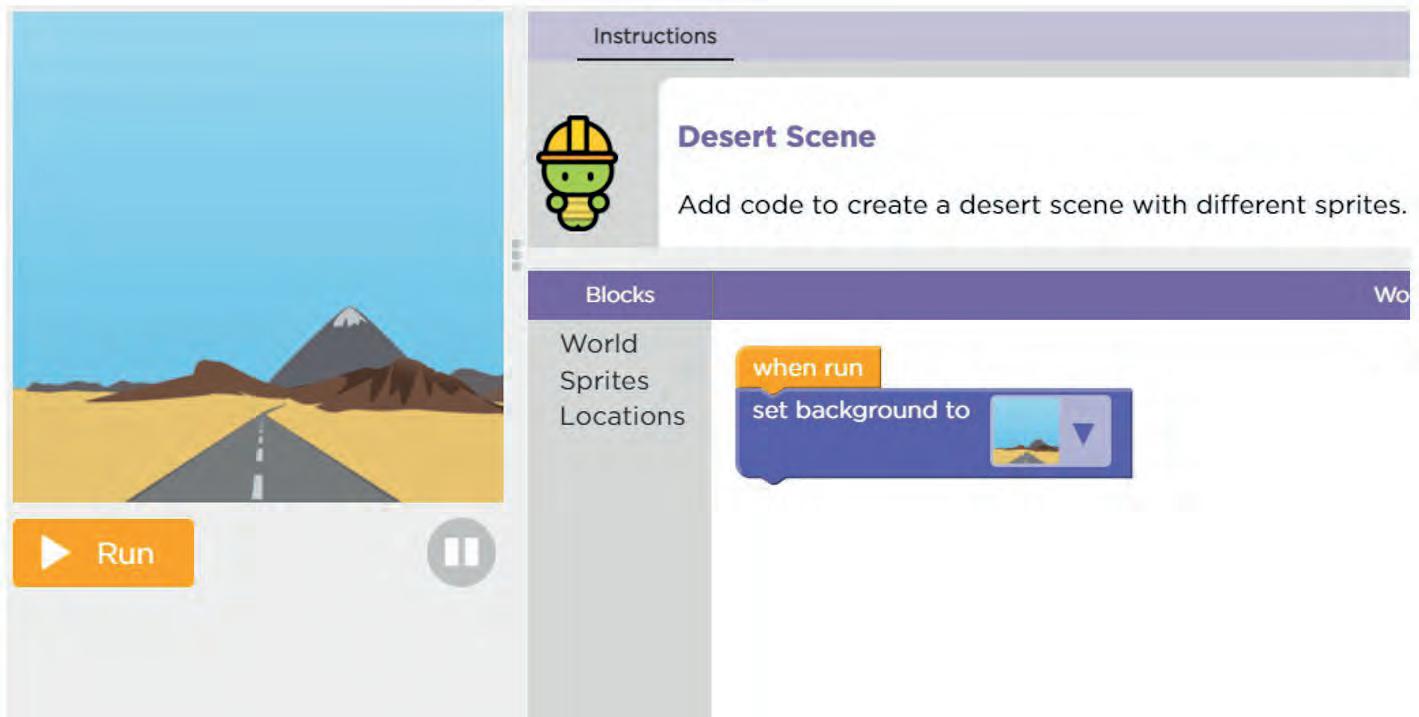
a. Make four sprites of your choice in a desert area.
b. Position each one in a different corner of the scene.
Let’s think about how you get ready for school.
1. Wake up.
2. Get ready.
3. Have breakfast.
4. Ready for school.
This is the general sequence we follow to get ready for school. Think about it and you will observe that there is a sequence in every process happening around us.
When we give more than one command in an order, it is called a Sequence.
Number the pictures below in the correct sequence.
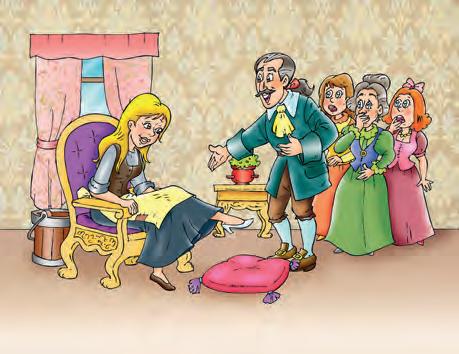

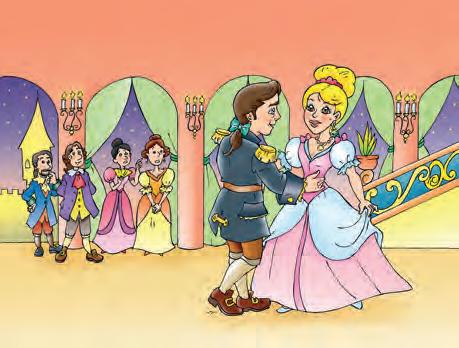
Let’s try another one!

Number the pictures below in the correct sequence.
Let’s look at how a seed becomes a fruit.
1. Take a pot and fill it with soil.
2. Put in the seed and cover it with soil.
3. With proper sunlight and water, it will sprout.


4. After some time it will flower.
5. Then, the fruit comes.


This sequence cannot be changed.
The seed will not grow into a plant if the sequence is not followed.
To open the activity
Open Google Chrome. Type the link given below in the address bar.
https://bit.ly/3iQJiFU
Ask your teacher or parent to help you.
1. Make both the sprites of the same size.
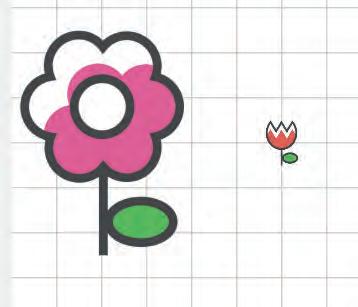
Solution
1 Read the instruction
We need to set the same size for both sprites.
2 Set size
We need to go to sprites and select the set size block.


Drag and Drop the set size block.
Make sure the sprite image is changed to the image whose size you want to change.

4 Set same size
As we want the same size for both sprites, change both the sprites’ size to 250
If you notice, we followed a sequence here, we cannot set the size before making the sprite.
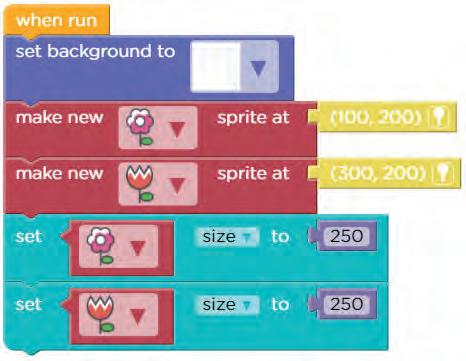
The “make new sprite” block has to be above the “set size” block.
To open the activity

Open Google Chrome. Type the link given below in the address bar.
http://bit.ly/3HNMNGP
Ask your teacher or parent to help you.
2. Set the behaviour of the sprite.
Solution
1 Read the instruction
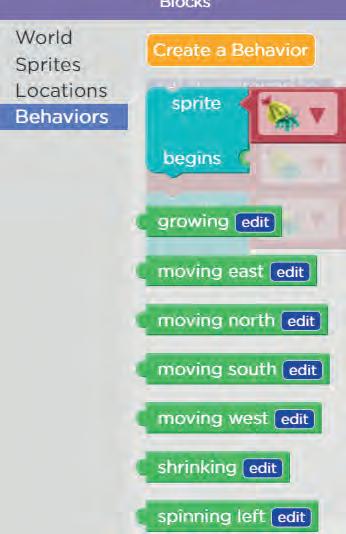
First we need to start the behaviour of the sprite.
3 Join the behaviour block
Drag and Drop the sprite begins behaviour block below the make new sprite.

Make sure the sprite image matches the one you want to make a behaviour for.



1. Let’s make a scene with birds flying.
a. Add 4 bird sprites.

b. Create a different for all the four birds.
Let’s look at the task of getting ready for school again. The picture below shows the steps we follow to complete this task. These steps are in a specific order.
We can think of a task to be done as a problem to be solved. In the example above, getting ready for school is the problem. And, the steps we follow in an order are the solution.
The set of steps we follow to solve a specific problem is called an Algorithm.
Algorithms help us to solve a problem.
We must break down a big problem into small parts to make it easy to solve.
Let’s understand algorithms better by taking the example of the life cycle of a butterfly.
Now let us write the life cycle of a butterfly step by step.
The egg is the first stage, and the egg hatches into a caterpillar.
The caterpillar feeds on leaves and hangs upside down to form a pupa.
The pupa turns into a butterfly after going through a complete transformation.
Once again, the butterfly will lay eggs and the process will continue.
We will follow an algorithm to create a scene of the life cycle of a butterfly in Sprite Lab.
How to open the Sprite Lab
1 Go to Code.org
Open Google Chrome. Type the below link in the address bar.
code.org
2 Sign into Code.org
Click on button.
Sign in using an existing Gmail account or by creating a new one.

First, you must think of the elements you need for the scene. Think about the place where you find butterflies the most.

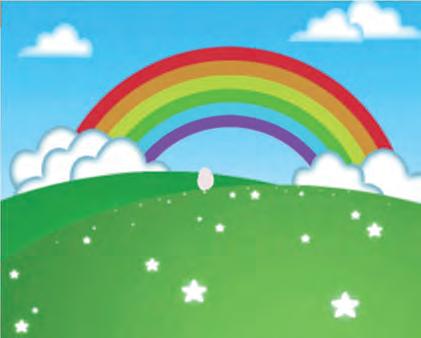
Characters: Sprites
Now think about the following to create an algorithm:
● What do you need to do to set the scene?
● What happens in the scene?


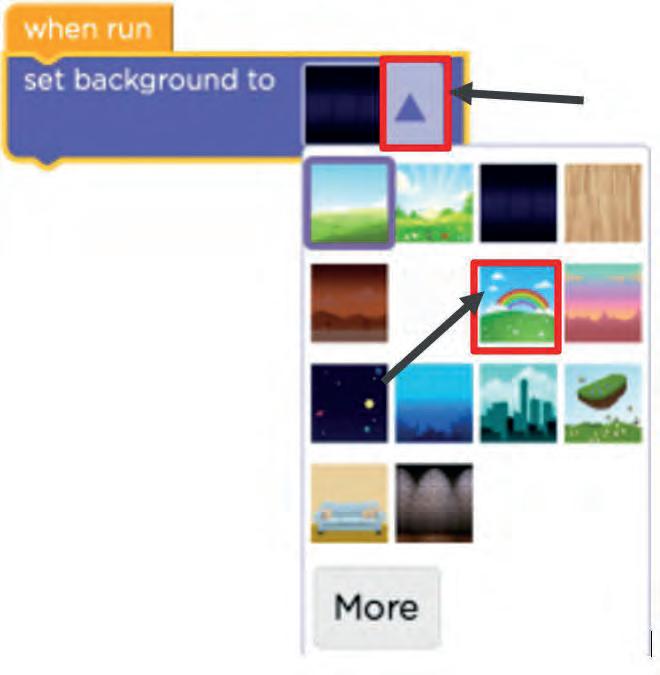
3 Set the background
Drag the set background block.
Drop it under the when run code block in Workspace.
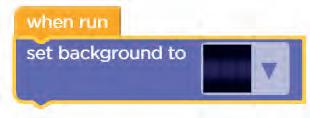
4 Select the background
Click on the drop-down button. Select the park background.


Click on the drop-down in the make new sprite code block.
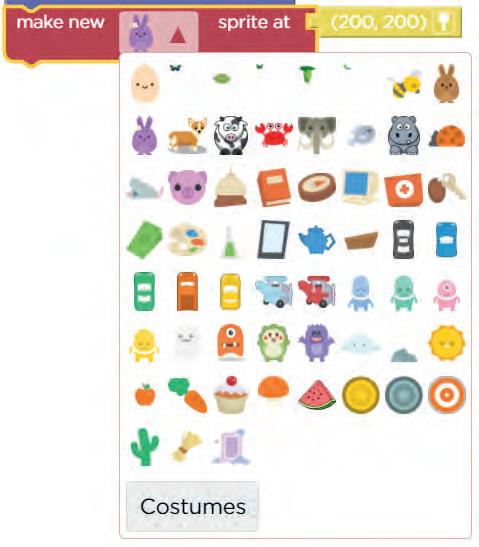
Select Egg from the list of sprites.
Click on the location icon to change the location.
Move cursor on play area to change the location of sprite.

Click where you want to place the sprite.

9 Find set size to code block

Go to Sprites in Toolbox.
Drag the set size to code block.
10 Set the size of Egg Sprite
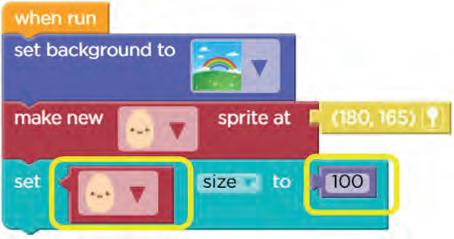
Select the Egg sprite.
Change the size to 100.
With the above step, our scene set-up is done.
What happens when someone tickles you?
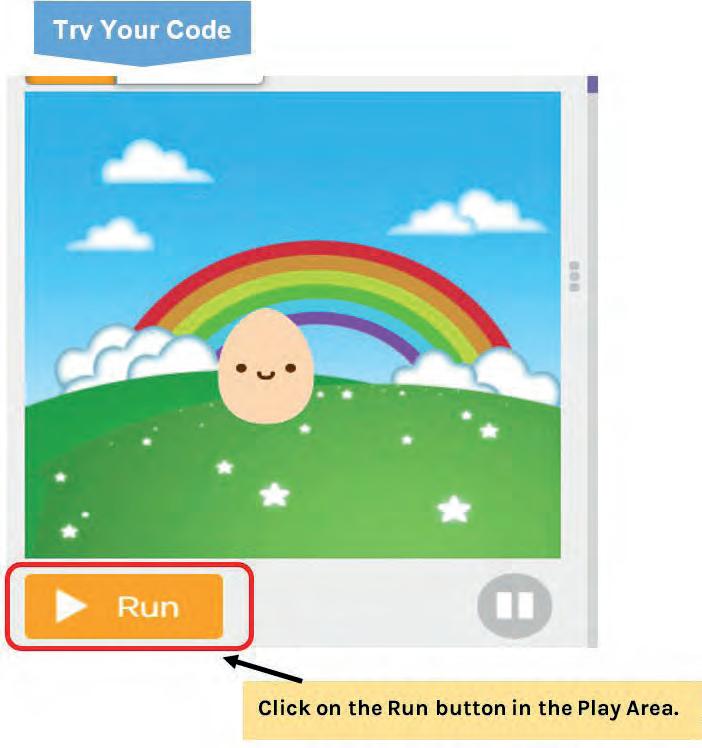
You laugh. Right!
Here, tickling is an event and laughing is an action.
An event brings about an action or a change.
You eat food.
Here, being hungry is an event and eating food is an action. Events play an important role in programming, too.

Here, we can move the car using the left and right arrows.

Clicking on the arrows is the event.


When it takes place, it leads to an action of the car moving.
Do you remember what happens after the butterfly eggs hatch?
Yes! The egg turns into a caterpillar.
Now, we need to think about how to make this happen. We will click on Egg. - Event.
1. Egg will change into a caterpillar - Action or change.
We have already set up the scene.
Next, we will transform the Egg into a caterpillar when we click on the egg.
DEFINE THE EVENT
Click on the egg
Change the costume of egg into caterpillar
Turn Egg into a Caterpillar
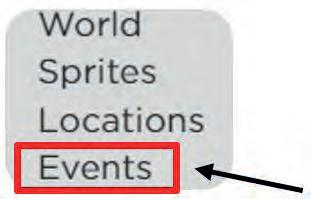
1 Go to Events
2 Find the when click block

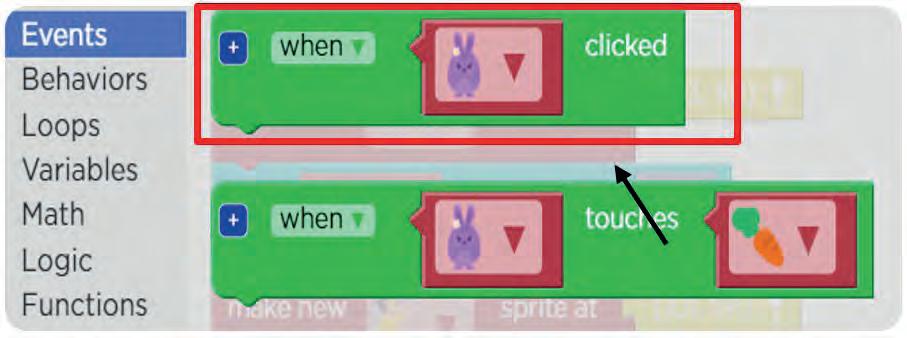
Drag and drop the when click event block in Workspace.
III
Select Egg as the sprite.

Go to Sprites.
Scroll down and select the change costume code block.

6 Set the change costume
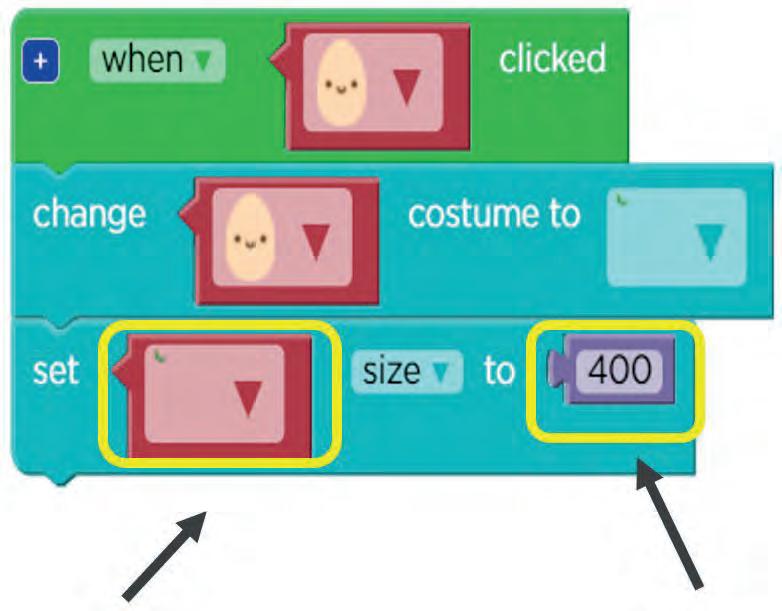
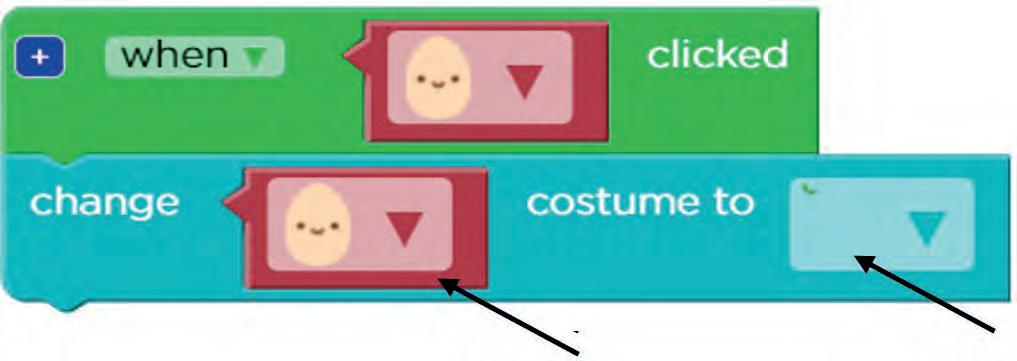
Drag and drop it below the when click Event block. Change the sprites image from the dropdown.
7 Set the size of Caterpillar Sprite
Click on the dropdown and select Caterpillar image. Set it’s size to 400.
Drag and drop it below the when click Event block and join the costume change block below it. Change the sprites image from dropdown.
Drag and drop it below the when click Event block and join the costume change block below it. Change the sprites image from dropdown.
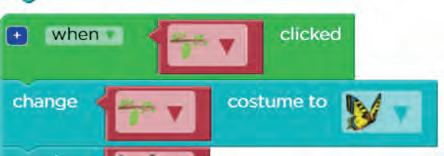
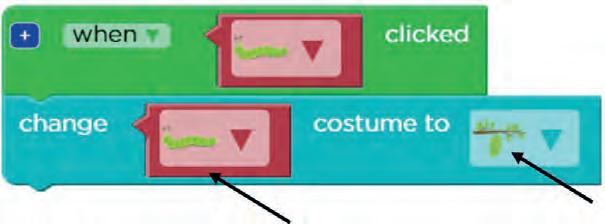
Drag and drop sprite begin block and drop it below the costume block of butterfly attach the wandering behavior with it.

The scene of the butterfly life cycle is complete now.
Rename it and share it with your friends.
Consider the way you walk.
You move one foot forward and then the other.
You continue walking in the same manner.
We can call this a loop.
A loop is an action of doing something over and over again.
What will happen if you never stop walking?
You will pass your destination and you will get very tired.
It is important to know when to stop doing something.
1. Tick () the picture that shows an example of a loop.
Can you jump four times?

What do you think?
What is simpler to say: Jump 4 times? Or
Jump, jump, jump, jump?
Yes, you are right.
If we say “jump, jump, jump, jump” it will take more time and energy. Instead, we can say jump 4 times. And that is where we are using a loop.
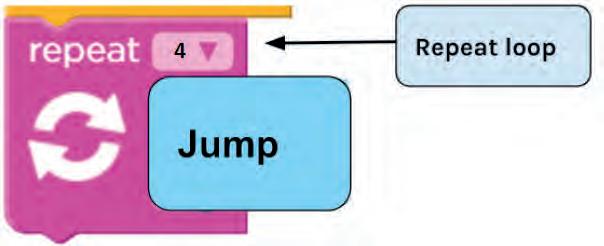
Jump 4 times
By using the repeat loop, our code becomes shorter.
The repeat loop is used when we want to repeat a task a certain number of times.
A good programmer always tries to use a loop to make their code as short as possible.
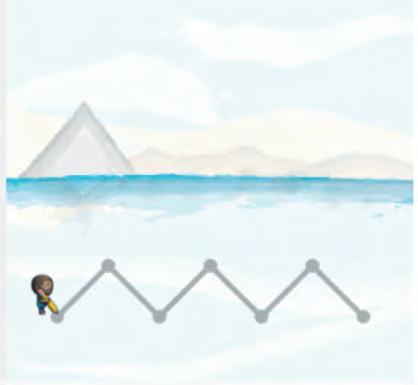
Let us build a program to make the character draw the following wave.
To open the activity
Open Google Chrome.
Type the link given below in the address bar.

https://bit.ly/line-l2
Ask your teacher or parent to help you.
Solution
1 Read the instruction
Think of the direction you would need to go to make each wave.

4 Repeat
Let’s make three waves
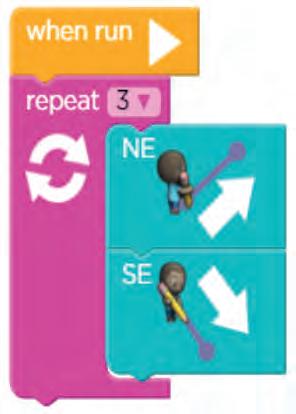
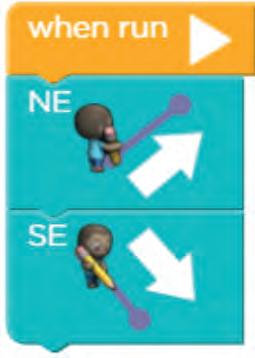
Repeat the process 3 times

Now let’s practise some questions.
Open Google Chrome.
Type the link given below in the address bar.
https://bit.ly/bee_a
Ask your teacher or your parent for help if needed.
1. Help the bee collect nectar from the flowers using repeat loops.

Suppose, your mother brings you a surprise box. You open the box to see what’s inside. It’s full of your favourite chocolates!
Now if you observe carefully, the box is a container to store chocolates. Here, the box is simply a variable having chocolates as the value assigned to it.
You can change the value of the variable to something else. For example, instead of chocolates, you can put cookies inside the box.
Now, if we have to label our box as “Chocolate” and put your favourite chocolate, let’s say a KitKat inside it, in programming terms, “Chocolate” is the variable name and KitKat is the value.
Just like you shouldn’t name a box full of chocolates
“Footwear”, there are some rules we need to follow for naming a variable.
● Names can contain letters, digits, and underscores(_).
● Names cannot contain blank spaces.
● Names are case-sensitive that is “Chocolate” and “chocolate” are two different names.
● Variable names can also begin with an underscore.
A few examples of valid variable names are Name, MyName, _name, and my_name.
Let’s start skipping. You have to skip 10 times.
Suppose you count your first skip as 1, your second as 2, and so on… you will count till you have skipped 10 times and then you stop. You already know when to start, when to count and when to stop. This is exactly how a for loop works.
There is an interval in every FOR loop.
In our case, the interval is equal to 1, as every time we skip our count is increased by 1.
For loop is a loop with a known beginning, end, and interval.
Let us see another example of a for loop. How many times do you brush your teeth in a day?
Two times, right?
It means, you do the act of brushing your teeth till you’ve brushed two times for the day. This is an example of for loop. In this case as well, the interval is 1, as every time you brush your teeth, you are increasing the counter by 1 till you reach the end.
Look at the circled numbers and find the interval.
Starting value: 4 Ending value: 20 Interval: ?
Here, we can see that the circled numbers are 4, 8, 12, 16, and 20. To find the interval, we can subtract the consecutive circled numbers. Hence,
It shows that 4 is the difference in each case, hence the interval is 4.
Starting value: 4 Ending value: 20 Interval: 4
For loop has three criteria:
1. Start
2. End
3. Interval
The for loop has all the 3 criteria in a single line of code.
1. Find the Interval by looking at the circled numbers.
Starting value: 0Ending value: 18 Interval: ?
2. Find the ending and the interval.
Starting value: 7Ending value: 14 Interval: ?
As we know, it is important to know when to end a loop.
Starting value of the counter
Value which keeps on changing as we add the interval
Ending value of the counter
Value we need to add to the counter each time as an interval
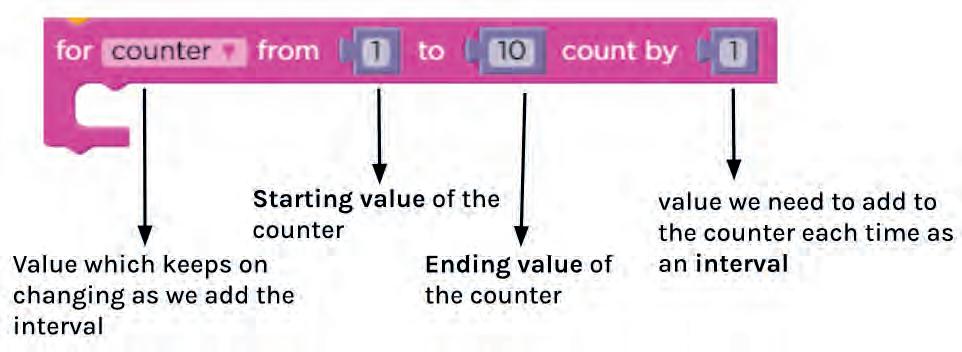
Here, the counter is like a score in a game; it keeps on changing as you score.
Let’s make a project called “Catch the ghost” using a for loop.
http://bit.ly/3H0iH0S
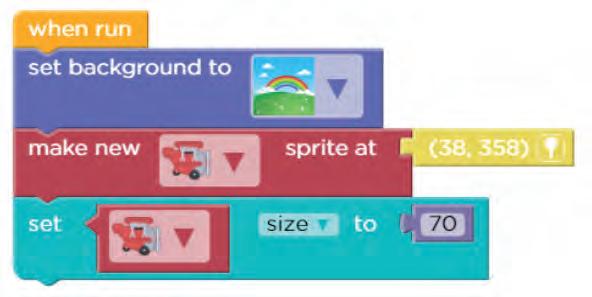
Begin with setting the background and making new sprites as shown below.
Step 1
Set background, make new sprite, and set the size.
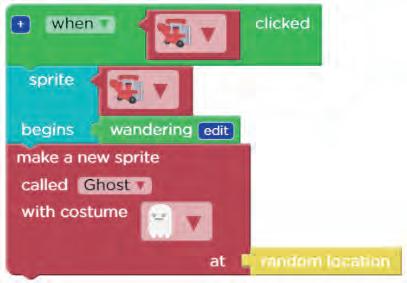
Add an event of clicking the plane, and then add a behaviour of wandering. Make another sprite called Ghost.
Now, when the plane touches the ghost, the ghost disappears and coins are awarded. Let’s use a for loop for this.
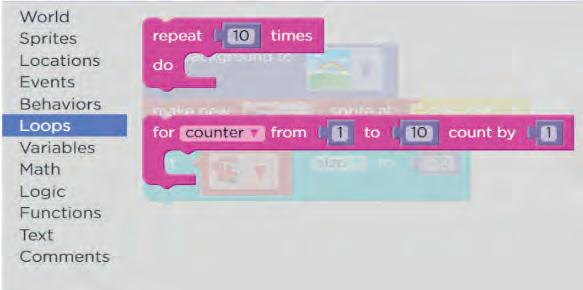
Step 3
Select for loop and set the counter.
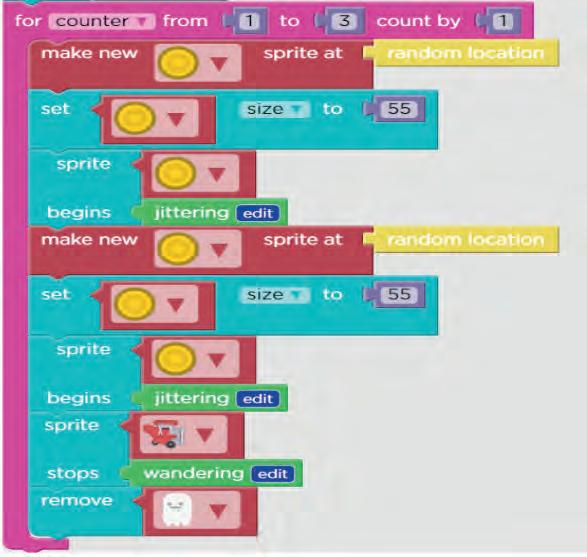
We need to think about what should happen and when. Suppose,
1. A for loop should count till 3.
2. Make a new sprite of Coin.
3. Add a behaviour of the new sprite.

4. Make another new sprite of Coin.
5. Add a behaviour of the second coin sprite.
6. Remove the ghost sprite.
With these steps, we will set up the scene and reward coins when the plane touches the ghost.
Select an event and join the for loop, set the counter to 3.
Step
Add new coin sprite, set the size and add behaviour. Repeat this 2 times. And at last, remove the ghost.
Yay! We are almost done.
How many coins will be created in the play area after the for loop runs?
Hint: 2 coins are created for every counter. Your project is ready!
Suppose, you go to your grandma’s place with your family to celebrate her birthday. She gets 5 gifts and is very happy with the family’s visit.
Now after the celebration is over, you decide to open the gifts with your grandma.
Think about the steps you would take to open the gifts one by one.
1. You pick up a gift
a. You unwrap it.
b. Observe what’s inside.
c. Put it aside and move on to the next gift.
You would follow these steps until you have no gift left to open.
Now think of the steps carefully. You’re repeating the task of picking up a gift 5 times. Every time you pick up the gift, you follow the next steps of unwrapping, observing, and putting it aside. This is a Nested loop.
A nested loop is used when the repetition of two tasks depends on each other in such a way that for every repetition of the first task, the second task has to be repeated a certain number of times.


To make Nested loops, we need at least two loops. When one loop is inside the other we call them nested loops.
Repeat loop and for loop both can be used to make nested loops.
1. Tick () the option with nested loops:
You ride a Ferris wheel 2 times and each time it revolved 3 times
Two friends singing together
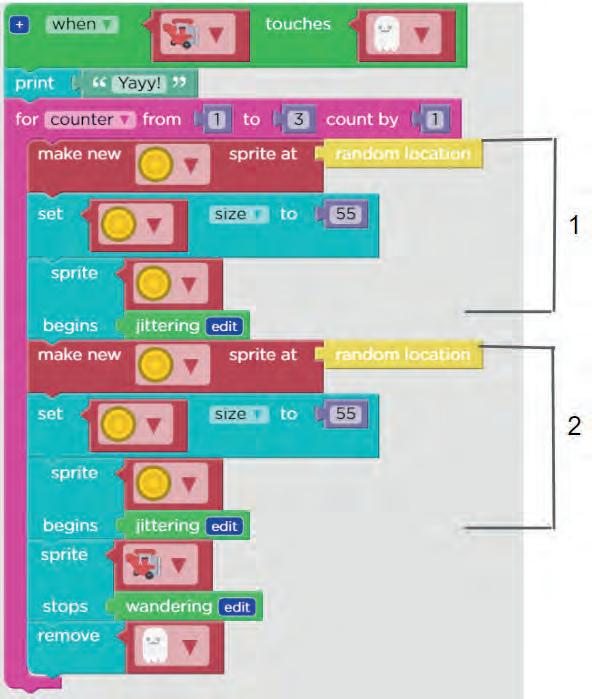
Now, observe the for loop block from the “Catch the ghost” project.
The instructions in part 1 are the same as the instructions in part 2. It means that part 1 is repeating itself 2 times. Can we represent this situation in a nested loop?
First, we remove the repeated blocks. Then we add the repeat block from the Loops section. Select the repeat block
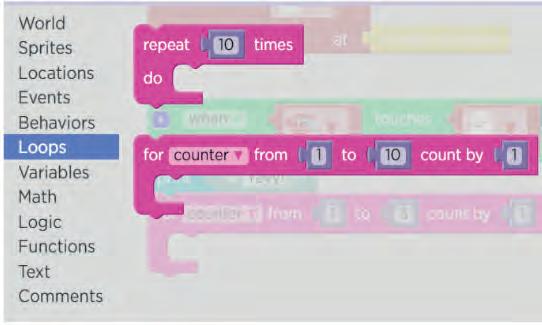


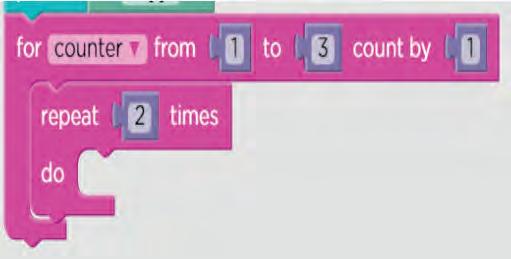
Add it to the for loop
Set the counter to 2 and add the repeat loop to the for loop.
Add block 1 inside the repeat loop
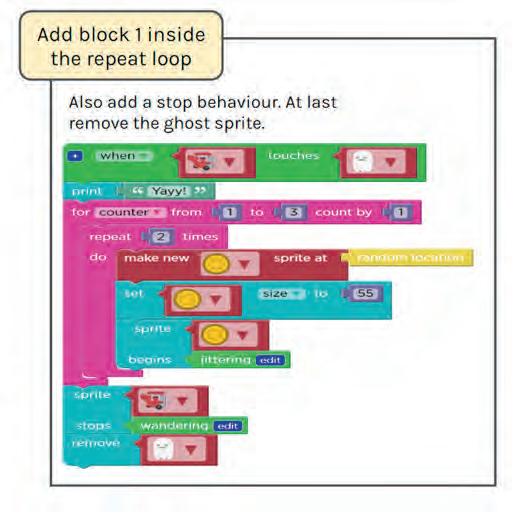
Did you observe how we avoided the repetition of blocks using nested loops? Our code is shorter as well!
Your project is better now! Share it with your friends and have fun catching the ghost!

Sorry! We don’t have cabbage.


I will buy only if you have cabbage.
Do you think the lady will buy anything from the shopkeeper?
No, because she stated that she would only buy other vegetables if they have cabbage.
In our daily life, we all have to make some decisions.
Will you play outside if it’s raining?
If it’s raining outside, then play inside.
Usually, we make these types of decisions automatically, since we know what to do in these situations.
Computers can’t do that, that’s why we need to write code so they can make decisions.
An if condition statements tells the computer what to do if a certain condition is true.
In the above situation, raining outside is a condition. If - else
Sometimes different actions have to be taken according to the situation.
…then we will play inside
If it’s raining…
…else we will play outside

Let us look at one more situation.
…then you can drive


If you are 18...
True False
The if-else statement is used for both the true part and the false part of a given condition. If the condition is true, the if block code is executed and if the condition is false, the else block code is executed Practice

1. You can vote if you are 18 years of age or older. Write conditional statements based on that. Write your answer in boxes.
If you are 18 or older…
True
2. Where will you go if you are sick? To the doctor’s or to school? Write your answer and the condition in the given boxes. False
Let us make a game using conditions.
First let’s open the Sprite Lab Open Google Chrome. Type the link given below in the address bar. http://code.org
1 Go to Code.org
2 Sign into Code.org
Click on Sign in button.
Sign in using an existing Gmail account or by creating a new one.
Three—the unicorn, the monsters and the candy. There is one background too.
In this game, the unicorn needs to eat candy and avoid monsters.

Let us first create an algorithm for what the game should look like.
● What do you need to do to set up the game?
SET UP THE GAME
Set the background
Add unicorn sprite
Set the size of unicorn sprite
Add 3 monster sprite using repeat loop
Set the size of monster Sprite
Add candy sprite and set its size
1 Go to World


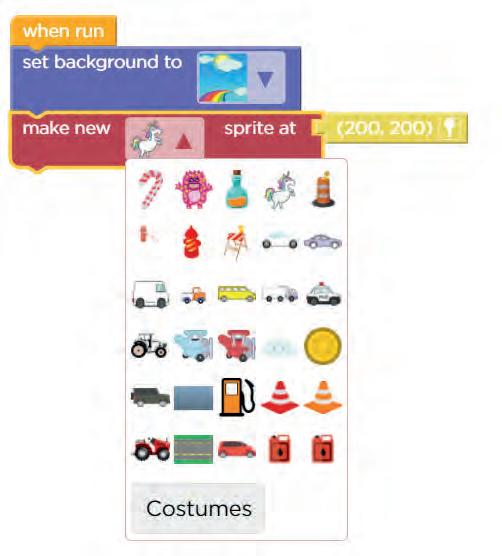
Click on the drop-down in the make new sprite code block.
Select Unicorn from the list of sprites.
Click on the location icon to change the location.
Move cursor on the play area to change the location of sprite.
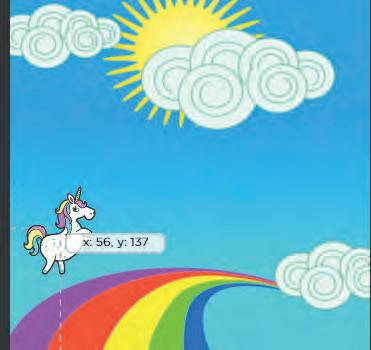
Click where you want to place the sprite.

6
Click on the dropdown and select Unicorn.
Change size of unicorn sprite to 120.
Click on Sprite and drag and drop the make new sprite block.

Click on the drop-down in the make new sprite code block.
Select Candy from the list of sprites.
Place Candy where you want it.
Set the size of Unicorn SpriteGo to Sprites in Toolbox.

Click and drag the set the size to code block.
Click on the drop-down and select Candy.
Change size to 60.
Click on Sprite and drag and drop the make new sprite block.
Click on the drop-down in the make new sprite code block.
Select Monster from the list of sprites.
 8 Set the Size of Candy
Remove the monster location
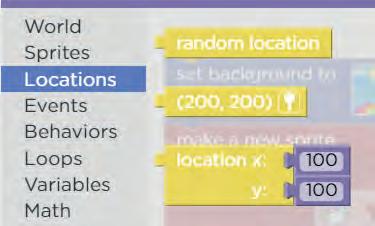
Delete the location block by dragging and dropping it back on toolbox area.
Place random location for monster
Go to locations and pick random location.
Drag and attach it to make new sprite block we already took.
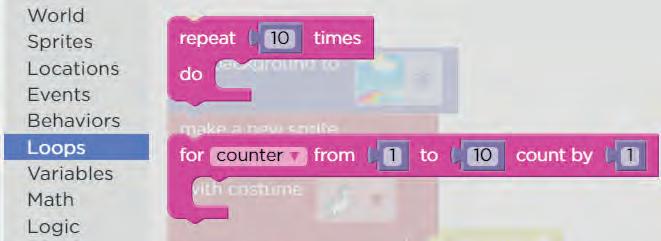
To make 3 monster sprite.
We will go to Loops and select repeat.
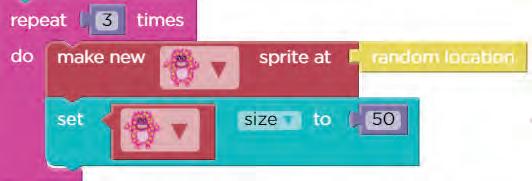
13 Make 3 monster Sprite
To make 3 monster sprite.
We will put make new monster sprite block inside the repeat block.
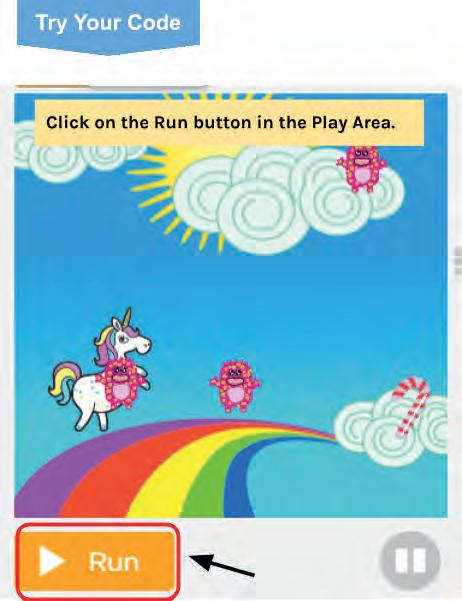
After we finish setting up our scene.
We require something that will make the scene appear to be moving.
How can we do that?
The monsters and candy should behave continuously, which means they should move from left to right or from east to west.

1 Find the Sprite begins code block
Go to Behaviors.
Drag the sprite begins block.
2 Set the sprite begins code block
Drag the sprite begins code block.
Drop it below the Monster size block. Select Monster sprite.
3 Set moving west and looping code block
Go to Behaviors.
Scroll down and look for the moving west and looping code block.

This behavior allows sprites to go out from the west end and re-enter from the right side.

In similar way we did for monster.
We will create Moving west and looping behavior for candy.
Go to Behaviors.
Scroll down and look for the moving west and looping code block.

We are now done with the game setup.
Next, we want our unicorn to go up and down to collect candies and avoid monsters.
DEFINE THE EVENT
Block


Drag and drop the when pressed event block in Workspace.

Scroll down and select the move code block.
5 Set the move block
Drag and drop it below the when pressed Event block.

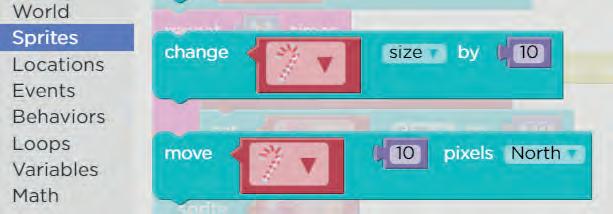
Go to Event.
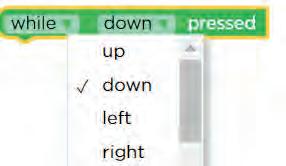
Drag and drop the when up pressed block in workspace area.

Click on drop down and change it to down.
7 Set the move down block
Go to Sprites.
Drag and drop it below when down pressed block.
Click on drop down and select south.
Pick the when touches block.
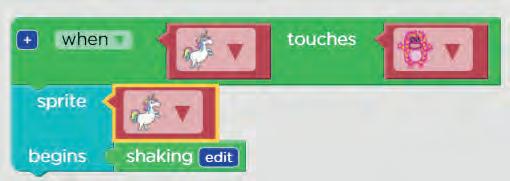
Drag and Drop it down in workspace area.
Don’t forget to change sprites image.
Drag the sprite begins block.
Find the shaking behavior.
Join it below the when monster touches the unicorn block.

When a traffic light turns green, what does it mean?

Right, it means you can go.
Similarly, a red light signals you to stop.
A yellow light signals you to wait.
Here we can see there are three conditions, so we cannot use the if else statement here.
If else if condition
1st condition
2nd condition
When there is more than 1 condition to be checked, we will use if else if conditions.
Did you notice that whenever you play a game, you can see your score and your level change?
In this game also, we will set scores.
Have you ever wondered how your level changes?
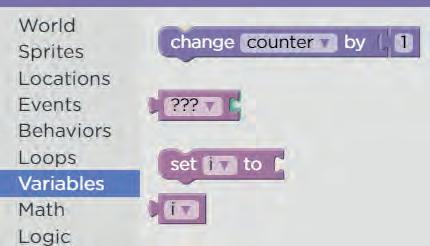
It can be done using conditions. When our score becomes 5, we will make our background change and when our score becomes 10 we will again make our background change. Let’s see how we can do that.
Go to Variables.
Select the set i block.
Click on dropdown rename it as score.

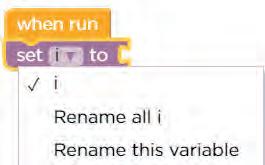
Click on rename this variable.
Name it as score.
Click on create.
Voila! You will see it as score now.
Click on rename this variable.


Name it as score.
Click on create.

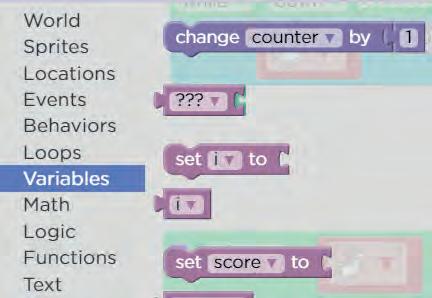


13
Go to variables and select score. As score is increasing. Instead of 0 make it score.

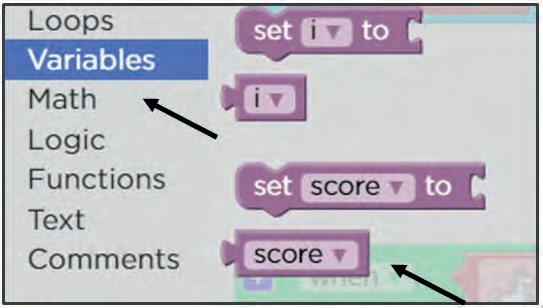
0 to score
Drag and drop down the 0 in toolbox. Instead of 0 make it score.
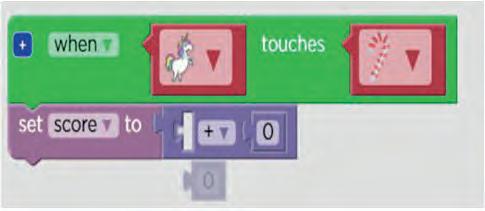


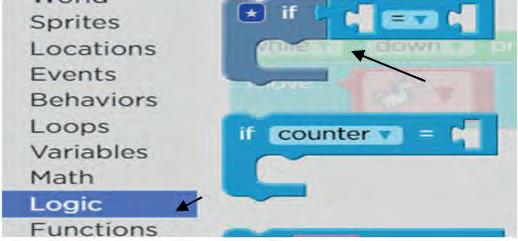

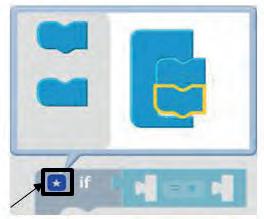

As we need to make condition if score is 5 background will change.

Set the Score as 5
To set the score as 5.


Click on math.
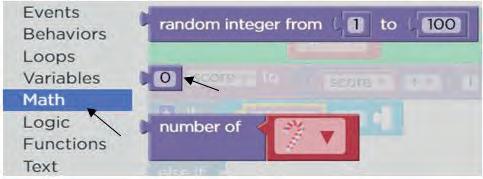
Select 0 and put it after = in if block.
We need to make condition of score = 5.
Instead of 0 write 5.
6 Duplicate the conditions
Press Ctrl + C to copy and Ctrl + V to paste.
Drag and drop it below the if block.


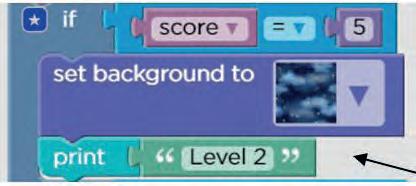
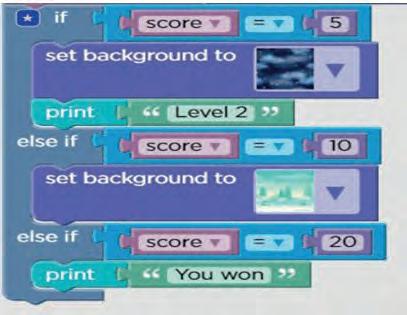
11 Remove all sprites
In last condition we need to remove all sprites. Go to Sprites.
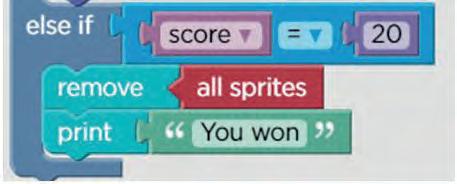
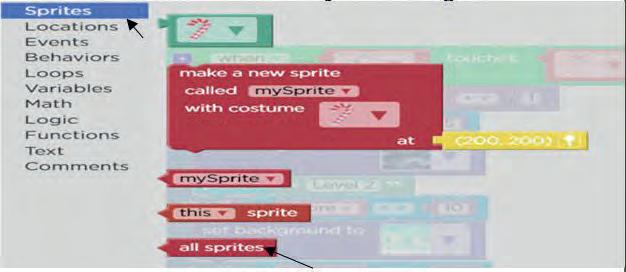
Select remove all from there and join them together.
12 Make last condition
Put remove all sprites inside the if condition.
Block Coding III

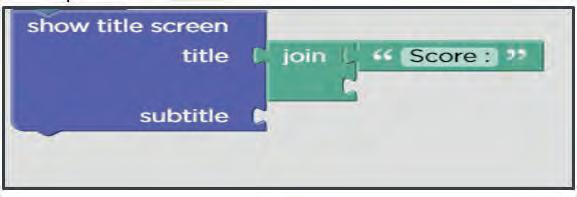
Go to variables.
Select score from there.

Drag and drop score adjacent to subtitle.

Our game is complete now.
Rename it and share it with your friends.
We have already studied loops and conditionals.
Loops help us repeat particular instructions.
Conditionals help us make a decision based on specific criteria.
Now, let us learn how we can use loops within a condition and a condition within a loop.
Baby Joe is trying to find the shiny star shield. If she finds the star shield, she will be rewarded with two magic carrots!
Now, let us analyse what blocks we need to add in order to create this story.
1. We need three sprites - Joe, star shield, and carrot.
2. We will check the condition, if Joe touches the star shield, she will unlock the magical carrots.
1. We add two sprites, Joe and the star shield at the start.
2. Next, we check the given condition.
3. If the condition is true, two magical carrots are revealed.
4. We use the repeat block to make two new carrot sprites.
Note: We can add the same conditions from the Events for Joe to move around using the up, down, left, and right arrow keys.
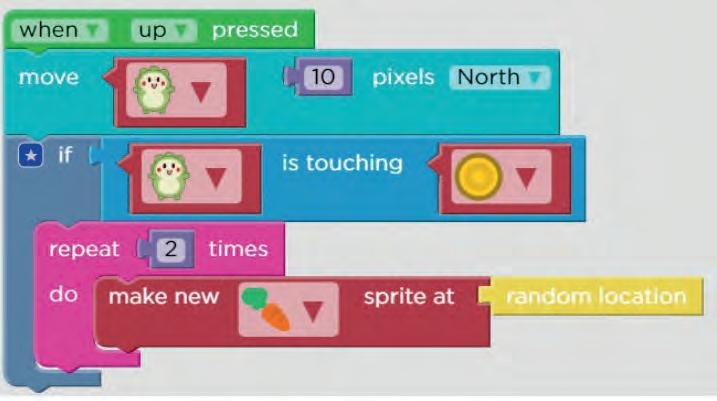
Here, we make multiple new sprites after checking a certain condition.
1. We have 1 bunny (We can change the number to see the effect).
2. We want to create 3 new sprites, so we use a repeat loop.
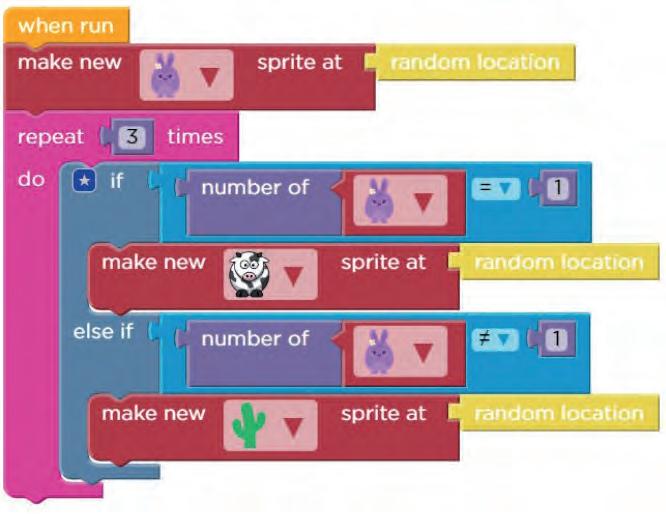
3. If the condition is true, three cows appear at random positions.
4. If the condition is false, three cacti appear at random positions.
We have understood the basics of using loops and conditionals together. Now, let us create a project to see the effect.
Ben is a little astronaut who has reached Mars. He meets new friends from space. The people from space called spacers have special crafts to move around. Ben is excited to meet the spacers.
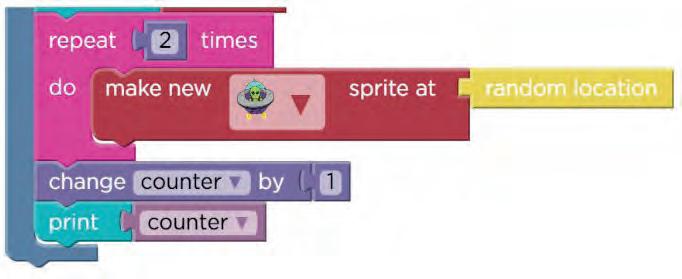
Every time Ben meets one spacer, he has a chance to meet 2 more spacers. Ben is keeping a count of the number of spacers he meets.
He will send a message to us so that we know how many friends he has made! Let


5 Remove the previous spacer
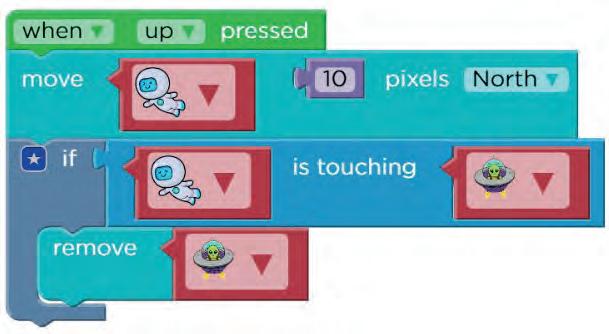
The spacer disappears
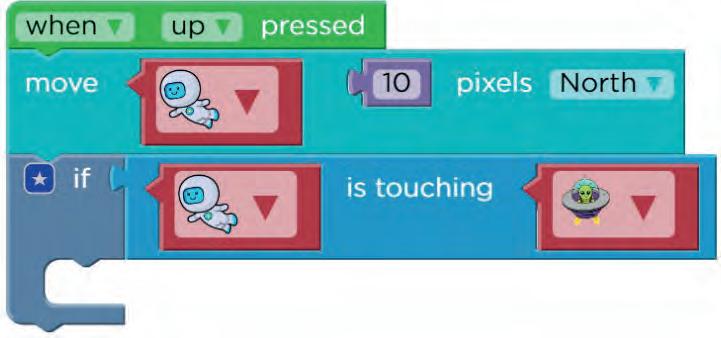

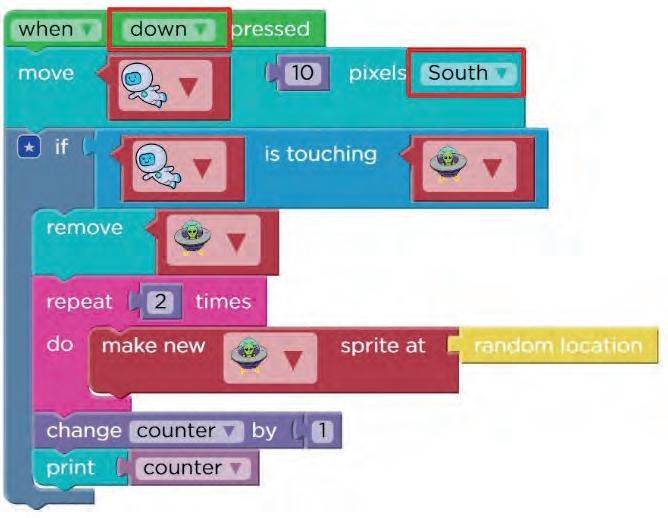
Be careful to change the direction of movement of the sprite when the down arrow key is pressed. It should be South.

Note: We can use copy and paste shortcuts Ctrl+C to copy and Ctrl+V to paste each block.
9 Do the same for when left pressed
Be careful to change the direction of movement of the sprite when the left arrow key is pressed. It should be West.
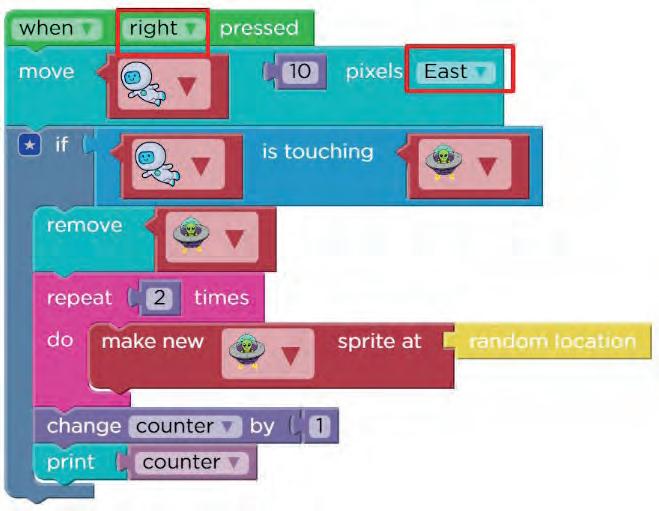
Be careful to change the direction of movement of the sprite when the right arrow key is pressed. It should be East.
There is a treasure hunter in search of rare diamonds. But we have a virus that is trying to stop the hunter. If the hunter collects 5 diamonds, we see a You win! message on the screen.
If the hunter touches the virus, she loses.
No, right?
They fall a lot, but they always get up and try to walk again. Similarly, it may happen that you don’t get the code right the first time. You may have to try many times until you get the code right.
We can relate a lot of things that happen in our daily life to coding. In coding, we make mistakes and then correct them.
Let’s find the 5 mistakes in the below image.
You found the mistakes in the image. In coding, these are called bugs. Bugs are the errors in the code.
I am not able to reach the acorn. Can you find the bug in my solution and correct it by drawing arrows?
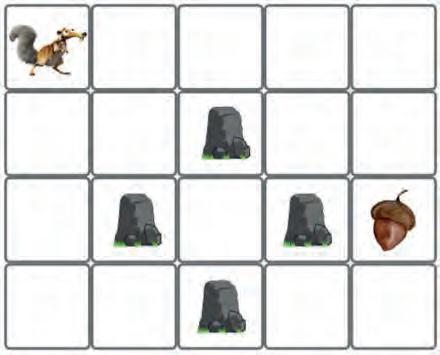
Seeing my solution below, you can write your solution by drawing arrows.
Solution
My Solution
Your Solution
I know you can easily find the correct solution and write it.
So here you found the bugs and corrected them.
The process of finding and correcting bugs in the code is known as DEBUGGING.
Now let’s see some examples.
Example
When the rocket touches the moon, the background should change to a galaxy. Find out why we can’t do it.
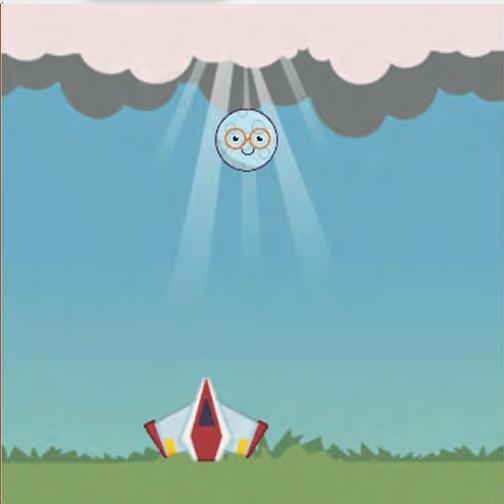
Solution
To open the activity
Open Google Chrome.
Type the link given below in the address bar.
http://bit.ly/40m6aOc
Ask your teacher or parent to help you.
To
Open Google Chrome. Type the link given below in the address bar.

http://bit.ly/40m6aOc
Ask your teacher or parent to help you.
Observe
Here, rocket is moving up but not going to galaxy.

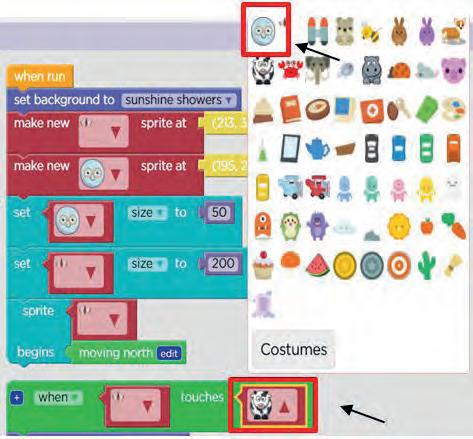
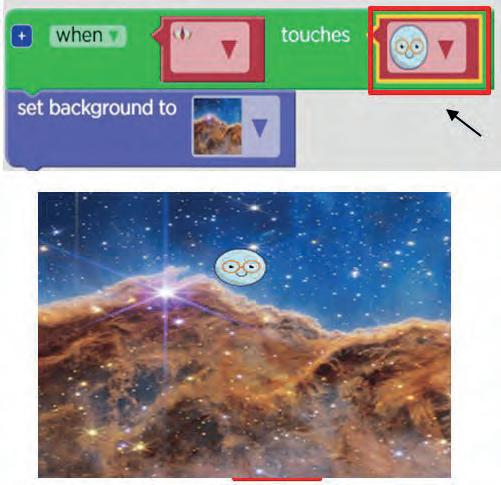
When rocket and moon touch each other background should change into galaxy.
It’s not happening because instead of moon sprite there is cow sprite.

Let us see another example.
Example
To open the activity
Open Google Chrome.
Type the link given below in the address bar.
https://bit.ly/frogprinces
Ask your teacher or parent to help you.

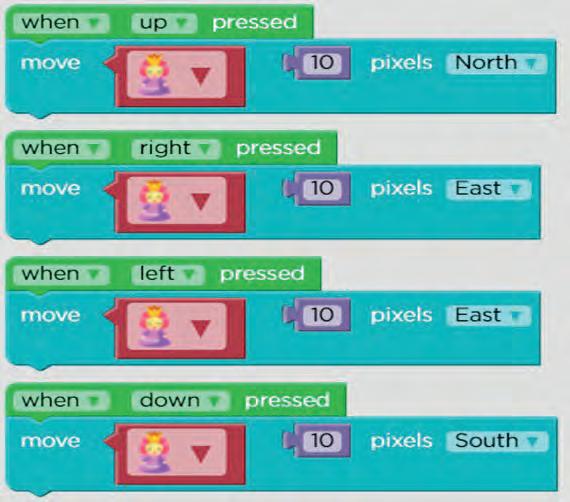
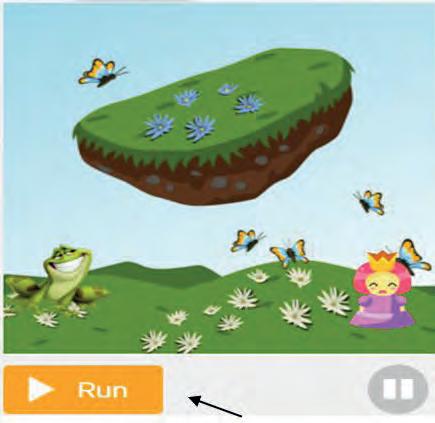
Princess should go left, but she is going right instead. You need to debug it.

Check the code especially for when princess is going left or west.
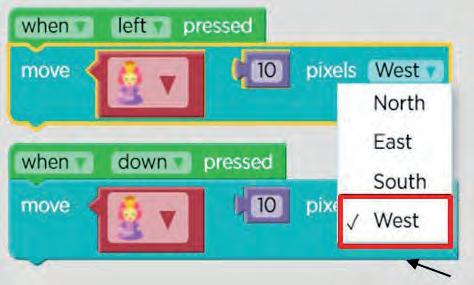
Instead of east princess should go west. Click on dropdown and change it to west.

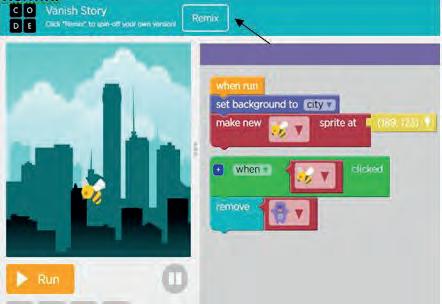
1. The honeybee should vanish when we click on her but it’s not happening. Check and correct the bug.
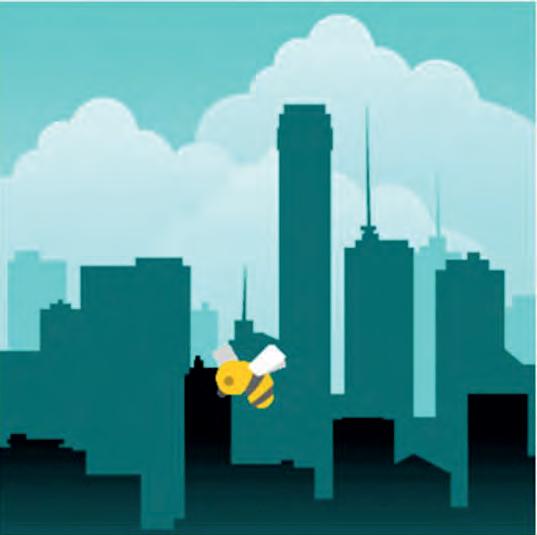
To open the activity
Open Google Chrome. Type the link given below in the address bar.
http://bit.ly/3j0Ey0e
Ask your teacher or parent to help you.
For making the changes in code. Click on Remix.
2. After catching the pokemon, we shouldn’t see the pokemon but I can still see it. Debug the code for me.

To open the activity
Open Google Chrome. Type the link given below in the address bar.
http://bit.ly/3WlKbE9
Ask your teacher or parent to help you.
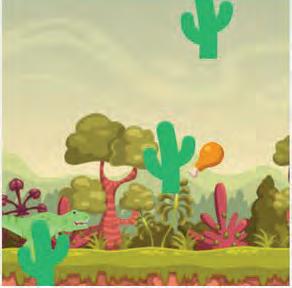
Project: Dino T-rex
Create a “Dino T-rex” project on Sprite Lab.
Follow the steps given below:
1. Open Google Chrome.
2. Type the link given below in the address bar.
http://bit.ly/3Wuh6GG
3. Set a field background or any background of your choice.
4. Make a dinosaur sprite.
5. Make four hurdles of your choice.

6. Make an energy sprite or any sprite of your choice which a dinosaur can eat.
7. Make the behaviour of hurdles and energy sprite moving and looping.
8. Make a variable score.
9. Add an event when the energy sprite touches the dinosaur.
a. First, score will increase.
b. Then, when score becomes 10, you can change the background and hurdles as well.
c. Finally, at 15 you can end the game by saying you won.
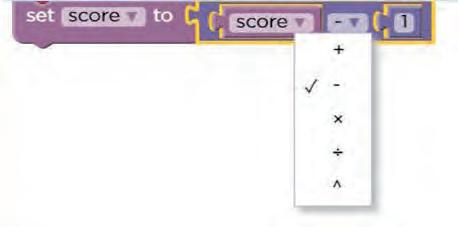
10. Add an event when the hurdle sprite touches the dinosaur. Score will decrease.
You can use the below hint to decrease the score.

11. Rename the project as “Dino T-rex”.
Hint:
To remove hurdles and sprites when they touch a dinosaur. Set up should look like this
For that, you can use the blocks below. So it looks like they are gone and coming back again.

1. Open the browser and type the link code.org.
2. Click on “sign in.”

3. Sign up either using an existing Gmail account or by creating a new one.
(You can use your parents’ email ID.)

4. It will ask you for details like, “Are you a student or a teacher”?
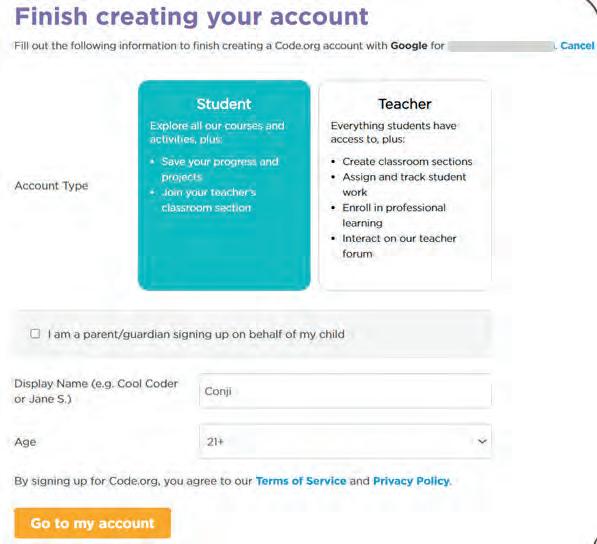
Fill in your details there.
Note: Always enter an age of 18 or older; otherwise, you will be unable to access all of the activities.
1. Type this link on the address bar http://code.org and sign in.
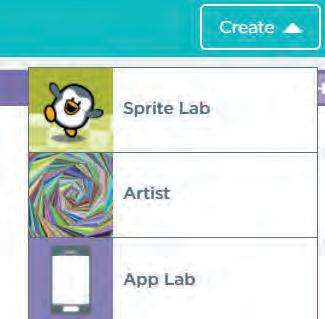
2. Once you are logged in, click on the Create button.
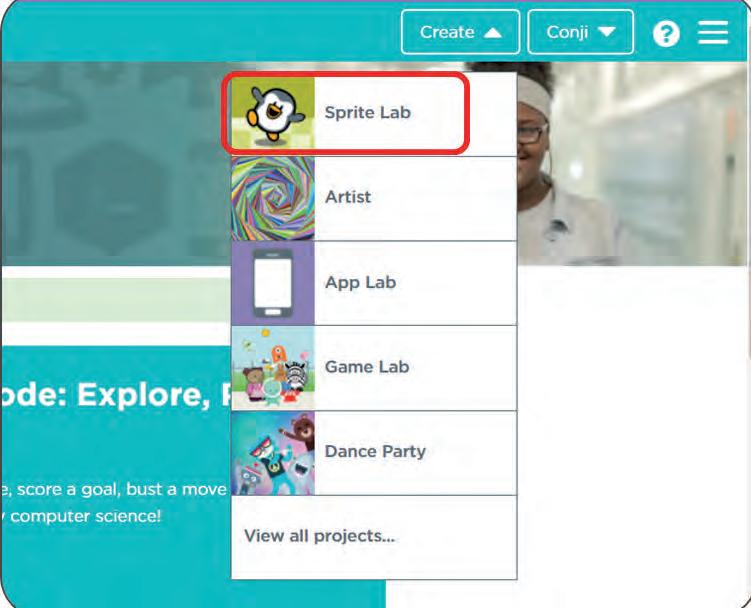

3. Select the Sprite Lab from the drop-down menu.

1. Rename the story
a. Click on Rename.
b. Write the name of your project.
c. Save it.
2. Share your story
a. Click on “Share.”
b. Click on the Copy link to copy the project link. You can paste it anywhere and share it.
About this book
This coding book is supplementary to the main “Mel n Conji” content book. This book represents a 21st-century approach to learning coding concepts and developing computational thinking and problem-solving skills. To prepare students for the digital age, the curriculum is interwoven with well-thought-out concept graduation with real-life examples and practice problems.
• Illustrative approach: Concepts in coding and computer science are delivered through pictorial representations and learner-friendly approaches.
• Learning through real-life examples: Age-appropriate examples that enable learners to relate to the concept and learn about the unknown from the known.
• Extensive practice: Multiple practice scenarios to reinforce learnings.
• Coding Challenges: Includes projects through which learners can demonstrate their learning outcomes in coding and computer science.

About Uolo Explore more
UOLO partners with K12 schools to bring technology-based learning programs. We believe pedagogy and technology must come together to deliver scalable learning experiences that generate measurable outcomes. UOLO is trusted by over 8,000 schools with more than 3 million learners across India, South East Asia, and the Middle East.
hello@uolo.com
