Web Development ll

NEP 2020 aligned Digital coding platform included


Web development is the process of creating, structuring, and organising a website. “Web” refers to a website, and “development” refers to building it from scratch
Web development includes two phases:
1. Front-end Development
2. Back-end Development
Front-end development focuses on the visuals of an application. In contrast, back-end development is associated with handling and storing data, which consumers do not need to know about.
We will be learning about front-end development in this course.
HTML stands for HyperText Markup Language. It is the oldest language to create web pages. It is a combination of Hypertext and Markup language. In 1991, Tim Berners-Lee created HTML and made the first website. Tim BernersLee created the web to make the information available to everyone online.
The first ever website made by Tim Berners-Lee
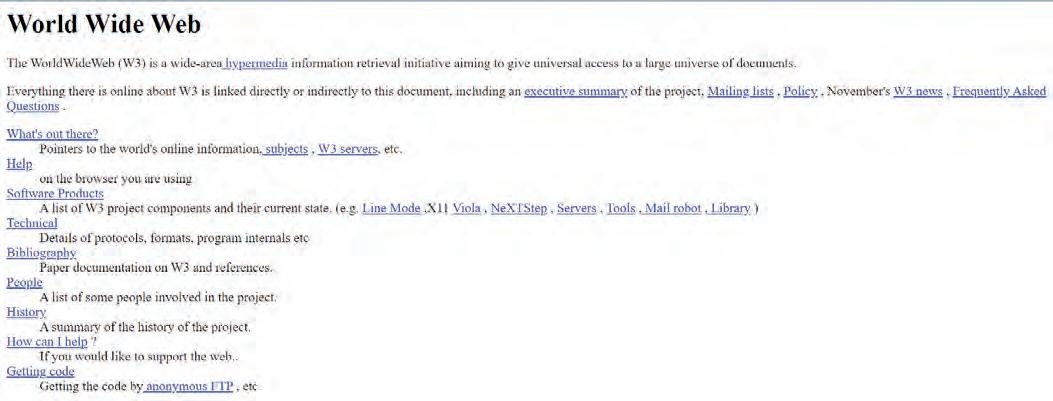
This website explained the concept and history of the Web, provided links to all “the world’s online information” and outlined the process by which people could improve and expand the Web.
Below are some important terms related to web development:
Web Page A hypertext document page is typically written in HTML to display certain information on the WWW.
Website A collection of web pages.
HTML Stands for HyperText Markup Language
It describes the structure of a web page with a series of elements that tell the browser how to display the content on a web page.
CSS Stands for Cascading Style Sheets
It defines design and layout styles for a webpage. Helps in adding variations to display webpages for different devices and screen sizes.
JavaScript A text-based programming language that is used to add interactive elements to web pages and make them more engaging.
HTML Tags Used to indicate the beginning and end of an HTML element in an HTML document.
There are mainly two types of HTML elements: Paired Tags and Unpaired Tags.
• A paired HTML tag contains three main parts:
opening tag (<>), content, and closing tag (</>). Another name for a paired tag is a container tag.
• An unpaired HTML tag doesn’t have a closing tag. An unpaired tag is also called an empty tag.
Below is the list of basic HTML tags.
Tag Purpose
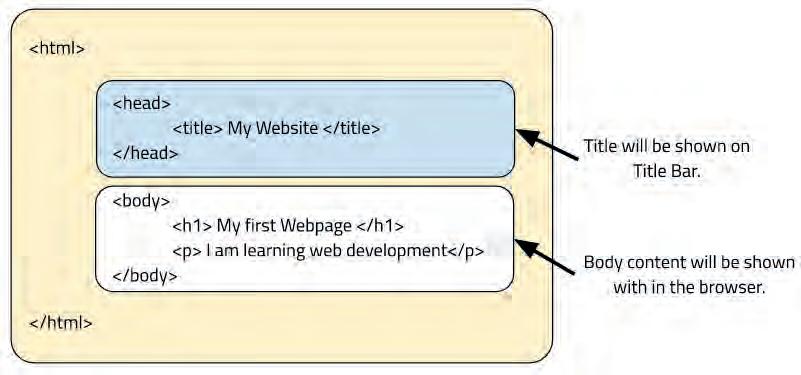
<html> </html> holds all other HTML elements.
<head> </head> stores all the information about the webpage. It contains the metadata (data about the data) of an HTML document but is not displayed on the page. The <head> tag is placed after the <html> tag and before the other tags.
<title> </title> defines the title of the document. The title is shown in the browser’s title bar or in the page’s tab.
<body> </body> contains all the contents of an HTML document. There can only be one <body> element in an HTML document.
Heading Tags HTML heading tags are used to add headings and subheadings to the content you want to display on a webpage. HTML has six levels of headings, from <h1> to <h6>. The <h1> heading tag is used to add the most important and heavy heading in the content. The <h6> heading tag is used to add the least important and lightest heading in the content.
<p> </p> is the paragraph tag that is used to add a paragraph.
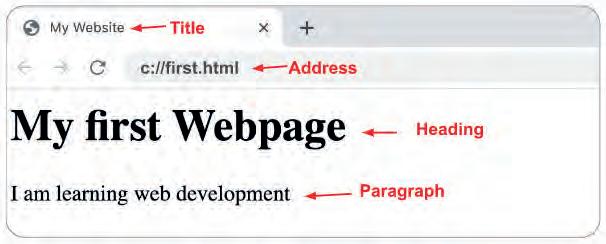
The structure of an HTML document mainly includes the head and body sections. The title added inside the head tag will be shown on the Title bar and the content added inside the body tag will be visible inside the browser.
We have already seen the basic tags that we need to make a website. To format text in an HTML document, we have the following tags:
Tag Purpose Example Output
<b> </b> Displays text in bold <b>smartest</b> smartest
<i> </i> Makes text italic <i>smartest</i> smartest
<u> </u> Underlines the text <u>smartest</u> smartest
Unpaired Tags are the HTML elements without closing tags.
Tag Purpose
<br> Inserts a single line break
<hr> Adds a horizontal line to separate the information
Title will be shown on the Title Bar. Body content will be shown within the browser.The <img> tag is used to add an image in an HTML document.
It carries the following two attributes:
1. src: src stands for source. The src attribute is used to provide the location of an image to be added.
Example: …./images/apple.jpg
2. alt: alt stands for alternative. The alt attribute is used to display alternative text describing the image, for times when the image does not load on the webpage.
This can happen in the following cases:
● The image is missing from the location
● The image name is incorrect
● Slow internet connection
● Access restricted to the file
It is also useful for visually impaired people who use screen-reader software.
Syntax:
<img src = "URL of the image" alt = "alternate text">
Note: The <img> tag is one of the unpaired tags.
<h2>A classroom</h2>
<img src="classroom.jpg" alt="classroom image">

On a web page, a hyperlink (or link) is an element, like a text or a button, that points to another location. Both images and text can be used to create a hyperlink.
The anchor <a> tag is used to create a link, and the href attribute of the <a> tag tells the browser about the destination of the link.
The anchor <a> tag has a closing </a> tag. The text between the opening and closing <a> tags is displayed on the browser as a link.
Syntax:
<a href="url" >Link Text</a>
<h2>HTML Links</h2>
<a href="https://en.wikipedia.org/wiki/HTML">Know more about HTML</a> </body> </html>
HTML Links
Know more about HTML
The target attribute determines where the linked web page or document should open. It can have the following values:
_blank: The linked web page will open in a new tab or window.
_self: The linked web page will open in the same tab that we are currently in.
Syntax:
<a href="url" target="_blank"> Link Text </a>
<!DOCTYPE html> <html> <head> <title>
HTML target Attribute
</title> </head> <body> <center>
<a href="https://www.tekie.in/" target="_blank">Tekie </a> </center> </body> </html>
Lists
A list represents information in bullet points. In HTML, we can create two types of lists: ordered and unordered.
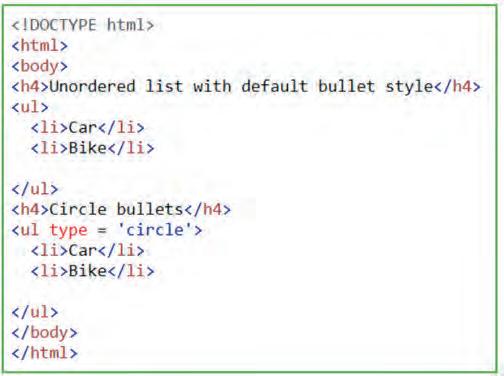
Unordered Lists
An unordered list is a list of items without any order.
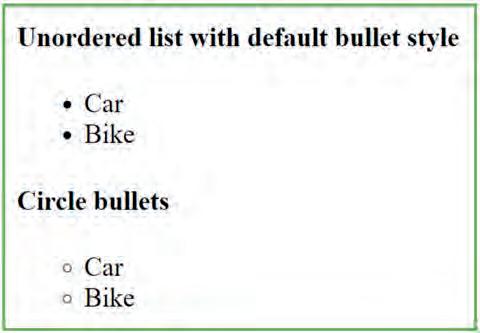
The <ul> tag is used to create an unordered list. Each list item is added within a <li> and </li> tag.
Unordered list items are displayed with a bullet. The default bullet is a dot, which is a small black circle.
We can change the bullets with other styles available, such as a circle or a square.
Syntax:
<ul type = 'circle'>
<li>item 1</li>
<li>item 2 </li>
</ul>
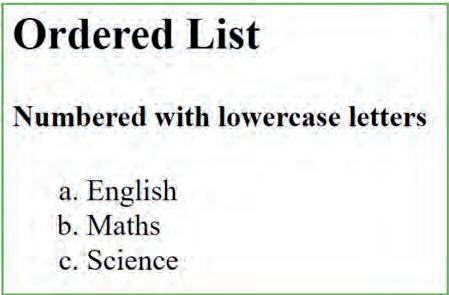
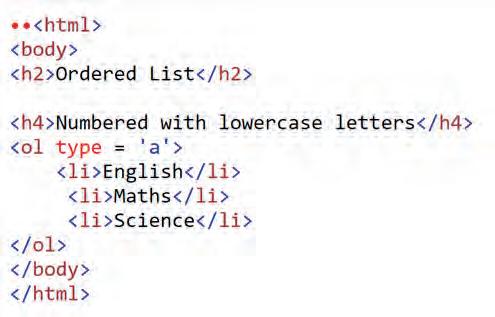
An ordered list is a list of items arranged in a numbered order. We use the <ol> tag for creating an ordered list.
The type of numbering of the list items can also be changed, like numbers, letters, roman numerals, and so on. This can be specified in the <ol> tag’s type attribute.
Syntax: <ol type = "a">
<li>item 1</li>
<li>item 2 </li> </ol>
type=“1” The list items will be numbered with number (default)
type=“A” The list items will be numbered with uppercase letters
type=“a” The list items will be numbered with lower letters
type=“I” The list items will be numbered with uppercase roman numbers
type=“i” The list items will be numbered with lower roman numbers
We can also reverse the ordered list using the reversed attribute of the <ol> tag.
Syntax:
<ol type='1' reversed> <li>item X</li> <li>item Y </li>
2. item X
1. item Y
The id attribute is used to identify the HTML elements in a web page uniquely. The id attribute specifies a unique identifier for an HTML element. The value of the id attribute must be unique within the HTML document.
Syntax:
<h1 id="id_name"> My Header </h1>
Bookmarking
HTML hyperlinks can be used to create bookmarks across a page. This is helpful when a page is very long and we want the user to jump directly to a specific part of the page.
To create a bookmark, we first need to create a link using the <a> tag, and then inside the href attribute, we write # followed by the id of the HTML element we want the user to jump to. The id acts like the address of each tag.
Syntax:
<a href = "#C10"> Jump to Chapter 10 </a> …..
<h2 id = "C10"> Chapter 10 </h2> CSS
CSS stands for “Cascading Style Sheets”. CSS is used to define styles for your web pages. To add CSS to our web page, we use the <style> tag inside the <head> tags of an HTML page. We add different CSS properties for each HTML element within these <style> tags.
Now that we know how to add CSS to our HTML, let’s learn about the following properties of CSS:
1. font size: The font-size property sets the size of the text. We use pixels (px) as the unit for font size.
2. background-color: The background-color property sets the background color of the element.
3. color: The color property sets the font color of an element.
Syntax: <style> body{ font-size:30px; background-color: lavender; color: crimson; }

</style>
Hex codes are another method of representing the color format that a computer can read and display.
HEX codes start with a “#” and are followed by six alpha-numeric characters. Since these are hexadecimal characters, each character ranges from 0 to 9, or A to F. In HTML, a color can be specified using a hexadecimal value in the form:
#rrggbb
Where rr (red), gg (green) and bb (blue) are hexadecimal values between 00 and ff.
# rr gg bb
● The first two characters in the hex code represent the intensity of the red color.
● The 3rd and 4th characters together represent the intensity of green.
● The last two characters represent the intensity of blue.
The hex code for black is #000000 and for white it is #FFFFFF.
The <div> tag defines a division or a section in an HTML document. The <div> tag is used as a container for HTML elements - which is then styled with CSS.
The <div> tag is styled by using the class or id attribute.
Syntax: <style>
.myDiv {
border: 5px outset green;
background-color: lightgreen;
text-align: center; } </style>
<div class="myDiv">
<h2>This is a heading in a div element</h2>
<p>This is some text in a div element.</p>
</div>

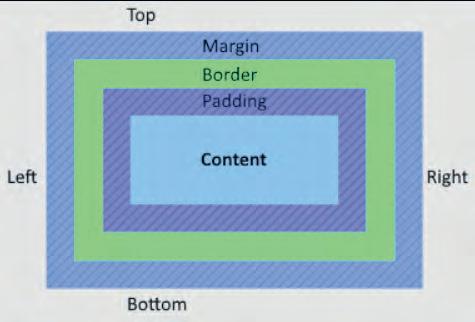
The CSS margin properties are used to create space around elements. It is completely transparent and doesn’t have any background color. It clears an area around the element.
Syntax:
<style> h1 { color:#F4A896; background-color:#358597; margin:40px; }
</style>
Padding is used to create space around an element’s content, inside of any defined borders. It is affected by background colours.


Syntax:
<style> h1 { color:#F4A896;
background-color:#358597; padding:40px; border: 2px solid black; }
</style>
We can change the horizontal placement (alignment) of the text in an element using the text-align property. We can align the text in the Center, Left or Right.
Syntax:
text-align : left;
Example
<html> <head> <style>
</head> <body>
</body>
Styling Images
h2 {text-align:left;}
h3 {text-align:center;}
h4 {text-align:Right;} </style>
<h2> Left </h2>
<h3> Center </h3>
<h4> Right </h4>
The widthandheight Properties
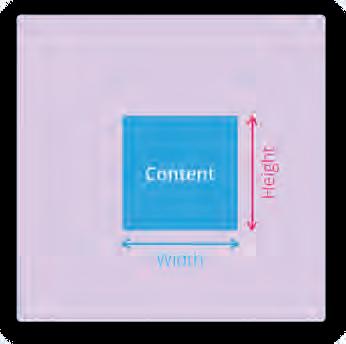
The width and height properties help us resize an image on the webpage.
Syntax: <style> img { width:500px; height:300px; }
</style>
Note: Width and height values are specified in pixels (px).
The CSS float property specifies how the image should be aligned (positioned) on the webpage.
It has two values - left and right. By default, the value of float is left.
Syntax: <style> img{ float:right; } </style>
Classes allow us to name or label the HTML elements with some meaningful name. Every HTML element can have a class attribute. It allows us to identify particular elements and what they are designed for.
Multiple HTML can share the same class name. By making elements part of the same class, we can apply the same styling to all the labelled elements at once in CSS.
Syntax to add class to any html element
<div class = "class-name">
</div>
Syntax to style a class in CSS
.class-name { }
Note: To refer to the class name for styling, write a dot (.) followed by a class name.
Border-style Property specifies the kind of border to display. There can be different styles of border, such as solid, dashed, or double.
Border-width Property sets the thickness of an element’s borders. Its value is specified in pixels.
Border-color Property sets the color of an element’s border.
border-style: value;
border-width: value;
1. Make a division and name its class as “border-properties”.
Design the div using the following instructions.
a. Add <h2> tag with “CSS Border properties” as text in it.
b. Set the border style to dashed.
c. Set border width to 20px.
d. Set the border colour to #FFC000.
e. And border radius to 20px.
2. Make an ordered list of your favourite pastimes. Design the list using the following instructions:
a. Number the list with lowercase letters.
b. Add an image of one of your hobbies.
c. Display two of your hobbies in bold.
d. Display two of your hobbies in Italics.
e. Underline the hobby you have recently participated in.
The HTML tables allow us to display content as a grid. Web developers can organise data such as text, images, links into rows and columns of cells using HTML tables.
The basic HTML table structure can be created using the four tags.
1. <table> defines the HTML table.
2. <tr> creates the table rows.
3. <th> creates the header cells.
4. <td> creates the data cells.
The elements under <td> are left-aligned by default.
All HTML table tags must be closed.
Let’s understand various elements of the HTML table.
The <table> tag is used to create a table. It is a paired tag. The <table> tag is the opening tag and </table> is the closing tag. This tag holds all the table tags that define the table structure.
Syntax:
<table> …. </table>
In <tr> tag, tr stands for table row. Each row starts with a <tr> and ends with a </tr> tag. A table can have as many rows as we like.
Syntax:
<tr> …. </tr>
Each table cell is defined with an opening and closing <td> tag. td stands for table data. Any type of HTML element, such as text, images, lists, and links, can be included in a table cell.
A simple table with two rows and two columns can be created with the code above.
In <th> tag, th stands for table header. Table heading is defined using an opening and closing <th> tag. We use <th> tag instead of the <td> cells to add a header to our table columns.
Generally, the top row will be the table heading. If not, we can use the <th> element in any row. Headings are in bold and centre-aligned by default.
Syntax:
<th> …… </th>
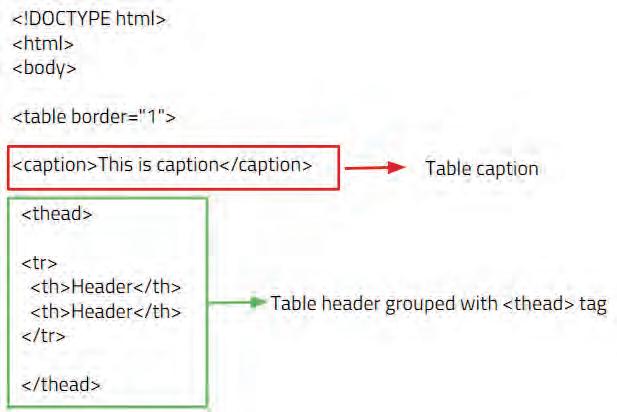
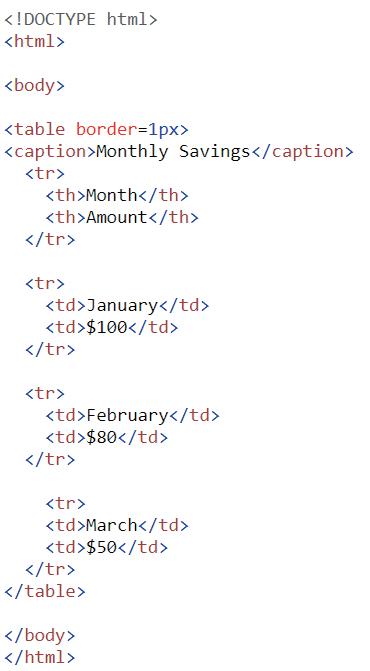
The table caption is defined with an opening and closing <caption>tag. It must be added right after the <table> tag. A table caption will be centred above a table by default.
Syntax: <caption> Table Caption </caption>
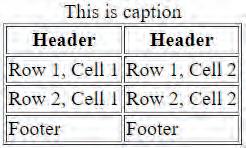
The <thead>, <tbody>, and <tfoot> Tags
The <thead> element along with <tbody> and <tfoot> are used to specify each part of an HTML table as header, body, and footer. There must be at least one “tr” tag inside the “thead” element.
Syntax: <thead> <tr> </tr> </thead> <tbody> <tr> </tr> </tbody>
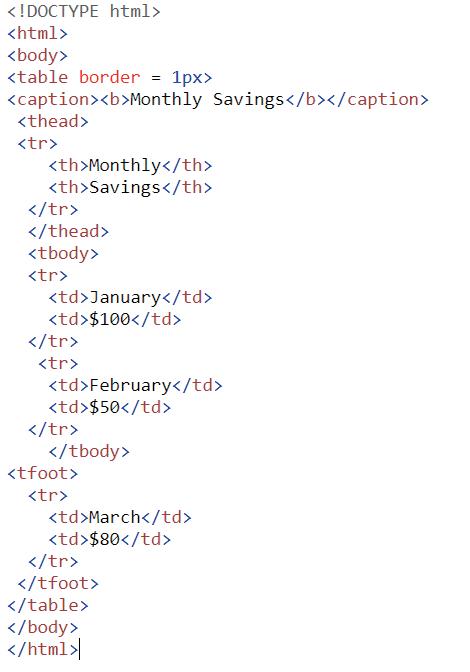
Let’s look at an example to understand these tags better:
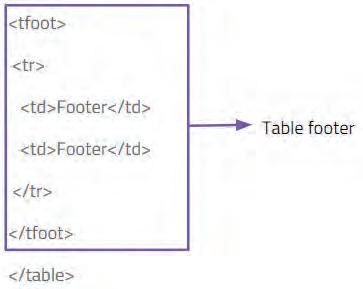
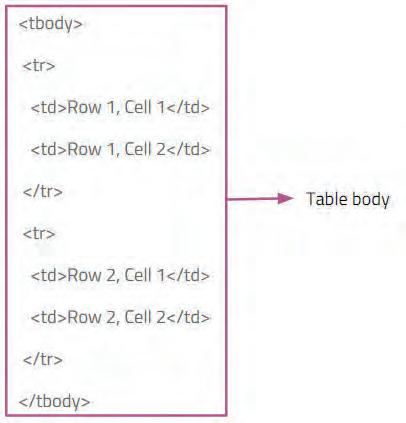
This code generates a table with two rows in the body, two columns, a header row, and a footer row with two headings each. OUTPUT
The table’s appearance and layout can be customised using CSS styling.
Solved Examples
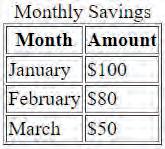
1. Create an HTML table for your monthly savings from January to March. Add a suitable caption to your table.
Solution
1. Create an HTML table with five of your favourite pastimes and how much time you spent on each last week. Add the table headings and a suitable caption. Represent the total amount of time spent in the footer.
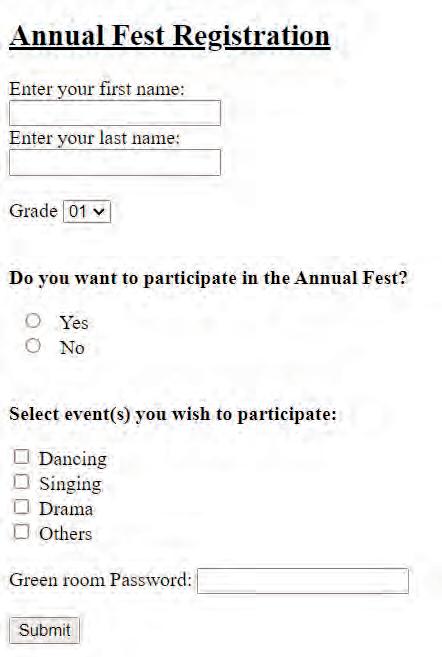
Forms are commonly used for registration, logging into an online profile, creating an online profile, and so on.
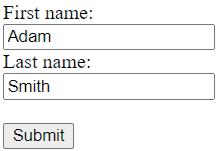
An HTML form is used to collect user input. A form collects a variety of data, including name, email, address, and contact information.
Example: A form to collect your first name and last name would look like this:
In HTML, a form is created using <form> tag.
Syntax: <form> Form content . </form>
We can use a variety of elements inside the <form> tag, such as text fields, text areas, drop-down lists, select, checkboxes, radio buttons, etc.
The action attribute defines where to send the form data when a form is submitted by the user.
Syntax:
The elements of a form are as follows:
The <input> tag specifies an input field where the user can enter data. The ‘input’ element of HTML is the most popular form element.
Syntax:
<input type="text" id="id name" name="id name">
Each input field must have a name attribute. If the name attribute is omitted, the value of the input field will not be sent in the backend. Depending on the type attribute, there are various ways that an <input> element can be displayed.
Some Input Types
Type
Function
<input type=”text”> Displays an input field (single line)
<input type=”button”> Displays a clickable button
<input type=”radio”> Shows a radio button so that you can choose one from a variety of options
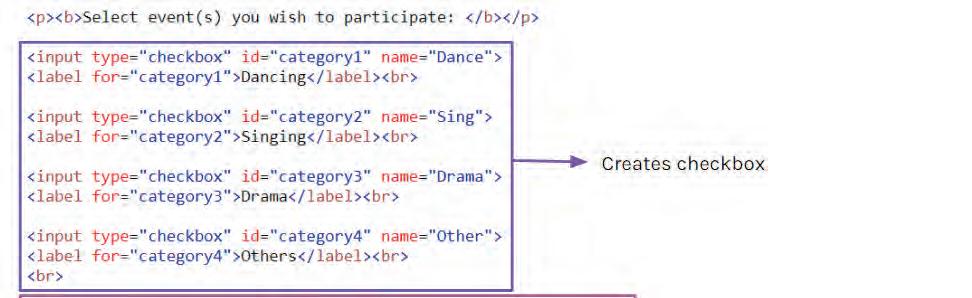
<input type=”checkbox”> Shows a checkbox so that you can select one or more from a variety of options
<input type=”password”> Defines a field where you can enter your password
<input type=”submit”> Displays a button for submitting the form
The <label> tag is used to specify a label for an element. The for attribute of the <label> tag should be equal to the id attribute of the <input> element to bind them together.
Syntax:
<label for= "label name"> Text to be displayed </label><br>
<input type="type of input" id= "label name" name="fname">
The HTML <select> tag is used inside the <form> tag to create a drop-down list. The <option> element is written inside a <select> tag to add options to the list.

Syntax: <select> <option> </option> </select>

Let’s apply your learning to a solved example.
Example
Create a form for the Annual fest registration using the above Form elements.
1. Create a form to login into your email account.
2. Create a form to collect the name, age, and contact number of your family.
Create a slam book to know your friends better using HTML forms. Add different fields to collect their Name, place of birth, section, date of birth, and hobbies. Ask them to enter the name of their best friend if they have one. Make use of suitable form attributes you have learned in this chapter.
JavaScript is a Programming Language also known as the ”programming language of the Web”.
● It is used to add interactivity to the webpage.
● It can update and change both HTML and CSS.
● It can perform calculations and is used to take logical decisions on the webpage.
The <script> tag is used to define JavaScript within the HTML code. The JavaScript code is added between the script elements.
Syntax:
<script>
//JavaScript code goes here
</script>
Variables are like boxes in the computer memory where we can store values and name them as per our choice. Variables label the data with a descriptive name which can be reused multiple times in the program.
Two major ways to define a variable in Javascript are:
i. var keyword: Before creating variables, we have to write the var keyword.
Syntax:
<script>
var num_1 = 90
</script>
ii. const keyword: The values stored in variables marked with const keyword cannot be changed across the program. We cannot redefine or reassign const variables.
Syntax:
<script>
const num_1 = "90"
</script>
1. Data types: The values we store in variables can be of different types like words, numbers, and so on. These different types or categories of values are called data types.
Below are the major data types in JavaScript:
Boolean Any of two values: true or false true, false
Syntax:
<script>
var integerVar = 90
var decimalNum = 9.40
var stringVar = "JavaScript"
</script>
2. document.write(): The document.write() method is used to write some text or HTML elements directly to the HTML output. It displays the values enclosed within the brackets () to the webpage.
Syntax: <script>
var num1 = 10 document.write(num1) document.write("<h2>Hello World!</h2><p>Have a nice day!</p>"); </script>
Example: CODE
1. <script>
2. var num1 = 10
3. document.write(num1)
4. </script> OUTPUT 10
3. typeof(): The typeof() in Javascript is a feature which will return the data type of the variable. It returns the datatype as a string value.
Syntax:
typeof(variable)
Example: CODE
1. <script>
2. var num1 = 10
3. var text = "this is a string"
4. document.write(typeof(num1))
5. </script> OUTPUT number
4. Type conversion: Type conversion is the process of converting data of one type to another, like converting a string into a number or vice versa. In JavaScript, type conversions are done using built-in features such as String() and Number() methods.
i. Number(): Number() method is used to convert the data type of a variable to a number. We put the variable we want to convert inside the brackets.
Syntax:
Number(variable)
ii. String(): String() method is used to convert any type of variable to a string. We put the variable we want to convert inside the brackets.
Syntax: String(variable)
Example: CODE
1. <script>
2. var str1 = "5.56"
3. var num1 = 3.14
4. var str_convert = Number(str1) //conversion to Number
5. var num_convert = String(num1) //conversion to String
6.
7. document.write("str1 had type ",typeof(str1),", was converted to ",typeof(str_convert),"<br>")
8. document.write("num1 had type ",typeof(num1),", was converted to ",typeof(num_convert))
9. </script>
strl had type string, was converted to number num1 had type number, was converted to string
Arithmetic operators are used to perform mathematical operations on numbers or variables that hold values of number type in them.
There are mainly six arithmetic operators in JavaScript:
1. <script>
2. document.write("Addition (5+3): ",5+3,"<br>")
3. document.write("Subtraction (5-3): ",5-3,"<br>")
4. document.write("Multiplication (5*3): ",5*3,"<br>")
5. document.write("Division (5/3): ",5/3,"<br>")
6. document.write("Modulus (5%3): ",5%3,"<br>")
7. document.write("Exponent (5**3): ",5**3,"<br>")
8. </script>
Addition (5+3): 8
Subtraction (5-3): 2
Multiplication (5*3): 15
Division (5/3): 1.6666666666666667
Modulus (5%3): 2
Exponent (5**3): 125
The JavaScript Math library provides several features and functions to perform simple and complex mathematical operations.
1. Maximum and Minimum: We can find the maximum and minimum from a group of numbers using the max() and min() functions.
Syntax:
<script>
var max_num = Math.max(var1,var2,var3,...)
var min_num = Math.min(var1,var2,var3,...) </script>
Example: CODE
1. <script>
2. var max_num = Math.max(1,5,6,7,9,4)
3. var min_num = Math.min(1,0,4,9,10)
4. document.write("<h2>Maximum and Minimum</h2>")
5. document.write("Maximum number from (1,5,6,7,9,4) is: " ,max_num, "<br>")
6. document.write("Minimum number from (1,0,4,9,10) is: " ,min_num)
7. </script> OUTPUT
Maximum and Minimum
Maximum number from (1,5,6,7,9,4) is: 9
2. Math.random(): Math.random() is used to generate a random number. It generates a random number between 0 and 1, both inclusive.
Syntax: <script> var randomNum = Math.random() </script>
Example:
Minimum number from (1,0,4,9,10) is: 0 CODE
1. <script>
2. document.write("<h2>Random number generation</h2>")
3. var randomNum = Math.random()
4. document.write(randomNum)
5. </script> OUTPUT
Random number generation
0.18548742479619973
3. Math.round(): Math.round() is used to round off decimal numbers to the nearest integer. For e.g. 5.49 is rounded down to 5 and 5.5 will be rounded up to 6.
Syntax:
<script>
var roundedNum = Math.round(Number_Value)
</script>
4. Math.floor(): Math.floor() is used to round down a number to the nearest integer. That means it will be rounded to the nearest lower integer number.
Syntax:
<script>
var floorNum = Math.floor(Number_Value)
</script>
Example: CODE
1. <script>
2. document.write("<h2>Math.round() function</h2>")
3. var num1 = 4.3
4. var rounded1 = Math.round(num1)
5. document.write("4.3 rounded off we get: ",rounded1,"<br>")
6. var num2 = 4.5
7. var rounded2 = Math.round(num2)
8. document.write("4.5 rounded off we get: ",rounded2,"<br>")
9.
10. document.write("<h2>Math.floor() function</h2>")
11. var num1 = 45.95
12. var floor1 = Math.floor(num1)
13. document.write("45.95 floored off we get: ",floor1,"<br>")
14. </script> OUTPUT
4.3 rounded off we get: 4
4.5 rounded off we get: 5
45.95 floored off we get: 45
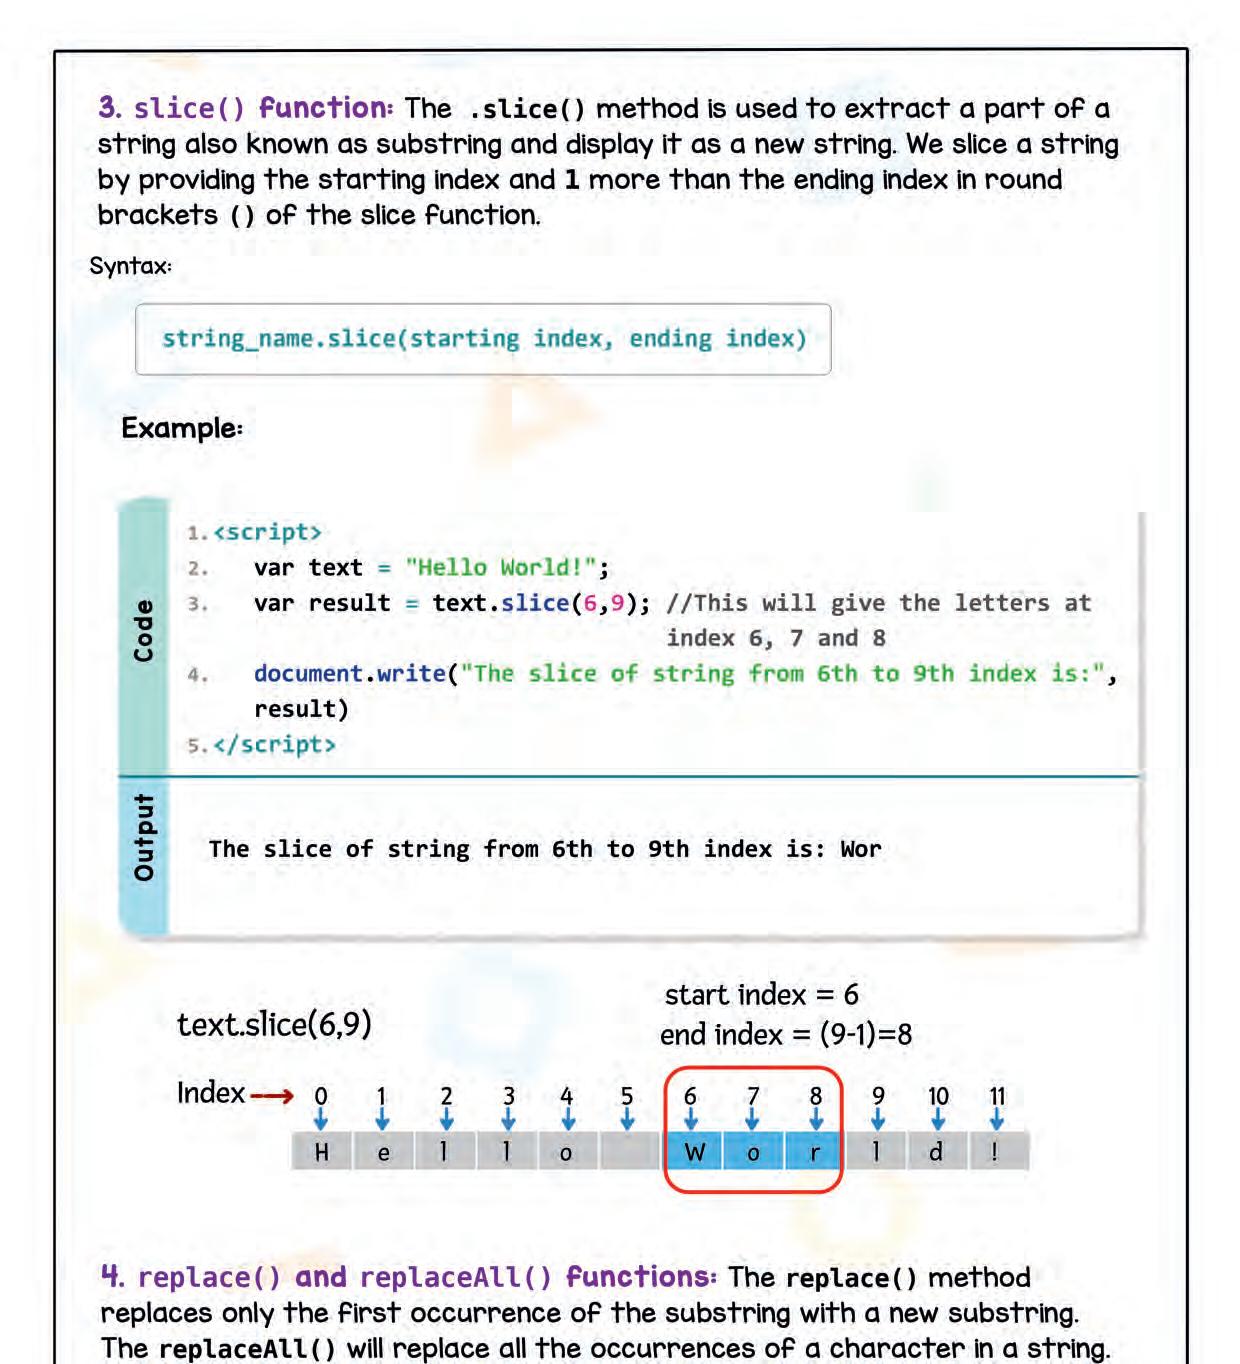
1. String index: Each character in a string is given a number in JavaScript. It’s known as an index.
2. indexOf() function: indexOf() function is used to get the index number of a particular character in a string.
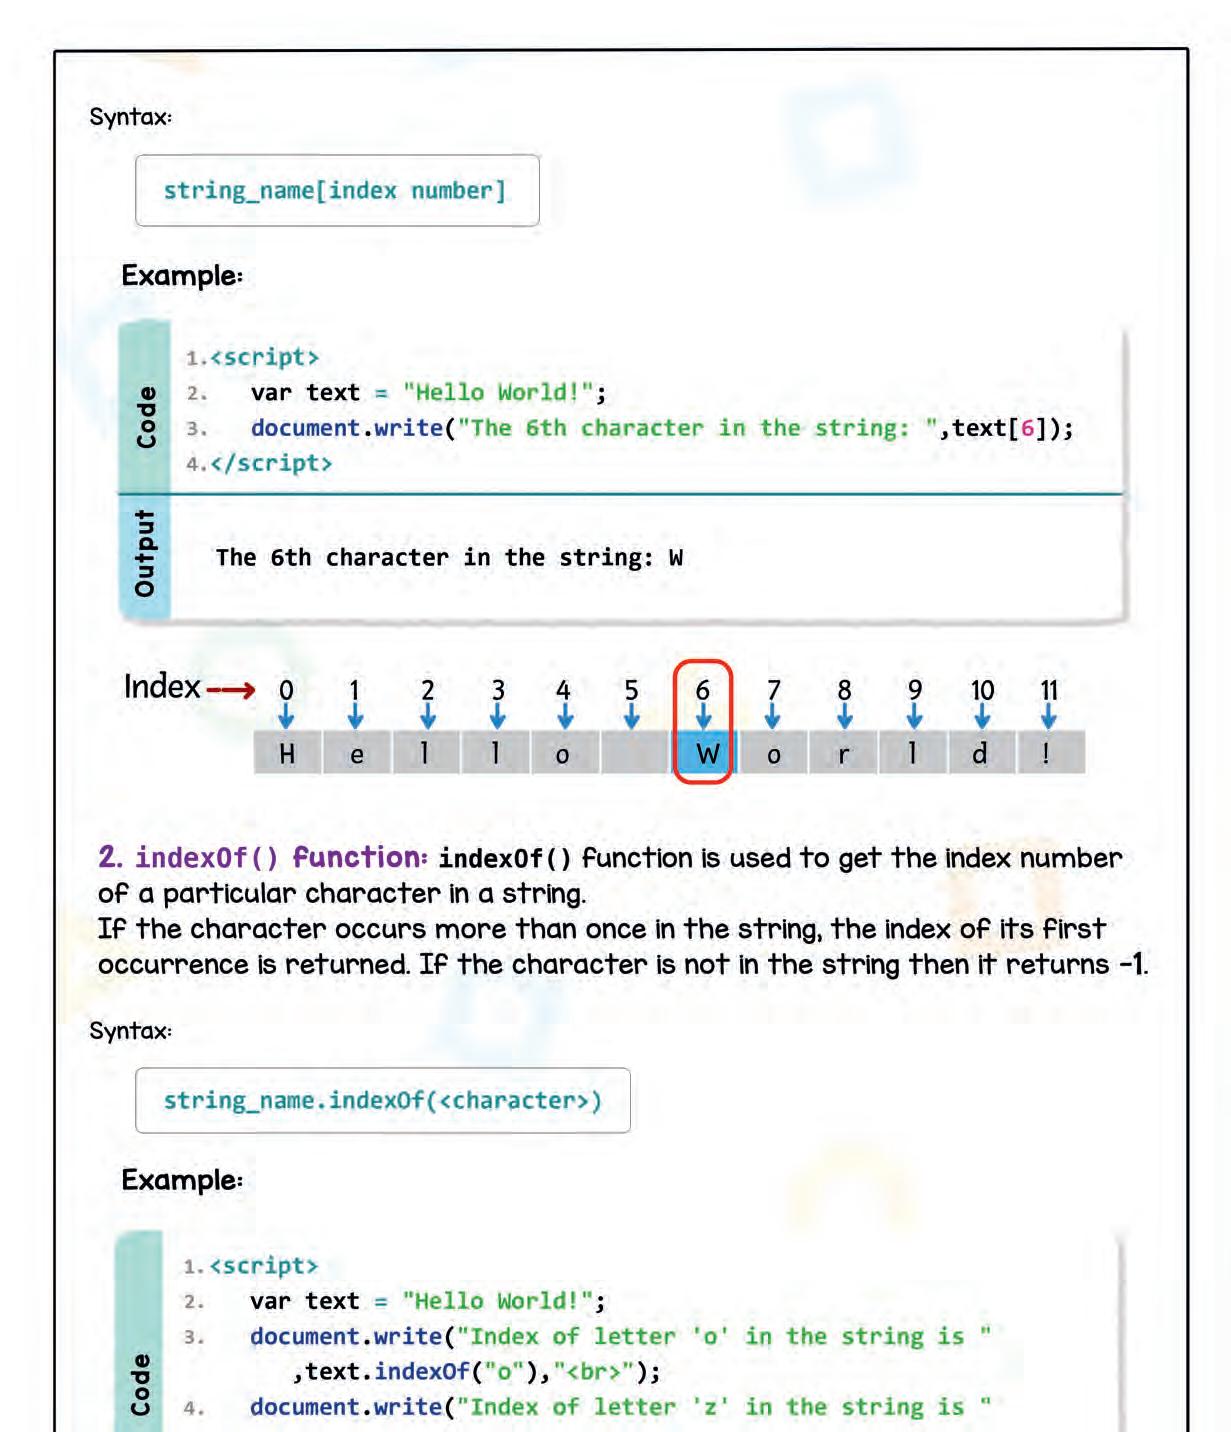
If the character occurs more than once in the string, the index of its first occurrence is returned. If the character is not in the string then it returns -1.
Syntax:
string_name.indexOf(<character>)
1. <script>
2. var text = "Hello World!";
3. document.write("Index of letter 'o' in the string is" ,text.indexOf("o"),"<br>");
4. document.write("Index of letter 'z' in the string is" ,text.indexOf("z"));
5. </script>
4. replace() and replaceAll() functions: The replace() method replaces only the first occurrence of the substring with a new substring. The replaceAll() will replace all the occurrences of a character in a string.
Syntax:
string.replace('oldWord', 'newword')
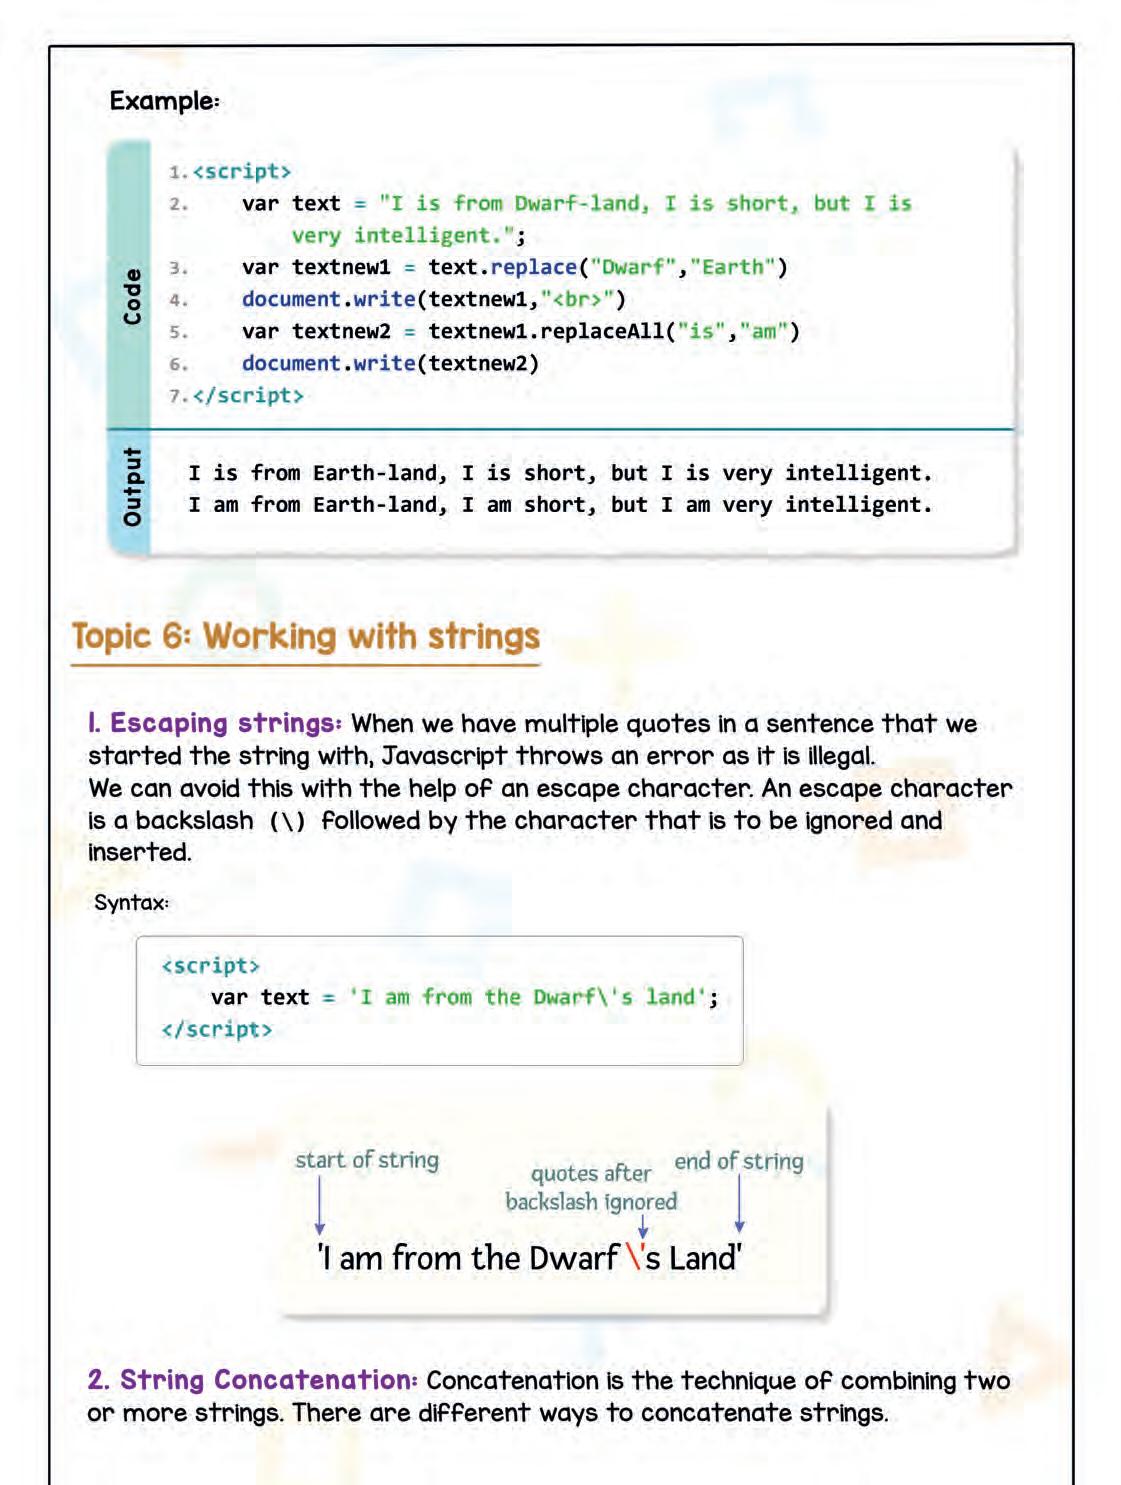
Example: CODE
<script>
document.write("<h2>String concatenation using '+' operator</h2>")
var text1 = "I am from the Dwarf\'s land.";
var text2 = "Where are you from?";
document.write(text1 + " " + text2) ;
</script>
I am from the Dwarf’s land. Where are you from?
ii. Concatenating using concat() method: We can use .concat() method to join two or more strings by passing the new strings to be joined within the brackets. The concat() function returns a new string and does not change the original string.
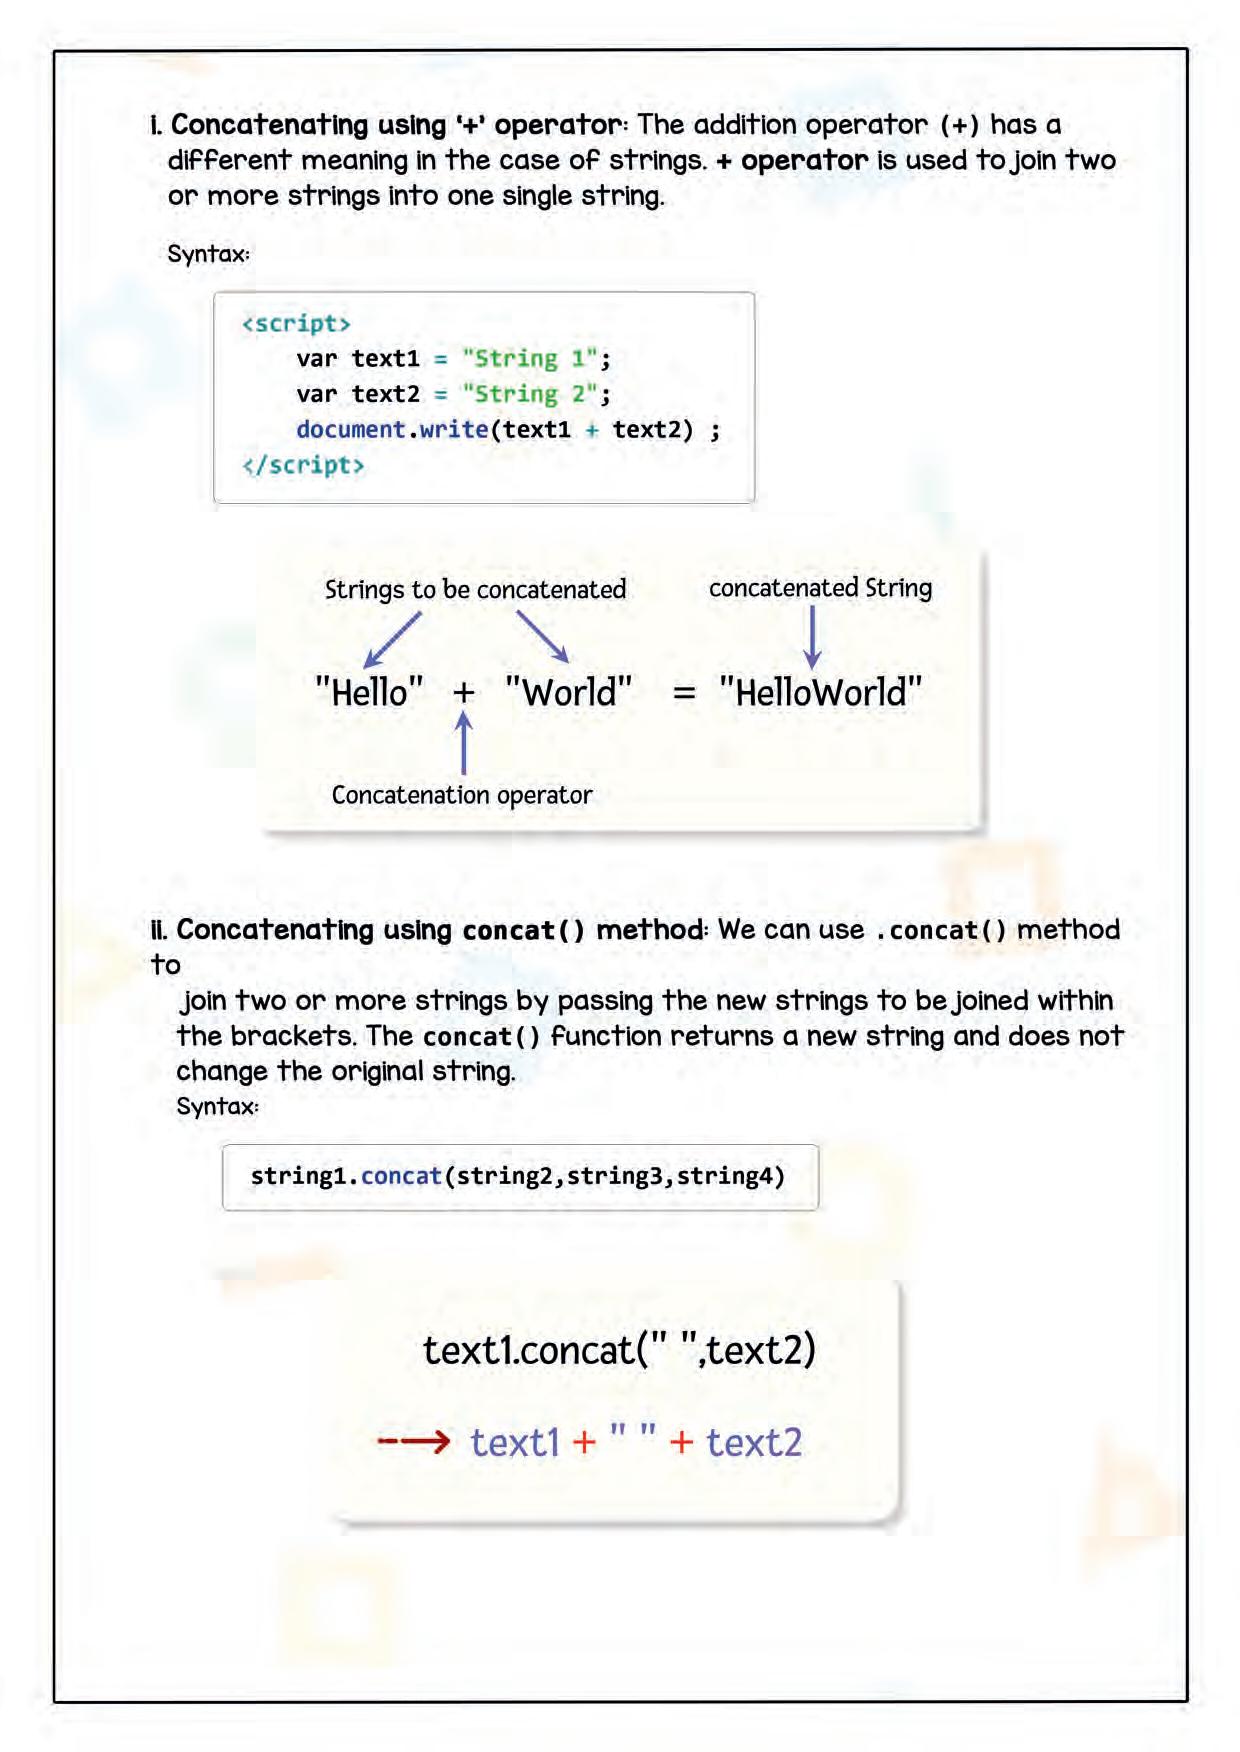
Syntax:
string1.concat(string2,string3,string4)
4. var text2 = "Where are you from?";
5. document.write(text1 + " " + text2);
6. document.write("<h2>Concatenating using concat()</h2>") newstring = text1.concat(" ",text2)
//Here, we are adding the " " and text2 with the variable text1 using the concat() document.write(newstring); </script>
I am from the Dwarf’s land. Where are you from?
I am from the Dwarf’s land. Where are you from?
3. Length method: .length property helps us calculate the number of characters in a string. Spaces are counted as characters too.
Syntax: <script> document.write(text.length); </script>
Example:
1. <script>
2. document.write("<h2>JavaScript Strings's Length</h2>")
3. var text = "JS is fun";
4. document.write(text,"<br>")
5. var len = text.length
6. document.write("Length of the string is: ",len);
7. </script>
JS is fun
Length of the string is: 9
4. toLowerCase() and the toUpperCase() functions: We can change the strings to either uppercase or lowercase using these two functions.
● toLowerCase() is used to convert all the characters in string to lowercase.
● toUpperCase() is used to convert all the characters in string to capital letters.
Syntax:
<script> ... var result_upper = text.toUpperCase(); var result_lower = text.toLowerCase(); </script>
Example: CODE
1. <script>
2. document.write("<h2>Upper and Lower case strings</h2>")
3. var text = "Hello World!";
4. var result_upper = text.toUpperCase();
5. var result_lower = text.toLowerCase();
6. document.write(result_upper + "<br>");
7. document.write(result_lower); </script>
<html> <head>
<title>Report Card</title>
<style>
body { background-color: #20212C; height:700px;
}
.header { text-align:center; color:#FFFFFF; }
.info-box { height:160px; width:80%; margin:auto;
.info-left { float:left; width:25%; background-color:#FF7465; color:#FFFFFF;
.info-right {
float:right; width:75%;
background-color:#EDE6E4; color:#20212C;
.info-p { margin-left:10px; font-size:20px; }
.report{
height:230px; width:80%;
text-align:center; margin:auto; font-size:20px; }
.left { margin:auto; float:left; width:45%;
.right { float:right; margin:auto; width:45%;
}
.title { height:35px; background-color:#FF7465; color:#FFFFFF; line-height:30px; }
.items{ height:210px; background-color:#EDE6E4; color:#20212C; }
.calculation{ width:80%; margin:auto; margin-top:50px; font-size:20px; color:#FFFFFF;
.total { float:left; }
.percentage { float:right; margin-right:15%; } hr { margin:30px; }
</style>
<script>
var math=96; var english=99; var science = 93 var socialStudies=94;
</script>
</head>
<body>
<div class='header'>
<h1> My Report Card </h1>
</div>
<div class='info-box'>
<div class='info-left'>
<p class='info-p'>
Name: <br><br>
Grade: <br><br>
School: <br>
</p>
</div>
<div class='info-right'>
<p class='info-p'>
Emily Anna <br><br>
8 <br><br>
John's Secondary School <br>
</p>
</div>
</div>
<hr>
<div class='report'>
<div class='left'>
<div class='title'>
Subject <br><br>
</div>
<div class='items'>
<br>
Math <br><br>
English <br><br>
Science <br><br>
Social Studies <br>
</div>
</div>
<div class='right'>
<div class='title'>
Marks <br><br>
</div>
<div class='items'>
<script>
document.write("<br>"+math);
document.write("<br><br>"+english);
document.write("<br><br>"+science);
document.write("<br><br>"+socialStudies);
</script>
</div>
</div>
</div>
<div class='calculation'>
<p class='total'>
<script>
document.write("<u>Total Marks</u>: " + (math+english+science+socialStudies));
</script>
</p>
<p class='percentage'>
<script>
In any programming language, the code needs to make decisions and carry out actions. Decision-making, as the name suggests, is making decisions based on certain conditions. To write these conditions we need to use comparison and logical operators in JavaScript.
1. Comparison operators: Comparison operators compare the value on the left-hand side with the value on the right-hand side and return either true or false as the result of the comparison. These operators are also known as relational operators. For comparison operators we can use this:
Difference between double equal-to (==) and triple equal-to (===)
‘==’ in JavaScript is used to compare two values and check if they have the same value or not irrespective of the data type. It ignores the data type of the variable.
Syntax:
document.write(<value1> == <value2>)
”===” in JavaScript is used to compare two values and check if they have the same value as well as the same datatype. This operator is also known as strict equal to.
Syntax:
document.write(<value1> === <value2>)
Example:
1. <script>
2. var num_1 = 50;
3. var num_2 = "50";
4. var num_3 = 50;
5. // comparing with ==;
6. document.write("num_1 and num2 has same value? - " ,num_1 == num_2, "<br>");
7. // comparing with ===;
8. document.write("num_1 and num_2 has same value and datatype? - ",num_1 === num_2, "<br>");
9. document.write("num_1 and num_3 has same value and datatype? - ",num_1 === num_3);
10. </script>
num_1 and num2 has same value? - true num_1 and num_2 has same value and datatype? - false num_1 and num_3 has same value and datatype? - true
2. Logical operators: Logical operators are used to compare two or more conditions, which are formed using the comparison operators. We get a boolean value (true or false) as output after comparing these conditions.
The operators include: AND, OR, NOT
i. AND operator (&&): The AND operator compares two conditional statements and returns true only if BOTH the statements are true, else it returns false in all other cases.
Syntax: Statement1 && Statement2
Example:
1. <script>
2. var x = 6;
3. var y = 3;
4. document.write("Is (6 < 10) AND (3>1): ",(x < 10 && y > 1), "<br>");
5. document.write("Is (6 < 10) AND (3<1) : ",(x < 10 && y < 1));
6. </script> OUTPUT
Is (6 < 10) AND (3>1): true
Is (6 < 10) AND (3<1): false
ii. OR operator: The OR operator compares two conditional statements and returns true if any one of the statements is true. It returns false if both conditional statements are false
Syntax:
Statement1 || Statement2
CODE
1. <script>
2. var x = 6;
3. var y = 3;
4. document.write("Is (6==5) OR (3==5)? - ", (x == 5 || y==5) ,"<br>");
5. document.write("Is (6==0) OR (3==3)? - ",(x == 0 || y==3) ,"<br>");
6. document.write("Is (6==6) OR (3==3)? - ",(x == 6 || y == 3));
7. </script> OUTPUT
Example: iii. NOT operator (!): The NOT operator performs a negation on a statement. The boolean value gets inverted.
The NOT operator changes a true statement to false and a false statement to true.
Syntax: !(Statement1)
Example:
1. <script>
2. var x = true;
3. var y = false;
4.
Is (6==5) OR (3==5)? - false Is (6==0) OR (3==3)? - true Is (6==6) OR (3==3)? - true CODE
5. document.write("NOT of true is - ",!(x),"<br>");
6. document.write("NOT of false is - ",!(y), "<br>");
7. </script> OUTPUT
NOT of true is - true
NOT of false is - false
Conditional statements are used to decide which part of the code is executed based on whether a condition is true or false.
1. if...else statement: Using if-else, we can make decisions based on certain conditions. When the condition is true, the statements in the if block are executed. When the condition is false, the if block is ignored and statements in the else block get executed.
Syntax:
<script>
if (condition1) { //Statements to execute //after condition1 is True
} else { //Statements to execute //after condition1 is False
</script>
Example:
<script>
document.write("<h2>JavaScript. If..else condition.</h2>") var required_IQ = 70; var person_IQ = 120;
if (person_IQ >= required_IQ){ document.write("IQ greater than 70. You are eligible!")
} else{
document.write("IQ not greater than 70. You are not eligible!")
</script>
JavaScript. If ..else condition.
IQ greater than 70. You are eligible!
2. If...else-if...else statement: In Javascript, we use the if..else-if...else statements to check multiple conditions one after the other. Javascript starts evaluating from the if condition and checks all the elseif conditions one after the other until it finds a true condition. If none of the conditions are true, the else block is executed.
Syntax: if (condition1) { //Statement1
} else if (condition2) { //Statement2 } else if (condition3) { //Statement3 } .. .. .. else { //FinalStatement
Example:
1. <script>
2. var dwarf_score = 4;
3. var elves_score = 4; 4. if (dwarf_score > elves_score){
5. document.write("Dwarves won the match!");
6. }
7. else if (dwarf_score == elves_score){
8. document.write("It's a draw"); 9. } 10. else{ 11. document.write("Elves won the match"); 12. } 13. </script>
It’s a draw
3. Ternary operator: Ternary operator is a short way to create an if-else statement and is frequently used as an alternative to if-else statements.
We write a condition followed by a question mark (?) symbol, after which we write two expressions which are executed if the condition is evaluated as true and false respectively. The two expressions are separated with a colon (:) symbol.
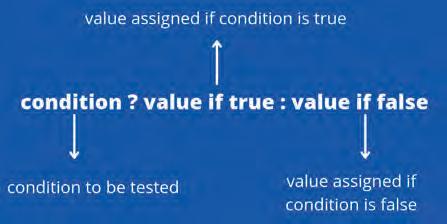
Syntax: condition ? <expression if true> : <expression if false>
Example:
1. <script>
2. var num = 5
3. num > 0 ? document.write("Positive Number"):
4. document.write("Negative number")
5. </script>
Positive Number
4. Nested if else: Nesting is the process of adding an if-else statement within another if-else. The second statement gets evaluated only when the first condition is true.
The first if statement is commonly called ”outer if” and the block within it is called ”nested / inner if”.
Syntax:
if (condition1) { //outer if statement
if (condition2) { //inner if statement StatementA
} else { StatementB
Example:
1. <script>
2. document.write("<h2>Javascript Nested if-else</h2>")
3. var order_pizza = "Yes"
4. var pizza_type = "Cheese pizza"
5. if (order_pizza == "Yes"){ // Outer if
6. if (pizza_type == "Veggie pizza"){ // Inner if
7. document.write("Veggie pizza for one.")
8. }
9. else if (pizza_type == "Cheese pizza"){ // Inner else-if
10. document.write("Cheese pizza for one")
11. }
12. else{// Inner else
13. document.write("We don't serve this pizza")
14. }
15.
16. }
17. else{//Outer else
18. document.write("No pizza then")
19. }
20. </script>
Javascript Nested if-else
Cheese pizza for one
5. Conditions and functions for strings: Any function or a feature that returns a boolean value (true/false) can be used along with if-else statements to check certain conditions. Some of these useful functions are given below:
I. includes() method: It checks whether a substring specified within the brackets () is present inside a string or not. It returns true if the substring is present and false otherwise.
Syntax:
text.includes (<substring>)
Example:
<script>
document.write("<h2>Javascript includes() function</h2>")
var text = "Cheese is my favorite." if (text.includes("Cheese")){ document.write("Found it! Cheese is present in the string.")
} else{
document.write("Sorry! String doesn't include Cheese.")
}
</script>
Javascript includes() function
Found it! Cheese is present in the string.
ii. startsWith(): It checks if a string starts with a specified character, word, or a substring or not.
It returns a boolean value.
Syntax:
variable_name.startsWith(<character>)
Example: CODE
1. <script>
2. var text = "Cheese is my favorite."
3. document.write("<h2>Javascript includes() function</h2>")
4. if (text.includes ("Cheese")){
5. document.write("Cheese is present in the string.")
6. }
7. else{
8. document.write("String doesn't include Cheese.")
9. }
10. document.write("<h2>Javascript startsWith() function</h2>")
11. if (text.startsWith("Cheese")){
12. document.write("String starts with the word Cheese"
13. ,"<br>")
14. }
15. else{
16. document.write("String does not start with the word
17. Cheese","<br>")
18. }
19. </script> OUTPUT
Cheese is present in the string.
String starts with the word Cheese
1. prompt() function: To take inputs from a user using JavaScript we use the prompt() method. The prompt() method displays a dialog box that asks the user for an input.
The prompt() method stores the input value into a variable if the user clicks ”OK”.
Note - By default, the input taken using prompt has a String data type.
Syntax: prompt(”<Text to be displayed in the dialog box>”)
Example:
1. <script>
2. var name = prompt("Please enter your name: ")

3. </script>
We use loops to perform a task again and again. Every loop has four parts.
● First, we need a variable to represent a starting point for the loop.
● Second, a condition that decides how many times the loop will run.
● Third, we modify the variable of the loop.
● Fourth, the body of a loop (set of code to repeat).
The two major types of loop in Javascript are while loop and for loop.
1. while loop: The while statement has a condition in it and it creates a loop to execute the statement or a block of code repeatedly as long as the condition evaluates as true. Once the condition becomes false, the loop stops. The while loop is also called a conditional loop.
Syntax:
while (condition) { // code block to be executed }
Example:
1. <script>
2. document.write("<h2>JavaScript While Loop</h2>")
3. var i = 1 //initializing/starting point of the loop
CODE
4. while (i<=3){ //condition tells how many times loop will run
5. document.write(i, "<br>")
6. i = i + 1 //modifying the value after each loop
7. }
8. </script>
JavaScript While Loop
2. for loop: For loop is also known as the counter loop as in this loop the initialization, condition and updation happens in the same line separated by semicolon.
Syntax: for (initial expression; loop condition; update expression) { // code block to be executed
Example:
1 2 3 CODE
<script>
document.write("<h2>JavaScript for Loop</h2>") for (var i = 1; i <= 5; i=i+1){ document.write(i,"<br>")
JavaScript While Loop
We can use a for loop to loop through each letter in a string as well.
Example:
1. <script>
2. document.write("<h2>JavaScript for Loop on string</h2>")
3. var text = 'Dwarfy' //line1
4. for (var i = 0; i < text.length; i = i + 1) {
5. document.write(text[i], "<br>") //in the first loop, i=0
6. thus text[0] = D is displayed.
7. }
8. </script>
3. Nested loop: Like nested if-else, nesting in loops is a loop inside another looping statement. The first loop is called the outer loop and the loop within it is called the inner loop. In Nested loops, for each time you execute the outer loop the entire inner loop is completely executed for its defined number of times.
For example, if the outer loop runs 3 times and the inner loop runs 5 times, then for all 3 times the outer loop will run, the inner loop will run 5 times. So in total the inner loop block of code runs 3 x 5 = 15 times.
Example: CODE
1. <script>
2. document.write("<h2>JavaScript Nested Loops</h2>")
3. for (var x = 1; x <= 2; x=x+1) { //outer loop
4. for (var y = 1; y <= 3; y=y+1) { //inner loop
5. document.write("x: " + x + ", y: " + y + "<br>"); //Statement
6. } 7. }
8. </script>
x: 1, y: 1
x: 1, y: 2
x: 1, y: 3
x: 2, y: 1
x: 2, y: 2
x: 2, y: 3
4. Break statement: When a break statement is encountered inside a loop, the loop stops immediately and the next statement after the loop is executed.
Syntax: break;
Example:
<script>
document.write("<h2>JavaScript Break Statement</h2>")
text = "Dwarf land"
for (var i = 0; i < text.length; i++){//for loop over the string
var char = text[i]
if (char == " ") { //check if current character is a space break //break statement
}
document.write(char, '<br>')
5. Continue statement: Continue statements break one iteration of a loop if a specific condition occurs, and it moves on to the next iteration.
The continue statement ”jumps over” one iteration in the loop while the break statement ”jumps out” of a loop.
Syntax: continue;
Example: CODE
1. <script>
2. document.write("<h2>JavaScript Break and Continue
3. Statements</h2>")
4. for (var i = 0; i < 100; i++){
5. if (i%2!=0) {
6. continue //continue if i is odd }
7. if (i>10){
8. break //break if i is greater than 10
9. }
10. document.write(i, '<br>') //the value of i only gets printed if it is even and less than 10
11. }
12. </script>
Q. Generate three random numbers between 1 to 100 using the Math library. These are the lucky lottery numbers. Generate a random number for the lottery user too. If the lottery user gets one of the three random numbers, they win a 100$. Else, wish them good luck for the next lottery.
<title>Lucky Numbers</title>
<style>
body {
background-color:#FBEAEB; height:400px;
}
.header{ width:100%; height:5px;
}
.header h1 {
text-align:center;
color: #2F3C7E;
font-size:30px;
.number-boxes { width:100%;
margin:auto; height:70px;
margin-top:10%;
.number-box { width:70px;
height:70px;
background-color:#FFFFFF;
border-radius: 15px;
color: #2F3C7E;
font-size:50px;
text-align:center;
margin-left:15%;
float:left;
.result-box {
width:90%;
height:280px;
margin:auto;
background-color: #F0DADB;
border-radius: 25px; }
.result-box h1
{
font-weight:normal; text-align:center; font-size:30px; color:#333D70; padding-top:10px; }
.result-number-box
{ width:110px; height:90px;
background-color:#FFFFFF; border-radius: 15px; color: #AA1A57; font-size:70px; text-align:center; margin:auto;
.prize h1 {
text-align:center; color:#333D70; font-size:30px; }
</style>
</head>
<body>
<div class="header">
<h1> The 3 Lucky Numbers are : </h1>
</div>
<div class="number-boxes">
<div class="number-box">
<script>
var num1=Math.floor(Math.random() * 100) + 1; document.write(num1);
</script>
</div>
</div class="number-box">
<script>
var num2=Math.floor(Math.random() * 100) + 1; document.write(num2);
</script> </div>
<div class="number-box">
<script>
var num3=Math.floor(Math.random() * 100) + 1; document.write(num3); </script>
</div> </div>
<div class="result-box"> <script>
var choice=Math.floor(Math.random() * 100) + 1; if (choice==num1 || choice==num2 || choice==num3) { document.write('<h1> Congratulations! You got a lucky number</h1> <div class="result-number-box">'+choice+'</div>'); document.write('<div class="prize"> <h1>You win $100!</h1> </div>'); }
else { document.write('<h1> Sorry! You did not win! <br>Your number is</h1> <div class="result-number-box">'+choice+'</div>'); document.write('<div class="prize"> <h1>Good luck next time!</h1> </div>');
Q. After the reopening of your school Each student who belongs to the school has their grade mentioned before their name. The school wants you to create a program in which they welcome the student and tell them which class they will have to go to. ( For eg. If a student belongs to Grade 1 and section A they’ll write it like 1A ).
Hint: Since all the students have the grade before their names and the section in their names. Use startsWith() to check which grade they belong to and includes() to check which section they belong to display the right text.
-If the GRADE of the student is 1
-Display Grade 1
-Then you have to check their section-
-If the section is A
-Display A
-If the section is B
-Display B
-If the GRADE of the student is 2
-Display Grade 2
-Then you have to check their section-
-If the section is A
-Display A
-If the section is B
-Display B
About this book
This coding book is supplementary to the main “Mel n Conji” content book. This book represents a 21st-century approach to learning coding concepts and developing computational thinking and problem-solving skills. To prepare students for the digital age, the curriculum is interwoven with well-thought-out concept graduation with real-life examples and practice problems.
• Illustrative approach: Concepts in coding and computer science are delivered through pictorial representations and learner-friendly approaches.
• Learning through real-life examples: Age-appropriate examples that enable learners to relate to the concept and learn about the unknown from the known.
• Extensive practice: Multiple practice scenarios to reinforce learnings.
• Coding Challenges: Includes projects through which learners can demonstrate their learning outcomes in coding and computer science.

About Uolo Explore more
UOLO partners with K12 schools to bring technology-based learning programs. We believe pedagogy and technology must come together to deliver scalable learning experiences that generate measurable outcomes. UOLO is trusted by over 8,000 schools with more than 3 million learners across India, South East Asia, and the Middle East.
hello@uolo.com
