
5 minute read
3 Device Initialization


3.1 Initialing Device
Device initialization is required for the first-time use. This manual is based on the operation on the web page. You can also initialize device through ConfigTool, NVR, or platform devices.
● To ensure the device safety, keep the password properly after initialization and change the password regularly.
● When initializing device, keep the PC IP and device IP in the same network.
Step 1 Open IE browser, enter the IP address of the device in the address bar, and then press the Enter key.
The IP is 192.168.1.108 by default.
Step 2 Select the area, language, and video standard according to the actual situation, and then click Next
Step 3 Configure the time parameters, and then click Next.
Figure
Step 4 Set the password for admin account.
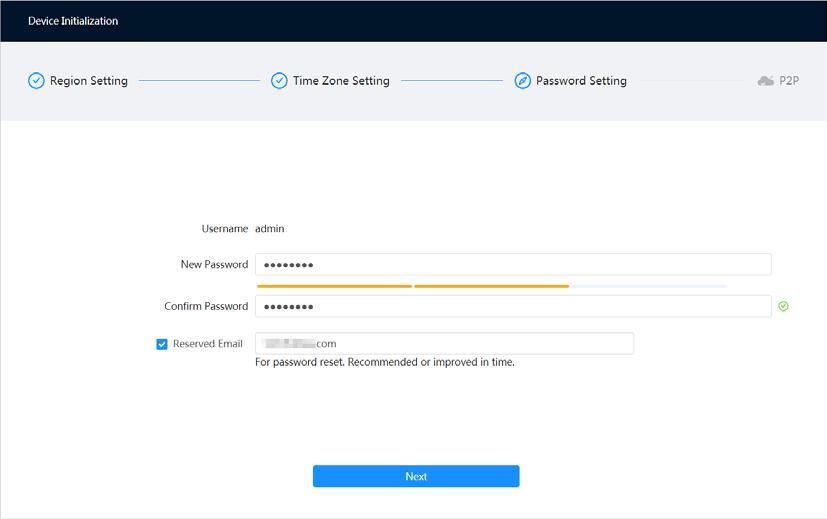

Table 3-1 Description of password configuration
Parameter Description
Username The default username is admin.
Password The password must consist of 8 to 32 non-blank characters and contain at least two types of characters among upper case, lower case, number, and special character (excluding ' " ; : &). Set a high security level password according to the password security notice.
Confirm password
Parameter Description
Enter an email address for password resetting, and it is selected by default.
Reserved email
When you need to reset the password of the admin account, a security code for password resetting will be sent to the reserved email address.
Step 5 Click Next, and then P2P page is displayed.
3.2 Changing IP Address
Change Camera IP address and ensure it is fitted to the actual network segment to get the Camera access network.
You can change one or several IP addresses through ConfigTool. You can also log in the web client to modify IP addresses.
3.2.1 Changing One IP Address
When there are only a few Cameras or the login passwords of Cameras are different, you can change only one IP address at one time. This section uses changing IP address on web page as an example. Step 1 Log in to the web page.

Step 2 Select > Network > TCP/IP
Step 3 Configure TCP/IP parameters.
Parameter Description
Host Name
Enter the host name, and the maximum length is 15 characters.

Parameter Description
Click to enable ARP/Ping to set IP address service. Get the camera MAC address, and then you can change and configure the device IP address with ARP/ping command. This is enabled by default. During restart, you will have no more than 2 minutes to configure the device IP address by a ping packet with certain length, the server will be turned off in 2 minutes, or it will be turned off immediately after the IP address is successfully configured. If this is not enabled, the IP address cannot be configured with ping packet.
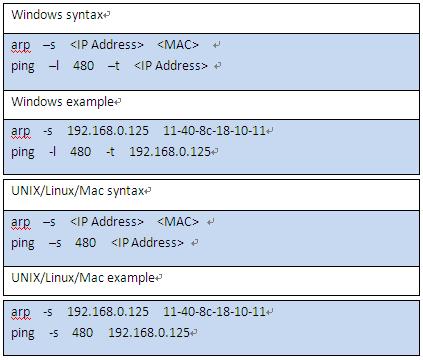
A demonstration of configuring IP address with ARP/Ping.
1. Keep the camera that needs to be configured and the PC within the same local network, and then get a usable IP address.
2. Get the MAC address of the camera from device label.
3. Open command editor on the PC and enter the following command.
ARP/Ping
NIC
4. Restart the camera.
5. Check the PC command line, if information such as Reply from 192.168.0.125…is displayed, the configuration succeeds, and you can turn it off then.
6. Enter http://(IP address) in the browser address bar to log in.
Select the Ethernet card that need to be configured, and the default one is Wire.
The mode that the camera gets IP:
Mode
● Static Configure IP Address, Subnet Mask, and Default Gateway manually, and then click Save, the login page with the configured IP address is displayed.
● DHCP
When there is DHCP server in the network, select DHCP, and the camera acquires IP address automatically.
Parameter Description
MAC Address Displays host MAC address.
IP Version Select IPv4 or IPv6.
IP Address When you select Static in Mode, enter the IP address and subnet mask that you need.
Subnet Mask
Default Gateway
● IPv6 does not have subnet mask.
● The default gateway must be in the same network segment with the IP address.
Preferred DNS IP address of the preferred DNS
Alternate DNS IP address of the alternate DNS Step 4 Click Apply.
3.2.2 Changing IP Addresses in Batches
When there are several Cameras or the login passwords of Cameras are the same, you can modify several IP address at the same time through the ConfigTool.
Prerequisites
● You have obtained the installation package of ConfigTool. To obtain the installation package, you can consult technical support staffs.
● You have achieved network communication between PC (which is with ConfigTool) and the Camera.
Procedure
Step 1 Click Step 2 Click Search Settings.
Step 3 Set the network segment of the Camera, admin and password. Then click Save After the search, the system displays Cameras that have been searched.
Default user name and password are both admin. Step 4 Select cameras whose IP address needs to be changed and click Batch Modify IP
Step 5 Configure IP address.
● DHCP mode: When there is a DHCP server in the network, set the Mode as DHCP and the Camera obtains IP addresses from the DHCP server automatically.

● Manual mode: Set Mode as Static and enter Starting IP, Subnet Mask and Gateway. Then, IP addresses of Cameras are incrementally modified from the start IP address.
If you select the Same IP checkbox, the IP address of the devices will be set to the same one.
Step 6 Click OK
3.3 Logging in to Web Page
After you have changed the IP addresses, you can log in to the web page of the Camera through a browser to operate, configure and maintain.
Background Information
To log in to the Camera in a smooth way, you need to make sure that the PC connected to the Camera satisfies the following requirements.
Procedure
Step 1 Open Chrome browser, enter the IP address of the camera (192.168.1.108 by default) in the address bar and press the Enter key.
Step 2 Enter the username and password, and then click Login.
● The default user is admin. The password is the one that was configured during initial settings.
● It will prompt you to install plug-in for the first system login. Please download and install plug-in according to the prompt.

● Functions of different Cameras might vary, and the actual product shall prevail.
Step 3 Click at the left-upper corner of the page to display the home page.
Click Logout on the upper right corner to exit the page.
3.4 Resetting Password
When you need to reset the password for the admin account, there will be a security code sent to the entered email address which can be used to reset the password.
Prerequisites
You have enabled password resetting service. For details, see "3.4 Resetting Password".
Procedure
Step 1 Open IE browser, enter the IP address of the device in the address bar and press Enter.
Step 2 Click Forgot Password?, and then you can reset the password through the email address that is set during the initialization.
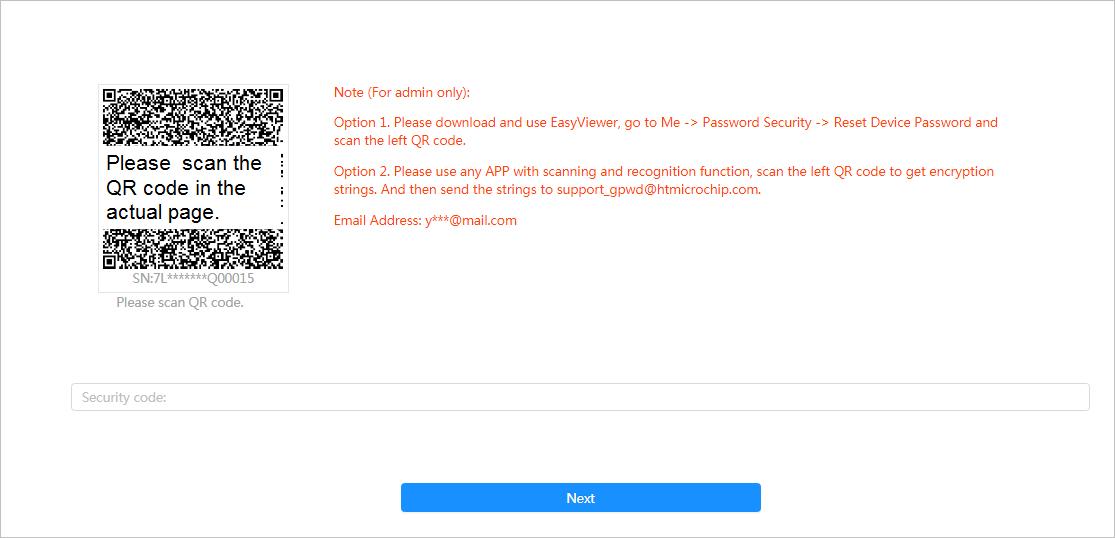
Step 3 Reset the password. Scan the QR code, and the security code will be sent to the email address you have already fulfilled. Enter the security code.
● Reset the password in time when you receive the security code, because the security code will be invalid within 24 hours.
● If you get security codes twice but do not use them, when you get the security code for the third time, the system will prompt failure. To solve this problem, you need to restore your Camera to default settings or wait 24 hours to get a new one.
Step 4 Click Next
Step 5 Enter a new password and confirm it.
The password must consist of 8 to 32 non-blank characters and contain at least two types of characters among upper case, lower case, number, and special character (excluding ' " ; : &). Set a password with high security level according to the prompt of the password’s security level.


